by Scott Muniz | Aug 5, 2020 | Alerts, Microsoft, Technology, Uncategorized
This article is contributed. See the original author and article here.
Over the last few months I’ve been doing a “summer tour” of user groups and delivering a talk entitled “Start your datacentre transformation journey with Azure Migrate”, during my talk I mainly focus on customer journeys that are moving resources from on prem to the cloud. However, due to some questions I’ve had from the audience I want to change focus a little and share with you the ability to use Azure Migrate to help you if you are looking to move from another cloud provider to Azure.
The first step of any migration journey regardless of your starting point and destination is an assessment, gathering information about your current environment. I talked about it why I think it’s so important and what information you should be gathering in my Datacentre Migration Checklist blog post.
The Azure Migrate: Server Assessment Tool can help not only assess your VMware, and Hyper-V virtual servers, or physical servers but it can also assess those living in other clouds. And in this video I show you the process of assessing your AWS virtual machines with a view to moving them to Azure. You can watch the full video here or on Microsoft Channel 9.
You can find more information here:
I hope you enjoyed the video if you have any questions feel free to leave a comment.
by Scott Muniz | Aug 5, 2020 | Alerts, Microsoft, Technology, Uncategorized
This article is contributed. See the original author and article here.
With the significant trend of moving to the cloud, you need to understand how to set up your organization for success. That’s why Anna Hoffman, Data & Applied Scientist, and Bob Ward, Principal Architect, on the Azure Data team, created all-new content to help you understand the benefits of Azure SQL. In Gayle Sheppard’s latest blog, she shares how SQL Server professionals can become Azure SQL professionals with all new learning tools from Anna & Bob.
Read more

by Scott Muniz | Aug 5, 2020 | Alerts, Microsoft, Technology, Uncategorized
This article is contributed. See the original author and article here.
|
Microsoft partners like Barracuda and Buurst deliver transact-capable offers, which allow you to purchase directly from Azure Marketplace. Learn about these offers below:
 |
Barracuda CloudGen WAN Service: CloudGen WAN is based on the security technology of Barracuda CloudGen Firewall. CloudGen WAN integrates with Microsoft Azure Virtual WAN to provide a secure SD-WAN network with high-performance connectivity. Dynamically scale your SD-WAN network while providing next-generation firewalls with CloudGen WAN. |
 |
SoftNAS: As a virtual storage appliance with enterprise network-attached storage capabilities, SoftNAS from Buurst lowers cloud storage costs and handles demanding workloads with fully customizable options. SoftNAS allows customers to migrate data to the cloud with continuous sync, with speeds up to 200 percent faster than TCP/IP over high-latency networks. It’s available for a 30-day free trial.
|
|
by Scott Muniz | Aug 5, 2020 | Alerts, Microsoft, Technology, Uncategorized
This article is contributed. See the original author and article here.
Database backups are an essential part of any business continuity and disaster recovery strategy, because they protect your data from corruption or deletion. In Azure SQL Managed Instance there are two types of automated backups that customers can use for restoring their databases:
- Short-term backups used for point-in-time restores (PITR) or geo-restores, keeping backup data for up to 35 days
- Long-term backups used for configuring longer retentions, keeping backup data for up to 10 years
To protect backup data from planned and unplanned events, including transient hardware failures, network or power outages, and massive natural disasters, backup storage is being replicated to another storage. By default, storage is geo-replicated to a paired region using RA-GRS strategy.
As many applications have regulatory, compliance, or other business requirements for data residency control, geo-redundancy is not good fit for every customer. To overcome this, option for configuring backup storage redundancy has been introduced. It allows customers to choose replication strategy for their backup storages and define if geo-redundancy (RA-GRS), zone-redundancy (ZRS), or local-redundancy (LRS) will be used.
What are the differences in storage redundancy?
Backup storage redundancy relies on Azure Storage redundancy:
- Locally redundant storage (LRS)
- Design characteristics: replicates your data three times within a single physical location in the primary region. LRS provides at least 99.999999999% (11 9’s) durability of objects over a given year. LRS protects your data against server rack and drive failures. However, if a disaster such as fire or flooding occurs within the data center, all replicas of a storage account using LRS may be lost or unrecoverable.
- Best for: LRS keeps your data in the same region and provides capability of data residency and helping you to stay compliant with regulatory requirements. In addition, LRS is the lowest-cost redundancy option (but offering the least durability compared to other options) which is good fit for dev/test scenarios.
- Zone-redundant storage (ZRS)
- Design characteristics: replicates your Azure Storage data synchronously across three Azure availability zones in the primary region. Each availability zone is a separate physical location with independent power, cooling, and networking. ZRS offers durability for Azure Storage data objects of at least 99.9999999999% (12 9’s) over a given year.
- Best for: ZRS also provides capability of data residency but offers higher durability due to data replicated across availability zones. It is good fit for production scenarios that are cost sensitive.
- Geo-redundant storage (RA-GRS) – RECOMMENDED (DEFAULT)
- Design characteristics: replicates your data synchronously three times within a single physical location in the primary region using LRS. It then copies your data asynchronously to a single physical location in a secondary region that is hundreds of miles away from the primary region. RA-GRS offers durability for Azure Storage data objects of at least 99.99999999999999% (16 9’s) over a given year.
- Best for: RA-GRS is best disaster recovery option which gives highest durability. In addition, geo-redundant backup storage enables Geo-restore capability – a cheap and economically efficient disaster recovery option. This is default configuration value and if there is no need for data residency compliance, it is recommended to use RA-GRS backup storage for all production workloads.
While LRS and GRS are available in all regions, ZRS is available only in specified regions. Detailed pricing information can be found on Azure SQL Managed Instance pricing page.
Feature capabilities
Backup storage redundancy option is in Preview phase. Main capabilities are following:
- Redundancy can be configured only during managed instance creation using REST API, ARM template or Azure Portal and cannot be changed later
- Available redundancy options are LRS, ZRS and RA-GRS
- When configured redundancy is applied for both PITR and LTR backups
- Redundancy is applied at instance level and cannot be configured per individual managed database
- Geo-Restore functionality is available only for instances with configured RA-GRS backup storage redundancy
How can I configure backup storage redundancy?
Backup storage redundancy can be configured during managed instance creation when request is submitted using REST API, ARM template or Azure Portal. In official documentation page, you can find instructions on how to select backup storage redundancy.
How can I change backup storage redundancy for existing instances?
It is not possible to update backup storage redundancy for existing instances. However, there is workaround which relies on process of creating new managed instance with different redundancy and moving your databases from old to the new instance.
Steps:
- Create new managed instance and select desired backup redundancy
- Use cross-instance point-in-time restore, transactional replication or use .bacpac files to backup and restore your data using SSMS
- Delete old managed instance
How long are backups kept on deleted managed instance?
Backups are kept until retention period set for each database expires + 7 days. For more details visit Backup storage consumption on Managed Instance explained. If you have need for immediate removal of backup data stored on old instance before deleting it you can:
- For LTR delete all backups taken and turn off LTR settings (learn how-to)
- For short-term backups reduce retention of active databases to 1 day and deleted databases to 0 days (learn how-to)
These two actions will ensure that all your data is removed from the old managed instance in up to 8 days.
by Scott Muniz | Aug 5, 2020 | Alerts, Microsoft, Technology, Uncategorized
This article is contributed. See the original author and article here.
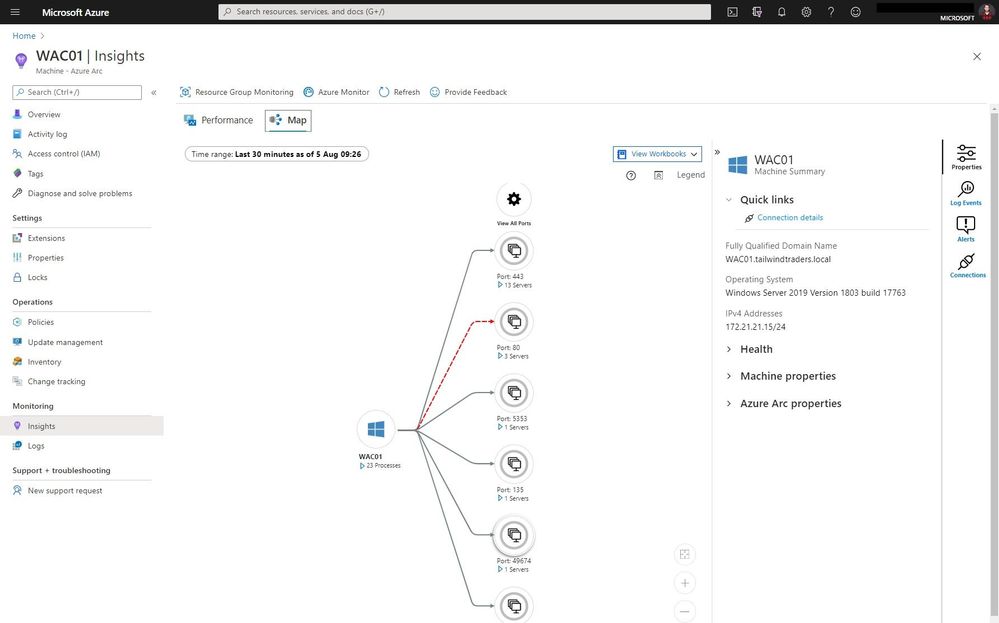
As you know Azure Arc for servers is currently in preview and allows you to manage your Windows and Linux machines hosted outside of Azure on your corporate network or other cloud providers, similar to how you manage native Azure virtual machines. With the new extensions which were introduced a couple of weeks ago, you can now also use Azure Monitor to not only monitor your servers in Azure but also servers running on-premises or at other cloud providers. This will provide you with cloud-native management for your Linux and Windows servers.
Now you can use the different Azure Monitor features and use RBAC to provide access to these features directly within the Azure Portal.

With the map view of Azure Monitor on an Azure Arc enabled server, you can see the connection and endpoints the machine connects too. It can also highlight failed connections, which can be super helpful in troubleshooting or migration scenarios.
But you can also the performance view to have a look at different metrics such as CPU utilization and much more.

You will also find these servers in the centralized portal view of Azure Monitor, where you can find your Azure virtual machines and your Azure Arc enabled servers side-by-side.
If you want to learn more about Azure Arc enabled Servers, check out my overview video about the different extensions, and check out the full blog post of Auston Li on Azure.com.
I hope this provided you with a brief overview about this new Azure Monitor feature for Azure Arc enabled servers. If you have any questions, feel free to leave a comment.
by Scott Muniz | Aug 4, 2020 | Alerts, Microsoft, Technology, Uncategorized
This article is contributed. See the original author and article here.
There are many benefits of having domain joined lab VMs in Azure Lab Services, including allowing the students to connect to the VM using their domain credentials. Each VM can be joined to the domain manually, but this is tedious and doesn’t scale when domain joining multiple VMs. To help with this, we have put together some Windows 10 Powershell scripts that a lab owner can execute on the so that every VM started in the lab is automatically joined to the domain and the student is added as a Remote Desktop user.
The scripts use Windows’ task scheduler to automatically run a script when the student VM starts up. The first script, which the lab owner executes on the template VM, registers a scheduled task that will run another script at VM start up. The script then publishes the template VM to create the students’ lab VMs. When a student’s lab VM is started the first time, the script that executes the domain join will automatically run. I would recommend that the VM start and domain join occur before the students need to login as this may take several minutes. If you increase the lab capacity later, those VMs will use the same configuration from the template VM and will be domain joined when they are started the first time. However, if you change the template VM, such as by adding more software or changing the configuration, the first script will need to be run again to set up the scheduled tasks.
The script will need a user, with password, that has permissions to join the domain, you may need to work with your IT department to get the necessary information.
The Azure Lab Service team will be building this functionality directly into the product, in the meantime these scripts will allow you to move forward with Lab Services.
Environments
These scripts work on the following configurations:
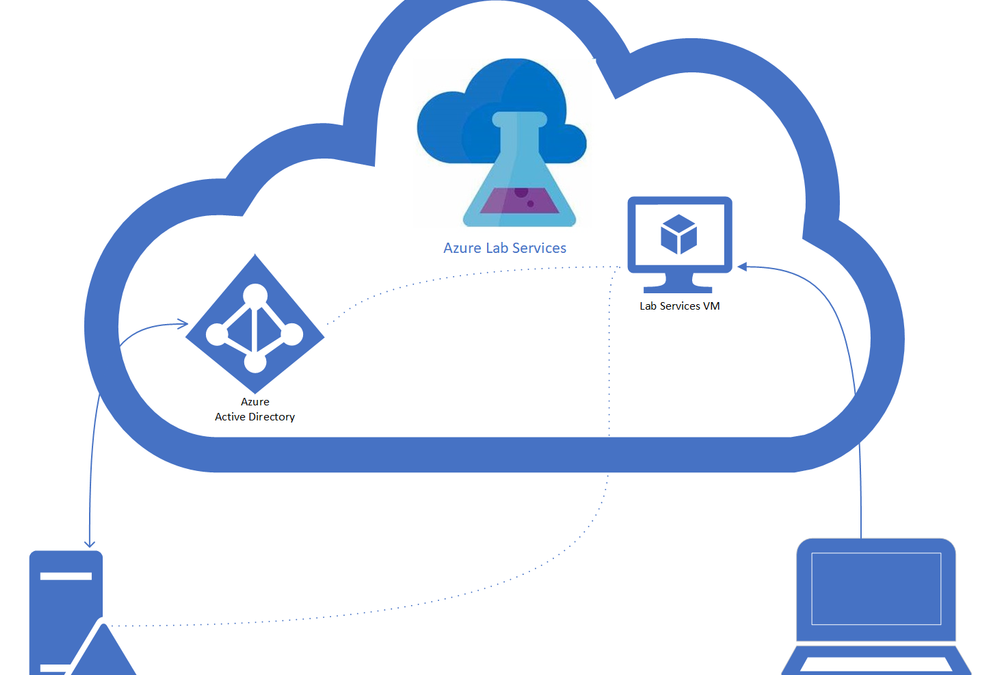
- On-premise Active Directory domain
- Hybrid Active Directory domain – An on-premise AD which is connected to an Azure Active Directory through Azure AD Connect. AD Domain Services is installed on an on-premise server, see the diagram below. Applies also to federated domains.

- Azure AD DS Domains – For full-cloud AD (Azure AD + Azure AD DS) or Hybrid AD with secondary Domain Services on Azure.
Lab account and Lab setup
This section focuses on configuring your lab account and lab so that it is connected to your on-premise domain controller. You may need to work with your IT department to get the necessary information and permissions to get the configuration properly setup.
1.) Either option will work:
– Wire up your on-prem Domain Controller on-prem network to an Azure VNet, either with a site-to-site VPN gateway or ExpressRoute.
– Create a secondary managed domain on top of your on-prem one with Azure AD DS (PaaS).
2.) Peer the Lab Account with the connected Virtual Network (VNet).
WARNING: The lab account must be peered to a virtual network before the lab is created.
3.) Create a new lab, with the option enabled to use the same password for all virtual machines.
Where are the scripts
The scripts are available on the along with a readme that has all the details about running the scripts. The scripts require a domain user that can add VMs to the domain, you may need to contact your IT department to get the necessary information.
The scripts are designed to be modular. The first script that is run on the template VM is the Join-AzLabADTemplate.
- Join-AzLabADStudent_RenameVm which renames the VM to a unique name.
- Join-AzLabADStudent_JoinVM which joins the VM to the appropriate domain to an optional organizational unit.
- Join-AzLabADStudent_AddStudent which adds the student that the VM is registered to, to the Remote User group so they can login. If the VM isn’t registered to a user the task is skipped.
Here are two additional scripts that aren’t part of the domain-join process that will help manage the VMs.
- Set-AzLabCapacity, which allows you to change the capacity of the lab from the template VM.
- Set-AzLabADVms, which starts all the VMs from the template VM. This script can be run to get all the VMs domain-joined instead of having the domain-join occur when the students start the VM.
If you have any questions, feel free to post them at the community forum. For issues with the scripts, add an issue to the GitHub repository.
Thanks
Roger Best

Recent Comments