
by Contributed | Nov 17, 2020 | Azure, Microsoft, Technology
This article is contributed. See the original author and article here.
Abstract:
In the present tech world, we are always lookout for better options on how we can quickly get an environment up and running and also minimize the costs, along with various other features.
Get introduced to the world of Azure DevTest Labs and Azure Classroom labs and the various features that they have to offer in a testing/development environment and also for students and universities.
Starting from cost management to quick implementation of a course lab, this session will be perfect for you to onboard to Azure Labs Services, how to tailor them to suit your scenario and also get clarified on any doubt that you may have.
Webinar Date & Time : December 10, 2020. Time 4.00 PM IST (10.30 AM GMT)
Invite : Download the Calendar Invite
Speaker Bio:

Siva is an Escalation Engineer with Azure DevOps and Azure Lab Services team in Microsoft. In Azure Lab Services, he helps customers right from their setup to troubleshooting complex issues and also works closely with product team to improve customer experience. In Azure DevOps, he specializes in moving on premise instances to cloud, CI/CD and also open source integrations in Azure DevOps. His area of interests include staying up to date on DevOps technologies, tools and concepts and also evangelizing Azure Lab Services.

Nitesh is an ardent engineer having 8 years of experience working on different Microsoft technologies such as Azure DevOps, Azure IaaS and PaaS, Microsoft Intune, SCCM and ADDS. Currently in Microsoft working extensively with different DevOps tools to design and implement infrastructure of premier customers. Also providing support to them and resolving issues within SLAs. Besides, working on helping customers with Azure Lab Services as well. Other than work he loves playing snooker, cricket, badminton.
Devinar 2020

by Contributed | Nov 17, 2020 | Azure, Microsoft, Technology
This article is contributed. See the original author and article here.
Abstract:
Containers run the world today and we see how many applications are running on containers in present world and a seamless deployment of containers becomes very important in this scenario.
This session offers you an introduction to build and deploy a Docker image of ASP.Net Web application using the Azure DevOps pipeline.
The docker images will be pushed to the Azure Container Registry and will be run using the Azure Web App Service containers.
Webinar Date & Time : December 9, 2020. Time 2.00 PM IST (8.30 AM GMT)
Invite : Download the Calendar Invite
Speaker Bio:

Ramprasath works as Support Engineer in Azure DevOps team in Microsoft and his role gives him opportunities to interact with the Azure DevOps customers across the world and help them with their issues. He is interested in Web Application development, IOT and on free time does hobby projects on Raspberry Pi.

Krishna is currently working as support Engineer for Microsoft Azure DevOps team. In daily activities, he interacts with world-wide customers and enable them to effectively use Azure DevOps to build scalable and robust solution . He is passionate about the cloud technologies specifically Azure stack and likes to work on IAAC along with containers.
Devinar 2020

by Contributed | Nov 17, 2020 | Azure, Microsoft, Technology
This article is contributed. See the original author and article here.
Abstract:
Azure virtual machine scale set agents are a new form of self-hosted agents that can be auto scaled to meet customer demands.
This elasticity reduces the need to run dedicated agents all the time. Unlike Microsoft-hosted agents, customers have flexibility over the size and the image of machines on which agents run.
In this session we will introduce you to the Azure DevOps VMSS agents and offer insights into the setup, working and also basic troubleshooting of the agents.
Webinar Date & Time : November 30, 2020. Time 4.00 PM IST (10.30 AM GMT)
Invite : Download the Calendar Invite
Speaker Bio :

Muni Karthik currently works as a Support Engineer in Microsoft, India. His day to day responsibilities include assisting customers overcome the challenges that they face with the different Team Foundation Server and Azure DevOps services. His interests are exploring the latest DevOps concepts and providing good support experience to the customers. He partners with Field teams, Product engineering groups to help our customers and developers.

Kirthish Kotekar Tharanatha is working as Support Escalation Engineer in Azure DevOps team in Microsoft and he helps the customers to resolve the most complex of issues in Azure DevOps day to day. His area of interests include the CI and CD part of Azure DevOps and also various other open CI/CD tools integration with Azure DevOps.
Devinar 2020
by Contributed | Nov 16, 2020 | Azure, Microsoft, Technology
This article is contributed. See the original author and article here.
What is covered in this blog post?
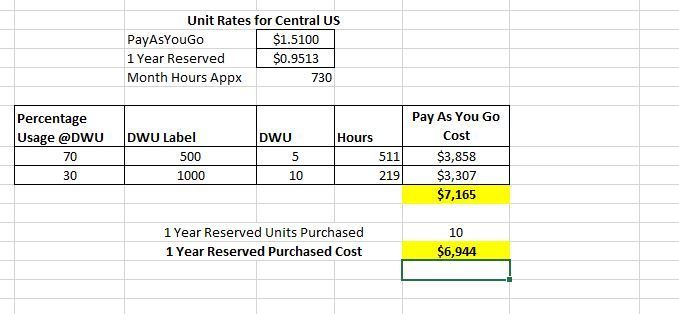
Recently I went through a Cost Optimization exercise of evaluating Azure Synapse Reserved instance pricing with my customer and this blog post documents the learnings from that exercise as I think it would be beneficial for others as well. The blog post covers following main points:
- Shares additional perspective with examples on cost optimization for Azure Synapse using Reserved Instance pricing when you plan to run Azure Synapse Instance at variable DWU Levels.
- Shares the example Excel spreadsheet (attached with this post) which can be used to play around with the usage patterns (variable DWU Levels) and cost estimates (Please refer to Pricing page for most up to date pricing information, the spreadsheet uses Central US as an example).
- Summarizes the main aspects of how the Azure Reserved Instance Pricing works (along with links to public documentation) in case you are not familiar
RI is the abbreviation I will use at times to refer to Reserved Instance pricing
Background
The main benefit of the cloud environment is its elastic scale where you can scale up and down as per your needs to save costs. My customer wanted to run Synapse instance at DWU Level 7500 a third of the time, DWU Level 6000 a third of the time and DWU Level 3000 a third of the time. So, the question to address was does it make sense to purchase Synapse Reserved Instance Pricing and how much should be purchased 3000, 6000, 7500 or something in the middle. Such requirements are not uncommon, the example scenario:
- Maybe 7500 DWU higher compute is needed during loads
- 6000 DWU needed during peak usage hours
- 3000 DWU sufficient during off-peak usage hours
Before going into Cost Analysis Examples from customer scenario I will first summarize how Azure Synapse Reserved Instance pricing works.
Summary of how Reserved Instance pricing works
Azure Synapse RI pricing is very flexible and very good cost saving measure. I will be bold enough to make a statement that if you are running a production workload which you don’t plan to sunset in near time most likely Synapse Reserved Instance Pricing would make sense for you.
I am summarizing a few important points around how Azure Synapse Reserved pricing works but you can read more from the official documentation pages – Save costs for Azure Synapse Analytics charges with reserved capacity and How reservation discounts apply to Azure Synapse Analytics
• 1 year Reserved Instance pricing discount is appx 37%
• 3 year Reserved Instance pricing discount is appx 65%
• Synapse charges are a combination of Compute and Storage, Reserved instance pricing is only applicable to Compute and not storage
• Compute charge is calculated as multiples of DWU 100, i.e. DWU 1000 is 10 units of DWU 100, DWU 2000 is 20 units of DWU 100, etc.
• When Azure Synapse Reserved Instance is purchased you are basically purchasing discounted rate for N number of DWU 100 units for a 1 or 3 year commitment
• The Azure Synapse Analytics reserved capacity discount is applied to running warehouses on an hourly basis. If you don’t have a warehouse deployed for an hour, then the reserved capacity is wasted for that hour. It doesn’t carry over but I will share some examples here to put you at comfort that the discount is so big that even if there is some wastages (instance running at a lower SKU then RI purchased) there is a good chance you will still come out ahead.
• The best part about the N units of RI purchased is that it can be shared between multiple instances within the same subscription or across subscription (customers need to decide on the scope of the RI) . As an example, if you purchase 10 units the discount can get applied to both your Dev as well as Prod instance.
• Simple Example for RI purchased for DWU 1000
- Say, Prod runs @ DWU 1000 during peak hours but is brought down to DWU 500 in off-peak hours.
- Say, you have another instance which runs @ DWU 500 but its future is not very clear for you to commit to Reserved instance pricing or maybe it is a Dev instance which goes between DWU 500 and 200 or even paused at time.
- When Prod runs @DWU 1000, you pay discounted rate for Prod and pay as you go rate for the Dev instance but when Prod is @DWU 500 then in that case you pay discounted rate for both of your Synapse Instances.
Costs Analysis Discovery/Learnings
The main objective of the cost analysis exercise was to determine if purchasing Reserved Instance Pricing makes sense when Azure Synapse will be running at variables DWU Levels.
In scenarios where you will be using Azure Synapse at different DWU Levels the bare minimum goal (or success criteria) is that Reserved Instance should not cost more than what you would pay under Pay as you Go cost model.
Example 1
1 Year RI, 10 Units
Low SKU – DWU 500
High SKU – DWU 1000
 With 1 Year RI you will still come out ahead if you run at Purchased RI SKU (DWU Level 1000) at least 30% of the time and at least 50% of the Purchased RI SKU (DWU Level 500) 70% of the time.
Example 2
1 Year RI, 30 Units
Low SKU – DWU 500
High SKU – DWU 3000

With 1 Year RI you will still come out ahead if you run at Purchased RI SKU (DWU Level 3000) at least 56% of the time and at least 17% of the Purchased RI SKU (DWU Level 500) 44% of the time.
Example 3
3 Year RI, 75 Units
DWU 3000 34% of the time
DWU 6000 33% of the time
DWU 7500 33% of the time

- When 1 or 3 Year Reserved Instanced Pricing is purchased for DWU 7500 (75 units), even when you run Synapse at a lower scale than RI purchased you will still come out ahead because the discount is so big
- 3 Years RI is so much cheaper that maybe you don’t want to do this scale up and down at all and run the Synapse instance DWU 7500 all the time
Conclusions
- Bottom line is that even if you are losing hourly discounted rate for partial hours you can still come out ahead because discount is so big (3 Year RI discount much bigger than 1 Year RI).
- Lastly, its important to re-iterate thanks to the flexible nature of Azure Reserved Instance pricing that you can have other Azure Synapse instances running in same or different Azure Subscription to make use of the discounted price which is unused capacity on your main Azure Synapse instance for which RI was purchased.
Azure Synapse Scaling Sample Script
In case you are planning scaling your Synapse instances I wanted to add link (https://github.com/microsoft/sql-data-warehouse-samples/blob/master/samples/automation/ScaleAzureSQLDataWarehouse/ScaleAzureSQLDataWarehouse.ps1) to this sample script for completeness. When scaling Azure Synapse connection is dropped momentarily so any running queries will fail. This sample scaling script accounts for active queries before performing scaling operation. Sample is a little old and I have not verified but plan to validate in a few days and update as per my validation results but it should give a good starting point regardless.
by Contributed | Nov 16, 2020 | Azure, Microsoft, Technology
This article is contributed. See the original author and article here.
Initial Update: Tuesday, 17 November 2020 01:11 UTC
We are aware of issues within Log Analytics and are actively investigating. Some customers may experience issues with missed, delayed or wrongly fired alerts or experience difficulties accessing data for resources hosted in West US2 and North Europe.
- Work Around: None
- Next Update: Before 11/17 04:30 UTC
We are working hard to resolve this issue and apologize for any inconvenience.
-Saika
by Contributed | Nov 16, 2020 | Azure, Microsoft, Technology
This article is contributed. See the original author and article here.
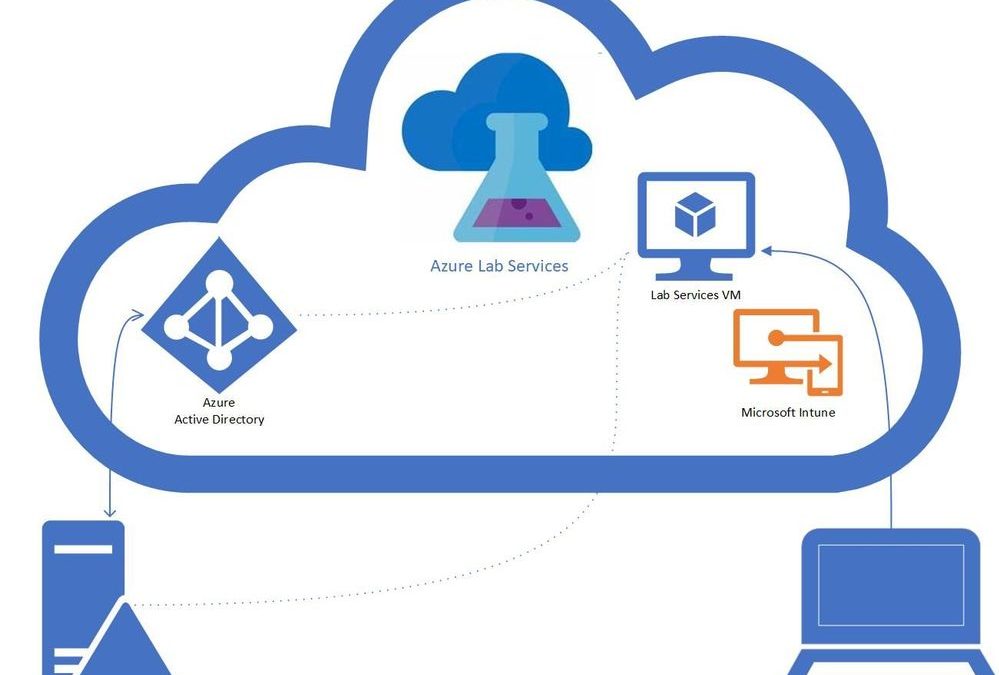
Intune + Azure Lab Services

A question that we get asked by IT departments is “can Intune be used to manage Windows 10 machines in a lab?” The answer is yes! In this blog post, we will show you how you can enable Intune on your lab’s VMs. This post will focus on getting lab VMs automatically domain joined, enrolled into Intune, and into a specific AD group at the initial student logon.
Benefits
There are several benefits to having the lab VMs being managed by Intune. The ability to create profiles that configure the VM to allow or restrict capabilities like blocking different URLs, setting sites to open when the browser starts, blocking downloads, and managing Bitlocker encryption. The Microsoft Endpoint Manager helps deliver a modern management tool for your lab VMs where you can create and customize these configuration profiles. For an education focused management tool, the Intune for Education is a portal that helps simplify Windows configuration, Take a Test, user management, group / sub-group inheritance and app management.
Prerequisites
These steps assume the following prerequisites have been configured:
- Check with your account representative for the appropriate Intune licensing.
- The Active Directory is setup with a MDM service, that is configured for auto-enrollment.
- You have a Azure Lab Services Account peered to a hybrid Azure Active Directory.
Here is more information on how to setup an Azure Lab Services account that is connected to your network.
Setting up the Lab
- Setup Template VM to join the domain.
Currently, there is a set of PowerShell scripts that are run on the template VM so that the Lab VMs will be domain joined when they are initially started. These set of scripts also rename the Lab VM to make the name unique, including setting a prefix for the VM name that can be used to put the VM in the appropriate AD group, I’ve included more details later in this blog.
- Set Group Policy to auto enroll into Intune.
The following steps will setup the auto enrollment for the lab VMs. On the template VM setup the auto-enrollment using the following steps:
- Open the local group policy editor (gpedit.msc)
- Under Computer Configuration / Administrative Templates / Windows Components / MDM
- Enable automatic MDM enrollment using default Azure AD credentials set to User Credential.
- Disable MDM enrollment is disabled.
- More information is available in the device management documentation.
- Publish Template
Once the template is published, the machines for that class will be created. The students VMs will join the domain on first startup. When the student logs on with their account, the device will be Intune enabled.
You should start the VMs before the students to get the VMs domain joined and setup for the students. The domain join and setting up the student access may take some time. Once the domain join has completed, the VMs can be turned off and when the students start and logon to the VM the auto enrollment will occur. In the case that you run into issues I’ve included a section on troubleshooting.
Additional: Setup dynamic AD group for the class
The Lab VMs are Intune enabled, but an additional step is to have the VMs added to a specific active directory group. Profiles can be set for an AD group so that any VMs added to the group will be configured based on the profile information. The dynamic group allows you to set up rules for which machines are in the group. Each group corresponds to a class or more specifically, the machines within the class. A student could have multiple classes where each class has a different set of requirements and machines that will need to be managed. Dynamic groups use rules to determine which AD group a VM should belong to. The simplest example is to use the VM name prefix (from the domain join script) as the rule for the group. An example rule would be “displayName -startsWith “Prefix”
Troubleshooting
In the case that the student VMs aren’t working as expected here are some troubleshooting tips.
- Start with the Domain join scripts.
- Check the Group Policy on the student VM
- Confirm that the group policy for auto-enrollment is set on the student VM, if not check the template VM.
- Check Event viewer on the student VM for information on the auto-enrollment task.
Final thoughts
Given the complexity of Active Directory and network configurations this is a specific example to help understand how to get Azure Lab Services working with Intune which opens a whole world of capabilities in managing student VMs.

Recent Comments