The Azure SDK Blog has moved!
This article is contributed. See the original author and article here.
You can find the new blog here: https://aka.ms/azsdk/blog
This article is contributed. See the original author and article here.
You can find the new blog here: https://aka.ms/azsdk/blog
This article is contributed. See the original author and article here.
Have you been following along with all the changes in Azure Active Directory (AD)-land and the various Microsoft Identity branded things?
(Especially since my epic series on all things Azure AD B2C?)
The changes and new features are amazing but change can be confusing. So let’s have a little chat about Azure AD and Microsoft Identity.
OK – so I’m going to level with you… the way things are named in Microsoft’s Identity Platform is a little bit… well, confusing.
I just illustrated my own point – I said Microsoft Identity Platform without introducing it first. What in the world does that even mean?
Microsoft uses the term Microsoft Identity Platform as the next evolution to the Azure Active Directory Developer Platform. It’s the all encompassing term for building apps with Azure AD.
The official Microsoft Identity Platform docs are good. Surprisingly good. But, you still need to know what you’re talking about before really grabbing and retaining info from the docs.
So let’s take the quick tour around Azure AD and Microsoft Identity XXX and try to remove any confusion around process and terms.
The super high level overview of Azure AD is that it is an Identity Provider (or IdP).
It verifies your users are who they say they are – and one way can be by username and password.
After it successfully verifies the user, it returns two tokens. A Token is a Base64 encoded string (also known as a JSON Web Token (JWT), which is just a standard) that has information in it about the user.
That info is known as Claims.
Think of it as… a user signs in, Azure AD verifies they are who they say they are, and returns 2 tokens full of information that Azure AD claims is true about that user.
Oh – and those 2 token flavors? One is known as an Identity token. And the other is an Access token. An Identity token has information about the user. And an Access token is used to gain access to other resources – like a Web API.
There’s more to it than that – but that’s the gist. And those are also the standard terms you’ll see docs and blogs throw around when talking about signing in users.
This is where we could get deep, deep into the details – so I’ll do my best not to.
There are industry standards that Azure AD implements that allow your app to talk to it.
You’ve probably heard of some of them before – like OpenID Connect or OAuth.
For our discussion, these aren’t important other than to know Azure AD supports them.
Supporting them means somebody else can write an SDK to abstract away all the intricacies of implementing the standard yourself to do the communication. That’s a big deal, you don’t want to mess up people signing in to your app.
Specifically, the sign-in request to Azure AD will be directed at an endpoint. And this is where things get confusing.
There used to be v1 endpoints. Now there are v2 endpoints. And you may even hear folks talk about Microsoft Identity Platform endpoints.
But endpoints are really a part of Azure AD Applications…
You can think of an Azure AD Application as a representation of your “real” app in Azure AD.
So let’s say you had a todo list application. That application has a web app, mobile app, and a web API.
Within Azure AD, you would have 2 applications. One to model the frontend apps. The other to model the web API.
Why a separate one to model the web API?
This goes back to those access tokens from before.
The user of the frontend app will authenticate with Azure AD and get an access token that will be passed to the web API to get access to it.
That access is granted by a Scope. It’s a portion of the backend’s functionality that is scoped out for other application’s to use.
So through the Azure AD portal, you create (or expose) a scope (or API permission as it will sometimes be called) for the backend’s Azure AD Application.
Then the frontend application is granted permission to that scope (again through the portal).
When the user signs in – they will be asked to Consent to the backend scope being used.
If you’ve ever used your Twitter credentials to signup for an account on another service, you’re already familiar with the consent screen. It’s the “Application ABCD wants to read your timeline”.
Your code is responsible for asking for the particular scope needed when signing-in to the frontend. And on the backend, your code is responsible for checking any authorization. Scopes tell you what’s going to happen, but leave the implementation details up to you.
Ok, to make Azure AD Applications a bit more confusing, there are a bunch of different types of them.
V1, V2, and Microsoft Identity Platform applications.
To get this out of the way – V2 and Microsoft Identity Platform applications are exactly the same thing. Just a rebranding, if you will.
V2 applications are a newer version of Azure AD Applications than V1.
They support more functionality, such as the ability to sign-in with corporate, personal (hotmail or xbox), or even Azure AD guest credentials. (And there’s a bunch more).
If you’re doing anything new – you pretty much don’t have a choice but to use V2 applications. And that’s a good thing.
If you’re supporting V1 apps – that’s fine too! Just know that when you start reading about the functionality and features of Azure AD applications, you need to know which version you’re on.
And which SDKs you can use depends on the Azure AD Application version – we’ll get to that.
Sometimes you’re going to hear about V1 and V2 endpoints. Well, a V1 application calls V1 endpoints and a V2 application calls V2 endpoints.
The functionality of what V1 and V2 applications can do really is dictated by the endpoints.
So you’ll hear Azure AD Application and Azure AD Endpoint versions mentioned interchangeably.
You do need to tell the SDK about the endpoint’s address. And there’s a couple variations of that (which will be covered in the next article). But know that you don’t have to invoke it directly – the SDK will take care of that for you.
And that brings us to…
If the various different types of Azure AD Applications and Endpoints and the terms that different but mean the same thing didn’t scare you off – wait until you see the SDKs.
First off – the SDKs are Amazing with a capital A. You can get down and dirty with the low-level specifics of handling authentication – or keep it nice and easy. Your choice.
But with choice comes… confusion?
First off – the folks who are developing the SDKs are awesome and creating them for all types of platforms. iOS, Android, .NET, JavaScript, even Python and Ruby.
Here’s what you need to know.
There’s a library called ADAL. It’s used for V1 applications. But… You don’t need to use it any longer. It still works, but if you can transition off it, may as well.
That’s because…
There’s another library called MSAL. This is for both V1 and V2 applications. It’s modern. Actively being developed. Open-sourced. Works for Azure AD and B2C (I know, we didn’t even talk about B2C – ON PURPOSE!).
You can get low-level with MSAL and it’ll do whatever you need.
But if you don’t need to get super duper low level (and you’re developing web apps)…
There’s yet another library called Microsoft.Web.Identity. This is brand new and is still in preview at the time I’m going to publish this article.
This library wraps a lot of the functionality that’s present in MSAL and it just works in tandem with ASP.NET Core.
There are even dotnet new templates for it that install the appropriate NuGets and boilerplate code.
Microsoft.Web.Identity uses MSAL under-the-hood. It’s just abstracted away.
That’s it!
Everything demystified, right?
Azure AD is amazingly powerful, we only touched the tip of the tip of the tip of the iceberg here. But it should give you enough info to start digging into the documentation and blogs and have a level-set of what they’re talking about.
If not – and you have questions – is there a better way for me to explain it – leave a comment! DM me on Twitter. This stuff can be confusing and having a plain ‘ol talk is the best way to lay it all out.
There’s going to be a couple of follow-up posts to this one.
The first will be creating an Azure AD Application for a .NET web app using `Microsoft.Identity.Web` and signing in.
The next will be gaining access from that app to a web API.
Then use a SPA to get access to that same web API.
Until then…
This article is contributed. See the original author and article here.
This blog is authored by Brian Delaney and Jon Shectman — with hearty thanks to our collaborator and pal Clive Watson.
In this article, we’ll share significant, functional enhancements we’ve made to the Insecure Protocols Workbook (IP Workbook) and we’ll detail how you can leverage these improvements to mitigate with speed, accuracy, and efficiency. If you’re new to the IP Workbook, we suggest starting with the implementation guide, which covers basic configuration steps, and sets you up for success in usage. Once you’ve completed the steps there, pop back over here to learn how to best use the recent enhancements and features.
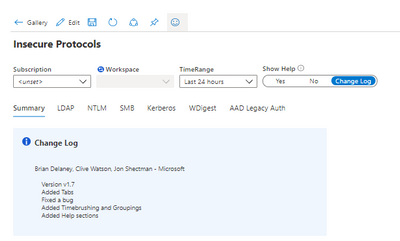
One of the first things you’ll notice in the new release is the new Show Help section in the top menu. By sliding the toggle, you can display Help for each protocol section. You can also display the Change Log.
By comparing your workbook version to the version in the Azure Sentinel Workbook Templates section, it’s easy to ensure you’re using the newest version. (At the time of this writing, Version 1.7 is the latest.)
We have also reimagined the navigation experience by adding Tabs. Tabs mean you no longer need scroll down to the protocol data you want to research; gone are the days of a single linear page.
Clicking a tab hides all of the other protocol pages, making available only the protocol data that you wish to research at that given moment.
This way, there is no confusion about which protocol data you are viewing, and you can clearly display a mitigation success (e.g. a data void) when you have removed a particular protocol from your estate. Tabs should make for a visually simpler, more actionable data comprehension experience.
Next, let’s examine Timebrushing and Groupings. Groupings is a back-end feature that will be largely transparent to you. Groupings maximizes efficiency in the way that each set of queries runs, making them load faster and with more efficiency. You should see better performance, with fewer lags for data paging as your workbook sections populate.
Timebrushing is one of the most significant functional changes we have introduced with this update to the IP workbook. As its name implies, Timebrushing allows you to “paint” a particular slice of time in a graphical interface and to export that parameter to filter your subsequent queries.
The value here is that Timebrushing allows for very specific, precise data analysis. Put differently, it allows us to filter our data to zero in on a specific activity that might have happened during a specific time. By way of example, let’s examine how we might use Timebrushing and several other filters to research Insecure LDAP.
The Insecure LDAP tab features one of two starting points to parse our data: Account or IP addresses. In this example, we’ll start by filtering by Account. Let’s filter on the most active account, svc1:
This outputs the query parameter (e.g. display only accounts containing the value svc1) in the subsequent filters. Then let’s say I want to understand how svc1 was used during a time of heavy activity in the logs.
From the time graph, I can see that there’s a particularly heavy, sustained usage of svc1 to make insecure LDAP calls from about 3:50am through about 6:50am. Let’s Timebrush that slice and examine the data further:
And here a story emerges. Because of time binning (necessary to group the data into understandable chunks), we get a nice breakdown of the Insecure LDAP activity that can be sorted by BindingType, count or TimeGenerated (as I have done here). In other words, we see that during this time slice, svc1 made significant numbers of Insecure LDAP calls each and every (time binned) hour. I can then drop down on the page and take what I’ve just learned (e.g. that svc1 is being used in an insecure manner) and I can research it by Source IP address.
Here I can fill in the blanks in the story from the account. svc1 made Insecure LDAP calls during multiple slices of time from a computer with IP address 192.168.2.74. Instead of having to sift through thousands of log files or (worse yet) try mitigating Insecure LDAP without a solid understanding of its presence in the environment, we now have a place to focus our mitigation activities. And, of course, once we have mitigated all of our Insecure LDAP in the environment, we will configure our domain controllers to no longer accept it at all — thereby effectively mitigating significant business risk to the organization.
The final enhancement that you’ll see in examining the IP Workbook is the Help section I mentioned earlier.
Each Help section is tab-specific, as you can see while moving between tabs with the Help toggle switch turned on.
The Help sections mainly follow the same format and contain sections that provide insight into each insecure protocol:
By way of example, let’s examine the Help file for Azure Active Directory Legacy Authentication (AAD Legacy Auth Tab). From the start, Protocol Risk gives us some compelling reasons to remove these insecure, outdated protocols.
The AAD tab is the only tab that does not include Auditing Settings, since we simply use AAD Sign-in logs here (e.g. this is a cloud-native SaaS data source). Instead, this tab lists the Legacy Authentication Protocols that you should consider as in-scope for this project.
The Mitigation Planning and Data Filters sections will look familiar from other tabs and once you start using the IP Workbook’s Help section frequently. Of course, once you’re familiar with each protocol, you can and should toggle off the Help section in order to maximize your screen real estate and to focus on understanding your data.
In this article, we covered enhancements to the IP Workbook, discussed how to leverage them to aid your data understanding, and drilled a bit deeper into the Timebrushing and Help features. Let us know how the IP Workbook is working for you and especially if you have ideas for enhancements. And until then, as always, happy auditing.
This article is contributed. See the original author and article here.
Hello folks … I recently presented at the VMware UserCon for Florida and Carolina. If you didn’t get a chance to attend and want to check it out, here is the video.
This article is contributed. See the original author and article here.
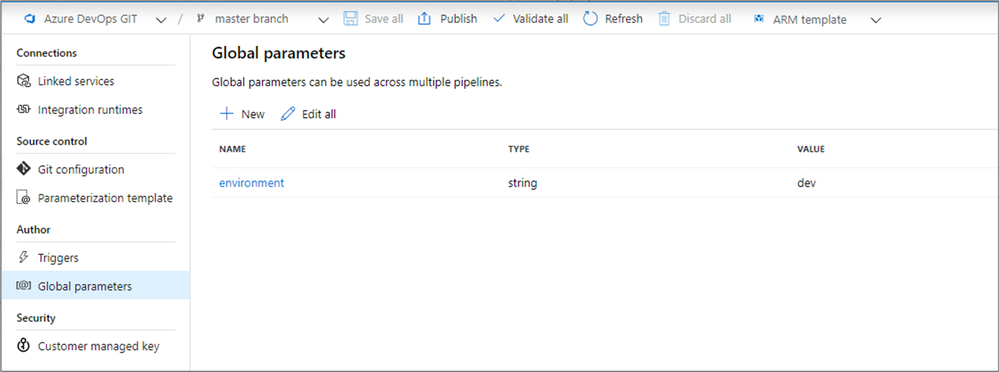
Global parameters are now generally available in Azure Data Factory. Global parameters are constants across a data factory that can be consumed by a pipeline in any expression. They are useful when you have multiple pipelines with identical parameter names and values.
Creation and management of global parameters is done in the management hub.
In any pipeline expression or dynamic content, global parameters can be referenced by pipeline().globalParameters.<parameterName>.
When promoting a data factory using the continuous integration and deployment process (CI/CD), you can override these parameters in each environment.
For more information, see the global parameters documentation.

This article is contributed. See the original author and article here.
If you haven’t been following along as we explore a Maya pyramid in the middle of the uncharted jungle, it’s not too late! Join us as we explore the pyramid.
The following content contains spoilers about gameplay!
In part 1 of the Azure Maya Mystery, we discovered the meaning of many glyphs to gain access to the pyramid. Amongst others, we learned symbols with familiar imagery: ‘jaguar’, ‘macaw’, and ‘snake’
as well as more esoteric glyphs: ‘earth’, ‘wind’, and ‘tree’
Art by Dana Moot II
Winding our way around the pyramid’s base and finally up its steps, we used our new knowledge to gain entrance. We also learned the meaning of one of the parts of the temple’s name by launching a chat app on an Azure Static Web App to talk to the goddess to whom the pyramid is dedicated.
But when the floor suddenly gives way underfoot, the intrepid explorer has to wait until Part 2 of the Maya Mystery to learn more!
That time is now.
In this part of the Mystery, you will continue your exploration of the deepest part of the pyramid, an underground cenote, a natural sinkhole that the ancient Maya sometimes used for sacrificial offerings. Your job? dive in and gather broken glyphs that careless prior explorers have tossed in to the cenote, restoring them to their former place. In the process, you will learn more glyph meanings and the second part of the pyramid’s name.
While exploring, you will also launch a shopping experience to acquire the gear you need to successfully complete your mission. Learn more about the Node.js code you need to launch by visiting a new Microsoft Learn learning path all about the topic!
Are you prepared to continue your exploration? Haven’t joined us yet? It’s not too late! Complete Level 1, or skip right to Level 2.


Recent Comments