by Scott Muniz | Aug 9, 2020 | Alerts, Microsoft, Technology, Uncategorized
This article is contributed. See the original author and article here.
Last time we look at how to get started with GraphQL on dotnet and we looked at the Azure App Service platform to host our GraphQL server. Today we’re going to have a look at a different approach, using Azure Functions to create run GraphQL in a Serverless model. We’ll also look at using JavaScript (or specifically, TypeScript) for this codebase, but there’s no reason you couldn’t deploy a dotnet GraphQL server on Azure Functions or deploy JavaScript to App Service.
Getting Started
For the server, we’ll use the tooling provided by Apollo, specifically their server integration with Azure Functions, which will make it place nicely together.
We’ll create a new project using Azure Functions, and scaffold it using the Azure Functions Core Tools:
func init graphql-functions --worker-runtime node --language typescript
cd graphql-functions
If you want JavaScript, not TypeScript, as the Functions language, change the --language flag to javascript.
Next, to host the GraphQL server we’ll need a Http Trigger, which will create a HTTP endpoint in which we can access our server via:
func new --template "Http Trigger" --name graphql
The --name can be anything you want, but let’s make it clear that it’s providing GraphQL.
Now, we need to add the Apollo server integration for Azure Functions, which we can do with npm:
npm install --save apollo-server-azure-functions
Note: if you are using TypeScript, you need to enable esModuleInterop in your tsconfig.json file.
Lastly, we need to configure the way the HTTP Trigger returns to work with the Apollo integration, so let’s open function.json within the graphql folder, and change the way the HTTP response is received from the Function. By default it’s using a property of the context called res, but we need to make it explicitly return be naming it $return:
{
    "bindings": [
        {
            "authLevel": "function",
            "type": "httpTrigger",
            "direction": "in",
            "name": "req",
            "methods": ["get", "post"]
        },
        {
            "type": "http",
            "direction": "out",
            "name": "$return"
        }
    ],
    "scriptFile": "../dist/graphql/index.js"
}
Implementing a Server
We’ve got out endpoint ready, it’s time to start implementing the server, which will start in the graphql/index.ts file. Let’s replace it with this chunk:
import { ApolloServer, gql } from "apollo-server-azure-functions";

const typeDefs = gql`
    type Query {
        graphQLOnAzure: String!
    }
`;
const resolvers = {
    Query: {
        graphQLOnAzure() {
            return "GraphQL on Azure!";
        }
    }
};

const server = new ApolloServer({ typeDefs, resolvers });
export default server.createHandler();
Let’s talk about what we did here, first up we imported the ApolloServer which is the server that will handle the incoming requests on the HTTP Trigger, we use that as the very bottom by creating the instance and exporting the handler as the module export.
Next, we imported gql, which is a template literal that we use to write our GraphQL schema in. The schema we’ve created here is pretty basic, it only has a single type, Query on it that has a single member to output.
Lastly, we’re creating an object called resolvers, which are the functions that handle the request when it comes in. You’ll notice that this object mimics the structure of the schema we provided to gql, by having a Query property which then has a function matching the name of the available queryable values.
This is the minimum that needs to be done and if you fire up func start you can now query the GraphQL endpoint, either via the playground of from another app.
Implementing our Quiz
Let’s go about creating a more complex solution, we’ll implement the same Quiz that we did in dotnet.
We’ll start by defining the schema that we’ll have on our server:
const typeDefs = gql`
    type Quiz {
        id: String!
        question: String!
        correctAnswer: String!
        incorrectAnswers: [String!]!
    }

    type TriviaQuery {
        quizzes: [Quiz!]!
        quiz(id: String!): Quiz!
    }

    schema {
        query: TriviaQuery
    }
`;
Now we have two types defined, Quiz and TriviaQuery, then we’ve added a root node to the schema using the schema keyword and then stating that the query is of type TriviaQuery.
With that done, we need to implement the resolvers to handle when we request data.
const resolvers = {
    TriviaQuery: {}
};
This will compile and run, mostly because GraphQL doesn’t type check that the resolver functions are implemented, but you’ll get a bunch of errors, so instead we’ll need implement the quizzes and quiz resolver handlers.
Handling a request
Let’s implement the quizzes handler:
const resolvers = {
    TriviaQuery: {
        quizzes: (parent, args, context, info) => {
            return null;
        }
    }
};
The function will receive 4 arguments, you’ll find them detailed on Apollo’s docs, but for this handler we really only need one of them, context, and that will be how we’ll get access to our backend data source.
For the purposes of this blog, I’m skipping over the implementation of the data source, but you’ll find it on my github.
const resolvers = {
    TriviaQuery: {
        quizzes: async (parent, args, context, info) => {
            const questions = await context.dataStore.getQuestions();
            return questions;
        }
    }
};
You might be wondering how the server knows about the data store and how it got on that context argument. This is another thing we can provide to Apollo server when we start it up:
const server = new ApolloServer({
    typeDefs,
    resolvers,
    context: {
        dataStore
    }
});
Here, dataStore is something imported from another module.
Context gives us dependency injection like features for our handlers, so they don’t need to establish data connections themselves.
If we were to open the GraphQL playground and then execute a query like so:
query {
    quizzes {
        question
        id
        correctAnswer
        incorrectAnswers
    }
}
We’ll get an error back that Quiz.correctAnswer is a non-null field but we gave it null. The reason for this is that our storage type has a field called correct_answer, whereas our model expects it to be correctAnswer. To address this we’ll need to do some field mapping within our resolver so it knows how to resolve the field.
const resolvers = {
    TriviaQuery: {
        quizzes: async (parent, args, context, info) => {
            const questions = await context.dataStore.getQuestions();
            return questions;
        }
    },

    Quiz: {
        correctAnswer: (parent, args, context, info) => {
            return parent.correct_answer;
        },

        incorrectAnswers: (parent, args, context, info) => {
            return parent.incorrect_answers;
        }
    }
};
This is a resolver chain, it’s where we tell the resolvers how to handle sub-fields of an object and it acts just like a resolver itself, so we have access to the same context and if we needed to do another DB lookup, we could.
Note: These resolvers will only get called if the fields are requested from the client. This avoids loading data we don’t need.
You can go ahead and implement the quiz resolver handler yourself, as it’s now time to deploy to Azure.
Disabling GraphQL Playground
We probably don’t want the Playground shipping to production, so we’d need to disable that. That’s done by setting the playground property of the ApolloServer options to false. For that we can use an environment variable (and set it in the appropriate configs):
const server = new ApolloServer({
    typeDefs,
    resolvers,
    context: {
        dataStore
    },
    playground: process.env.NODE_ENV === "development"
});
For the sample on GitHub, I’ve left the playground enabled.
Deploying to Azure Functions
With all the code complete, let’s look at deploying it to Azure. For this, we’ll use a standard Azure Function running the latest Node.js runtime for Azure Functions (Node.js 12 at the time of writing). We don’t need to do anything special for the Functions, it’s already optimised to run a Node.js Function with a HTTP Trigger, which is all this really is. If we were using a different runtime, like .NET, we’d follow the standard setup for a .NET Function app.
To deploy, we’ll use GitHub Actions, and you’ll find docs on how to do that already written, and I’ve done a video on this as well. You’ll find the workflow file I’ve used in the GitHub repo.
With a workflow committed and pushed to GitHub and our App Service waiting, the Action will run and our application will be deployed. The demo I created is here.
Conclusion
Throughout this post we’ve taken a look at how we can create a GraphQL server running inside a JavaScript Azure Functions using the Apollo GraphQL server, before finally deploying it to Azure.
When it comes to the Azure side of things, there’s nothing different we have to to do run the GraphQL server in Azure Functions, it’s just treated as a HTTP Trigger function and Apollo has nice bindings to allow us to integrate the two platforms together.
Again, you’ll find the complete sample on my GitHub for you to play around with yourself.
This post was originally published on www.aaron-powell.com.
by Scott Muniz | Aug 8, 2020 | Alerts, Microsoft, Technology, Uncategorized
This article is contributed. See the original author and article here.
This blog is authored and technically implemented by @Hesham Saad with hearty thanks to our collaborator and use-cases executive mind brain @yazanouf
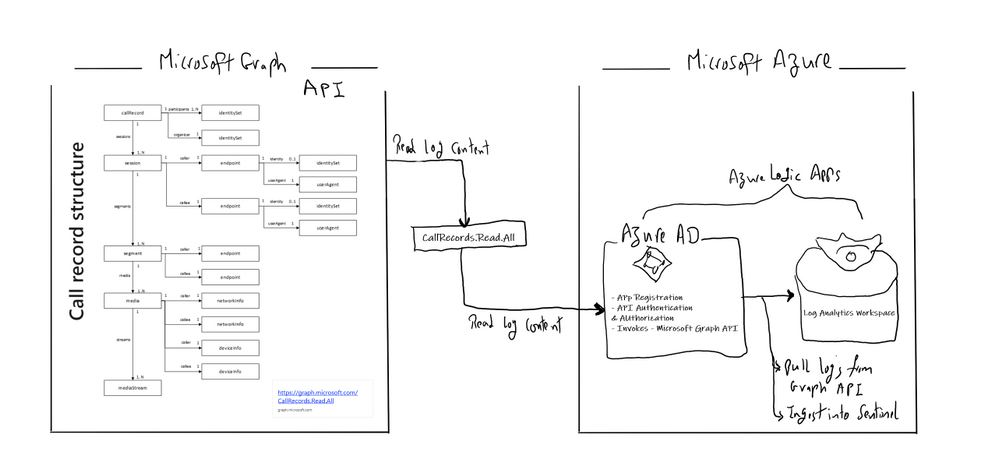
Before we dig deep on monitoring TEAMS CallRecords Activity Logs, please have a look at “Protecting your Teams with Azure Sentinel” blog post by @Pete Bryan on how to ingest TEAMS management logs into Azure Sentinel via the O365 Management Activity API
Collecting TEAMS CallRecords Activity Data
This section we will go into details on how to ingest TEAMS CallRecords activity logs into Azure Sentinel via the Microsoft Graph API and mainly leveraging CallRecords API which is a Graph webhook API that will give access to the Calls activity logs. SOC team can subscribe to changes to CallRecords via Azure Sentinel and using the Microsoft Graph webhook subscriptions capability, allowing them to build near-real-time reports from the data or to alert on specific scenarios , use cases which mentioned above.
Technically you can use the call records APIs to subscribe to call records and look up call records by IDs, the call records API is defined in the OData sub-namespace, microsoft.graph.callRecords.
So, what are the key resources types returned by the API ?
| Resource |
Methods |
Description |
| CallRecord |
Get callRecord |
Represents a single peer-to-peer call or a group call between multiple participants |
| session |
Get callRecord
List sessions |
A peer-to-peer call contains a single session between the two participants in the call. Group calls contain one or more session entities. In a group call, each session is between the participant and a service endpoint. |
| segment |
Get callRecord
List sessions |
A segment represents a media link between two endpoints. |
The callRecord entity represents a single peer-to-peer call or a group call between multiple participants, sometimes referred to as an online meeting. A peer-to-peer call contains a single session between the two participants in the call. Group calls contain one or more session entities. In a group call, each session is between the participant and a service endpoint. Each session contains one or more segment entities. A segment represents a media link between two endpoints. For most calls, only one segment will be present for each session, however sometimes there may be one or more intermediate endpoints. For more details click here
Below is the main architecture diagram including the components to deploy Teams CallRecords Activity Logs Connector:

Deployment steps:
Register an App
Create and register Azure AD APP to handle the authentication and authorization to collect data from the Graph API. Here are the steps – navigate to the Azure Active Directory blade of your Azure portal and follow the steps below:
- Click on ‘App Registrations’
- Select ‘New Registration’
- Give it a name and click Register.
- Click ‘API Permissions’ blade.
- Click ‘Add a Permission’.
- Click ‘Microsoft Graph’.
- Click ‘Application Permissions’.
- Search for ‘CallRecords’, Check CallRecords.Read.All. Also, Search for ‘Directory’ and Check Directory.ReadWrite.All and ‘Click ‘Add permissions’.
- Click ‘grant admin consent’.
- Click ‘Certificates and Secrets’.
- Click ‘New Client Secret’
- Enter a description, select ‘never’. Click ‘Add’.
- Note– Click copy next to the new secret and store it somewhere temporarily. You cannot come back to get the secret once you leave the blade.
- Copy the client Id from the application properties and store it.
- Copy the tenant Id from the main Azure Active Directory blade and store it.


Deploy a Logic App
Last step is to collect the CallRecords activity data and ingest it into Azure Sentinel via a Logic App.
Navigate to Azure Sentinel workspace, click at Playbooks blade and follow the steps below:
- Click on ‘Add Playbook’
- Select ‘Resource Group’, type a name to your logic app for example ‘TeamsCalls-SecurityGraphAPI’ and toggle on ‘Log Analytics’
- Click ‘Review + Create’ then ‘Create’
- Open your new logic app ‘TeamsCalls-SecurityGraphAPI’
- Under ‘Logic app designer’, add the following steps:
- Add ‘Recurrence’ step and set the value to 10 minute for example
- Add ‘HTTP’ step to create CallRecords subscriptions, creating a subscriptions will subscribe a listener application to receive change notifications when the requested type of changes occur to the specified resource in Microsoft Graph, for more details on Create Subscriptions via Microsoft Graph API
- Method: POST
- URI: https://graph.microsoft.com/beta/subscriptions
- Body, note that you can edit ‘changeType’ value with ‘created,updated’ for example, ‘notificationUrl’ is the subscription notification endpoint for more details on notificationUrl
-
{
  "changeType": "created",
  "clientState": "secretClientValue",
  "expirationDateTime": "2022-11-20T18:23:45.9356913Z",
  "latestSupportedTlsVersion": "v1_2",
  "notificationUrl": "https://outlook.office.com/webhook/3ec886e9-86ef-4c86-bfff-2d0321f3313e@2006d214-5f91-4166-8d92-95f5e3ad9ec6/IncomingWebhook/9c6e121ed--x-x-x-x99939f71721fcbcc7/03c99422-50b0-x-x-x-ea-a00e-2b0b-x-x-x-12d5",
  "resource": "/communications/callRecords"
}
- Authentication Type: Active Directory OAuth
- Tenant: with Tenant ID copied above
- Audience: https://graph.microsoft.com
- Client ID: with Client ID copied above
- Credential Type: Secret
- Secret: with Secret value copied above
- Add ‘HTTP’ step to list all subscriptions:
- Method: GET
- URI: https://graph.microsoft.com/v1.0/subscriptions
- Authentication Type: Active Directory OAuth
- Tenant: with Tenant ID copied above
- Audience: https://graph.microsoft.com
- Client ID: with Client ID copied above
- Credential Type: Secret
- Secret: with Secret value copied above
- If you want to get all sessions details per specific call record session ID follow the below steps, noting that the below example is for a single CallRecord Session ID for the sake of demonstration and hence we added a variable item, you can simply add a loop step to get all sessions IDs from the created CallRecords subscription step:
- Method: GET
- URI: https://graph.microsoft.com/beta/communications/callRecords/@{variables(‘TEAMSCallRecordsID’)}/sessions
- Authentication Type: Active Directory OAuth
- Tenant: with Tenant ID copied above
- Audience: https://graph.microsoft.com
- Client ID: with Client ID copied above
- Credential Type: Secret
- Secret: with Secret value copied above
- Add ‘Send TEAMS CallRecords Data to Azure Sentinel LA-Workspace’ step, after doing the connection successfully via your Azure Sentinel Workspace ID & Primary key:
- JSON Request Body: Body
- Custom Log Name: TEAMSGraphCallRecords


The complete Playbook code view have been uploaded to github repo as well, please click here for more details and check out the readme section.
Monitoring TEAMS CallRecords Activity
When the Playbook run successfully, it will create a new custom log table ‘TEAMSGraphCallRecords_CL’ that will have the CallRecords activity logs, you might wait for a few minutes till the new CL table been created and the CallRecords activity logs been ingested.
Navigate to Azure Sentinel workspace, click at Logs blade and follow the steps below:
- Tables > Group by: Solution > Custom Logs: TEAMSGraphCallRecords_CL
- Below are the list of main attributes that have been ingested:
- TimeGenerated
- Type_s: groupCall
- modalities_s: Audio, Video, ScreenSharing, VideoBasedScreenSharing
- LastModifiedDateTime
- StartDateTime, endDateTime
- joinWebUrl_s
- organizer_user_displayname_s
- participants_s
- sessions_odata_context_s
- As you can see from the results below we get the complete TEAMS CallRecords activity logs.

Parsing the Data
Before building any detections or hunting queries on the ingested TEAMS CallRecords Activity data we can parse and normalize the data via a KQL Function to make it easier to use:

The parsing function have been uploaded as well to the github repo.
Part (2): we will share a couple of hunting queries and upload them to github, it’s worth to explore Microsoft Graph API as there are other TEAMS related APIs logs that can be ingested based on the requirements and use cases:
- TeamsActivity:
- Read all users’ teamwork activity feed
- TeamsAppInstallation:
- Read installed Teams apps for all chats
- Read installed Teams apps for all teams
- Read installed Teams apps for all users
- TeamsApp
- Read all users’ installed Teams apps
…etc

We will be continuing to develop detections and hunting queries for Microsoft 365 solutions data over time so make sure you keep an eye on GitHub. As always if you have your own ideas for queries or detections please feel free to contribute to the Azure Sentinel community.
by Scott Muniz | Aug 7, 2020 | Alerts, Microsoft, Technology, Uncategorized
This article is contributed. See the original author and article here.
Scenario:
Transport Layer Security (TLS) and its deprecated predecessor Secure Sockets Layer (SSL), are cryptographic protocols designed to provide communications security over a computer network. SSL/TLS have some available versions to use, but the newer versions were created because of the security issues found on the previous ones.
It’s important to use the latest TLS version to make sure to have a secure way to exchanging keys, encrypt data and authenticate message integrity during all the communications..
This means the client and server should support the same SSL/TLS version.
Azure Cache for Redis can currently support TLS 1.0, 1.1 and 1.2, but there are some changes planned on TLS version and cypher Suites supported by Azure Cache for Redis:
- Azure Cache for Redis will stop supporting TLS versions 1.0 and 1.1.
After this change, your application will be required to use TLS 1.2 or later to communicate with your cache.
- Additionally, as a part of this change, Azure Cache for Redis will remove support for older, insecure cypher suites. The supported cypher suites will be restricted to the following when the cache is configured with a minimum TLS version of 1.2.
- TLS_ECDHE_RSA_WITH_AES_256_CBC_SHA384_P384
- TLS_ECDHE_RSA_WITH_AES_128_CBC_SHA256_P256
These changes were announced more than one year ago, and should have already occurred but were postponed due to COVID 19. Please be updated on theses changes in this link:
Remove TLS 1.0 and 1.1 from use with Azure Cache for Redis
Actions:
As the client and server should support the same SSL/TLS version, the client application will be required to use TLS 1.2 or later to communicate with your cache.
1. Changing client application to use TLS 1.2
In StackExchange.Redis and in most of other client libraries you may need to change your connection string and add ssl=true and sslprotocols=tls12 parameters, but this may be a little bit different on each one of client libraries. Also some other changes may be needed.
You can follow this documentation Configure your application to use TLS 1.2 to verify what changed are needed and if some other client environment changes are needed to use the latest TLS version in your client application.
.NET Framework: StackExchange.Redis, ServiceStack.Redis
.NET Core: all .NET Core clients
Java: Jedis, Lettuce, and Redisson
Node.js: Node Redis, IORedis
PHP: Predis, PhpRedis
Python: Redis-py
GO: Redigo
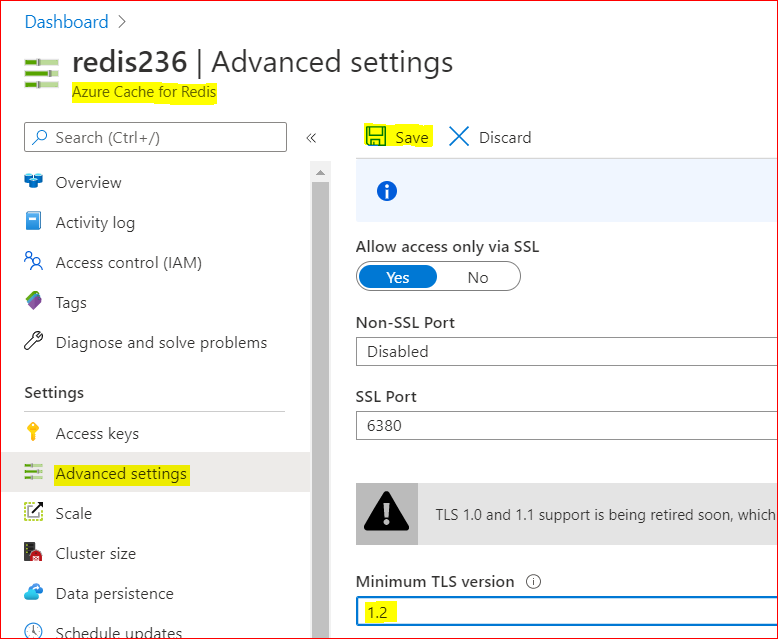
2. Changing Redis Minimum TLS version on Azure side
To disable old TLS versions on your Azure Redis instance, you may need to change the minimum TLS Version to 1.2.
This may take some minutes to be applied and you may use the Powershell script bellow to make sure the changes have been applied.
– Using Azure Portal :
– On Azure Portal, on your Azure Redis blade, choose Advanced Settings
– Change the minimum TLS Version to 1.2
– Save the changes

– Using PowerShell
You can do the same using PoweShell. You need the Az.RedisCache module already installed before run the command:
Set-AzRedisCache -Name <YourRedisName> -MinimumTlsVersion "1.2"
– Using CLI
Using CLI, the –minimum-tls-version are available only at Redis creation time and changing minimum-tls-version on an existing Azure Redis instance is not supported.
3. Check TLS versions supported by Redis endpoint
You can use this PowerShell script to verify what TLS versions are supported by your Azure Cache for Redis endpoint.
If your Redis instance have VNET integration implemented, you may need to run these PowerShell script from some VM inside your VNET, to have access to Azure Redis Instance:
param(
[Parameter(Mandatory=$true)]
[string]$redisCacheName,
[Parameter(Mandatory=$false)]
[string]$dnsSuffix = ".redis.cache.windows.net",
[Parameter(Mandatory=$false)]
[int]$connectionPort = 6380,
[Parameter(Mandatory=$false)]
[int]$timeoutMS = 2000
)
$redisEndpoint = "$redisCacheName$dnsSuffix"
$protocols = @(
    [System.Security.Authentication.SslProtocols]::Tls,
    [System.Security.Authentication.SslProtocols]::Tls11,
    [System.Security.Authentication.SslProtocols]::Tls12
)
$protocols | % {
    $ver = $_
    $tcpClientSocket = New-Object Net.Sockets.TcpClient($redisEndpoint, $connectionPort )
    if(!$tcpClientSocket)
    {
        Write-Error "$ver- Error Opening Connection: $port on $computername Unreachable"
        exit 1;
    }
    else
    {
        $tcpstream = $tcpClientSocket.GetStream()
        $sslStream = New-Object System.Net.Security.SslStream($tcpstream,$false)
        $sslStream.ReadTimeout = $timeoutMS
        $sslStream.WriteTimeout = $timeoutMS
        try
        {
            $sslStream.AuthenticateAsClient($redisEndpoint, $null, $ver, $false)
            Write-Host "$ver Enabled"
        }
        catch [System.IO.IOException]
        {
            Write-Host "$ver Disabled"
        }
        catch
        {
            Write-Error "Unexpected exception $_"
        }
    }
}
Conclusion:
Despite Azure Cache for Redis still currently support TLS 1.0, 1.1 and 1.2, it’s important to move only to TLS 1.2. Apart of the insecure TLS 1.0 and 1.1 versions, these versions will be deprecated soon from Azure Cache for Redis service.
For that reason is mandatory that all client applications can be adapted in advance to support TLS 1.2 on their Azure Cache for Redis connections, to avoid any downtime in the service.
Related documentation:
Remove TLS 1.0 and 1.1 from use with Azure Cache for Redis
PowerShell Az.RedisCache module
CLI Az Redis Create command
TLS security blog
I hope this can be useful !!!
by Scott Muniz | Aug 7, 2020 | Alerts, Microsoft, Technology, Uncategorized
This article is contributed. See the original author and article here.
Hi all, Zoheb here publishing on behalf of a guest author, Morne Naude. So without further ado…
Hi Everyone,
Morne here again and welcome to the first blog in our series on Azure Active Directory Security where we will be sharing all details on how we helped our SMC customers reduce the attack vector by enabling Identity Protection in Azure.
If you have not read our introductory blog covering the entire background on our SMC Delivery Methodology, please do give it a read now before continuing here.
How Microsoft Mission Critical Team Helped Secure AAD
If an Electron Can Be in Two Places at Once, Why Can’t You …
Well you can’t PERIOD
We refer to this as Atypical travel “Sign in from an atypical location based on the user’s recent sign-ins.“ or Unfamiliar sign-in properties “Sign in with properties we’ve not seen recently for the given user.”
Before we get on to more details on how we helped our SMC customer, here is some background information on Identity Protection & Risky Sign ins which may help you understand the subject better.
What is Azure Active Directory Identity Protection?
Identity Protection is a tool that allows organizations to accomplish three key tasks:
- Automate the detection and remediation of identity-based risks.
- Investigate risks using data in the portal.
- Export risk detection data to third-party utilities for further analysis.
Identity Protection uses the learnings Microsoft has acquired from their position in organizations with Azure AD, the consumer space with Microsoft Accounts, and in gaming with Xbox to protect your users. Microsoft analyses 6.5 trillion signals per day to identify and protect customers from threats.
This is but a few examples of risk types Azure identity protection use in its classifications.
Risk Classification
|
Risk detection type
|
Description
|
|
Atypical travel
|
Sign in from an atypical location based on the user’s recent sign-ins.
|
|
Anonymous IP address
|
Sign in from an anonymous IP address (for example: Tor browser, anonymizer VPNs).
|
|
Unfamiliar sign-in properties
|
Sign in with properties we’ve not seen recently for the given user.
|
|
Malware linked IP address
|
Sign in from a malware linked IP address
|
|
Leaked Credentials
|
This risk detection indicates that the user’s valid credentials have been leaked
|
|
Azure AD threat intelligence
|
Microsoft’s internal and external threat intelligence sources have identified a known attack pattern
|
Coming back to our customers’ pain areas, we were detecting a high number of Risky Sign ins every day across the organization, we spotted these during the Azure AD Assessments as well as observations from the Risky Sign in logs.
Working with the Mission Critical team gives our customers the ultimate personalized support experience from a designated team that:
- Knows you and knows what your solution means to your enterprise
- Works relentlessly to find every efficiency to help you get ahead and stay ahead
- Advocates for you and helps ensure get you the precise guidance you need.
Knowing the customer well helped us understand the extent of the problem, to work closely with their Identity team and recommend improvements to them.
There were various attack trends observed from Azure AD Connect Health related to Password spray, Breach replay, Phishing etc. on Azure and it was an urgent need of the hour to get into a better security posture.
After speaking with the messaging team, we realized that few of the Risky users had strange Mailbox rules created and were spamming multiple users in the organization (more details to come in one of our following blogs).
If you are interested to read more about Forms Injection Attacks on emails please see: https://docs.microsoft.com/en-us/microsoft-365/security/office-365-security/detect-and-remediate-outlook-rules-forms-attack?view=o365-worldwide
Our customer had no policy/process configured to tackle this issue, they only had Multi Factor Authentication (MFA) in place for Global Admins.
Policies
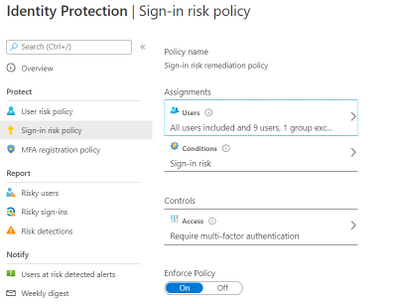
We suggested to enable User Risk as well as Sign-in Risk policies for users deemed as “high-risk”, below are some details on how it was enabled for our customer.
Identity Protection analyses signals from each sign-in, both real-time and offline, and calculates a risk score based on the probability that the sign-in wasn’t performed by the user. Administrators can decide based on this risk score signal to enforce organizational requirements. Administrators can choose to block access, allow access, or allow access but require multi-factor authentication.
We enabled Sign in risk Policy to force “MFA” for all “High Risk” users as per configuration below.

Identity Protection can calculate what it believes is normal for a user’s behaviour and use that to base decisions for their risk. User risk is a calculation of probability that an identity has been compromised. Administrators can decide based on this risk score signal to enforce organizational requirements.
Considering the circumstances, we suggested to our customer to implement below User Risk policy, this policy would ensure that if there is any “High Risk” user he will be required to change Password as per configuration below.

So, these two policies ensured all the Risky Sign in users are forced to use MFA and change their passwords.
Notification for Risky users
Our customer has Azure AD P2 licensing, so we could leverage the full set of Identity protection features.
We configured the users at risk email in the Azure portal under Azure Active Directory > Security > Identity Protection > Users at risk detected alerts.
By default, recipients include all Global Admins. Global Admins can also add other Global Admins, Security Admins, Security Readers as recipients.
Optionally you can Add additional emails to receive alert notifications; this feature is a preview and users defined must have the appropriate permissions to view the linked reports in the Azure portal. We included members of the Identity and Security teams as well.

The weekly digest email contains a summary of new risk detections, such as:
- New risky users detected
- New risky sign-ins detected (in real-time)
- Links to the related reports in Identity Protection

This resulted in a drastic reduction in the number of risky users and risky sign-ins. Additionally we helped implement a process of investigation and remediation of these at- risk accounts from the service desk to the internal security department. Currently the business is in the process of including Medium based at-risk accounts into the above policies.
NOTE: The features and guidelines implemented in this case were specific to this customer’s requirements and environment, so this is not a “General” guideline to enable any of the mentioned features.
Hope this helps,
Morne

by Scott Muniz | Aug 7, 2020 | Alerts, Microsoft, Technology, Uncategorized
This article is contributed. See the original author and article here.

August is already a week over, can you believe it? That doesn’t stop this team they’re everywhere doing great things to make the experience better for you in the docs, product and services. Have some feedback? Comment on their posts, contact them on twitter or wherever you see them engaging.
Cloud Advocates List on Microsoft Docs
Azure Cloud Adviocates Twitter List
Follow @azureadvocates on Twitter
Content Round Up
WebAssembly, your browsers sandbox
Aaron Powell
We’ve been doing web development for 30+ years and in all that time have you ever stopped to think, “This SPA needs more C++”? Well thanks to the power of WebAssembly you can finally bring C, C++, Rust, Go and other high level languages to the browser.
So does this mean that we can replace our JavaScript with these other languages? Probably not, so what is the role that WebAssembly can play in building web applications? And most importantly, what does it look like as a web developer to try and incorporate these platforms that have traditionally been on the server?
MS Dev Twitch Stream: Build a Virtual Reality Snake Game with JavaScript! – Aug 5th
Cassie Breviu
Did you know that you can create Virtual Reality (VR) websites with JavaScript using BabylonJS? In this session you will get an introduction on how to build WebVR sites! We will discuss the main concepts used in building 3D experiences. Then go step-by-step to build out a basic version of the classic snake game. By the end of this session you should have a starting point to building your first VR game!
Azure Monitor for Azure Arc enabled servers
Thomas Maurer
As you know Azure Arc for servers is currently in preview and allows you to manage your Windows and Linux machines hosted outside of Azure on your corporate network or other cloud providers, similar to how you manage native Azure virtual machines. With the new extensions which were introduced a couple of weeks ago, you can now also use Azure Monitor to not only monitor your servers in Azure but also servers running on-premises or at other cloud providers. This will provide you with cloud-native management for your Linux and Windows servers.
Docker, FROM scratch
Aaron Powell
Docker’s popularity has exploded over the last couple of years, especially in the DevOps space, but unless you’ve spent a lot of time in that area it can be a confusing technology to wrap your head around.
So let’s step back and start looking at Docker from, well, FROM scratch (and we’ll understand just what that means).
With minimal starting knowledge of Docker we’ll look into what it is, cover off all the core concepts from images to containers, volumes to networks, and how we can compose environments. We’ll also look at how to use Docker in Dev, not just DevOps and how containers can be useful tools without being something to run production infrastructure on.
HobbyHack Augmented Reality on the Web Workshop Video
Aysegul Yonet
Augmented Reality applications are becoming common user experiences on mobile devices. WebXR gives you a way to build for all mobile platforms as well as Augmented Reality headsets once. In this workshop you will learn: * The basic concepts of WebXR and 3D on the web. * Possible use cases for Augmented Reality mobile applications that solve real-world problems. * How to get started prototyping really fast.
Assess AWS VMs with Azure Migrate
Sarah Lean
Using Azure Migrate assess and understand what it would look like if you moved AWS VMs over to Azure.
ITOpsTalk Blog: Step-by-Step: Traditional Windows Cluster setup in Azure
Pierre Roman
How to deploy a windows cluster using Azure Shared Disks
Blog/ Setting-up Visual Studio Codespaces for .NET Core (EN)
Justin Yoo
Since April 2020 Visual Studio Codespaces has been generally available. In addition to that, GitHub Codespaces has been provided as a private preview. Both are very similar to each other in terms of their usage. There are differences between both, though, discussed from this post. Throughout this post, I’m going to focus on the .NET Core application development.
Add ISO DVD Drive to a Hyper-V VM using PowerShell
Thomas Maurer
Hyper-V offers the capability to add an ISO image to a virtual CD/DVD drive and you can use Hyper-V Manager to do that, or you can also use PowerShell. Here is how you can add an ISO to a Hyper-V virtual machine (VM) using PowerShell. There are two ways of doing it if you already have a virtual DVD drive attached to the VM or if you need to add a virtual DVD drive.
State of the Art in Automated Machine Learning
Francesca Lazzeri
- Automated Machine Learning (AutoML) is important because it allows data scientists to save time and resources, delivering business value faster and more efficiently
- AutoML is not likely to remove the need for a “human in the loop” for industry-specific knowledge and translating the business problem into a machine learning problem
- Some important research topics in the area are feature engineering, model transparency, and addressing bias
- There are several commercial and open-source AutoML solutions available now for automating different parts of the machine learning process
- Some limitations of AutoML are the amount of computational resources required and the needs of domain-specific applications
Building & Debugging Microservices faster using Kubernetes and Visual Studio
Shayne Boyer
Shayne walks through using Docker, Visual Studio 2019 and Kubernetes during his talk at .NET Conf 2019: Focus on Microservices. This demonstrations shows how you can take advantage of Visual Studio tools to build, debug and deploy microservices to Kubernetes faster.
Video: Assess AWS VMs with Azure Migrate
Sarah Lean
In this video Sarah Lean talks about how you can utilize Azure Migrate to assess your virtual machines hosted in AWS with a view to migrating them to Azure.
Let’s Talk About Azure AD and Microsoft Identity Platform
Matt Soucoup
Have you been following along with all the changes in Azure Active AD and the various Microsoft Identity branded things? The changes and new features are amazing … but change can be confusing. So, so many terms. And how do they all fit together? Let’s have a little chat…
Authenticate a ASP.NET Core Web App With Microsoft.Identity.Web
Matt Soucoup
So you want to authenticate your ASP.NET Core web app with Azure AD. It sounds daunting, but with a little help from the `Microsoft.Identity.Web` SDK and knowing how it fits in with the pieces of Azure AD’s Applications, it’s not too bad.
The intention of this article is straightforward. Configure Azure AD to allow users of your application to sign-in. And create an ASP.NET Core web application that signs in.

by Scott Muniz | Aug 7, 2020 | Alerts, Microsoft, Technology, Uncategorized
This article is contributed. See the original author and article here.
Another week, another ton of Azure to share. Here are some of the headlines we’re covering this week: SOC operational metrics now available in Azure Sentinel, Azure Monitor for containers with Azure Portal now supports Kubernetes resource view, Azure AD My Sign-Ins goes GA, Selective disks backup for Azure Virtual Machine is in public preview, and Microsoft Authenticator app lock now enabled by default.
SOC operational metrics now available in Azure Sentinel
Azure Sentinel incident data is now available within the Log Analytics workspace. The data can be used to report on metrics within the Security Operations Center (SOC). Typical SOC metrics include incidents created over time, mean time to triage, mean time to closure, etc. Administrators will now be able to run queries to get the metrics that are operationally important for the SOC via the new Security Incident table now available in Log Analytics. In addition, Microsoft has added the Security Operational Efficiency workbook into your templates, so you have a pre-built SOC metrics workbook out-of-the-box for use.
Azure Monitor for containers with Azure Portal now supports Kubernetes resource view
With the public preview of Azure portal providing Kubernetes resource view, administrators can use point and click navigation to see live, in-depth details of the workloads they have access to. The public preview includes multiple resource types (including deployments, pods, and replica sets) and supports the following key capabilities:
- Workloads running on a cluster, including the ability to filter resources by namespace
- Find the node an application is running on and their Pod IP address
- See pods in the replica set, ready status of each pod, and images associated with each
- Drill down to individual deployments to see live status and specification details
- Execute on the fly changes to YAML to validate dev/test scenarios
With Azure Monitor for containers enabled, users can view deployment hierarchy, insights such as CPU usage and memory usage in the Kubernetes resources view, and seamlessly transition to Azure monitor for more in-depth insights.
Azure AD “My Sign-In’s” is now Generally Available
In public preview, this new Identity feature allowed Enterprise users to review their sign-in history to check for any unusual activity. They could see:
- If anyone is trying to guess their password.
- If an attacker successfully signed into their account from a strange location.
- What apps the attacker accessed.
My Sign-Ins has just moved to General Availability and now allows end users to report “This wasn’t me” or “This was me” on unusual activities.
Selective disks backup for Azure Virtual Machine is in public preview
Microsoft recently announced the public preview of selective disks backup and restore capability for Azure Virtual Machines. Using the selective disks backup functionality, provides an option to back up a subset of the data disks in a VM. Each recovery point contains only the disks that are included in the backup operation which further allows you to have a subset of disks restored from the given recovery point during the restore operation. This applies to both restore from snapshot and vault.
Microsoft Authenticator app lock now enabled by default
Some time ago, Microsoft released the App Lock feature in response to feedback that organizations wanted to make sure apps they used were secured by a PIN or biometric. Last month, Microsoft expanded App Lock’s protection. Now, if App Lock is enabled, when you approve any notification, you’ll also have to provide your PIN or biometric. In the latest release, App Lock will be enabled by default if you’ve set up a PIN or biometric on your device.
MS Learn Module of the Week
Strengthen authentication (conditional access) with Azure Active Directory
Learn about modern authentication and the security benefits it provides to your organization, such as enabling multi-factor authentication (MFA) and a passwordless environment.
This module will detail how to:
- Define modern authentication.
- Understand how to enable multi-factor authentication.
- Explain how passwordless authentication improves security.
Let us know in the comments below if there are any news items you would like to see covered in next week show. Az Update streams live every Friday so be sure to catch the next episode and join us in the live chat.

Recent Comments