by Scott Muniz | Jul 31, 2020 | Uncategorized
This article is contributed. See the original author and article here.
This week the Azure Data Factory team is releasing the following new features in the ADF UX:
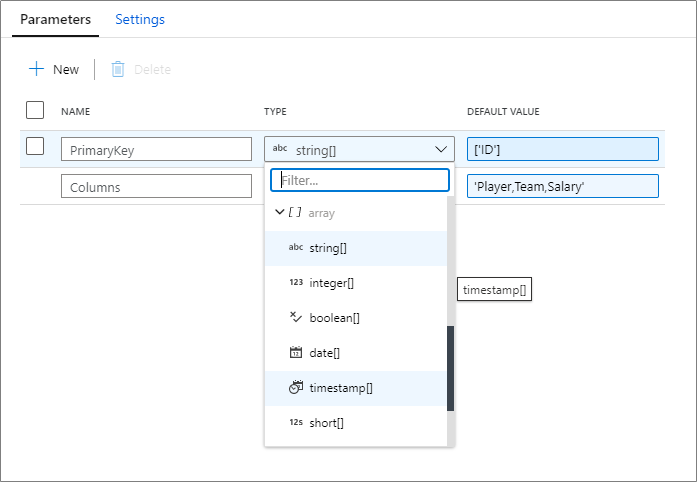
Array support for mapping data flow parameters
Array data types are now supported in mapping data flow parameters. You can pass in a list of an existing data type! Learn more on how to parameterize your mapping data flows.

Debug from job cluster
When operationializing your mapping data flows, you can now choose to run a pipeline debug run using either a running interactive debug cluster or with a just-in-time cluster using the integration runtime configuration of the activity.

Use the data flow debug session if you are running a single data flow with a small amount of data. This allows for you to test your business logic without having to wait a few minutes for a new cluster to start up.
For more advanced pipelines that move large amounts of data or have multiple concurrent data flow that run in parallel, use the activity runtime settings to spin up a new cluster. This allows for you to test different performance tuning options before you publish or merge your changes.
Filter by run id
When monitoring your pipelines, you can now look for an individual run by entering the run id into the filter search box. This can be useful for troubleshooting when you have many pipeline runs occurring in a factory.

Parameterize key columns
When writing to database sinks using data flows, you may have upsert, updates or deletes enabled on the destination. If so, you must specify a primary key or list of primary keys. For scenarios where the number of primary keys is dynamic, you can now enter a custom expression that takes in an array of column names at run-time. For more information, learn about the alter row transformation.

Updated feedback experience
Lastly, we have updated the feedback form in the ADF UX. Feel free to let us know what you think about some of these new features!


by Scott Muniz | Jul 31, 2020 | Uncategorized
This article is contributed. See the original author and article here.
Enable Multi-Factor Authentication (MFA)
Greetings! We are publishing this blog post to continue our series for the re-vamped Azure Security Center (ASC) Secure Score, and to educate the masses on the importance of ASC and what it can offer our customers…aka YOU. The desired result is to enhance everyone’s security footprint as much as possible leveraging one of the most (if not THE most) powerful forces of compute power on the planet.
What is Multi-Factor Authentication? I won’t go into too much detail here, but it’s basically a process where a user is prompted during the sign-in process for an additional form of identification, such as to enter a code on their cellphone or to provide a fingerprint scan. It leverages something you know (like a password) and something you have (phone / hardware key) or even leverage something you are (biometrics/facial scan). To read more about what MFA is and how it works, check out this article.
Before I dive into the subject of enabling Multi-Factor Authentication for accounts, I would like to address the WHY… Time to hop on the soap box…
We all have been told identity is the perimeter for defense. But what does that mean exactly? Back in the day you could get away with deploying network boundaries and relying on them to establish a good layer of network protection. Think of a moat around a castle as an analogy. However, over the last 20 years we’ve all seen/heard the news stories about how the “moat” approach failed (and continues to fail) time and time again.
To put things into perspective, there are over 300 million fraudulent sign-in attempts to our Azure cloud services every day. Think about the impact of that number on your own Azure tenant! The reality is that “Cyberattacks aren’t slowing down, and it’s worth noting that many attacks have been successful without the use of advanced technology. All it takes is one compromised credential or one legacy application to cause a data breach. This underscores how critical it is to ensure password security and strong authentication.” Reference – here…aka the WHY.
At Ignite 2019, it was discussed that out of all the Azure tenants globally, less than 8% of them WORLD-WIDE have enabled MFA. 99.9% of attacks on accounts are prevented by MFA. Question – Where does your Azure tenant fit in to the mix?
It’s very difficult not to go on a rampage verbally right now given the number of Azure tenants we have… so I’ll climb off the soap box instead.
OK so now you should have a better understanding of why addressing the security control “Enable MFA” is critical to the overall security of your Azure tenant, and in a lot of cases…your on-premises environments can be positively impacted too.
As you learned in this blog post (blog series), recommendations are grouped in Security Controls. This one control is probably considered one of the most important if not THE most important control to activate. Afterwards, your Secure Score will elevate 10 full points! I know it doesn’t sound like a lot, but with the new version of Secure Score it’s quite a positive impact, and is the largest number equated to a security control. Depending on your own tenant, it could be an 18% adjustment!
Note: For more information on Secure Score info, read this article here, and pay particular attention on how to ensure you’re getting the maximum points you can.
Also, the security control “Enable MFA” relates specifically to Azure MFA, not a 3rd party MFA provider. If you wanted to leverage a 3rd party MFA vendor, then we’d be addressing integrating one into an on-premises instance of ADFS in a Hybrid scenario. That’s not the topic of discussion and there’s plenty of available online references for that. Either way, MFA needs to be enabled regardless of whichever direction you choose for your organization.
Pertaining to licensing requirements, you can find all pertinent information regarding that here. There is a ‘free’ option to protect your tenant admin accounts, however it still comes with a cost. In order to take advantage of ‘free’ then you’re limited to either the global administrator accounts of your tenant…OR…your tenant’s got the “security defaults” turned on.
Without going into too much detail on “security defaults,” I will mention that if they are enabled on your tenant, the setting disables regular conditional access policies, then forces all users to have MFA after 14 days (amongst a few other enforcements). So be cognizant of that. Read up and learn more about “security defaults” here.
I believe all the main bases are covered in the blog opening so let’s get to the “meat and potatoes” of the topic at hand. Prior to doing anything, it’s important to make sure the environment is staged, set, and ready to go. Make sure you follow all the planning / recommended steps (found here) to ensure the MFA rollout is successful and issues are limited.
Security Controls
Let’s get going on the actual security controls now. Each one is actually a built-in policy definition contained within the Azure Portal.

MFA should be enabled on accounts with owner permissions on your subscription.
First up is the control under “Enable MFA” section in ASC Recommendations related to OWNER permissions for the subscription. This is to help enforce the control to prevent a breach of accounts or resources.
The last thing you want to do is allow some account that has complete ownership of your subscription to login without another factor of authentication. Simply letting a user account login with a password alone begs an attacker to compromise your tenant through a variety of attacks, taking full control of ALL accounts and ALL resources within the subscription.
Please…turn this on ASAP if it’s not already!!! You want to force MFA each and every time the subscription is accessed by an account with owner permissions.
MFA should be enabled on accounts with write permissions on your subscription.
Just like the previous mentioned control, this one too prevents a breach of accounts or resources on your subscription. Same methodology applies but the differences lie within permission levels. Even being able to write against a subscription allows an attacker to make unauthorized changes to accounts and resources without being an owner.
Again, I can’t stress enough the importance of enabling MFA and ensuring these controls are met!
On the path to Enabling MFA
There are a couple of ways to enable Azure MFA against your tenant. One way is to utilize conditional access policies, and the other is simply to turn it on against your user accounts. (Don’t forget about the caveat regarding “security defaults” mentioned above.) The screenshots show the latest GUI / portal interaction (as of the time of this blog post), but of course you can leverage PowerShell if you so choose.
Let’s look at the process for owner permissions.

Under the ASC Recommendations, simply click the link to initiate the process to enable MFA on owner permissions. It’ll take you to a subscription list page, then click the link associated with your subscription. Next, it’ll display the owner(s) of the subscription on the right side like this:

Click the continue button, and it redirects to the “conditional access policies” of the subscription.

Conditional Access Policy Method
Of the 2 methods mentioned previously, Microsoft recommends using conditional access policies (CAP) to enable MFA for users. Conditional Access policies enforce registration, requiring unregistered users to complete registration at first sign-in, an important security consideration. They give you the most flexibility and granularity when leveraging MFA in the environment. CAPs do require licensing of at least AAD P1, so keep that in mind. To begin your journey towards using CAPs and consuming gobs of relevant information, start here.
Given the flexibility and customization available for CAPs, the configurations could vary, so it’ll depend on what’s available for your tenant. Good news is that there’s “common” policy settings available for you to take advantage of that I’ll be addressing in this post. The common policies available are:
Regarding the ones with the asterisk * – if you enable all 4 that’s basically the same thing as doing the security defaults. Each link for the common policies above will take you directly to the article on how to set up and configure each one.

Reference Material – here.
Follow the above links for guides at enabling policies. At a bare minimum, Microsoft recommends you enabling MFA across administrative roles. Here’s an example of doing exactly that using the preview features (as of 7/2020):
- Sign in to the Azure portal as a global administrator, security administrator, or Conditional Access administrator.
- Browse to Azure Active Directory > Security > Conditional Access.
- Select New policy.
- Give your policy a name. We recommend that organizations create a meaningful standard for the names of their policies.
- Under Assignments, select Users and groups
- Under Include, select Directory roles and choose the following roles at a minimum:
- Authentication Administrator
- Billing administrator
- Conditional Access administrator
- Exchange administrator
- Global administrator (OWNER)
- Helpdesk administrator
- Password administrator
- Security administrator
- SharePoint administrator
- User administrator
- Under Exclude, select Users and groups and choose your organization’s emergency access or break-glass accounts.
- Under Cloud apps or actions > Include, select All cloud apps.
- Under Conditions > Client apps (Preview), set Configure to Yes. Click Done.
- Under Access controls > Grant, select Grant access, Require multi-factor authentication, and select Select.
- Confirm your settings and set Enable policy to On.
- Select Create to create to enable your policy. (PAY ATTENTION TO THE WARNING!)


Lastly, depending on the option selected below could impact your currently logged on account or not. Be mindful on your selection!

19 clicks of the mouse, and you’re done setting up MFA for administrative roles using the preview method of CAP as of 5/2020! You can see how customizable CAPs can be and just think of the flexibility you can leverage in your own environment. Just be careful you don’t accidentally lock yourself out!!
Direct User Method
If CAPs aren’t available to you at this time, then here’s a snippet of the process on simply enabling MFA against user accounts directly. Reference article.
Log into your Azure tenant (https://portal.azure.com), click Azure Active Directory, and go into Users, and then finally All Users. On the top menu bar, you’ll find “Multi-Factor Authentication.” Click it to open a new window to display the MFA user status.


Now that you’re on the MFA page for users, you can select all users who are OWNERS or WRITERS of the subscription, and roll out MFA in one fail swoop (Doing so for ALL users in the environment isn’t really recommended, you want to do that in chunks starting with the privileged accounts) or you can select individual accounts to start enabling MFA against for testing.
PRO TIP – Don’t move users directly to the Enforced state. If you do so, non-browser-based apps stop working because the user hasn’t gone through Azure Multi-Factor Authentication registration and obtained an app password. Only set them to Enforced after they’ve gone through the entire process.
Easy!
PRO TIP – Disabling MFA. We get a lot of customer questions that involve disabling MFA and the correct method to do that. Ultimately if you disable MFA at the subscription level…YOU MUST disable it at the management group as well or it won’t work!
This is the way you SHOULD be doing things: https://techcommunity.microsoft.com/t5/azure-security-center/centralized-policy-management-in-azure-security-center-using/ba-p/1276331
Next Steps
Obviously, you should get working on getting MFA enabled! Get moving on increasing that Secure Score and preventing bad actors from taking advantage of this attack vector on your tenant! We hope to see the statics jump dramatically in the direction of more customers leveraging MFA for sure!
To wrap up this blog post, I’d like you all to keep in mind this is just a small fraction of what ASC and the Secure Score can offer our customers to drive their security posture through the roof. We’re just getting started and this basically translates into some robust steps you can leverage to increase your own comfort level in protecting your environments / assets.
I hope you enjoyed this article and learned something that will assist you in the continued fight of cyber-security. Please continue to enjoy our ASC Secure Score blog series and I look forward virtually seeing you all in the next one. Until then…
GET STARTED ON ENABLING MFA IN AZURE! :smiling_face_with_smiling_eyes:
- The main blog post to this series (here)
- The DOCs article about Secure Score (this one)
Reviewer:
Yuri Diogenes, Senior PM CxE ASC Team
by Scott Muniz | Jul 31, 2020 | Alerts, Microsoft, Technology, Uncategorized
This article is contributed. See the original author and article here.
Greetings!
We’re back with another mailbag, this time focusing on your common questions regarding Azure AD Identity Protection. Security is always top of mind and Identity Protection helps you strike a balance between the usability required for end users to be productive while protecting access to resources. We’ve got some really great questions from folks looking to improve the effectiveness of their alerts and to increase their overall security posture. We even have a sample script for you! I’ll let Sarah, Rohini and Mark take it away.
—–
Hey y’all, Mark back again for another mailbag. You’ve been asking some really great questions around Azure AD Identity Protection. So good, in fact, I’ve kept putting this off for an embarrassingly long time. Then I called in for some help from some excellent feature PMs Sarah Handler and Rohini Goyal.
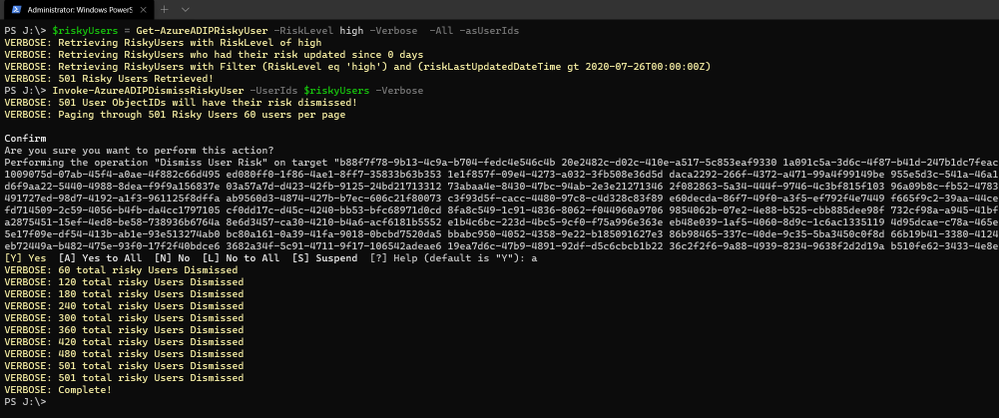
Question 1: I want to bulk dismiss a lot of Users that have risk. How can I do this?
Make sure that before you bulk dismiss users, you’ve already remediated them or determined that they’re not at risk. Then we have a GraphAPI call you can make to dismiss the user risk. We’ve put together a little sample script to help you with doing bulk dismissal.
We’ve provided a sample PowerShell script and examples to enumerate risky users, filter the results, and dismiss the risk for the collection.

Question 2: How do we detect TOR or anonymous VPN? Is it based off exit node or are there ways to bypass this?
We detect anonymizers in a few ways. For Tor, we continually update the list of Tor exit nodes. For VPNs, we use various third-party intelligence to determine whether an anonymizer has been used.
Question 3: How should we handle false positives?
There are two ways to address false positives: giving feedback on false positive detections that occur and reducing the number of false positives that get generated. If while investigating risky sign-ins you find a detection to be a false positive, you should mark “confirm safe” on the risky sign-in. There are two ways to prevent false positives in Identity Protection. The first is to enable sign-in risk policies for your users. When a user is prompted for a sign-in risk policy with MFA and passes the MFA prompt, it gives feedback to the system that the legitimate user signed in and helps to familiarize the sign-in properties for future ones. The second is to mark common locations that you trust as trusted locations in Azure AD.
Question 4: What is the best practice for whitelisting known locations?
First, you want to make sure you’re putting in your public egress end points. This helps with our detection algorithms. We’ve recently increased the named locations to 195 named locations with 2,000 IP ranges per location. You can read more in our docs.
But we know that many times networking teams make changes and don’t notify the Azure AD Admins. It’s good to have a process to work through the Sign-In logs and look for IP ranges that are not part of your named locations and add those as well as remove IPs that no longer are your egress point.
Question 5: Does AAD Leaked credentials connect to Troy Hunt’s Have I been Pwned API? Do I need to supplement with other scans?
Leaked credentials detection does not connect to Troy Hunt’s “Have I been Pwned”. Troy does an excellent job with his service correlating and collecting public dumps. Leaked credentials alerts take into account those public dumps as well as non-public dumps we call out in our docs, more info here. If you want to supplement the Azure AD leaked credentials alerting with other feeds, that is entirely up to you.
Question 6: When I turn on Password Hash Sync does the leaked credential alert on existing ones or only on leaks going forward?
Leaked credentials will only detect on leaks going forward. When we find clear text username and passwords pairs, we don’t keep them. We process them through and delete them. We’ve updated our documentation to call this out and provided more info.
We hope you’ve found this post and this series to be helpful. For any questions you can reach us at AskAzureADBlog@microsoft.com , the Microsoft Forums and on Twitter @AzureAD , @MarkMorow, @Sue_Bohn, and @Alex_A_Simons
-Rohini Goyal, Sarah Handler and Mark Morowczynski

by Scott Muniz | Jul 31, 2020 | Uncategorized
This article is contributed. See the original author and article here.
See what’s next in our Office Hours series, catch up on our Microsoft Inspire announcements and sessions, hear more about Project Cortex on the Intrazone, tell us more about your expertise finding scenarios, learn about our Microsoft 365 Content Services partners and how you can join the program, and see how organizations are using Microsoft 365 to stay connected.
See what’s coming up on Office Hours
Tune in on August 12 (download invite) to learn more about the business case for Project Cortex. We’ll discuss how Project Cortex can save your organization time and lower operational costs.
Did you miss an Office Hours meeting and check the schedule? Learn more about the series and upcoming meetings, and view the recaps and recordings for all past meetings on the Project Cortex Office Hours page.
Catch up on Project Cortex at Microsoft Inspire 2020
At Microsoft Inspire 2020, we announced new taxonomy features, gave an update on Project Cortex availability, and revealed the initial set of Project Cortex launch partners.

Read the blog post, check out the July 22 Office Hours meeting recap, or watch a session below to learn more about knowledge and insights with Project Cortex at Microsoft Inspire 2020.
See what’s new
The Intrazone: Prefrontal Project Cortex
Hear more about the latest Project Cortex updates – digging into the manage metadata service (MMS), classification, and knowledge curation – to learn how you and your company will further the union between people, content, and work processes. Mark and I talk with CJ Tan and Sean Squires, principal program managers on the Project Cortex team in Microsoft 365 engineering.
Tell us more
This week we’re offering an opportunity for you to help influence one of the potential future investment areas of Project Cortex. We’re looking to better understand what expertise finding scenarios are important to customers, and more specifically, which ones Microsoft can help with by providing better tools and processes. Let us know your thoughts in this brief (3 minutes!) survey.
Say ‘hello’ to new charter partners
We’re pleased to announce the addition of several charter partners to the Microsoft 365 Content Services Partner Program for FY20 and highlight some of their recent projects. Our partners help customers worldwide realize the value of Microsoft 365 – from migrating customers off legacy platforms to helping them implement and extend the capabilities of Microsoft 365 Content Services.

Interested in joining this partner program? We’re accepting applications now through August 31 for the Microsoft 365 Content Services Partner Program. Read the announcement to learn more about the program and how to apply. We’re also hosting a program overview meeting (download meeting invite) on Tuesday, August 4 at 8am PDT, to walk partners through the program benefits, requirements, and application process.
Learn about our customers and partners
Read how Microsoft 365 Content Services partners help organizations stay connected in a changing world. Below are a few customer stories from our partners:
For more related stories, see our Case Studies library on the Microsoft Tech Community Resource Center.
Visit the Project Cortex resource center to learn more.
by Scott Muniz | Jul 31, 2020 | Uncategorized
This article is contributed. See the original author and article here.
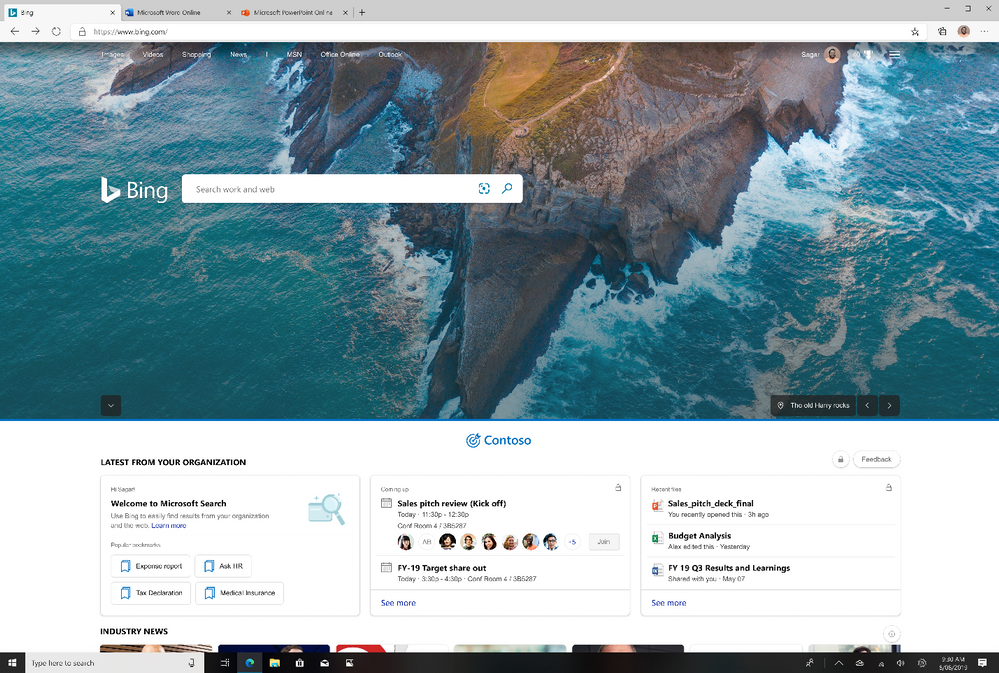
We’re happy to announce a new experience just for Microsoft Search in Bing users: the Bing enterprise homepage. Now you’ll see the same Bing homepage you love, enhanced with the work info you need, including popular bookmarks, meetings, recent files, and news. And with automatic sign in, you can get to the info even faster.

What are the benefits of the Bing enterprise homepage?
Customized branding: You’ll see your company’s logo and name right on the Bing homepage. Enterprise admins can configure the brand logo by customizing the Microsoft 365 theme for your organization. (Your logo will be changed across Microsoft 365 and Microsoft Search.)
Fast access to popular and timely info: If your organization has added bookmarks in the Microsoft 365 admin center, you’ll see popular bookmarks to help you get to important internal resources even faster.
You’ll also see your upcoming meetings—and who’s invited. (And for an even fuller picture of your day, just click the see more link.)
To help you pick up where you left off, you’ll see recent files you and co-workers have collaborated on.
News that impacts your work: Read the latest headlines and stories that matter to you and your industry. Enterprise admins can choose the industries for your enterprise, as well as topics important to your company, in your Microsoft 365 admin center settings (Org settings > Services > News).
Search suggestions designed for work: Just like you see web suggestions when you start a search, now you’ll see work suggestions too. Start typing a work-related search, like your manager’s name, in the search box to see it in action.
Highlight your news: Soon you’ll be able to showcase your company’s top internal news stories on the Bing homepage. Check out the image below for an early preview.

When will I see the new enterprise homepage?
The enterprise homepage updates started rolling out during the end of July. The admin controls for Industry news and internal news from your organization will roll out across tenants in August.
Coming soon: More controls
The right homepage for your business: We’re working on features that will let enterprise admins customize the homepage for your organization, including turning off the homepage image by default. (Your users will still be able to turn it back on.) And for organizations that prefer the ‘classic’ Bing homepage, Enterprise admins will have the option to turn off the enterprise homepage features.
Frequently asked questions
Who can see work info on the enterprise homepage?
Only you can see your work info. And your enterprise homepage is customized just for you. To help protect your privacy, you must sign in with a valid work or school account to see info from your organization. To learn more about privacy and Microsoft Search, see How Microsoft Search in Bing helps keep your info secure.
How can I hide enterprise info on the homepage?
To temporarily hide this info, minimize it by clicking the chevron control just above the enterprise section.

Or, on the homepage menu (upper-right corner), turn off the Show news & work info toggle.
Is this available outside the US?
Currently, the Bing enterprise homepage is available in eight locations: Australia, Canada, France, Germany, Great Britain, India, Spain and the US. The Industry news carousel is only rolling out in the US.
We hope you enjoy the new Bing enterprise homepage as much as we loved building it for you.
by Scott Muniz | Jul 31, 2020 | Uncategorized
This article is contributed. See the original author and article here.
This week, Microsoft To Do announced that it will now be integrated with the Microsoft 365 suite of applications, Tasks in Microsoft Teams is now in public roll out, and more.
@henryarphillips365 is our member of the week, and has been a fantastic contributor especially in the Microsoft Teams community.
View the Weekly Roundup for July 27-31 in Sway and attached PDF document.
by Scott Muniz | Jul 31, 2020 | Alerts, Microsoft, Technology, Uncategorized
This article is contributed. See the original author and article here.
The release of 20.07 brought along a range of security enhancements and changes to Azure Sphere. As head of the Operating System Platform (OSP) Security team, I want to provide more insights into the efforts to keep Azure Sphere secure as a platform while being as transparent as possible about all the improvements made since our 20.04 release.
The OSP Security team I run for Azure Sphere worked with a diverse group of people and companies to have three separate red team events happen on the platform over the last few months; an internal Microsoft team, Trail of Bits, and the currently active Azure Sphere Security Research Challenge (ASSRC). These efforts are on top of the continued work done by the OSP team over the last three months to harden and further the security of the platform.
Trail of Bits performed a private red team exercise on the system and identified a number of risks that have been fixed for 20.07:
- The /proc file system on Linux is mounted rw giving the ability to write to /proc/self/mem allowing unsigned code execution, /proc/self/mem is now read-only
- The internal GetRandom() function failed to properly fill in buffers that have a length that is not a multiple of 4, all current usage is a multiple of 4 so no risk and code was changed to avoid future impacts
- The Sysctl Linux kernel configuration flags can be hardened, following values enabled
- kernel.kptr_restrict = 1 – limit Linux kernel pointer leakage
- kernel.dmesg_restrict = 1 – prevent access to dmesg to unprivleged processes
- fs.protected_hardlinks = 1 – users cannot create hardlinks unless they own the source file
- fs.protected_symlinks = 1 – symlinks are only followed when not in a world-writable directory, the owner of the symlink and follower match, or the directory owner and fsymlink owner match
- fs.protected_fifos = 2 – limit FIFO creation options when dealing with world writable directories
- fs.protected_regular = 2 – limit regular file creation options when dealing with world writable directories
- The internal security library for setting process information used to return success even if failed to set a process’ capabilities
- DNS name expansion leaked stack memory
- Null pointer dereferences in DMA memory for mtk3620 in the Linux kernel
- Better filtering of the content-type for GatewayD to limit cross-site scripting abuse
Although the ASSRC is still on-going it has provided a range of great findings by the participants, some of which overlapped ToB’s findings like a writable /proc/self/mem. The Linux kernel related issues identified by ToB were not fixed in 20.05 or 20.06 due to the massive Linux kernel uprgade from 4.9 to 5.4, this oversight will be handled better in the future.
Cisco Talos reported the first 2 findings that are fixed in 20.07, ptrace used to bypass the unsigned code execution protections and the Linux kernel message ring buffer being user accessible allowing for information leakage. Along with reporting the first two findings, Cisco Talos also reported the /proc/self/mem finding and found a double free in the azspio Linux kernel driver that have been fixed. Cisco has a blog post up detailing their efforts so far for the ASSRC.
As an excellent example of findings from the ASSRC effort, I would like to describe a specific attack chain that McAfee Advanced Threat Research found for the device that has been fixed for 20.07. This attack chain did require physical access to a device and could not be done remotely due to the steps involved.
- We have multiple environments that devices can be part of, two of them are pre-production and production. McAfee ATR was able to claim a device to both preproduction and production across separate tenants. Due to an oversight in signature handling for device capability images on the cloud, an attacker that claimed a device they did not own to pre-production was allowed to request a capability image for the device that was production signed. This allowed obtaining a capability image for a device and gaining access to a locked down device, this was corrected immediately.
- With the ability to get a capability image for a device, McAfee ATR could unlock a locked down device and also obtain the development capability allowing them to upload their own package to the device. An application package is a signed ASXIPFS image, our file system that is a variation of CramFS with the ability to execute from flash. The original file system code allowed for special inode filesystem entries which McAfee ATR used to create a special inode pointing to the MTD flash giving them read-only access to the on-device flash. 20.07 removes the ability to create any special inodes in the ASXIPFS image.
- Although the user controlled special inode pointing to flash is read-only due to how the file system image is mounted, McAfee ATR found a 0-day in the Linux kernel for the MTD_WRITE ioctl. The ioctl function failed to check permissions before executing the ioctl call allowing flipping bits in flash from 1 to 0 allowing McAfee ATR to use this vulnerability to rewrite the uid_map file for the device. This is patched on our Linux kernel for 20.07 and publicly fixed with https://lkml.org/lkml/2020/7/16/430.
- With the ability to modify flash, McAfee ATR rewrote the uid_map file that maps user IDs to applications to have an application with a maximum user ID where all bits in the user ID are set. The maximum ID resulted in the setresuid and setresgid function calls being passed -1. A -1 value to these functions is a special flag to indicate that the user id and group id should not be modified resulting in an application being ran as the sys user. The uid map parsing code no longer allows for a maxium user ID where all bits are set.
- Under normal operation, a system package can not be uninstalled, however an application running as sys is allowed to modify and change symlinks in various directories resulting in the ability to abuse symlink confusion on packages and force the azcore package to be uninstalled when the uninstaller thinks it is uninstalling another application. From there a user package can be installed in it’s place. Symlinks are no longer allowed in user application packages as of 20.07.
- The user application that replaces azcore does have the proper uid and gid set when executed however because the Linux kernel executes it the capability bits were never cleared out. The user replaced azcore is then able to call setuid(0) and become root on the device. This will be fixed in 20.08.
McAfee ATR did a fantastic job putting together this attack chain and finding a 0-day in the core Linux kernel itself to make it work. The attack chain exposed a weakness in the cloud and multiple weakenesses on the device including a previously unknown Linux kernel vulnerability.
While the above changes were done as a result of external red team findings, the Operating System Platform team continued improving the security of Azure Sphere.
One effort we’ve been working on is minimizing the ability to use ptrace unless in development mode. PTrace is needed by gdb to properly provide debug information however normal customer applications do not have a need for it. Having ptrace be available to customer applications allows an attacker to ptrace the process being attacked and inject unsigned code into memory for execution. 20.07 brings along a Linux kernel change where ptrace is no longer possible unless in development which also brings along a few extra enhancements as a side effect, the largest being that /proc no longer shows any other process pid and is further restricted of what a process can know about itself.
Another security enhancement is moving to wolfSSL 4.4.0 bringing along additional side channel attack hardening. Along with the wolfSSL upgrade is work to begin exposing access to supported wolfSSL functionality, the first set of functions allowing customers to directly call wolfSSL for establishing TLS client connections.
We have added more fuzzing across 5 different components and additional static code analysis tools including extra static analysis tools on every pull request into our repositories. If the static analysis fails then the PR can not be completed, this further strengthens the system by making it more difficult to check in easy to abuse coding flaws. As we expand to add features and functionality more fuzzers are built for parts of the system being updated. The addition of the new static analysis tool detected an off by one calculation in DHCP message handling that allowed reading an extra byte of data past the end of the buffer, this was corrected in 20.07.
You may have noticed that our last couple quality releases did not have a Linux kernel patch bump, this time was used to allow the Linux kernel team to upgrade the Linux kernel from 4.9 to 5.4.44. By doing so we capture Linux kernel security enhancements done between the versions along with keeping up-to-date on the latest changes.
String manipulation functions are a very common way for leaking the stack cookie along with being able to write it when string buffers are not properly null terminated. GLibC helps limit string buffer attacks by forcing the first byte of the stack cookie in memory to be 0 however we use musl on the device for libc. Musl initializes all bytes in the stack cookie instead of leaving the first byte in memory 0 allowing for the potential of stack cookie leaks and abuses. Our version of musl in 20.07 sets the first byte to 0 and the patch was provided to the maintainer incase they wish to add this security measure to musl.
On top of our own changes, MediaTek provided a new version of the firmware for their WiFi subsystem of their MT3620 that is now being used on the platform to deal with a range of issues.
As you can see, a wide range of security improvements have been made to the platform as we continue to strive to be the best in the field. We will continue to be transparent about our efforts and are devoted to being the most secure platform for IoT.
Jewell Seay
Azure Sphere OSP Security Team Lead
by Scott Muniz | Jul 31, 2020 | Uncategorized
This article is contributed. See the original author and article here.
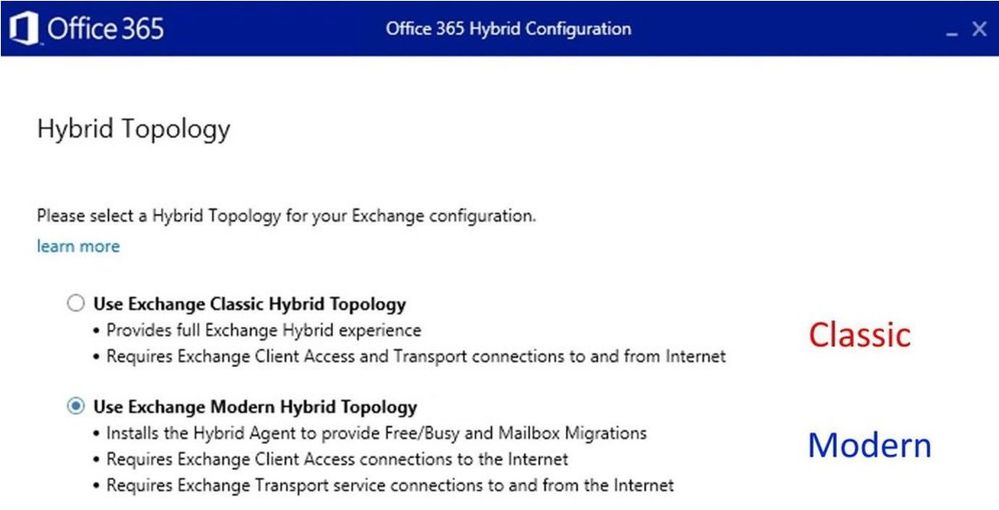
Most of you are probably familiar with Classic Hybrid Deployments that are automatically configured through classic option in the Hybrid Configuration Wizard (HCW). In this blog post we will focus on Modern Hybrid Configuration (aka Modern Hybrid Agent) and specifically, Agent troubleshooting.
The 2 mentioned flavors of hybrid deployments are:
 A comparison of the hybrid functionalities configured with these two options can be found in Hybrid Configuration Wizard options article.
Before getting more specific on how to troubleshoot the Modern HCW option, let me give you some information and troubleshooting hints for HCW application in general.
Run the latest version of the HCW
Always make sure you are running the latest HCW version by downloading it from https://aka.ms/hybridwizard or opening it from the Exchange Admin Center. Why run the latest version? Because many things get fixed in newer builds.
The version of the app can be found in multiple places such as in the HCW Graphical User Interface (GUI) in the top right corner in control panel, under Programs and Features, and in HCW log. Currently, the HCW build numbers are 17.x and if you have the build 16.x, the application will not auto-update to 17.x. Ideally, if you need to re-run HCW you should update to latest 17.x build first. Both versions can coexist on the same machine (not really recommended because you might be confused as to which is which), more info here:
 Hybrid Prerequisites and HCW FAQ
Many issues can be prevented if we read thoroughly the prerequisites of HCW modes and frequently asked questions. Here are they:
Admin accounts running HCW
There are 2 types of Admin accounts needed to run HCW:
 On-premises Exchange Account
This account needs to be member of Organization Management. If you change the account and insert credentials, these credentials will be automatically used for Test-MigrationServerAvailability in case HCW will need to create a Hybrid Migration Endpoint.
For Modern HCW, you would see the Migration Admin here:
 If you get an “invalid username or password” error in this step of the HCW, check if you have the required permissions for a Remote Mailbox Migration and that credentials are correct (use domainaccount format).
Office 365 Exchange Online Account.
This needs to be either a Global Admin (Exchange Admin included) or simply an Exchange Admin in O365.
Know that you can select 2 types of login to your O365 tenant: Modern Authentication and Basic Authentication (Legacy Login). Note that Basic authentication is being deprecated, but sometimes it’s useful to test it when you have login issues. That option can be found under “Legacy Login”:
 HCW F12 Diagnostic tools
Pressing F12 when in HCW will give you an additional Diagnostic Tools section in HCW UI:
 This is awesome and very useful when troubleshooting. Let’s mention each of them:
Open Exchange Management Shell
This shortcut opens a PowerShell window and connects to your on-premises Exchange environment.
If, for example, you get HCW failing to run a command in on-premises shell, you can quickly copy the failing command from the HCW log, open this shell and then paste the same command to see if the problem is in the on-premises environment / shell or it’s an issue with HCW itself (very rarely the case).
Another example is if you have issues with connecting to on-premises PowerShell in HCW GUI, you can quickly use this and see if the error is the same.
Open Exchange Online PowerShell
This shortcut opens a PowerShell window and connects to your Exchange Online environment.
 You would open this up when you see a command failing in Exchange Online PowerShell and use it to run the failing command to see if you get the same outcome.
You would also use it when you get the following error in HCW GUI:
 In HCW log, you would look for the entry Activity=Tenant Connection Validation for more details on the issue. This entry below suggests that I don’t use a proxy on the machine running HCW to connect to Office 365 Exchange Online PowerShell:
2020.05.29 20:37:37.469 10179 [Client=UX, HTTP GET=https://outlook.office365.com/, Thread=7] Request for https://outlook.office365.com/ does NOT go thru proxy
Open Log File
This opens the current HCW log file. In Notepad, I normally don’t use word wrap when I first open it so that I can have a quick and clear table format view.
This is the main HCW log, date_time.log, where we get information about what HCW version we are using, machine from where we ran HCW, OS and .NET version, on-premises organization current configuration etc.:
- mailbox databases
- accepted domains
- remote domains
- if a hybrid configuration is already in place
- if federation trust is in place – in case HCW needs to create it
- send and receive connectors,
- virtual directories, etc
We can also see EXO organization current configuration:
- EXO organization config itself
- migration endpoints
- EOP connectors
- accepted domains
- remote domains
- if there is an on-premises organization object, etc.
Create Support Package
This is very useful for us (people in support). This will make a zip of your HCW log files so that you can send it to Microsoft Support. There is a second screen once you click on the link, where you can specify to ZIP logs from the last 24 hours, or within a date range. You then have the option to copy the file to the clipboard so it can be easily attached to an email.
Open Logging Folder
This shortcut opens the folder where HCW logs are located on the machine where you ran HCW. C:Users<admin>AppDataRoamingMicrosoftExchange Hybrid Configuration
 Notable files in this folder:
Date_time.log file was mentioned above during Open Log File.
Date_time .xhcw
The second important log is the .xhcw log. This is an XML log which lists all the cmdlets done by HCW (like Get-*, Set-*, Update-*,Remove-*,New-*) in both EXO and Exchange OnPrem PowerShell sessions.
You would open this file in Notepad, add a starting xml tag like <root> at the beginning and then at the end add </root> as the ending tag and then save the xhcw log as .xml. Then, you can open it in the browser and check /expand the cmdlets. Example:

Date_time.boot log is the log showing the startup of HCW:

The .cc log is a small log with extra info regarding your Hybrid Configuration:

Date_time.hybridconnector.log
This is the setup log for Hybrid Connector (when you install the Hybrid Agent). This log is therefore not present in Classic Hybrid Configs.
 Open Process Folder
This link opens a Command Prompt with directory set to the HCW process. This can be helpful when we get HCW crashes or some generic errors like “Object reference not set to an instance of an object” and we can combine it with ProcDump tracing of the process. See here for more info on ProcDump download and syntax, we would normally use a quick command like shown below to get the stack exception but if you have to get here with troubleshooting, we advise you open a support case with us:
procdump.exe -e 1 -f “” Microsoft.Online.CSE.Hybrid.App.exe
Hybrid Agent in Modern HCW
You can learn more about Hybrid Agent architecture here.
This feature will install an agent, built on the same technology as Azure Application Proxy, which will publish the Exchange on-premises environment to Exchange Online to support free/busy and mailbox migrations without many of the challenges customers previously faced with external DNS, publishing of EWS and inbound connections ports having to be opened. The secret sauce here is that the Hybrid Agent registers a custom URL for only your tenant in the following format:
<guid>.resource.mailboxmigration.his.msappproxy.net
This URL is then used by the Organization Relationship or the Intra Organization Connector and the Mailbox Replication Service to route requests from your tenant to on-premises. This URL is only accessible from Exchange Online. Free/busy requests from cloud users to on-premises and mailbox migrations to/from the cloud are the two flows currently supported through the Hybrid Agent.
Where exactly in the hybrid configuration can we see this URL ending in “his.msapproxy.net”? Here are some of the cmdlets that will show you were the URL is used:
- Get-MigrationEndpoint (RemoteServer value)
- Get-IntraOrganizationConnector (TargetSharingEpr value)
- Get-OrganizationRelationship (TargetSharingEpr value)
Determine the Hybrid Agent route
Simply put, the Hybrid Agent is the middle man between the Exchange Online servers and the on-premises Exchange Server(s) and you can think of it as an Inbound Connector for HTTPS traffic from EXO to on-premises Exchange. The Hybrid Agent accepts traffic only from Exchange Online Servers.
A simple schema of the inbound route to Exchange on-premises Modern Hybrid would be the following:
EXO > Hybrid Agent (External URL) > Load Balancer or Exchange On Prem Server (Internal URL).
You can check the Connector route with the Get-HybridApplication cmdlet available with the Hybrid Management PowerShell Module:

From this screenshot, we can tell that the external URI is https://<GUID>.resource.mailboxmigration.his.msappproxy.net (externalUrl parameter) and that connections to this published namespace will be relayed to your Exchange Server or Load Balancer: https://internalFQDN/ (my lab machine in this example being mirebm340vm.domain.lab which is internalUrl)
The external URI should be resolvable in public DNS, You can use nslookup and resolve-dnsname to check if the Hybrid Agent is correctly published for my Office 365 tenant.
You can also check the Hybrid Connector Route in HCW log (ConnectorRoute value) and by looking at the output of the following Graph query: https://graph.microsoft.com/edu/$metadata#applications
ConnectorRoute in HCW log showing externalUrl and internalUrl

Graph Query in HCW log which shows the Hybrid Application:
 If there is no application returned in Get-HybridApplication, re-run the HCW with Modern Hybrid Topology option. It will restore the application.
If an application is returned, but the Exchange CAS server machine pointed to is not available, Update-HybridApplication allows you to reset the target URI to another CAS server or load balancer (supported only for Exchange 2013 MRSproxy servers and above). See more on this step here.
Setting up the Hybrid Agent in Modern HCW
There are 4 phases when setting up the Hybrid Agent via HCW:
- Download the agent install package.
- Installation of the agent on the local computer (this prompts for your Office 365 Global Administrator credentials again).
- Registration of the agent in Azure, including creation of the URL used to proxy requests. The URL has the format we already discussed: <uniqueGUID>.resource.mailboxmigration.his.msappproxy.net.
- Testing migration viability from your Office 365 tenant to your on-premises Exchange organization via the agent.
Starting with HCW version 17.x, we also have a Hybrid Updater Agent step which will be visible in HCW UI:
 Determine if the Hybrid Agent is installed and running
The Hybrid Agent may be running on a Client Access Server (CAS), or it may be running in the DMZ, but it must be running somewhere. The first step is to go to that machine and check the status of the service (Microsoft Hybrid Service should be started) and if the Hybrid Connector is up and running.
There are a few methods of checking if the Hybrid Agent is Active (registered and running) or Inactive (not registered or not running):
- By running HCW and choosing Modern Hybrid Topology, reference here
- Using the Get-Hybrid Agent cmdlet, available in the Hybrid Management PowerShell Module, reference here
Get-HybridAgent -Credential (get-credential <O365Admin>)
 Note that this cmdlet will return all Azure Proxy Connectors (including Pass-thru Authentication ones), not just Exchange Hybrid Agents, whereas HCW GUI mentioned first shows only Exchange ones.
If a connector for Exchange Online doesn’t show at all or it shows but status is inactive, this means that it’s either not running or not registered.
- When narrowing down registration issues, always check the installation prerequisites as mentioned here and run Test-HybridConnectivity.
- Check if the Hybrid Service is installed and running, reference here. You would install the agent automatically via HCW when choosing Modern Hybrid Topology or – less commonly – manually (in case of installing additional Agents).
The Agent would be uninstalled if, for example, you switched from Modern to Classic Hybrid Topology or manually uninstalled the Microsoft Hybrid Service in Programs and Features.
If you didn’t uninstall the Microsoft Hybrid Service and the service is started and running, then you would need to check the Hybrid Service logs.
If the service doesn’t start, look at the service startup logs. To enable the logging, you would have to navigate to Hybrid Service installation path, for example C:Program FilesMicrosoft Hybrid Service. In this folder, there is a config file of the Hybrid Service called Microsoft.Online.EME.Hybrid.Agent.Service.exe.config. You would run the Notepad as Administrator and then open this config file to edit it. Remove the <!— and –> characters (uncomment the XML comments) from the config file and save it.
The file should look like this after removing the XML comments and turning on logging:
 Restart the Microsoft Hybrid Services in services.msc. Follow the procedure from here to attempt a connection to the connector. Navigate to these 2 folders and check the HybridService logs:
- C:programdataMicrosoft Hybrid ServiceLogging will have logs related to connector registration and startup.
- C:programdataMicrosoftMicrosoft Hybrid ServiceTrace will have logs regarding application requests.
Validating the Hybrid Agent
Once we established that the Hybrid Agent is installed, registered and running, it is time to validate its functionality.
You can use the following steps to validate free/busy and mailbox migration flow via the Agent: Testing and validation of the Hybrid Agent.
If the requests counter goes up when doing Test-MigrationServerAvailaility, the connector is fine.
Next thing is to check if the request from Hybrid Agent Machine reaches Exchange CAS. There are 3 main logs for EWS (MRSproxy.svc) requests:
- HTTPerr logs: %SystemRoot%System32LogFilesHTTPERR
- IIS logs for Default Web Site (DWS): %SystemDrive%inetpublogsLogFilesW3SVC1 – UTC Timezone. The name of the IIS logs contains the date of the log, for example u_ex190930.log is from Sept 30, 2019.
- HTTPProxy logs for EWS (available in Exchange 2013 or later): %ExchangeInstallPath%LoggingHttpProxyEws. The name of the HTTPProxy logs contains the date and hour starting to log, for example HttpProxy_2019093014-10.LOG (10th log from Sept 30, 2019, starting hour 14:00 UTC)
Here are some tips on how to use these logs:
- Always correlate the time HH:MM:SS of the failed request with these logs (IIS and HTTPProxy are in UTC time zone)
- A failed request will never have 200 Status code (if you see status code 200 in logs, it means you are not looking at the failed request)
- If you see the failed request in HTTPerr logs, they probably won’t be present in IIS logs or HTTPProxy logs – they are stuck ‘in front of’ IIS. Check for the reason in HTTPerr logs and check for IIS misconfiguration
- If you see the failed requests in IIS logs , then you can do IIS failed request tracing on that status code and check further the detailed error in HTTPProxy logs
When doing Test-MigrationServerAvailability you would see about 5 entries in IIS logs for mrsproxy.svc, 2 with 401 status and additional ones with 200 OK status. In case of an error in Test-MigrationServerAvailability, let’s say 500, you would need to see if the entry with 500 is there is IIS logs.
500 error in IIS log:
2020-02-20 06:57:42 192.168.2.50 POST /EWS/mrsproxy.svc – 443 miryadministrator 4.43.0.1 – 500 0 0 125
If you see it (example above), then investigate the HTTPProxy logs (if Exchange 2013 or higher) and Failed Request Traces in IIS to get more info on the error. For the above example, you can narrow down the statuses between 500-599 as an example for this situation.
For most common errors at Validate Hybrid Agent phase (Test-MigrationServerAvailability in Modern Hybrid) and their fixes, see my other blog post.
Hope you find this helpful! I realize this is not really a post that you sit down and read from end to end, but it should come in handy when troubleshooting!
Mirela Buruiana
by Scott Muniz | Jul 31, 2020 | Uncategorized
This article is contributed. See the original author and article here.
New management features and capability improvements for Microsoft Teams rolled out in July.
Device management enhancements in the Teams Admin Center to manage your Teams devices in one location
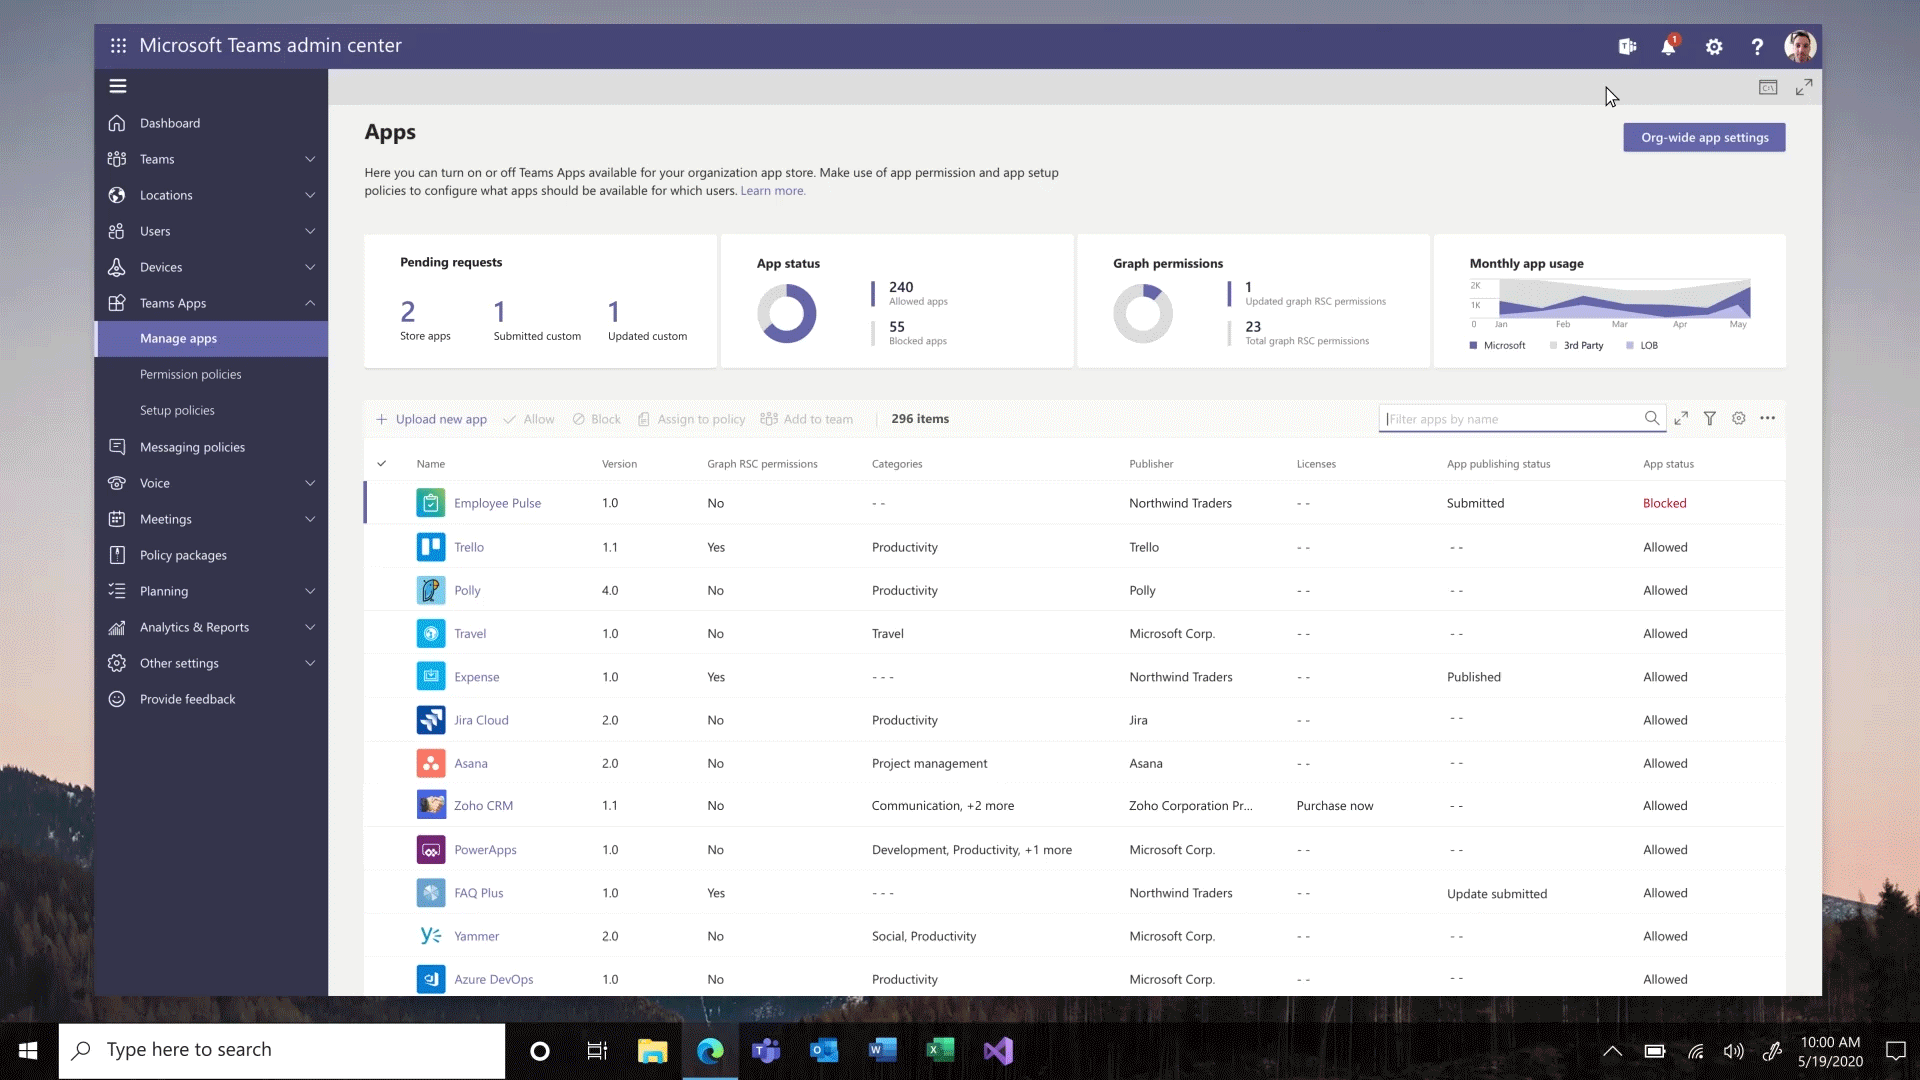
This month we introduced new capabilities for device management in the Teams Admin center, enabling customers to manage their Teams devices from one location, now including Microsoft Teams Rooms. Advancements include simplified devices setup, new granular device management capabilities, improvements across bulk management tasks with better tagging, troubleshooting and health monitoring of devices, as well as the ability to delegate these responsibilities to external partners. Find out more details in the Device management new capabilities blog.
App configuration in Team Admin center
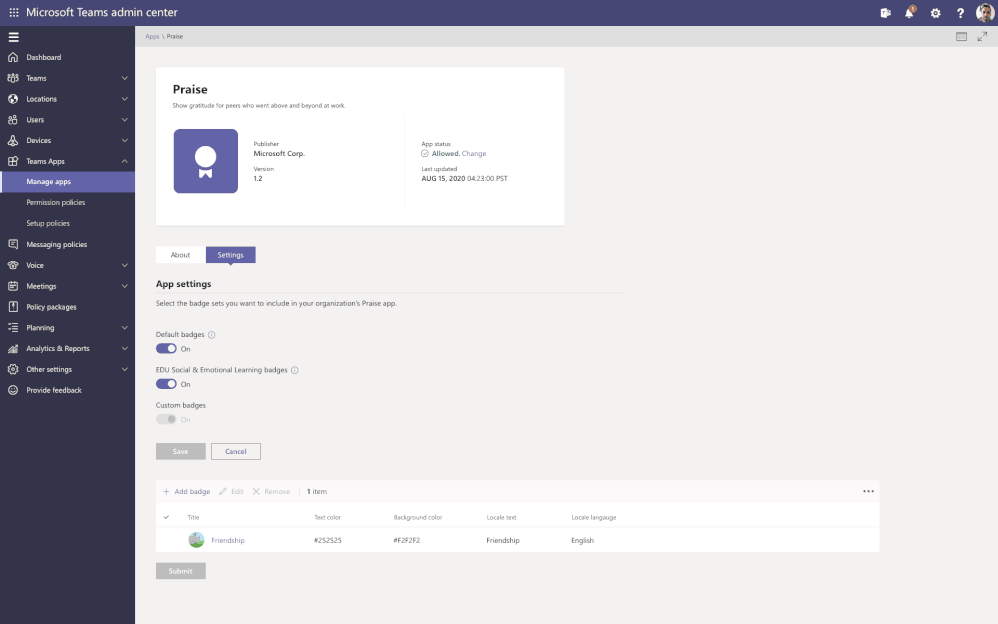
App configuration is now available in Teams Admin Center for Teams and Microsoft apps. This new manageability experience enables you to configure App specific settings that will streamline your management tasks and enable simple customization of apps to the organization needs.
For example, the Praise app (an app that allows users to call out the great work of a teammate or co-worker) in Microsoft Teams, now allows for customization of badges that reflect your company’s values and culture, all while leveraging tools you are already familiar with.

Advisor for Teams is now in GA (General Availability)
Advisor for Teams is a new onboarding tool to help you plan the best possible Teams deployment in your organization. Advisor offers a customized recommend plan for you to streamline the roll out of all the Teams workloads, including messaging, meetings, calling as well as Skype for Business upgrade workloads.
We have learned that organizations who use this tool increase their deployment velocity by 300%.

Enhancements for Teams life cycle:
Support for sensitivity labels – To ensure secure collaboration in a scalable way with Microsoft Information Protection Sensitivity Labels now can be applied to teams created within the Teams Admin Center, allowing for the consistent application of policies across your M365 environment.
In addition, you can now associate a sensitivity label with policies related to privacy, external user membership, as well as unmanaged device access.
The first step to securing sensitive content in teams, sites and groups is to create sensitivity labels with policies. For example, you can create a sensitivity label called “Confidential” and specify that any team, site, or group created with this label will be private. This means that a team or site owner cannot add users external to the organization and unmanaged devices will be allowed web access only.

Filtering in Teams summary table – To simplify your work, we are enhancing the tooling across all list tables within Team Admin Center. This means when filtering large data sets as the Teams, you will now find the information you need much more quickly. The Teams summary table is the place where you can view & manage all the Teams configured in the tenant. Currently available for filtering name & classification and will be extended to include more filtering fields in the future.
App Lifecycle Announcements
We are constantly looking for ways to streamline the process of developing, validating, publishing, and managing custom apps in Teams, including the increased automation for the app lifecycle process.
We are excited to announce the following new capabilities to ensure that users can more easily leverage the key business apps they use every day inside of Microsoft Teams.
Custom apps Submission to Approval – Building an app is just the beginning of the journey for app developers. Now developers and admins will enjoy a streamlined custom app submission process and enhanced app management capabilities – providing a connected experience through the development, publishing, and end user discovery process. You will now be able to submit Teams apps through any of these clients and trusted sources (e.g.: Visual Studio Code, Power Virtual Agents, Power Apps and more) via our App Submission Microsoft Graph API – streamlining the process of submitting apps directly to the Teams Admin Center for IT admins to review and approve.
Custom app publishing – You will be able to leverage a streamlined process to manage – review, approve and publish custom apps directly from the Teams Admin Center. These apps will be automatically available on the Teams Admin Center with no need to manually upload them. An admin can view the custom apps publishing status, manifest details, and update their status from ‘submitting’ to ‘publishing’ so that end users will be able to access those apps.
Install app to a team from Teams Admin Center – To create a customized, more productive environment for the users, you can now install an app for any team in your organization.

Application monetization and bringing the purchase to Team Admin Center – A new third-party subscription purchase experience will enable you to view and purchase subscriptions associated with the 3rd party Teams apps. You can view app licensing status and link to purchase the app all within the Teams Admin Center.
This new subscription purchase experience will enable you to view and purchase subscriptions associated with the third-party Teams apps. Now you purchase licenses right within the Teams Admin Center. Where you can see offers, plans and pricing information, it is also integrated with Microsoft AppSource to purchase licenses and with Microsoft 365 admin center to manage and renew licenses over time.

Policy Management Announcements
Enhancement on assign policies to your users in Microsoft Teams – package batch assignments are now GA
To help IT administrators assign policies, based on the organizational needs, we introduce the Bulk assignment of policies.
PowerShell module now supports:
- Policy assignment to O365 groups
- Batch assignment of policies (up to 5K users)
- Batch assignment of policy packages (up to 5K users)
A New Audio and Video Policy – Changes in Incoming IP video policy
To help you better manage bandwidth, we are updating meeting policies to allow you more control over using IP video in your Teams meetings. While the current capability can only prevent outgoing video, we are extending the policy to also allow you to prevent both outgoing and incoming video as needed. You can update the new policies in the meeting policies:

As we strive to build the best end user and administrator experiences, we continue to ask for your continued input on what is important to you and your users.
Have an idea for a feature or functionality missing from Teams? Please be sure to add or upvote it on the Teams UserVoice page.
We look forward to hearing from you!
by Scott Muniz | Jul 31, 2020 | Uncategorized
This article is contributed. See the original author and article here.
We announced a new set of features earlier this month that make virtual interactions in Microsoft Teams more engaging and inclusive, along with new capabilities announced at Microsoft Inspire 2020. Take a look at our new meetings, calling, devices, chat and collaboration, IT admin, and industry features this month!
What’s New: Meetings & Calling & Devices
We are continuing to transform the meetings experience in Teams to include new features, settings, and devices to create a better experience.
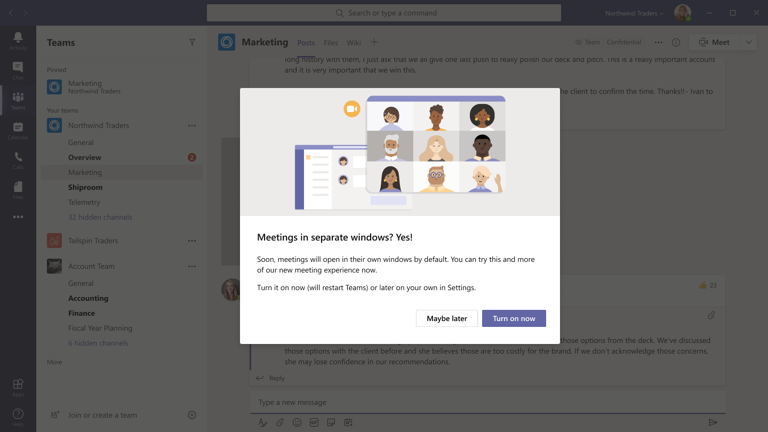
New multi-window meeting and calling experiences
We are pleased to share that the rollout of our new multi-window meeting and calling experiences has started. This new experience is the foundation for not only pop-out meetings and calling, but for Together mode and Large gallery views. You can find additional information on how to enable here.

New lobby setting in Teams Meeting Options: “only me”
A new lobby setting is coming to Teams Meeting Options that gives you greater control over who can enter your meeting. We are adding “Only me” as an option to the “Who can bypass lobby?” setting. Once enabled, only the organizer will be able to join the meeting directly. Everyone else, including people from within the same organization, will be sent to the lobby.

Microsoft Teams Rooms, app version 4.5.35.0 now available
The latest Microsoft Teams Rooms app, version 4.5.35.0, is now available through the Windows Store. Some of the most anticipated features enabled through this update include:
- Support for video gallery-only layouts: For meeting room configurations with a single front of room display, you can now switch between viewing the video gallery or presented content. By tapping the layout icon on the Teams Room console, you can select different views based on their needs. Options include video gallery-only, content-only, or combined video and content.
- Raise hand: During a meeting, you can raise a virtual hand from the center of room console to let people know you want to contribute without interrupting the conversation. Additionally, when someone raises their hand, a notification will appear on the center of room console and in the video gallery view.
- Default speaker volume settings: From within the Teams Rooms settings, device administrators can now set a default volume level for in-room conferencing and system speakers.
- Direct guest join for Cisco Webex meetings and devices: Now Teams Rooms and Cisco Webex meeting room devices can connect to each other’s meeting services via embedded web technologies. More details are included below.
- Auto-enrollment and device management from Teams Admin Center: Microsoft Teams Rooms have been added to the list of devices that can be managed through the Teams Admin Center.
The full list of updates included in app version 4.5.35.0, is available in the release notes.

Direct Guest Join
Many people work with organizations outside of their own and need to be able to join occasional meetings from other meeting providers. We want you to be able to join these meetings from your Microsoft Teams Rooms devices. At Ignite 2019, we announced a direct guest join capability that would enable meeting room devices to connect to meeting services from other vendors via embedded web technologies. We are excited to announce Direct Guest Join has reached general availability and is available through the latest Microsoft Teams Room app, version 4.5.35.0.
Through an embedded web experience, you can now use your Teams Rooms devices to join a Cisco Webex meeting. Leveraging this experience, you can use the Teams Room console to interact with the Cisco Webex app and control in-room audio and video devices. Similarly, the Microsoft Teams web experience is also available on web-enabled Cisco Webex devices allowing you to join a Microsoft Teams meeting from a Cisco Webex Room device. While no web experience can offer the same robust feature set as a native Teams meeting experience on a native Teams device, this will reduce the friction you experience when trying to join calls from external partners or clients who may not be using the same meeting service. The direct guest join feature will also be enabled for Zoom Meetings in Microsoft Teams Rooms and Teams Meetings in Zoom Rooms, and is currently in preview. Learn how to enable this feature here.

For those who have chosen Microsoft Teams as their communication and collaboration service but are not yet using native Teams devices, there are Cloud Video Interop (CVI) solutions available. While these solutions do not provide users with the full Microsoft Teams Room experience, it allows you to join Teams meetings from your existing devices as you make the transition to native Teams Room devices. CVI offers are currently available from Bluejeans, Pexip and Poly. At Ignite 2019, we announced Cisco would be joining as our fourth partner, and beginning today, their offer is in preview.
Manage Microsoft Teams Rooms and other Teams devices using enhanced device management capabilities in Teams Admin Center
New device management capabilities in the Teams Admin Center make it easier to deploy and manage a fleet of devices, with improvements across device set-up, bulk management tasks, and health monitoring. And now you can manage your Microsoft Teams Room devices in the same place as your collaboration bars and IP phones. Some of the enhancements include the ability to enable auto-updates, new device tagging capabilities, the ability to securely delegate device management access to partners, and more! To learn about all the new capabilities read our blog.

New Options to Enable and Manage Microsoft Teams Rooms devices
We’re delivering more ways to enable great room experiences with Teams devices: Microsoft Teams Rooms Standard and Microsoft Teams Rooms Premium.
Microsoft Teams Rooms Standard
The Microsoft Teams Rooms Standard offering, formerly known as the Meeting Room SKU, enables inclusive and collaborative meeting room experiences across Teams Rooms, collaboration bars and Surface Hub. Microsoft Teams Rooms Standard provides the necessary licenses for Microsoft Teams, Skype for Business Online, and Intune management. Furthermore, the offering enables Phone System, necessary for PSTN integration, and Audio Conferencing, where available. As part of this offering, customers have access to the newly enhanced device management experience through Teams Admin Center allowing them to manage devices themselves or delegate access to a partner who can manage devices on their behalf.
Microsoft Teams Rooms Premium
Microsoft Teams Rooms Premium includes all the licenses that come with Microsoft Teams Rooms Standard while providing additional value through a cloud-based remote management service. This service enables customers to shift the operational responsibility of managing and monitoring Teams Rooms devices to Microsoft. Microsoft Teams Rooms Premium provides 24/7 management and monitoring of room operating systems and software, surfacing insights and alerts, and taking remote action on behalf of the customer as permitted. Today’s offering is just the beginning, and we look forward to expanding with additional premium experiences in the future.
For more information about the Microsoft Teams Rooms Standard and Premium offering, read our blog.
What’s New: Chat & Collaboration
We have added new chat and collaboration capabilities to keep everyone connected. Check out the new capabilities below.
Contextual Search
Find information faster with contextual search in Microsoft Teams. You will have the ability to search for content in a specific channel or chat by pressing CTRL + F. Search results will only contain messages and files found in the selected chat or channel. This feature is generally available.

New file sharing experience
We’re rolling out a new, consistent file sharing and access control experience in Teams users already know from other Microsoft 365 apps, including OneDrive, Outlook, and Office. Soon, when you go to share a file from within Teams, you’ll have the option to create sharing links that provide access to anyone, people within your organization, people with existing access, or specific people, including those in a private or group chat. Learn more here.

Stay connected to your Yammer Communities while in the Microsoft Teams mobile apps
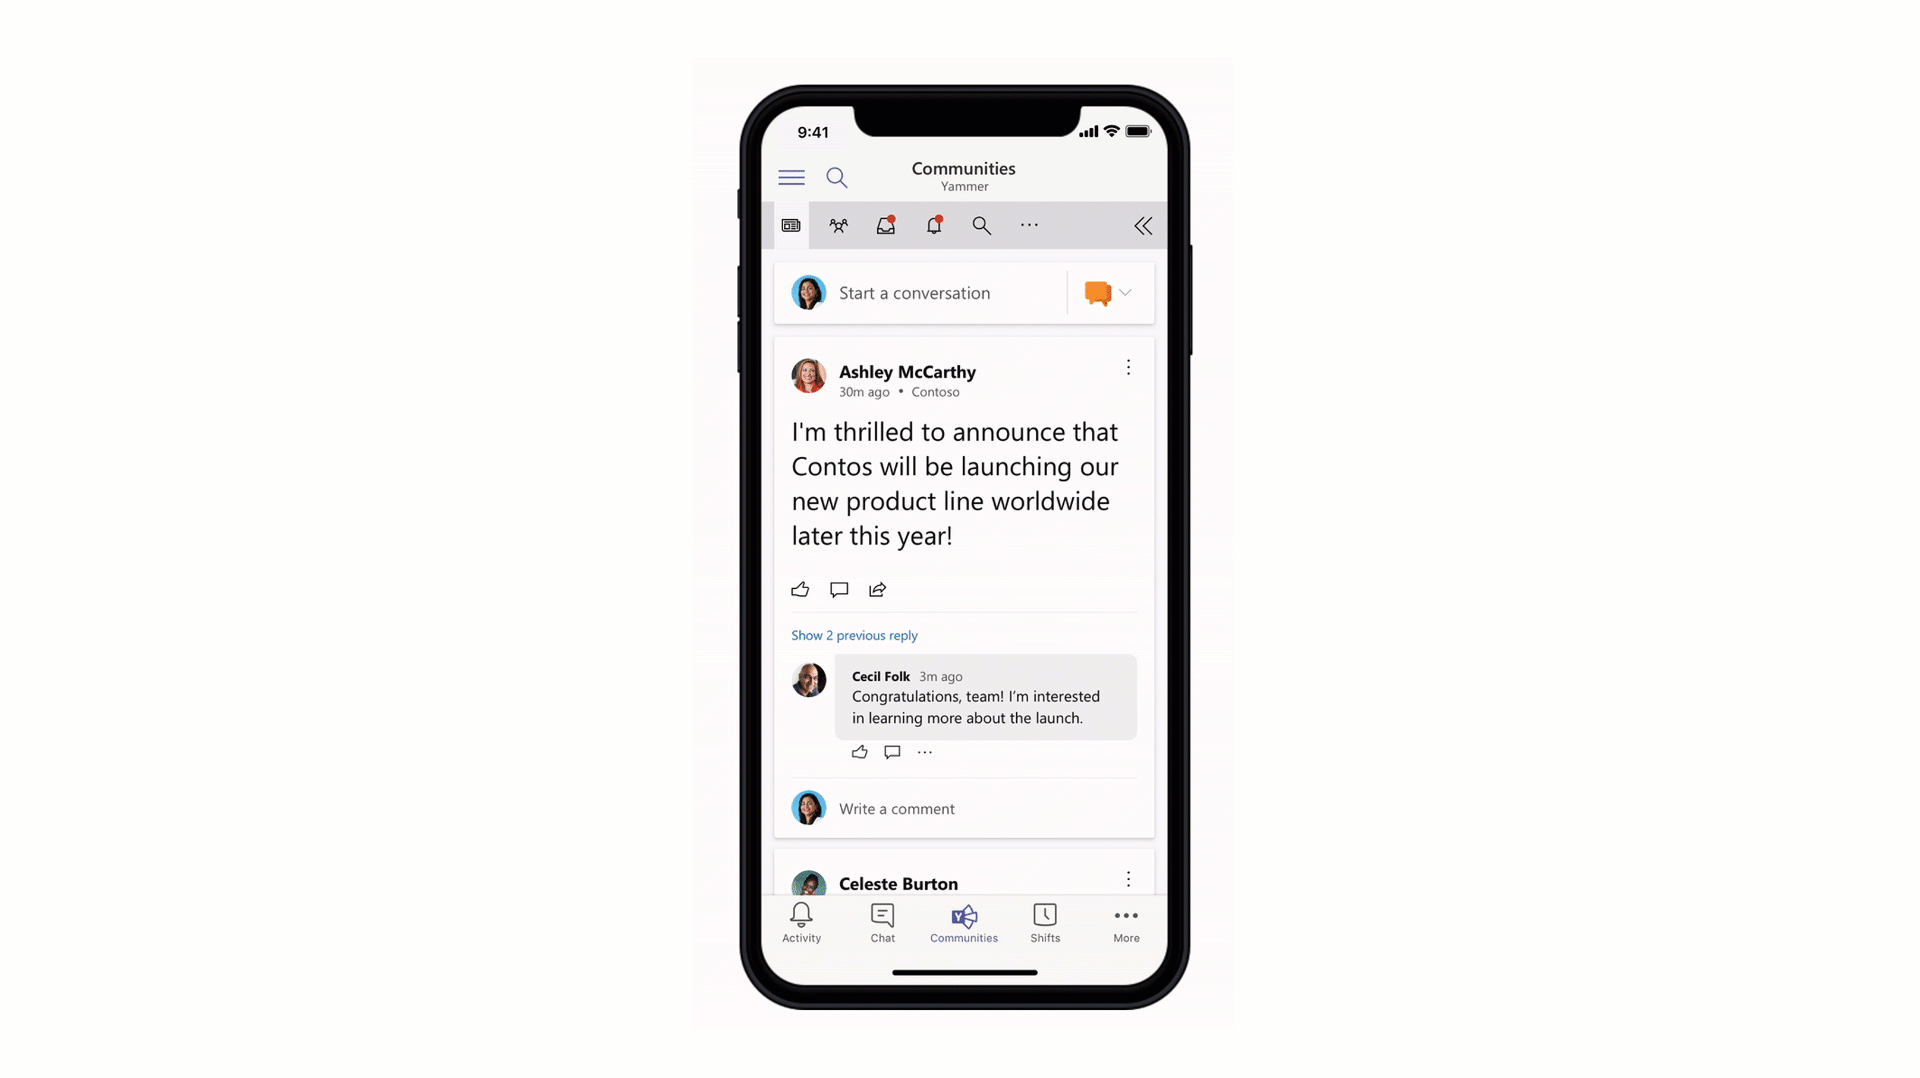
Engage your employees with company-wide announcements and live events that they can access anywhere. Stay connected to what’s happening in your communities, share knowledge across teams and departments, and crowdsource solutions and best practices at the edges of the organization. Starting 7/21, users with the Communities app installed in the Teams web or desktop clients will also see the Communities app in mobile. Admins pinning the app for their users will now also see the app appear in mobile. For info on how to install the Communities app, go here.
Channel info pane
Selecting the “Channel information” icon in the channel header will display summary information related to that channel including the description, a list of recent contributors and members, as well as system messages. Learn more here.
Filtering out system messages from the General channel
We are removing system messages from the General channel. Information about who is a member of the team can be found in the Member List or in the information pane of the channel.
What’s New: IT Admin
We continue to enhance our management capabilities to address IT admins evolving needs and make work more efficient. In addition to the new device management capabilities in Teams admin Center, here is what is rolling out this month.
Enabling App configuration in Team Admin center
We are adding the capability to configure your applications from the same Teams Admin Center portal, without the need to jump between portals to the application store to perform the changes. This new manageability experience enables you to configure App specific settings that will streamline your management task and enable simple customization of apps to the organization needs. App configuration is now available in Teams Admin Center for Teams and Microsoft Apps.
Advisor for Teams
Advisor for Teams is a new onboarding tool coming to help you plan the best possible Teams deployment in your organization and is now generally available. It offers recommended plans and a collaboration space for the deployment team to streamline the roll out of all the Teams workloads, including messaging, meetings and calling and Skype for business upgrade workloads. We have learned that organizations who use this tool might be able to increase their deployment velocity by up to 300%.
Read more about our New capabilities for Teams Management | July 2020 to get more details on all of the new management features.
Microsoft Information Protection sensitivity labels in Teams
We are excited to announce the general availability of sensitivity labels for Teams, SharePoint sites, and Microsoft 365 Groups. You can now associate a sensitivity label with policies related to privacy, external user membership, and unmanaged device access. With users constantly creating and sharing sensitive data in Teams and on SharePoint sites, this capability allows for holistically securing sensitive content whether it is in a file or in a chat by managing access to these containers. Along with manual and auto-labeling of documents on SharePoint and Teams, sensitivity labels helps you scale your data protection program to meet the proliferation of data and the challenge of secure collaboration while working remotely.
Teams Communication Compliance
Back in February we announced the general availability of Communication Compliance – we are now announcing improvements, including improved remediation actions through Teams. In this release, you have the ability to remove Teams messages, Teams chat support for on-premises mailboxes, and the ability to automatically add all of user’s Teams memberships when creating policies. Read more about how to foster a culture of inclusion and safety with Microsoft Teams and Communication Compliance.
What’s New: Developer & Platform
We are announcing new features to the Teams platform to continue to provide a rich canvas for developers to build, engage, and transform workflows.
Create, manage, and deploy Power Platform apps and chatbots seamlessly – powered by Dataflex
We are excited to announce new capabilities that will make it even easier for customers to create, deploy and manage apps and chatbots directly within Microsoft Teams, at no additional cost for select Microsoft 365 and Office 365 users. With Microsoft Dataflex – a built in relational database for Teams – makers can build, deploy, and manage these apps using Power Apps and chatbots using Power Virtual Agents to simplify and digitize their everyday work. This powerful combination of tools expands on the promise of Teams being a hub for collaboration and business processes.

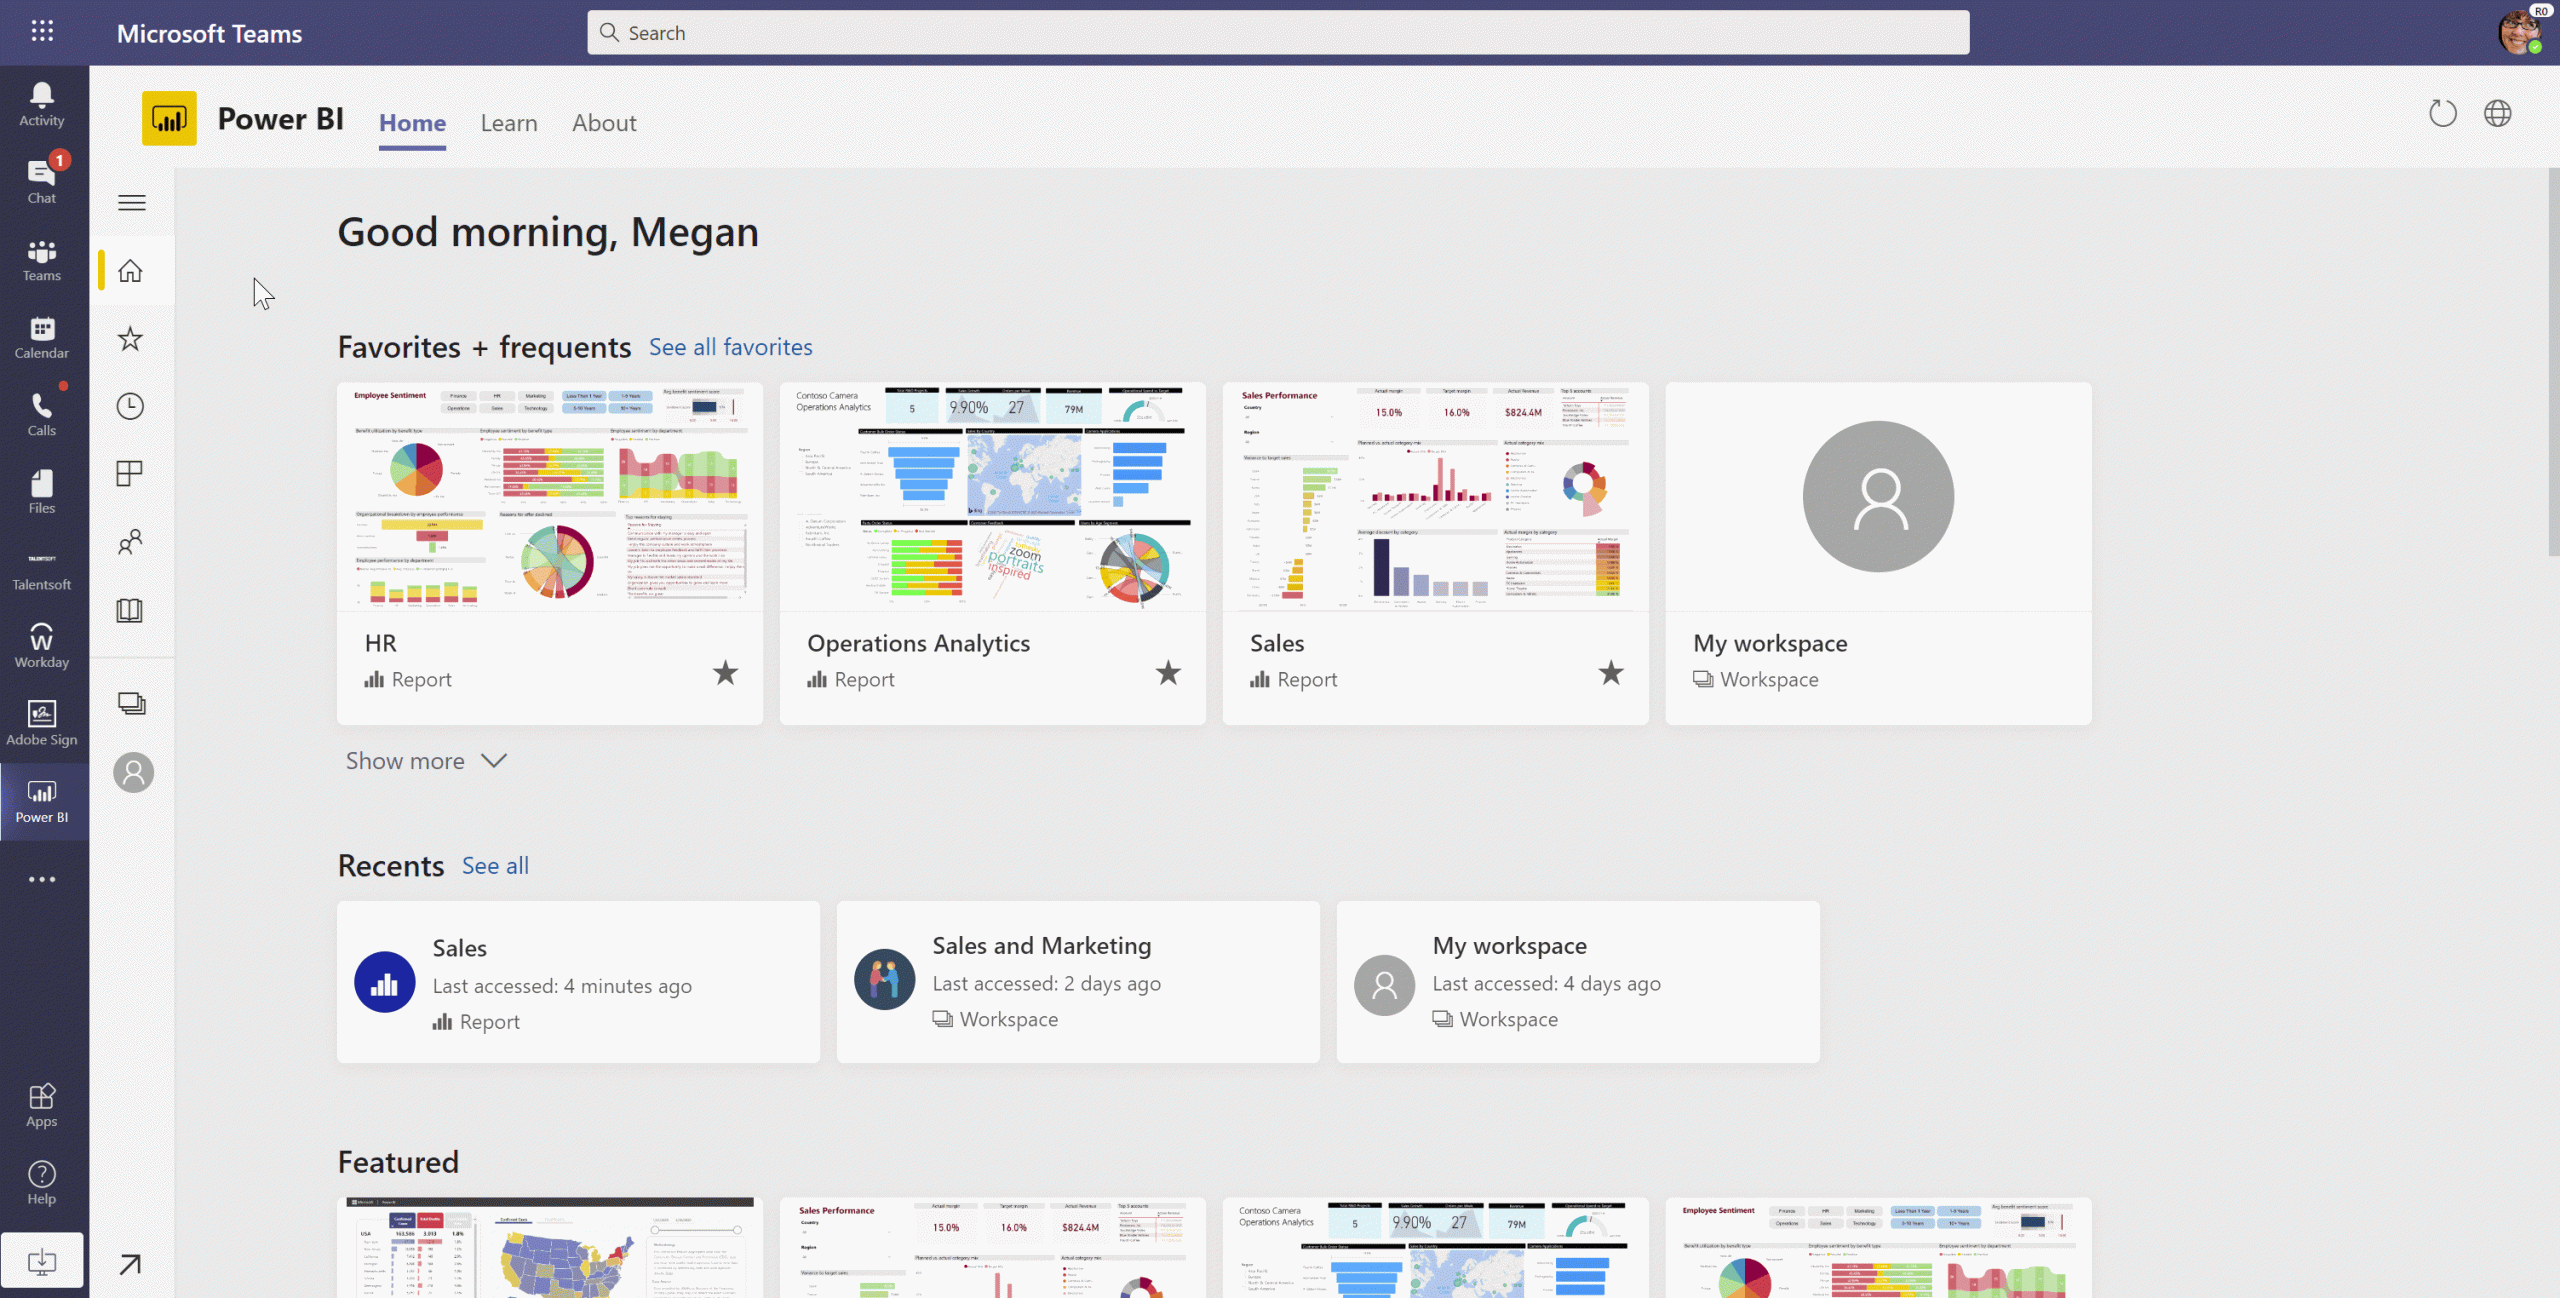
New Power BI app for Teams
Organizations are looking for new ways to leverage their data and take action based on insights. The new Power BI app for Teams enables you to access reports and dashboards in Teams to easily find insight in context and collaborate. This app also helps you make data-driven decisions at scale with confidence and provides new ways to connect insight to action through sample reports, automation, and easy sharing functionality.
New meetings extensibility points for Teams apps
At Inspire, we announced new meetings extensibility points that will enable developers to expand the Teams meeting experience. With this new capability, developers will be able to build apps or integrate their existing ones within the meeting surface and provide a richer collaboration experiences for users across the entire meeting lifecycle – covering events and actions from before, during, and after a meeting. These new extensibility points will be available soon for developer preview. Learn more here.

Single-Sign On (SSO) support for Teams tabs with Azure Active Directory
Teams tabs support for single sign-on (SSO) with Azure Active Directory is now generally available for both desktop and mobile! Developers can now build their apps to sign-in their users using the same account they are using to sign into Microsoft Teams – giving users a more enjoyable and frustration-free sign-on experience.

Microsoft Teams Toolkit for Visual Studio and Visual Studio Code
At Build, we unveiled the Microsoft Teams Toolkits for Visual Studio and Visual Studio Code, which provide developers everything they need to jump start their Teams app development journey. From code through publish, these toolkits provide a frictionless and enjoyable experience building Teams apps. We’re excited to announce that the Teams Toolkit for Visual Studio Code is now generally available and can be installed here. The Teams Toolkit for Visual Studio is also available for developer preview and can be installed here. Learn more about these toolkits in our Teams Developer blog post.

Teams Graph APIs updates
POST / Teams API now available in the Microsoft Graph v1.0 endpoint. New team membership API is coming soon in preview, allowing developers to list members, add and remove members, and change members’ roles. Lastly, granular permissions for proactive messaging available is now in preview., which will allow apps to install only itself and provide developers more convenient APIs for retrieving the chat thread ID for bots to use.
User attribution for bot messages
We’re pleased to announce that user attribution for bot messages is now generally available! In scenarios where a bot sends messages on behalf of a user, attributing the message to that user can help with engagement and showcase a more natural interaction flow. This also helps condense the card design and provides a cleaner interface. Learn how to configure this capability here.

Access and manage Visio files in Microsoft Teams with tabs
Visio tabs in Teams allow team members to quickly access content in a dedicated space within a channel or in a chat. With the new Visio as a tab feature, you can create a tab from any Visio file (new or existing) in Teams with a single click. Adding a tab in Teams is now available to all Teams users. However, editing is only available for those with a Visio Plan 1 or Plan 2 subscription.
What’s New: Firstline Workers
Time clock now available on Web and Desktop
Now, employees will be able to clock in and out of Shifts directly from web or desktop with Time clock along with the existing mobile experience This provides a hybrid clock in and clock out experience so Firstline Workers can start their shift from wherever their work is, whether remote or at the job location, all with the geo-fencing capabilities. If you already have Time Clock enabled – simply go to the Shifts App in Microsoft Teams and get started! To learn more about Time Clock and how to set it up, go here.
New policy packages for Firstline Worker and Managers
Firstline Worker and Firstline Manager policy packages for Teams provide IT administrators with pre-defined policies and policy settings tailored for their entire Firstline Workforce. Policy packages simplify, centralize, and help provide consistency when managing policies for Firstline Workers and managers across your organization. These new policy packages will be available by default in the IT Admin Center and in PowerShell. Learn more about setting up and customizing the policy packages for Firstline Workforce here.
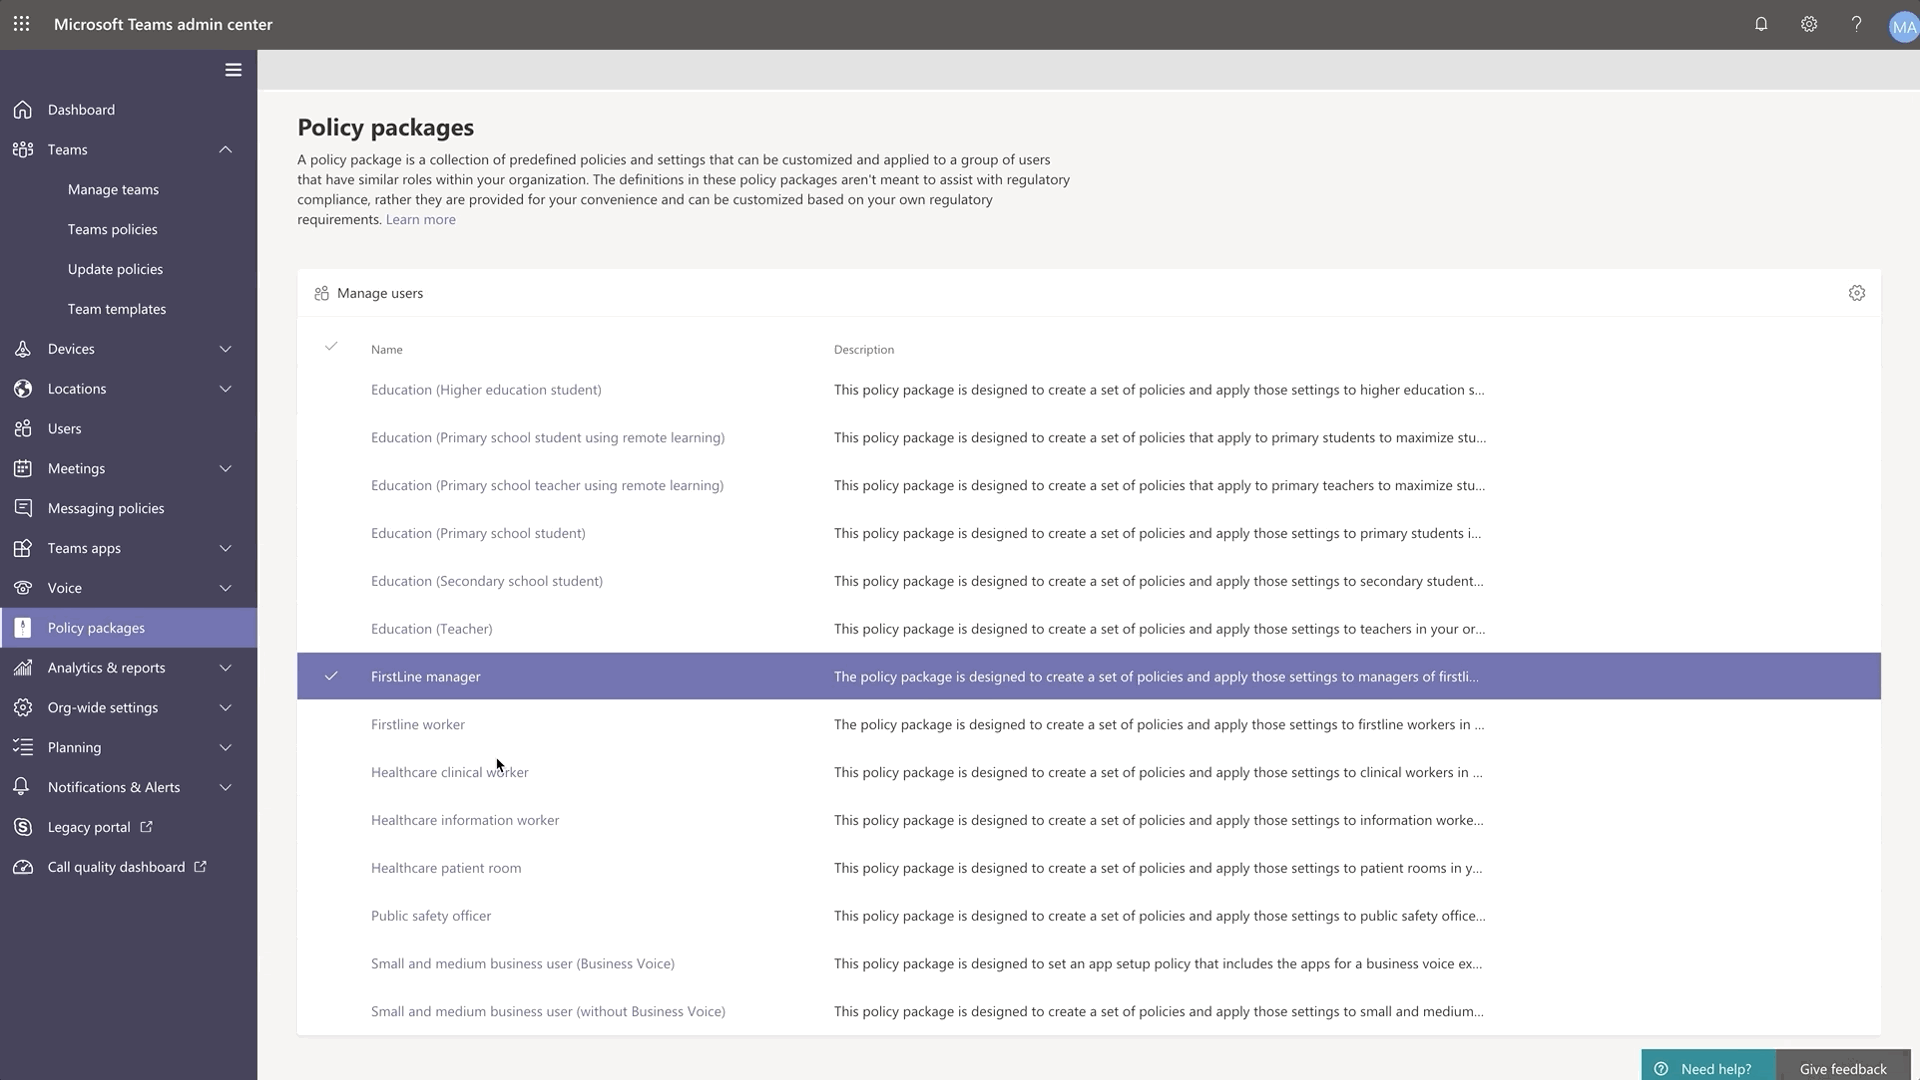
Search for Shifts activities in Teams Shifts Audit Logs
Audit logs for Shifts, now generally available, provides IT admins a unified view and search functionality to help monitor and keep track of activities. Staying on top of employees clocking in and out and making edits to shifts is critical to ensuring smooth and compliant operations. To learn more about what Shifts activities are logged and how to get started, please go here.
Check out more product news for Firstline Workers here.
What’s New: Teams for Education
Microsoft Teams for Education continues to evolve to meet the changing needs of institutions and educators. Now, there are more ways for educators to control their online classrooms and for IT Admins to support new team creation.
Student Lobby
To prevent uninvited students in class, Student Lobby, which keeps students in a lobby until invited in by the educator, is now available.
School Data Sync (SDS) team creation is back on
Admins can now (once again) automatically bulk-create both M365 Group and class teams for their educators. This helps to save educators time and makes a new team “locked” and inaccessible by students until educators unlock the team.
To learn about these and the other 20+ new features and updates coming to Microsoft Teams for Education, visit the What’s New in Teams for Education | July 2020 blog post.
What’s New: Teams for US Government
We are here to support US Government clouds. Here are the new capabilities for GCC customers.
Microsoft Teams meeting attendee limit increases to 300 participants for GCC, GCC-High, and DoD
To help customers meet rapidly changing communication and meeting needs, we are increasing the maximum number of participants allowed in a Teams meeting to 300.
Increase in the number of simultaneous videos in Teams meetings for GCC High and DoD customers
We are increasing the number of participants who can be viewed simultaneously on the Teams meeting stage from 4 to 9. This new experience optimizes for attendees who have enabled video and places the remaining audio-only participants below the meeting stage. To provide a high audio and video quality experience, the layout logic will consider user bandwidth and alter the number of videos shown to provide the best meeting experience.
Raise Hands for GCC, GCC High, and DoD
The raise hands feature allows meeting attendees to identify that they wish to speak by toggling the hand icon in the meeting control bar, making it easier to actively participate in meetings. Raise hands will be available for both PC, Mac, and web-based clients to start, with mobile applications quickly following.
PSTN participant phone numbers are masked from external users for GCC
For those with Audio Conferencing enabled for their Teams meetings, we will mask the PSTN participant’s phone number to users who have joined from outside of your organization.
Multi-Window Chat for GCC, GCC High, and DoD
You will be able to pop out individual Teams chat conversations into a separate window, to help them streamline their workflow and more easily move between ongoing conversations.
Priority Notifications in Gov Clouds
Share urgent messages and time-sensitive information more effectively with Teams. Priority notifications alert a recipient of an urgent message on their mobile and desktop devices until a response is received, every two minutes for up to 20 minutes. IT Admins can manage this feature as part of messaging policies in Teams.
New channel files tab for GCC, GCC-High, and DoD
We are rolling out the new channel files tab experience to the government clouds. This upgrade brings in more than 10 new features, including different SharePoint view, ability to view metadata, sync, row/column formatting etc.
Channel info pane for GCC
Selecting the “Channel info” icon in the channel header will display summary information related to that channel including the description, a list of recent contributors and members, as well as system messages.

Recent Comments