This article is contributed. See the original author and article here.
This post was co-authored by Michael Mendoza, Director of Service Transformation, Hitachi Solutions.
The era of AI is here, and it’s transforming how companies service customers in the field.
The field service industry is always evolving. Shifting customer preferences and demands, unpredictable economic forces, and tight labor markets have all required field service leaders to continuously adapt and innovate to succeed.
That said, Michael Mendoza, Director of Service Transformation at Hitachi Solutions, a Microsoft Gold Partner, expects that AI will bring about the most dramatic change yet for the field services industry: “It’s no exaggeration to say that the advent of AI promises to completely redefine what is possible, offer groundbreaking new opportunities to delight customers, and differentiate and reinvent service delivery for every organization on the planet.”
Helping to drive that redefinition is Copilot in Microsoft Dynamics 365 Field Service, an AI-powered assistant that helps accelerate field service productivity and deliver the proactive, “always on” support that customers expect. Three key areas where Copilot impacts field service organizations include:
Personalizing service experiences for customers to address issues quickly.
Helping frontline technicians work more efficiently.
Optimizing service operations for increased productivity.
Let’s walk through a common service scenario to see Copilot’s benefits in action.
Personalizing service experiences
New data from Microsoft’s 2023 Work Trend Index Annual Report reveals 63 percent of frontline workers struggle with having to do repetitive or menial tasks that take time away from more meaningful work. Let’s say a service manager for a parts manufacturing company receives an email in Outlook from a customer asking for a technician to come fix a broken circuit on an assembly machine. Before Copilot, the service employee had to find and review the account information and then create a work order separately in Dynamics 365 Field Service. This meant manually copying and pasting or re-entering information from the email into the required fields. The service manager also had to search for past work orders to better determine which service technicians had the right skills and knowledge to fix the issue, as well as which tools and parts were needed for the job.
But now, with Copilot’s AI capabilities and seamless Outlook integration, work order management is streamlined and available at the service manager’s fingertips.
I’m looking forward to providing customers with the ability to work with Field Service features directly in Outlook and Teams without having to switch applications while working with the tools they already use to communicate with customers and technicians.
Bill Caldwell, Director, Service Delivery at Hitachi Solutions
Now, Copilot processes the language in the customer’s email content to identify that creating a work order is the best next action, and suggests the service manager create a work order—all from their Outlook view. With a quick tap, the service manager can create the work order that Copilot has automatically generated (based on its historical knowledge of past work orders pertaining to that machine and incident type) by inserting the customer information, incident, parts needed, technician skills required, and service activities needed. It can also prioritize work orders by intelligently assessing even vague language to determine whether something is urgent or not based on customer language in the subject or the body of the email.
Hitachi Solutions has been privately previewing Copilot in Dynamics 365 Field Service and is already seeing benefits for customers. One particular benefit is that, with Copilot’s work order capabilities in Outlook, its service managers can immediately assign resources to solve customer issues, without leaving the flow of work. This means customers experience faster response times and enhanced service delivery. In addition, service managers have an easier time managing customer service requests, resulting in greater efficiency. And, most importantly, Hitachi knows that Microsoft is guided by our AI principles and Responsible AI Standard and decades of research on AI, grounding, and privacy-preserving machine learning. That means it can assure customers that it has measures in place to help protect against data leakage.
Helping frontline technicians work more efficiently
The most recent interaction a customer has with your company is also their final impression. Giving your frontline workers the information and tools, they need to be more productive, effective, and efficient in the field ultimately translates to happier, more loyal customers. New data from Microsoft’s 2023 Work Trend Index Annual Report reveals that 65 percent of frontline workers are optimistic that AI will help them in their job.
With Copilot, the technician no longer wastes valuable time determining what tools they need, making wrong guesses, or finding experts who can provide helpful information. Instead, the technician has the relevant information from the Copilot-generated work order and can focus on completing the service tasks at hand. For example, because Copilot uses next-generation AI to create a properly worded and concise description of the work the client needs performed in the work order summary, the technician has a clear understanding of the problem and what needs to be done to complete the task. This means technicians can resolve issues faster and with higher accuracy, minimizing customer downtime and inconvenience, and creating a better customer experience.
Optimizing service operations
Whether dealing with an inspection, installation, or maintenance issue, a happy field service customer is one who receives high-quality service, feels valued, and has a positive overall experience with the service provider—factors that are all ultimately rooted in operational excellence. Timeliness is crucial in field service, and customers value service organizations who prioritize their requests and strive to resolve their issues quickly and effectively without the need for multiple visits or repeat service calls. Now, right in Outlook, the system leverages the power of the Field Service scheduling engine to provide suggestions, so the work order can be dispatched immediately upon creation and even create a reply to the customer with available times for technicians with the appropriate skill set to solve their issue. That means faster, more efficient service.
Next-generation field service with AI—are you ready?
Service in the era of AI is an exciting time, and Copilot in Dynamics 365 Field Service is an innovative new capability for empowering field service teams to do their best work and deliver an exceptional customer experience. This is just the beginning of AI for field service, and we can’t wait for what’s to come.
Watch a brief video of Copilot in Dynamics 365 Field Service in action.
This article is contributed. See the original author and article here.
Now you will have the ability to view your reseller’s partner capability score, which is the measurement framework that gauge performance, skilling, and customer success to attain a Partner Solutions Designation. The Solutions Partner Designations differentiates partners with broad technical capabilities, a dedication to skilling and training, and a proven ability to successfully deliver solutions for customers in specific Microsoft Cloud solution areas.
This report allow you to develop targeted outreach to resellers, encourage program awareness, offer business development coaching, and provide guidance on how they can increase customer reach and expansion of their technical skilling, enablement, and support.
Nurture your resellers on their journey to attaining a Solutions Partner designation with this new functionality you have available through Partner Center and develop a solid relationship with the reseller community.
Review your reseller’s partner capability score and implement next steps accordingly.
This article is contributed. See the original author and article here.
Introduction
In the realm of high-performance computing (HPC) and AI workloads, the need for agile and powerful storage solutions cannot be overstated. Azure Managed Lustre (AMLFS) has emerged as a game-changing solution, providing managed, pay-as-you-go file systems optimized for these data-intensive tasks. Building upon the success of its General Availability (GA) launch last month and in direct response to customer feedback that we received during our Preview period, we’re excited to unveil two new performance tiers for AMLFS, designed to cater to the diverse array of customer needs. This blog post explores the specifics of these new tiers and how they embody a customer-centric approach to innovation.
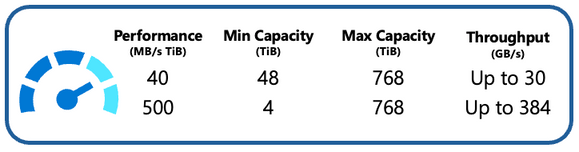
40 MB/s per TiB Option: Optimizing Cost and Capacity
The 40MB/s per TiB performance tier represents a significant milestone for Azure Managed Lustre users. It directly addresses the needs of customers dealing with larger datasets, providing a lower-cost option without compromising on performance. Built on the exceptional speed, reliability, and low-latency characteristics of Azure Managed SSDs, the 40MB/s per TiB configuration, ensures that organizations can unlock the power of HPC and AI without incurring exorbitant costs. This tier offers a default maximum file system capacity of 768 TiB. With this option, Azure Managed Lustre becomes an even more accessible solution for enterprises seeking scalable and cost-effective storage solutions.
500 MB/s per TiB Option: Tailored Performance for Massive Throughput Requirements
Azure recognizes that not all workloads require massive storage capacities. The introduction of the 500MB/s per TiB performance tier specifically speaks to the needs of customers dealing with smaller datasets. Constructed on top of Azure Managed SSDs, this tier strikes a balance between performance and capacity, ensuring that users can access a storage solution that aligns precisely with their requirements. With a minimum file system size of 4 TiB, this option empowers organizations to avoid over-provisioning on capacity to meet their performance requirements, allowing customers to efficiently manage their resources. This granular approach to performance tiers demonstrates Azure’s commitment to catering to a wide spectrum of customer needs.
Pricing
The introduction of these performance tiers underscores Azure’s dedication to listening to its customers and iterating its offerings to match real-world demands. While pricing details for these new options are set to be published next month, we want to be completely transparent. Below is a glimpse of the anticipated pricing across different regions for the 40 MB/s per TiB and 500 MB/s per TiB performance tiers:
The introduction of the 40 MB/s per TiB and 500 MB/s per TiB performance tiers for Azure Managed Lustre marks a significant step forward in the realm of HPC and AI storage solutions. These options cater to a diverse range of workloads, from large-scale datasets to smaller, performance-intensive tasks. Azure’s responsiveness to customer feedback and its focus on aligning its services with actual user needs further solidify its position as a leading cloud service provider. As the industry continues to evolve, Azure Managed Lustre remains at the forefront of delivering innovative solutions that empower organizations to thrive in the digital age.
Learn more about using Azure Managed Lustre for your HPC and AI solutions
This article is contributed. See the original author and article here.
With AI deeply embedded, Teams is the smart place to work.But what does it really mean to be smart? For us, it means that when AI is present, it is there to help you level up your work in a way that does not replace you or take away from your agency. We believe that AI should augment and amplify your potential, abilities, and productivity. With Copilot in Teams, you’ll experience a whole new way to work and be able to do things you’ve never been able to do before.
When Microsoft 365 Copilot was first announced in March, it was the start of Teams adding intelligence in ways that unlock new possibilities across communication and collaboration. This blog highlights what’s been announced for Copilot in Teams and some examples of ways you can engage with Copilot to get the most value – regardless of if you are participating in the Early Access Program (EAP) or not. Let’s take a look at where things started and where we are today.
Our first milestone, was announcing Microsoft 365 Copilot and Copilot in Teams meetings. The Microsoft 365 Copilot chat experience – available in Teams and in the browser – is an entirely new experience that works alongside you. It uses the power of Microsoft Graph to bring together data from across the internet, your documents, presentations, email, files, meetings, chats, documents, and 3rd party applications. It has the potential to save you a lot of time and effort throughout your work day. Using your own words to ask Copilot a question or selecting a suggested prompts – right in Teams – you will be able quickly find what you need to move your work forward. For example, rather than having to take time searching through your recent emails, chats, meetings notes, presentations, and other documents to prepare for a meeting – you can just ask Copilot. Copilot will find and summarize everything related to the project your meeting is about so that you don’t have to. In addition, you can get updated on the latest news related to a specific topic, summarize outstanding project deliverables with potential risks, and so much more.
Copilot in Teams meetings makes your meetings even more effective by becoming a powerful tool that helps you complete common meetings tasks. You can get up to speed quickly on anything you’ve missed when you join late, capture unresolved issues before the meeting ends, list all the questions that were left unresolved, identify the right people for specific follow-ups, or even create a table of the pros and cons for a decision that was being discussed. One of my personal favorites to use following an active discussion is to create a table of all the questions asked and their answers. It makes it easy to share back with the team in case any else had similar questions or as a starting point for a Frequently Asked Questions document. Just by using your own words or using a suggested prompt you can get the information you need without disrupting the discussion during a live meeting or afterwards with Intelligent Recap.
Most recently, at Inspire, we announced the next wave of Copilot in Teams with Copilot in Teams Phone and Copilot in Teams Chat, bringing the same great functionality from meetings to impromptu chats and calls. With Copilot in Teams Phone, you can make and receive calls from your Teams app on any device, and get real-time summarization, and insights. You can ask Copilot to draft notes for you and highlight key points, such as names, dates, numbers, and tasks during your call – for both VoIP and PSTN calls. Imagine needed to kick off a new project with a partner outside of your organization. You give the partner a call to provide an outline of the project and discuss the tasks that they will need to collaborate with you on. As your conversation unfolds, Copilot is summarizing the call and capturing the partners questions on timing, their feedback, as well as next steps. After the call, you can use this information to quickly send a follow-up note to confirm the project plan based on your conversation.
Copilot in Teams chat will help you stay on top of your conversations by quickly getting up to speed, summarizing or recapping your chats, and synthesizing key information across your Teams chat threads. The best part? You’ll be able to do all this without interrupting your conversation flow or endlessly scrolling through chats. To fully understand the potential of Copilot in Teams chat think about all the times that you have been away from work – whether in back to back meetings for a day, or out on vacation for 3 days. While you were away, the conversations don’t stop. Imagine that your team is working on a new marketing campaign. While you were away your team was using chat to discuss potential ideas. Rather than endlessly scrolling through the chat conversation, you can just ask Copilot questions to get a quick summary of what you missed over the past 3 days, the top ideas that were discussed, and a list of action items to follow-up on. You can even ask Copilot to create a table of the final ideas along the pros and cons discussed. This way you get back in the loop quickly without having to interrupt the team so everyone can continue focus on next steps for the new campaign. Catching me up after being away from active chats and asking for documents I need to review are a few things I find myself regularly asking Copilot to do in Teams chat.
If you’re interested in going even deeper, check out this episode of Inside Microsoft Teams, where we explore how Copilot in Teams Meetings, Phone, and chat work with the lead product managers responsible for building each experience. We are excited to continue to innovate and transform the way work happens, together. Stay tuned as we roll out more updates in the coming months.
This article is contributed. See the original author and article here.
Contributors: Eliran Azulai and Yuval Pery
Monitoring, management, and innovation are core pillars of Azure Firewall. With this in mind, we are delighted to share the following new capabilities:
Resource Health is now in public preview
Embedded Firewall Workbooks is now in public preview
Latency Probe Metric is now in general availability
When you monitor the firewall, it’s the end-to-end experience that we continuously strive to improve. Our aim is to empower you to make informed decisions quickly and maximize your organization’s security demands. Understanding the importance of having visibility into your network, this release focuses on making it easier for you to monitor, manage, and troubleshoot your firewalls more efficiently.
Azure Firewall is a cloud-native firewall as a service offering that enables customers to centrally govern and log all their traffic flows using a DevOps approach. The service supports both application and network-level filtering rules and is integrated with the Microsoft Threat Intelligence feed to filter known malicious IP addresses and domains. Azure Firewall is highly available with built-in auto-scaling.
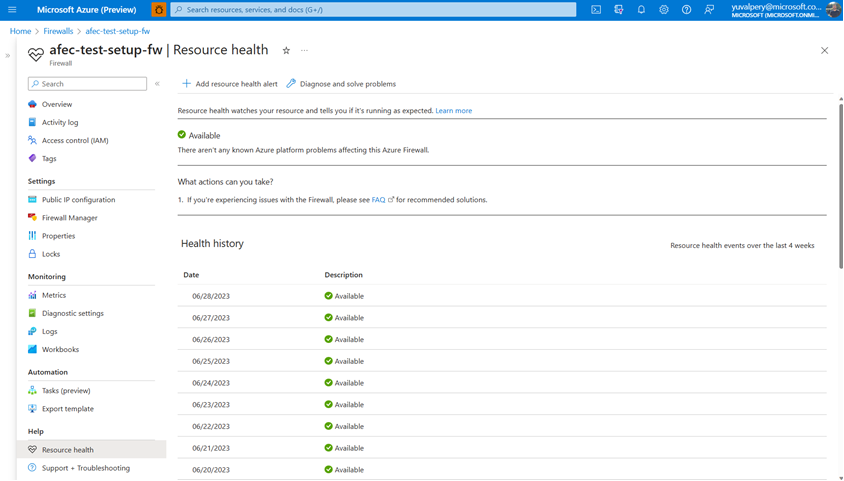
Resource Health is now in public preview
With the Azure Firewall Resource Health check, you can now view the health status of your Azure Firewall and address service problems that may affect your Azure Firewall resource. Resource Health allows IT teams to receive proactive notifications regarding potential health degradations and recommended mitigation actions for each health event type. For instance, you can determine if the firewall is running as expected with an “Available” status or if there was downtime due to platform events with an “Unavailable” status.
Easily view the resource health status and history of your firewall
Embedded Firewall Workbooks are now in public preview
The Azure Firewall Workbook presents a dynamic platform for analyzing Azure Firewall data. Within the Azure portal, you can utilize it to generate visually engaging reports. By accessing multiple Azure Firewalls deployed throughout your Azure infrastructure, you can integrate them to create cohesive and interactive experiences.
With the Azure Firewall Workbook, you can extract valuable insights from Azure Firewall events, delve into your application and network rules, and examine statistics regarding firewall activities across URLs, ports, and addresses. It enables you to filter your firewalls and resource groups, and effortlessly narrow down data sets based on specific categories when investigating issues in your logs. The filtered results are presented in a user-friendly format, making it easier to comprehend and analyze.
Now, Azure Firewall predefined workbooks are two clicks away and fully available from the Monitor section in the Azure Firewall Portal UI:
View valuable insights in a dashboard view using Azure Firewall Embedded Workbooks
Latency Probe metric is now generally available
The Latency Probe metric is designed to measure the overall latency of Azure Firewall and provide insight into the health of the service. IT administrators can use the metric for monitoring and alerting if there is observable latency and diagnosing if the Azure Firewall is the cause of latency in a network. This troubleshooting metric is helpful for proactively engaging in potential issues to traffic or services in your infrastructure.
Azure Firewall latency can be caused by various reasons, such as high CPU utilization, throughput, or networking issues. As an important note, this tool is powered by Ping Mesh technology, which means that it measures the average latency of the ping packets to the firewall itself. The metric does not measure end-to-end latency or the latency of individual packets.
View the overall latency of the Azure Firewall using the Latency Probe metric
Learn more
When you’re ready to try these new capabilities, just navigate to Azure Firewall Monitoring in the Azure Portal, and select Logs, Metrics, or Workbooks to use these new features. If you do not have logs, navigate to Azure Firewall Diagnostic settings to get started. And continue to provide us with feedback! To give us feedback just tap the feedback icon in the Azure Portal. Your feedback is invaluable in crafting an improved experience that caters to your specific needs.
Suren Jamiyanaa is a Product Manager in Azure Network Security. She joined the team in 2019 where she focuses on innovating the Azure Firewall product for customers in a modern cloud network strategy.
This article is contributed. See the original author and article here.
Issue:
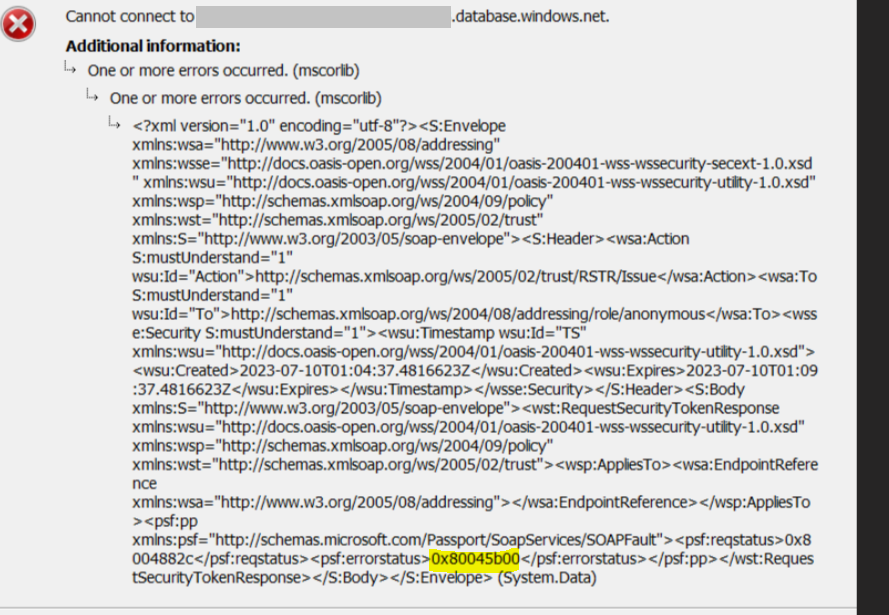
Trying to login to Azure SQL Managed Instance (MI) from SQL Server Management Studio (SSMS) using AAD-Integrated keeps getting the below error. However, the user is able to connect to MI using AAD-Password, AAD-MFA and SQL Authentication without any issue:
Below is the detailed error from SSMS:
===================================
Cannot connect to mySQLMI.xxxxxx.database.windows.net.
===================================
One or more errors occurred. (mscorlib)
—————————— Program Location:
at System.Threading.Tasks.Task.ThrowIfExceptional(Boolean includeTaskCanceledExceptions) at System.Threading.Tasks.Task.Wait(Int32 millisecondsTimeout, CancellationToken cancellationToken) at System.Data.SqlClient.SqlInternalConnectionTds.GetFedAuthToken(SqlFedAuthInfo fedAuthInfo) at System.Data.SqlClient.SqlInternalConnectionTds.OnFedAuthInfo(SqlFedAuthInfo fedAuthInfo) at System.Data.SqlClient.TdsParser.TryRun(RunBehavior runBehavior, SqlCommand cmdHandler, SqlDataReader dataStream, BulkCopySimpleResultSet bulkCopyHandler, TdsParserStateObject stateObj, Boolean& dataReady) at System.Data.SqlClient.TdsParser.Run(RunBehavior runBehavior, SqlCommand cmdHandler, SqlDataReader dataStream, BulkCopySimpleResultSet bulkCopyHandler, TdsParserStateObject stateObj) at System.Data.SqlClient.SqlInternalConnectionTds.CompleteLogin(Boolean enlistOK) at System.Data.SqlClient.SqlInternalConnectionTds.AttemptOneLogin(ServerInfo serverInfo, String newPassword, SecureString newSecurePassword, Boolean ignoreSniOpenTimeout, TimeoutTimer timeout, Boolean withFailover, Boolean isFirstTransparentAttempt, Boolean disableTnir) at System.Data.SqlClient.SqlInternalConnectionTds.LoginNoFailover(ServerInfo serverInfo, String newPassword, SecureString newSecurePassword, Boolean redirectedUserInstance, SqlConnectionString connectionOptions, SqlCredential credential, TimeoutTimer timeout) at System.Data.SqlClient.SqlInternalConnectionTds.OpenLoginEnlist(TimeoutTimer timeout, SqlConnectionString connectionOptions, SqlCredential credential, String newPassword, SecureString newSecurePassword, Boolean redirectedUserInstance) at System.Data.SqlClient.SqlInternalConnectionTds..ctor(DbConnectionPoolIdentity identity, SqlConnectionString connectionOptions, SqlCredential credential, Object providerInfo, String newPassword, SecureString newSecurePassword, Boolean redirectedUserInstance, SqlConnectionString userConnectionOptions, SessionData reconnectSessionData, DbConnectionPool pool, String accessToken, Boolean applyTransientFaultHandling, SqlAuthenticationProviderManager sqlAuthProviderManager) at System.Data.SqlClient.SqlConnectionFactory.CreateConnection(DbConnectionOptions options, DbConnectionPoolKey poolKey, Object poolGroupProviderInfo, DbConnectionPool pool, DbConnection owningConnection, DbConnectionOptions userOptions) at System.Data.ProviderBase.DbConnectionFactory.CreateNonPooledConnection(DbConnection owningConnection, DbConnectionPoolGroup poolGroup, DbConnectionOptions userOptions) at System.Data.ProviderBase.DbConnectionFactory.TryGetConnection(DbConnection owningConnection, TaskCompletionSource`1 retry, DbConnectionOptions userOptions, DbConnectionInternal oldConnection, DbConnectionInternal& connection) at System.Data.ProviderBase.DbConnectionInternal.TryOpenConnectionInternal(DbConnection outerConnection, DbConnectionFactory connectionFactory, TaskCompletionSource`1 retry, DbConnectionOptions userOptions) at System.Data.ProviderBase.DbConnectionClosed.TryOpenConnection(DbConnection outerConnection, DbConnectionFactory connectionFactory, TaskCompletionSource`1 retry, DbConnectionOptions userOptions) at System.Data.SqlClient.SqlConnection.TryOpenInner(TaskCompletionSource`1 retry) at System.Data.SqlClient.SqlConnection.TryOpen(TaskCompletionSource`1 retry) at System.Data.SqlClient.SqlConnection.Open() at Microsoft.SqlServer.Management.SqlStudio.Explorer.ObjectExplorerService.ValidateConnection(UIConnectionInfo ci, IServerType server) at Microsoft.SqlServer.Management.UI.ConnectionDlg.Connector.ConnectionThreadUser()
===================================
One or more errors occurred. (mscorlib)
—————————— Program Location:
at System.Threading.Tasks.Task.ThrowIfExceptional(Boolean includeTaskCanceledExceptions) at System.Threading.Tasks.Task`1.GetResultCore(Boolean waitCompletionNotification) at System.Threading.Tasks.Task`1.get_Result() at System.Data.SqlClient.SqlInternalConnectionTds.c__DisplayClass134_1.b__0() at System.Threading.Tasks.Task`1.InnerInvoke() at System.Threading.Tasks.Task.Execute()
This error may occurs when the computer account “AZUREADSSOACC” has an issue such as being removed or disabled for some reason.
How this account created:
When you enable Azure Active Directory Seamless Single Sign-On feature from Portal; this account will be created in your on-premises Active Directory (AD) in each AD forest that you synchronize to Azure AD (using Azure AD Connect), along with a number of Kerberos service principal names (SPNs) that are created to be used during the Azure AD sign-in process.
If the user disabled the computer account “AZUREADSSOACC“, they can follow the below steps to enable it back:
To open Active Directory Users and Computers, click Start, click Control Panel, double-click Administrative Tools, and then double-click Active Directory Users and Computers.
In the console tree, click Computers.
Where? Active Directory Users and Computersdomain nodeComputers
Or, click the folder that contains the computer account that you want to enable as shown below:
In the details pane, right-click the desired computer account, and then click Enable Account.
For more information about this issue, please refer to the following documents:
This article is contributed. See the original author and article here.
Disclaimer
This document is not meant to replace any official documentation, including those found at docs.microsoft.com. Those documents are continually updated and maintained by Microsoft Corporation. If there is a discrepancy between this document and what you find in the Compliance User Interface (UI) or inside of a reference in docs.microsoft.com, you should always defer to that official documentation and contact your Microsoft Account team as needed. Links to the docs.microsoft.com data will be referenced both in the document steps as well as in the appendix.
All the following steps should be done with test data, and where possible, testing should be performed in a test environment. Testing should never be performed against production data.
Target Audience
Microsoft customers who want to better understand Microsoft Purview.
Document Scope
The purpose of this document (and series) is to provide insights into various user cases, announcements, customer driven questions, etc. It is not meant as the final answer to all Purview related questions.
Topics for this blog entry
Here are the topics covered in this issue of the blog:
Topic – Purview related eDiscovery and Office Message Encrypted (OME) emails
Use Case #1 – legal or HR review of Office Message Encrypted (OME) emails within Purview eDiscovery
Use Case #2 – legal or HR review of OME emails that have been exported from Purview to a PST and/or Exchange Mailbox and then opened within an Outlook thick client.
Out-of-Scope
This blog series and entry is only meant to provide information, but for your specific use cases or needs, it is recommended that you contact your Microsoft Account Team to find other possible solutions to your needs.
Not done – OME and eDiscovery
1 – Roles Based Access Control (RBAC) for Purview
If you want to leverage Purview RBAC roles to access and view emails/files, you will need to open the Purview eDiscovery console. The Purview RBAC roles are not “usable” within Outlook thick or thin clients.
Here is a link to the RBAC information and a screenshot related specifical the Review role within that RBAC:
2 – Accessing emails that have been encrypted via OME inside of Purview eDiscovery
Let us first understand how Purview deals with encrypting/decrypting data, as it relates to eDiscovery. The following chart from Microsoft documentation should provide more light on what is decrypted in the Standard and Premium versions of Purview.
In conclusion, if you have the proper version of Purview eDiscovery (ie. Premium) and the proper RBAC role, you can view emails that have been encrypted using OME.
3 – Accessing emails that have been encrypted via OME and then exported to a PST and/or Exchange mailbox
Before we start this section, please note that review of eDiscovery related data from within Outlook is not a Microsoft best practice. We recommend you perform your reviews from within Purview eDiscovery or another eDiscovery solution designed for legal and HR investigations.
With that being stated, let us look at what options are available if you do decided to try and review encrypted (OME) that has been exported from Purview eDiscovery.
First, let us return to the supported decryption charted from above, we can see what versions of Purview support decryption of data when exporting to PST files.
Next, let us again return to one of the charts above, notice that you can export encrypted data (to email/PST). This applies to the export of encrypted data but DOES NOT decrypt data as part of its export process.
Question – if my data is exported and still encrypted with OME, how can I read OME emails from the exported PST file?
Answer – The official answer is you need additional rights tied back to RMS, in particular the RMS Decrypt role. Please note the information in the following link and screenshot for specifics.
From the link and screenshot above, there are 2 items listed:
You need to assign the RMS Decrypt role to your user performing the review. This is separate from the Reviewer role specific to Purview eDiscovery.
It is recommended that you run the ScanPST.exe tool on the exported PST. This tool does not decrypt data only verifies and fixes PST files that might have become corrupted.
Important Note
For a deeper understanding of what rights are needed and work flow you should follow (if you are pursuing this email review process) you should contact your Microsoft Account Manager or certified Microsoft Partner.
This article is contributed. See the original author and article here.
Learn how you can save money with the Azure saving plan recommendations. with your host Thomas Maurer and Azure savings plan expert Obinna Nwokolo.
Azure savings plan feature recap.
Azure savings plan for compute is an easy and flexible way to save money on compute services spend compared to pay-as-you-go (PAYG) prices. What customers do is you can commit to an hourly amount to spend over a one to three-year and in exchange for that you get significant discounts over the on-demand prices.
Purchase savings plans in the Azure portal.
You can purchase Azure savings plan by going to Azure Portal.
Login to the Azure Portal.
In the search box, search for “Savings plan”, click on that.
You’ll be brought to the Savings plan blade where you can click “Add” and then you can go through the purchasing process just by filling out the necessary information.
How are savings plan recommendations generated?
Thomas mentioned that when he talks to customer using the savings plan, he gets a few common questions such as “How much commitment should I make?” or “How do I select the right savings plan?” and so on because it varies by individual cases One other question, he gets asked is “How are Azure savings plans recommendations generated?”
From Obinna’s experience it is very difficult to figure out exactly how much to commit and so Microsoft tries to do that work for you. Microsoft looks at your hourly usage, what you’ve spent on savings plan eligible resources over the last 7, 30, and 60 days. Then Microsoft does some calculations where they try to determine what would have been the optimal savings plan amount for each hour within the 7, 30, or 60 day timeframe. Then Microsoft takes that optimal savings plan amount and attempts to simulate what would have happened had you made that savings plan purchase and your savings projected. After all those simulations have been done, Microsoft takes the top ten of those simulations that resulted in positive savings and presents those to you as recommendations. Your recommendations are based on what you’re actually spending.
Demo of Azure savings plan and explanation of calculations.
In the video below there is a segment where there is a demo. For example, let’s talk about a customer that would be a good fit for Azure savings plan. Our fictional customer Contoso runs a helpdesk service and because they are serving globally, it’s important for them to leverage compute services through multiple regions over the course of the day.
This makes them a really good candidate for the Azure savings plans. So, in this example how does Microsoft generate the recommendation is going to go through several steps.
Microsoft figures out what did you spend, this could be called the “commitment candidates”. These are the amounts that say for this hour this is the optimal savings plan amount.
Then some simulations are run where Microsoft figures out what you would have saved if you had that commitment.
Then Microsoft simulates all 720 commitment candidates; it is going to say here are the top 10 and this is what we’re going to present to you as a customer.
To recap, Microsoft wants to start by looking at your usage. In this scenario, when Microsoft looks at Contoso’s usage over 720 hours. Microsoft goes through hour one, hour two all the way down to the last hour for that period and says “this is your usage and what did they actually spend?”.
You can see how this is calculated in this example a little bit over $7.00, so $7.32 and fractions of that. Then Microsoft says, “let’s figure out that same answer for all of the remaining hours within that 30 day look back period.” Which in this case is 720 distinct hours (24 hours x 30 days = 720 hours). So now that Microsoft knows what they were spending for every single hour, Microsoft wants to understand what the optimal savings plan amount is for each one of those hours.
Microsoft then applies the Azure savings plan discount for each one of those hours and then calculates what’s the net resultant savings plan commit optimal amount. So, in this example their usage of on demand cost was $7.32 for hour one. When the savings plan discounts are applied, we find that the right amount for them, from a savings plan perspective, is a little bit more than $3.30.
So, we now know this is the optimal amount for our number one. Let’s take our number one’s value and apply to our number two, our number three and all the remaining hours in that 720-hour window. And so, we’re going to follow the benefit application rules that exist for savings plan, look at the meter that has the greatest discount and apply the savings plan to that first and then work our way down. As we go through that process in this particular example, we find that a $3.30 savings plan isn’t actually enough to fully cover that first meter so there’s going to be some overage. We’re going to fully consume the savings plan and then we’re going to incur an on-demand cost of $1.57. Then we’re going to go on that second meter and we’re going to, because the savings plan is gone, just charge that one as the full on-demand rate. So, the net of this is as we go through this, we see that we incurred a total simulated cost of $6.87. That’s actually still better than the on-demand cost that the customer had coming in which was $7.32. So, this $3.30 savings plan for our number two resulted in a net savings of $0.44 which is progress. As we go through each one of those hours, if a candidate results in a positive savings, we want to keep it because it’s got potential but if it doesn’t, we want to discard it. So we’re going to run this analysis for our number two, our number three, all the way to 720 when we finish for each individual hour, each individual simulation, we want to compare all of them.
In this case, again, we have 720 candidates. We’re going to simulate each one of those against every single hour. The result of this is about a little bit over 500,000+ calculations in this period and when we finish this whole process, we’re going to select up to the top 10 candidates that actually resulted in savings and that’s what you end up seeing within the Azure portal UI when you click into the billing into the hourly commitment.
You’ll see in this example we’ve presented for $1.43 all the way to $1.43 and a little bit more change along with providing the commitment amount, we do provide additional information. It says here’s your expected savings percentage as well as the expected coverage and this is the coverage that this savings plan and any other reservations and or savings plan you’ve previously purchased would have provided for you.
We think that’s really good information to help you make the right choice, but you still also have the ability to put a custom amount if you want to go a little bit less. We wouldn’t recommend going over because as you go over you have additional waste and again this is focused on making sure we provide you with the greatest cost savings.
Resources to help you learn more about Azure savings plan.
If you’d like to learn more about the general principles prescribed by Microsoft, we recommend Microsoft Cloud Adoption Framework for platform and environment-level guidance and Azure Well-Architected Framework. You can also register for an upcoming workshop led by Azure partners on cloud migration and adoption topics and incorporate click-through labs to ensure effective, pragmatic training.
This article is contributed. See the original author and article here.
We continue to expand the Azure Marketplace ecosystem. For this volume, 106 new offers successfully met the onboarding criteria and went live. See details of the new offers below:
Get it now in our marketplace
Atalo: Hosted and powered by Microsoft Azure, Atalo by Cadvil helps businesses manage all aspects of operations such as HR, production, finance, inventory, and more. Increase efficiency and drive growth with this comprehensive solution with affordable SaaS pricing.
Avanti – Managed Cloud Development Platform: Focus on value and time to market and let the Avanti platform manage all the infrastructure components involved in your software development cycle. Avanti is optimized for Microsoft Azure and follows Microsoft guidelines for a scalable and secure setup.
C3 Generative AI: Production Pilot: The C3 Generative AI production pilot facilitates a transformative human-computer interaction approach allowing enterprise users to quickly access critical information and relevant data through a natural language interface.
Cadvil SPOT: SPOT by Cadvil is an employee engagement and recognition application designed to increase employee morale, collaboration, team building, and production while reducing attrition, absenteeism, employee conflicts, training costs, and HR workload.
CGT Watch: This SaaS platform offers a comprehensive suite of tools for biopharma executives to access information and gain valuable insights about cell and gene therapy developments. Stay ahead of market trends and maximize opportunities for success with CGT Watch.
Ciro Hotel Booking Engine: Search hotel listings and book rooms with this app from Tecnoglare Infotech Pvt. Ltd. Sort listings by location, price, name, and star category. The solution can be integrated with all major payment gateways.
CIS Benchmark L1 on Microsoft Windows 11 Enterprise: Center for Internet Security (CIS) provides an image of Microsoft Windows 11 Enterprise that’s hardened according to a CIS Benchmark. Level 1 (L1) profile settings within the CIS Benchmark have been applied to provide clear security benefits.
ShareDocs Enterpriser CKYC Management Tool: ShareDocs Enterpriser provides a central repository for banking and financial institutions to maintain know-your-customer records. ShareDocs Enterpriser uses face recognition technology to automatically capture photos and data from forms.
Client-Side Global Server Load Balancer: DynConD’s client-side GSLB (global server load balancer) is used by replicated and distributed network services for optimal server selection by taking into account network distance, service response time, and server load.
CloudCasa: Kubernetes Backup Service: CloudCasa, a backup, recovery, and cluster migration service that’s compatible with Azure Kubernetes Service, lets you centrally manage the open-source backup tool Velero across multiple clusters and cloud providers.
CloudDRaaS: C-Data’s CloudDRaaS is a disaster recovery solution for VMware Cloud Director and vSphere. Users can replicate tenant vSphere workloads between an on-premises vCenter Server instance and a provider-hosted instance, or between provider-hosted vCenter Server instances.
CUBIKA Big Insights: CUBIKA Big Insights applies machine learning, analytics, and Digital Dialogue’s natural language processing to task automation, categorizing, and standardizing data. Manage your big-data environment with an automated, governed, and secure platform.
Custom LLM Model Training for Chat Search Service: Neuu Labs Pvt. Ltd.’s Chat.usln.in platform lets you train chatbots on custom data so it can respond to queries. The large language model (LLM) training is appropriate for customer support, sales assistance, task automation, or information retrieval.
Debian 11: This offer from AskforCloud provides Debian 11 on a Microsoft Azure virtual machine. Debian is an open-source Linux-based operating system known for stability and smooth upgrade processes.
Debian 11 Bullseye: This offer from AskforCloud provides Debian 11 (called Bullseye in development) on a Microsoft Azure virtual machine. Debian is an open-source Linux-based operating system known for stability and smooth upgrade processes.
decisionOS by Causal AI: decisionOS powered by Causal AI is a suite of Python packages that can determine the causal effect of your actions and root cause of outcomes. You can assess, quantify, and fix the fairness of your data and models different business-critical scenarios.
Deepsight AI Platform: DeepSight AI Labs’ computer vision platform utilizes AI to quickly parse your video analytics data so you can instantly detect specific objects and potential threats from multiple live cameras. It can be integrated with various IoT devices to make your existing setup smarter.
Digital Platform Conductor: ReadyWorks offers a comprehensive view of your IT estate by automating critical workflows and accurate compliance in your IT processes. It analyzes crucial data, facilitating responses to security and compliance audits with verified asset data, ensuring CMDB accuracy.
eekox for Remote Workspace Management: eekox’s Work as a Service (WaaS) credit-based solution empowers corporate nomads in your organization by providing them with an ideal workspace that promotes productivity and well-being. The platform utilizes Microsoft Azure for scalability and security.
eekox for Team Building: Designed to foster team unity and cohesion, eekox’s instant booking tool allows employees to choose the best space and plan for team building. Foster unity in remote work environments and ensure your team functions smoothly.
E-Invoice and E-Way Bill: Experience the convenience of integrating and generating E-Invoices and E-Way Bills with LogiTax’s solution. The app offers real-time validation, seamless integration, and instant transmission leading to faster processing and improved cash flow.
Engauge: Utilizing a single, unified interface that houses multiple CPaaS companies and gateway providers, Engauge by Decisive Analytical Systems enables digital marketing agencies to capitalize on cost-saving opportunities, streamline invoice management, and deliver a consistent UI/ UX experience.
ERP for Pharma: This ERP suite of solutions for Pharma provides end-to-end bidirectional traceability, ensures compliance, and enhances the quality, consistency, and speed to deliver drugs to market. The application allows you to streamline your workflow and cut production costs.
ERP School Management System (SMS): This integrated educational ERP solution streamlines, automates, and simplifies campus administration and enables educators to make quick and thoughtful decisions that enhance student and faculty performance and ultimately drives institutional growth.
FinanzOS for Tally: Reconcile all your accounting data sets across a wide range of sources with FinanzOS, a finance automation platform from Thoughtle Technologies. Enhance productivity and improve your cash flow efficiency via insights into your accounts receivable and accounts payable data.
FinStinct: FinStinct uses the power of AI/ML and NLP to automate and streamline the processing of unstructured data in the financial services industry. It can even convert complex financial and legal documents into personalized videos for analysis.
FinView: Enhance your customer engagement by converting complex bank, credit card, portfolio, and mutual fund statements into personalized videos. FinView sends the video clip of the research highlights and statement analysis by secure email to your clients.
FlyPal-CRS: Simplify crew management and ensure the proper balance of competent, well-rested crew members on board with FlyPal Crew Rostering System (CRS) from BytzSoft. The application can be configured to meet the needs of general aviation operations or commercial airlines.
FlyPal-SMS Neo: Proactively mitigate safety risks and enable data-driven decision making with aviation app FlyPal Safety Management System (SMS) Neo from BytzSoft. Comprehensive incident analysis tools and modules ensure compliance with international safety regulations.
FocusX – AI-Powered ERP: This AI-powered ERP with in-memory computing and industry-ready templates empowers businesses with ML-driven statistics, predictive analytics, and forecasting. Customers can cherry-pick their desired modules for effective communication and secure transactions.
Foresiet: This SaaS offer from Foresiet provides an AI-powered integrated digital risk protection platform that can identify and forecast risks by analyzing over 100+ unique vectors across on-premises and cloud deployments. Get deeper visibility through content-specific threat intelligence.
Goodbook: Experience the convenience of quickly generating custom pay slips with Goodbook’s intuitive platform. The application provides personalized pay slips and simplifies your payroll process, even if you have no prior accounting knowledge.
GST Return & Reconciliation: LogiTax streamlines the filing process, saving time and ensuring accuracy, thereby optimizing cash flow during upload for businesses with multiple GSTINs. It provides intelligence-driven reconciliation reports for easy ITC claims and vendor management.
HiFairs: Virtual Art Rooms: This SaaS offer from HIDS Technologies uses augmented, virtual, and extended reality to create 2D and 3D virtual art rooms. It supports artists, buyers, and sponsors by creating a digital ecosystem to assist with branding and selling of art products.
HiLearner: Interactive Platform for Learning: Designed to support e-learning, this SaaS offer from HIDS Technologies uses augmented, virtual, and extended reality to host, design, and tailor your classrooms, workshops, and labs. Learn to do more with less, while maintaining scalability and reliability.
iAQT: iAQT is an end-to-end SaaS platform for managing your Out-of-Home (OOH) media inventory. It ensures continued visibility of point-of-sale visual media assets and real time campaign status reporting for closed loop management.
iCert Global HRM: Streamline administrative tasks and engage effectively with customers by delivering personalized experiences through the right channels at the right time with iCert Global HRM. This comprehensive HR management solution fosters customer loyalty.
iCertGlobal LMS: iCert Global’s Learning Management System is a self-paced, live online training solution providing professional certification courses. Accelerate your career with data-driven digital classrooms that offers seamless collaboration between students and teachers.
Ideanote: Ideanote enables goal-driven innovation by collecting, developing, and managing ideas efficiently within Microsoft Teams. Available in multiple languages, the app helps enterprise users achieve strategic goals, enhance customer experiences, and reduce costs.
iMXM: This mobile-enabled point-of-sale visual merchandise management solution is tailored for retail chains and brands. iMXM manages your media inventory across stores, right from planning to installation and monitoring, with real time inventory analytics and campaign planning.
iTrans: An IoT-based solution, iTrans is a blood transportation and Haemovigilance box that addresses key principles for bedside transfusion safety. It ensures patient identification alignment connecting the Haemovigilance checklist directly with the blood issue process for enhanced safety and accuracy.
KappaX: KappaX significantly enhances customer engagement, brand recall, and sales with AI-powered interactive experiences. The collaborative, no-code platform combines customer experience with interactive storytelling and uses videos to drive brand action.
Kriyam FieldSutra: Kriyam FieldSutra streamlines field operations by automating and optimizing your workforce scheduling, dispatching, and tracking. The app provides real time updates allowing you to make informed decisions and respond quickly to customer service requests.
Kyvos: Kyvos’ semantic layer solution simplifies and accelerates analytics for business intelligence and data science teams. It allows you to analyze massive amounts of historical data at scale while enabling sub-second query response times for complex queries.
Laabam One ERP: This SaaS offer from Laabam provides an end-to-end cloud-based enterprise resource planning solution to optimize operations around billing, accounting, GST, and stocks. It supports mobile app integration for efficient data handling and management.
Lever.tax Lite: Designed for startups and small businesses, Lever.tax Lite simplifies the process of accessing tax credits for R&D expenses related to employee salaries. The solution offers a user-friendly form for eligibility assessment, application preparation, and submission.
Lever.tax Premium: Experience a simpler, faster, and more cost-effective approach to obtaining tax benefits with AI-powered Lever.tax Premium. The app generates R&D reports and application details for tax credits tailored to your country’s rules and requirements.
Multi Feature IoT Smart Energy Meter: This app from Delving Research measures 3-phase electrical parameters as well as physical parameters using IoT sensors. It works via GSM, Wi-Fi, or Ethernet and can calculate required capacitor values for power factor improvement with alarm/trip controls.
MTARGET: The Email Company: MTARGET helps deliver personalized emails at scale without having your organization maintain its own email server. Gather high-quality leads and retain customers using this AI-powered platform with SMTP relay, transactional email API, email validator, and more.
NetApp BlueXP (Annual): BlueXP abstracts the complexity of architecting underlying Azure infrastructure resources, making it easier to deploy and operate NetApp’s storage, mobility, protection, and analysis services within your Azure environment. This offer is for an annual subscription.
Novus: Novus streamlines the organization of conference data and offers seamless navigation across multiple conferences relating to oncology. It fosters networking, encourages attendee feedback, and integrates with popular calendar applications.
Omada Identity Cloud: Omada Identity Cloud is a robust identity, governance, and administration service solution. It enhances your Azure Active Directory environment by monitoring identities, groups, teams, and data along with access management workflows and advanced identity analytics.
Omnisient: Omnisient’s platform allows businesses to securely share, monetize, and access 1st party data. It enables businesses to perform market benchmarking and create new revenue streams while protecting consumer privacy and ensuring data sovereignty.
Plumb5: Plumb5 is a customer engagement platform that automates conversion and retention strategies in real time by intelligently connecting all customer touchpoints. It helps your business grow exponentially with effective tagging strategies and auto segmentation.
Qualitas EagleEye Edge Application: This standalone application offers on-premises deployment of AI models allowing you to effortlessly run AI models in any framework. The Qualitas EagleEye Edge deployment tool is used for image capture, annotation, deep learning training, and more.
Qualitas EagleEye Platform: Qualitas EagleEye Platform automates quality control in manufacturing using computer vision technology to extract insights from visual data, streamline tasks, and improve decision-making processes through data labelling, report generation, and inferencing.
Relatude CMS: Relatude, a unique content management system focused on APIs, offers a combination of AI capabilities, a graph-based content model, and an efficient core engine. Its intuitive user interface caters to content producers while providing developers with data models for advanced functionality.
Relatude E-Commerce: Whether you’re working on critical B2B e-commerce solutions or simple B2C web shops, the Relatude e-commerce application seamlessly blends content and commerce, enabling you to build a cohesive online business.
Relatude Web Application Framework: Relatude Web Application Framework (WAF) rapidly develops advanced web applications with AI-powered features, graph-based content model, and an efficient core engine. Developers can reduce risks and save time as WAF handles a significant portion of the code.
Rexo Campus: Designed to help students make informed decisions, Rexo Campus provides data transparency and convenience for educational institutions. The software assists with student registration, examination management, fee collection, HR, and payroll.
Rexo ERP: Rexo ERP is a flexible, scalable solution that offers multiple cross-platform features to meet the specific needs of educational institutions. It helps schools of any size manage students, teachers, courses, and academic programs using big data and cloud analytics.
Safetrans: SafeTrans is a vein-to-vein blood transfusion traceability software that tracks, records, and supports good transfusion practices. It enables blood banks to eliminate cognitive process-based bias errors by ensuring consistent adherence to configured blood transfusion rules.
SheValues – Diversity Hiring (SaaS): SheValues is a SaaS-based recruitment platform that promotes gender equality in the workplace by connecting women in non-IT segments with job opportunities. It aids in candidate sourcing, applicant tracking, and collaborative decision-making during hiring.
Taskurai: Taskurai is a scalable platform for running background tasks and jobs using serverless queues and containers. Build your applications with a powerful and easy to use .NET SDK that’s designed to be robust and resilient and equipped with automatic and configurable retry patterns.
TeamPilot Feild Service Management: TeamPilot Field Services by LocationGuru empowers service organizations to efficiently dispatch and monitor their teams in the field while digitizing work orders, expense claims, and inventory management.
Tekmon ESG Reporting: Tekmon’s no-code platform allows users to easily browse prebuilt templates and automate data collection processes to address environmental, social, and governance issues. It enables organizations to create value from their ESG strategy, data, and reporting.
ThirdRay Data Platform: ThirdRay Data Platform is a cloud-based service that automates extraction, processing, analytics, and integration of structured content from documents, video, and voice assets to create real-time actionable business insights.
TxHelpDesk: TxHelpDesk is an omnichannel ticketing tool that allows businesses to deliver a unified and consistent support experience by centralizing customer interactions, automating workflows, and ensuring efficient handling and monitoring of customer requests.
Video Analytics, Transcoding & Storage Optimization: Neuu Labs’ video and image converter supports an extensive range of formats, ensuring compatibility with different devices and platforms. With just a few clicks, you can convert your media files to the format that suits your needs.
Vision AI For Manufacturing: Using advanced machine learning algorithms, Thinking Stack’s Vision AI for Manufacturing optimizes operational efficiency, improves product quality, and increases safety standards across the factory floor.
Vision AI For Retail Sector: Thinking Stack’s Vision AI for Retail ensures that your store layout and product placement comply with your planogram. It also provides crowd analytics by processing real-time video feeds and sends alerts about low-stock, out-of-stock, or misplaced items.
WireGuard on CentOS 7: This offer from AskforCloud provides WireGuard along with CentOS 7 on a Microsoft Azure virtual machine. WireGuard is an open-source virtual private network (VPN) that utilizes state-of-the-art cryptography for encryption.
WireGuard on CentOS 8: This offer from AskforCloud provides WireGuard along with CentOS 8 on a Microsoft Azure virtual machine. WireGuard is an open-source virtual private network (VPN) that utilizes state-of-the-art cryptography for encryption.
WireGuard on Debian 10: Providing a ready-to-use environment to implement encrypted virtual private networks, AskforCloud’s image includes WireGuard on Debian 10. More performant than OpenVPN, WireGuard is a general-purpose VPN that can run on embedded interfaces and supercomputers.
WireGuard on Debian 11: Providing a ready-to-use environment to implement encrypted virtual private networks, AskforCloud’s image includes WireGuard on Debian 11. More performant than OpenVPN, WireGuard is a general-purpose VPN that can run on embedded interfaces and supercomputers.
WireGuard on Red Hat Enterprise Linux 7: This offer from AskforCloud provides WireGuard along with Red Hat Enterprise Linux 7 on a Microsoft Azure virtual machine. WireGuard is an open-source virtual private network (VPN) that utilizes state-of-the-art cryptography for encryption.
WireGuard on Windows Server 2012 R2: This offer from AskforCloud provides WireGuard along with Windows Server 2012 R2 on a Microsoft Azure virtual machine. WireGuard is an open-source virtual private network (VPN) that utilizes state-of-the-art cryptography for encryption.
WireGuard on Windows Server 2016: This offer from AskforCloud provides WireGuard along with Windows Server 2016 on a Microsoft Azure virtual machine. WireGuard is an open-source virtual private network (VPN) that utilizes state-of-the-art cryptography for encryption.
WireGuard on Windows Server 2019: This offer from AskforCloud provides WireGuard along with Windows Server 2019 on a Microsoft Azure virtual machine. WireGuard is an open-source virtual private network (VPN) that utilizes state-of-the-art cryptography for encryption.
Go further with workshops, proofs of concept, and implementations
Data Journey using Microsoft Fabric: 1-Day Workshop: Capgemini’s workshop will present an overview of Microsoft Fabric and articulate its value, then identify a sample use case and roll out infrastructure to support the use case. Capgemini will also develop and deliver train-the-trainer sessions.
Generative AI for Your Enterprise: Proof of Concept: Knowit AB’s proof of concept will represent a cost-effective path to determine if what you’re trying to achieve is feasible and if doing it with AI is worth it. Knowit AB will offer guidance so you can start the AI journey with solid planning and best practices in place.
Infrastructure as Code on Azure – Terraform: In this workshop, SVA will discuss the theoretical and practical basics of HashiCorp’s Terraform, an infrastructure-as-code tool. Participants will learn how to create their first Terraform modules. This service is available only in German.
Mission Planning with Propel on Azure: By advising on implementation practices for Microsoft Azure and providing solution prototyping, Propel’s experts will help clients leap the chasm between product strategy and execution.
OpenAI – 2-Day Workshop: Learn how to create and refine prompts and utilize Azure OpenAI Service and the next generation of Azure AI products with CDW’s interactive workshop. By deploying use cases you can quickly differentiate and sharpen your organization’s competitive edge.
OpenAI – 2-Hour Crash Course: CDW will introduce you to key concepts of AI/ML and Generative AI so you can understand how to utilize them in real-world applications. Learn about Azure Cognitive Services, Azure Chat Playground, and a host of AI-related topics to improve your business processes.
Optimize Sales, Marketing with ML & Generative AI: In this proof of concept, data scientists from Knowit AB will develop a machine learning model for your business needs. Key sales drivers and sales forecasts will simulate different scenarios, and reports and visualizations will highlight sales and marketing opportunities.
This article is contributed. See the original author and article here.
Organizations are increasingly challenged to stay aligned with evolving business requirements and protect against expanding attack surfaces with a diverse portfolio of devices outside of traditional organizational boundaries, adding complexity to the vulnerability management process. Vulnerability management solutions provide understanding of their overall security risk posture and where to prioritize.
In recent years, Microsoft has established itself as a leading solution for vulnerability risk management (VRM) by leveraging its industry-leading threat intelligence and security expertise. Microsoft Defender Vulnerability Management provides end-to-end capabilities across the VRM lifecycle to identify, assess, prioritize, and remediate vulnerabilities, making it an ideal tool for managing an expanded attack surface and reducing overall risk posture.
Announcing availability of Defender Vulnerability Management standalone
Earlier this year we released our premium capabilities as an add-on to the core capabilities included with Defender for Endpoint Plan 2 and we are thrilled to announce Defender Vulnerability Management is now offered as a standalone solution. Now organizations not yet on Defender for Endpoint Plan 2, or have another EDR solution, or just looking to replace an existing vulnerability management solution, can take advantage of our context-aware, risk-based prioritization that leverages Microsoft’s unmatched threat intelligence, breach likelihood predictions and business contexts to prioritize vulnerabilities across their portfolio of managed and unmanaged devices.
With this significant addition of a standalone offering, we also introduced enhancements to the Microsoft 365 Defender Unified RBAC permissions model to clearly associate relevant roles & permissions with Defender Vulnerability Management (this change will not affect existing roles).
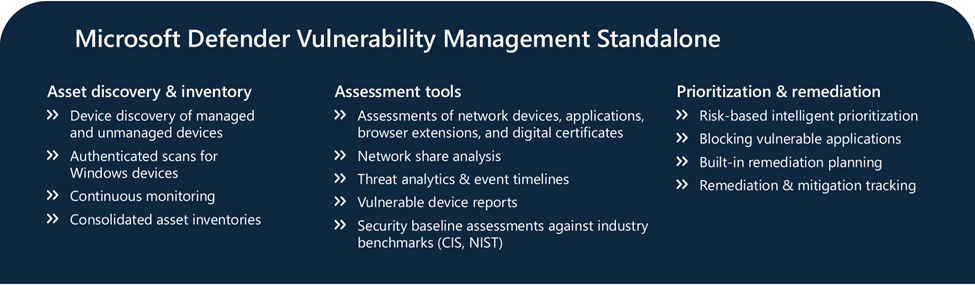
Figure: Core and premium capabilities in standalone offer
Defender Vulnerability Managementpremium capabilities provide advanced assessments with in-depth visibility into potential exposure to your assets:
Security baselines assessment – customized profiles that you can create to assess and monitor endpoints against industry security benchmarks, such as CIS, STIG and Microsoft benchmarks. Instead of running never-ending compliance scans, monitor your organization’s security baselines seamlessly according to customized profiles.
Block vulnerable applications – In addition to the core remediation capabilities, proactively reduce risks with this premium capability by taking mitigation steps such as warning users or blocking known vulnerable versions of applications. Leverage software usage insights to understand the impact of the vulnerable application.
Hardware and firmware assessment – full visibility into device manufacturer, processors, and BIOs information to assess vulnerabilities for hardware and firmware risks.
Digital certificates and browser extensions assessment – expand your asset coverage beyond devices and gain entity-level visibility into the various browser extensions and digital certificates installed across assets.
Network shares analysis– protect against misconfigurations used in the wild by attackers for lateral movement, reconnaissance, data exfiltration, and more.
Authenticated scans for vulnerability assessment– run scans on unmanaged devices by remotely targeting by IP ranges or hostnames to remotely access the devices for vulnerability assessment purposes.
Defender Vulnerability Management capabilities are integrated into Defender for Endpoint and Defender for Cloud enabling security teams to assess their exposure and address changes to improve security posture of your organization. You now have flexibility in our offering across endpoints and servers. More info on our updated website.
Figure: Availability of Core and premium capabilities across offerings that include Defender Vulnerability Management for endpoints and servers.
Your needs for vulnerability assessments and analysis spans platforms, clouds and modalities and our strategy for Defender Vulnerability Management is to support these environments that span multiple platforms across both on-premises and cloud. We have recently added Fortinet to the network devices and container support is our second big news.
Announcing vulnerability assessment (VA) for Containers powered by Microsoft Defender Vulnerability Management in Defender for Cloud
With the rise of containerization and microservices, it’s more important than ever to secure the software supply chain and ensure that container images are free from vulnerabilities.
Today, as a result of Defender for Cloud’s integration with Microsoft Defender Vulnerability Management, we are excited to announce thegeneral availability of agentless container posture management in Defender CSPM and the public preview of vulnerability assessment scanning for container images in Defender for Containers.
These new container vulnerability assessment capabilities powered by Defender Vulnerability Management include:
Agentless vulnerability assessment for containers
Zero configuration for onboarding
Near real-time scan of new images
Daily refresh of vulnerability reports
Coverage for both ship (ACR) and runtime (AKS)
Support for OS and language packages
Real-world exploitability insights (based on CISA kev, exploit DB and more)
Support for ACR private links
Agentless container posture management in Defender CSPM, powered by Defender Vulnerability Management
To help proactively strengthen the security posture of your containerized environments, Defender CSPM provides a new vulnerability assessment offering for containers powered by Defender Vulnerability Management, with near real-time scans of new images, daily report refreshes, and real-world exploitability insights. Vulnerabilities are added to Defender CSPM security graph for contextual risk assessment and calculation of attack paths. Customers can now access out-of-the-box container vulnerability assessments that, combined with attack path analysis and agentless discovery of the Kubernetes estate, enable security teams to hunt for risks with the cloud security explorer and prioritize the vulnerabilities that pose the greatest risks to the organization. This agentless approach allows security teams to gain visibility into their Kubernetes and containers registries across the SDLC, removing friction and footprints from the workloads.
Figure Attack path analysis outlining a containerized application publicly exposed with high severity vulnerabilities discovered using Defender Vulnerability Management
Public preview of vulnerability assessment for containers in Defender for Containers, powered by Defender Vulnerability Management
In providing comprehensive cloud workload protection, Defender for Containers’ new integration with Defender Vulnerability Management now provides our customers with vulnerability assessments through one-click enablement, near real-time scan of new images, and daily result refreshes of current and emerging vulnerabilities enriched withexploitability insights – all to help organizations focus on vulnerabilities with the greatest security impact to their organization.
New vulnerability assessment recommendation powered by Defender Vulnerability Management
Enable Container vulnerability assessments powered by Defender Vulnerability Management in one click here.
If you’re interested in learning more about Defender Vulnerability Management visit our website for updated pricing and packaging and datasheet. Read more about our plans and capabilities here. To take advantage of our free 90-day trial, check out our interactive guide, and read more information in our product documentation.
For additional information and other relevant updates on protecting cloud workloads please visit the Microsoft Defender for Cloud blog.


.png")


.png")


Recent Comments