by Scott Muniz | Aug 24, 2020 | Uncategorized
This article is contributed. See the original author and article here.
HDInsight 4.0 brings upgraded versions for all Apache components , but for this lab we specifically focus on the Hive versions.
| Component |
HDInsight 4.0 |
HDInsight 3.6 |
| Hive |
3.1.0 |
2.1.0 ; 1.2.1 |
Some key areas that Hive 3.x differs from earlier versions are.
Client
- Hive CLI support is deprecated in Hive 3.x and only the thin client Beeline is supported
Transaction Processing
- ACID tables are the default table type in Hive 3.x with performance as good as non Acid
- Automatic query cache
Catalogs
- Spark and Hive use independent catalogues for Spark SQL or Hive tables in same or independent clusters
- The Hive Warehouse connector is used to integrate between Spark and Hive workloads.
For an exhaustive overview of advancements in Hive 3.0 , listen to this presentation.
Lab
This lab is a simulation of a real migration and will consist of the following steps in sequence.
- Create an HDInsight Hadoop 3.6 cluster.
- Create test data in the HDInsight 3.6 cluster. We use TPCDS data here.
- Run TPCDS tests to simulate Hive workloads.
- Copy the Hive 2.1 Metastore and upgrade the Metastore copy to 3.1.
- Delete the older HDInsight Hadoop 3.6 cluster.
- Create a new HDInsight 4.0 cluster with the older storage account and new upgraded 3.1 Hive Metastore.
Run the same TPCDS tests to ensure everything is working as intended.
Create a Storage account
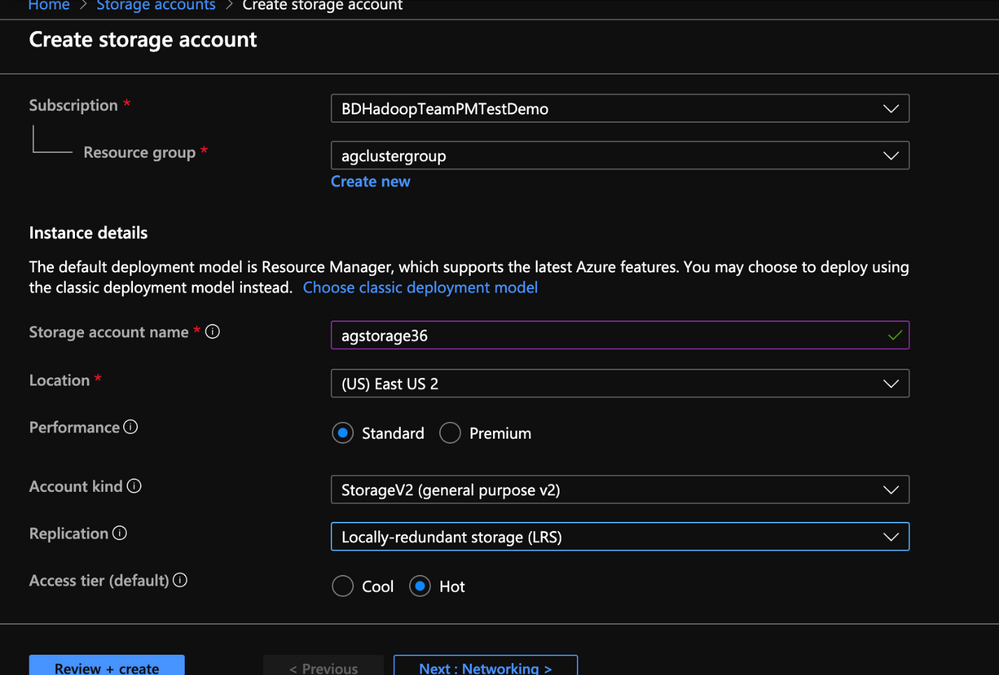
1. Create storage account and click create
2. Populate the Basics tab of Storage account with the below information.
- Resource group: Create or use an existing resource group
- Storage account name: Enter a unique name for your storage account( I used agstorage36 to represent an older cluster )
- Location: Enter an Azure region( HDInsight cluster needs to be created in same the Azure region)
- Performance: Standard
- Account Kind: StorageV2(general purpose v2)
- Replication: Locally-redundant storage(LRS)
- Access Tier: Hot

3. Populate the Advanced tab of Storage account with the below information.
- Security(Secure transfer required): Enabled
- Virtual Network(Allow access from): All networks
- Data Protection(Blob soft delete:( Disabled
- Data Lake Storage Gen2(Hierarchical Namespace): Disabled
< Insert Image >
4. Make no changes to the Tags Tab and post validation click Create on the Review + Create tab to create an Azure Blob storage account.

5. In the next section we would create the external metastore for the HDInsight Hadoop 3.6 cluster.
Create an External Metastore for the HDInsight Hadoop 3.6 cluster
1. On the Azure Portal Navigate to the SQL Database blade and click create

2. Populate the Basics tab of SQL Server with the below information.


3. Compute+Storage : Click on the Configure Database link to Navigate to the database configuration page

4. In the Database Configuration page select the Standard Tier with the below settings and click Apply
- DTU: 200
- Data Max Size : A few GBs

5. In the Networking tab ensure the following settings are met
- Connectivity Method : Public endpoint
- Firewall Rules:
- Allow Azure Services and Resources to Access this Server : Yes
- Add current IP address: Yes

6.Leave the Additional settings and Tags to their default state
7. In the Review+Create tab click Create

8. In this section we created an External Hive Metastore(aghive36db) which we will use subsequently in an HDInsight 3.6 cluster.

Provision HDInsight Hadoop 3.6(Hive 2.1.0) cluster from Azure Management Portal
To provision HDInsight LLAP with Azure Management Portal, perform the below steps.
-
Go to the Azure Portal portal.azure.com. Login using your azure account credentials.
-
Select Create a resource -> Azure HDInsight -> Create
-
Click the Custom(size ,settings, apps) slider

2. In the Basics tab populate the following values.
- Resource Group:Put the cluster in the same resource group as the Storage account and Metastore
- Cluster Name: Enter the cluster name. A green tick will appear if the cluster name is available.
- Region: Choose the same region as the storage account
- Cluster Type : Cluster Type – Hadoop
- Version: Hadoop 2.7.3 (HDI 3.6)

- Cluster login username:Enter username for cluster administrator(default:admin)
- Cluster login password:Enter password for cluster login(admin)
- Confirm Cluster login password:Repeat the same password as used earlier
- Secure Shell(SSH) username:_Enter the SSH username for the cluster(default:sshuser)
- Use cluster login for SSH: Check this box(this makes your SSH password same as the cluster admin password)

5. In the Storage tab populate the following values.
- Primary Storage Type: Azure Storage
- Selection method: Select from list
- Primary Storage account: Select the Azure storage blob account created earlier.
- Container: Enter a name for the storage container

6. Metastore Settings: Enter the name for the SQL Database/SQL Server combination that was created in the last step


7. Click Authenticate to enter the username and password for the Metastore. Enter the username and password that was set for the SQL Server in the last exercise.

8. In the Configuration+Pricing tab select the node sizes for the cluster. There are no hard and fast rules and the recommendation is to select larger nodes for faster data processing. Note that choosing nodes that are too small may result in failures.

9. In the Review+Create tab , review the cluster specifics and click Create.

10. In this step we created an HDInsight 3.6 Hadoop cluster with preconfigured external metastore and storage account.

11. In the next step we will create some test data in the cluster to represent a production workload.
Create TPCDS test data on the HDInsight 3.6 Hadoop cluster with Beeline CLI
Goal of this step is to help generate TPCDS data with hive as a close representation of production data.
- Clone this repo
git clone https://github.com/hdinsight/tpcds-hdinsight && cd tpcds-hdinsight
- Upload the resources to DFS
hdfs dfs -copyFromLocal resources /tmp
- Run TPCDSDataGen.hql with settings.hql file and set the required config variables.( 1 GB of data)
beeline -u "jdbc:hive2://`hostname -f`:10001/;transportMode=http" -n "" -p "" -i settings.hql -f TPCDSDataGen.hql -hiveconf SCALE=1 -hiveconf PARTS=1 -hiveconf LOCATION=/HiveTPCDS/ -hiveconf TPCHBIN=`grep -A 1 "fs.defaultFS" /etc/hadoop/conf/core-site.xml | grep -o "wasb[^<]*"`/tmp/resources
SCALE is a scale factor for TPCDS. Scale factor 10 roughly generates 10 GB data, Scale factor 1000 generates 1 TB of data and so on.
PARTS is a number of task to use for datagen (parrellelization). This should be set to the same value as SCALE.
LOCATION is the directory where the data will be stored on HDFS.
TPCHBIN is where the resources are found. You can specify specific settings in settings.hql file.
- Create tables on the generated data.
beeline -u "jdbc:hive2://`hostname -f`:10001/;transportMode=http" -n "" -p "" -i settings.hql -f ddl/createAllExternalTables.hql -hiveconf LOCATION=/HiveTPCDS/ -hiveconf DBNAME=tpcds
- Generate ORC tables and analyze
beeline -u "jdbc:hive2://`hostname -f`:10001/;transportMode=http" -n "" -p "" -i settings.hql -f ddl/createAllORCTables.hql -hiveconf ORCDBNAME=tpcds_orc -hiveconf SOURCE=tpcds
beeline -u "jdbc:hive2://`hostname -f`:10001/;transportMode=http" -n "" -p "" -i settings.hql -f ddl/analyze.hql -hiveconf ORCDBNAME=tpcds_orc
- Run a few queries to represent a production workload. Change the query number in the end to test various queries.
beeline -u "jdbc:hive2://`hostname -f`:10001/tpcds_orc;transportMode=http" -n "" -p "" -i settings.hql -f queries/query12.sql
-
In this section we have created test data on the cluster and then tested a few queries representative of production datasets.
-
In the next section we would upgrade the Hive Metastore from 2.1.1. to 3.1.
Upgrade the Hive Metastore from Hive 2.1.1 to Hive 3.1
Create a copy of the Hive Metastore in HDInsight 3.6
- From the HDInsight 3.6 cluster click on the External Metastores.

2. Click on the Metastore to open the SQL DB portal.

3. On the SQL DB portal click on Restore.

- In the restore blade choose the below values to get the most recent copy of the Hive Metastore
- Select Source : Point-in-time
- Database name: Assign a new db name*( I chose the name aghive40db)
- Restore Point:
- Date: Current date
- Time: Current time
- Target Server: Choose SQL server create earlier
- Elastic Pool: None
- Pricing Tier: Same tier as older metastore db
Click OK to continue with creation of a copy

5. After creation, the new SQL db(aghive40db) appears as an additional database in the same SQL Server.


Upgrade the Hive 2.1.1 Metastore
- On the HDInsight cluster click on Script Actions.

2. On the Script action page populated the parameters as described below and click Create

3. The script action starts on the cluster

4. The script comes back with a green check mark which indicates successful completion.

Validate the Hive Metastore version
After the script finishes , we would need to validate if the Hive Metastore is indeed upgraded
- Launch the new SQL db portal(aghive40db) and click on Query Editor.You could alternatively use SSMS or Azure Data Studio.

-
Enter the below query in the query editor and click Run. Select * from [dbo].version
-
Validate to see the if the schema version was upgraded to 3.1.0 . This would indicate that the Hive metastore was succesfully upgraded.

4. Post up-gradation , delete the older HDInsight 3.6 cluster.


-
In this section we upgraded the new Hive Metastore aghive40db from version 2.1.2 to 3.1.0 post which we deleted the older HDInsight cluster.
-
In the next section , we would create a new HDInsight 4.0( Hive 3.1) cluster with the new Hive Metastore and the older storage account.
Provision HDInsight Hadoop 4.0(Hive 3.1.0) cluster from Azure Management Portal
To provision HDInsight LLAP with Azure Management Portal, perform the below steps.
-
Go to the Azure Portal portal.azure.com. Login using your azure account credentials.
-
Select Create a resource -> Azure HDInsight -> Create
-
Click the Custom(size ,settings, apps) slider
-
In the Basics tab populate the following values.
- Resource Group:Put the cluster in the same resource group as the Storage account and Metastore
- Cluster Name: Enter the cluster name. A green tick will appear if the cluster name is available.
- Region: Choose the same region as the storage account
- Cluster Type : Cluster Type – Hadoop
- Version: Hadoop 3.1.0(HDI 4.0)

- Cluster login username:Enter username for cluster administrator(default:admin)
- Cluster login password:Enter password for cluster login(admin)
- Confirm Cluster login password:Repeat the same password as used earlier
- Secure Shell(SSH) username:_Enter the SSH username for the cluster(default:sshuser)
- Use cluster login for SSH: Check this box(this makes your SSH password same as the cluster admin password)

- In the Storage tab populate the following values.
- Primary Storage Type: Azure Storage
- Selection method: Select from list
- Primary Storage account: Select the Azure storage blob account created earlier.
- Container: Enter the same storage container that was used for the previous HDInsight 3.6 cluster

- Metastore Settings: Enter the name for the new SQL Database/SQL Server(agclusterdbserver/aghive40db) combination that was upgraded in the last step

6. Click Authenticate to enter the username and password for the Metastore. Enter the username and password that was set for the SQL Server.

7. In the Configuration+Pricing tab select the node sizes for the cluster. There are no hard and fast rules and the recommendation is to select larger nodes for faster data processing. Note that choosing nodes that are too small may result in failures.

8. In the Review+Create tab , review the cluster specifics and click Create.

-
In this step we created an HDInsight 4.0 Hadoop cluster with preconfigured upgraded external metastore and mapped its storage to a preexisting storage container.
-
In the next step we will create some test data in the cluster to represent a production workload.
Run TPCDS test data on the HDInsight 4.0 Hadoop cluster with Beeline CLI
Goal of this step is to run TPCDS tests with an upgraded Hive Metastore to represent regression tests of Hive workloads.
-
The TPCDS repo should already be cloned and TPCDS data should already exist from what we created earlier.
-
SSH into the cluster using the ssh credentials provided durinng cluster creation.
-
Run a few TPCDS queries to represent a production regression test . Change the query number in the end to test various queries.
beeline -u "jdbc:hive2://`hostname -f`:10001/tpcds_orc;transportMode=http" -n "" -p "" -i settings.hql -f queries/query12.sql
- In this lab we migrated multiple HDInsight 3.6 Hive workloads to HDInsight 4.0.
Further reference:
by Scott Muniz | Aug 24, 2020 | Uncategorized
This article is contributed. See the original author and article here.
A few days ago I was discussing with a customer about backup and restore on the SQL DW so I made this lab: https://techcommunity.microsoft.com/t5/azure-synapse-analytics/lab-how-to-restore-a-deleted-database-on-azure-sql-dw/ba-p/1589360
After some discussion, another doubt was raised about how to schedule a user restore point. Remember SQL DW will create 42 restore points and the user can additionally create more 42 restore points. Basically it is a point in time restore.
Between some possibilities, one of them is to use the run book to schedule a power shell restore point.
Public doc: https://docs.microsoft.com/en-us/azure/automation/start-runbooks#:~:text=%20Start%20a%20runbook%20with%20the%20Azure%20portal,the%20status%20of%20the%20runbook%20job.%20More%20
Here it goes…Step by Step:
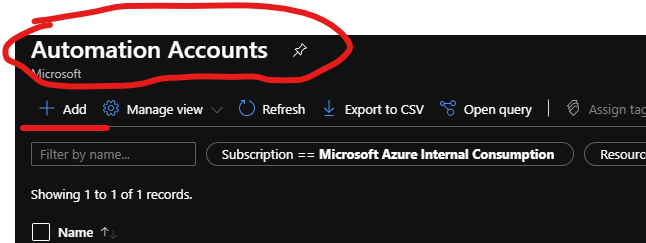
Let’s start with the Run Book.
- Create an automation account by searching on the azure portal
- Add a new account – Fig 1:

Fig 1 New Account
- Runbooks -> Create a runbook – Fig 2

Fig 2 Create a Run book
3. Our runbook will use power shell code as this is pretty much the example available on the public doc. Fig 3

Fig 3 Power Shell
4. Here is the power shell script for a customer restore point: https://docs.microsoft.com/en-us/azure/synapse-analytics/sql-data-warehouse/sql-data-warehouse-restore-points
$SubscriptionName="<YourSubscriptionName>"

$ResourceGroupName="<YourResourceGroupName>"

$ServerName="<YourServerNameWithoutURLSuffixSeeNote>"  # Without database.windows.net

$DatabaseName="<YourDatabaseName>"

$Label = "<YourRestorePointLabel>"


Connect-AzAccount

Get-AzSubscription

Select-AzSubscription -SubscriptionName $SubscriptionName


# Create a restore point of the original database

New-AzSqlDatabaseRestorePoint -ResourceGroupName $ResourceGroupName -ServerName $ServerName -DatabaseName $DatabaseName -RestorePointLabel $Label
5. Once you fill the gaps, open power shell and test the script
6. You can check the script’s result on the SSMS by running the following:
select * from sys.pdw_loader_backup_runs
You can confirm it worked by checking the label that you defined for the restore point on the power shell script. My label was portal_test – Fig 4:

Fig 4 check label
6. If everything is working as it should. Proceed in creating the Job, in other words, back to run book:
Here the public doc for runbooks:https://docs.microsoft.com/en-us/azure/automation/learn/automation-tutorial-runbook-graphical
$SubscriptionName="Name of your Subscription"
$ResourceGroupName="Name of your resource group"
$ServerName="Your Server Name "   # Without database.windows.net
$DatabaseName="Your Database Name"
$Label = "Any label you want - I defined as test as I do not have imagination"

	# Ensures you do not inherit an AzContext in your runbook
	Disable-AzContextAutosave –Scope Process

	$Conn = Get-AutomationConnection -Name AzureRunAsConnection
	Connect-AzAccount -ServicePrincipal -Tenant $Conn.TenantID -ApplicationId $Conn.ApplicationID -CertificateThumbprint $Conn.CertificateThumbprint

	New-AzSqlDatabaseRestorePoint -ResourceGroupName $ResourceGroupName -ServerName $ServerName -DatabaseName $DatabaseName -RestorePointLabel $Label
Note: If by any chance when you tried to use the notebook you experience the same errors as follows ( I did):
Error: The term ‘Connect-AzAccount’ is not recognized as the name of a cmdlet, function, script file, or operable program. Check the spelling of the name, or if the path was included verify that the path is correct and try again.
This has been documented on the troubleshooting public doc:
https://docs.microsoft.com/en-us/azure/automation/troubleshoot/runbooks
The script to update the cmdlet is on the GitHub – run it on the runbook:
https://raw.githubusercontent.com/microsoft/AzureAutomation-Account-Modules-Update/master/Update-AutomationAzureModulesForAccount.ps1
I Needed the Az Modules. Therefore, I created a runbook to run the GitHub script.
Note: [string] $AzureModuleClass = ‘Az’,
[Diagnostics.CodeAnalysis.SuppressMessageAttribute("PSUseApprovedVerbs", "")]
param(
    [Parameter(Mandatory = $true)]
    [string] $ResourceGroupName,

[Parameter(Mandatory = $true)]
    [string] $AutomationAccountName,

[int] $SimultaneousModuleImportJobCount = 10,

[string] $AzureModuleClass = 'Az',

[string] $AzureEnvironment = 'AzureCloud',

[bool] $Login = $true,

    [string] $ModuleVersionOverrides = $null,

    [string] $PsGalleryApiUrl = 'https://www.powershellgallery.com/api/v2'
)
This one was importing the AzureRM, but I ran a second time to import the Az as well. Fig 5:

Fig 5 Update the modules
You also can check the modules available on the portal.
Automation accounts->name of your account->Shared Resources ->modules – Fig 6:

Fig 6 Check Modules
7. The next step would be linked to a schedule. This option is on the run book and allows you to add an existing schedule or create a new one. Fig 7

Fig 7 Schedule link
That is it!
Liliam
UK Engineer
by Scott Muniz | Aug 24, 2020 | Uncategorized
This article is contributed. See the original author and article here.
Issue:
With reference to article https://docs.microsoft.com/hi-in/azure/service-fabric/service-fabric-reliable-actors-delete-actors , after Calling the DeleteActorMethod and enumerating the Actor list, the disk space is not getting cleaned up.
What can we analyze from our end:
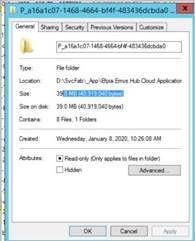
We can check the snapshot of the partition size after RDP into the node. Below is an example of one the Partition folder (E.g.: a16a1c07-1468-4664-bf4f-483436dcbda0) size before Calling DeleteActorMethod:


After Calling DeleteActorMethod: Disk space remains same:

Points to Note:
- Actual usage on disk depends on numerous factors from the underlying store and we don’t see immediate reduction of disk usage right after Actor deletion.
- Deleting data does not shrink the physical size of the DB down; it only shrinks the logical size (the size of the data) of the DB. However, the remaining space is reused when more data is added.
For example, imagine the execution of the following operations:
- Inserting 10GB of data.
- Deleting 7GB of data.
- Inserting 3GB of data.
The physical size of the DB remains to be 10GB after the occurrence of all the above operations. This is because of physical size not going down after the data is deleted as stated above. However, during step 3, the existing available space is reused instead of creating additional physical space.
- If we are interested in bringing the physical size of the db down, we can perform compaction. Shrinking of db file size is not supported proactively as it impacts write latency.
The recommended way is to test on workloads with real data which is having huge size. Disk space is rarely a bottleneck is general workloads.
- For compacting the partitions, we have added settings under LocalEseStoreSettings:
CompactionThresholdInMB = set to the max_data_size that customer expects to add like 5 GB + delta
FreePageSizeThresholdInMB = some threshold for skipping compaction if bloating is less than this size.. e.g. 500 MB
CompactionProbabilityInPercent = 5 or 10 %
These settings will make sure that compaction of partitions happen at appropriate time to reduce bloating of db files.
These can be set in settings.xml under “<ActorName>LocalStoreConfig” like “GameActorServiceLocalStoreConfig”
- Minimum db file size with 0 data is 4 MB. After that as we write data, file size will grow. Deletion information is shared by Hima above. Generally, file space is reused.
- The current compaction steps are deprecated in favor of new automatic compaction feature that we are working on priority and will update the Release Notes when the same is public.
- There may be a question where a node in the cluster fails for some reason and the cluster will automatically reconfigure the service replicas to the available node to maintain availability.
During this scenario, does the disk space reclaims?
The answer is No, because db file gets copied from some other node (which is in UP state) to new node.
For completeness, Replica folder and files get deleted on old node where replica is not needed anymore. New replica/node will get db files from current primary.
by Scott Muniz | Aug 23, 2020 | Uncategorized
This article is contributed. See the original author and article here.
SQL Server Extents, PFS, GAM, SGAM and IAM and related corruptions-2
In previous post, we discussed the PFS, GAM and SGAM pages. Today, I’m going show you two related corruptions on these pages.
SQL Server checks the bit in PFS, GAM, SGAM and IAM are checked when new pages are allocated. It guarantees that it does not store data to a wrong page/extent.
These pages are crucial to SQL Server, SQL Server considers it as a corruption if they are messed up.
I’m going to use the same database I used in previous .
You may restore the backup file and give it a try. Please note, restoring database will consume some pages and change the PFS, GAM, SGAM and IAM. You may get a different view from my mine.
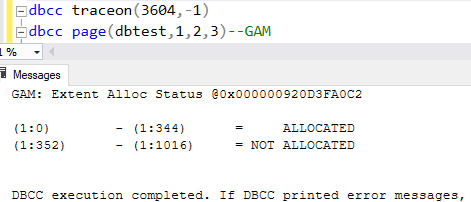
Let me show you some of the content of GAM and SGAM before the corruption samples.
Here are the GAM and SGAM page result:
1.GAM

2.SGAM

3.We can tell that the extent of page(1:352) and extents greater than that have not been allocated.
4.Let’s take a dive into the GAM page.

5.‘00000000 00f0’ interpretation:

5)Pages and extents of heaptable1
select allocated_page_file_id as [FileID],allocated_page_page_id as [PageID],page_type_desc,extent_page_id/8 as ExtentID, is_mixed_page_allocation,extent_page_id as [First Page in Extent],extent_page_id+7 as [LastPage in Extent],is_allocated From sys.dm_db_database_page_allocations(db_id(),object_id(‘dbo.heaptable1′),null,null,’detailed’) order by allocated_page_page_id

You will find all the data in this backup file dbtest20200823.zip.
1.Now let’s discuss the first corruption scenario: error 8903
1)The page 245,246,247,328,329,330,331,332,333 belongs to the table heaptable1.
2)Extent 30 and 41 have these pages.
3)These two extents are marked as allocated in GAM. What happen if the extents are marked as ‘not allocated’?
The answer is : that extent will be consider as corrupted and DBCC Checkdb may report the 8903 error:
Msg 8903, Level 16, State 1, Line 22
Extent (xx:xx) in database ID xx is allocated in both GAM (xx:xx) and SGAM (xx:xx).
4)It usually happens when disks or other hardware run into issue…
5)Here is the result of DBCC PAGE after the GAM page in data file is messed up:

6)’00000000 00f2’ interpretation.

7)DBCC PAGE of GAM with parameter 3.

8)Here is the result of DBCC CHECKDB:

9)Why (1:312) is marked as corruption?
Because I messed up the ’00000000 00f0ffff’: I replaced it with ‘00000000 00f2ffff‘.
The extent(1:328) is actually allocated, but ‘00000000 00f2ffff‘ conflicts the fact.
Takeaway: When SQL Server set a bit of extent to 0 in GAM to allocate an extent, it also set the bits in other allocation pages, like SGAM, IAM etc, that’s the normal behavior.
If the bits in these allocation pages conflict each other, SQL Server considers it’s corruption scenario.
Question: is the command ‘dbcc checkdb(dbtest,repair_rebuild)’ able to fix the issue? Why?
Please download the dbtest20200823_error8903.zip and give it a try.
2.Now let’s discuss the second corruption scenario: error 8905
1).The extent id of page(1:352) is 44, it’s not allocated yet. What if the extent 44(or the extent after 44) is marked as allocated only in GAM?
The answer is : that extent will be consider as corrupted and DBCC Checkdb may report the 8905 error:
Msg 8905, Level 16, State 1, Line 13
Extent (xxx:xxx) in database ID xx is marked allocated in the GAM, but no SGAM or IAM has allocated it.
2)It usually happens when disks or other hardware run into issue…
3)Here is the result of DBCC PAGE after the GAM page in data file is messed up:

4)’00000000 00f0ffff fe’ interpretation.

5)DBCC PAGE of GAM with parameter 3.

6)Here is the result of DBCC CHECKDB:

7)Why (1:512) is marked as corruption?
Because I messed up the ’00000000 00f0ffff ff’: I replaced it with ‘00000000 00f0ffff fe’.
Takeaway: When SQL Server set a bit of extent to 0 in GAM to allocate an extent, it also sets the bits in other allocation pages, like SGAM, IAM etc, that’s the normal behavior.
If the bit is only set in GAM, but not in SGAM or IAM, then there is erroneous info in the allocation pages, it’s a corruption! SQL Server detects it and raise an error.
Question: Is the command ‘dbcc checkdb(dbtest,repair_rebuild)’ able to fix the issue? Why?
Please download the dbtest20200823_error8905.bak and give it a try.
by Scott Muniz | Aug 23, 2020 | Uncategorized
This article is contributed. See the original author and article here.
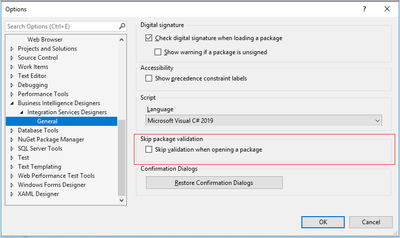
When opening SSIS package, SSDT loads the package, validates it and shows you the validation results by default. To accelerate the opening of SSIS package, we enable you to skip package validation when opening the package and validate it when you want to, since SQL Server Integration Services Projects version 3.9 and SSDT for VS2017 15.9.6.
This tutorial walks you through the process on how to accelerate the opening of SSIS package by skipping package validation.
Switch “Skip validation when opening a package” on/off
To switch “Skip validation when opening a package” on/off, select the “Tools -> Options” item on SSDT menu and check/uncheck the “Business Intelligence Designers -> Integration Services Designers –> General -> Skip validation when opening a package” checkbox on “Options” window.
When the checkbox is checked, package validation will be skipped when opening the package. When the checkbox is unchecked, package will be validated when opened. By default, the checkbox is unchecked.

SSDT monitors SSIS package opening time and hint you to switch “Skip validation when opening a package” on
SSDT monitors the time of opening SSIS package. If the time is too long, SSDT will pop up a dialog below to hint you to switch “Skip Validation when opening a package” on. If you select “Yes”, the checkbox “Skip validation when opening a package” in the window above will be checked and the package validation will be skipped when opening the package. If you check “Do not show this dialog again”, this dialog won’t show up again regardless you select “Yes” or “No”.

Validate package proactively
When “Skip validation when opening a package” is switched on, you can validate the package proactively by right clicking the package design panel and clicking the “Validate” button.

by Scott Muniz | Aug 23, 2020 | Uncategorized
This article is contributed. See the original author and article here.
In my previous post, we discussed how Raspberry PI can turn into a remote controller, using the LIRC module. Throughout this post, I’ll be literally remote controlling even outside the home network, using Power Platform.
The sample codes used in this post can be found at this GitHub repository.
node.js API App Server
There is an npm package, called node-lirc. With this package, we can easily build a node.js application to handle the LIRC command.
Remote Controller Function
Let’s write a simple remote.js module. Create a function, called remote(). It takes the device name and command (line #5-9). What it does is to just run the LIRC command, irsend SEND_ONCE <device> <command> (line #6). Then, create a command object of remoteControl that contains onSwitchOn and onSwitchOff functions.
    let lirc_node = require('lirc_node');

    lirc_node.init();

    const remote = (device, command) => {
        lirc_node.irsend.send_once(device, command, () => {
            console.log(command);
        });
    }

    const remoteControl = {
        onSwitchOn: (device) => {
            remote(device, "SWITCH_ON");
        },

        onSwitchOff: (device) => {
            remote(device, "SWITCH_OFF");
        }
    }

    module.exports = remoteControl;
API Server Application
We’ve got the remote controller module. This time, let’s build an API app that uses the remote controller module. If we use the express package, we can build the API app really quickly. Let’s have a look at the code below. it defines both endpoints for turning on and off appliances, /remote/switchon and /remote/switchoff respectively (line #6, 17). This example uses the GET verb, but strictly speaking, the POST verb is way closer. Finally, it allocates the port number of 4000 for this application (line #28).
    let express = require('express');
    let remote = require('./remote');

    let app = express();

    app.get('/remote/switchon', function(req, res) {
        let device = req.query.device;
        remote.onSwitchOn(device);

        let message = {
            "message": device + " turned on"
        }

        res.send(message);
    });

    app.get('/remote/switchoff', function(req, res) {
      let device = req.query.device;
      remote.onSwitchOff(device);

        let message = {
            "message": device + " turned off"
        }

        res.send(message);
    });

    app.listen(4000, () => {
      console.log("app started !!");
    });

    module.export = app;
Now we’ve got the API server app ready to run. Double check package.json so that the API can be run with the following command (line #4).
    {
        ...
        "scripts": {
            "start": "node app.js"
        },
        ...
    }
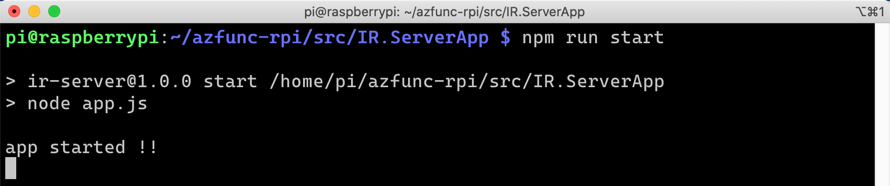
Run the command, npm run start to run the API app.

The API app is ready to receive requests. Open a web browser and send a request for the remote controller.
We’ve now got the API app up and running for the remote controller.
Secure Tunnelling to Home Network – ngrok
The API running on Raspberry PI resides within the home network. It means that, unless we open a secure channel, it can’t be accessible from the Internet because my home network uses the private IP address range like 172.30.xxx.xxx. There are many ways to sort out this issue, but I’m going to use ngrok to open a secure tunnel that allows only specified services. For more details, refer to their official documents. First of all, download the application and install it, then run the following command to open a secure tunnel.
./ngrok http 4000
The UI of ngrok looks like the following picture. As we use its free version, we can’t use a custom domain but are only allowed the randomly generated URL, every time we run it. The picture says it’s now https://48b6ff595189.ngrok.io, but the next time, it’ll be different.
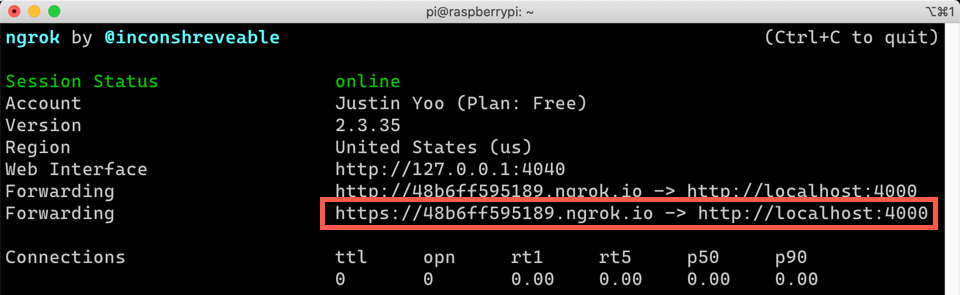
With this ngrok URL, we can access to the home network from the Internet. Let’s have a look at the video:
Controlling Remote Controller with Azure Functions
The purpose of the secure tunnelling is to run the remote controller from Azure Functions on the Internet. We can quickly build an Azure Functions app with node.js. The following function code uses either query string parameters or request body payload to populate both device and power values (line #6-7). In addition to that, it gets the ngrok-generated URL from the environment variables (line #9-11). By combining them (line #14), the function app calls the remote controller on Raspberry PI (line #16).
    const axios = require('axios');

    module.exports = async function (context, req) {
        context.log('JavaScript HTTP trigger function processed a request.');

        let device = (req.query.device || (req.body && req.body.device));
        let power = (req.query.power || (req.body && req.body.power));

        let baseUri = process.env.REMOTE__BASE_URI;
        let switchOnEndpoint = process.env.REMOTE__ENDPOINTS__SWITCHON;
        let switchOffEndpoint = process.env.REMOTE__ENDPOINTS__SWITCHOFF;
        let endpoint = power == 'on' ? switchOnEndpoint : switchOffEndpoint;

        let requestUri = baseUri + endpoint + "?device=" + device;

        let response = await axios.get(requestUri);

        context.res = {
            // status: 200, /* Defaults to 200 */
            body: response.data
        };
    }
Let’s run the function app on my local machine and send a request to the remote controller through ngrok.
Deploy the function app to Azure and run it again. Everything goes alright.
Controlling Remote Controller through Power Platform
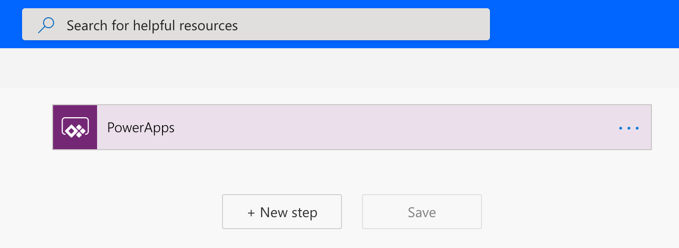
Azure Functions simply works as a proxy that calls the ngrok-secured remote controller API. It’s OK we stop right here, as long as we use a web browser. But let’s be fancier, using Power Platform. Power Automate handles the workflow of the remote controller by calling the Azure Functions app and Power Apps defines the behaviours how to “remote control” home appliances.
We can call Azure Functions directly from Power Apps, but the separation of concerns is also applied between Power Automate and Power Apps – control the workflow and control the behaviours. Let’s build the workflow first.
Power Automate Workflow
First of all, create a workflow instance at Power Automate. As Power App only triggers it, it sets the Power App as a trigger.

Once the instance is created, it opens the visual designer screen. Can you see the Power App trigger at the top?
As this workflow simply calls the Azure Functions app, search up the HTTP action.
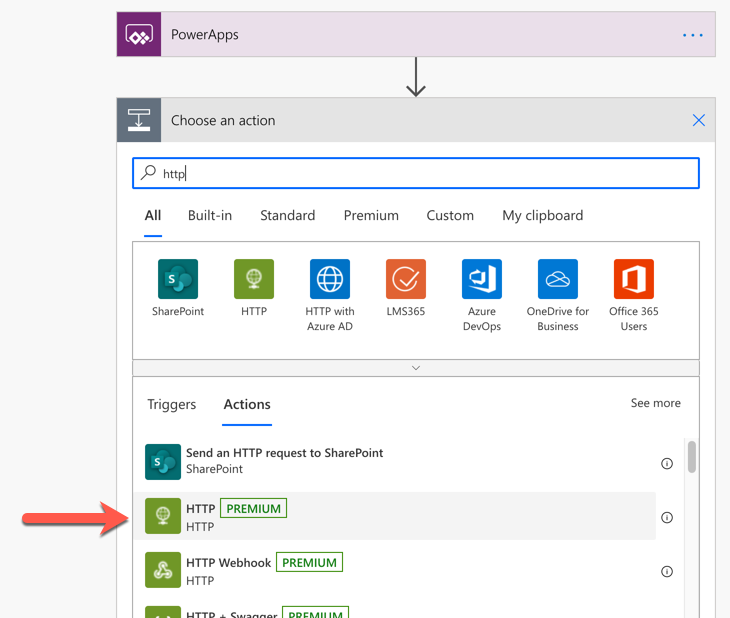
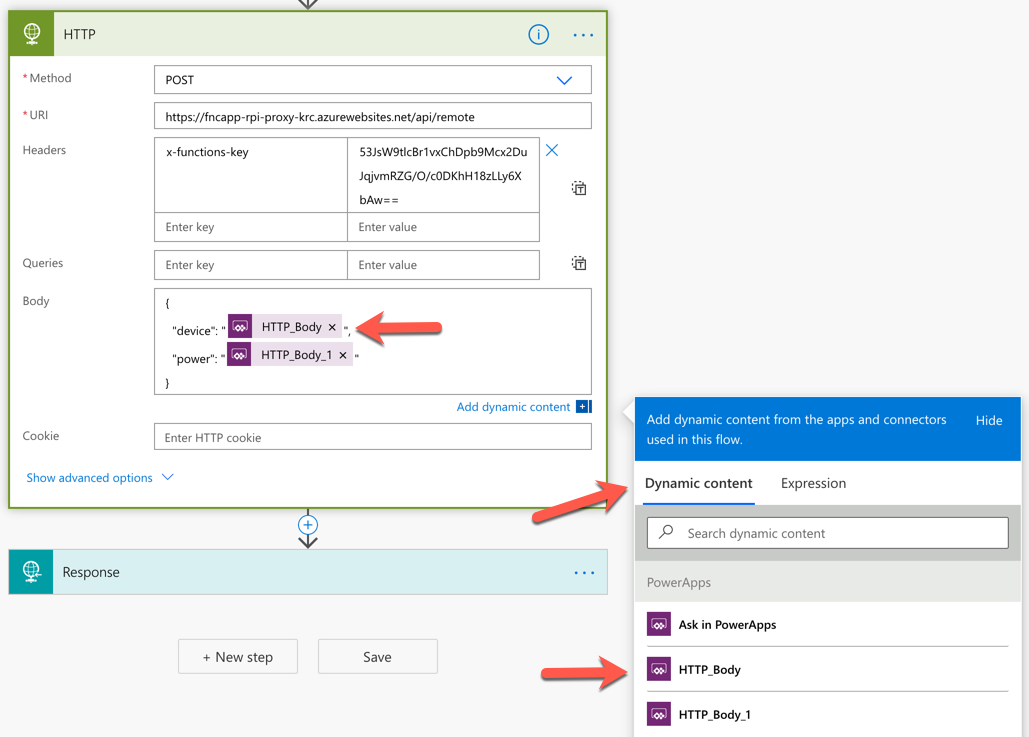
We created the Azure Functions endpoint to accept both GET and POST verbs. When we test it on the browser, we had to send the request through the GET verb. In Power Automate, it’s better to use the POST verb to send requests to the function app.
Set the function app endpoint URL and header like below. You can see both HTTP_Body and HTTP_Body_1 at the bottom-right side corner. Both represent device and power, respectively, which will be explained later in this post.
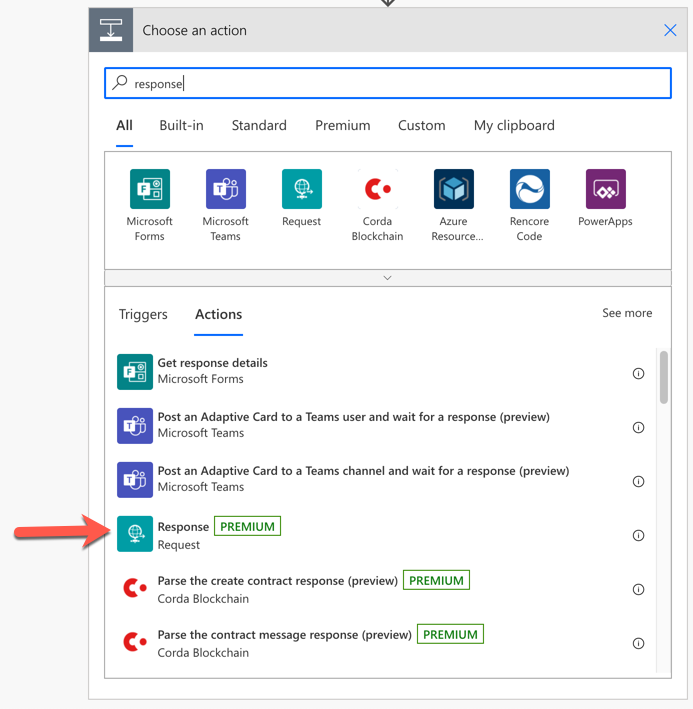
Search up the HTTP response action to return the execution result from the function app endpoint to Power App.
Put the entire HTTP action response to the response action.
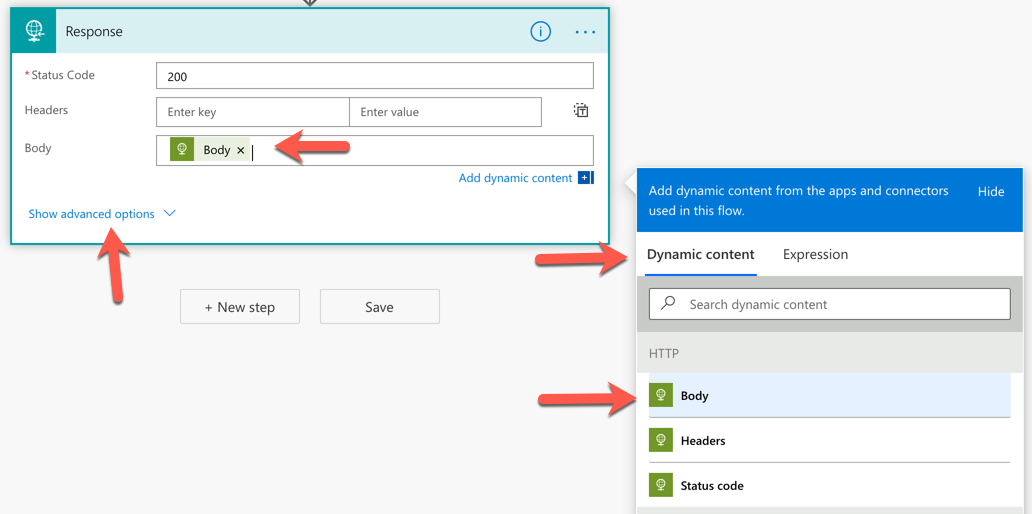
Click the Show advanced options button to define a JSON schema for Power Apps to recognise what the response might look like:
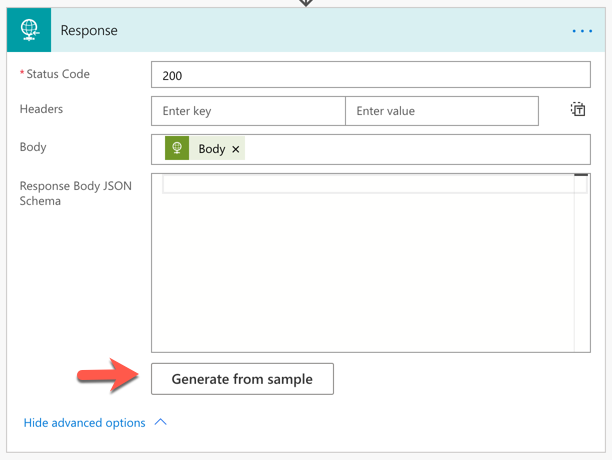
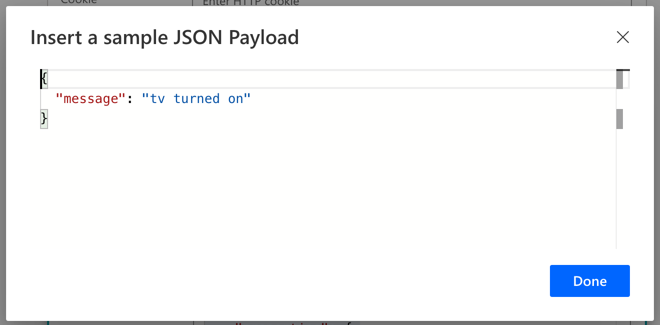
Click the Generate from sample button and paste the response payload taken from the previous example.
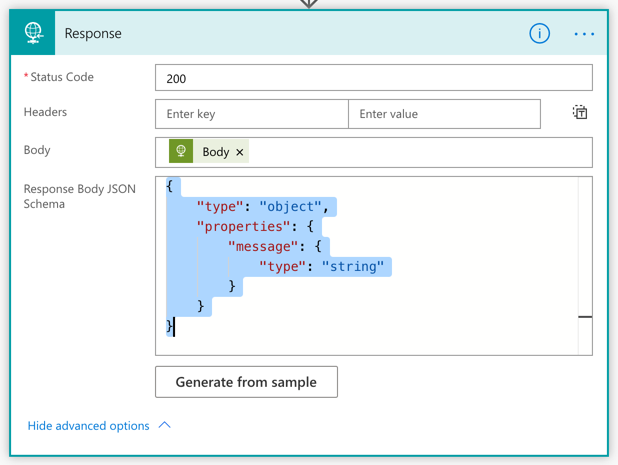
Then, it automatically generates the JSON schema.
We’ve now got the Power Automate workflow that calls the Azure Functions endpoints.
Power App Remote Controller for All Home Appliances
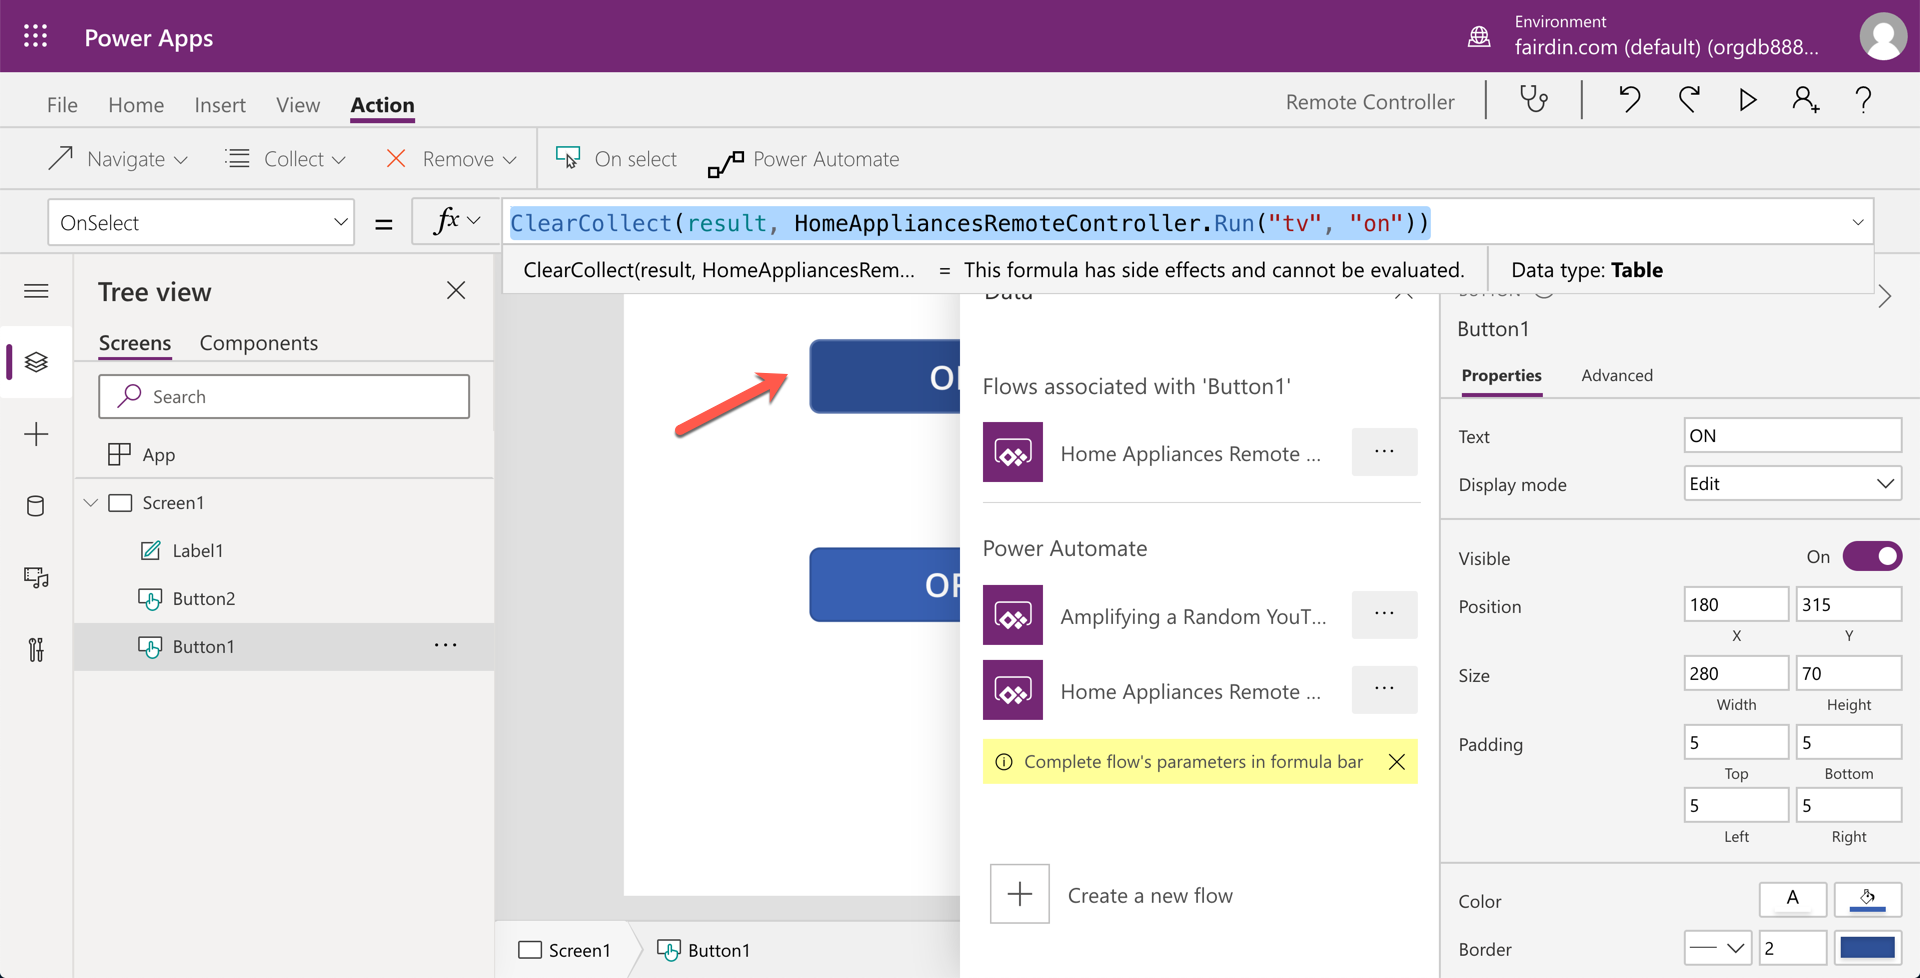
Let’s build the “real” remote controller with Power Apps. Add two buttons and one label controls. Set the name of “ON” to the first button and “OFF” to the second button.
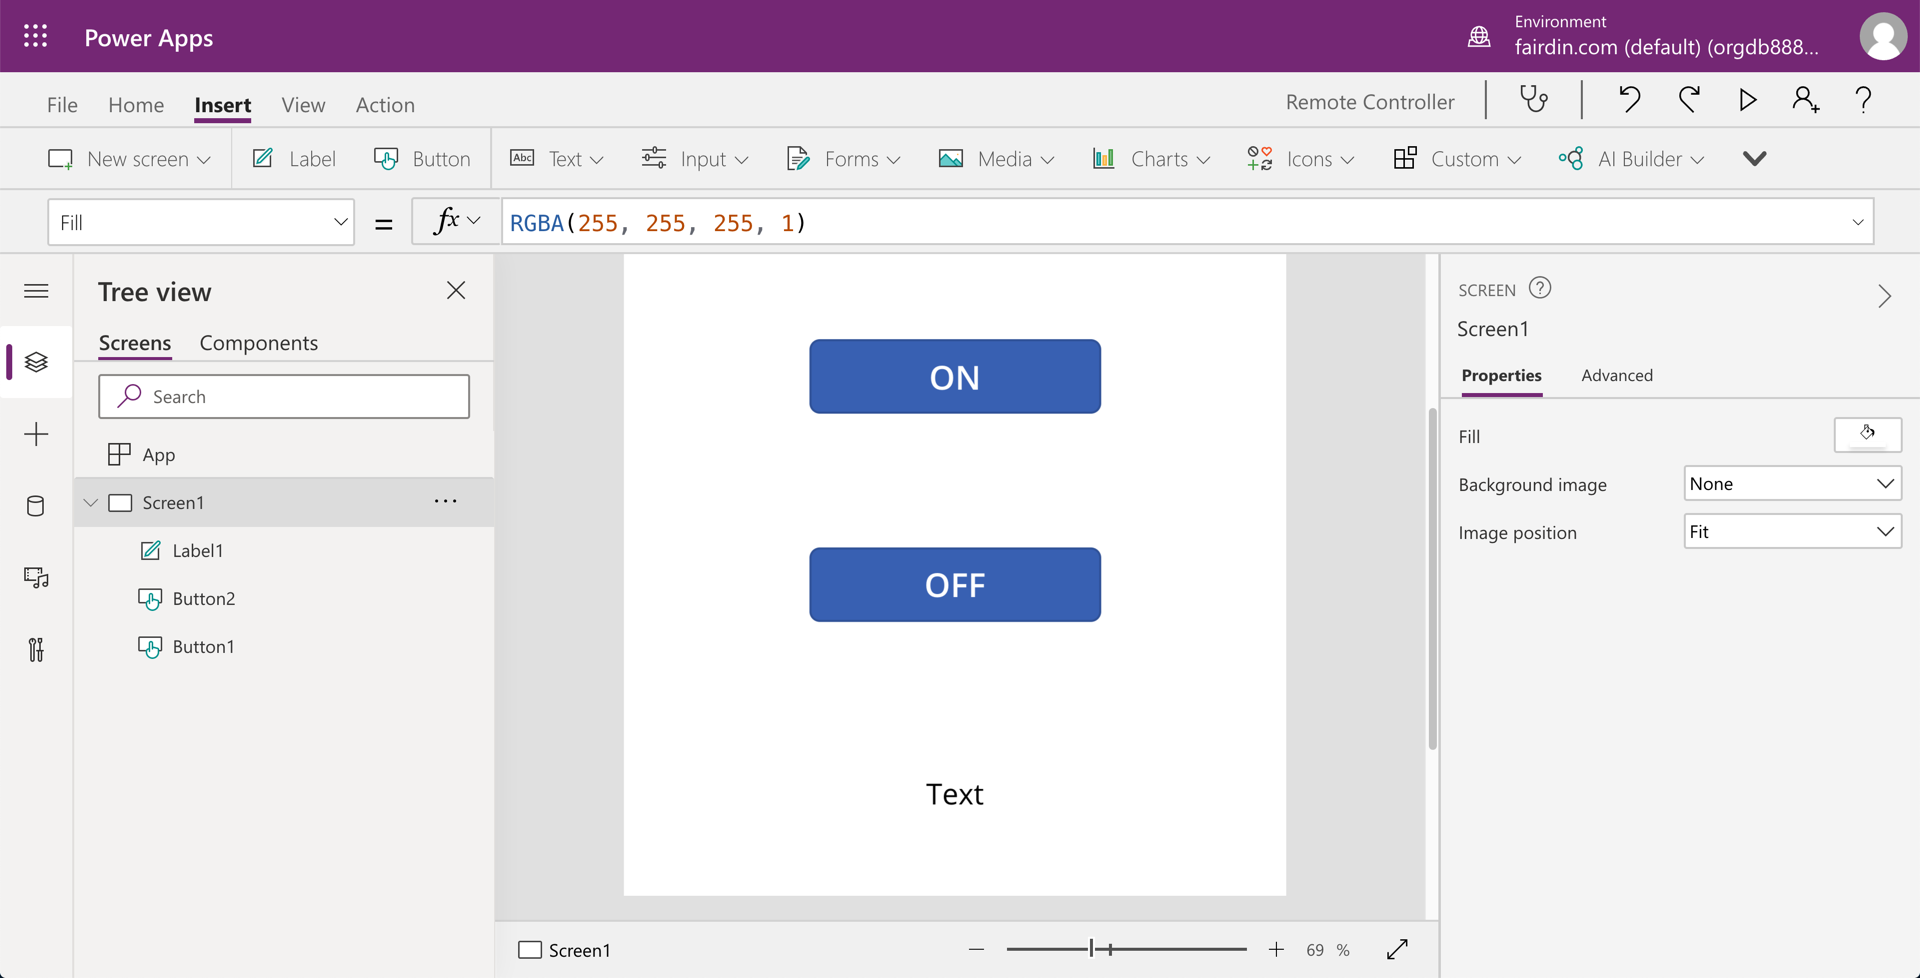
Connect the Power Automate workflow of Home Appliances Remote Controller with the ON button. The HomeAppliancesRemoteController.Run() function represents the workflow that takes two parameters of tv and on. Do you remember both HTTP_Body and HTTP_Body_1 from the Power Automate workflow that takes device and power respectively? These tv and on are the ones.
Like the ON button, the OFF button calls the same workflow with different parameters – tv and off.
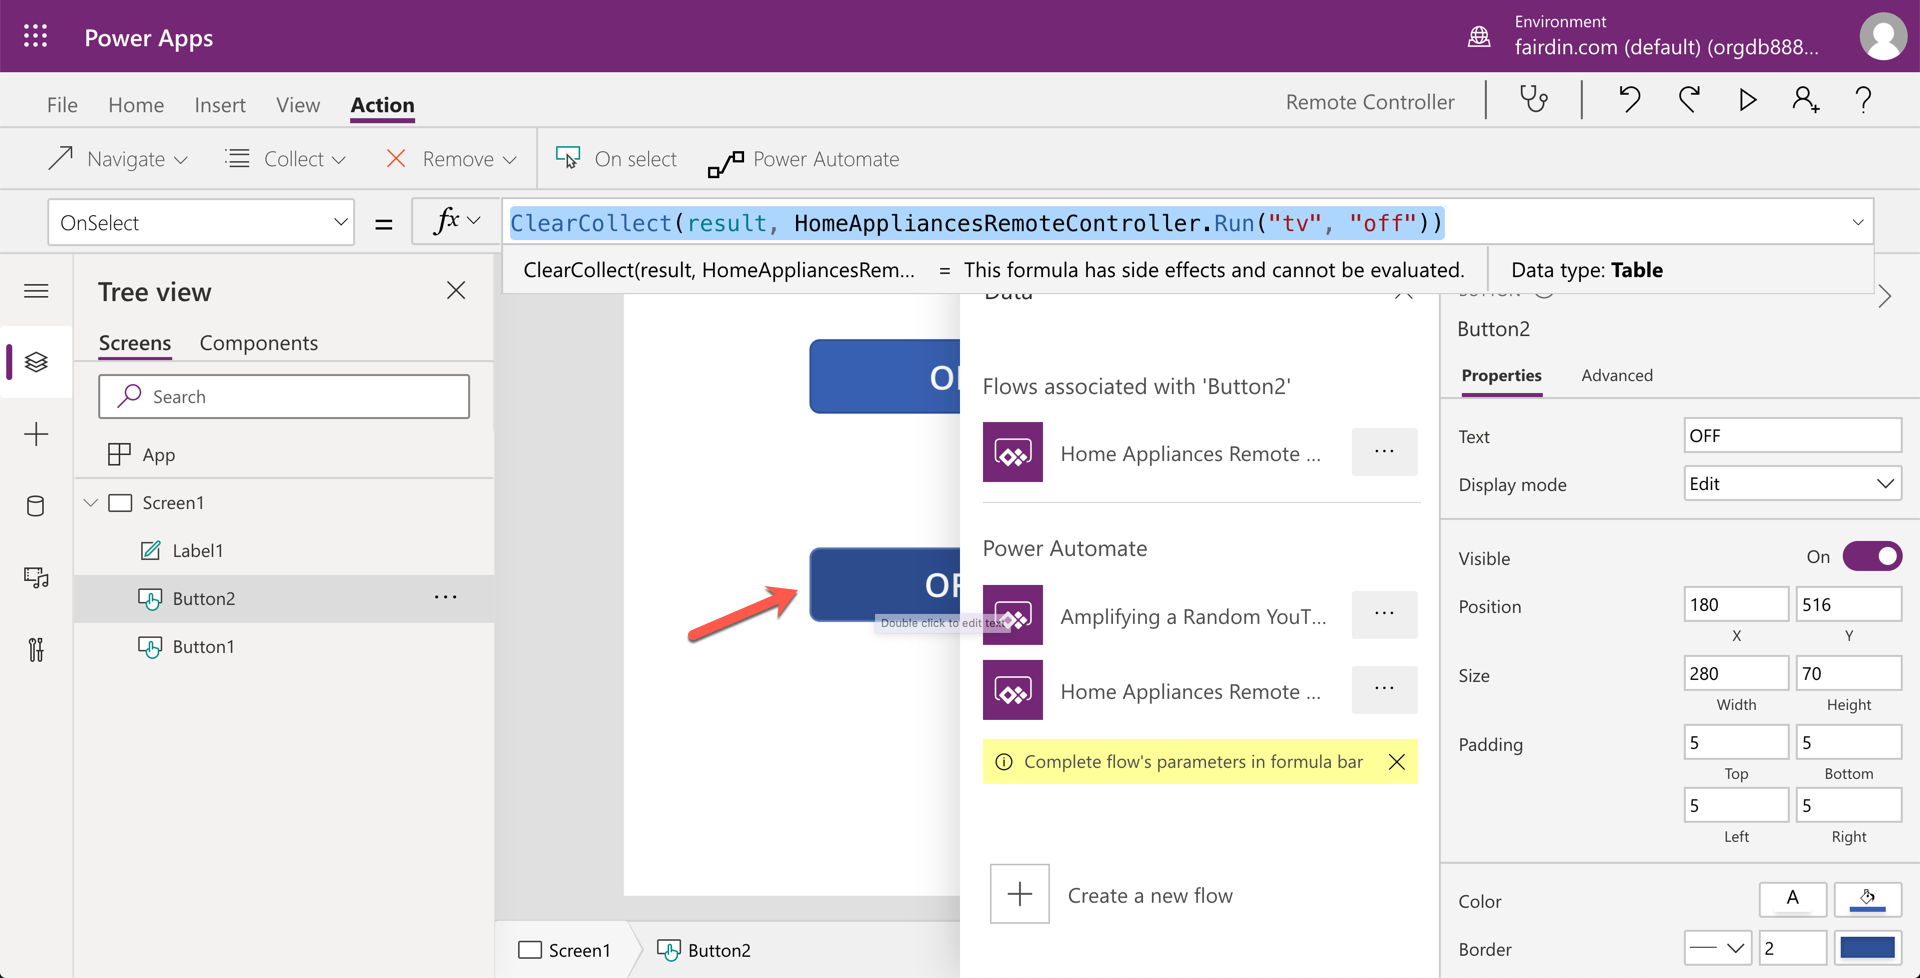
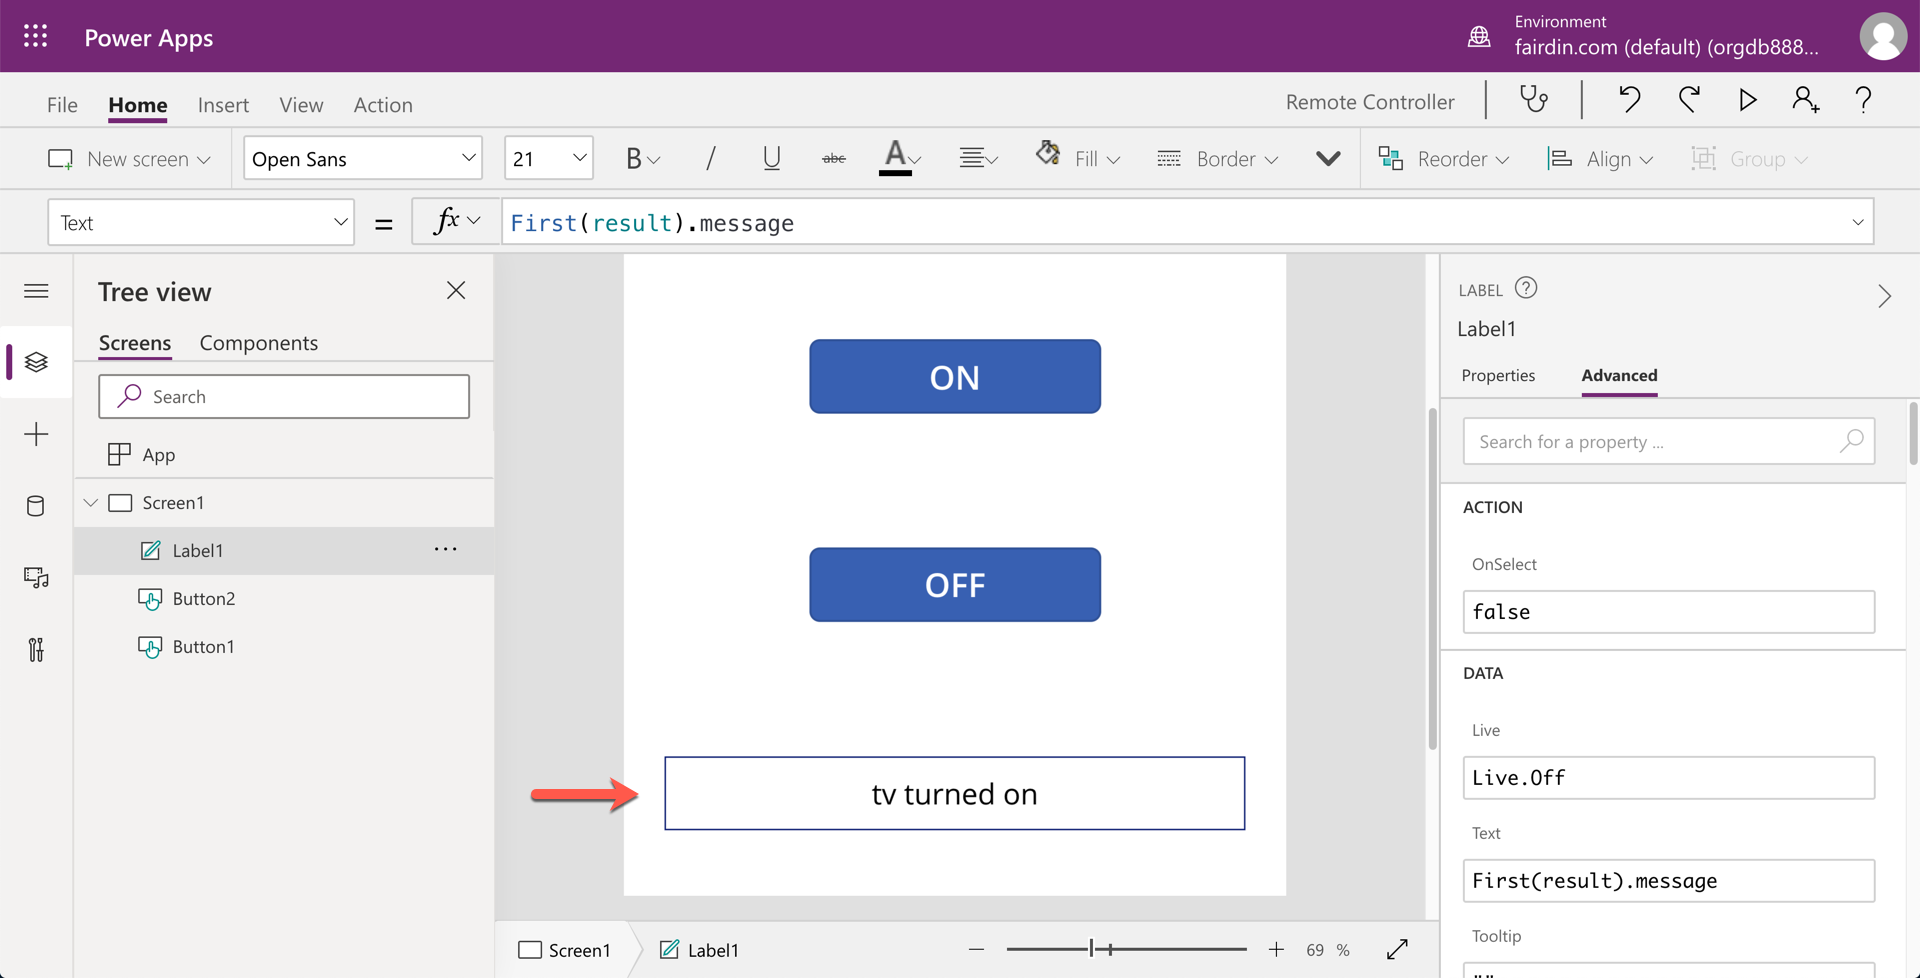
The text label shows the result of the call.
We just use only one appliance, that is TV. But if we add two extra buttons for an air-conditioning system, we can send parameters like winia and on, or winia and off.
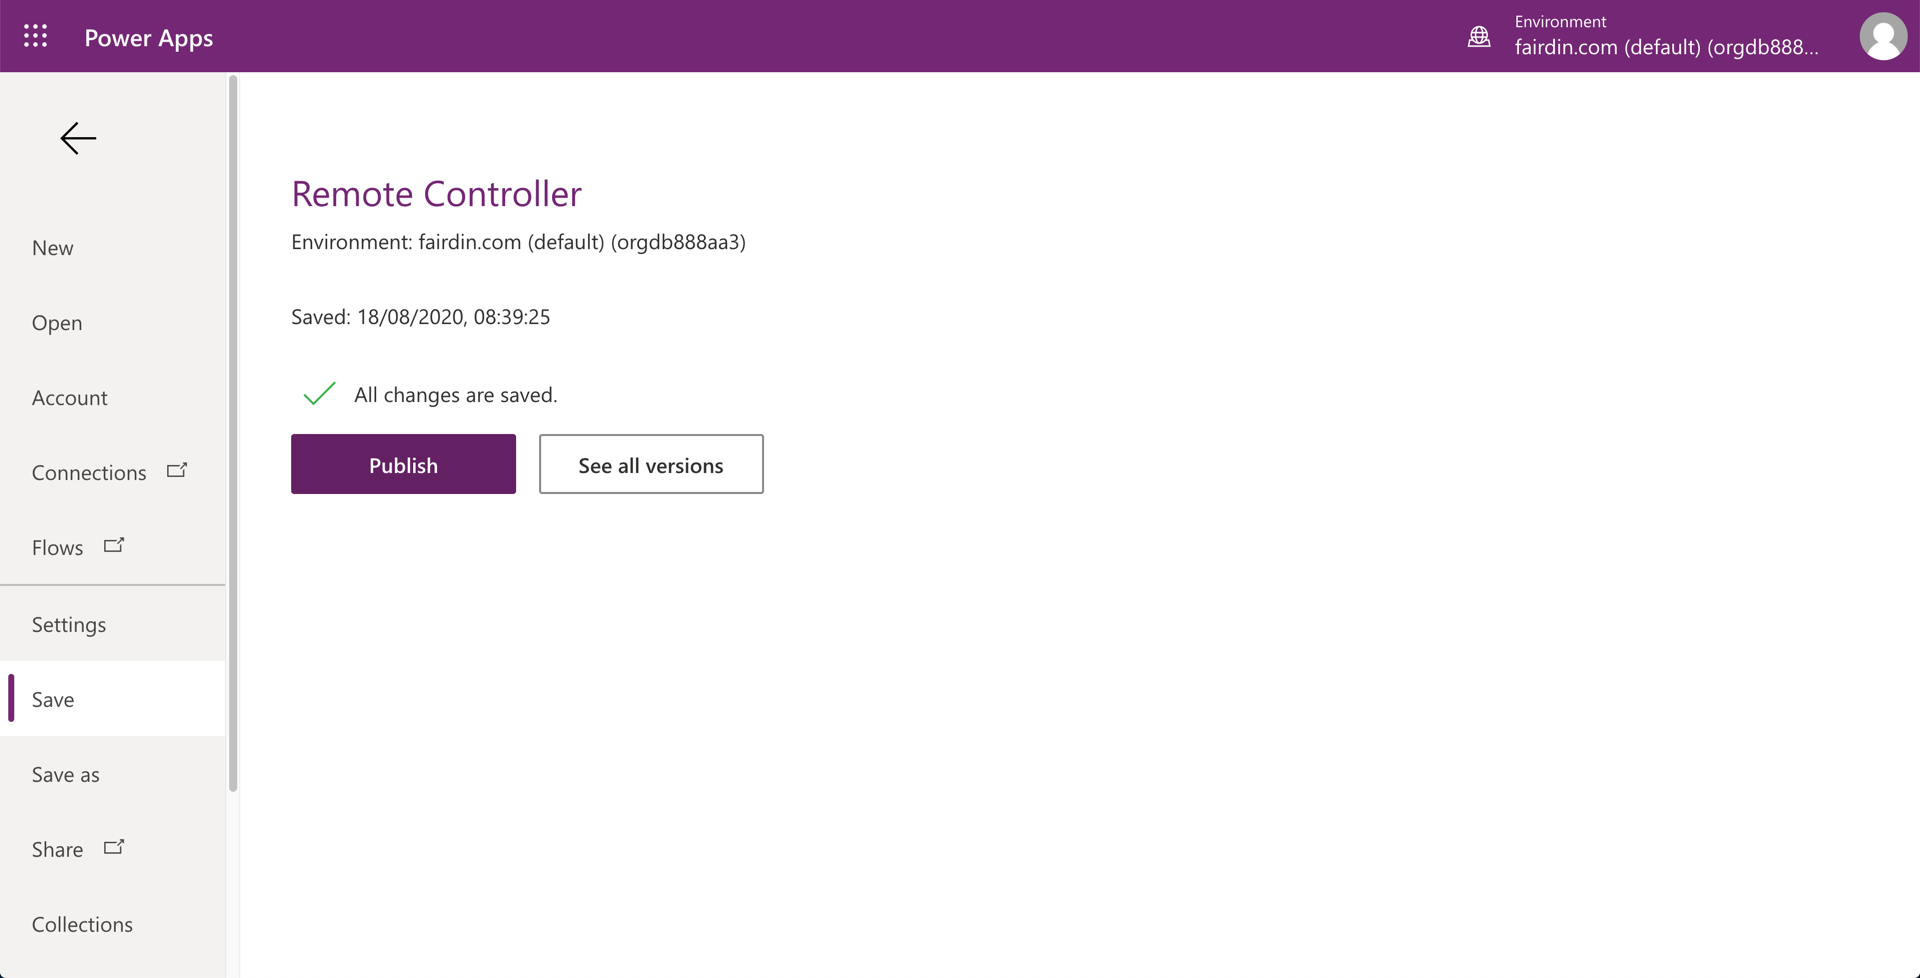
Save and publish the Power App.
On our mobile phone, the Power App might look like this video:
If I run this app in front of the TV, it looks like the following video:
So far, we built an API app, opened a secure tunnel, and built an Azure Function app, Power Automate workflow and Power App. Through this Power App, we can now control our home appliances outside the home. As there are plenty of scenarios for Power Platform, I would really like you to run your idea. Are you fascinated? It’s your turn now.
This article was originally published on Dev Kimchi.
by Scott Muniz | Aug 23, 2020 | Uncategorized
This article is contributed. See the original author and article here.
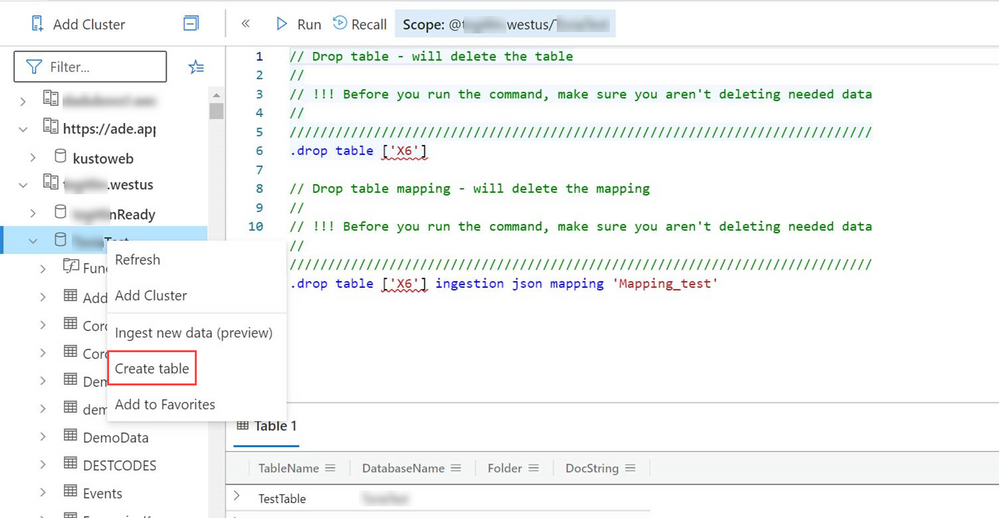
Create a table easily and quickly using 1-click ingestion.
One-click ingestion helps you ramp-up quickly to create database tables, mapping structures. Select data from different kinds of sources in different data formats to define the table schema.
To access the wizard from the Azure Data Explorer web UI, right-click the database row in the left menu of the Azure Data Explorer web UI and select Create Table.

The service automatically generates schema, which you can then change. Add new mapping based on your data source.
Feel free to use this tool to explore at will, as you will be given the option to revert all changes.
Read more about one-click ingestion

by Scott Muniz | Aug 22, 2020 | Uncategorized
This article is contributed. See the original author and article here.
I’m going to start a series of posts talking about SQL Server allocation pages and corruption. Each post will have samples showing how SQL Server use these pages and scenarios of corruption.
The first post will talk about the Extents, PFS, GAM, SGAM and IAM and related corruptions, you can find all concepts from following two pages:
Pages and Extents Architecture Guide
Under the covers: GAM, SGAM, and PFS pages
As there are many concepts and samples, I’m going to discuss the topics in two or three posts.
1.Extents
Extents are the basic unit in which space is managed. An extent is eight physically contiguous pages, or 64 KB. This means SQL Server databases have 16 extents per megabyte.
SQL Server has two types of extents:
· Uniform extents are owned by a single object; all eight pages in the extent can only be used by the owning object.
· Mixed extents are shared by up to eight objects. Each of the eight pages in the extent can be owned by a different object.
Up to, and including, SQL Server 2014 (12.x), SQL Server does not allocate whole extents to tables with small amounts of data. A new table or index generally allocates pages from mixed extents. When the table or index grows to the point that it has eight pages, it then switches to use uniform extents for subsequent allocations. If you create an index on an existing table that has enough rows to generate eight pages in the index, all allocations to the index are in uniform extents. However, starting with SQL Server 2016 (13.x), the default for all allocations in the database is uniform extents.
Sample 1: The first 8 pages are stored in mixed extent.
1)Create an empty database in SQL Server 2019 instance and enable the mixed extent allocation.
create database dbtest
go
alter database dbtest set MIXED_PAGE_ALLOCATION on
2)Create a heap table and insert one row.
create table heaptable1(c1 int, c2 varchar(8000))
insert heaptable1 values(1,REPLICATE(‘a’,1000))
3)Let’s check how these rows and pages stored in SQL Server.
select ht1.c1,ht1.c2, p.file_id,p.page_id, is_mixed_page_allocation
From heaptable1 as ht1 CROSS APPLY sys.fn_PhysLocCracker(%%physloc%%) as p inner join sys.dm_db_database_page_allocations(db_id(),object_id(‘dbo.heaptable1′),null,null,’detailed’) as dddpa
on p.file_id=dddpa.allocated_page_file_id and
p.page_id=dddpa.allocated_page_page_id

Because there is only 1 row, in one page, it’s stored in mixed extent.
The page id is:(1:305).
2.PFS
Page Free Space (PFS) pages record the allocation status of each page, whether an individual page has been allocated, and the amount of free space on each page. The PFS has 1-byte for each page, recording whether the page is allocated, and if so, whether it is empty, 1 to 50 percent full, 51 to 80 percent full, 81 to 95 percent full, or 96 to 100 percent full.
After an extent has been allocated to an object, the SQL Server Database Engine uses the PFS pages to record which pages in the extent are allocated or free. This information is used when the SQL Server Database Engine has to allocate a new page. The amount of free space in a page is only maintained for heap and Text/Image pages. It is used when the SQL Server Database Engine has to find a page with free space available to hold a newly inserted row. Indexes do not require that the page free space be tracked, because the point at which to insert a new row is set by the index key values.
A new PFS, GAM or SGAM page is added in the data file for every additional range that it keeps track of. Thus, there is a new PFS page 8,088 pages after the first PFS page, and additional PFS pages in subsequent 8,088 page intervals. To illustrate, page ID 1 is a PFS page, page ID 8088 is a PFS page, page ID 16176 is a PFS page, and so on. There is a new GAM page 64,000 extents after the first GAM page and it keeps track of the 64,000-extents following it; the sequence continues at 64,000-extent intervals. Similarly, there is a new SGAM page 64,000 extents after the first SGAM page and additional SGAM pages in subsequent 64,000 extent intervals. The following illustration shows the sequence of pages used by the SQL Server Database Engine to allocate and manage extents.
Sample 2: PFS page detail, how does SQL Server map the value ‘1’,’2’,’3’,’4’ to ’50 Percent full’,’80 Percent full’,’95 Percent full’ and ‘100 Percent full’.
1)The first PFS page is (1:1).
2)Run DBCC PAGE to display the content:

As the size of row is 1KB, the usage of the page is around 1000.0/8096=12%, so it’s marked as 50 percent full.
Let’s display the content again using the parameter 1 instead of 3.

The value is 61.
3)Let’s keep inserting another 4 rows.
insert heaptable1 values(2,REPLICATE(‘b’,1000))
insert heaptable1 values(3,REPLICATE(‘c’,1000))
insert heaptable1 values(4,REPLICATE(‘d’,1000))
insert heaptable1 values(5,REPLICATE(‘e’,1000))
4)The total size of 5 rows are around 5KB, the usage is around 5000.0/8096=61%, which is greater than 50% , but less than 80%, so it’s marked as 80 percent full.

Let’s display the content again using the parameter 1 instead of 3.

The value is 62.
5)Let’s keep inserting another 2 rows.
insert heaptable1 values(6,REPLICATE(‘f’,1000))
insert heaptable1 values(7,REPLICATE(‘g’,1000))
6)The total size of 7 rows are around 7KB, the usage is around 7000.0/8096=86%, which is greater than 80% , but less than 85%, so it’s marked as 95 percent full.

Let’s display the content again using the parameter 1 instead of 3.

The value is 63.
Takeaway: Because SQL Server stop storing data in a page of heap when it’s 95%, you won’t see ‘100 percent full’ even if you continue inserting a row with size 1KB.
8)For 100 percent full, please see sample 9.
3.GAM
Global Allocation Map (GAM)
GAM pages record what extents have been allocated. Each GAM covers 64,000 extents, or almost 4 gigabytes (GB) of data. The GAM has 1-bit for each extent in the interval it covers. If the bit is 1, the extent is free; if the bit is 0, the extent is allocated, either in GAM or SGAM.
Sample 3: GAM explore
1)Let’s check the GAM.

2)What does the entry ‘(1:0) – (1:304) = ALLOCATED’ stand for?
(1:0) is the first page of first extent in this range.
(1:304) is the first page of last extent in this range. (1:311) is the last page of this extent.
All the extents within the range, including the first extent and last extent, are allocated as mixed extent or uniformed extent. So do the page(1:0)~page(1:311) are in allocated.
Takeaway: By check GAM page, we can tell if the extents and pages are allocated, but we can’ tell if they are mixed extent or uniformed extent.
4.SGAM
Shared Global Allocation Map (SGAM)
SGAM pages record which extents are currently being used as mixed extents and also have at least one unused page. Each SGAM covers 64,000 extents, or almost 4-GB of data. The SGAM has 1-bit for each extent in the interval it covers. If the bit is 1, the extent is being used as a mixed extent and has a free page. If the bit is 0, the extent is not used as a mixed extent, or it is a mixed extent and all its pages are being used.
Sample 4: SGAM explore
Let’s check the GAM.

2)What does the first entry ‘(1:0) – (1:296) = NOT ALLOCATED’ stand for?
(1:0) is the first page of first extent in this range.
(1:296) is the first page of last extent in this range. (1:303) is the last page in this extent.
Please note: ‘NOT ALLOCATED’ is confusing, you see the ‘NOT ALLOCATED’ when the corresponding bit is 0: the extent is not used as a mixed extent, or it is a mixed extent and all its pages are being used. Please see the Sample 7 for more detail.
3)What does the second entry ‘(1:304) – = ALLOCATED’ stand for?
(1:304) is the first page of first extent in this range.
At least this extent is allocated as mixed extent. So do the page(1:304)~(1:311).
4)What does the second entry ‘(1:312) – (1:1016) = NOT ALLOCATED’ stand for?
(1:304) is the first page of first extent in this range.
(1:1016) is the first page of last extent in this range.
All the extents within the range, including the first extent and last extent, are not allocated as mixed extent. So do the page(1:304)~page(1:1023).
Takeaway:
1) SGAM only shows a part of mixed extents, not all of them. Please see the Sample 7 for more detail.
2)‘NOT ALLOCATED’ is confusing, you see the ‘NOT ALLOCATED’ when the corresponding bit is 0: the extent is not used as a mixed extent, or it is a mixed extent and all its pages are being used. Please see the Sample 7 for more detail.
Sample 5: GAM detail
Let’s review the GAM page from different perspective.
Run DBCC PAGE again with the parameter 1 instead of 3.

The 0000381f are reserved, the valid record starts from the fifth byte:00
Let’s talk a look at 00000000 80
It’s hex, Let me convert to binary:
|
Hex
|
00 00 00 00 80
|
|
Binary(little-endian):
|
0000`0000 0000`0000 0000`0000 0000`0000 1000`0000
|
|
Binary(normal :(
|
0000`0000 0000`0000 0000`0000 0000`0000 0000`0001
|
If the bit is 1, the extent is free; if the bit is 0, the extent is allocated, either in GAM or SGAM.
Because the bit of the extent 0~38(totally 39 extents) are all 0, are allocated, either in GAM or SGAM. so does the page 0~311(304+7).
The bit extent 39 is 1, so extent 39 is not allocated. The related page (1:312) is not allocated at all. As the rest of bits/bytes are 1,(f stands for 1111)
It exactly matches the content of DBCC Page with parameter 3.

Sample 6: SGAM detail
Let’s review the SGAM page from a different perspective.
Run DBCC PAGE again , but with the parameter 1 instead 3.

The 0000381f are reserved, the really record starts from the fifth byte:00
Let’s talk a look at 00000000 80
It’s hex, now convert to binary:
|
Hex
|
00 00 00 00 40
|
|
Binary(little-endian):
|
00000000 00000000 00000000 00000000 01000000
|
|
Binary(normal :(
|
00000000 00000000 00000000 00000000 00000010
|
Because the bit of the extent 0~37(totally 38 extents) are all 0, these extents are not used as a mixed extent, or it is a mixed extent and all its pages are being used.
The pages in extent 0~37 are (1:0)~(1:303).
The first page of extent 37 is (1:296).
The bit of extent 38 is 1, so the extent is used as a mixed extent, so does the page(1:304)~page(1:311)
It exactly matches the content of DBCC Page with parameter 3.

Takeaway: You can tell if the extent is allocated by checking the GAM and SGAM page, but you can’t tell if it’s mixed extent or uniformed extent. You need to combine the info with IAM page. I’m going to cover the topic in next post.
Sample 7: Insert more rows to make the heaptable1 has 8 pages.
1)Insert another 7 rows, the size of each row is around 8KB.
insert heaptable1 values(8,REPLICATE(‘i’,8000)) –page 2
insert heaptable1 values(9,REPLICATE(‘i’,8000)) –page 3
insert heaptable1 values(10,REPLICATE(‘j’,8000)) –page 4
insert heaptable1 values(11,REPLICATE(‘k’,8000)) –page 5
insert heaptable1 values(12,REPLICATE(‘l’,8000)) –page 6
insert heaptable1 values(13,REPLICATE(‘m’,8000)) –page 7
insert heaptable1 values(14,REPLICATE(‘n’,8000)) –page 8
2)There are 8 pages now.

3)Extent and page type
select allocated_page_file_id as [FileID],allocated_page_page_id as [PageID],page_type_desc,extent_page_id/8 as ExtentID, is_mixed_page_allocation,
extent_page_id as [First Page in Extent],extent_page_id+7 as [LastPage in Extent],is_allocated
From sys.dm_db_database_page_allocations(db_id(),object_id(‘dbo.heaptable1′),null,null,’detailed’) order by allocated_page_page_id

These pages belong to two different mixed extents, which are expected.
4)GAM also reflects the change.

5)Let’s check the SGAM
 ‘(1:320) – = ALLOCATED’ is marked as mixed extent, which makes sense.
However, we already know that the page(1:304)~page(1:311) are in mixed extent, but it’s marked ‘NOT ALLOCATED’. (Please review the Sample 4)
Sample 8: 100 Percent full. (Please review sample 2)

Page 310,311,320,321,322,323 and 324 are almost full because every row in pages is more than 8KB.
Let’s check the PFS page.

Display again using the parameter 1 instead of 3.

by Scott Muniz | Aug 21, 2020 | Azure, Microsoft, Technology, Uncategorized
This article is contributed. See the original author and article here.
Initial Update: Saturday, 22 August 2020 03:03 UTC
We are aware of issues within Log Analytics and are actively investigating. Some customers in all public regions may experience data gaps for certain data types.
- Work Around: None
- Next Update: Before 08/22 05:30 UTC
We are working hard to resolve this issue and apologize for any inconvenience.
-Jeff
by Scott Muniz | Aug 21, 2020 | Uncategorized
This article is contributed. See the original author and article here.
1. SQL SERVER cannot start and reported ‘Failed to allocate pages’. It looks like memory shortage issue. But we are quite sure that the server has enough memory. So we decided to focus on ‘Detected unsupported pre-release version of Windows 7 or Windows Server 2008 R2.‘ Because it looks abnormal. The windows OS is win2016. Why SQL SERVER found it was ‘pre-release version‘ ?
2020-07-27 00:01:08.82 Server Microsoft SQL Server 2016 (SP1-GDR) (KB4458842) – 13.0.4224.16 (X64)
Aug 18 2018 09:00:06
Copyright (c) Microsoft Corporation
Standard Edition (64-bit) on Windows Server 2016 Standard 6.3 <X64> (Build 0: ) (Hypervisor)
2020-07-27 00:01:08.83 Server UTC adjustment: -4:00
2020-07-27 00:01:08.83 Server (c) Microsoft Corporation.
2020-07-27 00:01:08.84 Server All rights reserved.
2020-07-27 00:01:08.84 Server Server process ID is 11196.
2020-07-27 00:01:08.84 Server System Manufacturer: ‘VMware, Inc.’, System Model: ‘VMware Virtual Platform’.
2020-07-27 00:01:08.84 Server Authentication mode is MIXED.
2020-07-27 00:01:08.84 Server Logging SQL Server messages in file ‘C:Program FilesMicrosoft SQL ServerMSSQL13.MSSQLSERVERMSSQLLogERRORLOG’.
2020-07-27 00:01:08.84 Server The service account is ‘Nxxxxxxxxx’. This is an informational message; no user action is required.
2020-07-27 00:01:08.84 Server Registry startup parameters:
-d C:Program FilesMicrosoft SQL ServerMSSQL13.MSSQLSERVERMSSQLDATAmaster.mdf
-e C:Program FilesMicrosoft SQL ServerMSSQL13.MSSQLSERVERMSSQLLogERRORLOG
-l C:Program FilesMicrosoft SQL ServerMSSQL13.MSSQLSERVERMSSQLDATAmastlog.ldf
2020-07-27 00:01:08.84 Server Command Line Startup Parameters:
-s “MSSQLSERVER”
2020-07-27 00:01:08.86 Server SQL Server detected 1 sockets with 4 cores per socket and 4 logical processors per socket, 4 total logical processors; using 4 logical processors based on SQL Server licensing. This is an informational message; no user action is required.
2020-07-27 00:01:08.86 Server SQL Server is starting at normal priority base (=7). This is an informational message only. No user action is required.
2020-07-27 00:01:08.86 Server Detected 12287 MB of RAM. This is an informational message; no user action is required.
2020-07-27 00:01:08.86 Server Using conventional memory in the memory manager.
2020-07-27 00:01:08.86 Server Detected unsupported pre-release version of Windows 7 or Windows Server 2008 R2.
2020-07-27 00:01:08.86 Server Failed allocate pages: FAIL_PAGE_ALLOCATION 2
2020-07-27 00:01:08.86 Server Error: 17138, Severity: 16, State: 1.
2020-07-27 00:01:08.86 Server Unable to allocate enough memory to start ‘SQL OS Boot’. Reduce non-essential memory load or increase system memory.
2020-07-27 00:01:08.86 Server SQL Server shutdown has been initiated
2. I searched ‘Detected unsupported pre-release version’ in our source code, and found only SOS_OS::boot function can report this error info. SOS_OS::boot calls
SOS_OS::IsWindows7_7065_OrBeyond function. The expected return result of SOS_OS::IsWindows7_7065_OrBeyond is true, but it returned false in our case.
3. SOS_OS::IsWindows7_7065_OrBeyond will return true if below 3 clauses are true.
dwMajorVersion == 6 && dwMinorVersion >= 1 && dwBuildNumber >= 7065
4. We captured TTT trace. However, TTT trace told us that BuildNumber was 0 in our case. The is the reason SOS_OS::IsWindows7_7065_OrBeyond returned false.
Breakpoint 3 hit
Time Travel Position: 20BD3:38
sqldk!SOS_OS::Boot:
00007ffd`b504fc30 57 push rdi
0:000> knL
# Child-SP RetAddr Call Site
00 00000003`665fc5f8 00007ff6`f321ee1b sqldk!SOS_OS::Boot
01 00000003`665fc600 00007ff6`f32188bf sqlservr!sqlservr_main
02 00000003`665fe860 00007ff6`f322fe5e sqlservr!wmain
03 00000003`665ffa90 00007ffd`fc9984d4 sqlservr!__tmainCRTStartup
04 00000003`665ffac0 00007ffd`ff46e871 KERNEL32!BaseThreadInitThunk
05 00000003`665ffaf0 00000000`00000000 ntdll!RtlUserThreadStart
0:000> dt sqldk!SOS_OS
……
=00007ffd`b4fd0000 sm_QpcInitializer : SOS_OS::QpcInitializer
=00007ffd`b5226860 sm_OSVersionInfo : _OSVERSIONINFOEXW
0:000> dx -r1 (*((sqldk!_OSVERSIONINFOEXW *)0x7ffdb5226860))
(*((sqldk!_OSVERSIONINFOEXW *)0x7ffdb5226860)) [Type: _OSVERSIONINFOEXW]
[+0x000] dwOSVersionInfoSize : 0x11c [Type: unsigned long]
[+0x004] dwMajorVersion : 0x6 [Type: unsigned long]
[+0x008] dwMinorVersion : 0x3 [Type: unsigned long]
[+0x00c] dwBuildNumber : 0x0 [Type: unsigned long]
[+0x010] dwPlatformId : 0x2 [Type: unsigned long]
5. We captured process monitor trace again and finally found that HKLMSOFTWAREMicrosoftWindows NTCurrentVersionCurrentBuild key was missing

Recent Comments