by Scott Muniz | Aug 24, 2020 | Azure, Microsoft, Technology, Uncategorized
This article is contributed. See the original author and article here.
In our continued effort to increase the baseline security of Azure Sphere, we have now released the Azure Sphere 20.08 quality fix that brings along a number of security enhancements to the platform. As before during our Azure Sphere Security Research Challenge, Cisco Talos continues to find more vulnerabilities and we have the final patch for the attack chain that McAfee ATR used. We also found an interesting scenario with the Linux Kernel 5.4 upgrade that I will cover below.
First of all, our list of security enhancements and fixes:
- We now properly limit the Linux application capability bounding set instead of leaving all bits set.
- We have added a call to set the PR_SET_NO_NEW_PRIVS value on new applications, further restricting their abilities once set.
- In an effort to further restrict impacts on the device, symlinks are disabled on most of the tmpfs mounted areas in the system.
- As a final patch for the McAfee privilege escalation, azcore now has its capability bits properly set restricting it from having extra permissions.
- wolfSSL has a patch from crashes in ASN parsing found by fuzzing.
- TrapaSecurity has been using Unicorn to test parts of the system that are not normally accessible, one of the calls they tested for secure world failed to validate its offset when writing to flash which has been corrected. The actual code itself is not accessible to a normal user application and would require a kernel bug or controlling the AzureD daemon.
Cisco Talos has stayed busy in identifying more issues in the system:
- They found another unsigned code execution bypass via /proc/self/tasks/taskid/maps which was overlooked when setting the /proc/self/maps file read-only.
- Cisco Talos used a similar attack chain that McAfee ATR located in 20.06, however one of the differences that is now patched is duplicating UIDs in the uid_map file to gain access to other users.
- The kernel personality flag READ_IMPLIES_EXEC can be used to bypass some of the memory protections, this has been disabled.
Our 20.08 release moves the Linux kernel to version 5.4.54. During the upgrade it was discovered that a key difference between the Linux kernel v4.9 and v5.4 releases is how the random data pool is initialized and used. The new 5.4 kernel brought along optimizations for how the random pool was initialized and used during boot prior to the loading of any drivers for the hardware random number generator (hwrng). On normal computers this is never a problem as the CPU itself has a hwrng embedded in it that the Linux kernel has access to during boot however on the Azure Sphere platform this caused a very small window prior to the Pluton driver initialization to be partially deterministic. Code has been added to secure world to pass a chunk of random data from the Pluton hwrng into the Linux kernel initialization to force a truly random state on boot until the Pluton driver is initialized. This patch guarantees the kernel now has full random data for its full boot process even prior to the driver initialization.
We strive to keep all Azure Sphere devices in the field secure and continue to work on improving their security even when unexpected security impacts occur. The ability to hold the security guarantees on Azure Sphere requires multiple companies to work together and help each other when design flaws are found, last month this involved Microsoft alerting the Linux Kernel team to a flaw in the ioctl handling of flash devices. Recently wolfSSL had a few vulnerabilities come out, one of which directly impacts TLS 1.3 client communications which is used by Azure Sphere. wolfSSL helps us keep our security promises for TLS by alerting us to the potential MITM attack along with a patch prior to public disclosure allowing us to get it into our release.
Thank you to the teams and researchers that help us increase the security of the platform and make attacking more difficult. As head of the OSP Security team I will continue to do blog posts as new security related enhancements are made to the Azure Sphere platform.
Jewell Seay
Azure Sphere OSP Security Lead
by Scott Muniz | Aug 24, 2020 | Uncategorized
This article is contributed. See the original author and article here.
There are a variety of scenarios including but not limited to, installations of Office using Content Delivery Network (CDN), lean 2nd installs (removing the Office source files from the install packages), right-sized first install (only include most used language packs), and default behavior where Office stays up to date using CDN. Microsoft recommends optimizing these network operations because a device can get portions of the content from other devices on its local network instead of having to download the update completely from Microsoft CDN. The goal of this article is to provide solutions for challenges collected from customers in the field.
Typical challenges we’ve heard from our customers
- Office updates are too large.
- Too many egress points within on-premises network when obtaining content.
- In a remote work world, we need a solution to address on-premises and remote users.
- Are there additional costs for this optimization? (Spoiler…NO!)
- Fear of increased complexity for office installs and updates.
- Can my compliance deadlines still be met?
Solution: Use Windows Delivery Optimization (DO) or if available, Microsoft Endpoint Configuration Manager Connected Cache
All of these above concerns can be addressed with this proposed solution. You can use Delivery Optimization (DO) to reduce bandwidth consumption by sharing the work of downloading Office content among multiple Windows 10 devices in your deployment. DO can accomplish this because it is a self-organizing distributed cache that allows clients to download content from alternate sources (such as other peers on the network). Delivery Optimization is a cloud-managed solution. Access to the Delivery Optimization cloud services is a requirement. This means that to use the peer-to-peer functionality of DO, devices must have access to the DO cloud service end points.
Optionally, customers who use Microsoft Endpoint Configuration Manager can take advantage of a feature called Configuration Manager Connected Cache which delivers a powerful combination of DO plus Connected Cache leading to high hit rates for content searches. If the cache doesn’t contain necessary files, Configuration Manager Site Server will download content to Distribution Point to populate cache, based on the client needs. In this way, customers have far more flexibility in terms of supporting different architectures and languages as manual downloads are no longer required as they’ve been replaced by a dynamic workflow as well as making use of existing capital investments.
Prerequisites for solution
- At least Office Version 1808 for background updates
- At least Office Version 1908 for installing or user-initiated updates
- Windows 10 Delivery Optimization
-
For communication between clients and the Delivery Optimization cloud service:
*.do.dsp.mp.microsoft.com.
*.dl.delivery.mp.microsoft.com
*.emdl.ws.microsoft.com
Delivery Optimization listens on port 7680 for requests from other peers by using TCP/IP. The service will register and open this port on the device, but you might need to set this port to accept inbound traffic through your firewall yourself. If you don’t allow inbound traffic over port 7680, you can’t use the peer-to-peer functionality of Delivery Optimization. However, devices can still successfully download by using HTTP or HTTPS traffic over port 80 (such as for default Windows Update data).
-
If you set up Delivery Optimization to create peer groups that include devices across NATs (or any form of internal subnet that uses gateways or firewalls between subnets), it will use Teredo. For this to work, you must allow inbound TCP/IP traffic over port 3544. Look for a “NAT traversal” setting in your firewall to set this up.
Delivery Optimization also communicates with its cloud service by using HTTP/HTTPS over port 80.
-
Recommended (if existing Configuration Manager customer, use Microsoft Connected Cache combined with Delivery Optimization)
Implementation steps.
1. Operationally, stop any future software updates for Microsoft 365 Apps for enterprise using Configuration Manager
Group Policy or Configuration Manager Client Settings require setting “Management of Microsoft 365 Apps for enterprise” (formerly known as Office 365 Client Management) to Disabled in order to restore default functionality where software update workflow for Office updates uses CDN not Configuration Manager. When available, Connected Cache feature will be enabled but software updates workflow for Office using Configuration Manager will no longer be used.
2. Configure Group Policy for Microsoft Office 2016 (Machine)/Updates
| Enable Automatic Updates |
Enabled |
| Hide option to enable or disable updates |
Enabled |
| Management of Microsoft 365 Apps for enterprise |
Disabled |
| Update Deadline |
3 (Deadline count starts once content download has completed on client) |
3. Configure Group Policy for Microsoft Office 2016 (Machine)/Updates
| Allow uploads while the device is on battery while under set Battery level (Percentage) |
Enabled (60) |
| Delay background download from http (in secs) |
Enabled *Higher time will increase likelihood of finding peer but slow background update. Example (240) |
| Delay foreground download from http (in secs) |
Enabled (60) |
| Download Mode |
Enabled (Group 2) |
| Enable Peer Caching while the device connects via VPN |
Disabled |
| Minimum Peer Caching Content File Size (in MB) |
Enabled (1) |
| Select a method to restrict Peer Selection |
Enabled (subnet) |
| Set Business Hours to Limit Background Download Bandwidth |
Enabled |
4. (optionally) Configure Connected Cache for Microsoft Endpoint Configuration Manager
Navigate using Configuration Manger Console to AdministrationOverviewDistribution Points and select properties of Distribution Point. Enable Connected Cache by checking box and designate LUN to host cached content.

Navigate using Configuration Manger Console to panel AdministrationOverviewHierarchy ConfigurationBoundary Groups. Select each on-premises boundary group and enable selection highlighted below. (toggle on other selections based on your environment preferences)

Finally, using Configuration Manger Console Navigate to AdministrationOverviewClient Settings, enable options below.

How to verify DO and Connected Cache are working?
1. Deploy Office to validation machine where per Update history for Microsoft 365 Apps (listed by date) build is N-2.
For example, at the time of this writing, today is “Patch Tuesday” so August 2020 Monthly Enterprise Channel is Version 2006 (Build 13001.20520). The reference machine should have June 2020 Version 2004 (Build 12730.20430) installed. This should result in Office moving to N-1 or N (depending on CDN throttle).
2. Allow up for 24 hours for scheduled task Office Automatic Updates 2.0 to detect and perform Office update.
For accelerated lab testing consider moving system clock forward by one day prior to running scheduled task.
3. [Client] Use PowerShell on Windows client to verify Office content used DO and Conncted Cache.
-
PS C:Windowssystem32> Get-DeliveryOptimizationStatus
- Search for field FileID from the list which contains string STREAM_X64_X_NONE or STREAM_X86_X_NONE for details which contains the build. (this is largest file containing Office). For the test, your looking for FileId is 95D2EE60-C9D3-45E4-876D-BAE16D758A87_16_0_13001_20520_STREAM_X64_X_NONE.
- Search for fields under FileID such as FileSize, TotalBytesDownloaded, BytesFromPeers, BytesFromHttp and BytesFromCacheServer. In my lab, the FileSize was 1863339050 bytes or 1.86 GB. Referencing TotalBytesDownloaded, the Office client using DO only downloaded 516967466 bytes or 517 MB because only the necessary pieces were downloaded not the entire Office build. Further, using BytesFromCacheServer I can confirm the 517 MB was downloaded from Configuration Manager connected cache, not egress to internet.
*In the example the client was N-2 plus Office was a new version which contributed to larger download.
4. [Server] Check the Configuration Manager Connected Cache disk for build.
- Browse the Connect Cache disk and explore content under officecdn.microsoft.com.edgesuite.net to find dynamically populated content for latest Monthly Enterprise Channel 16.0.13001.20520

Conclusion:
Delivery Optimization and Microsoft Connected Cache provide a powerful and low cost of ownership method for Office installations and updates using peer to peer sharing technologies.
FAQ
Are there some additional references for Delivery Optimization and its capabilities?
Are there some additional references for Configuration Manager and Connected Cache?
Where can I obtain more information about VPN and remote configuration options?
Can we use a third-party Configuration Manager alternate content provider with this solution?
No, alternate content providers typically depend on Configuration Manager software update workflow which won’t be used in scenario above.
For the UpdateDeadline GPO, how does that impact the end user experience?
Please see section “User Experience when updating from CDN” from blog posting Understanding Office 365 ProPlus Updates for IT Pros (CDN vs SCCM)
The Authors
This blog post is brought to you by @Dave Guenthner and @Martin Nothnagel, two Office Rangers at Microsoft. We’re looking forward to your questions and feedback in the comments below.
by Scott Muniz | Aug 24, 2020 | Uncategorized
This article is contributed. See the original author and article here.
The latest productivity experiences await you and your content. Once in Microsoft 365 – you will see improved collaboration, increased security, and compliance. Our goal is to help all customers to easily migrate their content to Microsoft 365.
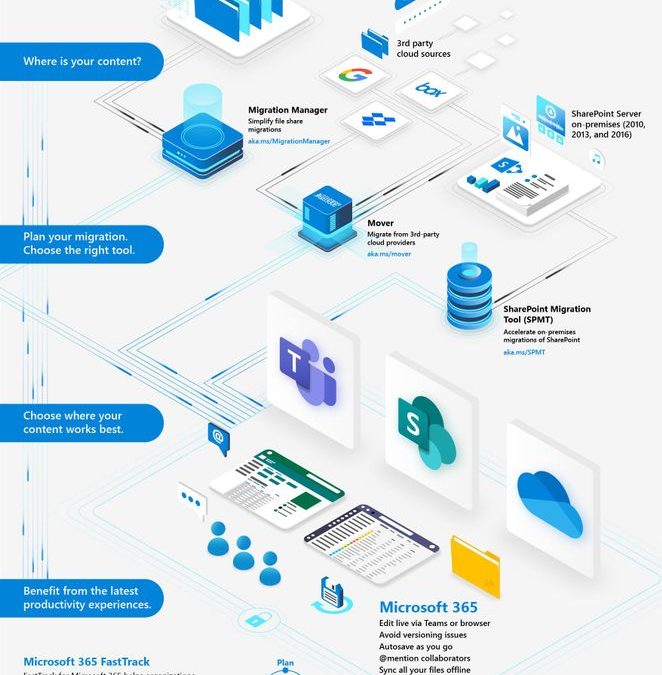
The infographic and information below, will help you learn about the numerous content migration tools and services from Microsoft and our 3rd-party migration partners. This is collectively the broadest set of offerings to assist your migration into Microsoft 365 – from assessment, to planning and onboarding.
- Migration Manager – simplify file share migrations
- Mover – migrate from 3rd-party cloud providers
- SharePoint Migration Tool (SPMT) – accelerate on-premises migrations of SharePoint
- Microsoft 365 FastTrack – helping organizations plan, migrate, and adopt
- Diverse migration partner ecosystem – offering a wide variety of migration tools and services
![Microsoft 365 content migration tools and services [infographic].](https://techcommunity.microsoft.com/t5/image/serverpage/image-id/213780i7BC518AEF9298AFC/image-size/large?v=1.0&px=999 "Migrate-your-content-into-Microsoft-365_infographic.jpg") Microsoft 365 content migration tools and services [infographic].
Microsoft 365 content migration tools and services [infographic].
[Download the above Microsoft 365 migration infographic]
Microsoft focuses on providing a seamless move to Microsoft 365 with as much expertise and tooling we and our ecosystem can offer – across the globe. Our goal is to help move to the cloud with confidence.
Migration Manager – simplify file share migrations
Migration Manager is now generally available. It is a key part of the SharePoint admin center, to help orchestrate and simplify management of file share migrations. Admins can add and manage multiple migration agents to centrally orchestrate all migration activities.
 SharePoint admin center – Migration manager, showing multiple agents to scale migration.
Migration Manager lets you migrate your on-premises file share content to Microsoft 365. Through a simple interface within the SharePoint admin center, admins can manage thousands of migration tasks across multiple machines.
Simplify file share migrations – learn more about Migration Manager (improved documentation and troubleshooting guide).
Mover – migrate from 3rd-party cloud providers
Mover supports migration from Amazon, Box, Dropbox, Egnyte, and Google– into OneDrive, SharePoint, and Teams. This enables seamless file collaboration across Microsoft 365 apps and services, including the Office apps and Microsoft Teams. The Mover team also brings deep expertise and migration technology, which advances Microsoft’s commitment to providing organizations of all sizes with the right tools, people, and partners to successfully migrate to the Microsoft Cloud.
 The Mover migration manager is the dashboard which gives you a summary of your overall migration; here showing an active migration of content from Google Drive into OneDrive.
Mover helps make it easier than ever for customers to migrate files to Microsoft 365 – for free. Start your cloud-to-M365 migrations today. Mover on Twitter.
SharePoint Migration Tool (SPMT) – accelerate on-premises migrations of SharePoint
The SharePoint Migration Tool (SPMT) is a simple and fast solution to help you migrate content from on-premises SharePoint Server sites and file shares to SharePoint, OneDrive, and now Microsoft Teams in Microsoft 365. It is designed to help you bring your information to the cloud and take advantage of the latest collaboration, intelligence, and security solutions within Microsoft 365.
 Use the SharePoint Migration Tool (SPMT) to migrate Sharepoint Server sites or file shares to SharePoint, OneDrive, and Teams – all in Microsoft 365.
Using the SharePoint Migration Tool, you can quickly bring your most important content to Microsoft Teams to create a more open, digital environment. The tool makes it easy to select Teams that you are an owner of, to then set them as the destination(s) for the migration. The tool will also let you select what specific channel you want the content to go into. Parallel to SPMT is the SharePoint Migration Assessment Tool (SMAT), a simple command line executable that scans the contents of your SharePoint farm to help identify the impact of migrating your server to SharePoint with Microsoft 365.
Learn more about what features the SharePoint Migration Tool (SPMT) supports.
Microsoft 365 FastTrack
FastTrack for Microsoft 365 helps organizations accelerate deployment, migration, and adoption of their Microsoft 365 subscriptions at no additional cost.
FastTrack provides guidance to enable OneDrive, SharePoint, and the source environment for migration. Depending on the source, we may perform various Enable steps. We help you with some activities by using a combination of tools, documentation, and guidance, and by performing configuration tasks where applicable and feasible.
 The FastTrack process for Microsoft 365.
Learn more about FastTrack for Microsoft 365 and their data migration services to get the most from your Microsoft 365 investment. FastTrack on Twitter.
Diverse migration partner ecosystem
Our diverse migration partner ecosystem provides a wide variety of tools and services to help plan and migrate your content to Microsoft 365.
Learn more about Microsoft Partners.
Related migration resources
Regardless of your organization’s size, data scale or information complexity, you can migrate documents and sites into OneDrive, SharePoint, and Teams in Microsoft 365 successfully. And we are here to help. Below are a the most top-level resources to all Microsoft migration tools and services:
On-demand webinar | “Free and easy migration to Microsoft 365” presented by Microsoft migration experts, Hani Loza and Eric Warnke:
Additional resources:
Our goal is to empower you and every person on your team to achieve, and move, more. Let us know what you need next. We are always open to feedback via UserVoice and continued dialog in the SharePoint community within the Microsoft Tech Community —and we always have an eye on tweets to @SharePoint. Let us know.
Thanks, Mark Kashman, senior product manager (SharePoint/Microsoft)
by Scott Muniz | Aug 24, 2020 | Uncategorized
This article is contributed. See the original author and article here.
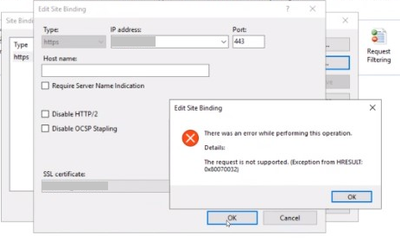
IIS uses bindings to determine where to redirect requests. These bindings can be secured (https – mostly on port 443) or unsecured (http – mostly on 80).
In a case I worked on, I came across to this error while trying to add an https binding: The request is not supported (Exception from HRESULT: 0x80070032).

The PowerShell command below gave an error too
netsh http add sslcert ipport=[IP:port] appid="[APP ID]" certhash=[HASH] certstorename=MY
SSL Certificate add failed, Error: 50
The request is not supported

Additionally, Windows Update wasn’t working neither. It displayed the following error.
“We couldn’t connect to the update service. We’ll try again later, or you can check now.”
Solution
Since both secure binding and Windows Update were failing, the issue seemed to be related to TLS protocol settings.
If you are troubleshooting a similar issue, make sure TLS protocols and encryption algorithms are enabled. Additionally, check if secure cipher suites are enabled. In our case, there was only one cipher suite defined. This was the reason of both binding and Windows Update issues.
We followed the steps below to use default cipher suite list:
- Go to “Start > Run“. Enter: gpedit.msc
- In the left pane, expand “Computer Configuration > Administrative Templates > Network > SSL Configuration Settings“
- In the right pane, right click “SSL Cipher Suite Order” and choose “Edit”
- Save the text inside “SSL Chiper Suite” field to a Notepad for backup
- Select “Not Configured”
- Click “OK”
- Restart the server (gpupdate doesn’t enforce this setting. You should restart the server)

by Scott Muniz | Aug 24, 2020 | Uncategorized
This article is contributed. See the original author and article here.
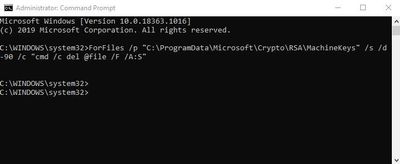
MachineKeys folder stores certificate keys that are used by IIS. This folder my fill up with thousands of files in a short time due to a permission or application code related issue.
The permanent solution would be correcting permissions or fixing the code so that the keys in this folder are automatically removed. However, if the permanent fix is taking long time, you may need a practical way of removing old files in the meantime.
Open Command Prompt as Administrator and run the following command to remove files older than 90 days in the MachineKeys folder
ForFiles /p "C:ProgramDataMicrosoftCryptoRSAMachineKeys" /s /d -90 /c "cmd /c del @file /F /A:S"

Why is this folder filling up? There are four common reasons:
- There is a permission issue that is preventing OS to remove files from that folder. Check this document for the permissions required
- There is a code related issue. The application is not removing X.509 certificates after they are used
- A security software is performing SSL check and preventing these files to be removed
- Enterprise CA might be failing to respond the request
by Scott Muniz | Aug 24, 2020 | Uncategorized
This article is contributed. See the original author and article here.
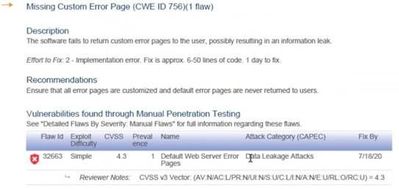
IIS comes with default error pages. In order to help troubleshooting issues, these error pages may provide detailed information about the application and server. Therefore, some penetration testing tools may flag this situation as a vulnerability. An example pentest report:
Missing Custom Error Page (CWE ID 756)
The software fails to return custom error pages to the user, possibly resulting in an information leak.

Solution
Unless detailed error pages are enabled for remote requests in IIS, I wouldn’t classify this situation as a critical vulnerability.

If you want to have a clean security scan report (and you want your users to see more meaningful error pages), you can create custom error pages.
In the case I worked on, the tool brought up this report for a folder that doesn’t have a default page. For this situation, there are a few easy workarounds:
- Add an index.html file to the folder. This should prevent that URL to be flagged again
- Customize IIS defaullt page for 403 error (C:inetpubcusterren-US403.html). Pentest tool is likely to mark the URL pass if that page is customized
- Enforce custom error pages in web.config
by Scott Muniz | Aug 24, 2020 | Uncategorized
This article is contributed. See the original author and article here.
Web.config file includes of crucial information for your website to work such as server and application specific settings. Depending on your website and environment, this file can grow quickly. IIS refuses to read it if it exceeds a threshold. This check is in place to prevent possible vulnerability attacks.
Maximum size for web.config file
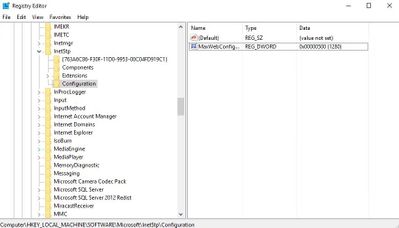
The default maximum limit is 250 KB. You can change this value by editing the registry key below (Reference). Make sure to restart the server after this change.
HKLMSOFTWAREMicrosoftInetStpConfigurationMaxWebConfigFileSizeInKB
It’s a (REG_DWORD) type. More information about this key is here.

If 32-bit is enabled for your application pool, make sure to edit the following key instead:
HKLMSOFTWAREWow6432NodeMicrosoftInetStpConfigurationMaxWebConfigFileSizeInKB
Is there a better way to manage big web.config file?
Yes. Instead of growing the file size, it’s better to separate the configuration into multiple files. Let’s look at two scenarios.
Extensive amount of URL Rewrite rules
If you have hundreds of URL Rewrite rules, you can create rewrite maps and store them in a separate file.
Let’s say you have a rewrite map like the one below. Save it in a file called rewritemaps.config.
<rewriteMaps>
  <rewriteMap name="Redirects">
    <add key="/fromthisURL" value="/tothisURL" />
    <add key="/fromthisURL2" value="/tothisURL2" />
  </rewriteMap>
</rewriteMaps>
Then refer it from your web.config file:
<configuration>
<system.webServer>
  <rewrite>
    <rewriteMaps configSource="rewritemaps.config"><rewriteMaps>
      <rule name="Redirect rule">
         ...
      </rule>
  </rewrite>
</system.webServer>
</configuration>
You can store rewrite rules themselves in a separate file as well:
<rules configSource="rewriteRules.config" />
Just like web.config file, rewritemaps.config and rewriteRules.config files have 250 KB size limit as well.
Is it a good idea to have hundreds of URL rewrite rules or maps in config files? For performance, redirection by using URL Rewrite rules is better as the requests will be redirected before they are handled by ASP.NET handler. For maintenance, it’s better to do redirection and manage URLs in database so config files won’t need to be edited often.
Extensive amount of application settings
If you need to add enormous amount of settings into your config file, you can use multiple web.config files.
In the example below, application settings and connecting strings are stored in separate config files. Here is how they are referenced from the main web.config:
<appSettings configSource="appSpecific.config">
</appSettings>
<connectionStrings configSource="databaseSpecific.config">
</connectionStrings>
Maximum count for web.config files
Based on my research, there is no theoretical limit. However, CPU and memory usage can play a factor when there are too many config files mapped.
by Scott Muniz | Aug 24, 2020 | Uncategorized
This article is contributed. See the original author and article here.
Earlier this year, we announced that average position will be removed from performance reports beginning in September. However, to give your clients more time to migrate, we’re extending the date to January 2021.
For any questions or feedback regarding the deprecation, we encourage you to reach out to your Microsoft Advertising account manager or contact Support. You can also ping us on Twitter, suggest a feature on the Microsoft Advertising Feature Suggestion Forum.
by Scott Muniz | Aug 24, 2020 | Uncategorized
This article is contributed. See the original author and article here.
The SqlClient team is moving forward with continuous updates and improvements to the Microsoft.Data.SqlClient data provider for SQL Server. Our plan is to provide GA releases twice a year with two preview releases in between. This cadence should provide time for feedback and allow us to deliver features and fixes in a timely manner. This first 2.1 preview includes several fixes and changes over the previous 2.0 GA release, including Active Directory Device Code Flow authentication and now supporting Always Encrypted with secure enclave directly against the .NET Standard 2.1 target.
For the full list of changes in Microsoft.Data.SqlClient 2.1 Preview 1, please see the Release Notes.
To try out the new package, add a NuGet reference to Microsoft.Data.SqlClient in your application and pick the 2.1 preview 1 version.
We appreciate the time and effort you spend checking out our previews. It makes the final product that much better. If you encounter any issues or have any feedback, head over to the SqlClient GitHub repository and submit an issue.
David Engel

by Scott Muniz | Aug 24, 2020 | Uncategorized
This article is contributed. See the original author and article here.
Hi Everyone!
My Name is Fabian Scherer, Customer Engineer (CE – formally PFE) at Microsoft Germany for Microsoft Endpoint Manager related topics.
Challenge
During the daily challenges at Customer Environments one thing was coming to my mind on every Engagement. No one trusts the monitoring status of their Console.

This is a familiar look in the morning at every Infrastructure I have seen during the past years. During the day, the counts are shifting a little bit but at midnight during the Status Summarizer Reset everything will go back to green and on the next day everything repeats. The most Customers are monitoring the Systems and will be notified if there is a bigger Issue with one of the Servers. But that’s an reactive Solution.
If you ask anyone about the status, the answers are always the same:
- We can’t trust this status
- If there is a big issue, we will get a Notification
- Our Infrastructure is too big
But if you want to get from the reactive to the proactive side it’s necessary to edit the Thresholds of the Stats in your Environment and to change the handling of the Supporters to a new level.
In this Blog I want to show you the journey we have taken to get to this point.
Preparation
After the decision to change the whole process the biggest and most annoying part of the project starts, the Preparation Phase. During this phase you must start to collect all the relevant data for your own infrastructure. This includes:
- Technical Understanding
- Listing Classification of your Components
- Thresholds during the past two weeks
- Status Messages which can be ignored
Technical Understanding
First, it is important to understand how the Threshold Topic works. You got all the Components at your Infrastructure and defined Thresholds like this:

(located at Administration > Site Configuration > Status Summarizers à Component Status Summarizer)
This means that the Component SMS_AD_SECURITY_GROUP_DISCOVERY needs 2,000 Messages of the Type Information to get to the Status Warning and 5,000 to get at the Critical state.

It also needs 10 Warning Messages to change to Warning and 50 Warnings to change to Critical state.

In Addition, it needs 1 Error Message to Change at the Warning State and 5 Error Messages to change to the Critical state.
This Defaults will make sense for some Components, but every Environment is different and needs separate Thresholds. Even at a Hierarchy you can’t compare Site A to Site B if there is a different count on Clients and Distribution Points.
One thing should also be clear – there is an separate Component named SMS_COMPONENT_STATUS_SUMMARIZER which detects if the Threshold of one Component is reached and switch it to the defined Status.
Listing Classification of your Components
So, let’s start on the top and list all Components in an Excel List.

After that you should also add the Systems where every of these Components is installed. When finally all Components are listed and linked to the Site Systems, you should start to tag the components with different Categories like this:
- Not installed
- Components which are not installed and shouldn’t be watched
- Not Relevant
- Components which are installed but currently not in Use
- Basic
- Components which are used by the Departments but just must be watched during Error and Warnings
- Important
- Components which are important for the Departments and there should be an investigation if something isn’t working in regular ways
- Critical
- Components which shows Critical Workflows and should be investigated as soon as something is strange

Thresholds during the past two weeks
As mentioned before the Count of Messages is relevant. So, you should start studying the Counts of Information, Warning and Error Messages for each Component during at least the past two weeks and wrote them down.

Some other Environment Issues like ‘Managements Points with a lower workload’ or ‘Distribution Points where the Site Server was unable to read the Registry’ got lighted out. This could be addressed during the Preparation Phase and were shown as good Quick Wins.
After you listed all the Message Counts you will be able to get an view all over the Weeks and to define how much Errors on some Components are ‘Normal’ and where too many Information Messages may can be Critical for the Environment.
Status Messages which can be ignored
On my Investigation, I found some Messages without any Sense for this Environment and Excluded them to minimize the Messages. For Example:
Message ID 9520 on SMS_DISTRIBUTION_MANAGER informs you that a Distribution will not take place because the Distribution Point is set on Maintenance Mode.
There are more Messages that could be not relevant for your own Environment, but you must detect and decide it by yourself.
Definition
After collecting all this Data it’s time to define new Thresholds for each Component on each Site. As first Key Factor you should choose the defined Category:
|
Category
|
Information to Warning
|
Information to Critical
|
Warning to Warning
|
Warning to Critical
|
Critical to Warning
|
Critical to Critical
|
|
Not Installed
|
–
|
–
|
–
|
–
|
–
|
–
|
|
Not Relevant
|
–
|
–
|
–
|
–
|
–
|
–
|
|
Basic
|
Unlimited
|
Unlimited
|
Individual Defined
|
Individual Defined
|
1
|
2
|
|
Important
|
Double the Daily average Plus 2
|
Triple the Daily average Plus 2
|
1
|
2
|
1
|
2
|
|
Critical
|
Daily Average Plus 2
|
Double the Daily Average Plus 2
|
1
|
2
|
1
|
2
|
(Note: The Information that the Component has been switched will also add one Message to your count.)
Examples:
- SMS_SITE_BACKUP | CAS | Critical | IW 12, IC 25, WW 1, WC 2, CW 1 CC 2
This Component on the CAS is writing 11 Information Messages per Day the whole Time I was spectating. If it’s writing more than 11 Messages, it’s important for me to see what’s different and if there is something we need to Investigate.
- SMS_SITE_SQL_BACKUP_% | SQL CAS | Critical | IW 5, IC 11, WW 1, WC 2, CW 2 CC 3
This Component on the SQL System related to the CAS is writing 4 Messages per Day the whole Time I was spectating. It also wrote 1 Error Message every Night. This was during the SMS_SITE_BACKUP and after one hour everything was fine. So, I accept the 1 Error Message per Night and let this Component switch after the Second Error Message.
Recommendation:
Discuss this step with all Units which are involved at your daily Business. They can show you some aspects you may not notice.
Implementation
After the Definition, the technically Part comes up. As mentioned before the Thresholds are defined at the GUI:
Administration > Site Configuration > Status Summarizers > Component Status Summarizer
But you can also list it using WMI:
WQL:
rootSMSSite_Sitecode
Select * from SMS_SCI_Component where ItemName like '%sms_component_Status_summarizer%'

Powershell:
$SiteCode = "<SiteCode>"

$ComputerName = "<FQDN>"

$QueryString =  "Select * from SMS_SCI_Component where ItemName like '%sms_component_status_summarizer%' and SiteCode='$SiteCode'"

$WMIObjects = Get-WmiObject -Namespace "rootsmssite_$SiteCode" -Query $QueryString -Impersonation 3 -ComputerName $Computername

$PropList = $WMIObjects.PropLists

$Property = $PropList | where {$_.PropertyListName -eq "Component Thresholds"}

$Values = $Property.Values

And also by using SQL:
select * from SC_Component_PropertyList where Name = 'Component Thresholds' and SiteNumber = '<SiteNumber>'

The SiteNumber can be detected by watching the SiteControlFile:
select * from vSMS_SC_SiteControlXML
The most uncomplicated (but also the longest way) to update the Thresholds is using the Console but it’s a pity to update all Files using the GUI:
4 Site Systems * 6 Entries * 70 Components would be 1.680 entries that must be manually edited.
The smartest way is using SQL. But be careful – The command must be exactly been executed. If you forget to define the Name your Environment will be crashed. So please perform a Backup before you try to edit the Thresholds and use the whole Command. I copied the Values of the .xml File at the SQL query and edited the defined thresholds.
Index:
IW = Information Messages to get The Warning State
IE = Information Messages to get the Critical State
WW = Warning Messages to get the Warning State
WE = Warning Messages to get the Critical State
EW = Error Messages to get the Warning State
EE = Error Message to get the Critical State
!YOU WILL HAVE TO UPDATE THE WHOLE XML FILE, NOT JUST THE ENTRIES YOU WANT TO EDIT!
If you choose this way you can use the following Query:
update SC_Component_PropertyList SET Value = '<The whole XML File>' where Name = 'Component Thresholds' AND SiteNumber = '<SiteNumber>'
It is possible that the defined Thresholds will be overwritten with the Default during an SCCM CB Update. So please check the Settings after every Update. You should also be aware of new Components releases with any Version.

Additional Words
This Adjustment is not the End of the Process – it’s the Start. After you have done the first part you can choose the possibilities and develop it to a new level. Some Thresholds will have to be edited later. You should implement a Documentation to get rid of recurrently appearing Issues and you can define Rules, E-Mail Messages or Actions that should be performed after special Events appear. It’s just the first step out of the reactive Support moving to a Proactive Service and an Improvement of your Service Quality.
Fabian Scherer
CE
Disclaimer
The sample scripts are not supported under any Microsoft standard support program or service. The sample scripts are provided AS IS without warranty of any kind. Microsoft further disclaims all implied warranties including, without limitation, any implied warranties of merchantability or of fitness for a particular purpose. The entire risk arising out of the use or performance of the sample scripts and documentation remains with you. In no event shall Microsoft, its authors, or anyone else involved in the creation, production, or delivery of the scripts be liable for any damages whatsoever (including, without limitation, damages for loss of business profits, business interruption, loss of business information, or other pecuniary loss) arising out of the use of or inability to use the sample scripts or documentation, even if Microsoft has been advised of the possibility of such damages.

Recent Comments