by Contributed | Oct 2, 2020 | Azure, Technology, Uncategorized
This article is contributed. See the original author and article here.
> TLDR; Azure Static Web Apps is a service that allows you to deploy both JavaScript apps but now also Blazor apps. The service is simple to use as it only requires an Azure subscription and a GitHub repo. That’s all the set up you need.
Resources
Blazor
Blazor is a framework that allows you to write C# fullstack. If you are developing a fullstack web application, you usually have to involve JavaScript at some point. You either add it to improve the interaction of your pages or you split between having a backend in .NET and the frontend in JavaScript using for example a SPA framework like React, Angular or maybe Vue. A Blazor app can be compiled into WebAssembly and can thereby be a first-class web citizen and also really fast.
If you are completely new to Blazor I recommend reading this intro article.
What is Azure Static Web apps service
Static Web Apps is an Azure service with which you can deploy fullstack apps within minutes. It can deploy both JavaScript projects as well as Blazor.
NET developer here, you have my attention. So, it can deploy a Blazor project, what else can it do?
-
Web hosting, your app is hosted on Azure, the end product it hosts is just HTML, CSS and JavaScript or Web Assembly.
-
Integrated API, you can add a Serverless API to your app at any time.
- Free SSL certificates
-
Reverse proxy. When calling APIs, no need to configure CORS, it just works.
-
Social auth + AAD supported. Through simple configuration get auth providers like GitHub, Linked In and even Azure Active Directory authentication/authorization to just work. This includes being able to set up separate roles to have access to specific resources.
That’s a nice featurelist. I care about ease of use, what can you tell me about that?
There’s not much to fill in, everything revolves around your GitHub repo and once you selected a repo, and a few other things, it starts deploying it.
Ok, but how does it work under the hood?
It works by creating and running GitHub actions that carries out things like fetching dependent libraries, building your code, and finally deploying it. You end up getting a so-called workflow file pushed to your repo (it’s a YAML file).
Alright, but I’m likely to update my code quite a lot, does it help me with redeploy?
It does, you can define in the workflow file when a redeploy should be trigger, like merging of a PR or a commit to master/main branch for example.
This all sounds very promising; can you take me through a deploy?
Of course, next thing on my list :)
Deploy your first Blazor app
-
Clone an app. The easiest way to get started is to create a Blazor app from this GitHub template Generate app from GH template. Once it’s done generating you now have a repo on your GH user. Type the following command:
git clone <name of repo URL>
-
Inspect an app. To inspect the app, first ensure you have the latest version of dotnet core installed install. Change directory to that of your cloned repo.
- Build the solution. Ensure you are standing at the solution root and type the following command:
-
Run the client app. Run the client by typing the following command:
You should get a terminal output similar to the following:
   info: Microsoft.Hosting.Lifetime[0]
      Now listening on: https://localhost:5001
   info: Microsoft.Hosting.Lifetime[0]
      Now listening on: http://localhost:5000
   info: Microsoft.Hosting.Lifetime[0]
      Application started. Press Ctrl+C to shut down.
   info: Microsoft.Hosting.Lifetime[0]
      Hosting environment: Development
   info: Microsoft.Hosting.Lifetime[0]
      Content root path:
   /path/to/project/blazor-sample/Client
-
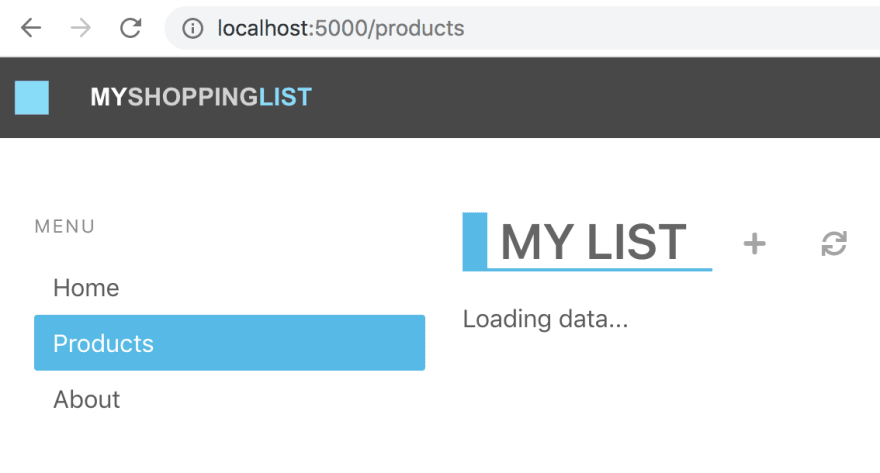
Navigate to the app. Type the following URL in the browser localhost:5000. The browser should now display the following content:

Deploy the app
At this point you have a working Blazor app that you can deploy using Azure Static functions. How do you do that?
- Navigate to the URL portal.azure.com in your browser and log on to Azure.
- Type Static Web Apps and select the suggestion.
- Click the + Add in the top left area.
Now you are met with a set of dropdowns where you need to fill in some info.
-
Subscription, select the subscription you want
-
Resource group, select the resource group you want or create a new one.
-
Name. Give the app name.
-
Region. Select a region.
-
SKU. No need to do a selection here, the service is free for now.
- Click Sign in to GitHub, after clicking this button you will need to locate and pick your generated repo.
-
Organization. Select organization.
-
Repository. Select the repo that was created when you generated it from the template.
-
Branch.. Select the branch, in this case we only have the main branch.
-
Build presets. Select Custom, now you are presented with some options:
-
App location. This is where the client app lives, so type /Client here.
-
Api location, leave as default
-
App artifact location. This is the folder that your client app gets built to. Give it the following value wwwroot
- Click Review + Create.
- Click Create at this point if you are happy with all selections you’ve made.
Click to be taken to the resource once deployed. The resource page should look something like this:

Above you have the resource. You could click the URL from the indicated field, but it would take you to default page. Why is that? Your app hasn’t finished building yet. Instead click the link GitHub action runs. This will take you to the GitHub actions of your repo. Once all the actions have finished it should look like so:

- Revisit your app. Now go back to the resource page at the Azure portal and click that app URL. You should see the following:

Adding an API
Now a Blazor app could contain its own backend. The way the Azure Static Web Apps service is constructed though it assumes your backend will be located in an Api directory. So what should be in that directory? Well a function app. Luckily your repo already have a working function app, almost.
Let’s review our repo quickly. Your solution should look something like this.
You already know about the Client directory where your Blazor app lives. The other directory of interest is the Api directory that contains a Function app. It’s an almost functioning Function app. What do I mean by almost? Well let’s have a look at it, expanding the Api directory there are some files of interest:
Client/
Api/
  ProductData.cs
  ProductsDelete.cs
  ProductsPost.cs
  ProductsPut.cs
The first file ProductData.cs contains an in-memory data store. The remaining three files is just routes for our API.
Adding missing GET route
For this API to be a full Create Read Update Delete it needs another file ProductsGet.cs, let’s create that file and give it the following content:
using System.Threading.Tasks;
using Microsoft.AspNetCore.Mvc;
using Microsoft.Azure.WebJobs;
using Microsoft.Azure.WebJobs.Extensions.Http;
using Microsoft.AspNetCore.Http;

namespace Api
{
  public class ProductsGet
  {
    private readonly IProductData productData;

    public ProductsGet(IProductData productData)
    {
      this.productData = productData;
    }

    [FunctionName("ProductsGet")]
    public async Task<IActionResult> Run(
        [HttpTrigger(AuthorizationLevel.Anonymous, "get", Route = "products")] HttpRequest req)
    {
      var products = await productData.GetProducts();
      return new OkObjectResult(products);
    }
  }
}
Now select Run > Start debugging from the top menu in VS Code. At the end of the build output you should have text stating something like this:
ProductsPut: [PUT] http://localhost:7071/api/products

ProductsGet: [GET] http://localhost:7071/api/products

ProductsPost: [POST] http://localhost:7071/api/products

ProductsDelete: [DELETE] http://localhost:7071/api/products/{productId:int}
You are almost there.
Testing locally, set up CORS
When testing things out locally you need to instruct the Function to allow requests from a cross domain, i.e our Blazor app. How do we do that? Locate the local.settings.json file and ensure it has the following content:
{
  "IsEncrypted": false,
  "Values": {
    "AzureWebJobsStorage": "",
    "FUNCTIONS_WORKER_RUNTIME": "dotnet"
  },
  "Host": {
    "CORS": "*"
  }
}
Above you added the Host property and made CORS point to allowing all requests. This is just something we do locally, don’t worry about this making production.
At this point you can run your client Blazor app and it will look like this:

The Blazor app is now able to talk to your Function app backend.
Deploy the app, now with API
So how do you deploy this so that the API part is there? You need to do the following:
-
Adjust the workflow YML file and point out the Api directory
-
Push the changes you did you did to the workflow file and Api directory
That’s it, the way the workflow file is constructed it should pick up the changes on push and redeploy the app.
Adjust workflow file
-
Open up the workflow file. It’s a file ending in .yml in your .github sub directory (ensure you have done a git pull before this so you get this file as it’s created and added to your repo the first time you deploy).
-
Locate the section called api_location:. Ensure it looks like this api_location: “/Api”. This will point out our Api sub directory.
Push the changes
Type the following command:
git add .
git commit -m "adding API"
git push
The above should push your changes to GitHub and the GitHub actions should be triggered.
- Go to the GitHub actions tab and wait for the actions to finish. Now ensure you reload the page
You should now see the deployed app, this time loading the data correctly
by Contributed | Oct 2, 2020 | Uncategorized
This article is contributed. See the original author and article here.

In this weekly discussion of latest news and topics around Microsoft 365, hosts – Vesa Juvonen (Microsoft), Waldek Mastykarz (Rencore), are joined by Vesa Nopanen – principle consultant at Finland-based Sulava and MVP for Office Apps and Services focusing on Microsoft Teams.
The group delves into why Teams is a passion for Vesa, as well as into topics like working asynchronously, guiding customers to Teams adoption, how digital transformation has been accelerated by the pandemic, a partner’s responsibility to show value in customers context and more.
Additionally, 17 recently released articles from Microsoft and the PnP Community are highlighted – many post Ignite summaries and an announcement on the newest Cloud Developer Advocate for Microsoft 365.
This episode was recorded on Monday, September 28, 2020.
Did we miss your article? Please use #PnPWeekly hashtag in the Twitter for letting us know the content which you have created.
As always, if you need help on an issue, want to share a discovery, or just want to say: “Job well done”, please reach out to Vesa, to Waldek or to your PnP Community.
Sharing is caring!

by Contributed | Oct 2, 2020 | Azure, Technology, Uncategorized
This article is contributed. See the original author and article here.
Another busy week in the Azure cloud. Here are the stories the team is covering this week: ZeroLogon is now detected by Microsoft Defender for Identity (CVE-2020-1472 exploitation), New updates for both Azure Backup and Azure Cost Management / Billing, Shared disks on Azure Disk Storage now available in broader set of regions and a new Microsoft Learn Fundamentals learning path.
Microsoft Defender for Identity now detects ZeroLogon (CVE-2020-1472) exploitation
Many have been intrigued about the recently patched CVE-2020-1472 Netlogon Elevation of Privilege Vulnerability, widely known as ZeroLogon. While we strongly recommend that you deploy the latest security updates to your servers and devices, Microsoft also wantes to provide you with the best detection coverage possible for your domain controllers. Microsoft Defender for Identity (previously Azure Advanced Threat Protection) along with other Microsoft 365 Defender (previously Microsoft Threat Protection) solutions detect adversaries as they try to exploit this vulnerability against your domain controllers.
What’s new in Azure Backup
Microsoft recently announced several new Azure Backup features that enhance the protection of your data in Azure. Azure Backup is Azure’s native backup solution that provides data protection capabilities for diverse and mission-critical workloads in a simple, secure, and cost-effective manner. The latest capabilities that we announced this Ignite let you expand your data protection to new workload types, enhance security, and improve the availability of your backup data. Furthermore, you can now increase operational efficiencies with built-in capabilities for managing backups at scale, along with the ability to automatically onboard Azure Backup to Windows Server Virtual Machines.
Shared disks on Azure Disk Storage is now available in broader set of regions
Azure Disk Storage is the only shared block storage in the cloud that supports both Windows and Linux based clustered or high-availability applications. Shared disks is now available for Premium SSDs in all regions and available for Ultra Disks in all regions that support Ultra Disks. Shared disks allows a single disk to be attached to multiple virtual machines, enabling customers to run their most demanding enterprise applications in the cloud like clustered databases, parallel file systems, persistent containers, and machine learning applications, without compromising on well-known deployment patterns for fast failover and high availability.
Azure Cost Management and Billing updates for September 2020
Whether you’re a new student, thriving startup, or the largest enterprise, you have financial constraints, and you need to know what you’re spending, where, and how to plan for the future. Nobody wants a surprise when it comes to the bill, and this is where Azure Cost Management + Billing comes in.
Microsoft is always looking for ways to learn more about your challenges and how Azure Cost Management + Billing can help you better understand where you’re accruing costs in the cloud, identify and prevent bad spending patterns, and optimize costs to empower you to do more with less. Here are a few of the latest improvements and updates based on your feedback: Simplify financial reporting with cost allocation (preview), Connector for AWS is now generally available, Pay-as-you-go rates for all Azure products and services, What’s new in Cost Management Labs, Expanded availability of resource tags in cost reporting, 15 ways to optimize your Azure costs, New ways to save money with Azure, Upcoming changes to Azure usage data, and Documentation updates.
MS Learn Module of the Week
Azure Fundamentals part 1: Describe core Azure concepts
New to the cloud? Azure Fundamentals teaches you basic cloud concepts, provides a streamlined overview of many Azure services, and guides you with hands-on exercises to deploy your very first services for free.
- Understand the benefits of cloud computing in Azure
- Explain cloud concepts such as high availability, scalability, elasticity, agility, and disaster recovery
- Describe core Azure architecture components such as subscriptions, management groups, resources, and resource groups
- Summarize geographic distribution concepts such as Azure regions, region pairs, and availability zones
Let us know in the comments below if there are any news items you would like to see covered in next week show. Az Update streams live every Friday so be sure to catch the next episode and join us in the live chat.
by Contributed | Oct 2, 2020 | Uncategorized
This article is contributed. See the original author and article here.
On Wednesday September 30th SharePointDsc v4.3 was released. This version contains a lot of bugfixes that were discovered over the last period.
Currently we are working on adding more logging to the event log, for example in case of errors being generated. This will be added in the next version.
You can find the SharePointDsc v4.3 in the PowerShell Gallery!
NOTE: We can always use additional help in making SharePointDsc even better. So if you are interested in contributing to SharePointDsc, check-out the open issues in the issue list, check-out this post in our Wiki or leave a comment on this blog post.
Improvement/Fixes in v4.3:
Added
-
SPProductUpdate
- Added extra logging when the setup file was not found
-
SPSecureStoreServiceApp
-
Added possibility to set the Master Key during creation of the service application
Changed
-
SharePointDsc
- Changed ModuleBuilder module to latest version
- Update Pester tests to remove legacy Pester syntax
-
SPFarm
- Added support for specifying port number in the CentralAdministrationUrl parameter. If CentralAdministrationPort is also specified both port numbers must match.
- SPWebAppSuiteBar
- Unblocked usage on SharePoint 2019. Added verbose messages clarifying usage scenarios on SharePoint 2019.
Fixed
-
SharePointDsc
-
Fixed issue where Invoke-SPDscCommand wasn’t available anymore for the script resource
- SPContentDatabase
- Fixed issue where the set method didn’t do anything when the Ensure parameter wasn’t specified
- SPFarm
- Fixed issue where the resource didn’t support precreated databases
- SPFarmAdministrators
- Fixed issue in SP2016 where an error was thrown in the Set method since v3.8
- SPFarmSolution
- Fixed issue where web applications weren’t compared properly when the desired value didn’t contain any slashes
- SPInstallLanguagePack
- Fixed issue with detection of Chinese language pack in SharePoint 2019
- SPServiceAppSecurity
- SPStateServiceApp
- Fixed issue where code failed because the State database already existed
- SPTrustedIdentityTokenIssuer
- Run Get-SPClaimProvider only if property ClaimProviderName is omitted/null/empty
- Property ClaimProviderName is never set
- SPWeb
- Fixed issue with incorrect detection of SPWeb that has to be absent
A huge thanks to the following guys for contributing to this project:
Yvan Duhamel and Jens Otto Hatlevold
Also a huge thanks to everybody who submitted issues and all that support this project. It wasn’t possible without all of your help!
For more information about how to install SharePointDsc, check our Readme.md.
Let us know in the comments what you think of this release! If you find any issues, please submit them in the issue list on GitHub.
Happy SharePointing!!
by Contributed | Oct 2, 2020 | Uncategorized
This article is contributed. See the original author and article here.
Final Update: Friday, 02 October 2020 05:41 UTC
We’ve confirmed that all systems are back to normal with no customer impact as of 10/02, 05:15 UTC. Our logs show the incident started on 10/02, 04:05 UTC and that during the 1 Hours & 10 minutes that it took to resolve, some customers may have experienced intermittent data latency and incorrect alert activation in Japan East Region.
-
Root Cause: The failure is due to configuration issues with one of our dependent service.
-
Incident Timeline: 1 Hours & 10 minutes – 10/02, 04:05 UTC through 10/02, 05:15 UTC.
We understand that customers rely on Metric Alerts as a critical service and apologize for any impact this incident caused.
-Vamshi
by Contributed | Oct 1, 2020 | Azure, Technology, Uncategorized
This article is contributed. See the original author and article here.
Azure Machine Learning service expands support for MLflow (Public Preview)
Background
Many data scientists start their machine learning projects using Jupyter notebooks or editors like Visual Studio Code. To ensure models can be used in production, it is essential to systematically track all aspects of an ML workflow, such as the data, environment, code, and models produced. These challenges with reproducibility can become complex when working in a hybrid cloud environment – but are mitigated if both environments conform to open standards.
AzureML’s support for MLflow
Azure ML now supports managing the end to end machine learning lifecycle using open MLflow standards, enabling existing workloads to seamlessly move from local execution to the intelligent cloud & edge. Azure Machine Learning has expanded support for running machine learning workflows to train, register and deploy models via native integration (API compatibility) with MLflow.
Let’s walk through some of the latest enhancements to the Azure ML and MLflow interoperability.
MLflow Projects
MLflow Projects provide a way to organize and describe your code to enable other data scientists or automated tools to run it. Any local directory or Git repository can be treated as an MLflow project. You can enable MLflow’s tracking URI and logging API, collectively known as MLflow Tracking, to connect your MLflow experiments and Azure Machine Learning. You can submit your MLflow experiments locally or remotely using MLflow Projects with full tracking support in AzureML by setting the project backend to “azureml”.
A project includes the following:
- Conda environment specification (conda.yaml)
- Any .py or .sh file in the project can be an entry point, with no parameters explicitly declared. When you run the command with a set of parameters, MLflow passes each parameter on the command line using –key <value> syntax.
- You specify more options by adding an MLproject file, which is a text file in YAML syntax. An example MLproject file looks like this:
name: tutorial
conda_env: conda.yaml
entry_points:

  main:
    parameters:
      alpha: float
      l1_ratio: {type: float, default: 0.1}
    command: "python train.py {alpha} {l1_ratio}"
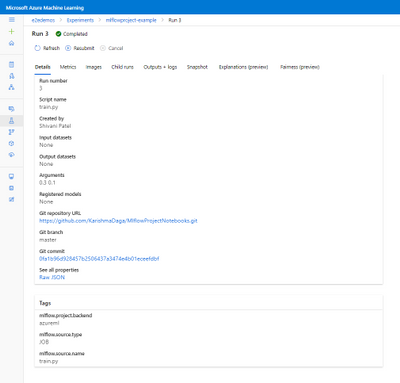
Here’s an example set up for a local run. I’ve set the backend to “azureml” to get all the tracking support and error logging from Azure ML. The backend config object is used to store necessary information such as the compute target, local managed environment or a system managed environment.
local_env_run = mlflow.projects.run(uri=".",
                                    parameters={"alpha":0.3},
                                    backend = "azureml",
                                    use_conda=False,
                                    backend_config = {"USE_CONDA": False})
In the image below you can see that Azure ML automatically tags the run with MLflow related metadata for visibility and logs the git info.

You can then log and visualize your run metrics in Azure Machine Learning Studio or the MLflow Experimentation UI.

You can see the same metrics in the Azure ML studio and MLflow UI.

MLflow Model Registry and Deployment
With the new support for the MLflow model format, it becomes even easier to track and deploy models on Azure ML. You can register models from local files or a run and use it to make predictions online or in batch mode.
From the MLflow project run, you can see the output model from the projects run is registered following the MLflow model schema.

The MLmodel file contains all the model details and metadata.

If you want to register, containerize, and deploy the model, you can now do that in one step. Using the mlflow.azureml.deploy() Python SDK method, AzureML will register the model in AzureML, build the docker container and deploy it to the chosen target. The deployed service will also retain the MLflow metadata as tags as show in the image below.

With the continuous support for MLflow, Azure ML is committed to being interoperable with Open source standards providing flexibility for users to work on-prem or on the cloud.
To get more details about the Mlflow and Azure ML integration show out the following links:
How to use MLflow with Azure Machine Learning
MLflow and Azure Machine Learning notebook examples
Framework Specific notebooks
by Contributed | Oct 1, 2020 | Uncategorized
This article is contributed. See the original author and article here.
Hi Everyone,
Zoheb here again with my colleague Simon Woolley from the beautiful city of Dubai and today we will be sharing some details on how we helped one of our SMC customer find a compromised user and remediate the impact.
If you haven’t read the 1st blog which covers the background do give it a read now before continuing here.
How the Microsoft Mission Critical Team helped secure AAD
Let me continue our story about Protecting the compromised user.
The Problem:
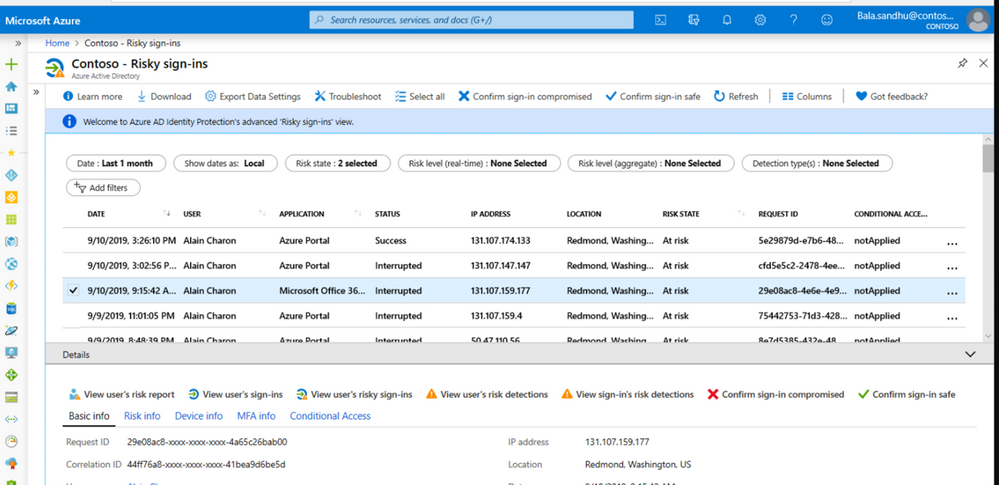
Our customer got alerted through Azure AD Risky Sign in Activity that the user is in high Risk and has done impossible travel.
This was an important user in the organization as he was from the CFO office.
The Solution:
The customer’s security team reached out to SMC to check why we are seeing such impossible travel alerts for this specific user.
SMC team checked and found that most of the Risky Sign ins were from multiple Geographies for Exchange Online, we made this user change password and enforced MFA.
See this blog to know How To Identity Investigate Risk

Based on the Sign in activities we were able to see Success in many of the Risky Sign in activities, unfortunately the customer did not have any Identity Protection enabled till then. To further investigate the issue, we involved the customer messaging team and Microsoft Incident Response team.
Simon found that several actions had been taken in this user’s mailbox, indicating that the users’ Identity had been compromised and was being used to gather additional credentials.
The attacker actions included the following:
- This user had sent emails to multiple users in the organization with a link to a malicious website.
- A new forwarding rule had been created to forward mail to an external address.
- A new inbox rule had been created to move items to RSS Subscriptions, and mark the mails as read.
Going back further we noted that a week before this the user had clicked on a URL that was determined by ATP to be malicious.
Basically, the attacker tried to compromise multiple users.
Our immediate response to this issue consisted of the following.
- We changed the user password.
- We enforced MFA on the user account.
- Removed the inbox rule using Exchange PowerShell commands.
- Removed the forwarding address.
- Used eDiscovery to find and remove the malicious mail from internal mailboxes.
- Reviewed all users that had clicked the URL, changed their passwords, and enforced MFA.
Reference for detailed information on similar remediation
https://docs.microsoft.com/en-us/microsoft-365/security/office-365-security/detect-and-remediate-outlook-rules-forms-attack?view=o365-worldwide
https://docs.microsoft.com/en-us/microsoft-365/security/office-365-security/responding-to-a-compromised-email-account
Being part of the Microsoft Mission Critical Solution team, we always go above and beyond to support our customers. The first step is always to quickly resolve the reactive issue, then identify the Root Cause, and finally through our Proactive Delivery Methodology, making sure this does not happen again.
In this case we helped our SMC customer identify the cause and gave all necessary recommendations to avoid any future certificate issues. Below are the reasons this issue occurred:
Detailed long-term solution
Identity Protection
Enforced MFA through an Identity Protection Policy based on the users Risk level.
Enabled MFA for any user not using a trusted IP.
See the blog below for more information on how we implemented this.
Risky Business in AzureAD
Azure Logic App
We developed a logic app in Azure that triggered when a user clicks on a malicious link.
This logic app then performs the following actions.
- Send the user a message in Teams to alert them that they had clicked a malicious link. This is a backup as the mailbox may be compromised and the user may not receive mail.
- Send the user an email to alert them.
- Send a mail to the security team for additional review.
- Send a mail to the Helpdesk to log a call.
- Send a mail to the Messaging team for further investigation.
- Add the user to a Security group which has MFA enforced through conditional access policies.
Anti-Spam Settings
Created a new outbound antispam policy to limit the number of recipients per hour internally, externally and a total number of recipients per day. This is to limit the scope of compromise.
Users that need to send more had to provide a business case and are added to a group to enforce MFA and this group was assigned to an outbound anti-spam policy with higher limits.
Please see this blog for more details on recommended settings for eop
This resulted in a drastic reduction in the number of risky users and risky sign-ins. Additionally we helped implement a process of investigation and remediation of these at- risk accounts from the service desk to the internal security department.
NOTE: The features and guidelines implemented in this case were specific to this customer’s requirements and environment, so this is not a “General” guideline to enable any of the mentioned features.
Regards,
Simon & Zoheb
by Contributed | Oct 1, 2020 | Azure, Technology, Uncategorized
This article is contributed. See the original author and article here.
Authors: Wolfgang M. Pauli and Manash Goswami

AI applications are designed to perform tasks that emulate human intelligence to make predictions that help us make better decisions for the scenario. This drives operational efficiency when the machine executes the task without worrying about fatigue or safety. But the effectiveness of the AI application is defined by the accuracy of the model used to address the end user scenario.
To build the accurate model, package in application and execute in the target environment requires many components to be integrated into one pipeline, e.g. data collection, training, packaging, deployment, and monitoring. Data scientists and IT engineers need to monitor this pipeline to adjust to changing conditions, rapidly make updates, validate, and deploy in the production environment.
This continuous integration and continuous delivery (CI/CD) process needs to be automated for efficient management and control. It also helps in developer agility to shorten the lifecycle to update and deploy the application.
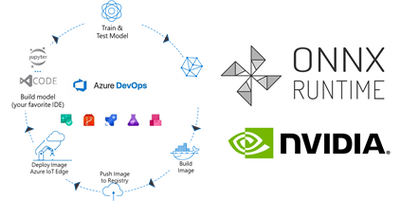
Today, we are introducing a reference implementation for a CI/CD pipeline built using Azure DevOps to train a CNN model, package the model in a docker image and deploy to a remote device using Azure IoT Edge for ML inference on the edge device. We will be training a TinyYolo Keras model with TensorFlow backend. The trained model is converted to ONNX and packaged with the ONNX Runtime to run on the edge device.
The sample is published here.

Before we get started, here are a few concepts about the tools we are using in this sample:
What is Azure DevOps?
Azure DevOps is the collection of tools that allows developers to setup the pipeline for the different steps in the development lifecycle. Developers can automate and iterate on software development to ship high quality applications.
ONNX and ONNX Runtime for ML on Edge device
ONNX (Open Neural Network Exchange) is the common format for neural networks that can be used as a framework-agnostic representation of the network’s execution graph. Models in ONNX format allow us to create a framework-independent pipeline for packaging and deployment across different hardware (HW) configurations on the edge devices.
ONNX Runtime is the inference engine used to execute models in ONNX format. ONNX Runtime is supported on different OS and HW platforms. The Execution Provider (EP) interface in ONNX Runtime enables easy integration with different HW accelerators. There are packages available for x86_64/amd64 and aarch64. Developers can also build ONNX Runtime from source for any custom configuration. The ONNX Runtime can be used across the diverse set of edge devices and the same API surface for the application code can be used to manage and control the inference sessions.
This flexibility, to train on any framework and deploy across different HW configuration, makes ONNX and ONNX Runtime ideal for our reference architecture, to train once and deploy anywhere.
Pre-requisites and setup
Before you get started with this sample, you will need to be familiar with Azure DevOps Pipelines, Azure IoT and Azure Machine Learning concepts.
Azure account: Create an Azure account in https://portal.azure.com. A valid subscription is required to run the jobs in this sample.
Devices: There are many options for Edge HW configurations. In our example, we will use two devices from the Jetson portfolio – they can be any of Nano / TX1 / TX2 / Xavier NX / AGX Xavier. One device will be the dev machine to run the self-hosted DevOps agent, and the other will be the test device to execute the sample.
-
Dev Machine: This machine will be used to run the jobs in the pipeline for CI/CD. This requires some tools to be installed on the device:
-
Azure DevOps agent: Since the test device is based on Ubuntu/ARM64 platform, we will setup a self-hosted Azure DevOps agent to build the ARM64 docker images in one of the devices. Another approach is to setup a docker cross-build environment in Azure which is beyond the scope of this tutorial.
-
Azure IoT Edge Dev Tool: The IoT Edge Dev Tool (iotedgedev) helps to simplify the development process for Azure IoT modules. Instead of setting up the dev machine as an IoT Edge endpoint with all the tools and dependencies, we will install the IoT Edge Dev container. This will greatly simplify the dev-debug-test loop to validate the inner loop of this CI/CD pipeline on the device before pushing the docker images to the remote IoT endpoint. You will need to manually setup the iotedgedev tool on this arm64 device.
-
AzureML SDK for Python: This SDK enables access to AzureML services and assets from the dev machine. This will be required to pull the re-trained model from the AzureML registry to package in the docker image for the IoT Edge module.
-
Test Device: This device is used to deploy the docker containers with the AI model. It will be setup as an IoT Edge endpoint
Training in TensorFlow and converting to ONNX
Our pipeline includes a training step using AzureML Notebooks. We will use a Jupyter notebook to setup the experiment and execute the training job in AzureML. This experiment produces the trained model that we will convert to ONNX and store the model in the model registry of our AzureML workspace.

Setup the Release Pipeline in Azure Dev Ops
A pipeline is setup in Azure DevOps to package the model and the application code in a container. The trained model is added as an Artifact in our pipeline. Everytime a new trained model is registered in the AzureML model registry it will trigger this pipeline.
The pipeline is setup to download the trained model to the dev machine using the azureml sdk.
Packaging the ONNX Model for arm64 device
In the packaging step, we will build the docker images for the NVIDIA Jetson device.
We will use the ONNX Runtime build for the Jetson device to run the model on our test device. The ONNX Runtime package is published by NVIDIA and is compatible with Jetpack 4.4 or later releases. We will use a pre-built docker image which includes all the dependent packages as the base layer to add the application code and the ONNX models from our training step.
Push docker images to Azure Container Registry (ACR)
The docker images are pushed to the container registry in Azure from the dev machine. This registry is accessible for other services like Azure IoT Edge to deploy the images to edge devices.
Deploy to IoT Edge device
The Azure IoT Hub is setup with the details of the container registry where the images are pushed in the previous step. This is defined in the deployment manifest – deployment.json. When new docker images are available in the ACR, they are automatically pushed to the IoT Edge devices.
This completes the deployment step for the sample.
Additional Notes
We can monitor the inference results in the IoT Hub built-in event point.
This sample can be enhanced to store the inference results in Azure Storage and then visualize in PowerBI.
The docker images can be built for other HW platforms by changing the base image in the Dockerfiles.

by Contributed | Oct 1, 2020 | Uncategorized
This article is contributed. See the original author and article here.
Turn content into knowledge with SharePoint Syntex
We are thrilled to announce that SharePoint Syntex, the first product from Project Cortex, is available today. SharePoint Syntex uses advanced AI and machine teaching to amplify human expertise, automate content processing, and transform content into knowledge.
SharePoint Syntex is generally available as a user-based add-on for Microsoft 365 plans for commercial customers. For more details, visit our Microsoft 365 Enterprise Licensing page.
SharePoint Syntex is the first product coming out of our investments in Project Cortex. In addition to SharePoint Syntex, we’ll be releasing other innovations later this year that help you organize information into topics and deliver knowledge across Microsoft 365 apps. We’ll have more details to share on Project Cortex topic experiences later this year.
Meet our Preferred partners

We’re proud to recognize our Preferred partners for the launch of Project Cortex, including SharePoint Syntex. Trained and prepared to deliver joint solutions for our customers, the Preferred partners of the Microsoft Content Services Partner Program (CSPP) span the globe and offer a broad range of software, consulting, training, and adoption solutions. Each has been recognized for proven customer success in envisioning and delivering customer content solutions in Microsoft 365, and for expertise with Project Cortex and SharePoint Syntex. Congratulations, and thank you.
Join us for Office Hours
Interested in how your company could use or benefit from Project Cortex, including SharePoint Syntex. Join us for the October 14 meeting (download invite), where we’ll highlight how Financial Services organizations can benefit from Project Cortex.
Learn more about the Office Hours series and view the recaps and recordings for all past meetings on the Office Hours page.
Catch up on Microsoft Ignite 2020

Discover more about SharePoint Syntex and Project Cortex by reading the SharePoint Syntex Ignite announcement and watching the following Microsoft Ignite 2020 sessions:
Dive deeper on the Virtual Hub
Visit the Virtual Hub for Knowledge to access 30 on-demand sessions on SharePoint Syntex, Project Cortex, and Knowledge in Microsoft 365, including the following:
- Connect people with knowledge and expertise in Microsoft 365
- Expertise & knowledge networks: Microsoft’s vision for a successful knowledge system in your organization
- Rolling out Project Cortex at DXC Technology, Mott MacDonald, and Protiviti
- How to successfully activate and adopt Project Cortex
- Adopting content capture and process automation services for content in Microsoft 365
- Step-by-Step: How to build a document understanding model using Project Cortex
Visit the SharePoint Syntex resource center and the Project Cortex resource center to learn more.

by Contributed | Oct 1, 2020 | Uncategorized
This article is contributed. See the original author and article here.
You and your team can now purchase Visio cloud subscriptions directly with your business domain. There’s no need to create a new account at onmicrosoft.com account or request a license through your IT department unless the self-service purchase is disabled for your organization. Aside from your credit card, all you need is an Azure Active Directory account to get Visio. Start using Visio when you need it and collaborate with your team right away!
Visio Plan 1 and Visio Plan 2 monthly commitment plans are available for self-service purchase by individuals at the Visio website.

Please note, self-service purchase capabilities aren’t currently available in India, Brazil, Democratic Republic of Congo (DRC), or to customers who are eligible for Government or Education offers.
The self-service purchase experience lets you purchase as many licenses as you’d like and then assign them to your colleagues at Microsoft 365 admin center in the limited admin mode. There’s more information about Visio self-service purchase for individuals on our Self-service purchase FAQ support page.
The new self-service purchase option doesn’t compromise IT oversight or control. If you have IT admin rights, you can disable or enable self-service purchases for users in your organization. You can also see all self-service purchases of Visio and related details in the Microsoft 365 admin center. Moreover, you can either take over self-service purchase subscriptions or assign existing licenses to users who purchased licenses on their own. See more details how to manage self-service purchases as an IT admin here.
This blog post is the first of four that dive into the update details from our Microsoft Ignite roundup blog. The remaining three will be published in the coming weeks, so keep checking our Tech Community Blogs site. In the meantime, please continue to send us your product feedback and ideas through UserVoice.


Recent Comments