by Contributed | Dec 8, 2020 | Technology
This article is contributed. See the original author and article here.
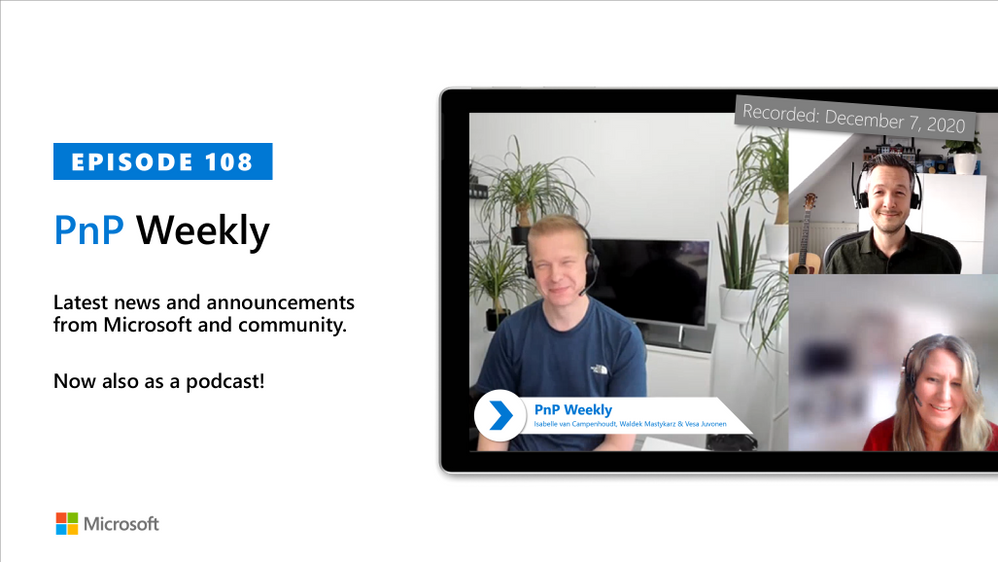
In this installment of the weekly discussion revolving around the latest news and topics on Microsoft 365, hosts – Vesa Juvonen (Microsoft) | @vesajuvonen, Waldek Mastykarz (Microsoft) | @waldekm, are joined by Data Architect, Transition Evangelist, Data Platform MVP Isabelle van Campenhoudt (ShareQL – Power Platform Associates) | @thesqlgrrrl, based in Belgium.
Topics discussed:
- The challenge for customers today is too much data, its availability, accuracy, recency, history, and shareability.
- The multiple levels of reporting on which all agree that what’s more important is what information needs to be conveyed in the report.
- Training needs to focus on “Consuming a Report” – and how to understand and manipulate data in a visual way.
- Finally, discussion on organizing or cataloging data, there is a data governance tool – Microsoft Azure Pureview – previously known as data catalog.
This episode was recorded on Monday, December 8, 2020.
Did we miss your article? Please use #PnPWeekly hashtag in the Twitter for letting us know the content which you have created.
As always, if you need help on an issue, want to share a discovery, or just want to say: “Job well done”, please reach out to Vesa, to Waldek or to your Microsoft 365 PnP Community.
Sharing is caring!
by Contributed | Dec 8, 2020 | Technology
This article is contributed. See the original author and article here.
Intro:
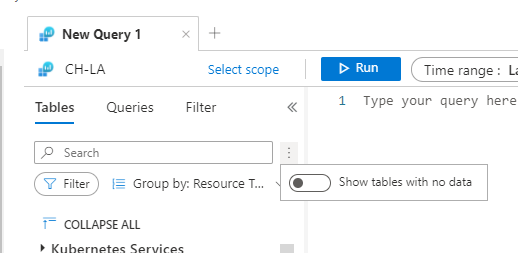
Log Analytics tables sidepane is a great way to find what you need.
The tables sidepane is contextual, and only loads the tables relevant to the scope you are in.
To learn more about Log Analytics scopes read this blog post.
The tables sidepane also allows filtering the different tables according to various parameters and grouping them in a way that makes sense and makes it easy to find what you need.
To learn more about Log Analytics tables sidepane read this blog post.
We are very excited to share our latest improvement to the tables sidepane
Showing tables with data:
Following your valued feedback, we have added an option for users to filter the tables sidepane to only show tables containing data.
This means empty tables associated with the scope you are currently exploring will not be shown by default, reducing clutter and helping you focus on the insights you need.
Controlling what tables are shown is super easy, using a toggle on the top of the tables sidepane:
Set your default:
By default, Log Analytics sidepane will only show tables with data, however, we have added the option to change this default behavior.
If you want Log Analytics table sidepane to show all tables, by default, you can change the setting using Log Analytics settings:

We value your feedback!
Let us know what you think by commenting on this blog post.
by Contributed | Dec 8, 2020 | Technology
This article is contributed. See the original author and article here.
Hello Folks,
Lately I’ve had a few conversations regarding Log Analytics workspace design. More specifically, questions like:
- Do I create one central workspace with all data?
- Should I create one workspace per application?
- Should each team have their own workspace?
Design conundrum
Figuring out how many workspaces, you need is determined by one or more of the following requirements:
- Which region do you need to store the data; do you have data sovereignty or compliance issues we need to comply with?
- Data Retention. How long do you need to keep the data?
- Data Access. The workspace is the security boundary for Log Analytics. If you have log data from two different teams, that are not allowed to see each other’s data, you’ll need to setup different workspaces.
- Data Collection. Solutions and data collection settings are set on workspace level. So, if you turn on collection of warnings in the Application log on Windows servers, that setting will be applied to all connected Windows servers, even if we only need it from some of your servers.
These items are really important to figure out since Log Analytics workspace provides by design:
- A geographic location for data storage.
- Data security by being able to grant different users different access rights to the data.
- Scope for configuration of settings like pricing tier, retention, and data capping.
IT shops these days are setup either in a centralized, decentralized, or an in-between hybrid of both structures. Therefore, the following workspace deployment models have been commonly used to map to one of these organizational structures:
- Centralized: All logs are stored in a central workspace and administered by a single team, with Azure Monitor providing differentiated access per-team.
- This scenario is easier to manage, search across resources, and cross-correlate logs
- Decentralized: Each departments or teams runs their own workspaces in a resource group they own and manage. In this scenario, the workspace can be kept secure and access control is consistent with resource access, but it’s difficult to cross-correlate logs.
- I know in that past I wrote about “Querying multiple Log analytics workspace at once” however I have come to realize that when your organization grow and new resources are added if you are adding new Workspaces, you have to edit all your existing cross-workspace queries.
- Hybrid: Both deployment models in deployed in parallel.
- This commonly results in a complex, expensive, and hard-to-maintain configuration with gaps in logs coverage.
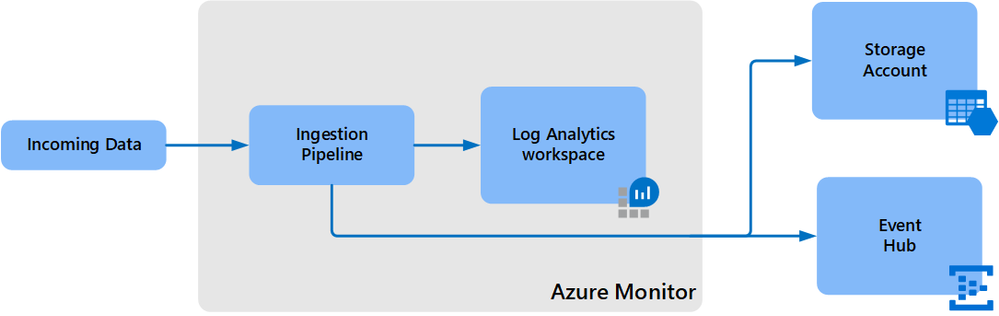
- To achieve this we can use the Log Analytics workspace data export method to export from all resource Workspaces to a central Storage account.
- Configuration can currently only be performed using CLI or REST requests. You cannot use the Azure portal or PowerShell.
- The –export-all-tables option in CLI and REST isn’t supported. You will have to provide the list of tables in export rules explicitly.
- Your Log Analytics workspace can be in any region except for the following:
- Switzerland North
- Switzerland West
- Azure government regions
- The destination storage account or event hub must be in the same region as the Log Analytics workspace.
- However, there are a few limitations at this point:
So, I really think that a central Workspace is a more reasonable solution for most organizations that have a need for querying all resources. If you don’t or seldom require cross-workspace queries, then a decentralized approach may be appropriate.
Manage access to log data and workspaces.
When deploying a centralized model. You need to manage access to the logs and to administer the workspaces, including how to grant access to:
- The workspace using workspace permissions.
- Users who need access to log data from specific resources using Azure role-based access control (Azure RBAC) – also known as resource-context
- Users who need access to log data in a specific table in the workspace using Azure RBAC.
You can view the access control mode configured on a workspace from the Azure portal or with Azure

The 2 Access options are:
Workspace-context: with this access, you can view all logs in the workspace you have permission to. Queries in this mode are scoped to all data in all tables in the workspace. And are queried in the Log Analytics workspace itself. By accessing the workspace, selecting Logs from the left side menu and writing your query in the editor.

Or
Resource-context: this model is aimed at Application teams. Administrators of Azure resources being monitored. When you access the workspace for a particular resource, resource group, or subscription, such as when you select Logs from a resource menu in the Azure portal, you can view logs for only resources in all tables that you have access to.
Queries in this mode are scoped to only data associated with that resource. This mode also enables granular Azure RBAC.
For more information about designing your Azure Monitor Logs deployment there is more information in the following documentation.
Cheers!
Pierre
by Contributed | Dec 7, 2020 | Technology
This article is contributed. See the original author and article here.
CU8 for BizTalk Server 2016 is now ready to download
For details on fixes and download link, please follow the master KB
https://support.microsoft.com/help/4583530
You may want to bookmark this index page for updates related to BizTalk Server
https://support.microsoft.com/help/2555976
It is timely to reference two previous postings in this forum that are relevant to this release:
Hotfixes and CUs for BizTalk Server 2016 Feature Update
https://techcommunity.microsoft.com/t5/biztalk-server/hotfixes-and-cus-for-biztalk-server-2016-feature-update/m-p/1569583
BizTalk Server 2016 Standard Edition CU7 not available in german language?
https://techcommunity.microsoft.com/t5/biztalk-server/biztalk-server-2016-standard-edition-cu7-not-available-in-german/m-p/1642944
by Contributed | Dec 7, 2020 | Azure, Microsoft, Technology
This article is contributed. See the original author and article here.
The SAP on Azure group is excited announce the preview for SAP on Azure Deployment Automation Framework. This introduces an extensible framework that will modularly address the complexities of running SAP on Azure.
Some of the largest enterprises in the world currently run their SAP solutions on Microsoft Azure. Since these SAP applications are mission critical, even a brief delay or disruption of service can have a significant business impact on an organization.
Today the journey to deploying an SAP system is a manual process. This can quickly become costly due to divergence in resources and configuration, or discrepancies introduced through human error. To reduce this impact, improve consistency, and reduce lead times, we are approaching the SAP deployment as an opportunity to define the SAP Infrastructure as Code (IaC) and capture the configuration activities as Configuration as Code (CaC).
To help our customers effectively deploy their infrastructure for SAP on Azure repeatably and consistently, we are providing the IaC (Infrastructure as Code) and CaC (Configuration as Code) code repository that will utilize the industry leading offerings such as, Terraform and Ansible respectively.
Key Capabilities of SAP on Azure Deployment Automation Framework
- Deploy multiple SAP SIDs consistently
- Securely managed keys with Key Vault
- Deploy and configure for High Availability (HA)
- IaaS – Infrastructure as Code (IaC)
- Logically partitionable by environment, region, and virtual network
- Availability Zone support where appropriate
- SAP HANA and AnyDB configuration support
- Distributed application tier deployment
- Configuration – Configuration as Code (CaC)
- SAP HANA database install
- Pacemaker configuration for SAP HANA with HSR
Benefits of SAP on Azure Deployment Automation Framework
Reviewable code: delivering the tools as IaC and CaC via open source, allows organizations and teams to preview the definition of what Azure resources will be created and how the VM OS will be configured. In the world of DevOps, this allows the code to be approved prior to execution.
Deployment Consistency: IaC and CaC allow, not only the IaaS to be deployed consistently and repeatably, but also define the post deployment system administration activities to follow a procedural set of steps that will be consistent and repeatable. Both tools function idempotently, which becomes part of drift detection and correction.
Configurable: The IaC and CaC modules provide standard functionality. However, the functionality can easily be configured through inputted parameters. Changes delivered over time will enhance and extend functionality. Some examples of supported configurations include: Number of application servers, high-availability in the database and/or application tier, enabling/disabling of either database or application tier, overriding default naming standard, and the ability to bring some of your own resources in certain instances.
Drift detection and correction; With tools that apply the IaC and CaC idempotently, we can detect when the deployed resources have drifted from their state as defined by the tools. When detected, a choice may be made to apply the desired state to resolve any drift.
Strategy
We have chosen to take an open source approach to establish a framework of Infrastructure as Code (IaC) and Configuration as Code (CaC). This framework provides the structure that allows an E2E workflow to be executed on by industry leading automation tools and is easily extendable.
- Terraform – is the swiss army knife of IaC tools. It is not only idempotent, Terraform is completely cloud-agnostic and helps you tackle large infrastructure for complex distributed applications. Terraform automation is orchestrated in varying degrees with the focus on the core plan/apply cycle.
- Ansible – Provides a “radically simple” IT automation engine. It is designed for multi-tier deployments and uses no agents. Ansible is a strong fit for configuration management, application deployment, and intra-service orchestration by describing how all the systems inter-relate. Ansible is one of the more flexible CaC tools on the market right now.
At this stage of the release, the IaC and CaC are offered as BYOO (Bring Your Own Orchestration). This means that you will provide the governance around the execution of the automation. We provide a framework workflow that can function out of the box, with a defined set of manual executions. It can also fit in to a more mature, customer provided, Orchestration environment.
Vision
The SAP on Azure Automation Framework over time will automate many more tasks than just deployment. We plan to continuously improve this framework to meet all your deployment automation needs and expand support for more infrastructure and post-deployment configurations. Stay tuned for updates.
Pricing and Availability
The tools being developed are meant to accelerate the customers adoption of Azure for SAP deployments. As such, these tools are offered free of charge.
Learn more
To learn more about the product, check out the GitHub repository and documentation in the preview branch at: https://github.com/Azure/sap-hana/tree/beta/v2.3
To get started, we have provided some bootstrapping instructions and a self-paced workshop to deploy the IaaS for a 1 or more SAP system deployments.
Feedback
We plan to continuously improve this framework to meet all your deployment automation needs. We welcome all feedback and can be reached at: sap-hana@microsoft.com
by Contributed | Dec 7, 2020 | Technology
This article is contributed. See the original author and article here.
SQL Server Big Data Clusters (BDC) is a new capability brought to market as part of the SQL Server 2019 release. BDC extends SQL Server’s analytical capabilities beyond in-database processing of transactional and analytical workloads by uniting the SQL engine with Apache Spark and Apache Hadoop to create a single, secure and unified data platform. BDC is available exclusively to run on Linux containers, orchestrated by Kubernetes, and can be deployed in multiple-cloud providers or on-premises.
The availability of the latest cumulative update (CU8) for SQL Server 2019 BDC includes several fixes, optimizations and adds two main capabilities for SQL Server BDC:
- Encryption at Rest experiences for SQL Server and HDFS
- Oracle Proxy Authentication Support on Data Virtualization.
We’ve also surfaced a number of documentation articles to help you plan and deploy more advanced Active Directory enabled BDC scenarios on Azure Kubernetes Services (AKS).
This announcement blog highlights some of the major improvements, provides additional context to better understand the design behind these capabilities, and points you to relevant resources to learn more and get you started.
Encryption at Rest on SQL Server Big Data Clusters
Starting on SQL Server Big Data Clusters CU8, a comprehensive encryption at rest feature set is available to provide application level encryption to all data stored in the platform. This enables application level encryption capability allows administrators to securely encrypt data on both SQL Server and HDFS services of BDC to comply with desired enterprise-grade requirements. If your organization needs to enable encryption at rest, read all concepts and guidelines in our new documentation set for the feature.
Oracle Proxy Authentication support
As a modern data platform, BDC have long supported Oracle as one of its Data Virtualization sources. In order to support more enterprise-grade compliant scenarios, we’ve enabled Oracle Proxy Authentication support to provide fine grained access control. A proxy user connects to the Oracle database using its credentials and impersonates another user in the database. To learn how to enable this feature on your Oracle connection scenarios, read the updated documentation article here.
A proxy user can be configured to have limited access compared to the user being impersonated. For example, a proxy user can be allowed to connect using a specific database role of the user being impersonated. The identity of the user connecting to Oracle database through proxy user is preserved in the connection, even if multiple users are connecting using proxy authentication. This enables Oracle to enforce access control and to audit actions taken on behalf of the actual user.
Azure Data Studio Operational Notebooks for SQL Server BDC CU8
Along the Cumulative Update 8 we are also releasing an updated set of Operation Notebooks to Azure Data Studio. This update contains a new section of notebooks for managing Encryption at Rest, adds endpoint certificate rotation and include many fixes.
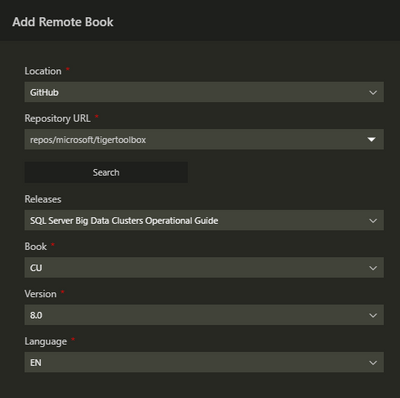
In order to get the latest version of the notebooks, either install the latest Azure Data Studio or use the “Add Remote Jupyter Book” feature as highlighted bellow. Using the Command Palette (Shift + Cmd + P), find and execute the “Jupyter Books: Add Remote Jupyter Book” command.
Fill out the information as displayed in the screenshot bellow, the click the “Add” button at the botton of the pane.
Active Directory enabled SQL Server BDC on Azure Kubernetes Services (AKS)
SQL Server Big Data Clusters have always supported Active Directory (AD) enabled deployment mode for Identity and Access Management (IAM). Yet, IAM on Azure Kubernetes Service (AKS) has been challenging because of industry-standard protocols such as OAuth 2.0 and OpenID Connect which are widely supported by Microsoft identity platform yet are not supported on SQL Server.
We are pleased to announce that you can now deploy a big data cluster (BDC) in AD mode while deploying in Azure Kubernetes Service (AKS). Learn more about how to plan Active Directory integration for BDC on AKS and how to Deploy SQL Server Big Data Clusters in AD mode on Azure Kubernetes Services (AKS) hand-by-hand follow the links to our documentation page.
Private BDC cluster with further egress traffic restriction using user-defined Route table ( UDRs ) on Azure Kubernetes Service (AKS)
To complement the above platform security enhancements regarding deployment of BDC in Active Directory mode on AKS, we are pleased to announce that we added support for deploying BDC in Azure Kubernetes Service (AKS) private cluster for both AD and non-AD clusters, it makes sure the network traffic between API server and node pools remains on the private network only. The control plane or API server has internal IP addresses in an AKS private cluster. You can find how to Deploy BDC in Azure Kubernetes Service (AKS) private cluster step-by-step here.
Leverage this configuration will help our customer restrict use of public IP addresses in enterprise networking environment. Furthermore, to restrict the additional hops are required for egress traffic, we also provide guidance on restricting egress traffic of Big Data Clusters (BDC) clusters in Azure Kubernetes Service (AKS) private cluster, please refer to this article on our documentation page. To know more about how to manage an Azure Kubernetes Service (AKS) private cluster with SQL Server big data clusters (BDC) deployed in Azure in here.
SQL Server BDC team hears your feedback
If you would like to help make BDC an even better analytics platform, please share any recommendations or report issues through our feedback page. SQL Server engineering team is thoroughly going through the reported suggestions. They are valuable input for us, that is being considered when planning and prioritizing the next set of improvements. We are committed to ensuring that SQL Server enhancements are based on customer experiences, so we build robust solutions that meet real production requirements in terms of functionality, security, scalability, and performance.
Ready to learn more?
With SQL Server 2019 CU8 updates, BDC continues to simplify the security, deployment, and management of your key data workloads.
Check out the SQL Server CU8 release notes for BDC to learn more about all the improvements available with the latest update. For a technical deep-dive on Big Data Clusters, read the documentation and visit our GitHub repository.
To get started using Encryption at Rest on BDC, follow the instructions on our documentation page.

by Contributed | Dec 7, 2020 | Technology
This article is contributed. See the original author and article here.
This installment is part of a broader series to keep you up to date with the latest features in Azure Sentinel. The installments will be bite-sized to enable you to easily digest the new content.
This post was written in collaboration with @JulianGonzalez.
Introduction:
Threat hunting is a powerful way for the SOC to reduce organizational risk, but it’s commonly portrayed and seen as a complex and mysterious art form for deep experts only, which can be counterproductive. Sophisticated cybercriminals burrow their way into network caverns, avoiding detection for weeks or even months, as they gather information and escalate privileges. If you wait until these advanced persistent threats (APT) become visible, it can be costly and time-consuming to address. In today’s cybersecurity landscape, SOC analysts need controls and integrated toolsets to search, filter, and pivot through their telemetry to derive relevant insights faster.
Taken into account, we are delighted to announce that we have introduced 80 new hunting queries that can empower your SOC analyst to reduce the gaps in your current detection coverage and ignite new hunting leads.
Hunting queries included:
The following queries are designed to help you find suspicious activity in your environment, and whilst many are likely to return legitimate activity as well as potentially malicious activity, they can be useful in guiding your hunting. If after running these queries you are confident with the results you could consider converting them to analytics or add hunting results to existing or new incidents.
The figure below illustrates the diversification and threat hunting coverage the new hunting queries provide across the MITRE ATT&CK framework matrix:
Feel free to expand the spoiler below to view the new list of out the box hunting queries and the MITRE ATT&CK tactics that are covered:
Spoiler (Highlight to read)
List of New Hunting Queries
Hunting Query MITRE ATT&CK Tactic
Azure DevOps- Project visibility changed to public |
{ Collection } |
{ } |
Azure DevOps- Project visibility changed to public |
{ Collection } |
{ T1213 } |
Non-owner mailbox login activity |
{ Collection Exfiltration } |
{ } |
Non-owner mailbox login activity |
{ Collection Exfiltration } |
{ T1114 T1020 } |
Potential DGA detected |
{ CommandAndControl } |
{ } |
Detect beacon like pattern based on repetitive time intervals in Wire Data Traffic |
{ CommandAndControl } |
{ } |
Potential DGA detected |
{ CommandAndControl } |
{ T1483 T1008 } |
Detect beacon like pattern based on repetitive time intervals in Wire Data Traffic |
{ CommandAndControl } |
{ T1043 T1065 } |
DNS – domain anomalous lookup increase |
{ CommandAndControl Exfiltration } |
{ } |
RareDNSLookupWithDataTransfer |
{ CommandAndControl Exfiltration } |
{ } |
DNS – domain anomalous lookup increase |
{ CommandAndControl Exfiltration } |
{ T1483 T1008 T1048 } |
RareDNSLookupWithDataTransfer |
{ CommandAndControl Exfiltration } |
{ T1043 T1048 } |
Failed service logon attempt by user account with available AuditData |
{ CredentialAccess } |
{ } |
Permutations on logon attempts by UserPrincipalNames indicating potential brute force |
{ CredentialAccess } |
{ } |
Failed service logon attempt by user account with available AuditData |
{ CredentialAccess } |
{ T1110 } |
Permutations on logon attempts by UserPrincipalNames indicating potential brute force |
{ CredentialAccess } |
{ T1110 } |
Azure storage key enumeration |
{ Discovery } |
{ } |
Azure storage key enumeration |
{ Discovery } |
{ T1087 } |
Cscript script daily summary breakdown |
{ Execution } |
{ } |
Least Common Parent And Child Process Pairs |
{ Execution } |
{ } |
Least Common Processes by Command Line |
{ Execution } |
{ } |
New processes observed in last 24 hours |
{ Execution } |
{ } |
Entropy for Processes for a given Host |
{ Execution } |
{ } |
Rare Process Path |
{ Execution } |
{ } |
Uncommon processes – bottom 5% |
{ Execution } |
{ } |
New PowerShell scripts encoded on the commandline |
{ Execution CommandAndControl } |
{ } |
New PowerShell scripts encoded on the commandline |
{ Execution CommandAndControl } |
{ } |
Powershell or non-browser mailbox login activity |
{ Execution Persistence Collection } |
{ T1059 T1098 T1114 } |
Hosts running a rare process with commandline |
{ Execution Persistence Discovery LateralMovement Collection } |
{ } |
Hosts running a rare process with commandline |
{ Execution Persistence Discovery LateralMovement Collection } |
{ } |
GitHub OAuth App Restrictions Disabled |
{ Exfiltration } |
{ } |
GitHub OAuth App Restrictions Disabled |
{ Exfiltration } |
{ T1537 } |
Azure Sentinel Connectors Administrative Operations |
{ Impact } |
{ } |
Azure Sentinel Workbooks Administrative Operations |
{ Impact } |
{ } |
Azure Virtual Network Subnets Administrative Operations |
{ Impact } |
{ } |
Common deployed resources |
{ Impact } |
{ } |
Anomalous Password Reset |
{ Impact } |
{ } |
Signin Logs with expanded Conditional Access Policies |
{ Impact } |
{ } |
Multiple Teams deleted by a single user |
{ Impact } |
{ } |
Preview – TI map File entity to OfficeActivity Event |
{ Impact } |
{ } |
Preview – TI map File entity to Security Event |
{ Impact } |
{ } |
Preview – TI map File entity to Syslog Event |
{ Impact } |
{ } |
Preview – TI map File entity to VMConnection Event |
{ Impact } |
{ } |
Azure Sentinel Connectors Administrative Operations |
{ Impact } |
{ T1496 } |
Azure Sentinel Workbooks Administrative Operations |
{ Impact } |
{ T1496 } |
Azure Virtual Network Subnets Administrative Operations |
{ Impact } |
{ T1496 } |
Common deployed resources |
{ Impact } |
{ T1496 } |
Anomalous Password Reset |
{ Impact } |
{ T1531 } |
Signin Logs with expanded Conditional Access Policies |
{ Impact } |
{ } |
Multiple Teams deleted by a single user |
{ Impact } |
{ T1485 T1489 } |
Preview – TI map File entity to OfficeActivity Event |
{ Impact } |
{ } |
Preview – TI map File entity to Security Event |
{ Impact } |
{ } |
Preview – TI map File entity to Syslog Event |
{ Impact } |
{ } |
Preview – TI map File entity to VMConnection Event |
{ Impact } |
{ } |
Failed Login Attempt by Expired account |
{ InitialAccess } |
{ } |
User added to Team and immediately uploads file |
{ InitialAccess } |
{ } |
Attempts to sign in to disabled accounts by IP address |
{ InitialAccess } |
{ } |
Azure Active Directory signins from new locations |
{ InitialAccess } |
{ } |
Same IP address with multiple csUserAgent |
{ InitialAccess } |
{ } |
Rare User Agent strings |
{ InitialAccess } |
{ } |
New time zone observed |
{ InitialAccess } |
{ } |
Failed Login Attempt by Expired account |
{ InitialAccess } |
{ T1078 } |
User added to Team and immediately uploads file |
{ InitialAccess } |
{ T1566 } |
Attempts to sign in to disabled accounts by IP address |
{ InitialAccess } |
{ T1078 } |
Azure Active Directory signins from new locations |
{ InitialAccess } |
{ T1078 } |
Same IP address with multiple csUserAgent |
{ InitialAccess } |
{ T1190 } |
Rare User Agent strings |
{ InitialAccess } |
{ T1190 } |
New time zone observed |
{ InitialAccess } |
{ T1078 } |
Suspicious credential token access of valid IAM Roles |
{ InitialAccess DefenseEvasion } |
{ } |
Suspicious credential token access of valid IAM Roles |
{ InitialAccess DefenseEvasion } |
{ T1078 } |
Anomalous AAD Account Creation |
{ Persistence } |
{ } |
Anomalous Role Assignment |
{ Persistence } |
{ } |
External user from a new organisation added |
{ Persistence } |
{ } |
New User created on SQL Server |
{ Persistence } |
{ } |
New domain added to Whitelist |
{ Persistence } |
{ } |
Anomalous AAD Account Creation |
{ Persistence } |
{ T1136 } |
Anomalous Role Assignment |
{ Persistence } |
{ T1098 } |
External user from a new organisation added |
{ Persistence } |
{ T1136 } |
New User created on SQL Server |
{ Persistence } |
{ T1136 } |
New domain added to Whitelist |
{ Persistence } |
{ T1098 } |
Azure DevOps- Guest users access enabled |
{ Persistence DefenseEvasion } |
{ } |
Azure DevOps- Public project created |
{ Persistence DefenseEvasion } |
{ } |
Azure DevOps- Guest users access enabled |
{ Persistence DefenseEvasion } |
{ T1098 T1089 } |
Azure DevOps- Public project created |
{ Persistence DefenseEvasion } |
{ T1098 T1089 } |
Alerts related to IP |
{ Persistence Discovery LateralMovement Collection } |
{ } |
Alerts related to IP |
{ Persistence Discovery LateralMovement Collection } |
{ } |
Crypto currency miners EXECVE |
{ Persistence Execution } |
{ } |
Crypto currency miners EXECVE |
{ Persistence Execution } |
{ T1059 T1053 } |
Rare Audit activity initiated by App |
{ Persistence LateralMovement } |
{ } |
Rare Audit activity initiated by App |
{ Persistence LateralMovement } |
{ T1136 } |
User Granted Access and Grants others Access |
{ Persistence PrivilegeEscalation } |
{ } |
User created by unauthorized user |
{ Persistence PrivilegeEscalation } |
{ } |
User added to SQL Server SecurityAdmin Group |
{ Persistence PrivilegeEscalation } |
{ } |
User Granted Access and Grants others Access |
{ Persistence PrivilegeEscalation } |
{ T1098 T1078 } |
User created by unauthorized user |
{ Persistence PrivilegeEscalation } |
{ T1098 T1078 } |
User added to SQL Server SecurityAdmin Group |
{ Persistence PrivilegeEscalation } |
{ T1098 T1078 } |
User Granted Access and associated audit activity |
{ Persistence PrivilegeEscalation Impact } |
{ } |
User removed from SQL Server Roles |
{ Persistence PrivilegeEscalation Impact } |
{ } |
User Granted Access and associated audit activity |
{ Persistence PrivilegeEscalation Impact } |
{ T1098 T1078 T1496 } |
User removed from SQL Server Roles |
{ Persistence PrivilegeEscalation Impact } |
{ T1098 T1078 T1496 } |
Privileged role attached to Instance |
{ PrivilegeEscalation } |
{ } |
Anomalous Login to Devices |
{ PrivilegeEscalation } |
{ } |
User made Owner of multiple teams |
{ PrivilegeEscalation } |
{ } |
Privileged role attached to Instance |
{ PrivilegeEscalation } |
{ T1098 } |
Anomalous Login to Devices |
{ PrivilegeEscalation } |
{ T1078 } |
User made Owner of multiple teams |
{ PrivilegeEscalation } |
{ T1078 } |
Tracking Privileged Account Rare Activity |
{ PrivilegeEscalation Discovery } |
{ } |
Tracking Privileged Account Rare Activity |
{ PrivilegeEscalation Discovery } |
{ T1078 T1087 } |
List of New Hunting QueriesHunting Query MITRE ATT&CK Tactic
Azure DevOps- Project visibility changed to public
{ Collection }
{ }
Azure DevOps- Project visibility changed to public
{ Collection }
{ T1213 }
Non-owner mailbox login activity
{ Collection Exfiltration }
{ }
Non-owner mailbox login activity
{ Collection Exfiltration }
{ T1114 T1020 }
Potential DGA detected
{ CommandAndControl }
{ }
Detect beacon like pattern based on repetitive time intervals in Wire Data Traffic
{ CommandAndControl }
{ }
Potential DGA detected
{ CommandAndControl }
{ T1483 T1008 }
Detect beacon like pattern based on repetitive time intervals in Wire Data Traffic
{ CommandAndControl }
{ T1043 T1065 }
DNS – domain anomalous lookup increase
{ CommandAndControl Exfiltration }
{ }
RareDNSLookupWithDataTransfer
{ CommandAndControl Exfiltration }
{ }
DNS – domain anomalous lookup increase
{ CommandAndControl Exfiltration }
{ T1483 T1008 T1048 }
RareDNSLookupWithDataTransfer
{ CommandAndControl Exfiltration }
{ T1043 T1048 }
Failed service logon attempt by user account with available AuditData
{ CredentialAccess }
{ }
Permutations on logon attempts by UserPrincipalNames indicating potential brute force
{ CredentialAccess }
{ }
Failed service logon attempt by user account with available AuditData
{ CredentialAccess }
{ T1110 }
Permutations on logon attempts by UserPrincipalNames indicating potential brute force
{ CredentialAccess }
{ T1110 }
Azure storage key enumeration
{ Discovery }
{ }
Azure storage key enumeration
{ Discovery }
{ T1087 }
Cscript script daily summary breakdown
{ Execution }
{ }
Least Common Parent And Child Process Pairs
{ Execution }
{ }
Least Common Processes by Command Line
{ Execution }
{ }
New processes observed in last 24 hours
{ Execution }
{ }
Entropy for Processes for a given Host
{ Execution }
{ }
Rare Process Path
{ Execution }
{ }
Uncommon processes – bottom 5%
{ Execution }
{ }
New PowerShell scripts encoded on the commandline
{ Execution CommandAndControl }
{ }
New PowerShell scripts encoded on the commandline
{ Execution CommandAndControl }
{ }
Powershell or non-browser mailbox login activity
{ Execution Persistence Collection }
{ T1059 T1098 T1114 }
Hosts running a rare process with commandline
{ Execution Persistence Discovery LateralMovement Collection }
{ }
Hosts running a rare process with commandline
{ Execution Persistence Discovery LateralMovement Collection }
{ }
GitHub OAuth App Restrictions Disabled
{ Exfiltration }
{ }
GitHub OAuth App Restrictions Disabled
{ Exfiltration }
{ T1537 }
Azure Sentinel Connectors Administrative Operations
{ Impact }
{ }
Azure Sentinel Workbooks Administrative Operations
{ Impact }
{ }
Azure Virtual Network Subnets Administrative Operations
{ Impact }
{ }
Common deployed resources
{ Impact }
{ }
Anomalous Password Reset
{ Impact }
{ }
Signin Logs with expanded Conditional Access Policies
{ Impact }
{ }
Multiple Teams deleted by a single user
{ Impact }
{ }
Preview – TI map File entity to OfficeActivity Event
{ Impact }
{ }
Preview – TI map File entity to Security Event
{ Impact }
{ }
Preview – TI map File entity to Syslog Event
{ Impact }
{ }
Preview – TI map File entity to VMConnection Event
{ Impact }
{ }
Azure Sentinel Connectors Administrative Operations
{ Impact }
{ T1496 }
Azure Sentinel Workbooks Administrative Operations
{ Impact }
{ T1496 }
Azure Virtual Network Subnets Administrative Operations
{ Impact }
{ T1496 }
Common deployed resources
{ Impact }
{ T1496 }
Anomalous Password Reset
{ Impact }
{ T1531 }
Signin Logs with expanded Conditional Access Policies
{ Impact }
{ }
Multiple Teams deleted by a single user
{ Impact }
{ T1485 T1489 }
Preview – TI map File entity to OfficeActivity Event
{ Impact }
{ }
Preview – TI map File entity to Security Event
{ Impact }
{ }
Preview – TI map File entity to Syslog Event
{ Impact }
{ }
Preview – TI map File entity to VMConnection Event
{ Impact }
{ }
Failed Login Attempt by Expired account
{ InitialAccess }
{ }
User added to Team and immediately uploads file
{ InitialAccess }
{ }
Attempts to sign in to disabled accounts by IP address
{ InitialAccess }
{ }
Azure Active Directory signins from new locations
{ InitialAccess }
{ }
Same IP address with multiple csUserAgent
{ InitialAccess }
{ }
Rare User Agent strings
{ InitialAccess }
{ }
New time zone observed
{ InitialAccess }
{ }
Failed Login Attempt by Expired account
{ InitialAccess }
{ T1078 }
User added to Team and immediately uploads file
{ InitialAccess }
{ T1566 }
Attempts to sign in to disabled accounts by IP address
{ InitialAccess }
{ T1078 }
Azure Active Directory signins from new locations
{ InitialAccess }
{ T1078 }
Same IP address with multiple csUserAgent
{ InitialAccess }
{ T1190 }
Rare User Agent strings
{ InitialAccess }
{ T1190 }
New time zone observed
{ InitialAccess }
{ T1078 }
Suspicious credential token access of valid IAM Roles
{ InitialAccess DefenseEvasion }
{ }
Suspicious credential token access of valid IAM Roles
{ InitialAccess DefenseEvasion }
{ T1078 }
Anomalous AAD Account Creation
{ Persistence }
{ }
Anomalous Role Assignment
{ Persistence }
{ }
External user from a new organisation added
{ Persistence }
{ }
New User created on SQL Server
{ Persistence }
{ }
New domain added to Whitelist
{ Persistence }
{ }
Anomalous AAD Account Creation
{ Persistence }
{ T1136 }
Anomalous Role Assignment
{ Persistence }
{ T1098 }
External user from a new organisation added
{ Persistence }
{ T1136 }
New User created on SQL Server
{ Persistence }
{ T1136 }
New domain added to Whitelist
{ Persistence }
{ T1098 }
Azure DevOps- Guest users access enabled
{ Persistence DefenseEvasion }
{ }
Azure DevOps- Public project created
{ Persistence DefenseEvasion }
{ }
Azure DevOps- Guest users access enabled
{ Persistence DefenseEvasion }
{ T1098 T1089 }
Azure DevOps- Public project created
{ Persistence DefenseEvasion }
{ T1098 T1089 }
Alerts related to IP
{ Persistence Discovery LateralMovement Collection }
{ }
Alerts related to IP
{ Persistence Discovery LateralMovement Collection }
{ }
Crypto currency miners EXECVE
{ Persistence Execution }
{ }
Crypto currency miners EXECVE
{ Persistence Execution }
{ T1059 T1053 }
Rare Audit activity initiated by App
{ Persistence LateralMovement }
{ }
Rare Audit activity initiated by App
{ Persistence LateralMovement }
{ T1136 }
User Granted Access and Grants others Access
{ Persistence PrivilegeEscalation }
{ }
User created by unauthorized user
{ Persistence PrivilegeEscalation }
{ }
User added to SQL Server SecurityAdmin Group
{ Persistence PrivilegeEscalation }
{ }
User Granted Access and Grants others Access
{ Persistence PrivilegeEscalation }
{ T1098 T1078 }
User created by unauthorized user
{ Persistence PrivilegeEscalation }
{ T1098 T1078 }
User added to SQL Server SecurityAdmin Group
{ Persistence PrivilegeEscalation }
{ T1098 T1078 }
User Granted Access and associated audit activity
{ Persistence PrivilegeEscalation Impact }
{ }
User removed from SQL Server Roles
{ Persistence PrivilegeEscalation Impact }
{ }
User Granted Access and associated audit activity
{ Persistence PrivilegeEscalation Impact }
{ T1098 T1078 T1496 }
User removed from SQL Server Roles
{ Persistence PrivilegeEscalation Impact }
{ T1098 T1078 T1496 }
Privileged role attached to Instance
{ PrivilegeEscalation }
{ }
Anomalous Login to Devices
{ PrivilegeEscalation }
{ }
User made Owner of multiple teams
{ PrivilegeEscalation }
{ }
Privileged role attached to Instance
{ PrivilegeEscalation }
{ T1098 }
Anomalous Login to Devices
{ PrivilegeEscalation }
{ T1078 }
User made Owner of multiple teams
{ PrivilegeEscalation }
{ T1078 }
Tracking Privileged Account Rare Activity
{ PrivilegeEscalation Discovery }
{ }
Tracking Privileged Account Rare Activity
{ PrivilegeEscalation Discovery }
{ T1078 T1087 }
How to access the new hunting queries:
All of the queries are available via the Hunting UI page. For this example, I will demonstrate how to filter the new Microsoft Teams hunting queries. To learn more, see article on the new Microsoft Teams data connector (Preview).
Navigate to the Azure Sentinel console, and select “Hunting” under the Threat Management area

Next, use the filter pills to filter the data source (TeamsData) for the hunting query. In this example, we are highlighting hunting queries that satisfy several use cases for Microsoft Teams:


Example: Previously unseen bot or application added to Microsoft Teams
As an example, this hunting query helps identify new, and potentially unapproved applications or bots being added to Microsoft Teams. This query requires you to have Microsoft Teams data ingesting into Azure Sentinel. Ensure you have the relevant data collectors configured for the target hunting queries. Visit here (Connect data sources to Azure Sentinel | Microsoft Docs) for more information.
// If you have more than 14 days worth of Teams data change this value
let data_date = 14d;
let historical_bots = (
TeamsData
| where CreationTime > ago(data_date)
| where isnotempty(AddOnName)
| project AddOnName);
TeamsData
| where CreationTime > ago(1d)
// Look for add-ins we have never seen before
| where AddOnName in (historical_bots)
// Uncomment the following line to map query entities is you plan to use this as a detection query
//| extend timestamp = CreationTime, AccountCustomEntity = UserId
Get started today!
by Contributed | Dec 7, 2020 | Technology
This article is contributed. See the original author and article here.
If you haven’t heard already, SharePoint 2010 Workflows will be completely deprecated in O365 by November 2020: SharePoint 2010 Workflow Retirement. This How-To will walk you through the process of Exporting and Importing your workflows from one tenant to another. If you find yourself in a situation where:
- You currently do not have an O365 Subscription but have a demo tenant or possibly a CVR tenant
- You will be migrating to O365 after or relatively close to the retirement date
- You have workflows that are important business process, and you cannot afford for them to down while you recreate them from scratch
Follow me through this How-To to give you ideas on how you can get a leg up on Workflow Migrations from SharePoint 2010 or SharePoint 2013 to O365.
*Currently this solution is available in GCC and GCC High tenants.
Initial SharePoint List
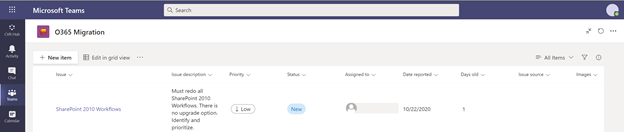
I am going to start by creating a simple list that keeps track of issues. This list will help us keep track of the SharePoint 2010 Workflow issue. I am not going to spend any time talking about the details of the list because it will take away from the article, however, if you would like to know more about how to create a list and what they are all about you can go here.
Let me set the stage to help you better understand how all this will work.
- Created a new list in Microsoft TEAMS
- I used the “Issue Tracker” template and called it “O365 Migration”
- I added a new item and assigned the “Issue” to myself
My “O365 Migration” list looks like this:
Microsoft Teams
Create Data Connections
There is more than one way to get to Power Automate. For our purpose, we will navigate to Power Automate using the following URL which points to a GCC Tenant: Power Automate in GCC. For a commercial tenant you will want to navigate to: Power Automate Commercial
We need to navigate to Power Automate and login.
The first thing we need to do is connect to our data. Our data is the “O365 Migration” list in SharePoint Online (SPO). On the right-hand menu click on “Data” and then “Connections”. For this How-To, we are going to assume that you don’t have any connections created yet (if you do have a connection already created for your SPO then you can skip the following few steps:
- In the Ribbon click on “New connection”
- Select “SharePoint”
- “Connect directly (cloud services)”.
- Click on “Create”
- You will be asked to authenticate
- Your connection to SharePoint should now be listed

Creating A New Workflow
Once we have our data connection to SharePoint we need to click on “Create” on the left-hand menu and then on “Automated Flow”. This will bring up a pop-up window which will allow you to select the type of workflow you want to create. In our scenario, we want to send an email to the user(s) who gets assigned an issue, therefore, we will select “When an item is created or modified”.
 New Flow
Adding Workflow Steps
Your workflow canvas should consist of only one Step: “When an item is created or modified”. To configure this step, click on the pull-down arrow from the “Site Addresses” row. Because we created the data connection on a previous step, your site should be listed as an option. Select the List Name to complete configuring this step.

To complete our workflow, we need to be able to send an email to the user(s) who gets assigned the task. Click on the “New Step” button and filter by O365 to quickly find the “Send an email (V2)” step.
- Once the step is added, click on the “To” field (textbox) to display the “Dynamic Content” pane to the right. In the Dynamic Content options, search for “Assigned to Email” under the “When an item is created or modified” header. This field has the email of the user that we want to send the email to.
- Moving over to the “Subject” field, click on the textbox to display the “Dynamic Content” pane. Under the “When and item is created or modified” header select “Title” to display the title of the task as the “Subject” of the email.
- In the next few steps, you will follow the steps above to get the “Dynamic Content” pane to display. In the “Body” field select “Issue Description”.
- In the “From (Send as)” field select the “Issue logged by Email”. This will let the user know who assigned the task to them.
- Finally, the “Send as email (V2)” should look very similar to the image below:
 Send Email
Flow Checker
This is the extent of our workflow. Like I said, nothing big, just a simple workflow to start testing our idea with. Now we need to make sure that our workflow follows Microsoft’s flow best practices by clicking on “Flow Checker” on the upper right hand corner of your window. If you are lucky, you will have the same results I did.

Test Flow
Now we get to test the workflow with actual data. Click on “Test” on the top right-hand corner of your screen to start testing your workflow. If this is your first time testing your workflow, the only option that will be available will be the first one: “I’ll perform the trigger action”. Once you have tested the flow at least once, the other option will be available to you.
 Test Flow
Because we have to “trigger” the workflow ourselves we must navigate to TEAMS immediately after clicking on the “Test” button. In TEAMS we need to create a new list item. Make sure that you have assigned the task to a valid email and have entered a valid email to the assigned to field. Once you have created the new item, go back to your workflow, and see that it was successful.
 Test Results
The email that the user will receive should resemble the following:

Export Workflow
On the left navigation pane, select “My flows”, then click on the workflow you just created. You should see something like the image below.

Click on “Export” on the top of the image, then “Package (zip)”.

Export Package
In the “Export package” page fill out the “Name”, “Environment”, and the “Description” details under the “Page details” header.
 Export Package
In the “Review Package Content” section, pay close attention to “Import Setup”. We are going to be moving the workflow from one tenant to another, and therefore, we cannot “Upgrade” the workflow. To change this setting, click on the ‘Wrench” icon to the right or simply click on “Update”. When the window displays, select the “Create as new” option.


Another section we need to make sure we modify is the “Related resources” section. It is important to make sure that the setting for this feature is set to “Select during import” for all of the connections that your workflow is using. We are using two, a SharePoint connection, and an Office 365 connection to be able to send out the email. Both of our settings are set correctly.
 Related Resources
Finally, once it all looks good and everything is filled in hit the “Export” button at the button to save the file locally. Make a note of the where the file, the package, gets saved to because we will need the file on the next steps.
Import Workflow
We are almost done with this How-To. We now need to import our flow to our new tenant but before we do that, we need to make sure of a few things:
- We need to make sure that the list we are going to use the workflow with exist
- That the connections to SharePoint is available in our new tenant
- And finally, that the connection to O365 Outlook is available in our new tenant
For simplification, I have created the same type of list, Issue Tracker, using TEAMS, on a different tenant making sure the fields are the same and the name of the list is the same.
To verify that the Data Connections have been made, simply click on “Data” and then on “Connections” on the left side menu. If you see the following connections listed, you have nothing else to do. You can move on to the next step.

If those connections are not listed, you will have to create them. We walked through the steps above on how to create the connections here.
Upload Zip File
Navigate and login to your other tenant. On the left navigation pane, click on “My flows” and this time click on “Import” on the ribbon. Click on the blue “Upload” button and navigate to the location of the zip file that you exported in the previous step. Select the zip file, click on open. The “Upload” button will change to “Uploading” to indicate the file is being uploaded.
 Upload Zip File
 Import Package
After the file gets imported your screen should look similar to this one:
 Import Package Screen
The only changes we will have to modify here, and they are very important, are the two errors showing under “Related resources”. Those errors mean that the Data Connections that it is expecting to see don’t exist. We must tell the import process of the new Data Connections we have created.
Click on “Select during import” for the “SharePoint Connection” and select the connection that connects to SharePoint. Then click on “Select during import” to choose the Office 365 connection.
 Import Package
Finally, click on the “Import” button at the bottom of the screen. After the system finishes trying to import the workflow you will see an error:
 Import Failed
The error is self-explanatory: one of the resources did not migrate. To fix this issue and complete the import simply click on “Save as a new flow”. Once it is done creating the import as a new workflow you will see the following screen:
 Flow Errors
This screen tells you one very important thing: Although the flow doesn’t work in its current state, it is, however, imported. The import did what we hoped it would do and that is to move an existing workflow from one tenant to another.
To fix the warnings that are displayed click on each step and point to the correct data connection.
 Connections
The SharePoint data connection will have to be configured to point to the new SharePoint Site and List. Without this step, the flow will remain pointing to the old URL and not work as expected.
The only thing left to do is test, test, and test again.
I hope this was helpful for you. Please comment on this article if it is! If you need additional support or information reach out Power Automate Support by going to their site.
Additional Resources
by Contributed | Dec 7, 2020 | Azure, Microsoft, Technology
This article is contributed. See the original author and article here.
I was helping a friend earlier today with their Azure Synapse Studio CI / CD integration. They had followed our Docs page Source control in Azure Synapse Studio and then they shared errors they were seeing in their release pipeline during deployment.
We took a step back to discuss what they wanted to do, and it looked like they were too far in the weeds for ADO. So I walked through creating an Azure DevOps Project, connecting Git to my Azure Synapse Studio, and then creating a branch and pushing some changes. We’ll push changes in a follow up blog post. Today we cover the basics.
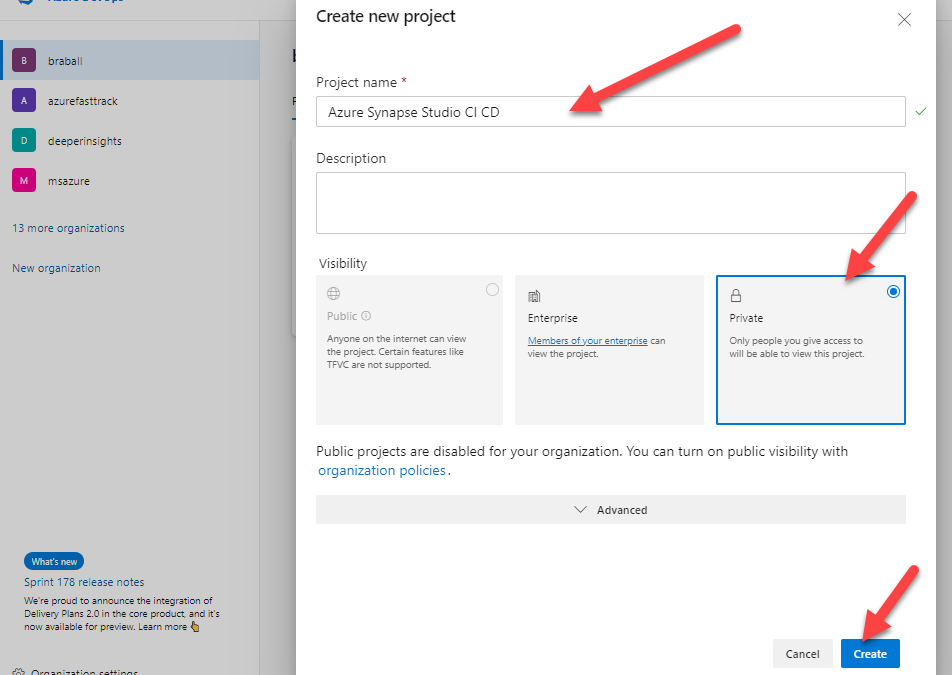
First let’s navigate to Projects – Home (azure.com). We will create a New Project and title it Azure Synapse Studio CI CD. I’m going to mark this repo private because it’s just for us.

Now I will click on the Repos menu.

Next I will go to the bottom of the page. I want to select Initialize main branch with a README or gitignore. I will click Initialize.

At this point I have a Repo that is initialized.

Now we can connect this to our Azure Synapse Studio. Let us travel over to https://web.azuresynapse.net/ and log into our Azure Synapse Studio. After we login we need to navigate to the Manage screen. If you are not on the Git configuration page, navigate there.

Next we want to click on Set up code repository. You can select Azure DevOps Git or GitHub. For this blog we will be selecting Azure DevOps Git. Then select your organizations Azure Active Directory tenant. *a quick side note, make sure the AAD account you are using to connect to Azure DevOps is the same account that has permissions to your Azure Synapse Studio workspace.
Then click Continue.

Select the Azure DevOps Account that our organization is using. The Project and Git repository name are the same, and are the Project Name we created earlier.
My collaboration branch is main, my Publish branch is workspace_publish, my Root folder is the default, I have checked import existing resources to repository.
As this is my initial commit I want to commit this to my main branch.
Then I click Apply.
*Another note: your company will have a DevOps environment, and specific rules on how you want things to connect. If I’m doing anything that makes you scream from a developer philosophy, please find me on Twitter under BuckWoody_MSFT …. also don’t tell Buck I did this …. I’m not Buck.

At this point in time your Azure DevOps Git Rep should be connected.

If we go to our Azure DevOps Repo we should see that it is populated with objects from our Azure Synapse Studio.

Back in Azure Synapse Studio, we can navigate to the develop pane, create a new branch to ensure any changes I make will not be automatically deployed against my main version of Azure Synapse Studio.

This is what we will tackle next time.

by Contributed | Dec 7, 2020 | Azure, Microsoft, Technology
This article is contributed. See the original author and article here.
After the announcement of the integration of Azure Data Explorer into the recently launched Azure Purview service, this blog post shows how to use ADX as a data source in Purview and highlights the new features in a few use cases that can be helpful in the context of ADX.
Read the announcement blog post about our integration with Purview here.
Setup: How to connect ADX as a data source in Azure Purview
Azure Data Explorer is available as a data source to scan within Azure Purview Studio. Just register a new source and choose “Azure Data Explorer (Kusto)” and the according cluster connection information.
In order to connect to an ADX cluster you need to provide a service principal with “AllDatabaseViewer” rights on the target cluster/databases to Azure Purview through an Azure KeyVault.
After that, register ADX as a data source in Azure Purview Studio. Go through the process of managing the credentials, registering a new data source and configuring the first scan, as described here.
Then select all the databases that should be included in this specific scan. For example you can set up a full scan for all databases that should be done monthly or weekly, and set up another scan on specific databases that runs daily to keep the information in the data catalog up-to-date (full and incremental scans).
Next you can specify which rule set you want to apply for this scan. There is a system default for every data source, which includes all default classifications.

The power of custom classifications and scans
You can create your own scan rule sets to include only the scan rules that are relevant for your data or include your own custom rules that you defined in Purview.
In the context of Azure Data Explorer, this can be very useful for a variety of use-cases:
Custom rules can be helpful for example if you want to identify custom part numbers that you might ingest with your IoT Telemetry or Log data, or other patterns that might help you identify certain attributes in tables specific for your business domain. These classifications will then be attributes of the tables/columns in Purview and users will be able to search for example for tables containing data about specific device families, product lines or production processes in your data catalogue.
Classifications can also be applied manually after a scan directly within Azure Purview on the relevant data assets, like on a table or column. For example you could highlight specific columns in a dataset that you know is used to measure customer interaction, when is a feature used and how long does it take a customer to get there. In combination with the Business Glossary in Purview these additional attributes can significantly improve the search and discovery experience for many user groups within a company. Business analysts can leverage this customer interaction data and see if there’s a correlation to any metric they might use.
If you give good thought about which classifications and business terms might be useful, you can make your IoT-, factory floor and device telemetry data much more accessible, democratizing access to these data that historically are often siloed within manufacturing systems.
You can always look at an overview of the recent scans in the run history:

Browsing the data catalog: ADX data assets
After the scan(s) have finished, you can start browsing the newly discovered data assets. You can do that either by directly searching for a specific term (part of a table name, classification, etc.) or by clicking “Browse assets” in the main menu.
In the case of ADX, an overview of the registered data assets can look something like this:

Looking at an ADX table for example we get detailed information as to which database it belongs to and about the cluster this database is running on. We also see when it was last changed, we can add a description to the table and see/add classifications for easier discovery, as well as some ADX specific properties like a potential folder or the docstring.
Also as mentioned you can add descriptions as well as classifications and associate terms from the business glossary with every ADX data asset, visible on the bottom right here:

The scans also pick up the table schema, showing all columns and their respective data type. And while giving the data consumers in your company the ability to discover data easily is very important, here you can also add a contact person, an owner, that people can talk to to learn more about the data asset, how to get access and how to use it.
Visualizing the data flows – data lineage information
A very powerful piece of information is located in the “Lineage” tab. This overview shows you the data flow between the assets in your data catalog. In the context of ADX this currently means that every data movement that you defined using Azure Data Factory involving an ADX table will be visualized in this tab.

In addition to the automatically inferred lineage information from Azure Data Factory, we saw that many customers also use custom scripts for data ingestion, or Jupyter notebooks on a Spark cluster, or they ingest data programmatically using one of the ADX SDKs provided. In this case, to make these data flows transparent as well, you can use the well documented Apache Atlas REST API to create custom objects within Azure Purview.
You can find all the details about using the Azure Purview REST API here, including a sample postman collection to get you started.
An example: Visualize custom data flows within Azure Purview lineage
One feature within ADX that many customers use very frequently is the concept of Update Policies. When using them, you essentially chain two or more tables together and transform data between them in some form. These data transformations can be linear, e.g. from Table A -> Table B -> Table C, or they can “fan out”, like filtering data per device family, e.g. from Table A -> Table B, as well as Table A -> Table C.
What that means is that update policies might be a very good candidate for visualization in the lineage tab. In order to achieve that, we use the Atlas API to create a new “Process” entity in Purview called “ADX Update Policy” with all the attributes it might have within ADX.
REST API Call (POST) against /api/atlas/v2/types/typedefs of our Purview instance:

{
  "entityDefs" : [
    {
      "superTypes" : [ "Process" ],
      "category" : "ENTITY",
      "name" : "adx_update_policy",
      "description" : "a type definition for azure data explorer update policies",
      "typeVersion" : "1.0",
      "attributeDefs" : [
        {
          "name" : "IsEnabled",
          "typeName" : "string",
          "isOptional" : true,
          "cardinality" : "SINGLE",
          "valuesMinCount" : 1,
          "valuesMaxCount" : 1,
          "isUnique" : false,
          "isIndexable" : false
        },
	{<additional attributes..>}
      ]
    }
  ]
}
After the creation of this asset, all we need to do to use it in the lineage tab, is to link two tables together using our newly created “Update Policy” object. Now in order to do that, we first need to fetch the GUIDs of the according ADX tables from Azure Purview, so that the tool is actually able to uniquely identify them. For the sake of this blog post we assume that we looked them up manually, but you can of course also discover them via REST API Call (hint: /api/atlas/v2/search/advanced)
.
After we have all the information, the body of the API call could look like this:
REST API Call (POST) against /api/atlas/v2/entity/bulk of our Purview instance:

{
  "entities": [
    {
      "typeName": "adx_update_policy",
      "createdBy": "admin",
      "attributes": {
        "qualifiedName": "adx_update_policy",
		    "uri": "adx_update_policy",
        "name": "adx_update_policy",
        "description": "transforms data between source and target table",
        "IsEnabled": "true",
        "Query": "KQLTransformationQuery()",
        "IsTransactional": "false",
        "PropagateIngestionProperties": "false",
        "inputs": [
          {
            "guid": "<Purview ID of the source table>",
            "typeName": "azure_data_explorer_table"
          }
        ],
        "outputs": [
          {
            "guid": "<Purview ID of the target table>",
			"typeName": "azure_data_explorer_table"
          }
        ]
      }
    }
	]
}
The result then can look something like this:

Of course these are only basic examples and they involve some scripting as well as orchestration of API calls and other sorts of automation, but you can be sure that we are hard at work with the Purview team to extend the automated lineage information to more data ingestion and analytics scenarios relevant for ADX, stay tuned for more.


Recent Comments