by Contributed | Jan 11, 2021 | Technology
This article is contributed. See the original author and article here.
For people new to networking, creating Azure Virtual Network subnets can be tricky. Learn how CIDR notation works to segment ranges of IP addresses.
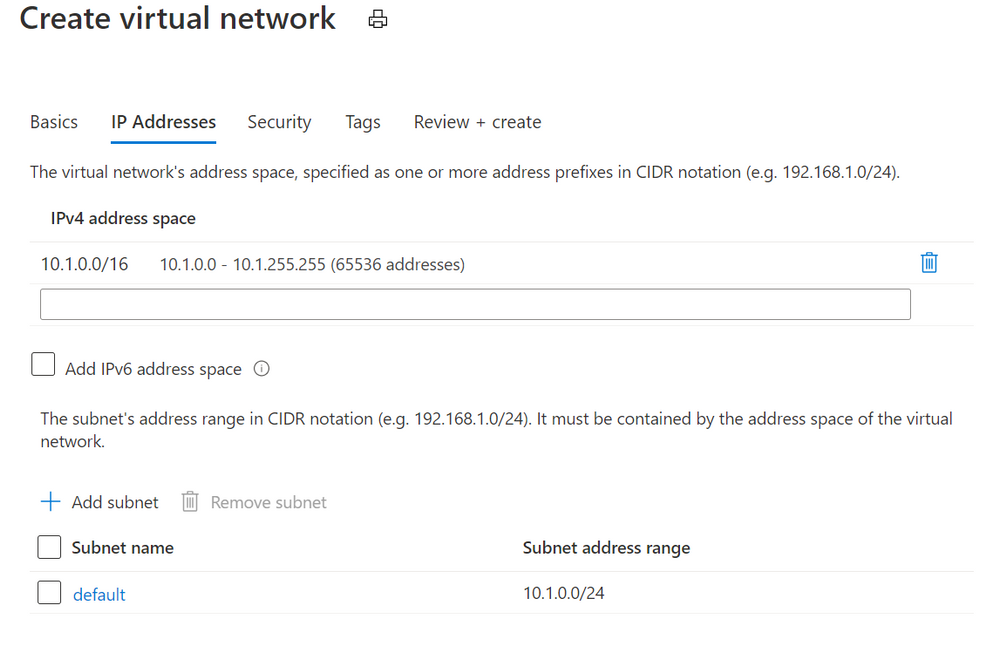
When you create an Azure virtual network, you’ll get default IP addresses that look something like this:
Azure Virtual Networks add dialog
This gives you a private address space at 10.1.0.0 with 65,536 addresses to use. Great!
(Note: These private IP addresses are not routable across the internet. If your devices need to be accessible on the public internet, visit Public IP addresses).
Now it’s not recommended to put all of your resources into that same address space. It’s inefficient from a network routing perspective, and it makes it harder to secure traffic and limit it between devices. A good security principle that applies to networking is to limit “lateral movement”, that is the ability for a hacker or infected device to easily communicate with other systems in your network. If we left this without any subnets, one compromised device could talk to the other 65,535 devices in our network.
Azure suggests that we add a subnet called default, with a Subnet address range of 10.1.0.0/24. What does that mean?
Well, subnets (literally sub networks) carve up or segment a bigger address space into smaller sections. We can then limit traffic in and out of this subnet (to the devices in this address space segment) by configuring a network security group. We can also add a network security group to the network interface of a specific virtual machine, to gives us another layer of network security control. To learn how this works, visit How network security groups filter network traffic.
Imagine your virtual network is a round, decorated birthday cake. You’ve carved out one segment of that birthday cake as a subnet, so it contains a smaller amount of those 65,536 addresses. How many does it contain? That depends on what CIDR notation you’ve used!
CIDR (Classless Inter-Domain Routing) is a method for allocating IP addresses. It’s the /x number, and that number determines how many IP addresses will be available in that subnet.
Stay with me if you want to go down the math rabbit hole of IP addressing for a moment, or skip to the next part. IP addresses (v4) are written as a set of four numbers, like 192.168.1.0.
These are converted to binary (the ones and zeroes that computers use), to look like this:
11000000 10101000 00000001 00000000.
We create a subnet by adding a “mask” to this number, telling the computer how many of the digits we want to read and keep the same (left to right).
With a /24, we’re saying “grab the first 24 digits” for this subnet, so that keeps the 192.168.1 and leaves us the “.0” on the end as a pool of addresses we can use in this subnet.
Those last 8 binary digits can only add up to 255 (with binary being a base 2 system) AND including zero as a possible value, that has defined our available 256 addresses we can use in this subnet – 0 to 255.
If we’d used a /29, keeping the first 29 digits, we’d only have 8 available IP addresses in this subnet, because 11000000 10101000 00000001 00000xxx leaves us just 000 left – a maximum binary value of 7 plus our zero value equals 8 IP addresses.
If you’re old school and are used to specifying subnet masks like 255.255.255.0, that’s a /24 CIDR notation, with its range of 256 IP addresses (255.255.255.0 to 255.255.255.255).
Skipped to here? Let’s continue!
The CIDR number is like specifying how large you want the slices of cake to be. Fortunately you don’t have to do the math, because there are a ton of free CIDR notation tables and calculators on the internet that will tell you how many addresses you’ll have in your subnet if you use a /28 or a /18 for example. When you add a subnet to your Azure virtual network, you’ll also get a note as you create it, telling you how many addresses will be available with the values you have entered.
Just remember, a subnet segments those address from the pool of your total available addresses. Segment two large subnets and you may not have room to add any more subnets.
In our example, the recommended default 10.1.0.0/24 gives us a subnet of 256 IP addresses EXCEPT Azure reserves 5 of these (the first and last address in each subnet for protocol conformance and 3 additional addresses for Azure service usage), so we have 251 available in Azure. This bundles up addresses 10.1.0.0-10.1.0.255.
So what if we want to add another subnet to this virtual network? Now we have to make sure we don’t overlap that subnet we already have!
Azure will suggest we use 10.1.1.0/24. Generally /24 is a good size for a subnet, and now we’d have:
Default 10.1.0.0 to 10.1.0.255
Subnet2 10.1.1.0 to 10.1.1.255
Again, keeping the first 3 parts of the IP address (24 digits in binary) the same.
Now we can keep on carving up our virtual network into different subnets, within the original 10.1.0.0 to 10.1.255.255 addresses (our 10.1.0.0/16 address space). Or, on reflection, we could have used a smaller CIDR notation for the original Azure Virtual Network, and created multiple different Vnets, each with their own subnets. There are just a couple of extra things to note …
Azure Virtual Network disallowed address spaces
The following address spaces cannot be used:
224.0.0.0/4 (Multicast)
255.255.255.255/32 (Broadcast)
127.0.0.0/8 (Loopback)
169.254.0.0/16 (Link-local)
168.63.129.16/32 (Internal DNS, DHCP, and Azure Load Balancer health probe)
Learn more at Create a virtual network
On-premises networks
IP addressing has to be unique – you can’t have two resources with the same IP address. If you’ve configured a Site-to-Site VPN to allow connectivity to/from an on-premises network, consider which private IP address spaces are in use in that on-prem environment, so your Azure vnets and subnets don’t conflict.
Gateway subnet
Speaking of VPN connections, if you’re using an Azure VPN Gateway it also needs gateway subnet of IP addresses. There are some rules around the configuration of this particular type of subnet – it must only contain your virtual network gateway resources, it must be named GatewaySubnet and it must be sized appropriately. You can’t change this sizing once you’ve deployed it, so Microsoft recommends a CIDR notation of /27 or “larger” (e.g. /26) to give you room for growth.
For more information on VPN Gateways, visit About VPN Gateway configuration settings
Want to learn more?
Secure and govern workloads with network level segmentation
Plan virtual networks – subnets
Add, change or delete a virtual network subnet
Gateway subnet guidance – About VPN gateway configuration settings
Azure Virtual Network and Azure VPN Gateway modules on Microsoft Learn
by Contributed | Jan 11, 2021 | Technology
This article is contributed. See the original author and article here.
There might be scenarios noticed where recurrence trigger did not fire at specified frequency. This blog tries to consolidate these recurrence behaviors.
Recurrence trigger:
In some scenarios the start times of recurrences might drift due to factors such as latency during storage calls. The options that can be made use of to make sure that your logic app doesn’t miss a recurrence are documented here .
Connection-based trigger:
In addition to the factors explained above for recurrence trigger, recurrences for connection-based triggers like SFTP-SSH, Service Bus etc. the recurrence schedule isn’t the only driver that controls execution, and the time zone only determines the initial start time. Subsequent runs depend on the recurrence schedule, the last trigger execution, and other factors that might cause run times to drift or produce unexpected behavior. For more information, see Recurrence for connection-based triggers.
Recurrences for connection-based triggers might also drift due to long polling nature of the trigger. If suppose, SFTP-SSH recurrence trigger ‘When a file is added or modified’ fires as per schedule and finds a file, another trigger will run again after 15 seconds to check if there are any more files present. The subsequent next trigger execution time is calculated from the last trigger execution time plus Recurrence interval. Hence, whenever trigger is fired, the immediate 15 seconds trigger is getting executed and altering the subsequent trigger executions.
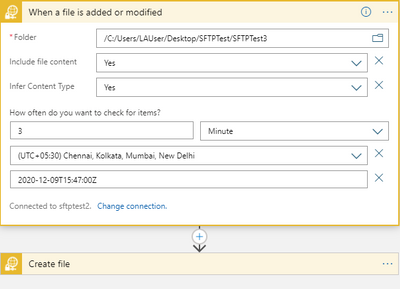
In the below example, we have a simple logic app where the recurrence trigger checks if a file is added or modified every 3 minutes.
Let’s consider the below 3 trigger runs.

Here, the trigger fired at 6:52:14 PM and found a file.

And then the trigger executed another run in roughly 15 seconds to check for any other pending files.

The subsequent next trigger which you would assume to run at 6:55:14 PM as per schedule has actually run at 6:55:33 PM i.e. 3 minutes after the follow-up trigger run that ended at 6:52:33 PM.

This is by design, contrary to normal assumption. So, every time the trigger fires and finds a file, the next subsequent would drift by roughly 15 seconds and in the long run the trigger recurrence would drift by hours or days from the expected schedule.
If this a concern, you can workaround this behavior by using a the normal recurrence trigger instead of the SFTP-SSH recurrence trigger as shown in the below sample.

by Contributed | Jan 11, 2021 | Technology
This article is contributed. See the original author and article here.
App Registration Expiration Monitoring and Notifications

Problem Statement
Azure services do not have a native feature to report on expiring App registrations. Without a solution in place to monitor and notify on expiration of these SPN’s solutions ranging from Custom Apps, and DevOps CICD Pipelines too orchestration engines like Azure Automation and Logic Apps, can and will cease to function without notice.
- Purpose of this solution: To provide an automated mechanism of calculating and ingesting the expiration dates into Log Analytics and automatically notify resources when expiration is within threshold.
- Requisites: This solution consists of:
- 1 Runbook consisting of the PowerShell script in this document.
- 2 Automation Variables containing the Log Analytics Workspace ID and the Log Analytics Primary Key.
- 1 SPN in the monitored cloud environment with Global Reader role.
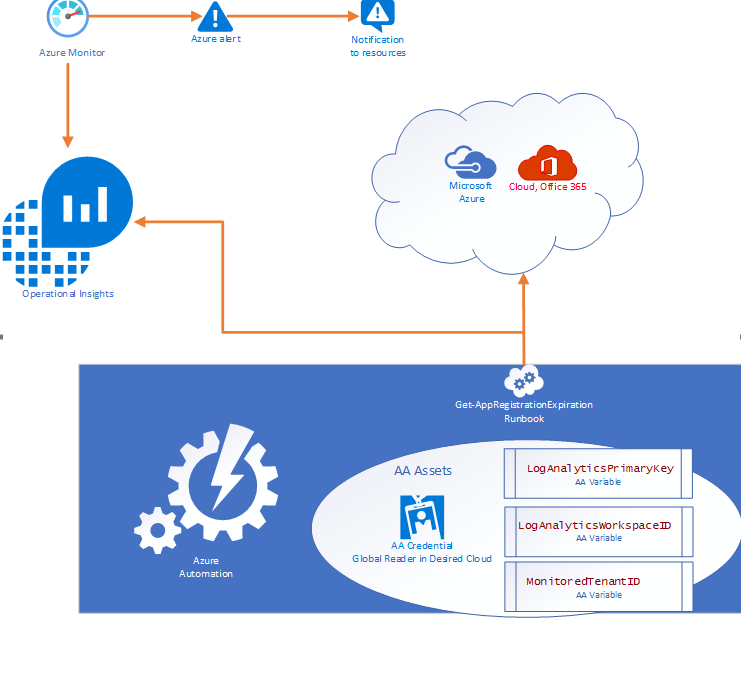
Solution Overview
The solution is designed to be cross tenant and requires an App RegistrationSPN in the desired environment with Global Reader rights. Utilizing Azure Automation (AA) and AA resources like Variables and Credentials our runbook pulls an array of SPN’s from the environment and calculates the time until expiration before using our custom function to send the data to a Log Analytics Workspace. Finally, Azure Monitor alerts can be triggered based on a Kusto query to notify resources that there are SPN’s within the threshold for expiration.
Where can I get this solution?
The solution is documented in detail on my GitHub repo and available for consumption immediately.
https://github.com/Cj-Scott/Get-AppRegistrationExpiration
by Contributed | Jan 10, 2021 | Technology
This article is contributed. See the original author and article here.
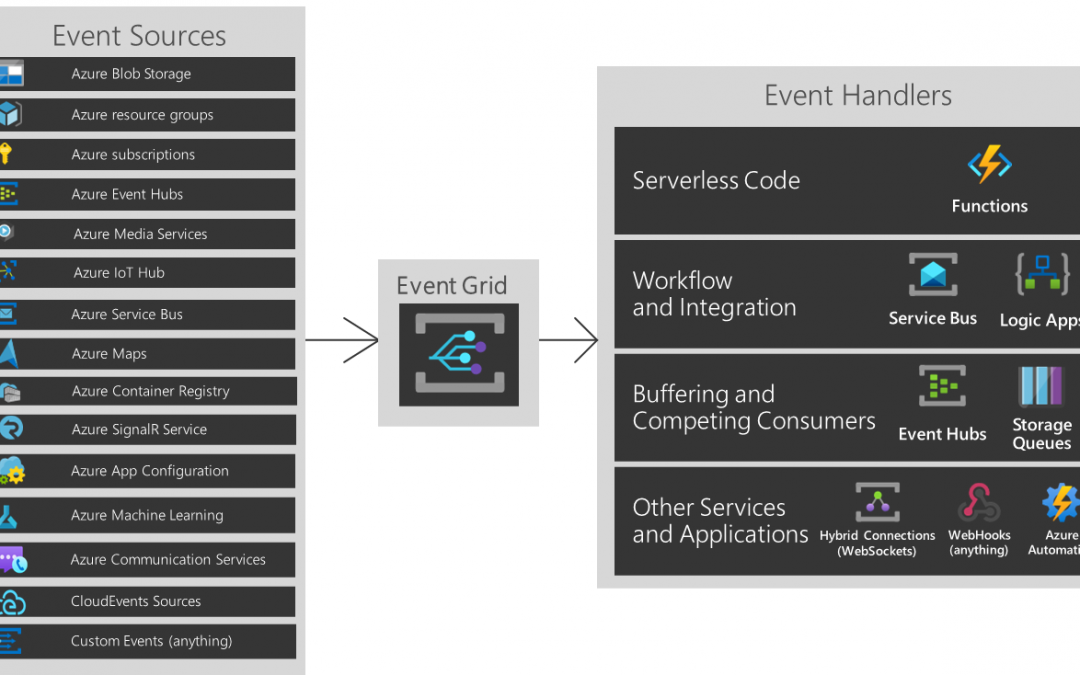
You are about to build an event-driven architecture, primarily to integrate existing enterprise applications. In that case, an event broker like Azure EventGrid takes a vital role. The following diagram introduces how Azure EventGrid plays on the Azure Platform.
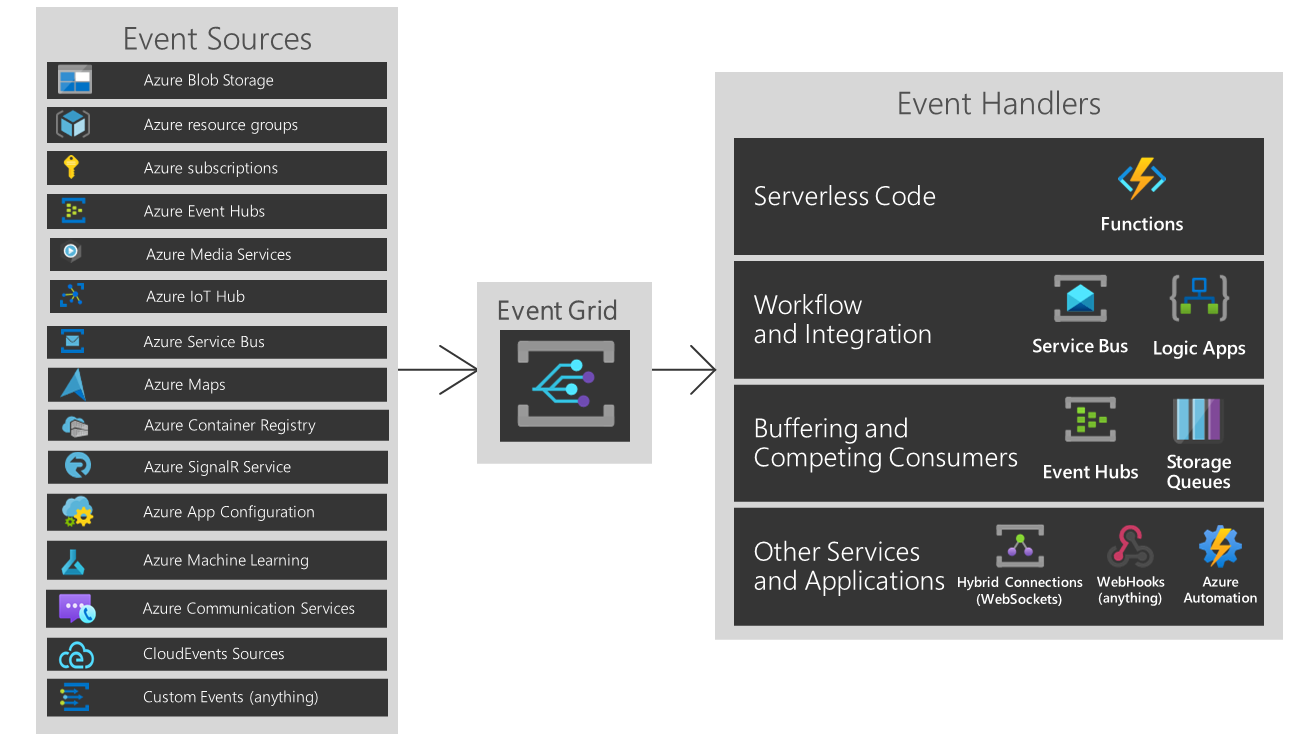
But As you can see, if you are running hybrid or heterogeneous cloud, either “Custom Events” or “CloudEvents” is your choice.
Three Pillars of Event-Driven Architecture
There are three major players of the event-driven architecture. I’ve taken the screenshots below from my talk about CloudEvents at Open Infra Days Korea back in 2018.
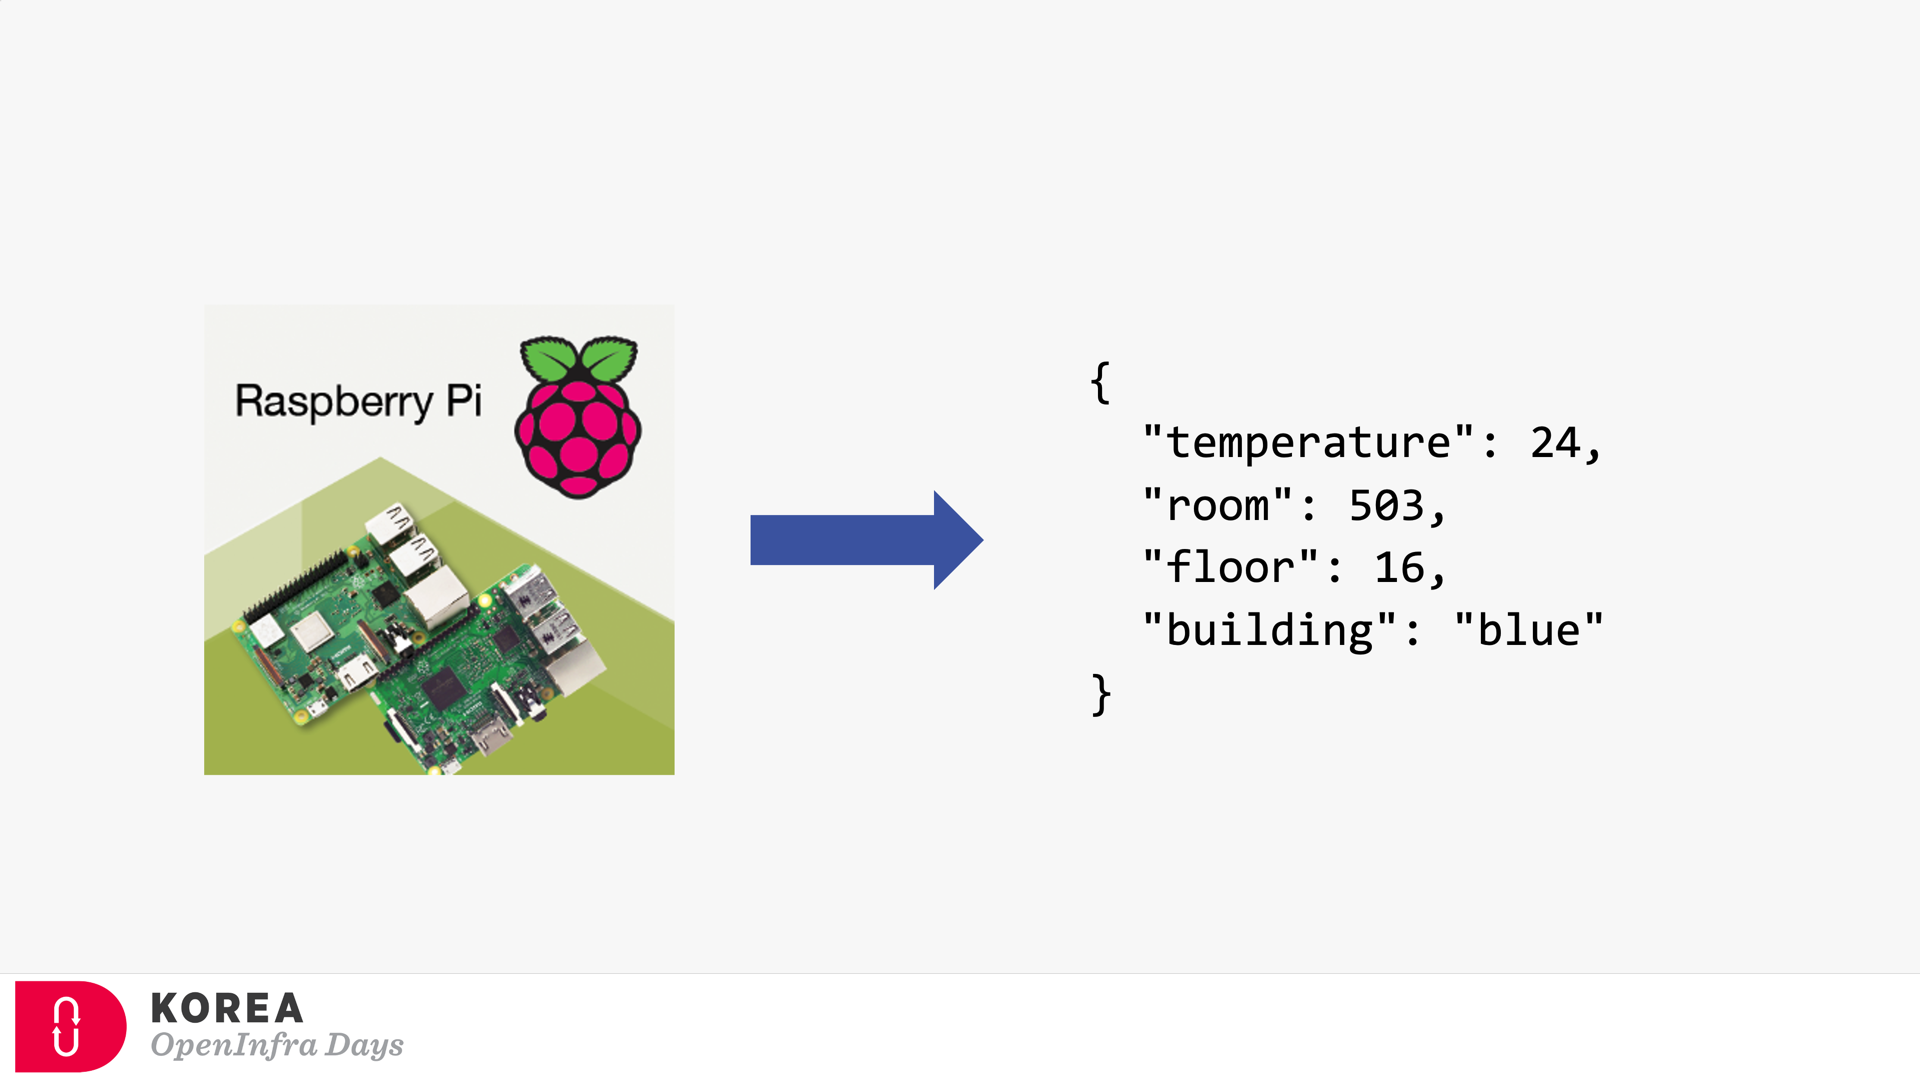
Event Publisher
It’s the source of the event. Any device can be the event publisher as long as it can raise events—the picture below depicted Raspberry Pi as the event publisher.
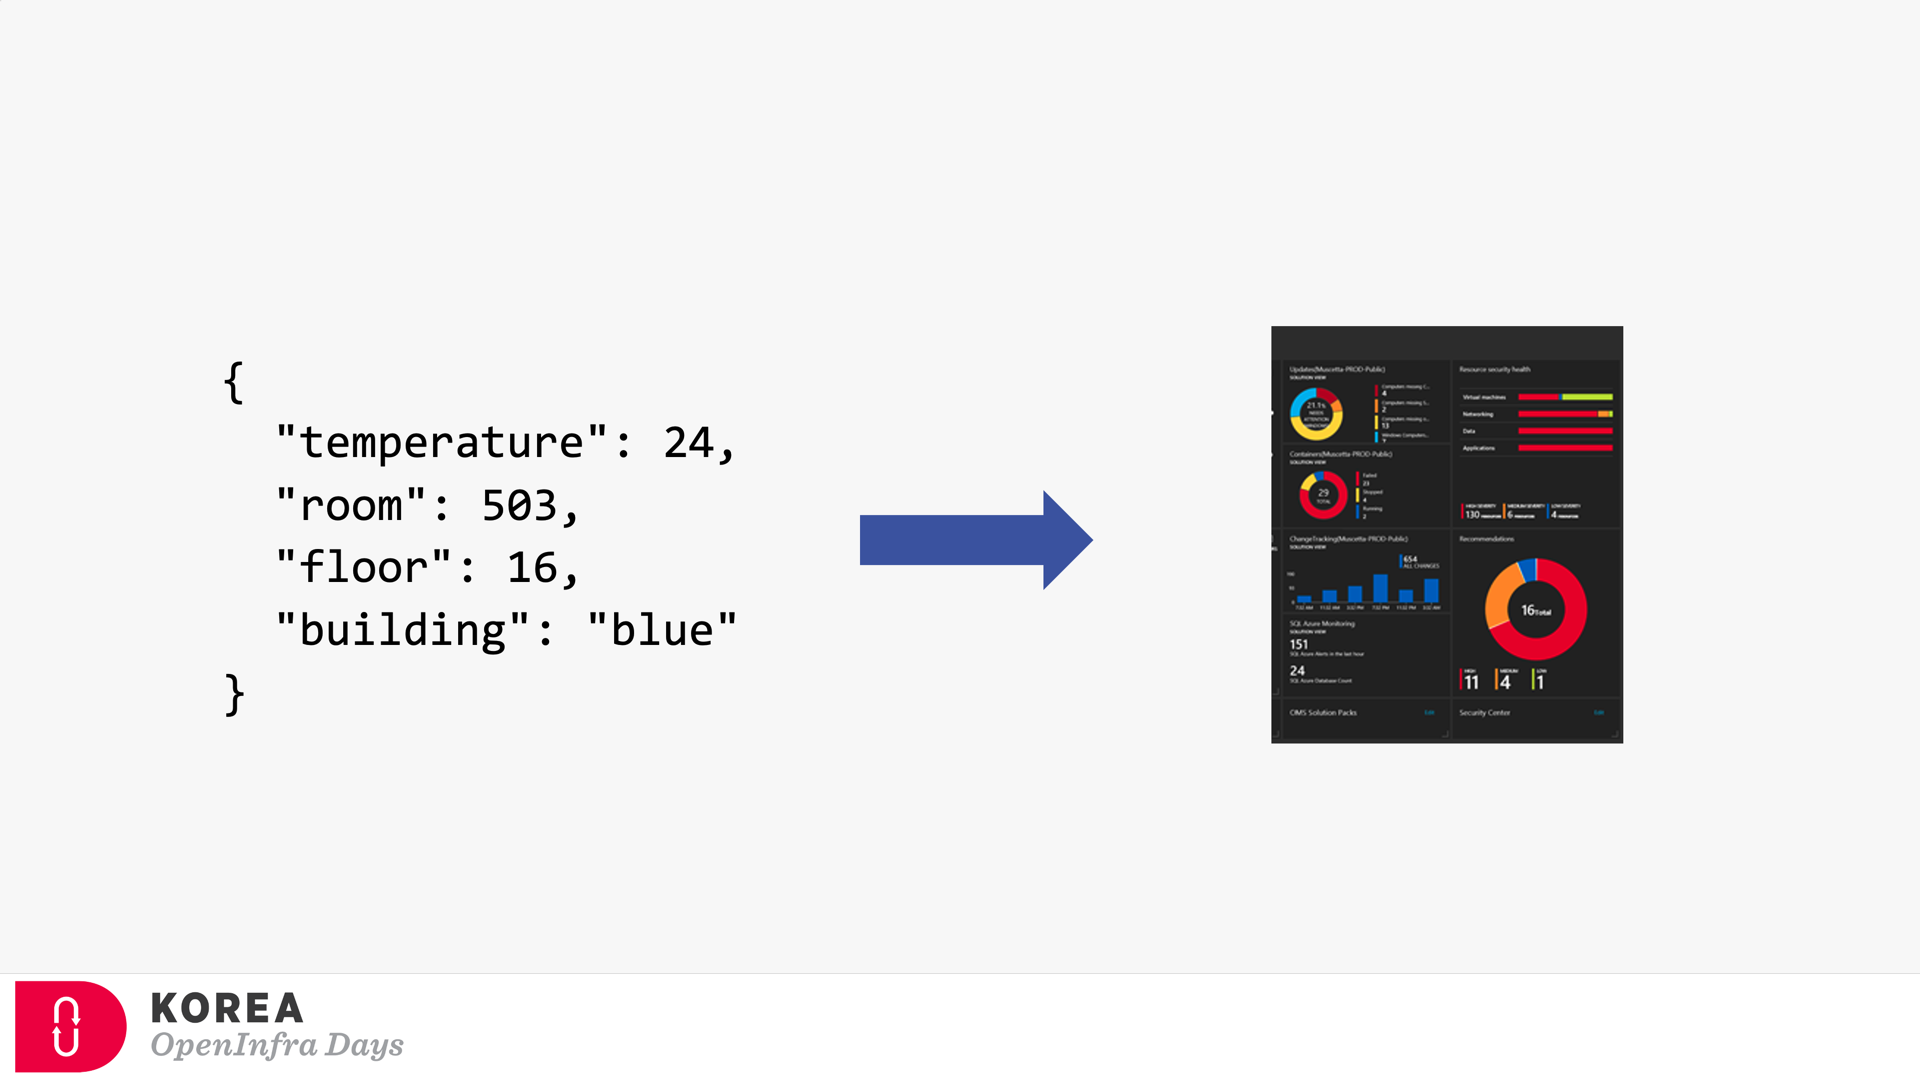
Event Subscriber / Event Handler
Strictly speaking, the event subscriber should be distinguished from the event handler. But in general, the event subscriber takes care of the events including processing them, so both terms are often interchangeable. The screenshot below describes how the event subscriber handles the events and processes them for visualising.
Event Broker
Because of the events’ nature, both event publisher and subscriber can’t be directly integrated. Therefore, the event broker should be placed in between. Azure EventGrid is the very player as the event broker. Here’s the screenshot showing how Azure EventGrid works between the publisher and subscriber.

If you’re OK with Korean language, you can check my talk video and slides about CloudEvents. There are no English subtitles provided, unfortunately.
Provisioning Azure EventGrid Subscription in ARM Template
It’s OK to provision the Azure EventGrid Custom Topic through ARM Template. However, provisioning the Azure EventGrid Subscription using ARM Template only corresponds with the System Topic, not the Custom Topic you just created, unless properly scoping it. Therefore, instead of the ARM template, you should consider Azure CLI to create the subscription.
But, before deep diving into Azure CLI, let’s have a look how we can provision Azure EventGrid Subscription resource specific to the Custom Topic.
Providing Scope (Recommended)
To use the ARM Template mentioned above, the scope attribute is the key. (line #7). Here’s the ARM Template written in Bicep:
    resource evtgrdtopic ‘Microsoft.EventGrid/topics@2020-06-01’ = {

        name: ‘my-eventgrid-topic’

    }
    resource evtgrdsub ‘Microsoft.EventGrid/eventSubscriptions@2020-06-01’ = {

        name: ‘my-eventgrid-sub’

        scope: evtgrdtopic

        …

    }
Providing Nested Resource Type (Doable but NOT Recommended)
Alternatively, you can provide the nested resource type like below. In this case, you don’t need the scope attribute, but as you can see the resource type and name looks more verbose (line #6-7).
    resource evtgrdtopic ‘Microsoft.EventGrid/topics@2020-06-01’ = {

        name: ‘my-eventgrid-topic’

        …

    }
    resource evtgrdsub ‘Microsoft.EventGrid/topics/providers/eventSubscriptions@2020-06-01’ = {

        name: ‘${evtgrdtopic.name}/Microsoft.EventGrid/my-eventgrid-sub’

        …

    }
Therefore, you can provision Azure EventGrid Subscription resource like above. Let’s move onto the Azure CLI part.
Azure CLI Extensions
To provision Azure EventGrid Subscription using Azure CLI, a couple of extensions are required to install beforehand. The Logic extension is to handle Azure Logic Apps, which will be used as the event handler.
Both extensions are currently in preview and will be changed at any time without notice.
Azure CLI Commands
As I would use Azure Logic App as the event handler, I need to get its endpoint URL. To call the Logic App endpoint, we must know a SAS token for it. As the first step, we should get the resource ID of the Logic App by running the following command, az logic workflow show:
    logicAppResourceId=$(az logic workflow show

    -g [resource_group_name]

    -n [logic_app_name]

    –query “id” -o tsv)
With this resource Id, use the az rest command to get the endpoint containing the SAS token.
    logicAppEndpoint=$(az rest

    -m POST

    -u “https://management.azure.com$logicAppResourceId/triggers/manual/listCallbackUrl?api-version=2016-06-01”

    –query “value” -o tsv)
Now, we got the Logic App endpoint to be added as the event handler. The next step would be to get the resource ID for the EventGrid Topic, by running the following command, az eventgrid topic show:
    eventGridTopicId=$(az eventgrid topic show

    -g [resource_group_name]

    -n [eventgrid_topic_name]

    –query “id” -o tsv)
We got all information we need. Run the az eventgrid event-subscription create command to provision the EventGrid Subscription. Let’s use the event schema type of CloudEvents, which is an incubating project of CNCF (line #4).
    az eventgrid event-subscription create

    -n [eventgrid_subscription_name]

    –source-resource-id $eventGridTopicId

    –event-delivery-schema cloudeventschemav1_0

    –endpoint-type webhook

    –endpoint $logicAppEndpoint
So, we finally got the EventGrid Subscription instance towards the EventGrid Custom Topic! And here’s the one-liner of all commands above:
    az eventgrid event-subscription create

    -n [eventgrid_subscription_name]

    –source-resource-id $(az eventgrid topic show

      -g [resource_group_name]

      -n [eventgrid_topic_name]

      –query “id” -o tsv)

    –event-delivery-schema cloudeventschemav1_0

    –endpoint-type webhook

    –endpoint $(az rest

      -m POST

      -u “https://management.azure.com$(az logic workflow show

        -g [resource_group_name]

        -n [logic_app_name]

        –query “id” -o tsv)/triggers/manual/listCallbackUrl?api-version=2016-06-01″

      –query “value” -o tsv)
So far, we have walked through how to provision the EventGrid Subscription to EventGrid Custom Topic, using Azure CLI. As this is command-line friendly, you can easily integrate it with any CI/CD pipeline like GitHub Actions.
This article was originally published on Dev Kimchi.
by Contributed | Jan 9, 2021 | Technology
This article is contributed. See the original author and article here.
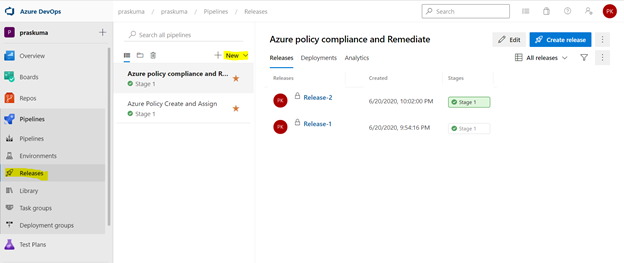
We can use Azure DevOps to perform all the policy operations – Create and Assign Policy and Initiatives, Remediate non-compliant resources,
and check compliance status.
Steps to setup the environment for policy operations
- Login to your Azure DevOps Organization and select Releases as shown below and click on New. Select New Release Pipeline.
- This will open a pop-up window and will ask to select a template.

- Select Azure Policy Deployment and Click on Apply

- Post template selection, We will get a small pop-up window to show us the stage details of this pipeline release. Close this window and proceed with next step.

- Before configuring the different Tasks of the stage, please make sure you have setup a Service connection to integrate your Azure DevOps organization with your Azure Subscription. We need to connect to our Microsoft Azure subscription, to a different build server or file server, to an online continuous integration environment, or to services you install on remote computers.
Please refer the below Microsoft article for step-by-step process to setup the service connection.
https://docs.microsoft.com/en-us/azure/devops/pipelines/library/service-endpoints?view=azure-devops&tabs=yaml
Once we setup the service connection, we can get to see/update them as below-

- We need to click on Stage1- Tasks option as highlighted below. Here, we do not need to add/update artifacts as we are not using any GitHub repository for policy operations in this article. Leave it as it is.
We can update the name of pipeline, stage, Agent and Tasks as per our convenience.

- Once We click, we will get to see the Stage Details and the Tasks in the hierarchy. Like here in the below snippet-
Stage Name – Stage 1
Tasks – Create Azure Policy and Assign Azure Policy

- Select any Task. Here we have selected the first task – Create Azure Policy. Please note that since here we are using Azure PowerShell as the backend script, please select the appropriate Task Versions. Here Task version represents the PowerShell version, and the versions may vary depending upon the cmdlets we will be using. It is always recommended to use the latest version.
Choose Azure Resource Manager as Azure Connection Type. If you have access to multiple Azure subscriptions linked through Service connection, you may choose any one of them and that will be used as scope for this policy assignment and creation.
Choose Script Type as Inline Script as we are providing the PowerShell script as inline content. We can use Script File Path as well in case we are using any repository like GitHub as the source for files.

- Copy below PowerShell code into the Inline Script block. We need to update the highlighted/bold values as per our requirement and add our policy in Json format like below
$definition = New-AzPolicyDefinition -Name 'denyCoolTiering2' -DisplayName 'denyCoolTiering2' -Description
'Deny cool access tiering for storage' -Policy '{

    "if": {
 "allOf": [{
"field": "type",
"equals": "Microsoft.Storage/storageAccounts"
},
{
 "field": "kind",
"equals": "BlobStorage"

            },

            {
"field": "Microsoft.Storage/storageAccounts/accessTier",
"equals": "cool"
}
 ]
},

    "then": {
"effect": "deny"
}

}'

- Similarly update the Inline Script of second Task- Assign Azure Policy. Please use the below code as reference and update the bold/highlighted values with your own policy details that is there defined in the target subscriptions.
$definition = Get-AzPolicyDefinition | Where-Object { $_.Properties.DisplayName -eq 'denyCoolTiering2'}

New-AzPolicyAssignment -Name "denyCoolTiering2" -DisplayName "denyCoolTiering2" -PolicyDefinition $definition

- Post updating both the Tasks, Click on Save and a new pop-up window will come up. Select the folder (if you have any hierarchy) with your comments (optional) and click OK.

- Now click on “Create a New Release” and another window will pop-up, click on “Create” and proceed.


Once you click on create, you will get to see a message like in the below snippet that “Release has been created”.

- Click on the message link – “Release has been created” and it will show the progress of all the Tasks in the stage
It will start from Queued and will go into in Progress and then Succeeded. If there is some syntax or runtime error, the task will fail with Failed message. We can click on the status and see the error/failure reason.


If we click on Succeeded link in the Stage, you will get to see the status of each step that was performed by the agent and further we can click on the succeeded status of each step to see the operation logs(Refer below snippet).


- Likewise, we can create either other Stages in the same release or Tasks in the same stage or a new Release for other policy operations like Compliance Check and Remediate. Please refer the below snippets. The steps will remain the same and only Inline Script needs to be updated.


Notes:
- In case of assigning a DINE policy, please make sure that managed identity must complete replication through Azure Active Directory before it can be granted the needed roles as per the documentation here: Remediate non-compliant resources – Azure Policy | Microsoft Docs. Else, the remediation tasks will fail due to missing permissions.
- You may encounter below errors while executing the script in the pipeline.
- The Service Principal (SPN) used by Azure DevOps to connect to your Azure subscription requires the Owner role and you may get this error while SPN has the less than the owner role.

By default, the SPN created by Azure DevOps to connect to your Azure subscription is assigned the Contributor role. For updating the assignment of security roles on a resource group requires the Owner role. You need to ensure that the SPN used by Azure DevOps has the Owner role assigned at the subscription level. This is accomplished through the Access control (IAM) blade for the subscription –

- The same SPN also requires Read directory data permissions to your Azure AD.

Steps to Grant Azure AD permissions:
By default, the SPN created by Azure DevOps is only granted sign in and read user profile permissions against Azure AD. We now need to grant the SPN the additional read directory data permission.
- Go to Azure AD -> App Registrations.
- Select the SPN that Azure DevOps uses

- Select API permission and then click on ‘Add a permission’

- Select Azure Active Directory Graph from the list

- Select Application permissions.

- Select Directory.Read.All permission from the list and click on Add permissions.

- Click on ‘Grant admin consent for Directory’.

Once permission is granted and the status shows as Green, Try running the deploying the Policy through Azure DevOps, it should work.
- Creating and Assigning Policy Initiatives:
In case of creating and assigning policy Initiatives, the above steps from 1-13 will remain the same except the sample code in steps 9 and 10. Please update the script as below:
Creating Policy Initiative : (Replace the code at Step 9)
$jsonPolicysetdefinition = @"

[ {
"policyDefinitionId": "/providers/Microsoft.Authorization/policyDefinitions/ea3f2387-9b95-492a-a190-fcdc54f7b070",

        "parameters": {
"tagName": {
"value": "[parameters('tags')]"
}
}
},
{
"policyDefinitionId": "/providers/Microsoft.Authorization/policyDefinitions/a08ec900-254a-4555-9bf5-e42af04b5c5c",

        "parameters": {
"listOfResourceTypesAllowed": {
"value": "[parameters('resourceTypes')]"
}
}
}
]"@

$jsonPolicydefinitionparameter = @"

{
"tags": {
"type": "String"
},
"resourceTypes": {
"type": "Array"
}
}"@

$Initiative= New-AzPolicySetDefinition -Name 'PolicyInitiativeTest' -PolicyDefinition $jsonPolicysetdefinition -Parameter $jsonPolicydefinitionparameter -SubscriptionId ‘abcd-e44e-4a99-a89c-45be63c6a8ad'

Write-Host $Initiative.PolicySetDefinitionId
Write-Host "##vso[task.setvariable variable=Initiative;isSecret=false;isOutput=true;]$Initiative.PolicySetDefinitionId"
Assign Policy Initiative: (Replace the code at Step 10)
$jsonPolicyassignmentparameter = @"

{

    "tags": {

        "value": "AnotherTag"

    },

    "resourceTypes": {

        "value": [

            "microsoft.devtestlab/labs/costs",

            "microsoft.media/mediaservices/streamingpolicies",

            "microsoft.security/iotsecuritysolutions/iotalerts",

            "microsoft.security/iotsecuritysolutions/analyticsmodels/aggregatedrecommendations",

            "microsoft.sql/managedinstances/metricdefinitions",

            "microsoft.sql/managedinstances/databases/vulnerabilityassessments/rules/baselines",

            "microsoft.sql/managedinstances/databases/backupshorttermretentionpolicies"

        ]

    }

}"@

$Policy = Get-AzPolicySetDefinition -Name 'PolicyInitiativeTest'

$remediationID = New-AzPolicyAssignment -Name 'PolicyInitiativeAssignment' -Scope '/subscriptions/abcd-e44e-4a99-a89c-45be63c6a8ad' -PolicySetDefinition $Policy -PolicyParameter $jsonPolicyassignmentparameter -Location 'eastus' -AssignIdentity

$roleDefId = Get-AzRoleDefinition 'Contributor'

New-AzRoleAssignment -Scope '/subscriptions/abcd-e44e-4a99-a89c-45be63c6a8ad' -ObjectId $remediationID.Identity.PrincipalId -RoleDefinitionId $roleDefId.Id

for($i=0; $i -lt $initative.Properties.policyDefinitions.Length; $i++){

    Start-AzPolicyRemediation -Name '$i Initiative' -PolicyAssignmentId $remediationID.PolicyAssignmentId -PolicyDefinitionReferenceId $initative.Properties.policyDefinitions[$i].policyDefinitionReferenceId }
by Contributed | Jan 8, 2021 | Technology
This article is contributed. See the original author and article here.
Welcome back after the holiday break! Together, let’s make 2021 our best IoT year yet!
If you are still trying to decide on your New Year’s resolutions, consider the options below. Pick one or more and make it happen!
- Learn something new about IoT:
- Keep up with new IoT updates:
- Share what you know about IoT with your local user group, youth organization, and/or school
The New Year is a perfect opportunity to re-focus. Hopefully, one or more of these resolutions caught your eye. Now that you have your goals in mind, take a few minutes to make your plan. Add a placeholder to your calendar to make time or add a To Do list task as a reminder. Remember that small changes can bring big rewards if you commit. Consistency and follow-through are key.
Best of luck to you in this new year! I’d love to hear whether you found this list helpful, if you plan to do any of these items, or if you already had some of these on your own list.
Did I miss anything noteworthy? Do you have other IoT-related resolutions that you want to share?
by Contributed | Jan 8, 2021 | Technology
This article is contributed. See the original author and article here.
News this week includes:
Attack simulation training in Microsoft Defender for Office 365 now Generally Available
IoT is now Generally Available as a solution covered by FastTrack for Azure to eligible customers
Announcing new H5P and OneNote integration to help bring interactive content to life
Shawn is our member of the week and a fantastic contributor in the Microsoft Edge Insider community.
View the Weekly Roundup for Jan 4-8th in Sway and attached PDF document.
https://sway.office.com/s/Q64u3T42X0ryrbJz/embed
![[Guest Blog] Humans of Mixed Reality: Making Tech a Place for All](https://www.drware.com/wp-content/uploads/2021/01/286x286)
by Contributed | Jan 8, 2021 | Technology
This article is contributed. See the original author and article here.
This article was written by Microsoft Mixed Reality Program Manager for Diversity, Equity and Inclusion as part of our Humans of Mixed Reality Guest Blogger Series. Dr. Dalya Perez shares her personal career journey in technology, and how she came to discover and love the mixed reality space.
To my fellow Mixed Reality community members, my name is Dr. Dalya Perez. I am the Microsoft Mixed Reality inaugural Program Manager for Diversity, Equity, and Inclusion. Like so many others, I began a new role recently amidst remote onboarding, racial justice uprisings, and a global pandemic, all while juggling the last month of a PhD program, dissertation, parenting a toddler and a tween, and tag-teaming work from home strategies with my beloved spouse in our cozy home. To say the least, it has been a heck of a transition, but I’m beyond happy to be here with all of you doing D&I in this moment in history. Thank you sincerely for welcoming me, and I look forward to meeting you if I haven’t yet.
Background
Pictured above: Dr. Dalya Perez
I come from humble beginnings. I am the daughter of a Jewish Egyptian refugee mother and a Filipino immigrant father, and a first generation undergrad/grad/PhD in my family. I grew up in Bothell, Washington, just up the road from Microsoft’s Redmond campus, yet never visited until my interview last year. I grew up in a multi-ethnic-racial community, constantly navigating and code-switching between middle-class white suburbia at school, Ashkenazi centric synagogue culture, Catholic Filipino family, to name a few. Our home was full of relatives, grandparents, and foods from across the oceans. I grew up grappling with those questions of “what are you?”, “where are you from?”, “why does your food smell weird?” – all while trying to figure out how and where I belong.

Pictured above: Dalya’s parents Josee and Mel Perez circa 1969
Career Beginnings
Diversity, equity, and inclusion have been deeply ingrained and interwoven across my personal, academic, and professional journeys. From my early career working in Latinx health clinics, to being the Executive Director of an LGBTQIA+ youth organization, I began my career with grassroots community organization. As a critical race scholar, I dedicated myself to studying educational leadership and policy and to implementing design-based interventions that bring about remediation and close equity disparities for underrepresented communities. In my last team, the Brotherhood Initiative, I was a founding member of a research project that aimed to brdige the graduation gap for men of color in higher education. I am proud to say that we were successful in graduating the first cohort with a 99% graduation rate. The key to this success was getting critical stakeholders across divisions and roles to collaborate. I believe that building collaborative relationships between people who view the problem space from different, unique vantage points is critical to designing strong D&I programs in all industries, but especially in tech.

Pictured above: University of Washington’s Brotherhood Initiative
My career at Microsoft
Joining Microsoft has taught me that cultural and systemic norms that have excluded historically marginalized groups from tech are the same and, in some cases, adjacent to the structural inequity in public sectors: educational pipelines, hiring biases, and the need for cultural competence to name a few. I am thrilled to be able to work somewhere with such potency of groundbreaking technology like mixed reality and being able to play a role where I can pair this with transformational change, access, and equitable policies for Black, Latinx, women, and many more communities historically underrepresented in tech. There’s work to do and we are lucky to be in a company and team with executive leadership all in for D&I. The alignment from the top down and bottom up is incredible.
As we cross into 2021, I know we still have a long road of navigating the pandemic. That said, we’re also going into this new year with a stronger sense of confidence and resilience in working remotely, parenting, home-schooling. With the incredible technology which enables us to do this work and be a team, to be flexible, adaptable…. I’m amazed at what we have been able to do. From my family to yours, wishing you a happy new year, wellness, and patience as we forge ahead into the unknown.
My number one priority in my first year has been to meet as many people on our team as possible and learn about your D&I journey. How do you use your tech superpowers in mixed reality to drive positive impact in your local company? Remember that D&I work is about relationships and community – we all have a story, and we all have a part in D&I work. Better yet, we have the tech tools to truly create change.
If you have ideas on how we can use mixed reality to promote inclusion and accessibility for all, please reach out. I look forward to building up this Mixed Reality Community as a safe space for all to learn, grow and become better humans.

Pictured above: Dalya, husband Brian, and kids Amiel (2) & Carlos (10)
#MixedReality #CareerJourney
by Contributed | Jan 8, 2021 | Technology
This article is contributed. See the original author and article here.

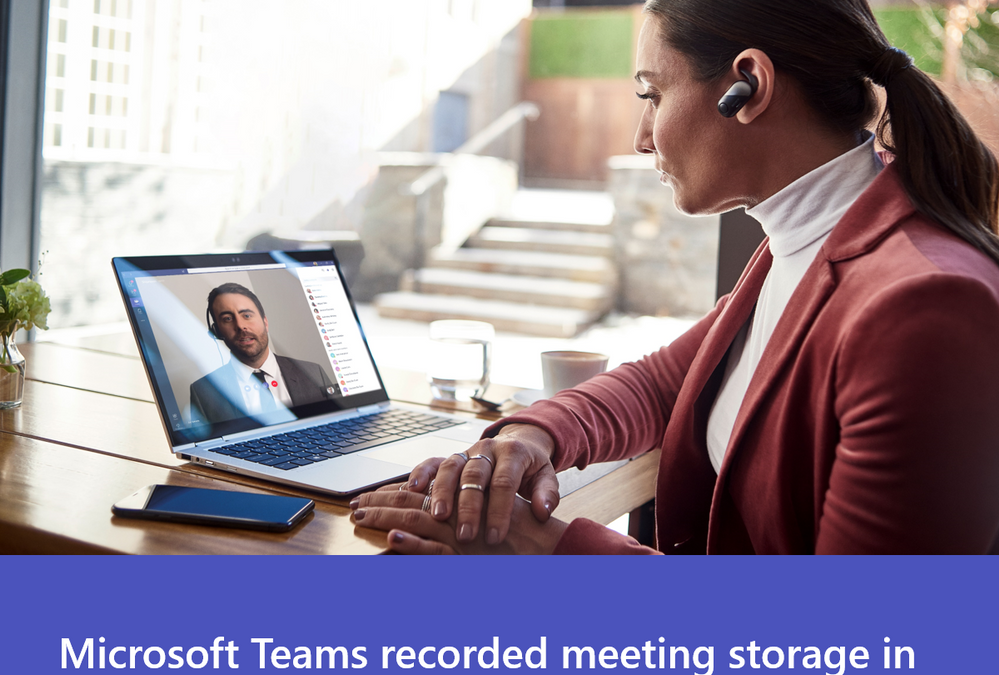
The change from using Microsoft Stream to OneDrive for Business and Microsoft SharePoint for meeting recordings will be a phased approach. While GCC customers can opt out starting October 5 they are unable to opt in (this feature will be rolled out to all GCC customers starting January 11, 2021, unless they’ve opted-out).
Starting on January 11, 2021 all new Teams meeting recordings for GCC customers will be saved to OneDrive for Business and SharePoint unless you delay this change by modifying your organization’s Teams Meeting policies and explicitly setting them to Stream.
If you’ve opted-out but are ready to turn on this feature, you may do so by setting your Teams Meeting Policy explicitly to OneDrive for Business.
Starting on March 1st, 2021 no new meeting recordings will be saved to Microsoft Stream (Classic), instead all customers will automatically have their meeting recordings saved to OneDrive for Business and SharePoint even if they’ve changed their Teams meeting policies to Stream.
We recommend that customers roll this feature out before this date so that they can control the timing of the release.
Microsoft Teams has a new method for saving meeting recordings. As the first phase of a transition from classic Microsoft Stream to the new Stream, this method stores recordings on Microsoft OneDrive for Business and SharePoint in Microsoft 365 and offers many benefits.
Benefits of using OneDrive for Business and SharePoint for storing recordings :
- Retention policies for Teams meeting recording
- Benefit from OneDrive for Business and SharePoint information governance
- Easy to set permissions and sharing
- Share recordings with guests (external users) with explicit share only
- Request access flow
- Provide OneDrive for Business and SharePoint shared links
- Increased quota
- Meeting recordings are available faster
- Bring your own key (BYOK) support
Caveats to consider:
- There will be English-only closed captions (meeting transcription is not yet available in GCC)
- You can control with whom you share the recording, but you won’t be able to block people with shared access from downloading the recording.
- You’ll not get an email when the recording finishes saving, but the recording will appear in the meeting chat once it’s finished. This will happen much quicker than it did in Stream previously
Administration and configuration
What you need to do to prepare ?
The meeting recording option is a setting at the Teams policy level. The following example shows how to set the Global policy. Make sure that you set the meeting recording option for the policy or policies that you have assigned to your users. If some of your users have assigned a per-organizer or per-user policy, you must set this setting on this policy if you want them to also store the meeting recordings in OneDrive for Business and SharePoint
Teams meeting policy changes take a while to propagate. Check back after a few hours of setting it, then sign out and sign in again.
- Install Skype For Business Online PowerShell. Note: Skype for Business Online Connector is currently part of the latest Teams PowerShell module. If you’re using the latest Teams PowerShell public release, you don’t need to install the Skype for Business Online Connector. See Manage Skype for Business Online with PowerShell.
a. Download Skype for Business Online PowerShell.
b. Follow the prompts to install it.
c. Restart your machine.
- Launch PowerShell as an admin
- Import the SkypeOnline Connector and sign in as a Teams admin.
… and then run the following set of PowerShell commandlets :
Import-Module SkypeOnlineConnector
$sfbSession = New-CsOnlineSession
Import-PSSession $sfbSession
Use Set-CsTeamsMeetingPolicy to set a Teams Meeting Policy to transition from the Stream storage to OneDrive for Business and SharePoint.
Set-CsTeamsMeetingPolicy -Identity Global -RecordingStorageMode
“OneDriveForBusiness”
Opting out of OneDrive for Business and SharePoint to continue using Stream
Even if a policy says it is set to Stream, it might not be set. Typically, if the policy is not set, then the default setting is Stream. However, with this new change, if you want to opt-out of using SharePoint or OneDrive for Business, then you must reset the policy to Stream to ensure that Stream is the default.
To configure the abovementioned you will need to leverage PowerShell.
- Launch PowerShell as an admin
- Import the SkypeOnline Connector and sign in as a Teams admin.
- Import-Module SkypeOnlineConnector
… and then run the following set of PowerShell commandlets :
$sfbSession = New-CsOnlineSession
Import-PSSession $sfbSession
Set-CsTeamsMeetingPolicy -Identity Global -RecordingStorageMode
“Stream”
Permissions or role-based access
We recommend that the recipient is required to be a logged-in user when sharing Teams Meeting Recordings.
Select the People in (Your Organization) option when you share the file as documented in Share SharePoint files or folders. External sharing is not designed for the distribution of large files or a large number of files.
Meeting type
|
Who clicked on Record?
|
Where does the recording land?
|
Who has access? R/W, R, or sharing
|
1:1 call with internal parties
|
Caller
|
Caller’s OneDrive for Business account
|
Caller is owner and has full rights.
Callee (if in the same tenant) has read-only access. No sharing access.
Callee (if in different tenant) has no access. Caller must share it to the Callee.
|
1:1 call with internal parties
|
Callee
|
Callee’s OneDrive for Business account
|
Callee is owner and has full rights.
Caller (if in the same tenant has read-only access. No sharing access.
Caller (if in different tenant) has no access. Callee must share it to the Caller.
|
1:1 call with an external call
|
Caller
|
Caller’s OneDrive for Business account
|
Caller is owner and has full rights.
Callee has no access. Caller must share it to the Callee.
|
1:1 call with an external call
|
Callee
|
Callee’s OneDrive for Business account
|
Callee is owner and has full rights.
Caller has no access. Callee must share it to the Caller.
|
Group call
|
Any member of the call
|
Member who clicked on Record’s OneDrive for Business account
|
Member who clicked on Record has full rights.
Other members from the same tenant have Read rights.
Other members from different tenant have no rights to it.
|
Adhoc/Scheduled meeting
|
Organizer
|
Organizer’s OneDrive for Business account
|
Organizer has full rights to the recording.
All other members of the meeting have read access.
|
Adhoc/Scheduled meeting
|
Other meeting member
|
Member who clicked on Record
|
Member who clicked on Record has full rights to the recording.
Organizer has edit rights and can share.
All other members have read access.
|
Adhoc/Scheduled meeting with external users
|
Organizer
|
Organizer’s OneDrive for Business account
|
Organizer has full rights to the recording.
All other members of the meeting from the same tenant as the organizer have read access.
All other external members have no access, and the Organizer must share it to them.
|
Adhoc/Scheduled meeting with external users
|
Other meeting member
|
Member who clicked on Record
|
Member who clicked on Record has full rights to the recording. Organizer has edit rights and can share.
All other members of the meeting from the same tenant as the organizer have read access.
All other external members have no access, and the Organizer must share it to them.
|
Channel meeting
|
Channel Member
|
Teams’ SharePoint location for that channel
|
Member who clicked on Record has edit rights to the recording.
Every other member’s permissions are based off of the Channel SharePoint permissions.
|
Frequently Asked Questions
Where will the meeting recording be stored?
- For non-Channel meetings, the recording is stored in a folder named Recordings that is at the top level of the OneDrive for Business that belongs to the person who started the meeting recording. Example:
recorder’s OneDrive for Business/Recordings
- For Channel meetings, the recording is stored in the Teams site documentation library in a folder named Recordings. Example:
Teams name – Channel name/Documents/Recordings
How do I handle recordings from former employees?
Since videos are just like any other file in OneDrive for Business and SharePoint, handling ownership and retention after an employee leaves will follow the normal OneDrive for Business and SharePoint process.
Who has the permissions to view the meeting recording?
- For non-Channel meetings, all meeting invitees, except for external users, will automatically get a personally shared link. External users will need to be explicitly added to the shared list by the meeting organizer or the person who started the meeting recording.
- For Channel meetings, permissions are inherited from the owners and members list in the channel.
How can I manage transcripts?
Transcription of recorded Teams meetings in GCC is not yet available. This article will be updated to discuss managing transcripts once the feature ships to GCC.
How will my storage quota be impacted?
Teams meeting recording files live in OneDrive for Business and SharePoint and are included in your quota for those services. See SharePoint quota and OneDrive for Business quota.
You get more storage with OneDrive for Business compared with Stream and more fungible storage with SharePoint.
How can I play a Teams meeting recording?
Your video will play on the video player of OneDrive for Business or SharePoint depending on where you access the file.
If you plan on deprecating adding to Stream, will existing videos stay as is and for how long?
Stream as a platform will not be deprecated in the near future. The videos that currently live in Stream will remain there until we start migrating. Upon migration, those videos will be migrated to OneDrive for Business or SharePoint as well. Check Stream classic migration for more information.
How do I apply a retention label ?
See How to auto-apply a retention label.
How do I assign policies to my users in Microsoft Teams and which policies take precedence?
See Which policy takes precedence?.
Quick Links
Read additional documentation here.
Watch “Meeting Recording” on our Microsoft 365 YouTube Channel for more information here :
https://www.youtube-nocookie.com/embed/8iol0KfCeL8
by Contributed | Jan 8, 2021 | Technology
This article is contributed. See the original author and article here.
We are actively building out our program by developing resources for both partners and Defense Industrial Base (DIB) companies to leverage in their Cybersecurity Maturity Model Certification (CMMC) journey. These tools cannot guarantee a positive CMMC adjudication, but they may assist candidate organizations by improving their CMMC posture going into a formal CMMC review in accordance with CMMC Accreditation Body (AB) standards. While we plan to release resources and guidance in waves, please keep in mind we are dependent upon the CMMC AB finalizing the CMMC guidance itself.
Here is a summary of current resources to help get you started:
 Microsoft Product Placemat for CMMC
The Microsoft Product Placemat for CMMC is an interactive view representing how Microsoft cloud products and services satisfy requirements for CMMC practices. The user interface resembles a periodic table of CMMC Practice Families. The default view illustrates the practices with Microsoft Coverage that are inherited from the underlying cloud platform. It also depicts practices for Shared Coverage where the underlying cloud platform contributes coverage for specific practices but requires additional customer configuration to satisfy requirements for full coverage. For each practice that aligns with Microsoft Coverage or Shared Coverage, verbal customer implementation guidance and practice implementation details are documented. This enables you to drill down into each practice and discover details on inheritance and prescriptive guidance for actions to be taken by the customer to meet practice requirements in the shared scope of responsibility for compliance with CMMC.
In addition to the default view, you may select and include products, features and suite SKUs to adjust how each cloud product is placed with CMMC. For example, you may select the Microsoft 365 E5 SKU for maximum coverage of CMMC where 18 of the CMMC practices are Microsoft Coverage and 74 practices are Shared Coverage. This is extraordinary as nearly 80% of the practices for CMMC Level 3 have coverage leveraging the spectrum of capabilities on the Microsoft cloud with the E5 SKU!

The Microsoft Product Placemat for CMMC is currently in public preview. You may download a copy at:
https://aka.ms/cmmc/productplacemat
Please share feedback at https://aka.ms/cmmc/productplacematfeedback.
 Azure Sentinel: Cloud-Native SIEM
See and stop threats before they cause harm, with SIEM reinvented for a modern world. Azure Sentinel is your birds-eye view across the enterprise. Put the cloud and large-scale intelligence from decades of Microsoft security experience to work. Make your threat detection and response smarter and faster with artificial intelligence (AI). Eliminate security infrastructure setup and maintenance, and elastically scale to meet your security needs—while reducing IT costs.
- Collect data at cloud scale—across all users, devices, applications, and infrastructure, both on-premises and in multiple clouds
- Detect previously uncovered threats and minimize false positives using analytics and unparalleled threat intelligence from Microsoft
- Investigate threats with AI and hunt suspicious activities at scale, tapping into decades of cybersecurity work at Microsoft
- Respond to incidents rapidly with built-in orchestration and automation of common tasks
Invest in security, not infrastructure setup and maintenance with the first cloud-native SIEM from a major cloud provider. Never again let a storage limit or a query limit prevent you from protecting your enterprise. Start using Azure Sentinel immediately, automatically scale to meet your organizational needs, and only pay for the resources you need.
For more information, please see https://azure.microsoft.com/en-us/services/azure-sentinel

Collect data at cloud scale—across all users, devices, applications, and infrastructure, both on-premises and in multiple clouds
 Azure Sentinel: CMMC Workbook
The Azure Sentinel CMMC Workbook provides a mechanism for viewing log queries aligned to CMMC controls across the Microsoft portfolio including Microsoft security offerings, Office 365, Teams, Intune, Windows Virtual Desktop and many more. This workbook enables Security Architects, Engineers, SecOps Analysts, Managers, and IT Pros to gain situational awareness visibility for the security posture of cloud workloads. There are also recommendations for selecting, designing, deploying, and configuring Microsoft offerings for alignment with respective CMMC requirements and practices.

Note: The Azure Sentinel CMMC Workbook is currently in Private Preview and will release in a Public Preview in early February 2021.
Microsoft Compliance Manager with Assessment Templates
Compliance Manager
Microsoft Compliance Manager is a feature in the Microsoft 365 compliance center that helps you manage your organization’s compliance requirements with greater ease and convenience. Compliance Manager may help you throughout your compliance journey, from taking inventory of your apparent data protection risks to managing the complexities of implementing controls, staying current with regulations and certifications, and reporting to auditors.
Compliance Manager helps simplify compliance and reduces risk by providing:
- Pre-built assessments for common industry and regional standards and regulations, or custom assessments to meet your unique compliance needs.
- The Assessment Templates include NIST SP 800-171 and projected requirements for CMMC Levels 1-5.
- The Assessment Templates that are available to your organization depend on your licensing agreement. Review the details. HINT: You will need an E5 SKU.
- Workflow capabilities to help you efficiently complete your risk assessments through a single tool.
- Detailed step-by-step guidance on suggested improvement actions to help you comply with known CMMC standards and regulations that are most relevant for your organization. For actions that are managed by Microsoft, you’ll see implementation details and audit results.
- A projected risk-based compliance score to help you understand your compliance posture by measuring your progress in completing improvement actions.
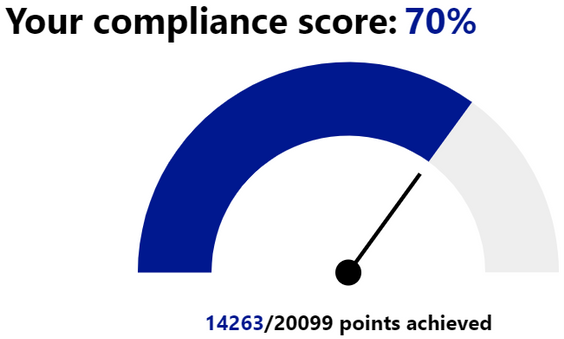
Your Compliance Manager dashboard shows your current projected CMMC compliance score, helps you see what needs attention, and guides you to key improvement actions. Below is an example of what your Compliance Manager dashboard will look like:

Please note, the Compliance Manager dashboard is a projection of your organization’s CMMC compliance profile based on all available information to date—Microsoft is not an accrediting body under the CMMC, and thus cannot guarantee any outcome under the formal CMMC review process.
Understanding your compliance score
Compliance Manager awards you points for completing improvement actions taken to comply with a regulation, standard, or policy, and combines those points into an overall compliance score. Each action has a different impact on your score depending on the potential risks involved. Your compliance score helps you prioritize which actions to focus on to improve your overall compliance posture.
Compliance Manager gives you an initial score based on the Microsoft 365 data protection baseline. This baseline is a set of controls that includes key regulations and standards for data protection and general data governance.
 Compliance Manager Availability in GCC and GCC High
The Compliance Manager is now available in all Microsoft 365 cloud offerings, including GCC and GCC High!
However, the Secure Score feature is still in preview within Commercial and GCC. Secure Score will not release in GCC High until it becomes Generally Available. As a result, automated testing does not work in GCC High. GCC High customers will need to manually implement and test their improvement actions in the Compliance Manager. For more information, please see Settings for automated testing and user history.
Azure Security Center with Azure Blueprints
Azure Security Center
Microsoft uses a wide variety of physical, infrastructure, and operational controls to help secure Azure, but there are additional actions you need to take to help safeguard your workloads. You may turn on the Azure Security Center to strengthen your cloud security posture:
- Assess and visualize the security state of your resources in Azure, on-premises, and in other clouds with Azure Secure Score;
- Simplify enterprise compliance and view your compliance against regulatory requirements such as NIST SP 800-171 and CMMC;
- Protect all your hybrid cloud workloads with Azure Defender, which is integrated with Security Center; and
- Use AI and automation to cut through false alarms, quickly identify threats, and streamline threat investigation.
You may assess the security state of all your cloud resources, including servers, storage, SQL, networks, applications, and workloads that are running in Azure, on-premises, and in other clouds. This includes the ability to visualize your security state and improve your security posture by using Azure Secure Score recommendations. You may view your compliance against a wide variety of regulatory requirements or company security requirements by centrally managing security policies to perform ongoing assessment and get rich, actionable insights and reports to simplify compliance.


Note: The Azure Security Center is available today in both Commercial and in Azure Government.
Azure Blueprints
Just as a blueprint allows an engineer or an architect to sketch a project’s design parameters, Azure Blueprints enables cloud architects and central information technology groups to define a repeatable set of Azure resources that implements and adheres to an organization’s standards, patterns, and requirements. Azure Blueprints makes it possible for development teams to rapidly build and stand up new environments with trust they’re building within organizational compliance with a set of built-in components, such as networking, to speed up development and delivery.
Blueprints are a declarative way to orchestrate the deployment of various resource templates and other artifacts such as:
- Role Assignments
- Policy Assignments
- Azure Resource Manager templates (ARM templates)
- Resource Groups
The Azure Blueprints service is designed to help with environment setup. This setup often consists of a set of resource groups, policies, role assignments, and ARM template deployments. A blueprint is a package to bring each of these artifact types together and allow you to compose and version that package, including through a continuous integration and continuous delivery (CI/CD) pipeline. Ultimately, each is assigned to a subscription in a single operation that can be audited and tracked.
With Azure Blueprints, the relationship between the blueprint definition (what should be deployed) and the blueprint assignment (what was deployed) is preserved. This connection supports improved tracking and auditing of deployments. Azure Blueprints can also upgrade several subscriptions at once that are governed by the same blueprint.
 Azure Policy and Blueprint Sample for CMMC Level 3
An Azure Policy and Blueprint allows organizations to easily establish compliant environments. Azure Policy is implemented via a centrally managed policy initiative that helps ensure cloud compliance, avoid misconfigurations, and practice consistent resource governance. An Azure blueprint simplifies large scale Azure deployments by packaging key artifacts such as policy initiatives, Azure Resource Manager (ARM) templates, and role-based access controls.
A new Azure policy initiative and blueprint sample for CMMC Level 3 are currently in development. The CMMC policy initiative builds upon the existing NIST SP 800-171 policy initiative/blueprint sample with the addition of 110 new policies. Any relevant new policies will be back-ported into the NIST SP 800-171 sample after the CMMC sample is finalized.
The CMMC policy initiative and blueprint sample is currently in Private Preview. It will transition to Public Preview in February 2021 with availability in both Azure Commercial and Government clouds.
Compliance Manager and the Azure Security Center
You may observe there are two different compliance tools depending on the use of Microsoft 365 or Microsoft Azure. While there are currently two different tools, they are not mutually exclusive in use. Holistic compliance with CMMC requires the use of both the Compliance Manager and the Azure Security Center. You deploy the Compliance Manager with the Assessment Template for CMMC for coverage of Microsoft 365 products and features, such as Office 365 and Enterprise Mobility & Security. Generally speaking, this includes coverage for most SaaS offerings. You will also want to deploy the Azure Security Center with the Azure Blueprint sample for CMMC (roadmap) for coverage of Azure IaaS and PaaS offerings. We are working on integration between the two tools along with integration with Azure Sentinel in the future roadmap. In the meantime, you will need to leverage both panes of glass for CMMC compliance.
Zero Trust Architecture with Azure Blueprints
Zero Trust Architecture
Today, many of our customers in regulated industries are adopting a Zero Trust architecture – moving to a security model that more effectively adapts to the complexity of the modern environment, embraces the mobile workforce, and protects people, devices, applications, and data wherever they’re located.
Regardless of where the request originates or what resource it accesses, Zero Trust teaches us to “never trust, always verify.” In a Zero Trust model, every access request is strongly authenticated, authorized within policy constraints, and inspected for anomalies before granting access. This approach aids the process of achieving compliance for industries that use NIST-based controls including the DIB and government.
A Zero Trust approach should extend throughout the entire digital estate and serve as an integrated security philosophy and end-to-end strategy, across three primary principles: (1) verify explicitly, (2) enforce least privilege access, and (3) assume breach.
 Azure blueprint for the Azure Security Benchmark Foundation
We have developed a GitHub Repo for an Azure Blueprint sample enabling Configuration-as-Code for Azure subscriptions. The Azure Blueprint for Azure Security Benchmark Foundation (formerly “Zero Trust”) enables application developers and security administrators to more easily create hardened environments for their application workloads. Essentially, the blueprint will help you implement Zero Trust controls across six foundational elements: identities, devices, applications, data, infrastructure, and networks.
Using the Azure Security Center and Azure Blueprints service, the blueprint sample will first configure your VNET to deny all network traffic by default, enabling you to extend it and/or set rules for selective traffic based on your business needs. In addition, the blueprint enforces and maintains Azure resource behaviors and configuration in compliance with specific NIST SP 800-53 security control requirements using Azure Policy.
The blueprint includes Azure Resource Manager templates to deploy and configure Azure resources such as Virtual Network, Network Security Groups, Azure Key Vault, Azure Monitor, Azure Security Center, and more. If you’re working with applications that need to comply with FedRAMP High or DoD Impact Level 4 requirements or just want to improve the security posture of your cloud deployment, the blueprint for Zero Trust is designed to help you get there faster.
The ASBF blueprint is currently in preview with limited support. To learn more and find instructions to deploy into Azure, see the ASBF repo. For more information, questions, and feedback, please contact us at ASBF feedback.
We are also working on updates in support of NIST SP 800-171 and CMMC for availability in the first half of calendar year 2021.
CMMC Documentation
CMMC Compliance Documentation
There are several artifacts we are working on for release this year 2021, to include:
- SSP: System Security Plan with customer scope of responsibility detailed
- CIS: Control Implementation Summary per environment (IaaS, PaaS and SaaS)
- SAR: Security Assessment Report from Microsoft’s C3PAO engagement
- Documented auditor observations based on pre-defined tenant configuration
Microsoft Cybersecurity Reference Architecture
The Microsoft Cybersecurity Reference Architecture (MCRA) describes Microsoft’s cybersecurity capabilities and how they integrate with existing security architectures. We have seen this document used for several purposes by our customers to include:
- Starting template for a security architecture – The most common use case we see is that organizations use the document to help define a target state for cybersecurity capabilities. Organizations find this architecture useful because it covers capabilities across the modern enterprise estate that now spans on-premises, mobile devices, many clouds, and IoT / Operational Technology.
- Comparison reference for security capabilities – We know of several organizations that have marked up a printed copy with what capabilities they already own from various Microsoft license suites (many customers don’t know they own quite a bit of this technology), which ones they already have in place (from Microsoft or partner/3rd party), and which ones are new and could fill a need.
- Learn about Microsoft capabilities – In presentation mode, each capability has a “ScreenTip” with a short description of each capability + a link to documentation on that capability to learn more.
- Learn about Microsoft’s integration investments – The architecture includes visuals of key integration points with partner capabilities (e.g. SIEM/Log integration, Security Appliances in Azure, DLP integration, and more) and within our own product capabilities among (e.g. Advanced Threat Protection, Conditional Access, and more).
- Learn about Cybersecurity – We have also heard reports of folks new to cybersecurity using this as a learning tool as they prepare for their first career or a career change.

The Microsoft Cybersecurity Reference Architecture is available here. Additional training resources are available here.
An update will be released early this year 2021 to include the branding updates announced at Ignite 2020. Most notably, the use of the Microsoft Defender branding will be incorporated in the update to MCRA.
Microsoft Blog Posts on CMMC
Program Scaffolding for Managed Service Providers
Behind the scenes, we are actively working with our partner community, and in particular the Managed Service Providers (MSP), to deliver scaffolding in the construction of CMMC offerings. The CMMC Acceleration Program is comprised of many different components as described above, and several that are yet unannounced. The intent is to provide building blocks, or what we call “scaffolding”, to our partners in support of their CMMC offers. Our partners will be enabled in our partner marketplace with advance specializations for CMMC and their concentration on the Defense Industrial Base. In alignment with the commitments made in our original CMMC Announcement, our MSP partners will implement reference architectures and compliance solutions for CMMC.
Into the Future
Microsoft is actively engaged with customers, partners, the CMMC Accreditation Body, and multiple industry working groups to refine what resources we should develop and make available as part of the CMMC Acceleration Program. We have many grand ideas, and welcome to feedback from the community at large. Please fill out this short survey to join our CMMC feedback loop if you are interested in learning more about the program.
For general comments on the CMMC Acceleration Program: Contact Us
Appendix
Please follow me here and on LinkedIn. Here are my additional blog articles:

Recent Comments