
by Contributed | Jan 13, 2021 | Technology
This article is contributed. See the original author and article here.
We are back with another serving of Reconnect, this time joined by Microsoft Certified Trainer and Cloud Architect Rolf McLaughlin!
Born in Germany and based in Ireland, Rolf started working with Microsoft Exchange in 1996.
Since then, Rolf has trained many Messaging and Domain Administrators, Cloud Administrators and Architects. He has also designed and implemented both smaller and larger installations of Microsoft Exchange, Active Directory and large hybrid enterprise infrastructures based on Microsoft technologies over the years. Rolf’s specialities involve Azure, PowerShell, Windows Client and Windows Server.
Training continues to be Rolf’s passion with the professional launching his own cloud training business TheCloud42.com. Rolf, who describes himself as a passionate and long-term Microsoft Certified Trainer with almost 25 years of service, says he looks forward to continuing to mentor young MCTs into the future.
Community service has also formed an important part of Rolf’s career with PowerShell Germany. In 2007, Rolf fondly recalls launching the first PowerShell User Group in his native country, which expanded to include members from other German-speaking countries like Switzerland and Austria.
According to Rolf, his plans for the future include one thing and one thing only: “Azure, Azure, and Azure… Did I forget something? Oh yes, Azure!”
For more on Rolf, check out his Twitter @PS_Rolf
by Contributed | Jan 13, 2021 | Technology
This article is contributed. See the original author and article here.
Prior to most of us taking off for the holiday break, Microsoft posted a blog about new Information protection capabilities. I am going to cover a bit more in depth the capabilities for Exact Data Match (EDM) discussed in that blog post.
The first announcement related to EDM, and biggest for most EDM admins, is the general availability of a user interface in the Compliance center for management of EDM. This is a big step forward and will help in the creation and management of EDM. The PowerShell option to manage EDM is still available for use for those who love the command line. I am going to cover more of this new interface later in this blog.
The second announcement is around the scale of the EDM service. Microsoft now supports files containing up to 100 million rows, up from 10 million rows at launch. They also reported that the time needed to upload and index the data to the EDM service has been reduced by 50%. On the security side, salting is being added to the hashing process, this protects the data while being transmitted to the service as well as while stored within the service.
The last announcement related to EDM is the general availability of configurable match (normalization). This will now allow for case insensitivity, treating upper- and lower-case letters as the same. Also, you can configure if punctuation should be ignored, such as the dashes in a social security number, “123-45-6789” would be the same as “123456789”
Let us dive deeper into the new user interface! If you read my previous blog series about Implementing Microsoft EDM, you will remember that virtually all the steps for setting up the EDM Schema and datastore were done via command line interface (mostly PowerShell). Now with the new UI (user interfaces) you can setup the Schema and Sensitive Information Types (SITs) from a graphical interface. I am going to compare the steps I completed in the blog series to how it looks today in the UI.
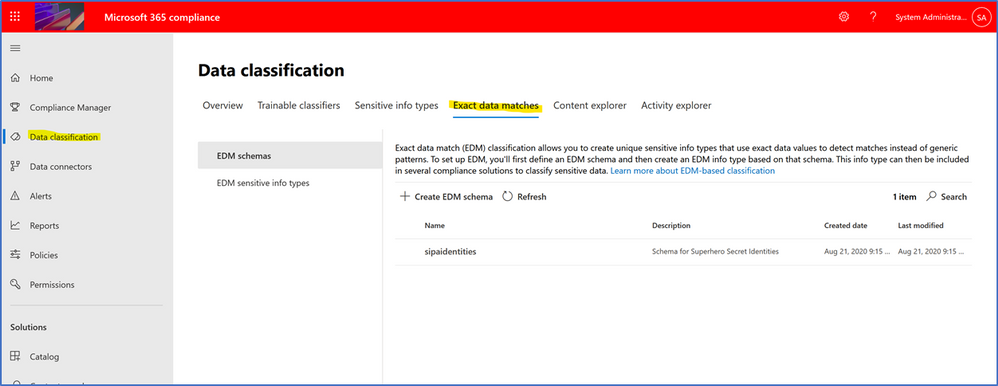
First off, where is the new UI? It is in the Microsoft 365 Compliance Portal, under Data classification you will see the new Exact Data Matches tab.
Above is the view from my demo tenant that I have rebuilt since the blog series, but I used the blog series to setup the EDM in this tenant. What I thought would be an effective way to show the new UI, is I am going to setup the same EDM configuration I did in the blog series, so here it goes.
In my new demo tenant, you can see I have nothing in the Exact data match area.

To begin the setup of EDM I need to get a Schema created. Below is the XML (eXtensible Markup Language) File that I used to setup the schema previously.

Let us create this in the new tenant and take advantage of the new UI and features available. Here is official Docs doc for the use of the wizards to create the schema and sensitive info types.
I selected Create EDM Schema from the page and got this. I went ahead and named the schema and gave a description.

Here is one of the new features, the ability to ignore delimiters and punctuation for the schema fields. I choose to enable and add several items to be ignored. Please note that the delimiters and punctuation ignored for indexed SITs must match the normalizations defined for that Out of Box (OOB) or custom SIT that will be referenced by the EDM SIT (more about this later in this blog). For example, US SSN (OOB SIT) is configured to detect straight-nines (e.g., 515121111), SSN with dashes (e.g., 515-12-1111) and SSN delimited by spaces (e.g., (515 12 1111). Any other delimiters and punctuation configured will be effectively ignored by the EDM service, as the underlying pattern won’t be able to detect them.

New is the schema fields to setup, one cool thing is with the above setting for ignoring delimiters and punctuation it defaults for all schemas. Notice the ability to turn on per schema ignoring, would need to turn off the blanket ignore policy above. I am going to keep mine as a schema wide ignore versus per field ignore. Besides the checkmark for enabling the field as searchable, you see another new feature, case insensitive, I am turning this on for all fields!

To add additional data fields, just click on the + to add additional. I am going to add the remaining fields, duplicating what I setup during the blog posts. After entering all five fields, I saved the schema. To view the schema, select the radio button next to the name to get a review pop out.

Now I switch to the EDM sensitive info types section, to work on those.

Selecting Create EDM sensitive info type (SIT) brings me to the UI wizard. First thing I need to do is choose the data store schema that I want to use for this EDM sensitive info type.

I selected Choose an existing EDM Schema and then selected the sipaidentities that we created previously.

Clicking next brings me to the defining the patterns for the SIT. Here are the patterns I used to setup the EDM SITs. One change that you will notice is that Microsoft has switched from a percentage-based confidence level to a 3-tier rating. Since I had 3 levels already, I will just transition using the 3-tier model.

Prior to creating the EDM SITs, I need to create the normal SITs that the EDM SITs will reference. This is referenced in Blog Post 2 of the series, creating the SRN SIT and creating the Superhero-Nickname SIT. I went ahead and created both, just like I did in the blog post.

Now I will go ahead and create/define the patterns for the EDM SITs. To start this, I click + Create pattern. For the first one I am setting it to Low Confidence and selecting SRN as the primary element (we created this in the Schema).

Next I choose the primary SIT I am associating with this EDM SIT for this it is the Superhero-Registration-Number(SRN) that I created.

Next is the Supporting elements area. First I select the other 4 fields as supporting elements for this SRN SIT.

Then I need to set the matching options/conditions. Since this first one is the low confidence pattern, I choose max and minimum as 2, just like the XML sample was configured for the 75% level.

After clicking Done it returns to the previous screen with the new pattern.

I went ahead and created the medium and high confidence level patterns for SRN.

Next, I setup the recommended confidence level and character proxy. Both these settings are in the XML Sample above and in the Blog series. I Set to Low as that is the equivalent percentage level that is set in the blog series patterns.

The next step is the name the EDM SIT, this was done in another section of the rulepack.XML File.

I entered in the name and description.

I reviewed the information and selected Submit.

Success, EDM SIT was created. I am not going to Hash, Salt and Upload now, as I need to create the Nickname-Nickname-EDM SIT before doing that. I do want to point out that the hashing, salting and the upload of the data is still done via the command line just like I described in the blog post.

I think this will wrap up this blog. Hope you enjoy using the new UI and other improvements and new features of Microsoft EDM!

by Contributed | Jan 13, 2021 | Technology
This article is contributed. See the original author and article here.
As a team who (used to) regularly speak at conferences or while creating engaging online technical content for various platforms – we thought we’d try something a little different. Talking with folks online to collect their feedback and taking stock of what the rest of the technical event space has been doing over the last year – let’s all acknowledge one thing: there is room for improvement.
As a team – We’re going to try to do something about it. I’m here to share what we’re planning and how you can get involved and participate. It’s a little moment in time we’re calling “IT Ops Talks: All Things Hybrid”. You might have seen the team tease some stuff out about it recently, well now it’s time for the full deal – or at least as much as we want to share with you today. ;)
I thought I would kick off a series of posts about why we are doing this and how the event will take place. In this post, I’m going to have a look at what we’ve heard over the last while regarding online events and what we’re trying to do.

First off – the topic. “All About Hybrid”. Microsoft has been building out a broad platform in the hyperscale public cloud space that any workload can thrive on. I’ve been talking about Microsoft Azure from an IT Pro / Operations perspective for over 9 years and watched it evolve to meet different customers’ needs. But I started to think about what part is often overlooked with most “cloud projects”? As a team, we started to poke around and ask folks in the community: What’s missing? what resources aren’t there right now? What we’ve come back with is “it depends”. Most cloud projects or cloud strategies would benefit from enabling Hybrid planning and how you can use them to solve problems you have on-premises today. Most times, folks just think hybrid is about establishing a secure link to your cloud provider and then poof you are done. There is so much demand for resources about hybrid capabilities we decided to shine a light on it. We’re focusing the discussion to talk about all things hybrid to make your on-prem world better.
As for the specifics on what we’re going that’s different than any other online event? Does any of this resonate with you?
- Online event sessions are too short. They shackle the expert from being able to present at the depth we’re looking for.
- Events are scheduled at a time that is not convenient for me. I can’t take time off work to participate. I lose focus or get called away and I don’t have the ability to pick up where I left off
- I really miss the connectedness of having hallway conversations or discussions / questions about the topic in question. I don’t need to ask a question right now, but I do want my questions answered at some point.
- You’re one of the 20% of attendees who actually want to ask a live question at a microphone stand and talk to the speaker directly. How can I do this in an online fashion?
- I don’t want to get a whole bunch of marketing emails or calls from folks because I signed up and registered for the event
This is a lot to unpack, so let me do my best at answering most of these.
- There is substantial data we’ve looked at saying that shorter is better for the attention span of most folks in the industry (and in online content in general). While this is true on the one hand, it also hinders the ability to have those longer format depth sessions folks are looking for. What if we turned this on its head and didn’t have a limit on length for this topic from speaker [insert speaker name here]? BUT – instead of using a traditional “presentation” format or monologue, let’s go with a more interactive interview / audience advocate to help break things up into shorter chunks. This should give the presenter someone to engage with as well as someone to act as a guide to help the audience follow along with the flow and jump to sections, they find relevant.
- We’re all dealing with challenging schedules and times that we try to separate between Work / Home / SELF. Why be constrained to a clock and consecutive sessions to make an agenda, when the most common and flexible form of video consumption is on-demand. What if an online event released ALL the content right at the start – all at the same time as a content release? Have a point in time and then let YOU the audience decide which sessions are interesting for you to watch and YOU choose when you watch them based on your flexible schedule. You can see from the session details which ones are interesting to you as well as fast forwarding to sections you really want to hear about or rewinding to see something again.
- If I have the ability to watch on demand, whenever it suits my schedule – but what about interacting with someone on the topic being presented. Where do I ask my questions or geek out about a cool demo that took place? Don’t worry, we got you covered here too. We are going to try using a live 24-hour FOCUSED chat channel that opens the same day the session becomes available. As you are watching the session – you can fire off comments, observations or ask questions whenever you like inside this channel and other attendees will be participating in the same channel (on their own schedule) to interact with you. We’ll seed the channel with experts on the topic as well the speakers themselves so that we can literally be there with you in the hallway – talking about the topic.
- You want to ask questions and get them answered in real time by the session speakers. I am the same way. Remember – we’re limited to the time zones that work for when the speakers are awake, so we do have some hard constraints. We’re planning on releasing the content at a single moment in time. You can asynchronously engage with folks / speakers on that topic leading up to a dedicated set Q&A time that will hit at least two major time zone areas to maximize audience coverage. We’re going to set this to be one week AFTER the release of the content so that everyone can take the time to catch up on their homework before showing up for the dedicated Q&A timeslots. These will be live hosted chats, taking live questions from the audience watching as well as some of the top questions from the session discussion areas.
- Registrations are for traditional events and follow up content / product leads. What if we just didn’t have a registration process and left this wide open for anyone to participate? We are focusing on getting the right speakers out to deliver the right content that matters to you. We’ll be including all the relevant resources for each session with you in each of the session write ups. – what else do you need if you have all of that?
I hope this covered the WHY we’re doing this and the WHAT with regards to how we are approaching this. We’ve got a lot of balls in the air right now with regards to getting this all nailed down and ready to go. You might have guessed from the teasers leading up to this – the MAIN EVENT will be taking place on February 2nd.
What can you do right now? Well, I would normally say “go register” but that doesn’t work for this event. How about you SHARE this blog post out and talk about it with us here in the comments. Is this something you have been waiting for? Are we way off base or completely missed something? Anything in particular you would like to see?
I’ll have more details to share next week about the topics we’re covering and pre-recording for the main event.
Stay tuned.
by Contributed | Jan 13, 2021 | Technology
This article is contributed. See the original author and article here.
Hey community, this is Helmut Wagensonner, a Customer Engineer for Windows Client platform. Today I want to provide you a workaround for an issue I ran into a couple of times now at my customers. Please note that at the date of writing the product group and engineers are investigating the root cause and probably there will be a fix. But for now…
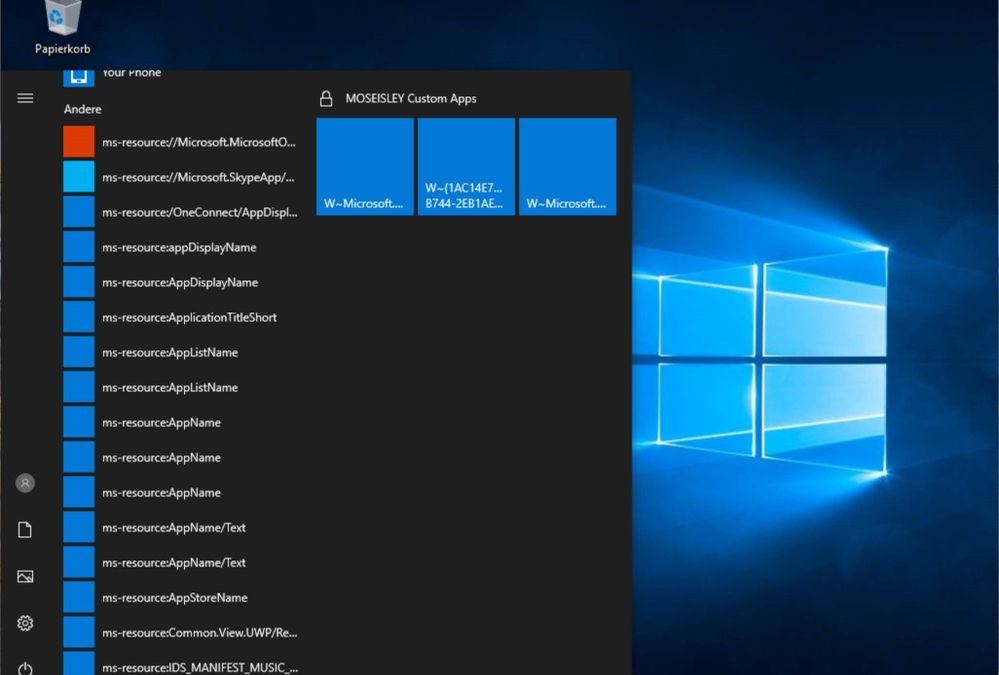
Let’s have a look into some details. It appears that built-in Microsoft start menu apps, also known as start apps or inbox apps, show up as orphaned links after upgrading the OS to Windows 10 1909 (and probably also newer versions). The following image shows an example.

We’ve seen this happening in combination with a blocked Windows Store or blocked inbox apps. In some cases, the apps start to heal themselves after a short while. However, we’ve also seen cases where ms-resource items remain.
It appears that apps showing orphaned links do not have the InstallLocation property set anymore. You can check this by running the Powershell command
Get-AppxPackage | Select Name,InstallLocation
from a Powershell window in the user’s context. So re-registering the apps for each user could solve the problem. That’s why engineers working on this topic came up with a workaround, which helped my customers to get the apps fixed. Following Powershell command can be used to repair the start menu:
Get-AppxPackage | % { if (!($_.InstallLocation) -and !($_.IsFramework)) { Add-AppxPackage -RegisterByFamilyName -MainPackage $_.PackageFamilyName }}
Credits go to Raul Martinez (raulm@microsoft.com) and David Bennet (dbenne@microsoft.com) for creating and fine-tuning this one-liner.
The command needs to run in the context of the user (i.e. logon script). It retrieves a list of all modern apps installed/registered by the user. If the app is not part of the UWP framework and if its InstallLocation property is empty, it get re-registered for the executing user account.
Experiences show that blocking the Windows Store using Applocker can advance the erroneous behavior. Consider one of those GPOs to prevent users from downloading apps from the public store: https://gpsearch.azurewebsites.net/#8215 or https://gpsearch.azurewebsites.net/#13794. Latter is recommended when a private store is available. However, we’ve also seen the orphaned inbox apps issue on clients, which were using the mentioned GPO to block the store.
I assume this will be fixed soon but we do not have an ETA yet. I will update this post as soon as we have new information.
Thanks for reading and stay healthy!
Cheers,
Helmut

by Contributed | Jan 12, 2021 | Technology
This article is contributed. See the original author and article here.
Introduction
This month, the Microsoft Education Customer Engagement and Support Team is releasing an updated version of the well-received Back To School Kit that was initially released in July 2020. This kit provides high-level guidance for Educators K12, Leadership and Special Services teachers on how to use Microsoft technology to prepare for their upcoming school year.
In addition, members of the EDU Engagement team will be hosting four new webinars to walk you through each aspect of the guide. Please see the overview below and join the Enable Remote Learning (ERL) Community for continuous updates or to ask us a question. See you soon!
Where to get the BTS kit
We’ll update this post as soon as we have the final download link for the guide, so please check back over the following days.
Webinar dates and intended audience
Based on feedback from our communities, we’ll be offering four public training sessions. Each session is specifically focused on a different EDU role. Our EDU experts will share common scenarios, use cases, and answer your questions live.
Feel free to share all info with others
If you know anyone who might be interested in joining these events, please share this post with them.
Live sessions on Twitch
All sessions will take place on live-streaming platform Twitch.tv, on Stephen Reid’s PlayMatters channel:
Presenters
Our presenters will be Geri Gillespy and Stephen Reid.
These webinars will be recorded and made available on demand afterwards.
by Contributed | Jan 12, 2021 | Technology
This article is contributed. See the original author and article here.
Updated January 12, 2021, 18:06 PM PST:
The partial Azure Sphere Security Service disruption has been resolved.
January 12, 2021, 17:36 PM PST:
Azure Sphere customers may be affected by a partial disruption of Azure Sphere Security Service today, January 12, 2021. Azure Sphere devices will not be affected. The disruption is limited to the public REST service. Our team is actively working to resolve the disruption.
We will update this post as more information is available.
by Contributed | Jan 12, 2021 | Technology
This article is contributed. See the original author and article here.
Sysmon v13.01
This bugfix update to Sysmon resolves a series of config parsing issues.
PsExec v2.30
Previous versions of PsExec are susceptible to a named pipe squatting attack. If a low-privileged attacker creates a named pipe on a server to which a PsExec client connects, they could intercept explicit authentication credentials or sensitive command-line arguments sent by the client. The PsExec client now drops a key into file protected with an administrator-only security descriptor with a name formatted as PSEXEC-.key into the Windows directory on the remote system that the PsExec service uses to authenticate to the client.
by Contributed | Jan 12, 2021 | Technology
This article is contributed. See the original author and article here.
Final Update: Tuesday, 12 January 2021 22:44 UTC
We’ve confirmed that all systems are back to normal with no customer impact as of 01/12, 22:28 UTC. Our logs show the incident started on 01/12, 20:35 UTC and that during the 1 hours & 54 minutes that it took to resolve the issue only 24 subscriptions of customers experienced connectivity failures when attempting to establish connections to Log Analytics ingestion endpoint. Additionally, customers may have also experienced their Log Search alerts missing or fired incorrectly..
- Root Cause: The failure was due to a
certificate configuration issue in a recent deployment preventing customers from establishing connections to the Log Analytics ingestion endpoint.. - Incident Timeline: 1 hours & 54 minutes – 01/12, 20:35 UTC through 01/12, 22:28 UTC
We understand that customers rely on Application Insights as a critical service and apologize for any impact this incident caused.
-Arish B
Update: Tuesday, 12 January 2021 21:53 UTC
Root cause has been isolated to a certificate configuration issue in a recent deployment which resulted in Log analytics not accepting OMS ingestion data. To address this issue we are deploying a corrected certificate to the Brazil region. Some customers may experience residual affect and we estimate 1 hour before all data loss or connection issue is addressed.
Start time: 2021-01-12 20:35 UTC
- Work Around: None
- Next Update: Before 01/13 00:00 UTC
-Arish B
by Contributed | Jan 12, 2021 | Technology
This article is contributed. See the original author and article here.
Digital transformation usually starts with moving business processes, including printing and print infrastructure, to the cloud. Universal Print is very welcome news as it provides an easy way to move printing to the cloud. If you are just starting digital transformation initiatives, YSoft OMNI Bridge, which enables Universal Print on in-market printers, comes at just the right time for you.
The Quocirca Global Print Security Report 2019, states that in 2018, 91% of organizations believed printing to be important in their business processes and 87% indicated it still would be in 2020. For on-premises print infrastructure, redundancies can be built-in, to ensure critical business processes are not interrupted. However, what happens when print moves to the cloud?
While Microsoft provides a Universal Print connector to connect existing printers to the Universal Print service in Microsoft 365, it must be installed on a Windows workstation or Server. YSoft OMNI bridge is adding value Universal Print as it is an intelligent edge device that acts as a connector. Not only can it connect existing printers to Universal Print without requiring a Windows print server, but it can also solve the need to have always-on print services. Our solution is YSoft OMNI Series.
YSoft OMNI Series™ consists of a serverless Edge device, YSoft OMNI Bridge™, and YSoft OMNI UP365™, which runs as an app on YSoft OMNI Bridge. With OMNI Series, in-market printers – those you use today that do not support Universal Print natively – can instantly and cost effectively connect to the Universal Print service in Microsoft 365. How can this help with always-on print services?
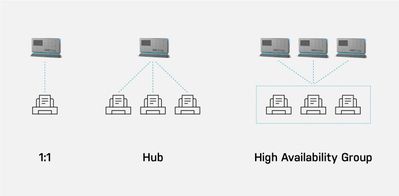
There are three different scenarios for how OMNI Series can be used, also shown in Figure 1:
- One to one: One OMNI Bridge is connected to one printer.
- Hub: One OMNI Bridge is connected to many printers.
- High Availability Group: Two or more OMNI Bridges are grouped and connected to many printers, providing load balancing and failover for business-critical printing.
Scenarios 1 and 2 are simple; it is the High Availability Group where things get interesting!
Figure 1. Three scenarios showing YSoft OMNI Bridge printer support
Load balancing and failover are two important concepts. Together they provide what is often referred to as high availability. Let’s explore these concepts further and I’ll explain how YSoft OMNI Series provides the high availability businesses need.
Load balancing
You may ask yourself, why is load balancing necessary for my business? Load balancing makes sure there is no single bottleneck between the user submitting a print job and the job coming out at the printer. By having just one connector, regardless of whether it is the OMNI UP365 App, the Universal Print Connector Microsoft provides, , all your user’s print jobs must pass through that single point. Any clog or failure may impact employees’ ability to print. It’s similar to a single lane road between point A and point B. Heavy traffic or an accident can be a nightmare.
In Figure 2 below, one OMNI Bridge is serving three printers. Naturally, there are multiple users who would like to print to the available printer closest to them. If one user submits a large print job, other users’ print jobs are queued for processing causing delays.
 Figure 2 YSoft OMNI Series 1:3 printers’ example
In figure 3 we see the High Availability scenario where two OMNI Bridges are grouped together. In this scenario, the print load is “normal” and everything is running smoothly. The company knows it has bursts of print activity that it needs to accommodate or that print is an essential business process.
 Figure 3 YSoft OMNI Bridge – High Availability scenario with normal print traffic
How can we solve the scenario where there is a clog in the road – a lot of sudden print traffic, so that users can print their critical print jobs without delay?
In Figure 4, you can see two OMNI Bridges are grouped together. If one OMNI Bridge is busy delivering a large print job, since there is a high availability group created, the second OMNI Bridge takes care of delivering the other jobs to the printers and the users do not experience any delay.
 Figure 4 YSoft OMNI Series High Availability when Load Balancing is required
Failover
Failover is a complementary concept to load balancing. With load balancing, multiple points are splitting the workload. With failover, when one connector fails, the others take over seamlessly; users are not even aware of the change.
Technology being what it is, it can fail – perhaps due to a power surge. If only one OMNI Bridge is serving a set of printers, critical business printing stops.
In Figure 5, should one OMNI Bridge fail, the second OMNI Bridge completely takes charge of delivering all the jobs to the printers transparently, without the users’ knowledge that something in the print job’s routing changed. As in load balancing, the YSoft OMNI Series group ensures the business-critical prints are delivered on time, every time.
 Figure 5 YSoft OMNI Series High Availability when Failover is required
Both failover and load balancing have specifically designed technology behind them to provide a smooth user experience. With two or more groups of OMNI Bridges, you have the redundancy and failover you need for your printing process printers – all through an inexpensive, serverless device that requires minimal maintenance and works with your existing print fleet.
As a true intelligent Edge device, YSoft OMNI Bridge leverages the full power of Microsoft Graph, IPP infrastructure and IPP everywhere to enable organizations to eliminate traditional print servers. Further, by leveraging native cloud technologies such as Azure IoT Edge Platform, it delivers an enterprise grade experience and zero trust security, while maintaining high resilience and service availability. All this, while keeping security as a top priority; TLS is used by default when transferring jobs from OMNI Bridge to the printer.
In short, YSoft OMNI Series provides organizations using Microsoft 365 an easy, cost-effective way to get to cloud printing today with their existing printers as well as a resilient, reliable way to ensure printing is always available.
How does it work?
- Login in to the YSoft OMNI Central Portal.
- Register OMNI Bridge with Azure AD. When prompted, enter the code displayed on your OMNI Bridge.


- When OMNI Bridge registration has successfully completed, your OMNI Bridge will appear in the OMNI Central Portal.
- Once a second YSoft OMNI Bridge device has been registered, the two YSoft OMNI Bridges can be configured for high availability by assigning multiple printers to them.
As Universal Print by Microsoft and YSoft OMNI Bridge are both in public preview, real time customer feedback is being incorporated. Early YSoft OMNI Bridge beta customers can already expect a secure, reliable, resilient, and robust print platform. Contact us to join in public preview and let us know what you think.
Visit YSoft OMNI Series for public preview ordering and further details.
Note: All screenshots are subject to change between public preview and general availability.

Recent Comments