by Contributed | Jan 14, 2021 | Technology
This article is contributed. See the original author and article here.
Tutorial: Reconnaissance Playbook
The second tutorial in this four-part series for Azure WAF protection and detection lab is the reconnaissance playbook. The purpose of the Azure WAF security protection lab is to demonstrate Azure WAF‘s capabilities in identifying and protecting against suspicious activities and potential attacks against your web applications. This playbook explains how to test Azure WAF’s protections against a reconnaissance attack with emphasis on Azure WAF protection ruleset and logging capabilities. The lab does not include advanced application security concepts and is not intended to be a reference for application security testing as these areas are broader than the use cases demonstrated herein.
This playbook demonstrates the web application protection capabilities of Azure WAF against a simulated reconnaissance (recon) attack from common, real-world, publicly available hacking and attack tools.
In this tutorial you will:
- Run web application vulnerability scan against the target OWASP Juice Shop web application directly and then scan the same instance of the web application published through Azure WAF
- Review the differences in the results of the two web application vulnerability scans
- Review the summarized logs in the WAF Workbook (Azure Monitor Workbook for WAF)
Prerequisites
A completed Azure WAF security lab setup
- We recommend following the lab setup instructions as closely as possible. The closer your lab is to the suggested lab setup, the easier it will be to follow the Azure WAF testing procedures
Reconnaissance Attack
Before an attacker can exploit a vulnerability, they will typically spend time researching their target web application which involves collecting application specific data and analyzing it for potential vulnerabilities. One of the methods for collecting sensitive security data to identify potential vulnerabilities in a web application is to utilize web application security vulnerability scanners. These scanners can analyze an application’s response headers to identify potential vulnerabilities. Data collected with web application vulnerability scanners can reveal potential vulnerabilities that an attacker could then test, develop, and leverage for exploitation or exfiltration. Such reconnaissance activities also allow attackers to gain a thorough understanding and complete mapping of your application for later use.
Performing Reconnaissance with Web Application Vulnerability Scanner
One of the first things an attacker will attempt is to try and gain extensive understanding of the application components, framework, and the potential vulnerabilities in a target web application. The quickest, most common method of doing this is to use a commercial or an open source web application vulnerability scanner (also called security scanners) to run unauthenticated/unauthorized scans against a target. In this tutorial, you will run two web application vulnerability scans against the target web application
- First scan will point to the target web application directly
- URL: http://owaspdirect-<deployment guid>.azurewebsites.net
- Second scan will point to the same target web application protected by Azure WAF on Application Gateway
Running Web Application Vulnerability Scan against the Target Application
To run the web application vulnerability scans, we will connect to the Kali VM with RDP. Once connected, we will use Nikto, a versatile, command line open source web application vulnerability scanning tool which is bundled in the Kali Linux distro. When pointed to the target web application, Nikto will scan the application for common vulnerabilities and display the scan output in the terminal window for quick review.
- Sign into the Kali Linux VM using your lab credentials
- Launch the web browser and ensure that you are able to access the OWASP Juice Shop website directly with URL http://owaspdirect-<deployment guid>.azurewebsites.net and also through WAF with URL http://juiceshopthruwaf.com
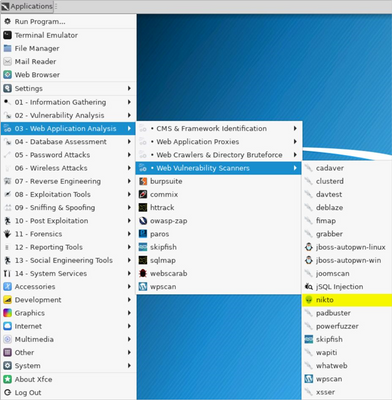
- Launch two instances of Nikto Web Vulnerability Scanner. Click on Applications on the top left and then click Web Application Analysis –> Web Vulnerability Scanners –> Nikto
- To initiate the scans, utilize the following commands. One in each of the open Nikto windows
- nikto -h http://owaspdirect-<deployment guid>.azurewebsites.net
- nikto -h http://juiceshopthruwaf.com
- Tips
- To display verbose output in Nikto, use the following command
- nikto -h <http://owaspdirect-<deployment guid>.azurewebsites.net> -Display v
- To save Nikto output to a file to review later, use the following command
- nikto -h <http://owaspdirect-<deployment guid>.azurewebsites.net> -Save ./juiceshopdirect.htm
Reviewing Web Application Vulnerability Scan Results
After the scans finish running, we can quickly review the results by looking at the highlighted lines in the figures below.
- When going to the Juice Shop website directly, we see that the scanner sent 7k+ requests1 to the web server and as a result found 2 errors and 150+ items/issues which could then be used to develop further attack and exploitation scenarios
Figure 1 (Scan Start)

Figure 2 (Scan End)

! IMPORTANT: For the scenarios demonstrated in this document, OWASP Juice Shop application was running on HTTP port 3000. This is not the case when you use the Azure WAF Attack Testing Lab Deployment Template as it configures the application to run on port 80, 443 and assigns it a URL. For the lab tutorials, you will connect to the application on HTTP port 80 only. The URL for the application will be http://owaspdirect-<deployment guid>.azurewebsites.net. <deployment guid> is unique to every deployment
- While scanning Juice Shop website through the Azure WAF, we see that the scanner made >3x the number of requests1 when compared to scanning the website directly in Step 1 and still it did not find any errors to report. Similarly, this scan is only able to report <1% of the number of items/issues for further investigation as compared to when scanning the website directly
1 Request count for http://owaspdirect-<deployment guid>.azurewebsites.net taken from baseline of scans for comparison

Understanding What Happened
Upon reviewing the Nikto scan outputs, we see the pattern as shown in the below table. This clearly indicates that when going through the Azure WAF, the scanner is not as effective in assessing the web application and identifying potential vulnerabilities.
Recon Scan Route
|
No. of Issues
|
No. of Items for Investigation
|
Direct
|
2
|
167
|
Through WAF
|
0
|
3
|
Now let us use the Azure Monitor Workbook for WAF to understand how WAF handled traffic from the Nikto security scanner. This workbook visualizes security relevant WAF events across several filterable panels. It works with all WAF types, including Application Gateway, Front Door, and CDN, and can be filtered based on WAF type or a specific WAF instance.
Click here to deploy Azure Monitor Workbook for WAF to your subscription in Azure.
- Tip: To understand what is happening when scan traffic destined for the Juice Shop application goes through the Azure WAF, you can also examine the log entries associated with ApplicationGatewayFirewallLog in the Azure Monitor
Reviewing WAF logs in the Workbook
- You can access the WAF workbook by going into the Workbook blade and then selecting the WAF workbook deployed for this lab. Once in the workbook, ensure that you have selected the appropriate Time Range, WAF Type and WAF Items in the event filters

- You should also ensure that you have selected the correct Public IP address for your attacker machine (Kali VM) in the Top 10 Attacking IP Addresses, filter to single IP address pane.
- Tip: If you are using the Azure WAF Attack Testing Lab Environment Deployment Template and have followed the lab setup instructions then the client IP address will be the public IP address of the Azure Firewall in your demo environment

- After selecting the correct client IP, we scroll back up to the top of the Workbook and review the visualizations at the top, in the WAF Workbook. The sections of the workbook we will be using here are highlighted with alphabetized callouts in the below figure, we see that they map to the following sections
a. WAF actions filter
b. Top 40 Blocked Request URI addresses, filter to single URI address
c. Top 50 event trigger, filter by rule name
d. Message, full details

Overview of the Workbook sections
- Starting from the top, the WAF actions filter shows the number of matches and the blocked requests

- We can then look at the Top 40 Blocked Request URI addresses, filter to single URI address to identify the top URIs for which requests were blocked by WAF

- The Top 50 event trigger, filter by rule name shows all the rules which evaluated the scanner traffic

- The below table shows an extract of the Top 50 event trigger, filter by rule name output for scanner traffic. This data clearly shows that WAF was able to detect the security scanner and blocked suspicious requests/payloads from the Nikto Scanner. This is expected because a security scanner will attempt to perform various types of operations to test security of the web application
Rule
|
count_
|
Found User-Agent associated with security scanner
|
8906
|
Request Missing an Accept Header
|
8906
|
GET or HEAD Request with Body Content.
|
8860
|
Node-Validator Blacklist Keywords
|
4553
|
SQL Injection Attack: Common Injection Testing Detected
|
3354
|
Found request filename/argument associated with security scanner
|
2422
|
Possible Remote File Inclusion (RFI) Attack: Off-Domain Reference/Link
|
2418
|
Possible Remote File Inclusion (RFI) Attack: URL Payload Used w/Trailing Question Mark Character (?)
|
2355
|
Detects basic SQL authentication bypass attempts 2/3
|
2249
|
Detects MySQL comments, conditions and ch(a)r injections
|
2233
|
Path Traversal Attack (/../)
|
1698
|
OS File Access Attempt
|
699
|
Remote Command Execution: Unix Shell Code Found
|
682
|
XSS Attack Detected via libinjection
|
667
|
SQL Injection Attack: SQL Tautology Detected.
|
641
|
Possible XSS Attack Detected – HTML Tag Handler
|
616
|
XSS Filter – Category 1: Script Tag Vector
|
616
|
NoScript XSS InjectionChecker: HTML Injection
|
616
|
Detects classic SQL injection probings 2/3
|
455
|
Invalid character in request (non printable characters)
|
342
|
Invalid character in request (null character)
|
340
|
SQL Injection Attack
|
272
|
Remote Command Execution: Unix Command Injection
|
199
|
SQL Comment Sequence Detected.
|
197
|
URL file extension is restricted by policy
|
192
|
Restricted File Access Attempt
|
178
|
SQL Hex Encoding Identified
|
147
|
Possible Remote File Inclusion (RFI) Attack: Common RFI Vulnerable Parameter Name used w/URL Payload
|
136
|
PHP Injection Attack: High-Risk PHP Function Call Found
|
128
|
- Review further details in the Message, full details section

Key Takeaway
Using security scanners to perform web application vulnerability assessment scans to expose vulnerabilities in a target web application is a common technique used by attackers. When external adversaries can perform these scans against your web applications, they are able to learn about your application design and its vulnerabilities which could potentially lead to exploitation.
For web applications secured with it, Azure WAF can detect and protect against reconnaissance attacks executed with security scanners at the network edge, with its out of the box ruleset.

by Contributed | Jan 14, 2021 | Technology
This article is contributed. See the original author and article here.
Tutorial: Data Disclosure and Exfiltration Playbook
The last tutorial in this four-part series for Azure WAF protection is the data exfiltration playbook. The purpose of the Azure WAF security protection lab is to demonstrate Azure WAF‘s capabilities in identifying and protecting against suspicious activities and potential attacks against your web applications. This playbook explains how to test Azure WAF’s protections against a SQL Injection (SQLi) attack with emphasis on Azure WAF protection ruleset and logging capabilities. The lab does not include advanced application security concepts and is not intended to be a reference for application security testing as these areas are broader than the use cases demonstrated herein.
This playbook demonstrates the protection capabilities of Azure WAF against a simulated SQL Injection attack from common, real-world, publicly available hacking and attack tools.
In this tutorial you will:
- Simulate SQL Injection (SQLi) attack against the target OWASP Juice Shop application directly and then attack the same instance of the web application published through Azure WAF
- Observe the difference in the web application behavior in the two scenarios
- Review the summarized logs in the WAF Workbook (Azure Monitor Workbook for WAF)
Prerequisites
- A completed Azure WAF security lab setup
- We recommend following the lab setup instructions as closely as possible. The closer your lab is to the suggested lab setup, the easier it will be to follow the Azure ATP testing procedures.
- Completion of the reconnaissance playbook tutorial
- Completion of the vulnerability exploitation playbook tutorial
Configuring Burp Suite and Firefox
Before you being, please refer to the Configuring Burp Suite and Firefox section in the previous tutorial, Vulnerability Exploitation Playbook to setup Burp Suite and the Firefox web browser on the Kali VM.
Sensitive Data Exposure and Exfiltration
In this phase, the attacker is ready to use a vulnerability they have previously discovered, tested, and developed further to achieve their objective to access and exfiltrate data. In this playbook, we will perform a SQL Injection attack to disclose and then exfiltrate the list of all user credentials in the OWASP Juice Shop application.
Performing SQL Injection against the Target Web Application
In this tutorial, you will perform a SQL Injection (SQLi) attack against the OWASP Juice Shop application two times.
- Scenario 1: Performing SQL injection in the target web application directly
- Scenario 2: Performing the same injection in the same target web application protected by Azure WAF on Application Gateway
Scenario 1: Performing SQL Injection when going to the OWASP Juice Shop Application directly
- Sign into the Kali VM using your lab credentials
- Launch Burp Suite and ensure you have Burp Suite configured and running as described in the Configuring Burp Suite and Firefox section of the Vulnerability Exploitation Playbook
- Using Firefox, browse directly to the Juice Shop site by going to http://owaspdirect-<deployment guid>.azurewebsites.net
- In Burp Suite, check the Proxy –> HTTP history tab for the request and response data for this website
- In the search bar on the Juice Shop website, type “apple” and examine the request and response in Burp Suite
! IMPORTANT: For the scenarios demonstrated in this document, OWASP Juice Shop application was running on HTTP port 3000. This is not the case when you use the Azure WAF Attack Testing Lab Deployment Template as it configures the application to run on port 80, 443 and assigns it a URL. For the lab tutorials, you will connect to the application on HTTP port 80 only. The URL for the application will be http://owaspdirect-<deployment guid>.azurewebsites.net. <deployment guid> is unique to every deployment
- We see that when searching, the client makes a connection to the /rest/products/search endpoint

- The /rest/products/search endpoint of the OWASP Juice Shop application is vulnerable to SQL injection. In this tutorial, we will be exploiting the SQLi vulnerability in this endpoint
- To exploit the SQLi vulnerability in the /rest/products/search endpoint, we will use Burp Suite’s Repeater functionality to inject a specifically crafted SQL query in the request to this endpoint
- To do this, right click one of the GET requests to the /rest/products/search endpoint and then click Send to Repeater
Figure 1 – Send Request to Burp Repeater

Figure 2 – Request in Burp Repeater

- When ready to perform the injection, we will copy/paste and append the following encoded SQL query to the Request URI /rest/products/search?q= (as value to the query parameter) in the Burp Repeater window
a. URL encoded SQL query
%71%77%65%72%74%27%29%29%20%55%4e%49%4f%4e%20%53%45%4c%45%43%54%20%69%64%2c%20%65%6d%61%69%6c%2c%20%70%61%73%73%77%6f%72%64%2c%20%27%34%27%2c%20%27%35%27%2c%20%27%36%27%2c%20%27%37%27%2c%20%27%38%27%2c%20%27%39%27%20%46%52%4f%4d%20%55%73%65%72%73%2d%2d
b. Plain text SQL query (for reference)
qwert')) UNION SELECT id, email, password, '4', '5', '6', '7', '8', '9' FROM Users--
- Tip: You can also append the plain text SQL query to the request URI, but it may fail in certain conditions
- After appending the encoded query to the request URI, as value to the to the query parameter, click Go (or Send button)

- You should see a successful response from the OWASP Juice Shop application with details of all the users and their credentials disclosed by the web application. This indicates that our SQL injection attack was successful

JSON data in the response body
{"status":"success","data":[{"id":1,"name":"admin@juice-sh.op","description":"0192023a7bbd73250516f069df18b500","price":"4","deluxePrice":"5","image":"6","createdAt":"7","updatedAt":"8","deletedAt":"9"},{"id":2,"name":"jim@juice-sh.op","description":"e541ca7ecf72b8d1286474fc613e5e45","price":"4","deluxePrice":"5","image":"6","createdAt":"7","updatedAt":"8","deletedAt":"9"},{"id":3,"name":"bender@juice-sh.op","description":"0c36e517e3fa95aabf1bbffc6744a4ef","price":"4","deluxePrice":"5","image":"6","createdAt":"7","updatedAt":"8","deletedAt":"9"},{"id":4,"name":"bjoern.kimminich@gmail.com","description":"6edd9d726cbdc873c539e41ae8757b8c","price":"4","deluxePrice":"5","image":"6","createdAt":"7","updatedAt":"8","deletedAt":"9"},{"id":5,"name":"ciso@juice-sh.op","description":"861917d5fa5f1172f931dc700d81a8fb","price":"4","deluxePrice":"5","image":"6","createdAt":"7","updatedAt":"8","deletedAt":"9"},{"id":6,"name":"support@juice-sh.op","description":"d57386e76107100a7d6c2782978b2e7b","price":"4","deluxePrice":"5","image":"6","createdAt":"7","updatedAt":"8","deletedAt":"9"},{"id":7,"name":"morty@juice-sh.op","description":"f2f933d0bb0ba057bc8e33b8ebd6d9e8","price":"4","deluxePrice":"5","image":"6","createdAt":"7","updatedAt":"8","deletedAt":"9"},{"id":8,"name":"mc.safesearch@juice-sh.op","description":"b03f4b0ba8b458fa0acdc02cdb953bc8","price":"4","deluxePrice":"5","image":"6","createdAt":"7","updatedAt":"8","deletedAt":"9"},{"id":9,"name":"J12934@juice-sh.op","description":"3c2abc04e4a6ea8f1327d0aae3714b7d","price":"4","deluxePrice":"5","image":"6","createdAt":"7","updatedAt":"8","deletedAt":"9"},{"id":10,"name":"wurstbrot@juice-sh.op","description":"9ad5b0492bbe528583e128d2a8941de4","price":"4","deluxePrice":"5","image":"6","createdAt":"7","updatedAt":"8","deletedAt":"9"},{"id":11,"name":"amy@juice-sh.op","description":"030f05e45e30710c3ad3c32f00de0473","price":"4","deluxePrice":"5","image":"6","createdAt":"7","updatedAt":"8","deletedAt":"9"},{"id":12,"name":"bjoern@juice-sh.op","description":"7f311911af16fa8f418dd1a3051d6810","price":"4","deluxePrice":"5","image":"6","createdAt":"7","updatedAt":"8","deletedAt":"9"},{"id":13,"name":"bjoern@owasp.org","description":"9283f1b2e9669749081963be0462e466","price":"4","deluxePrice":"5","image":"6","createdAt":"7","updatedAt":"8","deletedAt":"9"},{"id":14,"name":"chris.pike@juice-sh.op","description":"10a783b9ed19ea1c67c3a27699f0095b","price":"4","deluxePrice":"5","image":"6","createdAt":"7","updatedAt":"8","deletedAt":"9"},{"id":15,"name":"accountant@juice-sh.op","description":"963e10f92a70b4b463220cb4c5d636dc","price":"4","deluxePrice":"5","image":"6","createdAt":"7","updatedAt":"8","deletedAt":"9"},{"id":16,"name":"uvogin@juice-sh.op","description":"05f92148b4b60f7dacd04cceebb8f1af","price":"4","deluxePrice":"5","image":"6","createdAt":"7","updatedAt":"8","deletedAt":"9"},{"id":17,"name":"demo","description":"fe01ce2a7fbac8fafaed7c982a04e229","price":"4","deluxePrice":"5","image":"6","createdAt":"7","updatedAt":"8","deletedAt":"9"},{"id":18,"name":"john@juice-sh.op","description":"00479e957b6b42c459ee5746478e4d45","price":"4","deluxePrice":"5","image":"6","createdAt":"7","updatedAt":"8","deletedAt":"9"},{"id":19,"name":"emma@juice-sh.op","description":"402f1c4a75e316afec5a6ea63147f739","price":"4","deluxePrice":"5","image":"6","createdAt":"7","updatedAt":"8","deletedAt":"9"}]}
- Tip: Data in the “Description” field in the server response is the password hash of the users which can be reversed using free tools available on the internet
Scenario 2: Performing SQL Injection when going to the OWASP Juice Shop Application through Azure WAF
You will now attempt to perform SQL Injection with the same query when going to the OWASP Juice Shop site through Azure WAF.
- On Kali VM, launch a new instance of Burp Suite and the Firefox browser
- Using Firefox, browse to http://juiceshopthruazwaf.com and check the Proxy –> HTTP history tab for the request and response data for this website in Burp Suite

- Search for “apple” in the search bar, find the request to the vulnerable /rest/products/search endpoint and send it to the Burp Repeater
Send Request to Burp Repeater

Request in Burp Repeater

- Append the encoded SQL query (from Step 10 in Scenario 1 above) as value to the query parameter in the Burp Repeater and click Go (or Send)

- Upon examining the response, we find that the request was blocked by Azure WAF on Application Gateway

Understanding What Happened
Upon reviewing the HTTP requests and responses for the two attempts to perform SQL Injection in the same instance of the Juice Shop application, we see the pattern as shown in the below table. This clearly indicates that the potentially malicious payload which could otherwise be stored in the application is not allowed through by Azure WAF.
SQL Injection Route
|
Success
|
Direct
|
Yes
|
Through WAF
|
No
|
Now let us use the Azure Monitor Workbook for WAF to understand how the WAF handled traffic with the SQL Injection query. This workbook visualizes security relevant WAF events across several filterable panels. It works with all WAF types, including Application Gateway, Front Door, and CDN, and can be filtered based on WAF type or a specific WAF instance.
Click here to deploy Azure Monitor Workbook for WAF to your subscription in Azure.
- Tip: To understand what is happening when traffic with SQL Injection query destined for the Juice Shop application goes through the Azure WAF, you can also examine the log entries associated with ApplicationGatewayFirewallLog in the Azure Monitor
Reviewing WAF logs in the Workbook
- You can access the WAF workbook by going into the Workbook blade and then selecting the WAF workbook deployed for this testing. Once in the workbook, ensure that you have selected the appropriate Time Range, WAF Type and WAF Items

- You should also ensure that you have selected the correct Public IP address for your attacker machine (Kali VM) in the Top 10 Attacking IP Addresses, filter to single IP address pane
- Tip: If you are using the Azure WAF Attack Testing Lab Environment Deployment Template and have followed the lab setup instructions then the client IP address will be the public IP address of the Azure Firewall in your demo environment

- After selecting the correct client IP, we scroll back up to the top of the Workbook and review the visualizations at the top, in the WAF Workbook. Below are the sections of the workbook we will be using as numbered in the below figure
a. WAF actions filter
b. Top 40 Blocked Request URI addresses, filter to single URI address
c. Top 50 event trigger, filter by rule name
d. Message, full details

Note: For a detailed overview of these sections of the WAF workbook, please refer to the Overview of the Workbook Sections in the prior tutorial, Reconnaissance Playbook
- From the sliced data in the WAF workbook, we can see that two requests to the /rest/products/search URI were blocked by WAF. Upon reviewing the Top 50 event trigger, filter by rule name we see all the rules which evaluated the POC code in the request, the Message, full details section shows that the traffic was blocked by Mandatory rule because the Anomaly Score threshold was exceeded (Total Score: 43, SQLi=43) with SQL Injection attack being the closest match
- The below table shows an extract of the Top 50 event trigger, filter by rule name output for scanner traffic. This data shows that the WAF evaluated the encoded query in the HTTP request to detect that it was a SQL injection attack and therefore blocked it
Rule
|
count_
|
SQL Injection Attack Detected via libinjection
|
1
|
Detects MSSQL code execution and information gathering attempts
|
1
|
Looking for basic sql injection. Common attack string for mysql, oracle and others.
|
1
|
Detects MySQL comment-/space-obfuscated injections and backtick termination
|
1
|
Detects basic SQL authentication bypass attempts 2/3
|
1
|
Detects classic SQL injection probings 1/3
|
1
|
Detects classic SQL injection probings 2/3
|
1
|
SQL Injection Attack
|
1
|
Restricted SQL Character Anomaly Detection (args): # of special characters exceeded (12)
|
1
|
Key Takeaway
SQL Injection (SQLi) is one of the most common type of application security vulnerability which allows an external adversary to exploit a vulnerable application to disclose and exfiltrate sensitive information in the application.
For web applications secured with it, Azure WAF can protect against SQL Injection (SQLi) attacks by detecting and blocking suspicious SQL queries at the network edge, with its out of the box ruleset.

by Contributed | Jan 14, 2021 | Technology
This article is contributed. See the original author and article here.
Tutorial: Vulnerability Exploitation Playbook
Vulnerability Exploitation playbook is third in the four-part tutorial series for the Azure WAF protection and detection lab. The purpose of the Azure WAF security protection lab is to demonstrate Azure WAF‘s capabilities in identifying and protecting against suspicious activities and potential attacks against your web applications. This playbook explains how to test Azure WAF’s protections against a Cross Site Scripting (XSS) attack with emphasis on Azure WAF protection ruleset and logging capabilities. The lab does not include advanced application security concepts and is not intended to be a reference for application security testing as these areas are broader than the use cases demonstrated herein.
This playbook demonstrates the protection capabilities of Azure WAF against a simulated Server Side XSS injection (Stored XSS) attack from common, real-world, publicly available hacking and attack tools.
In this tutorial you will:
- Simulate Cross Site Scripting (XSS) attack against the target OWASP Juice Shop application directly and then attack the same instance of the web application published through Azure WAF
- Inject a proof of concept (POC) XSS payload in the target OWASP Juice Shop application directly and then through Azure WAF
- Observe the difference in the web application behavior in the two scenarios
- Review the summarized logs in the WAF Workbook (Azure Monitor Workbook for WAF)
Prerequisites
- A completed Azure WAF security lab setup
- We recommend following the lab setup instructions as closely as possible. The closer your lab is to the suggested lab setup, the easier it will be to follow the Azure WAF testing procedures.
- Completion of the reconnaissance playbook tutorial
Configuring Burp Suite and Firefox
To inject the POC XSS exploit code in the OWASP Juice Shop application, we will connect to the Kali VM with RDP. Once connected, we will use Burp Suite (Community Edition), a powerful web application security research and analysis tool which is bundled in the Kali Linux distro. In this playbook, we will be using Burp Suite to inspect application requests and responses to understand what happens when injecting the POC XSS payload in the target web application is different scenarios.
Burp Suite works as a client-side proxy and your web browser should point to Burp’s Proxy Listener so, it can intercept requests and responses.
- Sign into the Kali VM using your lab credentials
- Launch the web browser and ensure that you are able to access the OWASP Juice Shop website directly with URL http://owaspdirect-<deployment guid>.azurewebsites.net and also through Azure WAF with URL http://juiceshopthruazwaf.com
- Launch Burp Suite by clicking on Applications on the top left and then click Web Application Analysis –> burpsuite
- In the “Burp Suite Community Edition” window, accept the defaults (Temporary project –> Use Burp defaults –> Start Burp) to start Burp Suite
Figure 1 – Launch Burp Suite

Figure 2 – Launch Burp Suite

- When open, click on Target –> Scope tabs and then add the 2 URLs for the Juice Shop website in the “Include in scope” box. This will setup Burp to only capture requests and responses for these specific websites while excluding traffic going to other destinations
a. http://owaspdirect-<deployment guid>.azurewebsites.net
b. http://juiceshopthruazwaf.com/
- The exclusions in the “Exclude from scope” are optional and will help reduce noise in the capture
a. http://owaspdirect-<deployment guid>.azurewebsites.net/socket.io/
b. http://juiceshopthruazwaf.com/socket.io/

! IMPORTANT: For the scenarios demonstrated in this document, OWASP Juice Shop application was running on HTTP port 3000. This is not the case when you use the Azure WAF Attack Testing Lab Deployment Template as it configures the application to run on port 80, 443 and assigns it a URL. For the lab tutorials, you will connect to the application on HTTP port 80 only. The URL for the application will be http://owaspdirect-<deployment guid>.azurewebsites.net. <deployment guid> is unique to every deployment
- Then click on the Proxy –> Options tabs and verify that Burp Proxy is running on 127.0.0.1:8080

- Click on the Intercept tab and turn off intercept

- Launch Firefox browser on the Kali Linux VM and update the proxy settings to use Burp proxy listener under Menu –> Preferences –> Network Proxy –> Settings –> Manual proxy configuration and point it to 127.0.0.1:8080

Vulnerability Exploitation
After collecting and analyzing web application specific data from the various recon activities to detect vulnerabilities, an attacker can then successfully exploit the identified vulnerabilities with the intent to compromise a user or the application itself to elevate privileges. In this playbook, we will simulate a Cross Site Scripting (XSS) attack against the target application using a proof of concept (POC) exploit payload.
Performing Cross Site Scripting (XSS) Attack against the Target Web Application
In this tutorial, you will perform a Server Side Cross Site Scripting (XSS) attack against the OWASP Juice Shop application two times.
- Scenario 1: Injecting the XSS payload in the target web application directly
- Scenario 2: Injecting the same XSS payload in the same target web application protected by Azure WAF on Application Gateway
Scenario 1: Injecting XSS payload when going to the OWASP Juice Shop Application directly
- Sign into the Kali VM using your lab credentials
- Using Firefox, browse directly to the Juice Shop site by going to http://owaspdirect-<deployment guid>.azurewebsites.net
- In Burp Suite, check the Proxy –> HTTP history tab for request and response data for this website
- Click the website menu icon on the top left and then click on Customer Feedback


! IMPORTANT: For the scenarios demonstrated in this document, OWASP Juice Shop application was running on HTTP port 3000. This is not the case when you use the Azure WAF Attack Testing Lab Deployment Template as it configures the application to run on port 80, 443 and assigns it a URL. For the lab tutorials, you will connect to the application on HTTP port 80 only. The URL for the application will be http://owaspdirect-<deployment guid>.azurewebsites.net. <deployment guid> is unique to every deployment
- In the Comment box of the Customer Feedback form, copy/paste the POC code
<iframe src="x-javascript:alert(`xss`)">
- Give a Rating, respond to the CAPTCHA challenge and click Submit

- Upon clicking Submit, you should see a Thank you message

- Switching back to Burp, we can see the following request and response for the Feedback that we submitted in Step 4 above
Figure 1 – Request with XSS Payload in Burp Suite

Figure 2 – Successful Response from Juice Shop in Burp Suite

Raw Request and Response – Headers and Body
Request
|
Response
|
POST /api/Feedbacks/ HTTP/1.1
Host: juiceshopdirect.com:3000
User-Agent: Mozilla/5.0 (X11; Linux x86_64; rv:60.0) Gecko/20100101 Firefox/60.0
Accept: application/json, text/plain, */*
Accept-Language: en-US,en;q=0.5
Accept-Encoding: gzip, deflate
Referer: http://juiceshopdirect.com:3000/
Content-Type: application/json
Content-Length: 105
Cookie: io=LsYFH7-IUxnCTaU5AAAW; language=en; welcomebanner_status=dismiss; cookieconsent_status=dismiss
Connection: close
{“captchaId”:7,”captcha”:”3″,”comment”:”<iframe src=”javascript:alert(`xss`)”> (anonymous)”,”rating”:3}
|
HTTP/1.1 201 Created
Access-Control-Allow-Origin: *
X-Content-Type-Options: nosniff
X-Frame-Options: SAMEORIGIN
Feature-Policy: payment ‘self’
Location: /api/Feedbacks/11
Content-Type: application/json; charset=utf-8
Content-Length: 205
ETag: W/”cd-jaYV3gaD4F+1IP1EkEdoiAcNqfQ”
Vary: Accept-Encoding
Date: Sat, 10 Oct 2020 23:51:52 GMT
Connection: close
{“status”:”success”,”data”:{“id”:11,”comment”:”<iframe src=”javascript:alert(`xss`)”> (anonymous)”,”rating”:3,”updatedAt”:”2020-10-10T23:51:52.834Z”,”createdAt”:”2020-10-10T23:51:52.834Z”,”UserId”:null}}
|
- The 201 Created response code with a successful status tells us that the malicious POC XSS payload was stored successfully by the web application. We can now check if the XSS exploit is indeed working by going to the About Us page of the application. On this page, in addition to the company information, customer feedback is also displayed with rating and comments
- As shown in image on the right below, as soon as we browse to the About Us page, we see the pop-up with indicates that the exploit is working as expected

Scenario 2: Injecting XSS payload when going to the OWASP Juice Shop Application through Azure WAF
We will now attempt to perform the injection of the same XSS payload in the Customer Feedback form on the Juice Shop website when going through Azure WAF on Application Gateway.
- On Kali VM, launch a new instance of Firefox and browse to the Juice Shop website published through Application Gateway and protected with Azure WAF by going to http://juiceshopthruazwaf.com/
- In Burp Suite, check the Proxy –> HTTP history tab for the request and response data for this website
- Tip: To see the latest request/response, sort by #
- In the browser window, click on the website menu icon on the top left and then click on Customer Feedback
- In the Comment box of the Customer Feedback form, copy/paste the POC code
<iframe src="x-javascript:alert(`xss`)">
- Give a Rating, respond to the CAPTCHA challenge and click Submit

6. Upon clicking Submit, you will observe that the thank you message does not show up this time
- Tip: The web application does not provide an error response in this scenario. This is due to the behavior of the Juice Shop application
7. Switching back to Burp, we can see the following request and response for the Feedback that we submitted in Step 5 above
Figure 1 – Request with XSS Payload in Burp Suite

Figure 2 – 403 Forbidden Response from Application Gateway in Burp Suite

Raw Request and Response – Headers and Body
Request
|
Response
|
POST /api/Feedbacks/ HTTP/1.1
Host: juiceshopthruazwaf.com
User-Agent: Mozilla/5.0 (X11; Linux x86_64; rv:60.0) Gecko/20100101 Firefox/60.0
Accept: application/json, text/plain, */*
Accept-Language: en-US,en;q=0.5
Accept-Encoding: gzip, deflate
Referer: http://juiceshopthruazwaf.com/
Content-Type: application/json
Content-Length: 107
Cookie: io=ygD2rhS_-3S5-Q_vAAF2; language=en; welcomebanner_status=dismiss; cookieconsent_status=dismiss
Connection: close
{“captchaId”:14,”captcha”:”-6″,”comment”:”<iframe src=”javascript:alert(`xss`)”> (anonymous)”,”rating”:3}
|
HTTP/1.1 403 Forbidden
Server: Microsoft-Azure-Application-Gateway/v2
Date: Sun, 11 Oct 2020 02:26:32 GMT
Content-Type: text/html
Content-Length: 179
Connection: close
<html>
<head><title>403 Forbidden</title></head>
<body>
<center><h1>403 Forbidden</h1></center>
<hr><center>Microsoft-Azure-Application-Gateway/v2</center>
</body>
</html>
|
- The 403 Forbidden response from the Application Gateway tells us that the request with the POC XSS payload was blocked by Azure WAF
Understanding What Happened
Upon reviewing the HTTP requests and responses for the two attempts to inject POC XSS payload to the same instance of the Juice Shop application, we see the pattern as shown in the below table. This clearly indicates that the malicious XSS payload which could otherwise be stored in the application is not allowed through by Azure WAF.
XSS Exploitation Route
|
Success
|
Direct
|
Yes
|
Through WAF
|
No
|
Now let us use the Azure Monitor Workbook for WAF to understand how the WAF handled traffic with the XSS payload. This workbook visualizes security relevant WAF events across several filterable panels. It works with all WAF types, including Application Gateway, Front Door, and CDN, and can be filtered based on WAF type or a specific WAF instance.
Click here to deploy Azure Monitor Workbook for WAF to your subscription in Azure.
- Tip: To understand what is happening when traffic with XSS payload destined for the Juice Shop application goes through the Azure WAF, you can also examine the log entries associated with ApplicationGatewayFirewallLog in the Azure Monitor
Reviewing WAF logs in the Workbook
- You can access the WAF workbook by going into the Workbook blade and then selecting the WAF workbook deployed for this testing. Once in the workbook, ensure that you have selected the appropriate Time Range, WAF Type and WAF Items

- You should also ensure that you have selected the correct Public IP address for your attacker machine (Kali VM) in the Top 10 Attacking IP Addresses, filter to single IP address pane
- Tip: If you are using the Azure WAF Attack Testing Lab Environment Deployment Template and have followed the lab setup instructions then the client IP address will be the public IP address of the Azure Firewall in your demo environment

- After selecting the correct client IP, we scroll back up to the top of the Workbook and review the visualizations at the top, in the WAF Workbook. Following are the sections of the workbook we will be using as called out in the figure below
a. WAF actions filter
b. Top 40 Blocked Request URI addresses, filter to single URI address
c. Top 50 event trigger, filter by rule name
d. Message, full details

Note: For a detailed overview of these sections of the WAF workbook, please refer to the Overview of the Workbook Sections in the previous tutorial, Reconnaissance Playbook
- From the sliced data in the WAF workbook, we can see that two requests to the /api/Feedbacks/ URI were blocked by WAF. Upon reviewing the Top 50 event trigger, filter by rule name we see all the rules which evaluated the POC XSS payload in the request; the Message, full details section shows that the traffic was blocked by Mandatory rule because the Anomaly Score threshold was exceeded (Total Score: 53, XSS=35) with XSS attack being the closest match
- The below table shows an extract of the Top 50 event trigger, filter by rule name output for request with the XSS traffic. This data shows that the WAF evaluated the POC payload in the HTTP request to detect XSS injection and therefore blocked it
Rule
|
count_
|
Remote Command Execution: Unix Shell Expression Found
|
1
|
XSS Attack Detected via libinjection
|
1
|
XSS Filter – Category 4: Javascript URI Vector
|
1
|
NoScript XSS InjectionChecker: HTML Injection
|
1
|
NoScript XSS InjectionChecker: Attribute Injection
|
1
|
IE XSS Filters – Attack Detected.
|
1
|
XSS Filter – Category 5: Disallowed HTML Attributes
|
1
|
Possible XSS Attack Detected – HTML Tag Handler
|
1
|
SQL Injection Attack: SQL Tautology Detected.
|
1
|
Detects basic SQL authentication bypass attempts 3/3
|
1
|
Restricted SQL Character Anomaly Detection (args): # of special characters exceeded (12)
|
1
|
Key Takeaway
Cross Site Scripting (XSS) is one of the most common type of application security vulnerability and an external adversary can easily exploit a vulnerable application to compromise the application and its users to elevate their privileges.
For web applications secured with it, Azure WAF can protect against XSS attacks by detecting and blocking XSS payload at the network edge, with its out of the box ruleset.
by Contributed | Jan 14, 2021 | Technology
This article is contributed. See the original author and article here.
Tutorial: Setup an Azure WAF Security Protection and Detection Lab
The purpose of the Azure WAF security protection and detection lab tutorial is to demonstrate Azure Web Application Firewall (WAF) capabilities in identifying, detecting, and protecting against suspicious activities and potential attacks against your Web Applications. This first tutorial in a four-part series walks you through creating a lab environment for testing against Azure WAF’s protections. This lab focuses on the OWASP protection ruleset and logging capabilities of Azure WAF. The lab does not include advanced application security concepts and is not intended to be a reference for application security testing as these areas are broader than the use cases demonstrated herein. For more information about each tutorial in this series, refer to the previous section, Tutorial Overview.
In this tutorial you will:
- Deploy a demo test environment in Azure
- Deploy Azure Monitor Workbook for WAF
- Enable desktop environment on Linux VM
- Create host file entries to resolve host names
Prerequisites
- An Azure subscription to deploy the Azure WAF Attack Testing Lab Environment Deployment Template
- A Log Analytics workspace to send all diagnostic logs
- Azure Monitor Workbook for WAF deployed to the same workspace
- Familiarity with Azure Application Gateway WAF
Deployment Steps
- Click here to deploy the lab environment to your Azure subscription
- Click here to deploy the Azure Monitor Workbook for WAF to your Azure subscription
- Tip: For more information, refer to the detailed deployment instructions here – Deploying Network security demo environment
- Please refer to the above document for deployment instructions only and do not use the deployment template linked in it. The deployment template used in these lab tutorials is different from the one used in the deployment instructions document
Recommendations
We recommend using the Azure WAF Attack Testing Lab Environment Deployment Template as it already contains all the components needed for this lab including a customized version of the OWASP Juice Shop application. The closer your lab is to the suggested lab setup, the easier it will be to follow the Azure WAF testing procedures. After deployment and minimum configuration steps, you will be ready to perform actions with the suggested hacking research tools and review Azure WAF’s protections against those malicious actions.
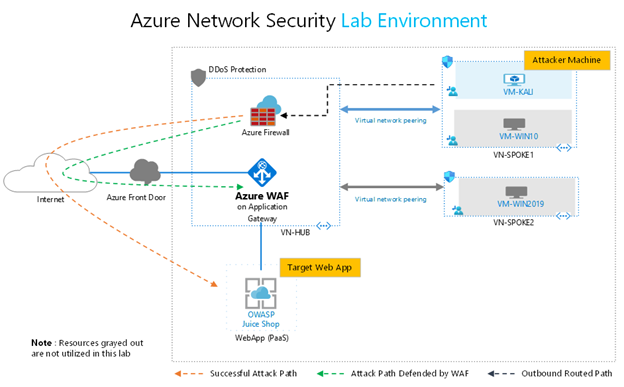
When using the Azure WAF Attack Testing Lab Environment Deployment Template, additional resources such as VMs and Azure Front Door will be deployed. The below diagram represents resources in the environment which are utilized in this lab. The resources which are not used in this lab have been grayed out (VMs, Azure Front Door, DDoS Protection).
! IMPORTANT: This environment will be used as the baseline for the remainder of this document and the tutorial
In this setup, traffic from the attacker machine (Kali VM) will be routed to the internet through the Azure Firewall. Successful attack path is one where malicious data is sent directly by the attacker to the OWASP Juice Shop web application leading to successful exploitation. Attack path defended by WAF represents the path where malicious data is inspected by Azure WAF (on Azure Application Gateway) and blocked with its out of the box ruleset before it reaches the web application.
You can also use a preexisting environment for this lab. For completing these tutorials, your environment must have the following key components:
- An instance of the customized OWASP Juice Shop web application with an internet accessible endpoint
- An instance of Application Gateway with Azure WAF which publishes the OWASP Juice Shop web application to the internet
- An attacker machine (VM) with common hacking tools and internet connectivity. We use Kali Linux as the attacker VM
If manually deploying the components required for this tutorial, your complete lab setup should look as similar as possible to the following diagram:
Resources
The below table details the resources needed from all resources deployed with the Azure WAF Attack Testing Lab Environment Deployment Template.
Resource
|
Name
|
IP Address Type
|
Purpose
|
Virtual Machine
|
VM-Kali
|
Private only
|
Attacker VM (Kali Linux) with preinstalled vulnerability and penetration testing tools
|
Firewall
|
SOC-NS-FW
|
Private & Public
|
Azure Firewall for outbound and inbound traffic restrictions and inspection
|
Azure WAF on Application Gateway
|
SOC-NS-AG-WAFv2
|
Private & Public
|
Azure Web Application Firewall preventing threats to the OWASP web application published through Application Gateway
|
OWASP WebApp
|
owaspdirect-<deployment guid>.azurewebsites.net
|
Public only
|
OWASP Juice Shop Application. An open source web application with built in security vulnerabilities and CFT challenges
|
! IMPORTANT: For the scenarios demonstrated in this document, OWASP Juice Shop application was running on HTTP port 3000. This is not the case when you use the Azure WAF Attack Testing Lab Environment Deployment Template as it configures the application to run on port 80, 443 and assigns it a URL. For the lab tutorials, you will connect to the application on HTTP port 80 only. The URL for the application will be http://owaspdirect-<deployment guid>.azurewebsites.net.
- Tip: As it is a security best practice, we strongly recommend that you change the default lab password after deployment
Configuration
Additional configuration is required on the Kali Linux VM before getting started on the lab exercises. The Kali VM in this lab environment needs remote desktop environment installed and configured. Please complete the steps in the order outlined below.
Updating Kali Linux and Installing Desktop Environment
- Launch PowerShell on your local machine and run the following command to connect to the Kali VM
ssh svradmin@<Public IP Address of Azure Firewall>
<Type your password when prompted to login>
- Tips:
- You can find the public IP of Azure Firewall in the Azure Portal under Resource Group –> SOC-NS-FW –> Public IP configuration
- You can also use Putty client on your local machine to connect to the Kali VM
- Once connected to the Kali VM with SSH, run the following command to update the Kali Linux distro
sudo apt-get update
<Type your password when prompted>
- Once the Kali Linux distro is updated, run the following command to install and configure the remote desktop server on the Kali VM
a. sudo apt-get -y install xrdp
b. sudo systemctl enable xrdp
c. echo xfce4-session >~/.xsession
d. sudo service xrdp restart
- Upon completing the abovementioned steps, you should be able to connect to the Kali VM over RDP on port 33892
a. Connect to the Kali VM over RDP by using the following IP address and port combination
<Public IP Address of Azure Firewall>:33892
b. When prompted to choose the setup for the first startup, click to select “Use default config”

c. You can now close your SSH session to the Kali VM by typing “exit” in the SSH session running in PowerShell
- Create an entry in the HOSTS file on Kali VM to map a name to the Public IP address of the OWASP Juice Shop site published on Application Gateway
a. Launch Terminal and run the following command
sudo nano /etc/hosts
<Type your password when prompted>
b. Create the following entry

c. Save the hosts file and exit
Use Ctrl+S to save and Ctrl+X to exit
- Tip: You can find public IP of the Application Gateway in the Azure Portal under Resource Group –> SOC-NS-AG-WAFv2 –> Frontend Public IP address
Next Steps
Before proceeding to the next tutorial, take a few mins to review the following
- OWASP Juice Shop publishing rule on Application Gateway
- Web Application Firewall configuration on Application Gateway
- Test connectivity to the OWASP Juice Shop website when accessing the application directly and when going to it through the Application Gateway
- Tip: You can find the public URL of the deployed Juice Shop app in the Azure Portal under Resource Group –> owaspdirect-<guid> –> URL
by Contributed | Jan 14, 2021 | Technology
This article is contributed. See the original author and article here.
Introduction
Customers often want to test and validate the capabilities of products before using them in mission critical environments. Same is true for Azure Web Application Firewall (WAF), where customers often have a need to test its security capabilities and validate their effectiveness before deciding to secure their production workloads with it.
To enable customers in rapidly validating the effectiveness of Azure WAF against real world web application attacks, we have designed this four-part lab tutorial. Part one of the tutorial provides guidance to quickly deploy a test environment with all required components. Parts two through four provide step by step walkthroughs for attacking a vulnerable web application with common, real-world, publicly available hacking and attack tools.
Tutorial Overview
The purpose of the Azure WAF security protection and detection lab tutorial is to demonstrate Azure Web Application Firewall (WAF) capabilities in identifying, detecting, and protecting against suspicious activities and potential attacks against your Web Applications. In this four-part tutorial, you will learn how to
- Configure the working environment to test Azure WAF protection against web application attacks
- Emulate an adversary by attacking and exploiting a vulnerable web application using step by step instructions
- Review Azure Monitor Workbook for WAF to understand WAF detection and processing logic for specific attack patterns used in every tutorial
The lab tutorials provide walkthroughs for running successful attacks against the vulnerable OWASP Juice Shop web application when it is exposed to the internet directly, without Azure WAF. The tutorials then also demonstrate effectiveness of Azure WAF on Application Gateway in blocking the same attacks against the same instance of the vulnerable OWASP Juice Shop Application when it is protected by Azure WAF.
This lab focuses on the OWASP protection ruleset and logging capabilities of Azure WAF. The lab does not include advanced application security concepts and is not intended to be a reference for application security testing as these areas are broader than the use cases demonstrated herein.
Part 1 – Lab Setup
The first tutorial in this four-part series walks you through deploying/creating a lab environment for testing Azure WAF protection and logging capabilities. The tutorial includes information about machines and tools that are needed to set up the lab and complete its playbooks. The instructions assume you are comfortable with deploying and administering resources in Azure and have some familiarity with web application security concepts. The closer your lab is to the suggested lab setup, the easier it will be to follow Azure WAF testing procedures. When your lab setup is complete, use the Azure WAF Security Protection and Detection playbooks for testing.
Setup an Azure WAF Attack Testing Lab
Part 2 – Reconnaissance Playbook
The second tutorial in this four-part series is a reconnaissance playbook. Reconnaissance activities allow attackers to gain a thorough understanding and complete mapping of your web application for later use. The playbook shows Azure WAF capabilities in identifying, detecting, and protecting against suspicious activities from potential recon attacks using examples from common, publicly available hacking and attack tools.
Reconnaissance Playbook
Part 3 – Vulnerability Exploitation Playbook
The vulnerability exploitation playbook is third in the four-part tutorial series. In the exploitation phase, an attacker attempts to exploit known or a previously identified vulnerability with intent to elevate privileges. As you run through this playbook, you will see Cross Site Scripting (XSS) detections and rules get triggered on Azure WAF from the attack you will simulate in your lab.
Cross Site Scripting (XSS) attacks are performed against web applications with the intent of compromising end users or the application itself.
Vulnerability Exploitation Playbook
Part 4 – Data Disclosure and Exfiltration Playbook
The last tutorial in the four-part series is the data exfiltration playbook. During the data exfiltration phase, an attacker has already gained access to your application backend and attempts to disclose and copy sensitive data. You will simulate an SQL Injection (SQLi) attack to see the attack detection and protection capability of Azure WAF.
SQL Injection (SQLi) attacks are performed against web applications with the intent of exposing/exfiltrating sensitive application and user data.
Data Disclosure and Exfiltration Playbook
by Contributed | Jan 14, 2021 | Technology
This article is contributed. See the original author and article here.
We’re pleased to announce that the Microsoft Information Protection SDK version 1.8 is now generally available via NuGet and Download Center.
Highlights
This release of the Microsoft Information Protection SDK we’ve focuses on better support for macOS, as well as quality and performance fixes.
Summary:
- Added support for Mac on ARM.
- Signed all dylib files for Mac.
- All clouds are fully supported across all three SDKs.
- Rename
TelemetryConfiguration to DiagnosticConfiguration.
- Updated
MipContext to accept DiagnosticConfiguration instead of TelemetryConfiguration.
- Exposed new
TelemetryDelegate and AuditDelegate.
- Added support for user-defined labels with double key encryption.
- Added an API,
MsgInspector.BodyType to expose body encoding type for MSG files.
- Added APIs to support Double Key Encryption with User-Defined Permissions.
For a full list of changes to the SDK, please review our change log.
Metadata Updates
In November, we announced that the metadata location for Office files would be moving. While the legacy metadata storage in custom.xml is still in use, Office features will be made available in 2021 that require the new storage location. For more details on this update, please review https://aka.ms/mipsdkmetadata. We encourage you to begin updating, testing, and deploying MIP SDK 1.8 so that your customers, applications, and services can take advantage of these new features as they become available. Also be sure to checkout the MIP SDK FAQ for a section on these changes.
Java Support
In MIP SDK 1.7, we announced the public preview of our Java wrapper. We aren’t quite ready to announce that it’s generally available, yet, and will continue to look for feedback as we start work on MIP SDK 1.9.
The Java Wrapper for MIP SDK 1.8 now supports streams. You’ll no longer be required to pass in files directly.
Wrap Up
As always, we appreciate your support, feedback, and efforts to integrate the MIP SDK into your applications and services. Here’s a quick recap of some helpful MIP SDK resources.
-Tom Moser
by Contributed | Jan 14, 2021 | Technology
This article is contributed. See the original author and article here.
This document provides an overview of how enterprise customers can deploy Microsoft Teams-DLP for protecting sensitive information that is traversing with-in or outside of the organization. Unified DLP has integration with multiple workloads that help to protect customer data with a single policy. Teams-DLP is one of the workloads within the Unified-DLP console. This guide walks through the different aspects of deploying use cases across content/containers and shows the effectiveness of the unified DLP portal as a single place to define all aspects of your DLP strategy.
In summary, this play book will help to
- Understand the unified console and interface.
- Develop a strategy for deploying Teams-DLP across the organization.
- Provide near real time Alerts with notifications.
- Review various scenarios to test Teams-DLP over chat and channel communication.
This document helps readers plan and protect sensitive information scenarios that normally exist in every organization. This Playbook helps as a user guide to mitigate the risk of exchanging crucial data while communicating over chat or giving access to sites for guest users.
If you have any questions on this play book or suggestions, please reach out to our yammer group at aka.ms/askmipteam
Thank you Pavan and team for writing this!!! :)
by Contributed | Jan 14, 2021 | Technology
This article is contributed. See the original author and article here.
Happy New Year! We are excited to announce that the January 2021 release (1.2020.1219.0) of the MSIX Packaging Tool is now available!
We have released the MSIX Packaging Tool through the Microsoft Store, and are offering the offline download of the tool and license here as well. You can also check out the Quick Create VM to easily get the latest release in a clean environment.
Our January 2021 release features UX improvements to places like Package files and the Select installer page, as well as a full transition to supporting Device Guard Signing version 2. To learn more about the features and fixes we’ve made, you can check out our release notes. If you have any questions, feature ideas, or just want to connect with the Product Team, join our Tech Community. We love connecting and hearing from you, so don’t hesitate to file any feedback with us via the Feedback Hub as well!
Don’t forget about our Insider Program, which gets you early access to releases as they are in development!
Sharla Akers (@shakers_msft)
Program Manager, MSIX
by Contributed | Jan 14, 2021 | Technology
This article is contributed. See the original author and article here.
Authors: Lei Sun, Neta Haiby, Cha Zhang, Sanjeev Jagtap
Documents containing tables pose a major hurdle for information extraction. Tables are often found in financial documents, legal documents, insurance documents, oil and gas documents and more. Tables in documents are often the most important part of the document but extracting data from tables in documents presents a unique set of challenges. Challenges include an accurate detection of the tabular region within an image, and subsequently detecting and extracting information from the rows and columns of the detected table, merged cells, complex tables, nested tables and more. Table extraction is the task of detecting the tables within the document and extracting them into a structured output that can be consumed by workflow applications such as robotic process automation (RPA) services, data analyst tools such as excel, databases and search services.
Customers often use manual processes for data extraction and digitization. However, with the new enhanced table extraction feature you can send a document (PDF or images) to Form Recognizer for extraction of all the information into a structured usable data at a fraction of the time and cost, so you can focus more time acting on the information rather than compiling it.

Table extraction challenges
Table extraction from a wide variety of document images is a challenging problem due to the heterogeneous table structures, diverse table contents, and erratic use of ruling lines. To name a few concrete examples, in financial reports and technical publications, some borderless tables may have complex hierarchical header structures, contain many multi-line, empty or spanned cells, or have large blank spaces between neighboring columns. In forms, some tables may be embedded in other more complex tabular objects (e.g., nested tables) and some neighboring tables may be very close to each other which makes it hard to determine whether they should be merged or not. In invoices, tables may have different sizes, e.g., some key-value pairs composed tables may contain only two rows/columns and some line-item tables may span multiple pages. Sometimes, some objects in document images like figures, graphics, code listings, structurally laid out text, or flow charts may have similar textures as tables, which poses another significant challenge for successful detection of tables and reduction of false alarms. To make matters worse, many scanned or camera-captured document images are of poor image quality, and tables contained in them may be distorted (even curved) or contain artifacts or noises. Existing table extraction solutions fall short of extracting tables from such document images with high accuracy, which has prevented workflow applications from effectively leveraging this technology.

Form Recognizer Table extraction
In recent years, the success of deep learning in various computer vision applications has motivated researchers to explore deep neural networks like convolutional neural networks (CNN) or graph neural networks (GNN) for detecting tables and recognizing table structures from document images. With these new technologies, the capability and performance of modern table extraction solutions have been improved significantly.
In the latest release of Form Recognizer, we created a state-of-the-art table extraction solution with cutting-edge deep learning technology. After validating that Faster/Mask R-CNN based table detectors are effective in detecting a variety of tables (e.g., bordered or borderless tables, tables embedded in other more complex tabular objects, and distorted tables) in document images robustly, we further proposed a new method to improve the localization accuracy of such detectors, and achieved state-of-the-art results on the ICDAR-2019 cTDaR table detection benchmark dataset by only using a lightweight ResNet18 backbone network (Table 1).
For the challenge of table recognition or table cell extraction, we leveraged existing CNN/GNN based approaches, which have proven to be robust to complex tables like borderless tables with complex hierarchical header structures and multi-line/empty/spanned cells. We further enhanced them to deal with distorted or even slightly curved tables in camera-captured document images, making the algorithm more widely applicable to different real-world scenarios. Figure 1 below shows a few examples to demonstrate such capabilities.

Easy and Simple to use
Try it out with the Form Recognizer Sample Tool.

Extracting tables from documents is as simple as 2 API calls, no training, preprocessing, or anything else needed. Just call the Analyze Layout operation with your document (image, TIFF, or PDF file) as the input and extracts the text, tables, selection marks, and structure of the document.
Step 1: The Analyze Layout Operation –
https://{endpoint}/formrecognizer/v2.1-preview.2/layout/analyze
The Analyze Layout call returns a response header field called Operation-Location. The Operation-Location value is a URL that contains the Result ID to be used in the next step.
Operation location –
https://cognitiveservice/formrecognizer/v2.1-preview.2/prebuilt/layout/analyzeResults/44a436324-fc4b-4387-aa06-090cfbf0064f
Step 2: The Get Analyze Layout Result Operation –
Once you have the operation location call the Get Analyze Layout Result operation. This operation takes as input the Result ID that was created by the Analyze Layout operation.
https://{endpoint}/formrecognizer/v2.1-preview.2/layout/analyzeResults/{resultId}
The output of the Get Analyze Layout Results will provide a JSON output with the extracted table – rows, columns, row span, col span, bounding box and more.
For example:

Get started
by Contributed | Jan 14, 2021 | Technology
This article is contributed. See the original author and article here.
The Set Up
While you have many choices for how to bring your service desk into Teams, AtBot provides the most complete solution to facilitate this integration. A bot in Teams offers users a friendly and intuitive way to ask for help. From being able to answer simple questions, drawing on your existing knowledge base, to providing step-by-step resolution instructions, and ultimately creating and assigning new service tickets for issues that the bot cannot resolve.
In this article, I will be expanding on the technical integrations that can empower your bot in Teams. ServiceNow, Microsoft Cognitive Services and the Power Platform, all brought together into a cohesive solution through AtBot. You can employ this strategy for any bot in Teams, not just your service desk, but for the sake of this article, we will be focusing on IT support.
What Makes a Good Bot
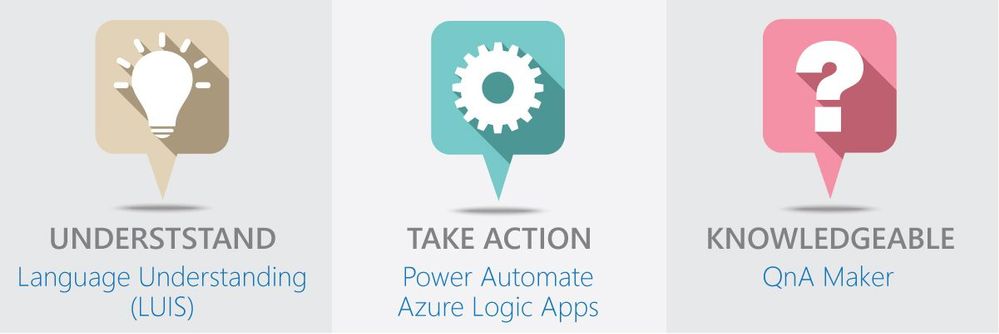
The main thing that makes a bot “good” is the fact that your users continue to use it. If the experience is poor, or users do not get value out of their interactions with the bot, then it will go unused. We believe that there are 3 pillars that breath life into your bot.
Language Understanding
The first pillar is the ability to understand natural language. The bot should not only understand what you are asking or trying to accomplish, but also any key components of your ask that are relevant. For example, if a user states, “I need to have Visio installed on my laptop”, the bot should understand that they need a software installation and that Visio is the software they are in need of.
This capability is accomplished through AtBot’s integration with Microsoft LUIS or Language Understanding Intelligent Service. LUIS is an easy-to-use language modelling service that can be leveraged to give your bots a deep understanding of the natural language that would be used within your organization to ask for services (like software installation).
Knowledge
The second pillar is the bot’s ability to respond to questions with knowledgeable answers. AtBot employs a direct connection to Microsoft QnA Maker to give your bots a knowledge base that can be derived from existing content or managed directly in the QnA Maker portal.
This knowledge base empowers your bot to answer questions with static content like “What is the guest WIFI password” or, “what are the service desk hours?”.
Action
The final pillar of any good bot is its ability to take action on the users’ behalf. Whether it is to create a new incident for the user in ServiceNow or to look up the status of a ticket, the bot should be fully capable of doing these things for the user.
This capability is provided through AtBot’s integration with Power Automate and Azure Logic Apps. AtBot has a standard connector in each of these RPA platforms which allows you to create skills for the bot without having to write any code. This is where our integration with ServiceNow comes in as ServiceNow is an out-of-the-box connector as well. If you can create a flow, you can program your bot using AtBot!
Your 24/7 Tier 1 Support Agent
When you put all this together, you can quickly configure, build, and deploy a bot to Teams which can provide support to your users throughout all hours of the day. The built-in integration with ServiceNow means that your existing flow for incidents can be leveraged and the bot can create and route new tickets accordingly.
The video below is an example of an IT support bot that was built using AtBot to combine the powers of Microsoft Cognitive Services, Power Automate, Teams and ServiceNow. This bot took about 6 hours to build from start to finish.
https://youtube.com/watch?v=-RfpRVsm030
Conclusion
If your organization is using Teams for communication and collaboration, now is the time to start looking at integrating other services through bots and application integrations. ServiceNow is one great example, but through Power Automate you can integrate with other systems as well. From Dynamics to SharePoint, FreshDesk to Azure SQL, integrating with your data is as simple as placing a block inside the flow and making the connection. This is all made possible by the AtBot platform, the no-code solution for building bots for Teams.


Recent Comments