by Contributed | Feb 15, 2021 | Technology
This article is contributed. See the original author and article here.
Hello Folks,
If you have not seen the content our team has put together for our “ITOpsTalks: All things Hybrid” online event? You can still watch all the sessions online. To the point of today’s post. During the OPS117: PowerShell Deep dive session Joey Aiello and Jason Helmick introduced us to Predictive IntelliSense otherwise known as PSReadLine.
PSReadLine replaces the command line editing experience of PowerShell PSReadLine and up. It provides:
- Syntax coloring.
- Simple syntax error notification.
- A good multi-line experience (both editing and history).
- Customizable key bindings.
- Cmd and emacs modes (neither are fully implemented yet, but both are usable).
- Many configuration options.
- Bash style completion (optional in Cmd mode, default in Emacs mode).
- Bash/zsh style interactive history search (CTRL-R).
- Emacs yank/kill ring.
- PowerShell token based “word” movement and kill.
- Undo/redo.
- Automatic saving of history, including sharing history across live sessions.
- “Menu” completion (somewhat like Intellisense, select completion with arrows) via Ctrl+Space.
The “out of box” experience is meant to be very familiar to PowerShell users with no need to learn any new keystrokes.
I really think this is a great new editing experience for anyone working with PowerShell scripts but as I mentioned to Joey during our talk “is there a way to share the PowerShell console history across multiple machines. Jason mentioned that you can pick up the history files and move it around.
I ran a little experiment and it’s working flawlessly. So far… LOL
Preparing Machine 1
Before we start. I use the latest version of PowerShell 7 on all my machines. Yes Windows PowerShell is installed but I did NOT try the following experiment with Windows Powershell. If you are planning on trying this on Windows PowerShell. You will need the 1.6.0 or a higher version of PowerShellGet to install the latest prerelease version of PSReadLine.
Windows PowerShell 5.1 ships an older version of PowerShellGet which doesn’t support installing prerelease modules, so Windows PowerShell users need to install the latest PowerShellGet by running the following commands from an elevated Windows PowerShell session.
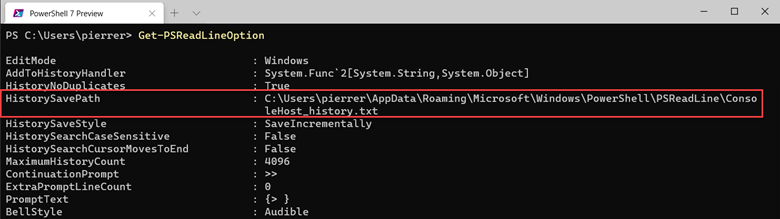
So, once I had PSReadLine installed on my PC I verified the location of my history file by using the Get-PSReadLineOption command.
I copied the “ConsoleHost_history.txt” file to a folder I created in my OneDrive folder.
In my case “D:1drvOneDrivePS-Hystory”. You can put it wherever you want. After copying the file all I needed to do is set the location by using the following command:
Set-PSReadLineOption -HistorySavePath D:1drvOneDrivePS-HystoryConsoleHost_history.txt
Preparing Machine 2
I moved to one of the laptops I use when I travel (which I have not done in a long time), I installed the module,
Install-Module -Name PSReadLine -AllowPrerelease
imported it,
Import-Module PSReadLine
Used the Set-PSReadLineOption cmdlet to customizes the behavior of the PSReadLine module to use the history file.
Set-PSReadLineOption -PredictionSource History
And checked my settings.

Finalizing settings
Just to ensure that the folder on all my machines would always be updated I set the properties on the folder to “Always keep on this device” on all my machines.

Now I have a shared history file on all my PCs. This was fun and will be useful.
Cheers!
Pierre
by Contributed | Feb 15, 2021 | Technology
This article is contributed. See the original author and article here.
Hi Everyone!
My name is Fabian Scherer, Customer Engineer (CE – formerly known as PFE) at Microsoft Germany for Microsoft Endpoint Manager related topics. In some of my previous engagements I have been analysing and troubleshoot Site Maintenance Task related problems and developed a strategy to improve Site Maintenance Tasks.
This blog post will cover the following topics:
- What are Site Maintenance Tasks
- Sources and helpful commands
- Ensure all Site Maintenance Tasks are up and running
- Check the defined timespans
- Synchronize a global MEMCM hierarchy
- Disable Site Maintenance Tasks for Hierarchy Updates
What are Site Maintenance Tasks
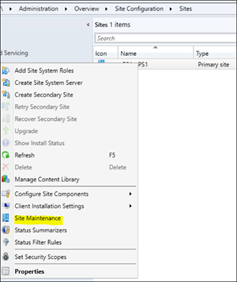
The MEMCM built-in Maintenance Tasks can be configured and used to automatically clean up obsolete and old data from your Configuration Manager database. The Site Maintenance Tasks are located at:
Administration > Overview > Site Configuration > Sites > Properties > Site Maintenance

Starting with Configuration Manager Version 1906, there is an additional category at the bottom of the console.

If you open one of these tasks, you can enable/disable it, define the data scope (e.g. the age of data) and the schedule, in which this task attempts to run and perform the intended operation. Note: You cannot define the exact start time of the individual task. Configuration Manager controls the amount and sequence of all scheduled tasks and continuously evaluates, if there is enough time left to start and complete the next task within the allowed timeframe.
If there is an open slot during the defined timeframe, the task will be executed. If the timeframe is over or nears to end shortly, the task will or may not be started and waits until the next scheduled run. Only the ‘Backup SMS Site Server’ Task will terminate other running tasks, to ensure and enforce its own completion.
Sources and Helpful Commands
Microsoft Documentation:
Maintenance tasks for Configuration Manager
Reference for maintenance tasks in Configuration Manager
Related Logs:
%MECM_installdir%Logssmsdbmon.log
SQL Execution Status:
Select * from SQLTaskStatus
Enforce a Site Maintenance Task to ‘run now’:
Powershell (Credits go to Herbert Fuchs for this script):
$SiteCode = 'FOX'
$MT = Get-CMSiteMaintenanceTask -SiteCode $SiteCode -Name 'Delete Aged Scenario Health History'
$MethodParam = New-Object 'System.Collections.Generic.Dictionary[String,Object]'
$MethodParam.Add('SiteCode',$($SiteCode))
$MethodParam.Add('TaskName',$($MT.TaskName))
$ConfigMgrCon = Get-CMConnectionManager
$ConfigMgrCon.ExecuteMethod('SMS_SQLTaskStatus','RunTaskNow',$MethodParam)
SQL:
Update SQLTaskStatus set RunNow = '1' where taskName = '$TaskName'
Get Runtime:
SQL:

SELECT *,
DATEDIFF(ss,LastStartTime,LastCompletionTime)
AS Runtime from SQLTaskStatus
Where LastStartTime like '%2021%'
/*Available Timespans:
hour hh
minute mi, n
second ss, s
millisecond ms
microsecond mcs
nanosecond ns*/
Ensure all Site Maintenance Tasks are up and running
Using the Get Runtime SQL Query will give you an overview of all Site Maintenance Tasks on your Site with a LastStartTime timestamp in 2021.

If you find a task with a negative value in the ‘Runtime’ column, it’s an indicator that the task is not running properly and did not complete successfully on the last attempt (please ignore the ‘Evaluate Provisioned AMT Computer Certificates’ if it shows up, it’s an outdated task).
To fix a maintenance task with negative runtime, you can use the “Enforce a Site Maintenance Task to ‘run now’” Powershell Script or SQL Query to trigger the task immediately, regardless of its defined schedule:


After this task is completed, the data is cleaned up and removed from the database. If this task is still failing, you will have to start troubleshooting the specific task.
The most common reason for a failing task, is when its overlapping with other tasks. Sometimes the task cannot be started during the defined timeframe or will be terminated by the “Backup SMS Site Server” task, which will result in the intended data not getting cleaned up and will continue to pile up. This may kick off an avalanche of problems coming your way.
Check the defined timespans
The most challenges are:
- Ensure that all Site Maintenance Tasks are running
- Ensure that there are no blocking tasks
- Synchronize the tasks with the backup
- Ensure that the load is evenly balanced
So I recommend all to build a view (Example Excel Sheet is attached) and enter the ‘external’ indicators like:
- Distribution Point Content Validation
- Collection Evaluation
- External SQL Backup
- Maintenance Scripts (for example Ola Hallengren)

After that, you should add the Active Site Maintenance Tasks and the Runtime for this Site:

Now you can start to plan the Site Maintenance Tasks. I prefer a system where ‘related categories’ get consolidated and the runtime does not exceed 50% of the defined timeslot:

Summarized Categories:
- Specific Site Cleanup Tasks
- The Central Administration Site and the Primary Site got separated Tasks which are only vailable on the specific Site Role
- Client related Information Cleanup
- Delete all Client related stuff
- Replication Data
- All Data which has to be replicated at the Infrastructure
- Maintenance Scripts
- Like Ola Hallengren SQL Maintenance Scripts
- Backup
Synchronize a Global MECM hierarchy
I recommend to synchronize the Site Maintenance Task Timeslots in a hierarchy.
This will benefit in:
- Minimizing the administrative effort
- Minimizing the replication data
- Minimizing the replication time, especially during a Disaster Recovery
This is quite easy if you have a hierarchy running in the same time zone. If you are running a global hierarchy, I would recommend using the time zone of your CAS as the baseline time and calculate to synchronize it with the other time zones of your primary sites (Example: CAS runs in EMEA and the Primary Site on UTC +6):

Now you can simply copy/paste the timespans to the other time zone and synchronize the global Replication Data.
Disable Site Maintenance Tasks for Hierarchy Updates
It’s a Microsoft recommendation to ensure that no Site Maintenance Tasks are running during an MECM hierarchy update. To ensure this I recommend to disable all Tasks. But the work doing this manually step by step is a time wasting action so I would like to share three Powershell scripts with you to disable the Tasks:
Preparation:
Copy the attached Scripts to your Server and create the following Folders:
Edit the following Points at the Scripts:
- $Sitecode (Script 1)
- $ProviderMachineName (Script 1)
- %Scriptpath% (Script 1, 2, 3)
1_Get_Site_Maintenance_Tasks.ps1
This is the first script will create an .csv file with all Site Maintenance Task values. If you run it the second time it will backup your existing .csv File to the Backup folder. This ensures that no data is lost when someone runs this script on the wrong time.
$SiteCode = "XYZ"
$ProviderMachineName = "Servername.FQDN"
$ExportFile = "%Scriptpath%DataSiteMaintenanceValues.csv"
$Bkup = "%Scriptpath%BackupSiteMaintenancesValues_"+[DateTime]::Now.ToString("ddMMyyyy_hhmmss")+".csv"
if (Test-Path $ExportFile)
    {
        Copy-Item -Path $ExportFile -Destination $Bkup
        Remove-Item $ExportFile
    }
$initParams = @{}
if((Get-Module ConfigurationManager) -eq $null)
    Import-Module "$($ENV:SMS_ADMIN_UI_PATH)..ConfigurationManager.psd1" @initParams
}
if((Get-PSDrive -Name $SiteCode -PSProvider CMSite -ErrorAction SilentlyContinue) -eq $null) {
    New-PSDrive -Name $SiteCode -PSProvider CMSite -Root $ProviderMachineName @initParams
}
Set-Location "$($SiteCode):" @initParams
Get-CMSiteMaintenanceTask | Export-csv $ExportFile
2_Disable_Site_Maintenance_Tasks.ps1
This script is the second one and will disable all enabled Tasks except ‘Update Application Catalog Tables’ which are marked es -enabled out of the .csv of the first script.
$Values = Import-CSV "%Scriptpath%DataSiteMaintenanceValues.csv"
$Log = "%Scriptpath%LogsDisable_SiteMaintenanceTasks.log"
$Time = Get-Date -Format "dd-MM-yyyy // hh-mm-ss"
"$Time New Run - Set back to default Values." | out-file "$Log" -Append

foreach ($Item in $Values)
{
$SiteCode = $Item.Sitecode
$ProviderMachineName = $Item.PSComputerName
$DeleteOlderThan = $Item.DeleteOlderThan
$DeviceName = $Item.DeviceName
$Name = $Item.TaskName
"Start working at $Name on $SiteCode." | out-file $log -Append
$initParams = @{}
if((Get-Module ConfigurationManager) -eq $null) {
    Import-Module "$($ENV:SMS_ADMIN_UI_PATH)..ConfigurationManager.psd1" @initParams
}
if((Get-PSDrive -Name $SiteCode -PSProvider CMSite -ErrorAction SilentlyContinue) -eq $null) {
    New-PSDrive -Name $SiteCode -PSProvider CMSite -Root $ProviderMachineName @initParams
}
Set-Location "$($SiteCode):" @initParams
Set-CMSiteMaintenanceTask -SiteCode $SiteCode -MaintenanceTaskName $Name -Enabled 0
"Finished $Name on $SiteCode" | out-file $log -Append
"---" | out-file $log -Append
}
3_Enable_Site_Maintenance_Tasks.ps1
This is the third script and should run after the Update is done. It will enable all -enabled marked Site Maintenance Tasks except of “Backup SMS Site Server”. The “Backup SMS Site Server” has to be enabled manually. This is caused by the .csv backuped data. If you run an Environment with an delocated SQL Server the Backup Path Value will be stored as “F:SCCM_Backup|Y:SQL_Backup” and Powershell is unable to work with the pipe at the Value. I also prepared the opportunity to write the settings back but it’s not necessary because the values will be saved at the Infrastructure.
$Values = Import-CSV "%Scriptpath%DataSiteMaintenanceValues.csv"
$Log = "%Scriptpath%LogsEnable_SiteMaintenanceTasks.log"
$Time = Get-Date -Format "dd-MM-yyyy // hh-mm-ss"
"$Time New Run - Set back to default Values." | out-file "$Log" -Append
foreach ($Item in $Values)
{
$SiteCode = $Item.Sitecode
$ProviderMachineName = $Item.PSComputerName
$DeleteOlderThan = $Item.DeleteOlderThan
$DeviceName = $Item.DeviceName
$Name = $Item.TaskName
$Enabled = $Item.Enabled
if ($Enabled -eq 'TRUE')
    {
        "Start working at $Name on $SiteCode." | out-file $log -Append
        $initParams = @{}
        if((Get-Module ConfigurationManager) -eq $null) {
            Import-Module "$($ENV:SMS_ADMIN_UI_PATH)..ConfigurationManager.psd1" @initParams
        }
        if((Get-PSDrive -Name $SiteCode -PSProvider CMSite -ErrorAction SilentlyContinue) -eq $null) {
            New-PSDrive -Name $SiteCode -PSProvider CMSite -Root $ProviderMachineName @initParams
        }
        Set-Location "$($SiteCode):" @initParams
        if ($Name -eq "Backup SMS Site Server")
           {
                "$Name could not be restored." | out-file $log -Append
                "---" | out-file $log -Append
            }
        else
            {
                Set-CMSiteMaintenanceTask -Name $Name -Enabled 1 -SiteCode $SiteCode
            }
        "Enabled $Name on $SiteCode" | out-file $log -Append
        "---" | out-file $log -Append
    }
else
    {
        "$Name on $SiteCode is deactivated per Design and will be skipped." | out-file $log -Append
        "---" | out-file $log -Append
    }
}
Fabian Scherer
CE
Disclaimer
The sample scripts are not supported under any Microsoft standard support program or service. The sample scripts are provided AS IS without warranty of any kind. Microsoft further disclaims all implied warranties including, without limitation, any implied warranties of merchantability or of fitness for a particular purpose. The entire risk arising out of the use or performance of the sample scripts and documentation remains with you. In no event shall Microsoft, its authors, or anyone else involved in the creation, production, or delivery of the scripts be liable for any damages whatsoever (including, without limitation, damages for loss of business profits, business interruption, loss of business information, or other pecuniary loss) arising out of the use of or inability to use the sample scripts or documentation, even if Microsoft has been advised of the possibility of such damages.
by Contributed | Feb 14, 2021 | Technology
This article is contributed. See the original author and article here.
This is a condensed form of the article originally published on the Visual Azure site. It’s part of an effort to explain technology concepts using visual vocabularies, including sketchnotes!
Background
Recently, I came across the Microsoft 2020 Environment Sustainability Report and had a chance to check out this review of the progress made towards the sustainability goals that had been laid out in the Jan 2020 announcement from Microsoft leadership. I had already decided I wanted to spend more time this year in understanding environmental issues and sustainability solutions in both tech and community contexts. And I needed to start by understanding basic concepts and terminology.
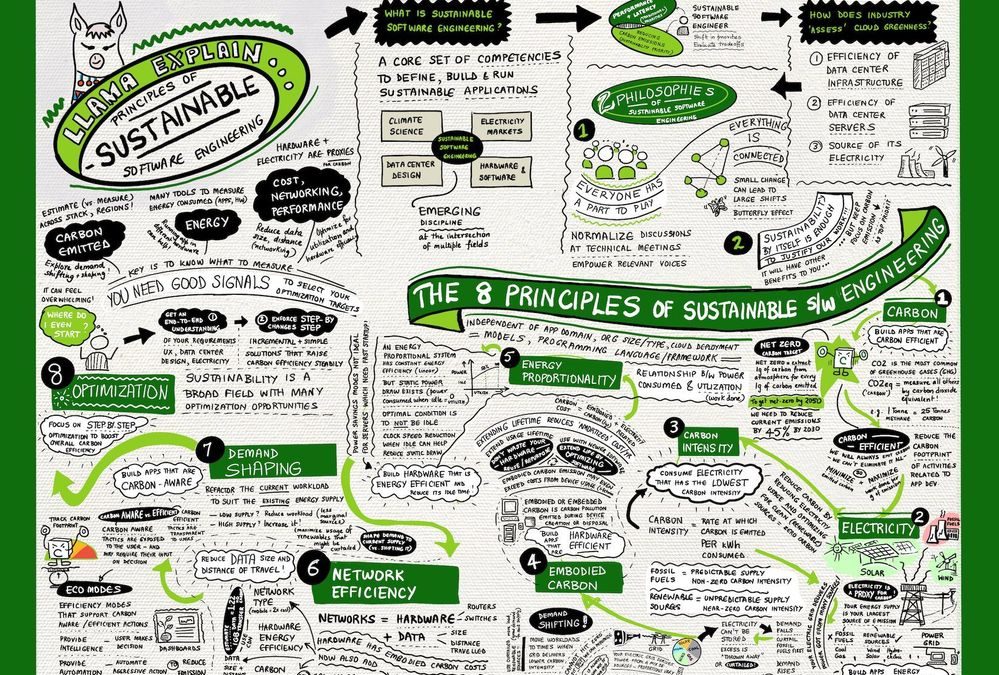
Thankfully, my colleagues from the Green Advocacy team in Developer Relations had recently released a Microsoft Learn Module covering the Principles of Sustainable Software Engineering. So I did what I always do when I want to learn something and retain that knowledge in meaningful ways for later recall — I sketch-noted it!
The Big Picture
As a visual learner, I’ve found that capturing information in one sheet helps me grasp “the big picture” and make connections to other ideas that I learn about in context. So here’s the sketch-note of the module. You can download a high-resolution version at the Cloud Skills: Sketchnotes site, and read a longer post about what I learned on my Visual Azure blog.

Key Takeaways
The module describes the 2 core philosophies and 8 core principles of sustainable software engineering.
Let’s start with the core philosophies:
How I think about this:
- Butterfly Effects. Even the smallest individual action can have substantial collective impact. In that context, educating ourselves on the challenges and principles is critical so that we can apply them, in whatever small ways we can, to any work we do in the technology or community context.
- Duty to Protect. We have just this one planet. So even though sustainability may have other side-effects that are beneficial or profitable, our main reason for doing this is the core tenet of sustainability itself. We do it because we must, and all other reasons are secondary.
As for the 8 principles, this is what I took away from my reading:
- Carbon. Short for “carbon dioxide equivalent”, carbon is a measure by which we evaluate the contribution of various activities to greenhouse gas emissions that speed up global warming.
- Electricity. Is a proxy for carbon. Our power grid contains a mix of both fossil fuels (coal, gas) and renewables (wind, solar, hydroelectric) where the latter emit zero carbon but have a less predictable supply.
- Embodied Carbon. Is the carbon footprint associated with creation and disposal of hardware. Think of embodied carbon as the fixed carbon cost for hardware, amortized over its lifetime. Hardware is viewed as a proxy for carbon.
- Carbon Intensity. Is the proportion of good vs. bad energy sources in our energy grid. Because renewable energy supply varies with time and region (e.g., when/where is the sun shining), carbon intensity of workloads can also vary.
- Energy Proportionality. Is a measure of power consumed vs. the utilization (rate of useful work done). Idle computers consume power with no (work) value. Energy efficiency improves with utilization as electricity is converted to real work.
- Demand Shaping. Given the varying carbon intensity with time, demand shaping optimizes the current workload size to match the existing energy supply – minimizing the curtailing of renewables and reliance on marginal power sources.
- Network Efficiency. Is about data transmission and the related hardware and electricity costs incurred in that context. Minimizing data size and number of hops (distance travelled) in our cloud solutions is key to reducing carbon footprint.
- Optimization. Is about understanding that there are many factors that will contribute to carbon footprints – and many ways to “estimate” or measure that. Picking metrics we can understand, track, and correct for, becomes critical.
This is a high-level view of those principles each of which is described in detail in its own unit. I highly encourage you check the course out after reviewing the sketch-note.
Sustainability @microsoft
Why does this matter to us as technologists? I found the Sustainability site to be a good source for educating myself on how these challenges are tackled at scale, in industry.

Microsoft has set three objectives for 2030:
- Be carbon negative: Extract more carbon dioxide from the atmosphere, than we contribute.
- Be water positive: Replenish more water from the environment, than we consume.
- Be zero waste: Reduce as much waste as we create, emphasizing repurposing and recycling materials.
A fourth goal is to be biodiverse and use technology to protect and preserve ecosystems that are currently in decline or under threat. And this is where technology initiatives like the Planetary Computer come in, helping researchers collect, aggregate, analyze, and act upon, environmental data at scale to craft and deliver machine learning models for intelligent decision-making.
The bottom line is that we all have a role to play, and educating ourselves on the terms and technologies involved, is key. I hope you’ll take a few minutes now to review the sketchnote and complete the Principles of Sustainable Software Engineering on your own. It’s time to be butterflies and drive collective impact with our individual actions!
by Contributed | Feb 14, 2021 | Technology
This article is contributed. See the original author and article here.
Initial Update: Sunday, 14 February 2021 17:06 UTC
We are aware of issues within the Log Analytics portal with scope configuration changes and are actively investigating. Some customers may experience an error when trying to create a scope configuration indicating “Failed to create scope configuration resource.”
Next Update: Before 02/14 21:30 UTC
We are working hard to resolve this issue and apologize for any inconvenience.
-Jeff
by Contributed | Feb 14, 2021 | Technology
This article is contributed. See the original author and article here.
Final Update: Sunday, 14 February 2021 16:37 UTC
We’ve confirmed that all systems are back to normal with no customer impact as of 02/14, 13:50 UTC. Our logs show the incident started on 02/14, 12:50 UTC and that during the 1 hour that it took to resolve the issue some of the customers in South East Asia Region experienced data access issues, delayed or misfired log search alerts.
- Root Cause: The failure was due to issues with in one of the backend services.
- Incident Timeline: 1 Hour – 02/14, 12:50 UTC through 02/14, 13:50 UTC
We understand that customers rely on Application Insights as a critical service and apologize for any impact this incident caused.
-Jayadev
by Contributed | Feb 14, 2021 | Technology
This article is contributed. See the original author and article here.
To develop applications for SharePoint or Microsoft Teams with the SPFx framework, a few requirements must be met on your development computer. Learn how to install the supported Node.js v10.x version and how you can use other Node.js versions additionally with Node Version Manager!
Why?
As developer, it often makes sense to have multiple versions of a framework installed on a single computer. For developing an app for SharePoint Server 2019 or SharePoint Online with the SPFx framework, you need to have Node.js LTS v10.x.x installed (LTS stands for Long Time Support). You can find all the requirements at Set up your SharePoint Framework development environment. For developing other web applications, e.g. when using frameworks such as Angular, you might need other versions of Node.js installed.
The solutions for operation with several different versions of Node.js are supplied with the Node Version Manager (NVM). Here is a step-by-step guide on how to remove old versions of Node.js, how to install NVM and desired Node.js versions, and how to switch between the Node.js versions. After the installation process, learn how to develop your custom SharePoint app using the provided tools.
Install nvm and Node.js
First, follow the steps here to install the Node.js frameworks on your machine. Alternatively, there´s a good description at Set up your Node.js development environment directly on Windows.
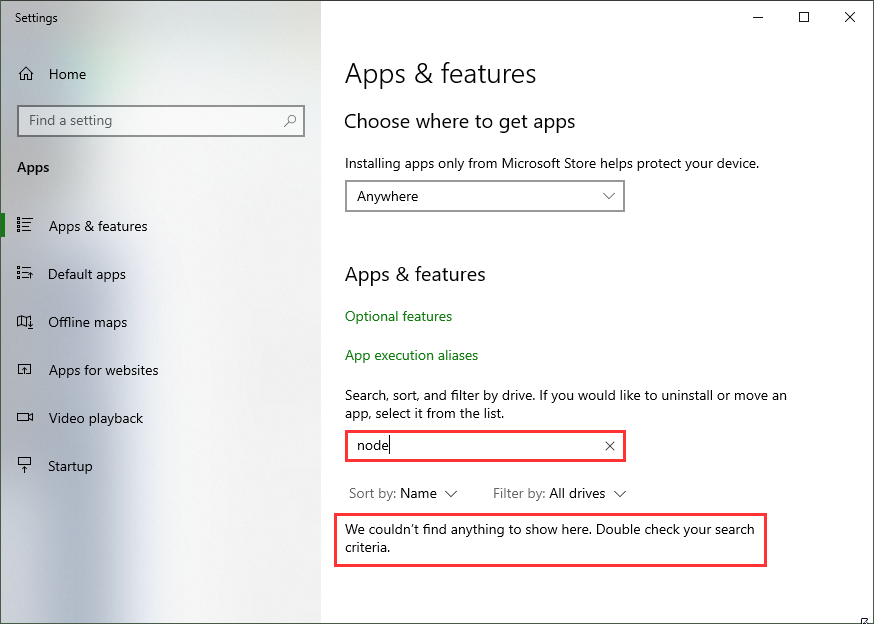
If you already have installed other Node.js versions, it´s a good idea to remove existing versions in the Windows Apps & Features settings. When you have a later version, such as 14.5, already installed, it´s usually not required to uninstall this version. nvm finds that version and allows to use it with nvm.
Alternatively, when you have chocolatey installed, you can run
choco uninstall nodejs -y
(as I did on my machine to cleanup.)

You can install nvm from Node Version Manager (nvm) for Windows by Corey Butler. The latest version is nvm v1.1.7. Download nvm-setup.zip and run it. Or, you can use choco (if installed on your computer):
choco install nvm -y
Let´s check if nvm is working:
nvm ls
should find no Node.js versions.

To see the latest Node.js versions check https://nodejs.org/en/, or simply run
nvm ls available
 List available Node.js versions
Now, install the desired Node.js versions:
Now check the installed versions: nvm ls

You can now switch between versions with nvm. Use <nvm version>, e.g.
nvm use 10.23.0 or nvm use 14.15.4
That´s the basic installation of Node.js and npm.
Install the SPFx development tools once
To install the required tools yo with the sharepoint generator and gulp and for SharePoint development, we follow the steps at Set up your SharePoint Framework development environment. Here are the commands to run in a PowerShell console: First, switch to Node.js v10, confirm, (check the current version), and install the tools with npm.
nvm use 10.23.0
npm install gulp yo @microsoft/generator-sharepoint –global
 npm install
Create a new SPFx webpart
To create a new SPFx app, follow the steps described at Build your first SharePoint client-side web part (Hello World part 1). In a new directory, run
yo @microsoft/sharepoint
 Run yo
You need to trust the development self-signed SSL certificate as described at Trusting the self-signed developer certificate here. Then, you can open the workbench with SSL.
gulp trust-dev-cert
 gulp trust-dev-cert
You can open Visual Studio Code now to modify the solution: code .
Run the SPFx webpart
The generated solution includes the sample app that can now be modified.
 Coding…
When done, let´s open the default browser with the gulp webserver:
gulp serve
This opens the SPFx workbench, in our sample at https://localhost:4321/temp/workbench.html. Here, you can add the webpart to the workbench page and test it.
 Use the workbench to run the webpart
Tip: When gulp serve is running, you can open your M365 tenant´s SPO site and use the custom webpart with the data from SharePoint, too: https://<tenant>.sharepoint.com/sites/<sitename>/_layouts/15/workbench.aspx
Deploy the SPFx solution
To build the ready-to-use solution, run
gulp bundle –ship
to build the package for the correct folder and
gulp package-solution –ship
to create the sharepointsolution<project>.sppkg file that can be uploaded to the SharePoint App catalog.
Develop the solution
You can follow the next steps to develop the app described here:
Switch as required with nvm
The Node Version Manager helps to work with multiple versions of Node.js for different purposes on the same machine. I hope this tip helps developers for a productive development environment!
Happy developing! 
This blog article is a repost from blog.atwork.at.
by Contributed | Feb 14, 2021 | Technology
This article is contributed. See the original author and article here.
API Management has the ability to validate a JSON Web Token (JWT) through the validate-jwt policy. If you use the OpenID config URI property in the policy and set it to your AAD tenant’s OpenID Connect metadata document endpoint, the token would be validated for anyone in your tenant. The goal in this blog post is to control that access to only allow specific users, using an app registration, roles and claims. I will outline the steps to set this up below.
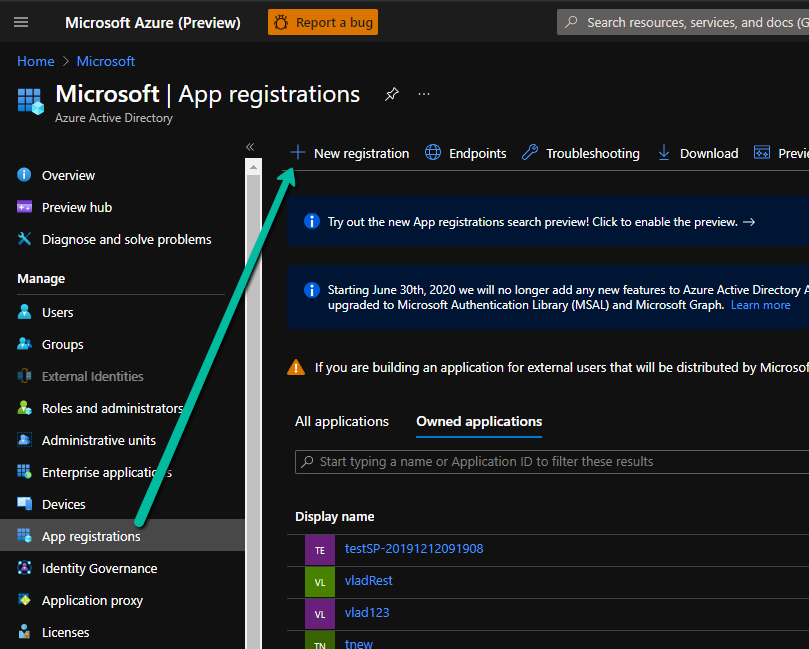
- Create an App registration in your Azure Active Directory.
Enter a name and Register, leave the other settings as they are for now.
- Open the App registration and go to the “App roles | Preview” blade. Create a role. For our purposes, we can use:

- Go to the “Expose an API” blade and set the Application ID URI:

- Now, try to get a token for this resource using Azure CLI:
az login
az account get-access-token –resource api://a268af9e-1598-4ec3-ad16-77e30b042f92
- Notice you will get a HTTP 400 error that states that Azure CLI is not an authorized client application. To fix this, go back to the “Expose an API” blade in the app registration and add a scope:

- Now, we can add the client application from the same blade. Use the client ID for Azure CLI from the error message on step 5. The error looks like this: “Get Token request returned http error: 400 and server response: {“error”:”invalid_grant”,”error_description”:”AADSTS65001: The user or administrator has not consented to use the application with ID ‘04b07795-8ddb-461a-bbee-02f9e1bf7b46‘ named ‘Microsoft Azure CLI’.”

- Next, we need to grant a user that role to test. Go to the “Overview” blade in your app registration and copy the Application (Client) ID. Then go back to Azure Active Directory, “Enterprise applications” blade and search for the Application ID. Open the enterprise application corresponding to your App registration.
- From the “Users and groups” blade, add yourself as a user and select the role you created on step 2:

- Now we can try to generate a token from Azure CLI again:
az account get-access-token –resource api://a268af9e-1598-4ec3-ad16-77e30b042f92′
- Copy that token and decode it using https://jwt.ms:

Notice the audience (aud) is your Application ID URI generated on step 3 and there is a “roles” claim with the role we assigned to ourselves on step 2. We will use this information in the API Management validate-jwt policy to restrict access to tokens that have been generated for this audience and have this specific role. Any other tokens would not be validated by API Management.
- Go to API Management and create an API. We can use Http Bin to test:

- Create an operation:

- Edit the policy for the operation we created:

- The policy would look something like this:
<policies>
<inbound>
<validate-jwt header-name="Authorization" failed-validation-httpcode="403" failed-validation-error-message="Forbidden">
<openid-config url="https://login.microsoftonline.com/72f988bf-86f1-41af-91ab-2d7cd011db47/v2.0/.well-known/openid-configuration" />
<audiences>
<audience>api://a268af9e-1598-4ec3-ad16-77e30b042f92</audience>
</audiences>
<issuers>
<issuer>https://sts.windows.net/72f988bf-86f1-41af-91ab-2d7cd011db47/</issuer>
</issuers>
<required-claims>
<claim name="roles" match="any">
<value>APIM.Access</value>
</claim>
</required-claims>
</validate-jwt>
<base />
</inbound>
<backend>
<base />
</backend>
<outbound>
<base />
</outbound>
<on-error>
<base />
</on-error>
</policies>
Note: you can get the value for the OpenID config URL from the Azure Portal by going to Azure Active Directory -> App registrations -> Endpoints -> OpenID Connect metadata document
Note 2: The audience is the Application ID URI from Step 3.
Note 3: The value of the “roles” claim is the value of the role we created at Step 2.
Note 4: I added the issuer from the token I got from Azure CLI as well (you can see the value if you decode it – Step 10).
- Now, let’s test it using Postman. Generate another token using Azure CLI if the previous one expired (Step 9). Select your API Management operation in the Azure Portal and go to the Test tab to get the Request URL and your subscription key:

- Open postman and fill in the token in the Authorization header (including “Bearer ” in front of the value), the subscription key if it’s required, then send a request:

If you get a HTTP 403 and/or you need to debug, the OCP trace feature would be helpful. If you include the subscription key and the Ocp-Apim-Trace: true header, the response will contain a link to a trace file in the header Ocp-Apim-Trace-Location which will show what is going wrong.

For more information, these links would come in handy:
https://docs.microsoft.com/en-us/azure/active-directory/develop/howto-restrict-your-app-to-a-set-of-users
https://docs.microsoft.com/en-us/azure/active-directory/develop/howto-add-app-roles-in-azure-ad-apps
https://docs.microsoft.com/en-us/azure/api-management/api-management-access-restriction-policies#ValidateJWT
by Contributed | Feb 13, 2021 | Technology
This article is contributed. See the original author and article here.
Synapse provides an exciting feature which allows you to sync Spark database objects to Serverless pools and to query these objects without the Spark pool being active or running. Synapse workspaces are accessed exclusively through an Azure AD Account and objects are created within this context in the Spark pool. In some scenarios I would like to share the data which I’ve created in my Spark database with other users for reporting or analysis purposes. This is possible with Serverless and in this article I will show you how to complete the required steps from creation of the object to successful execution.
In attempt to reproduce a real-world scenario where one Domain user creates a database in a Spark Pool with objects which are synced to Serverless Pool I made use of an admin user and Test user.
I started by creating a database and a table with parquet storage format in Spark pool Notebook, as per the example found here Shared metadata tables – Azure Synapse Analytics | Microsoft Docs
(Only Parquet Format tables will be synced to Serverless, no other format will be synchronized)
%%sql
Create database CharlSync
CREATE TABLE CharlSync.myParquetTable(id int, name string, birthdate date) USING Parquet
%%csharp
using Microsoft.Spark.Sql.Types;
var data = new List<GenericRow>();
data.Add(new GenericRow(new object[] { 1, “Charl”, new Date(2010, 1, 1)}));
data.Add(new GenericRow(new object[] { 2, “Bob”, new Date(2020, 1, 1)}));
data.Add(new GenericRow(new object[] { 3, “Bob”, new Date(2021, 1, 1)}));
data.Add(new GenericRow(new object[] { 4, “Bob”, new Date(2019, 1, 1)}));
var schema = new StructType
(new List<StructField>()
{
new StructField(“id”, new IntegerType()),
new StructField(“name”, new StringType()),
new StructField(“birthdate”, new DateType())
}
);
var df = spark.CreateDataFrame(data, schema);
df.Write().Mode(SaveMode.Append).InsertInto(“CharlSync.myParquetTable”);
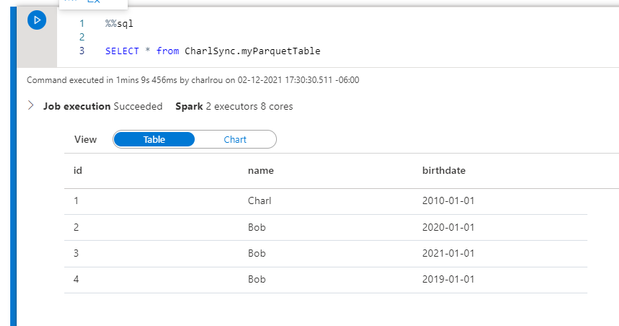
The data has been written to the table and I can perform a SQL select from the table in my Sparkpool
The table is visible in the and the object which I created is listed in the Spark database.

From SQL Serverless I can select from the metadata database without any problem as I am the owner and creator of the database and object, from a storage account perspective my admin account has been granted storage blob contributor access and therefore I am able to write to the storage account and access the data without failure.

Now let’s move on to SSMS or Azure Data Studio
In SSMS I open up an Azure AD connection and connect with my domain account , from the metadata database I run a select statement on the table

It returns invalid object name; this is not supposed to be the case.
I verify the object name in sys.objects and as you can see it is lowercase, the object is case sensitive in Serverless.

I change my object to the name as per the sys.objects table and it returns my data as expected from the metadata sync table.

I will now create an Azure AD User in my Serverless Pool and grant the user access in order to execute statements.
As per our documentation the access is based on the service principal permissions at a storage level, and if your user has access to the service it can execute statements, with server less all access is governed by storage account level permissions and through database or servers scoped credentials.
I therefore do not have to assign any additional permissions or role access within the server itself.

The test user has been created in the sqlodtest database and I connect to the database and attempt to access the table, which fails. The reason for the failure is that the user account has not been granted access to the default storage account and subsequent container and folders.

The Domain user account requires access to the folder which has been created in the default storage account, a folder per table is created as follows: /<containername>/synapse/workspaces/<workspacename>/warehouse/<sparkdatabasename>.db/<tablename>
As the user execution context is being used to connect to the storage account, I grant the user account Storage blob reader RBAC Permissions on the container and underlying folders.


As per the published documentation on Workspace permissions I only have to grant the User Permissions in my On-Demand Database.
Understand the roles required to perform common tasks in Synapse – Azure Synapse Analytics | Microsoft Docs

Within the workspace under Access Control I validate that my test account does not have any workspace level permissions, the highlighted account below is my admin account.

Once you have completed all of the above-mentioned actions and created the User account in the Serverless database and granted the account folder level RBAC permissions, It is important that you disconnect from the Serverless session and re-connect.
I connect to my Serverless database which I created earlier and to which I granted my Test user access, I am then able to execute the statement against the “Spark replicated database and table and return data.

Microsoft Documentation
Understand the roles required to perform common tasks in Synapse – Azure Synapse Analytics | Microsoft Docs
Shared metadata tables – Azure Synapse Analytics | Microsoft Docs
by Contributed | Feb 13, 2021 | Technology
This article is contributed. See the original author and article here.
A Visual Introduction To Azure Fundamentals
This is a summary of an article that I just published in A Cloud Guru which goes into more details on the choice of the “truck” (delivery) metaphor and resources to prep for AZ-900. Don’t forget to check that out!
Setting The Stage
The start of a new year is great to kickstart learning resolutions – and aiming for certification (like AZ-900) is a great goal to have!! But sticking to that resolution requires a study plan (for accountability) and study resources (that suit your learning style). Read the A Cloud Guru article for some thoughts on how you can set yourself up for success, including links to communities and study guides that can help.
Today though I want to focus on the learning styles we adopt – and in particular, on our visual learning ability. 65% of us are visual learners — which means we absorb information (“see the big picture”) more quickly from images than from text, and can make connections more quickly to relevant ideas (“connect the dots”) by detecting or reinforcing patterns that we are innately familiar with.
In reality, we all learn by mixing several styles – read/write (articles), kinesthetic (tutorials), auditory (lectures) and visual (imagery) — so as you study for certification, it’s worth exploring different resources to see which ones give you the best approach to not just understanding the topic, but retaining that knowledge and recalling it effectively later.
Azure Fundamentals: A Sketchnote!
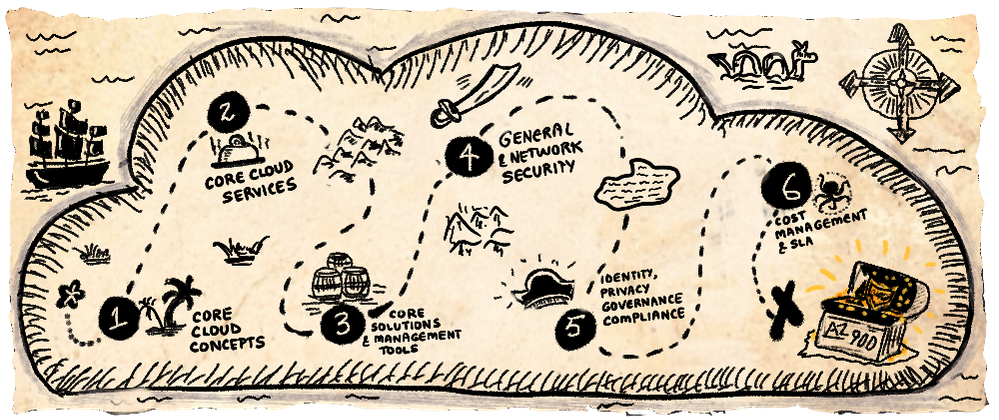
In 2021, I started the VisualAzure project, and its accompanying Cloud Skills: Sketchnotes repository, in an effort to create useful learning resources for visual learners that could complement relevant Microsoft Docs and Microsoft Learn content. My first target — the Azure Fundamentals learning paths and AZ-900.
Here is the sketchnote visualizing the Introduction To Azure Fundamentals unit of the common module that anchors all six learning paths. The sketchnote uses two key visual storytelling tactics:
- A visual vocabulary — so you can quickly scan the sheet at a glance, spot various “sections” and navigate the information “flow” using visual cues like icons, arrows and banners.
- A visual metaphor — in this case, the definition of cloud computing as “the delivery of computing services over the internet” inspired me to use a transport (delivery truck) metaphor, and use related analogies to explain other concepts tied to cloud computing.

I hope you find this not just interesting, but also informative and useful, for your Azure learning and certification journeys. I encourage you to check out these resources to learn more:
Last but not least – if you have feedback for improving these sketchnotes, or want to request one for a specific Microsoft Learn (module) or Docs (topic) – leave me a request or share your comments via this Discussion Forum!
Happy learning!

by Contributed | Feb 13, 2021 | Technology
This article is contributed. See the original author and article here.
Missed our recent Microsoft Reactor “Mixed Reality BizApps 101: Dynamics 365 Remote Assist Deployment Best Practices” event? We’ve got you covered! Here is a quick summary of Payge Winfield’s top 5 takeaways from the session. You can also watch the full session recording here.
Engineer using Dynamics 365 Remote Assist
1. The Big Three
There are three common deployment scenarios that we typically see.
Scenario 1: Internal Remote Assist Communications
In this scenario Company X owns the Remote Assist and Teams licenses. Company X provides their internal users with Remote Assist and Team licenses to make internal calls to one another.

Scenario 2
In this scenario Company X owns Remote Assist licenses, and Company Y owns Teams licenses. Each company assigns their users with their respective licenses. The Remote Assist users in Company X need to communicate with the Teams users in Company Y.

Scenario 3
In this scenario Company Y owns both the Remote Assist and Teams licenses. Company Y assigns their experts with Teams licenses. Company Y wants assign Remote Assist licenses to external clients using “service accounts“. A service account is an account in your tenant that you distribute to external users.

Each of these scenarios pose different concerns. The rest of this blog will highlight the top three, common concerns as well as some Do’s and Don’ts.
2. How do I Lock Down/Restrict the HoloLens?
One of the best ways to lock down the HoloLens is to use Kiosk mode and WDAC. While Kiosk Mode and WDAC are typically viewed as interchangeable methods for locking down the HoloLens device, this couldn’t be further from the truth. Both Kiosk Mode and WDAC can lock down the device, but the methods these features use differ. Kiosk Mode is a user experience feature, while WDAC is a security feature. While Kiosk Mode disables the visibility of an app to a user, WDAC places the app on an actual allow/block list.
3. How do Companies Communicate with Each Other?
In scenario 2, Company X (Remote Assist user) and Company Y (Teams user) both owned their own licenses. However, it is important to note that Remote Assist is built on top of the Teams platform. This means that Remote Assist will honor any communication (federation) configurations that are implemented by Teams.
Specifically, there are three methods that Company X and Company Y can use to communicate with each other:
- Both companies enable open federation – which is the default setting in Teams.
- Both companies ensure that they are federated with one another. More specifically, each company needs to add the other to their “Allow” list or remove them from their “Block” list.
- Company X (the person with Remote Assist) can guest Company Y (Teams) users into their tenant.
4. Mobile Device Management (MDM) Recommendations
Managing HoloLens devices is an important step in deploying at scale. Below are some recommendations for CSPs (Configuration Service Providers) to deploy to HoloLens 2 devices.
- Wi-Fi profiles and device-based certificates
- Tenant locking the device ensures that nefarious actors (Company Z) cannot wipe a HoloLens device and enroll it into their own company’s tenant
- Manage OS updates with Update/AllowAutoUpdates
To learn more about CSPs, please check out our documentation:
Policies in Policy CSP supported by HoloLens 2 – Windows Client Management | Microsoft Docs
Configuration service provider reference – Windows Client Management | Microsoft Docs
5. Do’s and Don’ts
Last – but not least – it is important to keep these do’s and don’ts in mind when deploying HoloLens devices.
Do’s
|
Don’ts
|
- Understand security requirements before deploying HoloLens 2
- Review our deployment documentation
- Utilize individual user-based accounts where possible
- Use Azure AD for identity management
- Do enroll devices into MDM
- Do ensure that you are using Kiosk Mode and WDAC appropriately
|
- Wait to get security involved (Involve them in the process early on!)
- Rely on Kiosk Mode as a security feature
|
Here are some other documents that I highly recommend reading in your HoloLens + Remote Assist deployment journey. Thanks for reading!
#MixedRealityBizApps #RemoteAssist #Deployment


Recent Comments