by Contributed | Mar 2, 2021 | Technology
This article is contributed. See the original author and article here.
In this new series, I am excited to share highlights of the new capabilities we’ve built and released in Microsoft Endpoint Manager. Every month, I plan to summarize just a few of the new additions from our engineering team. Give them a try! Let me know which one is your favorite by commenting back on this post, connecting with me on LinkedIn, or tagging me @RamyaChitrakar on Twitter.
2102 (February) Release & Microsoft Ignite Edition
While you can find the full list of engineering investments we’ve made at What’s New, here are a few of my favorite additions to Microsoft Endpoint Manager! I have been tracking these closely because they help you realize your Zero Trust goals and enable remote work while ensuring the productivity of end users. I’ve left off a few I’ve talked about already – Microsoft Tunnel, for example – so be sure to also listen to my Microsoft Ignite session for the complete list of What’s New and What’s Coming Soon in Microsoft Endpoint Manager.
Continued investments in Endpoint analytics – new features requested by IT
We’re announcing two Endpoint analytics features this month that will optimize your time and the quality of the experience you’re delivering to end users. Endpoint analytics is a feature of Microsoft Endpoint Manager that helps you to better understand and improve end-user experience. As an IT Admin, you play a tremendous role in balancing the security and management needs of your organization and your end users’ productivity – and then layer in the complexities that remote work has brought us all.
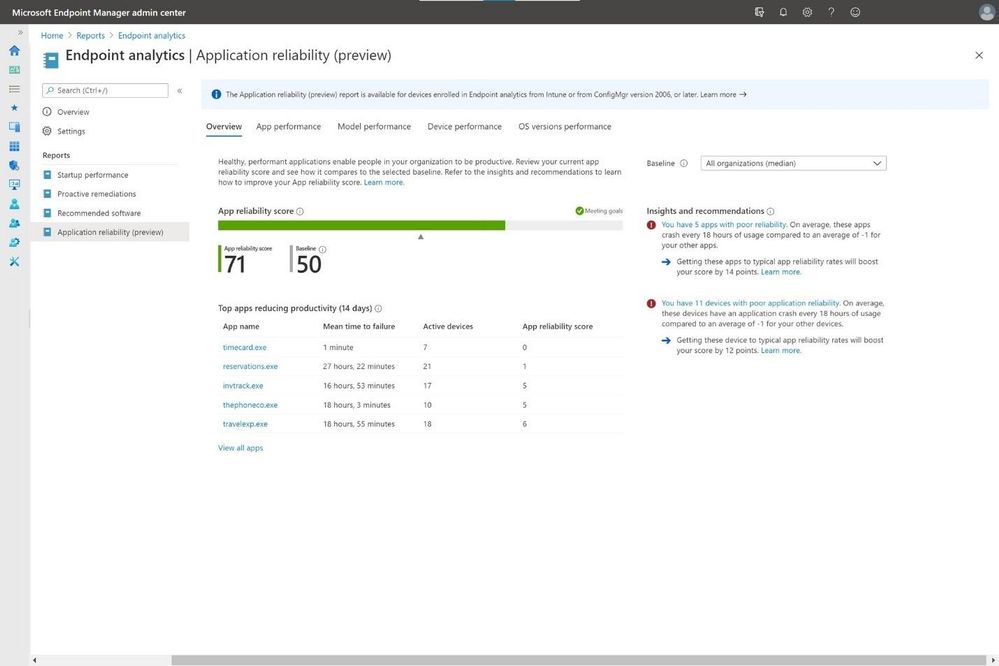
We are adding two new, highly requested features: application reliability and restart frequency. The new application reliability feature will provide greater visibility across your entire organization to tell you how well your apps are functioning. Users are never happy when an app crashes and their flow is broken, or worst case they lose the work, they just did. The second feature – restart frequency information – provides insights into the existing startup performance report to help you identify problematic devices. Both these features help you improve your end-user experience by giving you better visibility into the device experience.
Read this post for more on using these new features, and below, you’ll see a screenshot of the application reliability feature! I’m excited; I hope you are too!
New All Devices Export Experience – If you’re anything like me, you spend a lot of your day looking at data and making decisions based on that data. In our daily shiproom, we need flexibility to view data that allows us to make investments and customizations are key. Similarly, we’ve heard from you that you want to customize the All Devices list. This is why the new device export experience is one I’m excited for. So many customers I talk with use this report daily, and with this feature, you can consistently export all the columns if you’d like to. This way you can make data-based decisions.
Here’s the admin UI from one of our test accounts –

Microsoft Defender for Endpoint risk signals available for your App protection policies (preview)
With this release, you can now configure a setting within your App Protection Policy (APP, also known as MAM) Conditional Launch policy to include ‘Max allowed threat level’ signals from Microsoft Defender for Endpoint on Android and iOS/iPadOS. You can choose to Block Access or Wipe Data based on whether or not the device meets the expected threat level. End users will be prompted to install and set up the Microsoft Defender for Endpoint app from the appropriate store (e.g., Google Play). As a prerequisite, don’t forget to set up your Microsoft Defender for Endpoint connector and switch on the toggle to send risk data to your App Protection Policies.

In this first post, I’ve discovered it’s hard to pick just a few of our engineering investments as many span the product. I will pick some each sprint to represent the breadth of our capabilities and those that have been asked for by our customers. Read What’s New in the 2102 release for all new features and releases and watch What’s New in Microsoft Endpoint Manager at Microsoft Ignite. I am incredibly proud of the work the team does. We listen to your feedback and make changes and investments based on your goals to improve the end-user experience and simplify IT.
Follow me for more! Comment back on this post, connect with me on LinkedIn, or tag me @RamyaChitrakar on Twitter.
by Contributed | Mar 2, 2021 | Technology
This article is contributed. See the original author and article here.
Tom McElroy, Rob Mead – Microsoft Threat Intelligence Center
Thanks to Andrey Karpovsky, Ely Abramovitch, Ram Pliskin, Roberto Rodriguez and Ross Bevington for making this blog possible.
On March 2nd 2021 we released a demo as part of Microsoft Ignite Spring 2021 showing an investigation that brought together incidents from Azure Defender blob storage and Microsoft 356 Defender. If you haven’t seen this session yet, make sure to check it out before reading the blog to get the most value from the detection and hunting queries we’ll be discussing.
As part of this investigation, we saw how a custom Azure Sentinel detection allows us to identify additional files uploaded by the threat actor, and how we could correlate hashes across on-premises Microsoft 365 Defender data and Azure Defender cloud data
This blog post will take an in-depth look at some of the log sources we used behind the scenes to connect these events. We’ll also cover in more detail how to analyse blob and file storage logs. As well as looking at the log sources, we’ll explore some additional hunting queries and detections that can be added to your Azure Sentinel hunting arsenal. All of the queries within this post can be found liked at the bottom.
Blob and File Storage Overview
Blob and File storage on Azure provide storage that can be accessed via Azure storage explorer, the Azure portal, or in the case of File storage directly as a mapped network drive. Both file storage methods allow files to be uploaded, shared, and downloaded. After files are uploaded, a link to the file can be generated meaning that files hosted using these methods can easily be shared through messaging systems. To learn more about the different Azure storage methods click here.
A threat actor with access to legitimate credentials can use blob or file storage to facilitate command and control, use the storage account to exfiltrate data, or as we saw in the Ignite demo, stage additional malicious files to use in their campaign.
Blog storage logs are in the StorageBlobLogs table and file storage logs can be found in the StorageFileLogs table. These tables have the same schema. All the analytics in this blog will merge the tables together using the union operator. Regardless of your container choice, the analytics will still work.
The animation below shows how to enable the diagnostic setting for Blob storage, which will send file operations to Log Analytics. To enable the same logging for File storage, simply follow the same process but choose “File” under the storage account name on the Diagnostic settings page.
Accessing File Uploads
When file upload actions are performed, a log entry is created. For Blob storage the operation name PutBlob, indicates a file upload action. File uploads are logged differently, first a file container is created and then the bytes are written to the file. For the purpose of building file upload analytics, the PutRange operation can be used as an equivalent to PutBlob. Both PutRange and PutBlob indicate the files bytes were written to the storage account.
The query below will join the tables and then select file upload activity events.
union
StorageFileLogs,
StorageBlobLogs
| where OperationName =~ "PutBlob" or OperationName =~ "PutRange"
| project TimeGenerated, AccountName, Uri, ResponseMd5, Protocol, StatusText, DurationMs, CallerIpAddress, UserAgentHeader, Type
| take 10

After execution, the query will project columns that will be valuable for security analytics. We will take a deeper look at those columns as we build out our hunting and detection queries. A sample of the output can be seen in the image above.
During the Ignite demo we used information from this table to share file hashes with Microsoft 365 Defender. These additional hashes were generated by a detection, which extracted additional files uploaded by the threat actor, following the known-bad malicious file hash upload to Blob storage. To begin building this detection, we need to locate and parse malicious file upload alerts.
Parsing Malicious File Upload Data
When a file with a known-bad hash is uploaded to Blob or File storage, Azure Defender checks to see if the file has a known-bad file hash. If Azure Defender determines that the file is malicious based on its hash, it will generate a security alert which is logged to the SecurityAlert table in Azure Sentinel.
The query below can be used to find instances of this alert in Azure Sentinel.
SecurityAlert
| where TimeGenerated > ago(14d)
| where DisplayName has "Potential malware uploaded to"
The Entities field of the alert contains the uploader IP and country, alongside the file Name, Hash, and the Directory the file was uploaded to. The Entities field needs to be parsed so that we can use these elements.
The query below will extract the IP address and file information from the Entities field and will then re-join this information into a single row for each Azure Defender security alert.
//Collect the alert events
let alertData = SecurityAlert
| where TimeGenerated > ago(7d)
| where DisplayName has "Potential malware uploaded to"
| extend Entities = parse_json(Entities)
| mv-expand Entities;
//Parse the IP address data
let ipData = alertData
| where Entities['Type'] =~ "ip"
| extend AttackerIP = tostring(Entities['Address'])
| extend AttackerCountry = tostring(Entities['Location']['CountryName']);
//Parse the file data
let FileData = alertData
| where Entities['Type'] =~ "file"
| extend MaliciousFileDirectory = tostring(Entities['Directory'])
| extend MaliciousFileName = tostring(Entities['Name'])
| extend MaliciousFileHashes = tostring(Entities['FileHashes']);
//Combine the File and IP data together
ipData
| join (FileData) on VendorOriginalId
| summarize by TimeGenerated, AttackerIP, AttackerCountry, DisplayName, ResourceId, AlertType, MaliciousFileDirectory, MaliciousFileName, MaliciousFileHashes
//Create a type column so we can track if it was a File storage or blob storage upload
| extend type = iff(DisplayName has "file", "File", "Blob")

Extracting and Preparing File Upload Data
We have extracted the threat actor’s IP and file hash information from the Entities field. Next, we will identify other upload activity from the malicious file uploader.
Earlier, we covered how PutBlob and PutRange operations can be used to find uploads. We can create a query that extracts file upload activity and summarises it. It can then be joined to the suspicious file upload alert, using the IP address of the malicious file uploader.
The query below will prepare the data stored in StorageBlobLogs and StorageFileLogs so it can be joined with the previous query. The query will parse the filename from the Uri field, decode the Base64 encoded file hash and then summarise all file uploads for each client IP into a single row for joining. While not used in the Ignite demo, the query will also extract file deletions by extracting DeleteFile and DeleteBlob operations.
union
StorageFileLogs,
StorageBlobLogs
| where TimeGenerated > ago(7d)
//File upload operations
| where OperationName =~ "PutBlob" or OperationName =~ "PutRange"
//Parse out the uploader IP
| extend ClientIP = tostring(split(CallerIpAddress, ":", 0)[0])
//Extract the filename from the Uri
| extend FileName = extract(@"/([w-. ]+)?", 1, Uri)
//Base64 decode the MD5 filehash, we will encounter non-ascii hex so string operations don't work
//We can work around this by making it an array then converting it to hex from an int
| extend base64Char = base64_decode_toarray(ResponseMd5)
| mv-expand base64Char
| extend hexChar = tohex(toint(base64Char))
| extend hexChar = iff(strlen(hexChar) < 2, strcat("0", hexChar), hexChar)
| extend SourceTable = iff(OperationName has "range", "StorageFileLogs", "StorageBlobLogs")
| summarize make_list(hexChar) by CorrelationId, ResponseMd5, FileName, AccountName, TimeGenerated, RequestBodySize, ClientIP, SourceTable
| extend Md5Hash = strcat_array(list_hexChar, "")
//Pack the file information the summarise into a ClientIP row
| extend p = pack("FileName", FileName, "FileSize", RequestBodySize, "Md5Hash", Md5Hash, "Time", TimeGenerated, "SourceTable", SourceTable)
| summarize UploadedFileInfo=make_list(p), FilesUploaded=count() by ClientIP
| join kind=leftouter (
        union
        StorageFileLogs,
        StorageBlobLogs
        | where TimeGenerated > ago(7d)
        | where OperationName == "DeleteFile" or OperationName == "DeleteBlob"
        | extend ClientIP = tostring(split(CallerIpAddress, ":", 0)[0])
        | extend FileName = extract(@"/([w-. ]+)?", 1, Uri)
        | extend SourceTable = iff(OperationName has "range", "StorageFileLogs", "StorageBlobLogs")
        | extend p = pack("FileName", FileName, "Time", TimeGenerated, "SourceTable", SourceTable)
        | summarize DeletedFileInfo=make_list(p), FilesDeleted=count() by ClientIP
) on ClientIP

Creating the Detection Query
Now that the alert information has been collated, and the additional file upload information has been summarised by IP address, it is possible to join the two queries.
The query below merges both queries into a single detection (including identifying other potentially malicious files that were uploaded). The detection will also output an IPCustomEntitiy and a FileHashCustomEntitiy so that the results of the detection can be added to the Azure Sentinel investigation graph.
//Collect the alert events
let alertData = SecurityAlert
| where TimeGenerated > ago(30min)
| where DisplayName has "Potential malware uploaded to"
| extend Entities = parse_json(Entities)
| mv-expand Entities;
//Parse the IP address data
let ipData = alertData
| where Entities['Type'] =~ "ip"
| extend AttackerIP = tostring(Entities['Address']), AttackerCountry = tostring(Entities['Location']['CountryName']);
//Parse the file data
let FileData = alertData
| where Entities['Type'] =~ "file"
| extend MaliciousFileDirectory = tostring(Entities['Directory']), MaliciousFileName = tostring(Entities['Name']), MaliciousFileHashes = tostring(Entities['FileHashes']);
//Combine the File and IP data together
ipData
| join (FileData) on VendorOriginalId
| summarize by TimeGenerated, AttackerIP, AttackerCountry, DisplayName, ResourceId, AlertType, MaliciousFileDirectory, MaliciousFileName, MaliciousFileHashes
//Create a type column so we can track if it was a File storage or blobl storage upload
| extend type = iff(DisplayName has "file", "File", "Blob")
| join (
  union
  StorageFileLogs,
  StorageBlobLogs
  | where TimeGenerated > ago(30min)
  //File upload operations
  | where OperationName =~ "PutBlob" or OperationName =~ "PutRange"
  //Parse out the uploader IP
  | extend ClientIP = tostring(split(CallerIpAddress, ":", 0)[0])
  //Extract the filename from the Uri
  | extend FileName = extract(@"/([w-. ]+)?", 1, Uri)
  //Base64 decode the MD5 filehash, we will encounter non-ascii hex so string operations don't work
  //We can work around this by making it an array then converting it to hex from an int
  | extend base64Char = base64_decode_toarray(ResponseMd5)
  | mv-expand base64Char
  | extend hexChar = tohex(toint(base64Char))
  | extend hexChar = iff(strlen(hexChar) < 2, strcat("0", hexChar), hexChar)
  | extend SourceTable = iff(OperationName has "range", "StorageFileLogs", "StorageBlobLogs")
  | summarize make_list(hexChar) by CorrelationId, ResponseMd5, FileName, AccountName, TimeGenerated, RequestBodySize, ClientIP, SourceTable
  | extend Md5Hash = strcat_array(list_hexChar, "")
  //Pack the file information the summarise into a ClientIP row
  | extend p = pack("FileName", FileName, "FileSize", RequestBodySize, "Md5Hash", Md5Hash, "Time", TimeGenerated, "SourceTable", SourceTable)
  | summarize UploadedFileInfo=make_list(p), FilesUploaded=count() by ClientIP
      | join kind=leftouter (
        union
        StorageFileLogs,
        StorageBlobLogs
        | where TimeGenerated > ago(30min)
        | where OperationName =~ "DeleteFile" or OperationName =~ "DeleteBlob"
        | extend ClientIP = tostring(split(CallerIpAddress, ":", 0)[0])
        | extend FileName = extract(@"/([w-. ]+)?", 1, Uri)
        | extend SourceTable = iff(OperationName has "range", "StorageFileLogs", "StorageBlobLogs")
        | extend p = pack("FileName", FileName, "Time", TimeGenerated, "SourceTable", SourceTable)
        | summarize DeletedFileInfo=make_list(p), FilesDeleted=count() by ClientIP
        ) on ClientIP
  ) on $left.AttackerIP == $right.ClientIP
| mvexpand UploadedFileInfo
| extend LinkedMaliciousFileName = UploadedFileInfo.FileName
| extend LinkedMaliciousFileHash = UploadedFileInfo.Md5Hash
| project AlertTimeGenerated = TimeGenerated, tostring(LinkedMaliciousFileName), tostring(LinkedMaliciousFileHash), AlertType, AttackerIP, AttackerCountry, MaliciousFileDirectory, MaliciousFileName, FilesUploaded, UploadedFileInfo
| extend FileHashCustomEntity = LinkedMaliciousFileName,HashAlgo = "MD5", IPCustomEntity = AttackerIP

In the above output, each row represents a file upload event that the threat actor IP has initiated. By processing the file hash, this can be added to the Azure Sentinel Investigation graph as a custom entity. In the Ignite demo, the hashes were then shared with Microsoft 365 Defender using a playbook. We won’t be covering playbooks in this blog, but can find out more about playbooks here.
Creating a Detection Analytic
Finally, the detection query can be set up as a custom analytic rule. This will allow the detection to run periodically, checking for Azure Defender alert. When a known-bad file hash incident from Azure Defender has been created, our analytic will run to produce a new alert containing the additional hashes uploaded.
Full details of how to create new analytics in Azure Sentinel can be found here. Once in the wizard for rule creation, the detection query can be added to the rule logic. The query will execute every 15 minutes in our example environment. As the query executes every 15 minutes, we can reduce the number of rows processed by setting the query to only collect the last 30 minutes of events.

We want to generate an incident when this analytic returns results, so the Create incident option is toggled “on” under the Incident settings.

Now, an automated response can be configured. In the Ignite demo we execute a playbook manually to share indicators using the Graph API. However behind the scenes, this sharing had already been done using Automated response options on the analytic rule. More information on automated threat response can be found here.
Whenever a malicious file is uploaded to blob or file storage, the detection will collect additional files uploaded to blob storage by the threat actors IP address. You will receive an incident if additional files are uploaded by the same IP address within a 30-minute window of the original malicious file upload alert.
In the image below you can see that after the blob storage alert triggered (Incident ID 8 ) our detection ran and created a new incident as additional file uploads were seen (Incident ID 9).

Now we have a custom detection setup, we’ll look at some follow-on hunting queries to help uncover more of the compromise.
Hunting: Viewing Access Keys
Towards the end of the Ignite demo, we see that an analyst has investigated AzureActivity logs to determine other suspicious actions within our subscription. In their investigation, the analyst uncovers the malicious IP address using the GemmaG account to view blob storage keys.
AzureActivity is a platform log in Azure that provides insights into events that take place within the subscription. To access blob or file storage the threat actor had to obtain the access keys, enabling them to connect and upload files. Whenever keys for a storage account are accessed a “List Storage Account Keys” Operation is logged. An example of these events can be viewed with the following query.
AzureActivity
| where OperationName has "List Storage Account Keys"
| take 10
In the demo we see that the threat actor IP address has performed this operation using the GemmaG user account, allowing us to conclude that the threat actor compromised that account and used it to enable their cloud pivot.
While we have seen how AzureActivity can be used to enrich our investigation, we can also use this log to detect potentially suspicious Azure actions. In the query below we can use a list of Virtual Private Server (VPS) provider networks to check the logs for Administrative operations that have been conducted from a known VPS range, allowing us to detect potentially suspicious activity.
Virtual Private Servers are often abused by threat actors, they are a cheap and reliable way of acquiring infrastructure for operations. VPSs are often used to host websites and services, however they can also be configured to provide VPN and proxying capabilities. For most network environments, it is relatively unusual to see a known VPS provider IP ranges authenticating or performing user actions within the network.
While the list of VPSs compiled in the below query is not exhaustive, it provides many of the most common ranges, and is a good starting point when analysing network logs of unusual login or administrative behaviour.
The query below uses the ipv4_lookup plugin to evaluate IP addresses from our network logs against a list of known providers. If a match for a known VPS IP address is found, a row will be returned.
let IP_Data = (externaldata(network:string)
  [@"https://raw.githubusercontent.com/Azure/Azure-Sentinel/master/Sample%20Data/Feeds/VPS_Networks.csv"] with (format="csv"));
AzureActivity
| where CategoryValue =~ "Administrative"
| evaluate ipv4_lookup(IP_Data, CallerIpAddress, network, return_unmatched = false)
| summarize make_set(OperationNameValue), min(TimeGenerated), max(TimeGenerated) by CallerIpAddress, Caller
Hunting: File Distribution
In the Ignite demo we manually hunted for the compromised host using the Microsoft 365 Defender portal, this allowed us to make a connection between the servicehost file in cloud storage and the servicehost file on host. Microsoft 365 Defender Advanced hunting data could have allowed us to make this connection automatically.
Once malicious files have been identified in a storage account, we can use the Microsoft 365 Defender Advanced Hunting table DeviceFileEvents to determine if files were then spread to machines in the network. The DeviceFileEvents table contains information on file creation and modification, as well as other file system events.
Each time a file is created on a system, a log entry is made. As we have previously extracted the File MD5 hash from the storage logs, we can use the hash to join events from the DeviceFileEvents table with events from StorageFileLogs and StorageBlobLogs.
We need to prepare the data in DeviceFileEvents for joining. While there is lots of useful information in this table, we are only looking to make a link between a malicious file in storage and its presence on host. The query below will prepare the data in the DeviceFileEvents table for joining by extracting file create events which have an MD5 hash. It will then summarise the information about the device into a Kusto bag, creating a JSON structure we can expand later.
DeviceFileEvents
| where ActionType == "FileCreated"
| where isnotempty(MD5)
| extend p = pack("FileCreateTime", TimeGenerated, "Device", DeviceName, "DeviceId", DeviceId, "InititatingProcess", InitiatingProcessFileName)
| summarize make_bag(p), dcount(DeviceName) by MD5

The above output shows the data has been prepared successfully for joining. We can now add this query into our previous query which extracts files from the StorageFileLogs and StorageBlobLogs tables.
Once joined we will uncover instances where risky uploaded by the same malicious IP address as the known-bad file, have been uploaded to our storage account and are downloaded to a machine within our network. In the Ignite demo, the threat actor was staging additional malicious tools to help further their campaign. This hunting query would allow us to identify additional compromised systems.
  union StorageFileLogs,
  StorageBlobLogs
  | where TimeGenerated > ago(7d)
  //File upload operations
  | where OperationName =~ "PutBlob" or OperationName =~ "PutRange"
  //Parse out the uploader IP
  | extend ClientIP = tostring(split(CallerIpAddress, ":", 0)[0])
  //Extract the filename from the Uri
  | extend FileName = extract(@"/([w-. ]+)?", 1, Uri)
  //Base64 decode the MD5 filehash, we will encounter non-ascii hex so string operations don't work
  //We can work around this by making it an array then converting it to hex from an int
  | extend base64Char = base64_decode_toarray(ResponseMd5)
  | mv-expand base64Char
  | extend hexChar = tohex(toint(base64Char))
  | extend hexChar = iff(strlen(hexChar) < 2, strcat("0", hexChar), hexChar)
  | extend SourceTable = iff(OperationName has "range", "StorageFileLogs", "StorageBlobLogs")
  | summarize make_list(hexChar) by CorrelationId, ResponseMd5, FileName, AccountName, TimeGenerated, RequestBodySize, ClientIP, SourceTable
  | extend Md5Hash = strcat_array(list_hexChar, "")
  | project-away list_hexChar, ResponseMd5
  | join (
    DeviceFileEvents
    | where TimeGenerated > ago(7d)
    | where ActionType =~ "FileCreated"
    | where isnotempty(MD5)
    | extend p = pack("FileCreateTime", TimeGenerated, "Device", DeviceName, "DeviceId", DeviceId, "FileName", FileName, "InititatingProcess", InitiatingProcessFileName)
    | summarize make_bag(p), dcount(DeviceName) by MD5
  ) on $left.Md5Hash == $right.MD5
  | project TimeGenerated, FileName, FileHashCustomEntity=Md5Hash, AccountName, SourceTable, DevicesImpacted=dcount_DeviceName, Entitites=bag_p

Executing the query will return a row for each file seen in blob or file storage. The row will indicate how many devices the file was downloaded to, alongside an Entities field that contains the impacted host information and the process used to initiate the file. For example, if in this data we saw that winword.exe was used to create the file on disk, it’s possible the file was dropped by the word process after the successful execution of malicious code.
Hunting: Implicated User Account
Storage logs do not record the user account that was used when the file upload event occurred, this is because a shared access token can be used which is not implicitly linked to a single user account. In instances where the threat actor uses the Azure Portal to upload and manipulate files within file or blob storage, we can create a hunting query that links sign in activity to the upload event.+
The below query will look back 1 minute prior to the file upload and then extract sign in entries from SigninLogs based on the IP address, the query will perform an additional check to ensure and the previous sign in match (this can be commented out if you suspect the threat actor is spoofing their user agent). The look back period can be adjusted at the top of the query, and the query can also be adapted to search for a specific file upload. This query will only successfully link sign in events if the upload used the Azure Portal.
let TimeRange = 7d;
//Period of time to look back in signin logs
let lookback = 1m;
let TargetFile = "mimikatz.exe";
union
StorageFileLogs,
StorageBlobLogs
| where TimeGenerated > ago(TimeRange)
//Collect file uploads
| where StatusText =~ "Success"
| where OperationName =~ "PutBlob" or OperationName =~ "PutRange"
| extend FileName = extract(@"/([w-. ]+)?", 1, Uri)
//Uncomment below to enable file specific matching
//| where FileName =~ TargetFile
//Caller IP has the port appended, remove it
| extend CallerIpAddress = tostring(split(CallerIpAddress, ":", 0)[0])
| extend FileUploadTime = TimeGenerated
| extend WindowStart = FileUploadTime - lookback
| join (
    SigninLogs
    | where TimeGenerated > ago(TimeRange)
    | project AzureLoginTime=TimeGenerated, UserPrincipalName, IPAddress, LoginUserAgent=UserAgent
) on $left.CallerIpAddress == $right.IPAddress
//Look back in the signinlogs for the most recent login
| where AzureLoginTime between (WindowStart .. FileUploadTime)
| project AccountUsed=UserPrincipalName, AzureLoginTime, OperationName, FileUploadPath=Uri, CallerIpAddress, LoginUserAgent, UploadUserAgent=UserAgentHeader
//Optional user agent check
| where LoginUserAgent =~ UploadUserAgent
//Pack and summarise the matching login events by the upload event
| extend p = pack("AccountUsed", AccountUsed, "AzureLoginTime", AzureLoginTime, "UserAgent", LoginUserAgent)
| summarize LoginEvents=make_bag(p) by FileUploadPath, OperationName, UploadUserAgent
Hunting: MSTICPy TILookup
The threshold for a malicious file upload alert from Azure Defender is set high, this is so that it does no generate large volumes of alerts, only alerting you to the most dangerous files. As part of the Ignite demo we saw how additional tools were uploaded by the attacker, while one of these triggered an alert, two of the tools did not reach the threshold for alerting. Once we identified additional files in our storage account, we could use a 3rd party service like VirusTotal to get additional insights into the files based on their hashes.
If the actor is using our blob storage for command and control, or if they are operating a large campaign, we may see many files and associated hashes, so we need a way to look them up programmatically.
A quick way to lookup multiple hashes is by using the MSTICPy TILookup feature. MSTICPy is a python library created by the Microsoft Threat Intelligence Center to help with cyber security data analysis. Once installed, MSTICPy provides access to a range of useful python tools to manipulate, enrich and pivot on data. MSTICPy can be found here on github.
One of the classes that is part of MSTICPy is TILookup. This class allows you to easily perform single IOC or multi-IOC lookups from Python. You can find more information about the TILookup class here, and full documentation for MSTICPy can be found here.
In this blog we are going to create a notebook that will connect to our Azure Sentinel Log Analytics environment, execute a Kusto query from Jupyter Notebooks using the MSTICPy query provider, and then send the hashes to VirusTotal to collect additional file enrichments. The complete notebook can be found here.
Upon execution the notebook will import the required packages and then allow you to select the workspace you want to investigate and the time range for the notebook to execute the query.

Executing the next cell will authenticate with your workspace, simply copy and paste the code into the popup dialogue. Ensure you authenticate with a user account that has access to the Azure Sentinel Log analytics instance.
After successful authentication we can execute a Kusto query using the MSTICPy query provider, this is a modified version of our earlier query and will extract information from Azure Sentinel where a file was uploaded to blob or file storage.

Now we have the hash data from Azure Sentinel, we can use the MSTICPy TIProvider to look up the hashes in VirusTotal. We can unique and convert the hashes to a list from the dataframe directly, we can invoke a new ti_lookup provider and then perform the lookup. The screenshot below shows the code and the expected output.

Here we can see that two of the files seen in blob storage are marked as high severity. By enriching our storage files with information from VirusTotal we have gained additional insights into the malicious files uploaded to our blob or file storage. VirusTotal should not be used in place of an EDR solution, however this notebook can be used as part of an investigation.
Hunting: Suspicious File Operations
We have seen how to automatically enrich Azure Defender malicious file upload alerts, and how to investigate those incidents with hunting queries, but what happens if a file is uploaded that doesn’t match a known-bad hash?
There are a few approaches we can use to uncover potentially suspicious file activity without an alert triggering by looking for suspicious file operations.
File Exfiltration
When threat actors compromise file or blob storage accounts, they may use them for file exfiltration, uploading stolen data from your environment to the storage account. A common behaviour when exfiltrating data is to delete it from the victim network after it has been retrieved. This is to reduce the intrusions footprint on the compromised network and remove evidence of the compromise that may later be found during an investigation.
We can use storage logs of identify files that were uploaded and then deleted within a 5-minute window of the upload. This will allow us to find situations where automated file exfiltration and collection has taken place. The query below will return a row when such activity is detected
let threshold = 5m;
let timerange = 7d;
let StorageData =
union
StorageFileLogs,
StorageBlobLogs;
StorageData
| where TimeGenerated > ago(timerange)
| where StatusText =~ "Success"
| where OperationName =~ "PutBlob" or OperationName =~ "PutRange"
| extend Uri = tostring(split(Uri, "?", 0)[0])
| join (
    StorageData
    | where TimeGenerated > ago(timerange)
    | where StatusText =~ "Success"
    | where OperationName =~ "DeleteBlob" or OperationName =~ "DeleteFile"
    | extend Uri = tostring(split(Uri, "?", 0)[0])
    | project OperationName, DeletedTime=TimeGenerated, Uri
) on Uri
| project TimeGenerated, DeletedTime, OperationName, OperationName1, Uri, CallerIpAddress, UserAgentHeader, ResponseMd5, AccountName
| extend windowEnd = TimeGenerated+5m
| where DeletedTime between (TimeGenerated .. windowEnd)
Next, we can create a query that detects manual file exfiltration activity. Typically, files in cloud storage are accessed by many people, or multiple times, after they are uploaded. If the threat actor is using a manual file exfiltration system, we may be able to detect it by looking for instances where a file is uploaded, accessed by a single client IP, and then deleted. The query below will return a result when it detects this behaviour.
let threshold = 5m;
let timeRange = 15d;
//Union the file and blob data
let StorageData =
union
StorageFileLogs,
StorageBlobLogs;
//Get file and blob uploads
StorageData
| where TimeGenerated > ago(timeRange)
//File upload operations
| where StatusText =~ "Success"
| where OperationName =~ "PutBlob" or OperationName =~ "PutRange"
//Parse the URI to remove the parameters as they change per request
| extend Uri = tostring(split(Uri, "?", 0)[0])
//Join with deletions, this will return 0 rows if there was no deletion
| join (
   StorageData
   |where TimeGenerated > ago(timeRange)
   //File deletion operations
   | where OperationName =~ "DeleteBlob" or OperationName =~ "DeleteFile"
   | extend Uri = tostring(split(Uri, "?", 0)[0])
   | project OperationName, DeletedTime=TimeGenerated, Uri, CallerIpAddress, UserAgentHeader
   ) on Uri
| project UploadedTime=TimeGenerated, DeletedTime, OperationName, OperationName1, Uri, UploaderAccountName=AccountName, UploaderIP=CallerIpAddress, UploaderUA=UserAgentHeader, DeletionIP=CallerIpAddress1, DeletionUA=UserAgentHeader1, ResponseMd5
//Collect file access events where the file was only accessed by a single IP, a single downloader
 join (
   StorageData
   |where Category =~ "StorageRead"
   |where TimeGenerated > ago(timeRange)
   //File download events
   | where OperationName =~ "GetBlob" or OperationName =~ "GetFile"
   //Again, parse the URI to remove the parameters as they change per request
   | extend Uri = tostring(split(Uri, "?", 0)[0])
   //Parse the caller IP as it contains the port
   | extend CallerIpAddress = tostring(split(CallerIpAddress, ":", 0)[0])
   //Summarise the download events by the URI, we are only looking for instances where a single caller IP downloaded the file,
   //so we can safely use any() on the IP.
   | summarize Downloads=count(), DownloadTimeStart=max(TimeGenerated), DownloadTimeEnd=min(TimeGenerated), DownloadIP=any(CallerIpAddress), DownloadUserAgents=make_set(UserAgentHeader), dcount(CallerIpAddress) by Uri
   | where dcount_CallerIpAddress == 1
   ) on Uri
| project UploadedTime, DeletedTime, OperationName, OperationName1, Uri, UploaderAccountName, UploaderIP, UploaderUA, DownloadTimeStart, DownloadTimeEnd, DownloadIP, DownloadUserAgents, DeletionIP, DeletionUA, ResponseMd5
Uploads from Suspicious IP Addresses
A threat actor is most likely to access the storage account from their own infrastructure. Earlier we built a small query to identify when VPN providers are used to access our storage keys; we can re-use components of that query to detect when a VPN IP is used to upload file to blob storage.
let IP_Data = (externaldata(network:string)   [@"https://raw.githubusercontent.com/Azure/Azure-Sentinel/master/Sample%20Data/Feeds/VPS_Networks.csv"] with (format="csv"));
union StorageFileLogs,
StorageBlobLogs
| where TimeGenerated > ago(7d)
//File upload operations
| where StatusText == "Success"
| where OperationName =~ "PutBlob" or OperationName =~ "PutRange"
| evaluate ipv4_lookup(IP_Data, CallerIpAddress, network, return_unmatched = false)
| summarize make_set(OperationName), min(TimeGenerated), max(TimeGenerated) by CallerIpAddress, Uri
Mass File Deletion
With an increase in Human Operated Ransomware, it’s becoming more likely that cybercrime groups will seek to damage or delete cloud backups prior to deploying ransomware to an on-prem network. If a cybercrime group can pivot to your cloud environment using stolen credentials, it is possible they will seek to damage, delete, or encrypt files stored in Azure Storage accounts.
Mass file deletion activity can be detected using File and Blob storage logs. The query below will collate File and Blob Storage events, and then return a result where the number of deletions from a single IP address in a specified window breaches a pre-defined threshold. In the example query below, if 3 or more deletions take place within a 10-minute window, a row will be returned.
let deleteThreshold = 3;
let deleteWindow = 10min;
union
StorageFileLogs,
StorageBlobLogs
| where TimeGenerated > ago(3d)
| where StatusText =~ "Success"
| where OperationName =~ "DeleteBlob" or OperationName =~ "DeleteFile"
| extend CallerIpAddress = tostring(split(CallerIpAddress, ":", 0)[0])
| summarize dcount(Uri) by bin(TimeGenerated, deleteWindow), CallerIpAddress, UserAgentHeader, AccountName
| where dcount_Uri >= deleteThreshold
| project TimeGenerated, IPCustomEntity=CallerIpAddress, UserAgentHeader, FilesDeleted=dcount_Uri, AccountName
In Conclusion
In this blog we have expanded on many of the concepts touched on during the Ignite demo. We have covered how to replicate the alerts we saw as part of our Ignite investigation.
The Ignite demo showed a planned investigation following a single investigative path. This article has provided additional investigative steps and pivots, allowing you to explore the rich logging provided by Azure Storage. We built several hunting queries using Azure Storage logs to uncover additional malicious activity. Each of these queries shows how different data sources can be brought together in Azure Sentinel for an improved hunting experience.
Azure Activity Logs: Our investigation into Azure Activity logs uncovered the threat actor viewing access keys that enabled them to upload file to Azure Storage. This allowed us to identify the user account that had been compromised.
Microsoft 365 Defender Advanced Hunting: Using data from the DeviceFileEvents table provided by M365D, it was possible to identify which machines in our network the files hosted in storage were distributed to.
Sign in Logs: Merging data from storage logs with sign in events provided another mechanism for us to determine the likely user account used to upload the file based on IP and user agent correlation.
VirusTotal: Through MSTICPy we were able to execute multiple file hash queries against VirusTotal to provide further insight into the files found within our storage account. While in this example we used VirusTotal, any third party data source could be used to enhance our investigation through Azure Sentinel Connectors, or through API lookups using MSTICPy.
Hunting queries: We also created hunting queries to help detect potentially suspicious file activity, covering exfiltration of data from our network to mass deletion events that may be a sign of an impending ransomware attack.
This blog has shown how Azure Sentinel provides a broad view of compromises taking place in both on-prem and cloud environments. Azure Sentinel brings together data from disparate log sources and allows us to build powerful Kusto queries to hunt for and detect malicious activity.
GitHub Sentinel Queries
Detection: Additional Files Uploaded by Actor
Hunting: Azure Administration from VPS
Hunting: Azure Storage File Create, Access, Delete
Hunting: Azure Storage File Created then Quickly Deleted
Hunting: Azure Storage File on Endpoint
Hunting: Azure Storage Mass Deletion
Hunting: Azure Storage Upload from VPS
Hunting: Azure Storage Upload Link Account
Further Reading
Learn more about what’s new with Azure Sentinel in Sarah’s post here: Cloud SIEM Innovations from Azure Sentinel (microsoft.com)
by Contributed | Mar 2, 2021 | Technology
This article is contributed. See the original author and article here.
In my blog post last September, I called out the herculean work of the IT admin community in shepherding organizations through the new era of remote work in response to the pandemic. Five months later the role of the IT professionals is no less critical, especially as we begin to shape what the “new normal” looks like.
In talking with many of you, we overwhelmingly hear about your challenges balancing the need to stay focused on strategy and business problems, with the work that often gets in the way of that—managing deployments, security updates, and support calls from users. That’s why we are excited to share new features to make this easier!
In May and September 2020, we announced new cloud-based capabilities in the following three areas: intelligent insights, servicing automation with controls, and Microsoft 365 Apps health. Since then, we’ve seen over 11 million devices running Microsoft 365 Apps onboard to Inventory. We’ve also provided IT admins with over eight million app health metrics and delivered servicing updates to over 500,000 devices with our new Servicing Profile, keeping them continuously secure with the latest security improvements and up to date with improvements for collaboration and remote work.
Today, we are excited to announce improvements and more new capabilities to keep devices up to date, give you greater control and enable you to more easily manage Office as a service:
- New in Microsoft 365 Apps Inventory and Servicing Profiles
- General availability of Skip and Rollback
- General availability of Microsoft 365 Apps health
Gain comprehensive insights with the new Microsoft 365 Apps Inventory
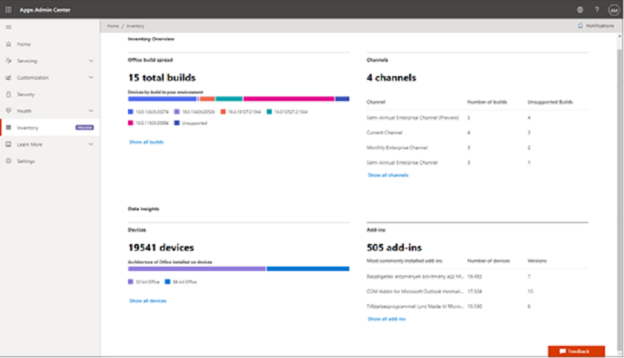
When it comes to understanding the Office apps environment in your enterprise, we know you need answers quickly. By using the apps Inventory service available in preview today, you gain deep insights into Microsoft 365 Apps in your organization. With these details, you can quickly identify anomalies, such as version sediment across your apps and add-ins. We have learned what is important from the feedback of partners and customers who helped us define and design these capabilities. We heard that understanding the versions of Office builds deployed across your organization, the number of devices with Microsoft 365 Apps, and the most installed add-ins are important to help you quickly assess and make decisions about security posture, quality of employee experience and expediting deployments. You can even view the last time a device checked into the service. Learn more about Inventory in the Microsoft 365 Apps admin center.
Inventory overview in Microsoft 365 Apps admin center
Managing positive security posture is the top priority for all of us. Keeping Microsoft 365 Apps current with the latest patches contributes to positive security posture in a rapidly evolving security landscape. We included security update status by device (currently in preview) as a key metric that IT pros can monitor across the estate. This metric helps you assess the coverage of your enterprise with the latest security updates for Microsoft 365 Apps, share with your Security team, and take appropriate actions to remediate imminent threats.
You can also set goals for applying updates, tracking update progress, and identifying where your IT organization can improve processes to ensure devices stay up to date with Microsoft 365 Apps. Finally, you can also export all of this data for internal reporting or for sharing information with auditors and regulators. Learn more about security update status report.
Automate for more efficient Office updates with Microsoft 365 Apps Servicing Profiles
Since announcing the preview of Servicing Profiles last September, we’ve serviced more than 500,000 devices with Microsoft 365 Apps to keep them continuously updated. Now you can use the Servicing Profile feature (currently in preview for Monthly Enterprise Channel) to efficiently manage and automate how devices receive monthly updates directly from the Office Content Delivery Network (CDN). To ensure IT admins are at the helm, we built a set of explicit controls that enable you to pause and resume the updates with a click of a button. Additionally, we have heard that many organizations want the ability to automatically pause updates from being delivered during specific times, typically during tax or holiday seasons, to reduce the possibility of disruption for critical business processes. You can easily schedule these with our exclusion dates feature.
“From previously managing updates from ConfigMgr, using the Servicing Profiles from within the Apps Admin Center is a breath of fresh air.”
– Matt B, Technical Systems Engineer, Cisco
Coming soon to preview, you’ll be able to set Servicing Profiles by using Azure Active Directory (AD) user or device groups. If an issue is detected post update, you will be able to restore the device to the previous Office build and pause the rollout until the issue is resolved. For broader issues affecting a larger number of devices, you will be able to restore and pause updates using Azure AD groups. Today, Servicing Profile is only available in preview for the Monthly Enterprise Channel and will be available in preview for the other channels at a later date. Learn more about our update channels to help you deliver the latest value to the business.
Streamline servicing of Microsoft 365 Apps with Skip and Rollback
We designed Servicing Profiles to meet the needs of all organizations regardless of their complexity. But we believe that many environments will be sufficiently served by using Skip and Rollback in Version management* based on your preselected default channel. With Version management, you can easily roll back all your devices to a previous version of Office or skip an upcoming update. You can find this feature, now generally available**, in the Microsoft 365 admin center under Settings > Org settings > Services > Office installation options.
 Skip and rollback are now generally available in the Microsoft 365 admin center
Increase performance, reliability, and security with Microsoft 365 Apps health
We’re excited to announce that Microsoft 365 Apps health is generally available this month. Since we first previewed this capability, we’ve provided insights for over eight million devices through the dashboard. Now, via the Microsoft 365 Apps admin center, you can see reliability and performance trends by app and channel, and features like Reliability advisories, advisory history and diagnostic data coverage to help you easily monitor, optimize, and discover issues with Microsoft 365 Apps in their environment.
 Microsoft 365 Apps health is generally available this month
Like the Inventory and Servicing Profile dashboards, the Apps health dashboard provides at-a-glance views for quickly spotting anomalies that might need investigation and troubleshooting. You can identify devices running unsupported Office builds, a list of advisories for your organization, and devices covered by Apps health. You can also see trends over the last 30 days to view trends by channel and see any correlation between current advisories and those that occurred in the past.
The Microsoft 365 Apps health dashboard provides visibility and actionable guidance about the health of the deployment of Microsoft 365 Apps. Microsoft processes diagnostic data from your environment to produce these valuable insights and give you confidence that the deployment of Microsoft 365 Apps in your organization is secure, up to date and behaves properly.
A frequent request we receive from IT admins is to help them assess the quality of their Office deployment and compare it to similar companies. To deliver on this need, we are introducing aggregate industry benchmark to evaluate performance, currency, and reliability and other key metrics of your deployment with your industry peers. We will be gradually rolling out this feature in the coming weeks.
To preview and start using all these new features, log in to Microsoft 365 Apps admin center. Check out our Guide to Microsoft 365 Apps deployment and servicing at Microsoft Ignite to learn more about all the new features coming your way soon. Have a question? Join our Office deployment experts on March 3 and March 10 for live Office Hours Q&A sessions to ask any questions you have about deploying and servicing Microsoft 365 Apps. Or head over to the Microsoft 365 Tech Community discussion space to continue the conversation!
Footnotes:
*If you’re already using another method to manage Office updates on devices in your organization, such as Group Policy or Microsoft Endpoint Configuration Manager, then the choices on the Office installation and the Version management tabs won’t apply to those devices.
**The skip and rollback functionalities are now available in the Microsoft 365 admin center, but are not available to customers who have the following plans: Office 365 operated by 21Vianet, Office 365 Germany, Office 365 GCC, or Office 365 GCC High and DoD.
by Contributed | Mar 2, 2021 | Technology
This article is contributed. See the original author and article here.
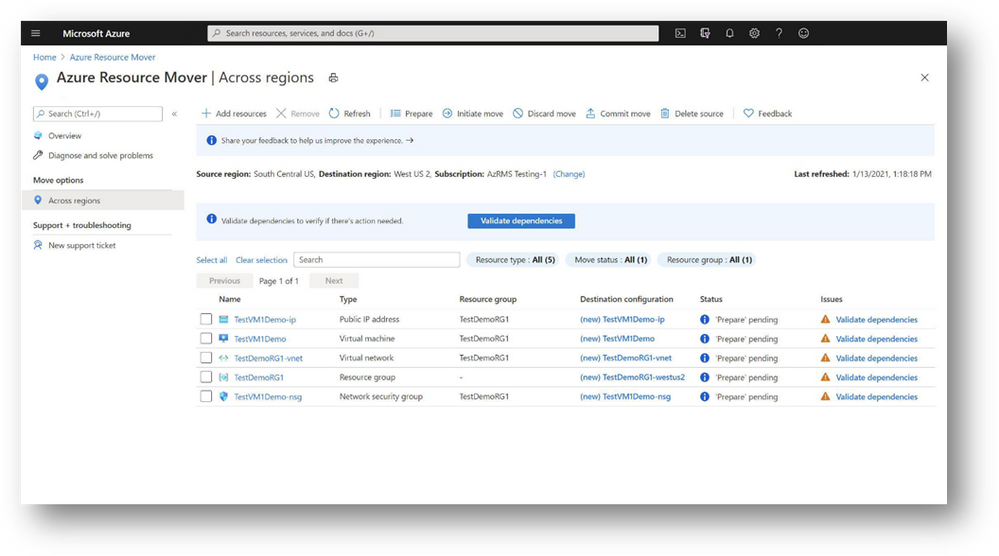
Today, we are excited to announce the General Availability of Azure Resource Mover, a free global service available for use in all public regions and within regions in China. We announced the Public Preview of Azure Resource Mover at Ignite last year and since then the service has seen healthy adoption by customers looking to move resources between regions and whose valuable feedback has helped drive improvements to the service.
Enterprise grade customers are constantly looking for ways to reduce latency, ensure compliance with the latest data governance and sovereignty regulations, and achieve business continuity on Azure. Azure Resource Mover is built to get the most from Azure’s datacenter region portfolio, providing customers with the flexibility to operate in the location that best suits their needs. We continue to expand Azure to new markets with new datacenter regions announced in 14 countries in 2020 and additional expansion in the US, Indonesia, and China in 2021. In the last year Azure has launched Availability Zones in an additional 5 regions with a roadmap to have AZs in every country we operate Azure in by the end of 2021. With Azure Resource Mover, customers can now take advantage of Azure’s growth in new markets and regions with Availability Zones with moves across regions that support their business needs.
Key enhancements and new features
Azure Resource Mover transforms the way customers can move resources between regions, now with improved controls and enhancements to enable enterprise grade customers to plan large scale moves confidently with even fewer steps than before.
- Azure Resource Mover now further simplifies the dependent resources analysis by validating and identifying all dependent resources in a single step. This reduces the multiple iterative steps previously required to discover all the resources in the environment, thus making planning for large scale even more seamless.

- Customers from various industries such as Banking, Financial services or Healthcare may have sensitive data, which they encrypt using keys or certificates in key vaults. Azure Resource Mover now supports VMs encrypted using Customer Managed Keys (CMK) or Azure Disk Encryption (ADE) mechanisms.
- We have heard from our customers that they needed a native experience within Azure Resource Mover that allows delete of source resources. We are now happy to announce that users can now delete multiple resources simultaneously using the delete source feature that provides full control and confidence with validations in place to ensure the delete is performed only after the move is completed.
- VM replication health monitoring is now enabled once the ‘Prepare’ phase is complete, exposing any warnings and take corrective actions if there are any issues with ongoing replication.
We have designed Azure Resource Mover with customer feedback and experience in mind. Customers using Azure Resource Mover can now provide real-time feedback and communicate directly with product teams throughout the move experience. The service is now available through the Azure portal, PowerShell, and SDKs with any Azure subscription. Learn more about Azure Resource Mover and how you can get started on your move.
by Contributed | Mar 2, 2021 | Technology
This article is contributed. See the original author and article here.
At Ignite in September we announced Microsoft 365 Defender, a unified XDR security solution for identities, endpoints, cloud apps, email and collaboration. Since then, we’ve seen tremendous results, with customers taking advantage of deep integrations that modernize security operations and prioritize actionable insights across their enterprise assets. In fact, in one case we saw consolidation from 1,000 alerts to just 40 high-priority incidents. Built-in self-healing technology has fully automated remediation tasks in action in more than 70% of the time and helps defenders to focus on other tasks that better leverage their knowledge and expertise.
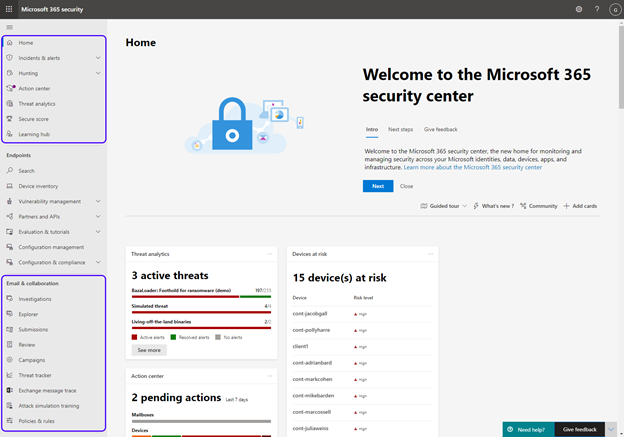
Announcing public preview of the unified security portal
We’re incredibly excited about this unified approach to threat protection, and today we announced the public preview of the new Microsoft 365 Defender and the unified security portal, which now includes Microsoft Defender for Office 365. This is an important milestone in our journey to provide consolidated security tools that deliver intelligent and integrated security across domains.
Figure 1: The new Microsoft 365 Defender portal
Customers are now able to use the unified portal to manage security operations across Microsoft Defender for Office 365 and Microsoft Defender for Endpoint. This new portal is available at security.microsoft.com, and it contains all the Defender for Office 365 capabilities you use today, with the addition of some new features as well.
What’s new in the Security portal?
In the new converged portal, we are surfacing the same great experiences you know from Defender for Office 365 and incorporating new experiences for cross-workload detection and response to security incidents. These new capabilities can only be found in the new Microsoft 365 Defender portal, and they allow security teams to investigate and hunt in one centralized location, harnessing the power of correlation of signals across products.
Microsoft 365 Defender and the unified portal introduce new and exciting capabilities such as:
- Incidents – a unified investigation page that correlates multiple alerts into a single incident, including details on triggering alerts, impacted assets, and deep-dive details across your endpoints, identities, cloud apps, and Office 365 environment. Learn more about incidents in Microsoft 365 Defender here.
- Threat Analytics – detailed in-product threat intelligence reports providing in-depth analysis and context around the real-world threats tracked by Microsoft experts. Each report shows where and how your organization may be affected through incidents and alerts and provides recommendations to mitigate and prevent these threats. Learn more about Threat analytics in Microsoft 365 Defender here.
- Email investigation page – A comprehensive view that surfaces a variety of insights and contextual data for each email, helping security teams investigate emails from a single view. Learn more about the email entity page in Microsoft 365 Defender here.
- Learning Hub – a collection of educational resources to help you get started, including things like blogs, how-to videos, interactive guides, and official product documentation.
 Figure 2: The new email investigation page in the Microsoft 365 security center
In addition, the new security portal provides advanced tools for post-breach investigation, like:
- Unified alerts queue and a new alert details page – a new look for alerts that provides a simple to use experience for alert analysis, surfaces more details on each alert, and provides a drill down to continue with a detailed investigation in Threat Explorer
- Advanced Hunting – a tool for examination of data using custom queries
- Automated Incident Remediation – capabilities that save SecOps teams valuable time by leveraging AI-powered automatic remediation capabilities to ensure all impacted assets related to an incident are automatically remediated where possible
- Action Center – A centralized view of actions pending approval
What about the existing capabilities?
While the portal has changed from protection.office.com to security.microsoft.com, what has not changed is our mission to offer customers comprehensive protection of Office 365 against advanced threats.
 Figure 3: Our comprehensive approach to securing Office 365
The new security portal also contains all the capabilities and dashboards your security teams use today in Defender for Office 365. These features have moved into the new security center and can be found in the Email & collaboration section of the navigation pane. Capabilities like Threat Explorer, Submissions, Quarantine, Reports, and policy creation and setting options have all been ported over. Customers will see the features that correspond to their Defender for Office 365 or E5 subscription.
If you have questions regarding the transition, check out our documentation.
Next steps
We’re incredibly excited about this update, and hope you’ll take the time to familiarize yourself with the new security home, learn all about the new capabilities, and locate your previously used tools. You can update your workflows to use the new unified portal at security.microsoft.com. As we move forward towards general availability, the protection.office.com portal will be phased out.
Check out this video for a quick summary of some of the new capabilities for Defender for Office 365 customers.
Are you a Microsoft Defender for Endpoint customer? Learn more about how this transition affects Defender for Endpoint here.
Get involved!
Do you have questions or feedback about Microsoft Defender for Office 365? Engage with the community and Microsoft experts in the Defender for Office 365 forum.
by Contributed | Mar 2, 2021 | Technology
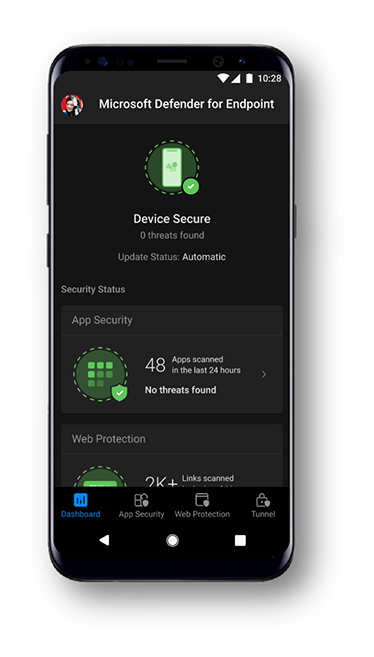
This article is contributed. See the original author and article here.
Today we are excited to announce that Microsoft Tunnel VPN capabilities will show up in the Microsoft Defender for Endpoint app for iOS and Android. This enables organizations to offer a simplified end user experience with one security app, while security and IT teams are able to maintain the same admin experiences they are familiar with.
Later this month, existing customers of Microsoft Defender for Endpoint, who are also licensed for Microsoft Tunnel, will see Tunnel capabilities in the Defender for Endpoint app on Android. On iOS, Tunnel capabilities will be added to the Defender app next quarter. Existing Tunnel customers that opt-in for the new public preview will switch to using the Microsoft Defender for Endpoint app for VPN. They will not see any other changes to Tunnel features, it will simply now appear within the Defender for Endpoint app. IT administrators will be able to continue to use the Microsoft Endpoint Manager admin center to configure both Defender and Tunnel features. For additional details, read the blog announcing these changes.

Microsoft Defender for Endpoint customers will notice an updated look and feel to the app. The new experience helps end users better understand the capabilities the app provides and enables the user to be more aware of the security threats to their device. There are no changes to Defender for Endpoint capabilities on mobile. Microsoft’s mobile threat defense solution will continue to offer:
- Protection against phishing coming from browsing, email, apps, and messaging platforms
- Scans for malware and potentially unwanted apps (on Android)
- Blocking of unsafe connections as well as access to sensitive data (on Android)
- A single pane-of-glass experience for SecOps through the Microsoft Defender Security Center, or the unified Microsoft 365 security center
Finally, we are pleased to share that later this month, we will be offering mobile application management (MAM) support for Android and iOS in public preview. Currently, Microsoft Defender for Endpoint on Android and iOS works on devices that are enrolled with Intune mobile device management (MDM) only. With this update, we are extending support to enable enterprises that are using Intune only for application management to use Microsoft Defender for Endpoint. This will also extend support to devices enrolled with third-party EMM providers as long as they are using Intune to manage apps on the devices.
Please don’t hesitate to share your feedback with us! We look forward to continuing to make our experiences for end users as well as security and IT teams better and better.
Microsoft Defender for Endpoint is an industry leading, cloud powered endpoint security solution offering vulnerability management, endpoint protection, endpoint detection and response, and mobile threat defense capabilities. With our solution, threats are no match. If you’re not yet taking advantage of Microsoft’s industry leading capabilities, sign up for a free Microsoft Defender for Endpoint trial today.
by Contributed | Mar 2, 2021 | Technology
This article is contributed. See the original author and article here.
I hope you are all having a great time at Microsoft Ignite! My name is Chris Hoard, Partner Education Lead at Vuzion here in the UK. I am a Microsoft Certified Trainer Regional Lead (MCT RL) and Office Apps and Services MVP. I am interested in everything Microsoft – however my principle focus is Microsoft 365 and all the apps within it.
A few weeks ago, I had the pleasure of meeting Melinda Hu for the first time. Melinda is the PMM for Microsoft Forms, and in our discussion, we covered a number of things including how Forms has matured over the last few years, how it could develop further, and how I use them every day for the education practice that I run here in the UK. Of all the apps in the Microsoft 365 stack, I rate Forms as highly as Microsoft Teams, Lists and Stream – powerful apps both in and of themselves which help us individually and as a team to save time and be more productive. However, in this blog I want to show the power of Forms when used alongside several other Microsoft 365 apps such as Power Automate, Lists and even Yammer. This is an example of how we can take Forms to the next level.
I am going to break it down into three parts:
- How Forms helps me capture data
- How I can analyse data that I receive from the form
- How I can act on data that I receive from the form
In the scenario I’m walking through below, I have an education practice which runs cloud computing courses. The Form that I will create will be used to capture feedback on multiple courses, including the quality of the course
PART ONE: HOW FORMS HELPS ME CAPTURE DATA
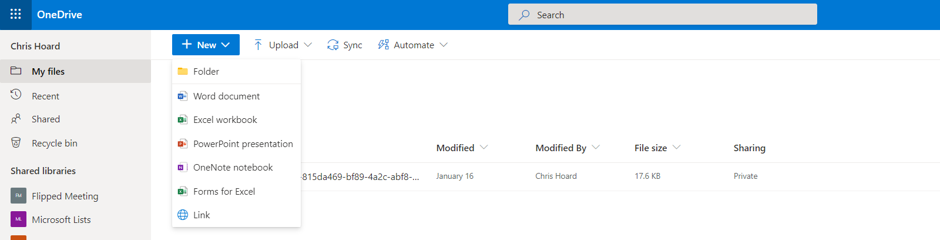
My first step is to create the feedback form itself. I don’t do this at https://forms.office.com but in OneDrive for Business via Forms for Excel. I choose a name for the Form and then Create.

I now populate the Form. As you can see it’s a simple form with four questions – Name (Text), Course Attended (Choice), Instructor (Choice) and Course Rating (Rating).

I then create a corresponding List within Microsoft Teams. In Teams, I create that List with column names corresponding to the questions in the Form

Now I connect the Form and List via Power Automate. I go to https://flow.microsoft.com and then select create

I select Automated Cloud Flow.

I search for the trigger When a new form response is submitted then Create.

I select the new form in the Form ID field from the dropdown and then select New Step.

I search for and select Get response details (Forms).

In the Form ID field I select the new form from the drop down and in the Response ID field add the dynamic content Response ID. I select New Step.

I now search for and select Create Item (SharePoint).

In the Site Address field, I add the URL of the SharePoint Site where the list is housed from the dropdown. In the List Name I then select the List created earlier. The next four fields will correspond to the List Columns – add the dynamic content corresponding to the form questions so the answers to the questions in the form go into the right List columns.
Once done select Save.

Now I test the form. The responses should go into both the Excel in OneDrive for Business as well as the List in Teams. This will open up the Microsoft 365 stack as we look to analyse and act on data from our form. If you want a team/sharepoint site to house the data instead of an individual’s onedrive, you can always create a form at https://forms.office.com, create an Excel online document in the underlying sharepoint site of the team, create a table within that Excel similar to the List, then add an extra step on the flow to add a row into a table after it has been created in the List.


PART TWO: HOW I CAN ANALYSE THAT DATA FROM THE FORM
Now that data is coming in through my form and captured in both Excel (in OneDrive) and the List there is a few ways that I can analyse that data to make better data driven decisions based upon the data that is being captured. Firstly, I can always go into https://forms.office.com and look at the form to see analytics and insights from the form responses.

Secondly, if I want to go use the form data alongside other data sources, I can surface those responses in Power BI. As I have created the form through OneDrive (or if the data is added into an Excel within SharePoint via the flow as suggested above) the data can be ingested into a Power BI workspace and kept up to date continuously as opposed to having to manually import it periodically. So I go to Power BI at https://app.powerbi.com/ select Workspaces and then Create a Workspace.

I give the workspace a name and description and select Save.

I select Add Content.

On Files I select Get.

I select OneDrive – Business.

I select the Excel connected to my form and select Connect.

As I intend to keep the Excel in OneDrive, I select Import.

I select the Dashboard.

I then click on the data.

From a blank canvas, I can now go on to build the visualisations I want from the form data.

Once saved as a report this can the added back into Microsoft Teams as a Tab within the channel.

I can even surface it easily in the new Power BI app within Teams. Awesome.

PART THREE: HOW I CAN ACT ON DATA THAT I RECEIVE FROM THE FORM
Data is coming through my form and captured in both Excel (in OneDrive) and the List within Teams. It is being analysed and provides insights within the Forms app and from Power BI, where I can begin to blend it with other data I capture, should I need. Now, I need to act on that data – however, I think this would be even more awesome if I could save myself time and have it be done in an automated way. For example, if the rating of the course was high, I can let my organisation know of its success. If it were low, I can reach out and ask for ways to improve. For this, I add another question to my form which captures the email address of the attendee. You’ll see why in a moment.

I head back to Power Automate at https://flow.microsoft.com and in my flow add New Step. I search for, and select condition.

I am going to tackle bad feedback for courses through the form first. In the condition box I add the dynamic content for the course rating and set contains “1” – the lowest mark possible. In the yes box I select add an action.

I search for and select Send an Email (v2) (Outlook).

I now complete the email action, using dynamic content Email Address (Forms) to send an email to the attendee who gave the low score. It’s requests them to then go to another Form in order to suggest how the course can improve. I have also used dynamic content such as Name (Forms) and Course Attended (Forms) to personalise the email.

I test this to make sure that it works. I send the form with a rating of 1.

I now receive an email calling me to another form to feedback on course improvements.

I can now feedback on the course and how it can improve.

So my flow is now set for low scores, but what about high ones? This is something which I want to broadcast to my team, and to my organisation to let them know of the good news. I head back yet again to Power Automate at https://flow.microsoft.com and in my flow, within the no box of he condition I select Add an Action.

For a second time I search for, and select condition.

In the second condition box I add the dynamic content for course rating and set contains “5” – the highest mark possible. In the No box I select add an action.

I search for and select Terminate.

What this does is that it stops the flow with no further action if the score on the form is neither a 1 or a 5. The flow ends as successful. In the Yes box I now select add an action.

I search and select Start and Wait for an Approval.

I complete the approval fields – again using dynamic content to complete the title and the details (the body of the approval). I select add an action.

I search for and select Post a Message (v3) (Teams).

I complete the message I want to send to the team, and personalise that with dynamic content. I select Add an action.

I search for and select Post Message (Yammer).

I complete the message I want to send to the organisation, and personalise that with dynamic content.

I now Save the flow. Here it is in its entirety – all based on a single form.

I have a final test by submitting another form with a rating of 5.

An approval shows in Microsoft Teams. I select Approve.

The team is messaged the good news in the Teams channel…

…and so is the wider organisation in Yammer.

CONCLUSION
We broke down this blog into three parts:
- How Forms helps me capture data
- How I can analyse data that I receive from the Form
- How I can act on data that I receive from the Form
In part one, I showed how form data can go into Lists as well as Excel sheets housed in OneDrive (or in SharePoint if you want it out of personal storage). This means we can get data to where we can analyse and act on it. In part two, I showed how we can use analytics already in the Forms app but can go beyond this by using Power BI to create rich workspaces and dashboards, which we can pipe back up into Teams. This would be great to review the running feedback on courses where things like instructor performance, content and format can be reviewed over time. In part three, I showed how we can act on the form data. If a course is scored low, we can have an immediate response via email to the attendee who felt the course could be improved, whereas if a course is scored high, we can get that great feedback to the team, and broadcast it out to our organisation. The amazing thing here is that all of this is automated. And this isn’t the end – there is much more scope as this was only a simple form and a simple setup.
Thanks for taking the time to read. I hope you have an amazing time at Ignite!
You can follow me on:
Twitter: @Microsoft365Pro
by Contributed | Mar 2, 2021 | Technology
This article is contributed. See the original author and article here.
March 2021 Edition Sections:
- Highlighted
- Microsoft Teams – IT Admins & Planning
- Microsoft Teams – End Users & Champions
- Security & Compliance
- Device Management
- Ignite 2021
- Blogs & Articles of Interest
Highlighted
This month we highlight our annual Ignite conference, along with some new Teams-focused events.
Microsoft Ignite – March 2021
When: Tuesday, March 2, 2021 – Thursday, March 4, 2021 | Join our digital experience on March 2–4, 2021 to learn, connect, and explore new tech that’s ready to implement. All skill levels welcome. Save the date! Registration is now open.
Ask Microsoft Anything (AMA): Microsoft Teams Virtual Events
When: Tuesday, March 9, 2021 at 9:00am PT | We are very excited to announce a Microsoft Teams ‘Ask Microsoft Anything’ (AMA) for Virtual Events in Microsoft Teams! The AMA will take place on Tuesday, March 9, 2021 from 9:00 a.m. to 10:00 a.m. PT in the Microsoft Teams AMA Space. An AMA is a live online event similar to a “YamJam” on Yammer or an “Ask Me Anything” on Reddit. This AMA gives you the opportunity to connect with members of the product engineering team who will be on hand to answer your questions and listen to feedback. Be sure to add the event to your calendar!
Microsoft Teams Summit: March 2021 | Online Event
In 2020, remote and hybrid working became the new normal. Through Microsoft Teams, we came together; connecting, collaborating – and keeping our teams productive, creative and secure. Microsoft is hosting a three-day digital event, The Microsoft Teams Summit, commencing the week of March 22, 2021. It’s an event you won’t want to miss. You’ll hear from experts on how Teams can supercharge the way you and your organization work and discover best practices from customers who’re using Teams to achieve amazing successes. To make sure you’re getting information tailored to your needs, each of the three days will be dedicated to a different group of Teams users: Business leaders, IT professionals, and our everyday users.. So, however you’re using Teams, join us to discover new ways to enhance your skills, and bring your teams closer together to achieve more.
Microsoft Teams – IT Admins & Planning
Microsoft Teams: Plan your upgrade (Start here!)
Discover everything you need to facilitate a successful upgrade to Teams. By the end of this workshop, participants will be able to: (1) Understand why a formal plan is crucial for upgrade success, (2) Identify the steps to the upgrade success framework, (3) Recognize common attributes of successful customers, and (4) Create and implement their own upgrade plan. The audience for this session is All (Business Sponsors, IT Admins, User Readiness/Change Manager, Project Lead).
Microsoft 365 Virtual Training Day: Enabling Remote Work with Microsoft Teams
To be productive in a remote environment, your employees need to be able to safely collaborate from anywhere. Microsoft 365 Virtual Training Day: Enabling Remote Work with Microsoft Teams helps you provide a remote workforce with the tools, resources and solutions they need to stay connected and productive. Join us to learn how to get the most out of Microsoft Teams online meetings, calling, video and chat, and empower your workforce to work from any location on any device. During this two-part training event, you will explore how to: (1) Enable your people to meet and collaborate from home, (2) Make productivity applications available on any device, and (3) Deliver the best remote user experience.
Teams Chalk Talk: Get to Teams – Zero to Production
Microsoft Teams can help your employees stay connected and collaborate with each other, especially in the current unprecedented time where remote work is a reality of employees around the world. Being able to chat, do video meetings and collaborate on Office documents within Teams can help companies stay productive. Whether you are a small business, a non-profit or a large organization, you can get started with Teams within Microsoft 365 or Office 365 suite – even before deploying any other Office app or service. Join Microsoft Teams experts as we review Teams implementation for collaboration, chat and meetings. We’ll share key configurations, considerations, best practices, and resources to get your users up and running quickly. After this session, you will be able to: (1) Recognize key success factors for technical and user readiness, (2) Identify pre-requisites and tenant setup for your environment, (3) Install the Teams clients appropriate for your organization, (4) Configure policies that enable your preferred user experiences, and (5) Leverage collaboration features to enhance remote work scenarios.
Teams Chalk Talk: Apps in Teams Fundamentals
Join Microsoft Teams experts as we review how you can deploy commonly-used applications directly within Teams, enabling your users to work more efficiently and effectively by accessing everything they need in a single interface. This foundational workshop covers basic capabilities across app management and security. With over 400 out-of-the-box applications available (and growing), you’re sure to find an app, or two, that your team can begin using today in Teams. After this session, you will be able to: (1) Identify suitable apps to meet the needs for your organization, (2) Recognize common attributes of successful app deployment, (3) Navigate security and compliance considerations for Teams’ apps, and (4) Determine the next steps to deploy an app to your environment.
Teams Chalk Talk: Taking charge of AV quality experiences
Are you looking to ensure users have optimal experiences with meetings and voice capabilities in Teams? During this session, we’ll discuss tools, reporting and best practices to help you manage service quality — from establishing a proactive strategy to resolving common quality issues as they arise. We’ll build upon best practices from Teams experts and make it real with examples of common scenarios that may arise as your organization embraces meetings and voice capabilities in Teams. Join us for an expert-led workshop for guidance on key resources and actionable insights to manage audio and video quality with Microsoft Teams. Your users will thank you for it! After this session, you will be able to: (1) Define key service metrics and user experience factors for quality, (2) Recognize concepts and metrics in core tools and resources that help you assess usage and quality, (3) Identify key indicators of poor experience in common scenarios and relevant actions to address, and (4) Establish a proactive quality management strategy to ensure optimal user experience.
Teams Chalk Talk: So…you want to make calls with Microsoft Teams?
Are you ready to add PSTN calling capabilities to Microsoft Teams? Join Microsoft Teams Engineering subject-matter-experts as they demystify the options for adding PSTN calling to Teams, provide you with best practices for configuring calling options and show you how to monitor call quality. After this session, you will be able to: (1) Understand the history of voice services in Microsoft products, (2) Identify what calling options in Microsoft Teams are right for you, (3) Configure your calling options in the Teams admin portal, and (4) Monitor and use call quality tools in Teams.
Microsoft Teams – End User & Champions
Get Started with Microsoft Teams
Whether you are switching from Skype for Business or brand new, join us to learn the basics of how to use Teams to chat with your colleagues and collaborate on projects. Through a series of live demonstrations and best practices, you’ll leave this session with everything you need to start using Teams. After this session, you will be able to: (1) Set up your profile and notifications in Microsoft Teams, (2) Use chat and calling for 1:1 and group conversations, sharing and collaboration in Microsoft Teams, (3) Schedule and conduct meetings in Microsoft Teams, and (4) Align your team and teamwork in Microsoft Teams.
Customer Immersion Experience: Getting Started with Microsoft Teams
Whether you are switching from Skype for Business or brand new, join us to learn the basics of how to use Teams to chat with your colleagues and collaborate on projects. Join us for this session and leave this with everything you need to start using Teams. During this 2-hour interactive session, you will explore how to: (1) Set up your profile and notifications in Microsoft Teams, (2) Use chat and calling for 1:1 and group conversations, sharing and collaboration in Microsoft Teams, (3) Schedule and conduct meetings in Microsoft Teams, and (4) Align your team and teamwork in Microsoft Teams. Each session is limited to 15 participants, reserve your seat now.
Microsoft Teams: Master working from home
Working from home offers the opportunity to maintain your workflow while allowing flexibility in how and where you get your work done. Shifting to a remote worker status can be an adjustment as you look for ways to balance home and work life, maintain focus and be fully productive. Microsoft Teams can help you stay connected to your team while providing access to all of the tools and resources you need to get your work done. Join us to learn tips that can help set you up for success as you transition into a ‘work from home’ scenario. During this session, we’ll share: (1) Guidance for setting up your home environment for work, (2) Best practices for maintaining your workflow while working at home, (3) Tips for staying connected to your team while remote, and (4) Insights for effectively supporting a remote team.
Go Deeper with Microsoft Teams: Leverage pro tips and tricks for Microsoft Teams
Designed for those who are already familiar with Microsoft Teams, our ‘Go Deeper’ sessions offer insights and best practices. Learn how Teams can help organize your workday and make it easier to stay connected with colleagues. Learn tips and tricks for managing and organizing work and communications in Teams. After this session, you will be able to: (1) Leverage formatting best practices to help get your messages noticed (and responded to), (2) Easily find files, chats and projects, (3) Implement strategies to manage and organize your work, and (4) Simplify your workday.
Go Deeper with Microsoft Teams: Build collaborative workspaces in Microsoft Teams
Designed for those who are already familiar with Microsoft Teams, our ‘Go Deeper’ sessions offer insights and best practices. Learn how Teams can help organize your workday and make it easier to stay connected with colleagues. Explore ways to determine the best approach for creating workspaces for projects and workgroups. After this session, you will be able to: (1) Determine the best approach for your collaboration needs (chat versus teams & channels), (2) Create workspaces for your team to provide the best teamwork experience, and (3) Determine best practices in Microsoft Teams to enhance productivity.
Run Effective Meetings with Microsoft Teams
Have you spent significant time and resources to prepare for a meeting and still felt it wasn’t productive? Have you attended a meeting only to leave feeling like not much was accomplished? Join this class to learn how to make your meetings engaging, productive and effective. Microsoft Teams can help make your meetings worth showing up for. After this session, you will be able to: (1) Use Teams for your entire meeting experience, (2) Record your meeting, making it easy for those who couldn’t attend to get caught up, (3) Keep important meetings at your fingertips by pinning them for easy access, and (4) Assess which audio and video devices are best for your meeting needs.
Integrate apps to do more in Microsoft Teams
Do you want to get more done in Teams? Receive targeted and timely updates? Access services directly through Teams? Apps let you complete tasks, receive updates and communicate. This session introduces you to the key activities needed to get started with adding applications, bots and connectors in Microsoft Teams today. Through a series of live demonstrations and best practices, you’ll leave this session with everything you need to start using apps in Teams. After this session, you will be able to: (1) See how applications, bots and connectors can help you be more efficient while working in Teams, (2) Select an application, bot or connector for your workspace, (3) Install an application, bot or connector, and (4) Use an application, bot or connector in your workspace.
Microsoft 365 Virtual Training Day: Building Microsoft Teams Integrations and Workflows
Remote work requires smarter workflows. Microsoft 365 Virtual Training Day: Building Microsoft Teams Integrations and Workflows shows you how the Microsoft Teams developer platform makes it easy to integrate your apps and services to improve productivity, make decisions faster and create collaboration around existing content and workflows. Join us to learn how to build apps for Teams and create integrated, people-centered solutions that can transform productivity in your organization, whether you’re on-site or working remotely. During this two-part training event, you will explore how to: (1) Build modern enterprise-grade collaboration solutions with Microsoft Teams, (2) Transform everyday business processes with Microsoft 365 platform integrations for Power Platform, SharePoint and Microsoft Office, and (3) Use the wealth of data in Microsoft Graph to extend Microsoft 365 experiences and build unique intelligent applications.
Security & Compliance
Microsoft 365 Virtual Training Day: Secure and Protect Your Organization
When employees are confident in their ability to collaborate remotely and securely, they are free to achieve more without worry. Learn how to protect data, devices, and applications while simplifying IT and minimizing the impact on employees at Microsoft Security Virtual Training Day: Secure and Protect Your Organization. During this free two-part learning event and accompanying Q&A, you’ll form the foundations to safeguard your company’s digital footprint. During this training event, you will explore how to: (1) Craft identity synchronization, protection, and management, (2) Utilize security in Microsoft 365, and (3) Integrate cloud app security and device management plans.
Microsoft Ignite 2021 Tech Community Blog for Security, Compliance, and Identity
We are so excited to have you virtually joining us either live or catching the event on-demand. Our product and engineering teams have been working hard over the past six months to bring you the latest product news and announcements that will be shared during the event. Below is a comprehensive list of all sessions and opportunities to engage with Microsoft experts. There is a lot to explore during Microsoft Ignite, so we hope you take some time to watch, participate and learn!
Device Management
Office Hours: Managing Windows 10 Devices & Updates
To support your efforts to deliver and deploy updates to the Windows 10 devices being used by remote, onsite, and hybrid workers across your organization, and manage those devices effectively, we are continuing our series of weekly “office hours” for IT professionals here on Tech Community. During office hours, we will have a broad group of product experts, servicing experts, and engineers representing Windows, Microsoft Endpoint Manager (Microsoft Intune, Configuration Manager), security, FastTrack, and more. They will be monitoring the Windows 10 servicing space and standing by to provide guidance, discuss strategies and tactics, and, of course, answer any specific questions you may have. Office hours are text-based; there is no audio or virtual meeting component. To post a question, you just need to be a member of the Tech Community. Simply visit the Windows 10 servicing space and click Start a new conversation. At the start of office hours, we’ll pin a post outlining the individuals on hand, and their areas of expertise. Can’t attend at the designated time? Again, no problem. Post a question in the Windows 10 servicing space up to 24 hours in advance and we’ll make sure we review it during office hours.
Ignite 2021
Microsoft Ignite – March 2021
When: Tuesday, March 2, 2021 – Thursday, March 4, 2021 | Join our digital experience on March 2–4, 2021 to learn, connect, and explore new tech that’s ready to implement. All skill levels welcome. Save the date! Registration is now open.
Your Guide to Microsoft Teams @ Spring Microsoft Ignite 2021
Microsoft Spring Ignite is just around the corner and we’d like to share a preview of what you’ll see from Microsoft Teams at this event. This spring we will be focused on external collaboration, meetings, and digital events and webinars. We’ve created sessions that span the breadth of Teams to give you a view into our product capabilities, answer your questions, and provide insights into how your organization can create an even better hybrid workplace with Microsoft Teams.
Related:
Guide to Microsoft 365 Apps deployment and servicing at Microsoft Ignite
In May 2020, we discussed how to modernize servicing by introducing a new Monthly Enterprise Channel, and in September, we introduced new cloud-based admin capabilities to help IT admins service Microsoft 365 Apps for their organizations. This time at Ignite, we’re bringing you more! Learn what’s new and ask our Microsoft 365 Apps deployment experts any questions you have during one of our Office Hours Q&A sessions, or head over to the Microsoft 365 Apps discussion space and post your question there. Be sure to also check out the on-demand sessions, blogs, and Microsoft Docs articles below to learn more. | Related: Windows & Devices at Microsoft Ignite 2021: March edition
Microsoft Ignite 2021 Tech Community Blog for Security, Compliance, and Identity
We are so excited to have you virtually joining us either live or catching the event on-demand. Our product and engineering teams have been working hard over the past six months to bring you the latest product news and announcements that will be shared during the event. Below is a comprehensive list of all sessions and opportunities to engage with Microsoft experts. There is a lot to explore during Microsoft Ignite, so we hope you take some time to watch, participate and learn!
Blogs & Articles of Interest
Public Sector Blog Website | RSS Feed
Microsoft Teams Blog Website | RSS Feed
Office & Microsoft 365
Enterprise identity, mobility, and security
Microsoft Azure and Development
Windows, Operations, Management, and Deployment
Support and adoption
Misc
Thanks for stopping by and reading our monthly resources. Feel free to reach out in the comments below with any comments, questions or ideas on other events to add to the list. Here in Public Sector we want to make sure we are giving you the information and insights to best serve your needs in this community.
by Contributed | Mar 2, 2021 | Technology
This article is contributed. See the original author and article here.
Today, we are excited to announce the Windows Update for Business deployment service. This new service empowers IT professionals to meet the business goals of their organizations and requirements of their end users no matter where a device resides on the planet—be it in the office, at home, or on the road.
Over the past year, organizations have rapidly shifted to remote work strategies, emphasizing and leveraging cloud services more than ever before. We have evolved our approach to Windows as a service since the release of Windows 10. We added more controls, and developed frameworks to help you successfully transition to a cloud servicing cadence.
Microsoft AI powers update decisions for more than a billion devices worldwide, and we are committed to making the same controls and technology available to every device manager. The deployment service is designed as an enterprise-grade solution on top of this servicing platform.
These technologies represent an exciting next step in the evolution of Windows as a service.
A closer look at the Windows Update for Business deployment service
The deployment service is a new cloud service within the Windows Update for Business product family. It provides control over the approval, scheduling, monitoring, and safeguarding of content delivered from Windows Update, and is designed to work in harmony with your existing Windows Update for Business policies.
We have designed deployment service with your feedback in mind.
- IT is in control. Approve and schedule any Windows content delivered from Windows Update, including feature updates, quality updates, drivers, and firmware. As the IT professional responsible for your organization, if you have not approved the content, it won’t deploy.
- Easy to adopt. The deployment service is integrated with Microsoft Endpoint Manager, either through cloud-only controls or co-management so you can adopt content and features at your own pace. No need to “lift and shift” your organization at one time.
- Responsive to change. Delivering innovation through cloud services makes it easy for you to adopt. Capabilities are common across OS releases and you no longer need to install an update to access new update controls.
- Compliant and privacy-focused. ISO 27001, FedRAMP High, HiTRUST, and SOC II certified.
The deployment service significantly extends the management plane available to devices connecting to Windows Update. It will enable you to:
- Schedule update deployments to begin on a specific date (ex: deploy 20H2 to these devices on March 14, 2021)
- Stage deployments over a period of days or weeks using rich expressions (ex: deploy 20H2 to 500 devices per day, beginning on March 14, 2021)
- Bypass pre-configured Windows Update for Business policies to immediately deploy a security update across your organization when emergencies arise
- Ensure coverage of hardware and software in your organization through deployments that are tailored to your unique device population through automatic piloting
- Leverage Microsoft ML to automatically identify and pause deployments to devices which are likely to be impacted by a safeguard hold
- Manage driver and firmware updates just like feature updates and quality updates
Availability
Our Preview release of the deployment service will be available to all Windows Enterprise customers in the first half of 2021. These capabilities will be made available through new Microsoft Graph APIs and the associated PowerShell SDK. An extension to Update Compliance will provide reporting and monitoring support for the deployment service.
For customers who are looking for an integrated solution, we are delivering these capabilities through Microsoft Endpoint Manager as well. We started with the Windows 10 feature updates public preview, and we have been encouraged by the strong adoption from customers of all sizes and industries across the globe. New organizational and operational reporting capabilities are also available, with more update management capabilities coming in future releases.
For all enterprise customers, deployment service capabilities are available to Azure AD joined and Hybrid Azure AD joined devices that are covered by a Microsoft 365 or Windows 10 E3 user license. Intune support requires either a Microsoft 365 E3 license, or both Windows and EMS E3 licenses.
Next steps
We are excited to see how you and your partnering application developers will use the deployment service and broader Windows Update for Business product family to simplify update management and deliver better results for your organization and users.
For more details on the scenarios and capabilities coming to you through the deployment service, see the depth on demand sessions listed at https://aka.ms/WindowsAtIgnite.

by Contributed | Mar 2, 2021 | Technology
This article is contributed. See the original author and article here.
Microsoft is excited to announce a new deployment service for driver and firmware updates, giving you visibility into the drivers hosted in Windows Update that are a match for your enterprise devices and offering you control over both the selection of individual updates and the scheduling of update deployments to devices from Windows Update.
IT admins, we’ve heard you. You want more support for the ongoing servicing of drivers for the devices you manage. Today’s post informs you how to browse all drivers (we will be using this term going forward to refer to both drivers and firmware) on Windows Update and decide which updates to deploy, to which devices, and in which manner. We also unveil how our new deployment service provides reporting capabilities that will help you monitor driver deployments and outcomes.
To dive deeper into the topics discussed in the post, visit https://aka.ms/WindowsAtIgnite and look for our “Driver updates and servicing in the enterprise” session.
Ongoing servicing leads to ongoing security and functionality
There are many reasons why enterprises want to deploy driver updates regularly from Windows Update. A few are worth calling out:
- The hardware ecosystem constantly publishes new drivers and fixes to Windows Update.
- The Windows Update service targets devices with the right drivers just for them.
- Security incidents are often mitigated with driver updates and require a quick servicing response.
Don’t miss out: new drivers and driver fixes are published frequently to Windows Update
Drivers are primarily built by independent hardware vendors (IHVs) like Intel or Realtek and original equipment manufacturers (OEMs) like Dell and Lenovo. The hardware ecosystem for Windows devices comprises hundreds of partners who continuously build new drivers and deliver updates to existing ones. All drivers must be certified by the Windows Hardware Dev Center and signed by Microsoft in order for Windows to install them, and most are also published to Windows Update.
Drivers are published to Windows Update with specific targeting parameters that identify individual hardware components, computers, operating system (OS) versions, and/or a combination of these items. Microsoft enforces a robust publishing process that aims to grant only the highest quality drivers to Windows Update. Post-publishing rollout monitoring is used to find issues fast and mitigate them with the hardware partner who published the update.
Hardware components benefit from regular software updates, when available, to improve performance and interoperability with other components, and are often required for new OS versions to unlock new functionality.
Windows Update delivers the right driver to the right device
The IT admins we frequently meet with mention how difficult it is to identify the right drivers required for their devices. Windows Update does this automatically by evaluating the information sent by a device when it scans the service and identifying drivers on the service that are better than those already installed on the device. A combination of factors like driver version, driver date, and targeting information such as Hardware ID and Computer Hardware ID is used to inform the selection process. Microsoft continuously collaborates closely with the hardware ecosystem to bring more and eventually all driver updates to Windows Update.
React faster to security incidents with established servicing practices
Firmware and hardware issues are one of the most active areas of enterprise security. We are all familiar with recent incidents that impacted end-users and enterprises around the globe in the past few years. Hackers take advantage of increasingly sophisticated attacks that are often mitigated with drivers.
However, the complexity of driver servicing and the prevalence of parallel servicing practices for drivers and other Windows updates generate additional friction for IHVs, OEMs, and enterprises at a time when mitigations are most urgent. Investments in ongoing servicing for operability optimization and better functionality also set you up for success when the next security incident hits.
Current driver & firmware servicing capabilities and feedback
Over the past two years, we’ve met with hundreds of admins from a wide range of industries, geos, sizes, and servicing infrastructures. The goal was to learn how you think about drivers, how you make servicing decisions, and how you act on these decisions. We are also collaborating with many IHVs and OEMs on the journey to bring ongoing servicing to our joint customers: IT admins and enterprises.
Servicing capabilities for devices that already scan Windows Update
Let’s recap the existing capabilities available to enterprises.
Intune admins, who have adopted cloud servicing and point their devices to scan Windows Update, can choose to accept drivers whenever they become available on the service or instruct Windows Update never to offer these updates. Admins set a policy in Intune that is, in turn, set on each device.
The policy choice is communicated to the Windows Update service as part of the daily scan from the device. Windows Update will only offer drivers it determines to be better than what is on a device only if the policy to allow driver updates stipulates it.

Configuration Manager admins cannot sync drivers from Windows Update to Windows Server Update Services (WSUS) like they do other Windows updates due to the sheer size of the driver’s catalog; recall the explanation of how drivers are published to explain why the catalog is so large. Configuration Manager customers must rely on OEM updaters and other processes to address their driver servicing needs.
We heard you
Configuration Manager admins have little capabilities available, since WSUS doesn’t sync any drivers from Windows Update. This means that admins lack the same level of control over deployments they are used to for all other updates from WSUS. Based on feedback, IT admins need help to learn when updates are available for devices, which ones should be deployed to which devices, and support for the servicing mechanism that is already in place for other Windows updates.
Usually, Configuration Manager admins delay driver servicing until forced, generally during OS upgrades. These tend to be infrequent, so driver servicing is also infrequent with all the benefits of ongoing servicing forgone.
It is encouraging that many of the Configuration Manager admins we’ve spoken with express willingness to leverage co-management and connect to Windows Update in the cloud for driver servicing. However, some admins feel reluctant to move all their Windows updates management to Windows Update in one fell swoop. They want to connect to Windows Update for drivers only, while evaluating a gradual move to Windows Update for all other Windows update when the time is right. Sneak peek: this co-management capability is included in what we are announcing today! Keep reading.
Intune admins have access to a driver’s policy to allow or block all drivers from Windows Update. This approach, when adopted, means that whenever a driver becomes available in Windows Update, it will be offered to scanning devices with no notice to admins. Since the hardware ecosystem publishes drivers on an irregular cadence, there is also no control over the timing of such deployments.
Intune admins need a way to pause the deployment of individual drivers identified to cause potential reliability issues while an investigation is ongoing with drivers flowing whenever they become available. In fact, admins need to control the flow of all drivers, choosing the manner and timing of their deployments. Finally, Intune admins lack reporting to track driver installations and their outcomes.
Meet the commercial deployment service for drivers & firmware
The new deployment service is coming to Intune and the Microsoft Graph in second half of 2021. In preparation, we will be launching a private preview program in the coming weeks.
We collaborate closely with many hardware partners on the success and functionality of the deployment service for drivers and firmware, and some of them wanted to share a personal message with you.
Tom Garrison, Intel VP, Client Security:
Balaji JR “JRB”, Director of Product, Dell Technologies:
Joseph R Parker, Principal Engineer, Director, Commercial Deployment Readiness Team, Lenovo:
Control over driver and firmware deployments from Windows Update
Before we share more about the capabilities of the new deployment service, we are excited to announce that we are making it easier for Configuration Manager admins to benefit from all that we are announcing today without changing the way you service Windows updates with WSUS.
When our Private Preview launches, co-management will support configuring a cloud scan for drivers only, knowing that Windows Update will offer only those drivers you approved and at the time you scheduled them. There will be no change to any of your deployments from WSUS.
IT admins can access the deployment service in Intune by creating Driver Update Policies and assigning devices to them. Once a device is under the purview of such a policy, the deployment service allows Windows Update to make its selection decisions, but the results are sent to the admin for review and action instead of simply offering the drivers to the device.
Admins can review available content and then make approval decisions on a per driver basis – no longer all and any drivers are offered by default – and choose the timing when Windows Update should start offering the driver to the devices in the policy. At the right time, Windows Update activates the approval and the next time the device scans it will offer drivers that are the “just right” only if they are approved by the admin. In fact, the deployment service augments the matching logic in Windows Update to also consider admin-approval as one of the targeting parameters for commercial devices.
Let the approval and scheduling of drivers begin!

To see a comprehensive demonstration of how Driver Update Policies are created in Intune and how driver deployments are approved, scheduled, and suspended, visit https://aka.ms/WindowsAtIgnite and look for our “Driver updates and servicing in the enterprise” session.
Join the community and sign up for the private preview
We invite you to join our engineering neighborhood in the Windows Customer Connection Program to stay informed and engage other IT admins in the community (select the Driver and Firmware Updates Private Preview option in question #5). We will continue to provide regular updates via Microsoft Teams, including the timing of all Preview phases.
We look forward to our continued collaboration and to your enterprise’s adoption of the new deployment service and ongoing servicing of driver and firmware updates.

Recent Comments