by Contributed | Mar 23, 2021 | Technology
This article is contributed. See the original author and article here.
Host webinars directly from the Microsoft Teams environment, and offer unique attendee experiences that help tailor the event to participants’ needs. Teams is now one single and familiar tool for all your meeting types. Online meetings can be extended to webinars and scale out to a significantly larger audience. As a Teams user, there is no additional expertise required to set up a Team’s webinar. It’s a rich, interactive, and engaging experience for both presenters and attendees, combining voice, chat, video, and of course, live reactions.
Troy Batterberry, Microsoft Teams Vice-President, joins host Jeremy Chapman to show you the set up experience before the event, the presenter and attendee experience during the event, and the organizer experience after the event.
Set Up Experience: Easy and customizable. Just hit dropdown menus and select. Host up to a thousand people with full interactivity. If a meeting exceeds one thousand, tens of thousands more participants can join seamlessly using a View Only experience.
Presenter & Attendee Experience: PowerPoint Presenter View — Establish better eye contact and connection with the audience. Presenter Mode — Overlay yourself on content, so your attendees feel as if you’re speaking directly to them. Promote attendees to speaker — Allow your audience to interact. Give your attendees an engaging experience, and still stay in control of your event.
Post Event Experience: See who attended, and how long they joined. Export data from your webinar to build your own custom reports.
QUICK LINKS:
01:09 — Audience size
01:47 — Set up experience
03:12 — Attendee experience
04:25 — Presenter View
05:13 — Presenter Mode
06:11 — Promote attendees to speaker
07:02 — Post event experience
07:23 — Wrap up
Link References:
Try it out for yourself at https://aka.ms/teams_virtual_events
Unfamiliar with Microsoft Mechanics?
We are Microsoft’s official video series for IT. You can watch and share valuable content and demos of current and upcoming tech from the people who build it at Microsoft.
Video Transcript:
– Up next on the special edition of Microsoft Mechanics we’re joined by a Microsoft Vice President Troy Batterberry for, Microsoft Teams to show you how anyone can now host webinars directly from the Microsoft Teams environment as well as some of the unique attendee experiences that help tailor the event experience to participants need. So Troy, thanks for joining us on Mechanics today.
– Hi Jeremy. Thanks, it’s great to be on the show.
– Thanks again for coming on. So really big news today is the launch of new webinars capabilities in Microsoft Teams. So congrats to you and the team. You know, most of us I think are familiar with Microsoft Teams for online meetings, especially as we stay connected and really work remotely. So it seems natural that the same environment can now host webinars and online events.
– Yeah, it really is. And this means that Microsoft Teams is now one single and familiar tool for all your meeting types. Your online meetings can now be extended to webinars and scale out to a significantly larger audience. As a Teams user, there is no additional expertise required to set up a Teams webinar. It’s a rich, interactive and engaging experience for both presenters and attendees, combining voice, chat, video, and of course live reactions.
– Okay, so just to expand on your point about scale, how many people does this extend to using webinars in Teams? I know that today we can do around 300 people in an interactive meeting, right?
– Yeah, that’s right. 300 was our previous limit, but we now scale even further. You’ll be able to host up to a thousand people with full interactivity and if a meeting exceeds a thousand, tens of thousands more participants can join seamlessly using a view-only experience. And with this extension of Teams as a one-to-many platform, you’ll be able to easily host things like town halls, webinars, conferences or even media broadcasts.
– Okay, so you mentioned the richness of the experience for presenters and attendees of Microsoft Teams and those events. So can you walk us through what that experience looks like?
– Yeah, I’d love to show you the experience before the event, the set up, the presenter and attendee experience during the event, and then of course, after the event for the organizer. So I’m logged into Teams and you can see my calendar. All you need to do is hit the dropdown next to new meeting and select webinar. Because I want to send everyone a registration link for the webinar, I’ll go ahead and choose require registration and select this for everyone. From there I’ll name it Industrial Design Webinar. I’ll invite another presenter, in this case, Adele, my co-presenter, and everyone else will be an attendee by default. Next I’ll customize the registration form for the webinar. This is the page people see when I send them the invitation. Now for the sake of time, I’ve already filled in the description and added myself as a speaker. Every form requires the first and last name and an email for registration. I can add custom fields or I can even add custom questions. This can be multiple choice or a text input. For instance, I’ll add, how familiar are you with design? And I’ll paste in three choices for the response. Now, once I hit save, I can preview the registration page. And I can copy the link to use in my invite to the webinar. In fact, I’ve already started to promote the event on LinkedIn. Jeremy, why don’t you show the experience for attendees on LinkedIn?
– Alright, so I happened to be logged into my LinkedIn account, which is a great place to promote webinars. So I can see your post here Troy. I’m going to go ahead and click the shortened link. And now I’m taken to the registration page that you just created. So let me register for the event. I’ll go ahead and enter my first name, Jeremy, my last name, Chapman, my email address. And now I’m going to go ahead and answer the related question to the event and I’ll sell it. I’m very familiar with the topic. So I’ll go ahead and click register now. And now my registration is confirmed. So if I jump into Outlook, I can see that the confirmation email just arrived and I can go ahead and either join directly to the event or I can add this to my calendar. So now I’ll go ahead and join the event and I’ll be placed in the lobby until the event starts.
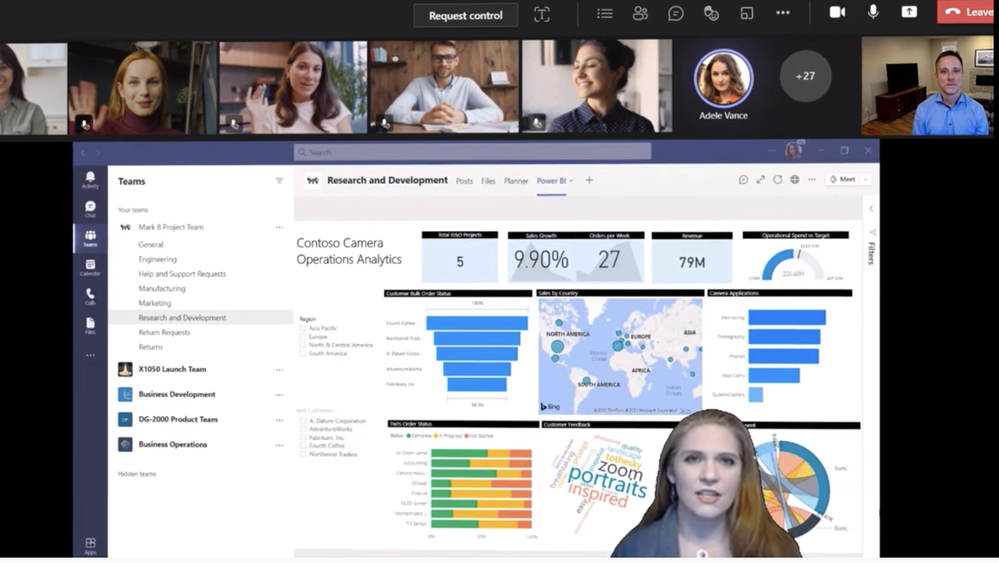
– Great, okay so now you’re in, I’m going to go ahead and start the webinar. I can see there are already 33 people in the lobby. That’s great attendance. I’ll go ahead and admit everyone. Now with dynamic view the meeting stage layout changes as more people join. I’ll wait a second for a few more to join us. And as I mentioned before we’ve made improvements to optimize your engagement as a presenter. So presenters have everything they need in Teams to be their very best. Back in January we started rolling out PowerPoint Live Presenter View in Teams. I’ll open up the share tray and share a PowerPoint file. Using this approach I can see my presenter notes and I can advance or skip slides all within Teams. Right now I can see attendees on the right. I see the main interface with all the controls on top. If I click on this one to see participants, the attendees automatically move to the top. You know this helps me establish more connection to the audience because as I present my eye gaze is closer to where my camera is located. As a frequent presenter, these new various capabilities give me the confidence to be my very best. Now I’m going to hand it over to Adele, my co-presenter, to show off one of our new hero experiences.
– Thanks Troy. So I’m sharing our Power BI report here. And I’m joining you via a new custom layout called presenter mode. This new layout allows me to overlay myself over content. So that as an attendee you get more of the feeling that I’m talking to you. This also allows for a much more interactive and immersive experience.
– So this is using the same background effects capabilities built in the Teams. You don’t need a green screen or software that supports Chroma key functionality. It’s just built into Teams and anyone can produce these kinds of professional results. Now I’m going to take back over presenting my PowerPoint. Let’s flip over to your experience, Jeremy, as an attendee.
– Great, so I can see your presentation now and I can see the live reactions rolling in at the same time. Troy, as the host of the meeting you’ve scoped my attendee experience here. So in this case because you shared the PowerPoint presentation over Teams, I have full control to move the slides forward and backward which also is useful if I say missed a slide or want to move through the presentation at my own pace. And I can see here that you’ve disabled my microphone so I’m not able to speak cause I’m not a presenter. So on that point though is it possible to promote an attendee to a speaker?
– Yes, absolutely. We think this is a critically important capability to allow the audience to interact and ask questions. And for the rest of the audience to see them and any associated content they may want to share. All while allowing the presenter and organizer to stay in control of their event. In fact, I can see the Jonathan has his hand raised. I’ll go ahead and promote Jonathan and spotlight his camera feed so that everyone can see him.
– Hi Troy, thanks for taking my questions.
– You’re more than welcome. Thanks for joining us today. So you can see, this is a much more engaging experience for both presenters and attendees. And all within the familiar Teams environment. So with that, let’s go ahead and end the webinar.
– Yeah, it’s really nice to see that the webinar’s support is natively built into Teams. So now that it’s over though, what does the post-event experience look like?
– Well, if you are an event host you can see who attended and how long they joined. We allow you to also export that raw data so you can build your own custom reports. We’ll also be providing richer reports within Teams over time.
– Good stuff, but I know Troy that your work is never done. So what are you working on next in Microsoft Teams?
– Look, we want to make Teams be the best place to host your meetings of all sizes. Your interaction with your customers doesn’t stop when the webinar ends. You’ll also be able to export that attendee information into Dynamics 365 for nurturing and future follow-up.
– This is really an amazing set of updates and a lot to take in but when will these updates start to roll out and where can people go to learn more?
– Everything we’ve shown today as either rolling out now or coming soon. Check out aka.ms/teams_virtual_events to learn more and try it out for yourself.
– Thanks again Troy and of course keep watching Microsoft Mechanics for the latest updates. Subscribe if you haven’t already. And thanks for watching.
by Contributed | Mar 23, 2021 | Technology
This article is contributed. See the original author and article here.
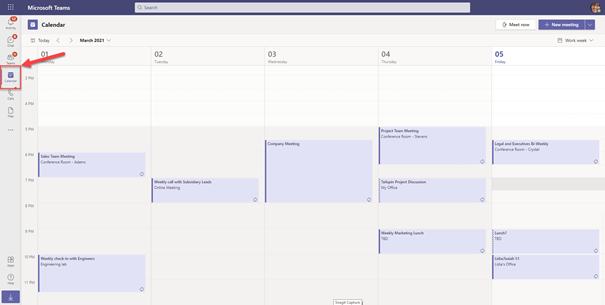
The calendar application is an essential component of Microsoft Teams. This application’s task is to display your calendar from the personal mailbox. You access the calendar app directly from the app bar within your Teams client. The following screenshot shows the Microsoft Teams web client as an example.
Microsoft Teams contacts the Teams Backend Services in Microsoft 365 to get calendar information from the Teams Backend Services to display the users’ calendar. The Backend Services get the required information from the Exchange mailbox. This access is not a problem for mailboxes hosted in Exchange Online, as Microsoft 365 provides the required access paths and permissions for your tenant.
Your on-premises Exchange Organization must meet specific requirements to provide access for Microsoft Teams. These technical prerequisites bring additional complexity into daily operation, which has its troubleshooting challenges. As an IT administrator, you need to know the individual components involved and their interaction to handle problems efficiently.
In this first article, I focus on the technical components and the requirements to make local Exchange mailboxes accessible for Microsoft Teams. The following two blog posts show you your options and tools for troubleshooting connectivity issues to on-premises mailboxes.
Microsoft Teams (Backend) Services
In contrast to other software clients that access an Exchange mailbox, calendar access in Microsoft Teams is not done by the Teams client itself, but rather by the so-called Teams Middle-Tier, which is part of a set of Teams Backend Services, independently of the client. Client access to other Microsoft 365 services, such as SharePoint Online or OneNote, is done directly.
The following diagram shows how Teams clients access the Teams Backend Services.

We only focus on the two components highlighted with a red rectangle, the Teams Services and Exchange. The connection between Teams Backend Services and Exchange is drawn as a simple line in the diagram, but it is precisely this connection that needs your attention to make Microsoft Teams work with on-premises mailboxes.
Calendar Access Overview
When a user accesses the calendar app in a Microsoft Teams client, the client queries the calendar information from the Teams Backend Services. The request uses the user’s login name (e.g., John-Doe@varunagroup.de), which is supposed to be the primary email address.
Let us assume the user uses John.Doe@varunagroup.de as a login when starting the Teams client.
In the first step, after receiving the calendar request from the Teams client, the Teams Backend Services perform an AutoDiscover V2 query on Exchange Online (1). The Teams Backend Services always query outlook.office365.com first because the services assume that Exchange Online has the necessary information for calendar access to John Doe’s mailbox.

In this example, the mailbox is in an on-premises Exchange organization, Exchange Online replies with an HTTP 302 redirect response. As a result, the Teams Backend Services need to determine the local Exchange organizations endpoints using AutoDiscover V2 independently. The services use the domain part of John Doe’s email address for the request, which is varunagroup.de.
In step (2), the Teams Backend Services tries to determine the default AutoDiscover endpoint using the DNS name provided in the HTTPT 302 response. After successful DNS resolution, the services establish an anonymous AutoDiscover V2 connection using HTTPS. Exchange Server responds to this request with the local Exchange organization’s URL information configured as ExternalUrl attributes for the virtual Exchange Server directories.
Authenticated access to the Exchange mailbox only takes place in step (3). The AutoDiscover V2 requests use anonymous requests for performance reasons. Teams Backend Services uses OAuth-Authentication when accessing the Exchange Web Services’ endpoint and reading calendar information. The Backend Services services then prepare the calendar information and respond to the Teams client request.
After receiving the Teams Backend Services response, the Teams client displays the calendar app icon for John Doe.
The requirements for this process to function correctly are:
- Correctly configured Azure AD Connect with Exchange Hybrid option enabled
- Synchronization of all on-premises mailbox users to Azure AD
- Exchange Organization published to the internet
- Exchange Server 2019 or 2016 running the latest cumulative updates
- Exchange namespace correctly configured in the external DNS zone
- Configured AutoDiscover endpoints for all primary email domains in the external DNS zones, accepting non-authenticated requests
- Configuration of Exchange Classic Full Hybrid Mode using Hybrid Configuration Wizard
With a hybrid Exchange configuration that meets these requirements, the use of on-premises mailboxes with Microsoft Teams works.
Exchange Server is a very tolerant server application that you can operate in very different configurations. Individual deviations from the preferred architecture of Exchange Server and a hybrid configuration with Microsoft 365 lead to possible errors when using Microsoft Teams with on-premises user mailboxes.
I highly recommend reading the Microsoft Docs article Troubleshoot Microsoft Teams and Exchange Server interaction issues, when encountering problems with your on-premises mailboxes and Microsoft Teams.
In the next two blog posts, I will take a closer look at calendar access and calendar delegate situations and the possible sources of errors and options for error analysis.
Links
Thomas Stensitzki is a leading technology consultant focusing on Microsoft messaging and collaboration technologies and the owner of Granikos GmbH & Co. KG. He is an MVP for Office Apps & Services and an MCT Regional Lead. As a user group organizer, he hosts the Microsoft Teams User Group Berlin and the Exchange User Group DACH.
Twitter: https://twitter.com/stensitzki
Blog: https://JustCantGetEnough.Granikos.eu
Teams User Group: https://TeamsUserGroup.berlin
Exchange User Group: https://exusg.de
To write your own blog on a topic of interest as a guest blogger in the Microsoft Teams Community, please submit your idea here: https://aka.ms/TeamsCommunityBlogger
by Contributed | Mar 23, 2021 | Technology
This article is contributed. See the original author and article here.
We’ve all been in situations where we’re double-booked or joined a meeting late. You don’t want to interrupt the flow but need to catch up quickly. Or, for accessibility reasons or ambient noise situations, you need help following the conversation and understanding who’s speaking. Wouldn’t it be great to have transcription with speaker attribution built into the meeting?
We’re excited to now offer live transcription in Microsoft Teams meetings for English (US). Live transcription is a written record of the spoken text that occurs during a meeting. It identifies each speaker, is captured automatically in near real time, and is available during and after the meeting.
Delivering live transcription with high accuracy, minimal latency, and cost efficiency at enterprise scale has been one of the toughest challenges in the industry. Over the last two years we’ve made significant strides in solving this problem and have dramatically improved our models for accuracy using meeting context in real time and cutting edge AI.
Live transcription in Teams uses a meeting’s invitation, participant names, attachments, etc. to improve the accuracy and recognize meeting-specific jargon for each transcript automatically, without any human involvement. This means no one at Microsoft ever sees the meeting’s content, and the models are automatically deleted immediately after each meeting. In addition, Microsoft doesn’t use or store this data for improving its own AI.
How to set up live transcription in Teams meetings
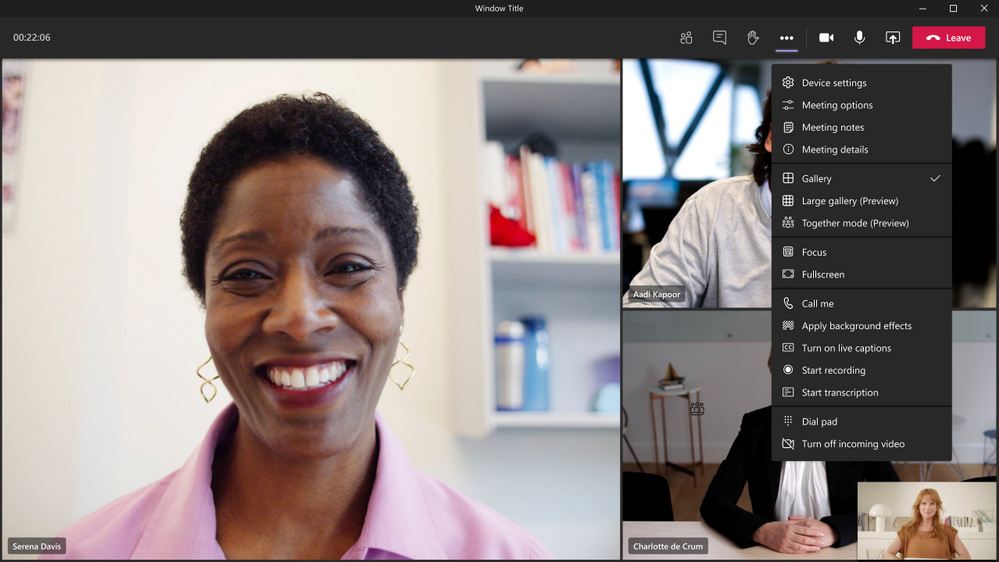
To get started, the tenant admin just needs to turn on the Allow Transcription policy. Then the meeting organizer or a presenter can start transcription.
In terms of privacy, live transcription is similar to recording a meeting. Participants are notified that live transcription is on and have the ability to hide it from their meeting view with just a click. If they choose not be identified, attendees can also turn off speaker attribution in their profile settings.

After the meeting, the saved transcript is available for reference and download in Teams for desktop and web.

The transcript is also immediately available in the meeting event in Teams calendar, as well as through the transcript tile in the chat.

Teams live transcription files are stored in the meeting organizer’s Exchange Online account and only the organizer and tenant admin have permissions to delete it.
Teams meeting recordings that are saved in OneDrive for Business and SharePoint (ODSP) use Teams live transcript to display captions in recordings, so we recommend turning on live transcript to ensure captions are present in post-meeting recordings.
Note that live transcription is not guaranteed to be 100% accurate and so should not be relied upon in life-altering situations.
Who can start using live transcriptions?
Live transcription with speaker attribution is available for scheduled Microsoft Teams meetings (in U.S. English) to our public cloud customers with licenses for Microsoft 365 E3, Microsoft 365 E5, Microsoft 365 Business Standard, and Microsoft 365 Business Premium SKUs. Live transcripts for channel and Meet Now meetings will be coming soon.
Delivering highly accurate, AI-based live transcriptions for Teams meetings has been a massive and rewarding effort across the company. With this powerful foundation built at scale, we’re ready to tackle the next set of challenges to keep improving inclusivity, accessibility, and productivity in Microsoft Teams meetings. Stay tuned…
by Contributed | Mar 23, 2021 | Technology
This article is contributed. See the original author and article here.
Purpose:
The purpose of this post is to walk through the experience of configuring a Windows client to map a drive to an Azure File Share, with the User Experience that they are used to. The process is documented in a multi-part article on Microsoft Docs. This post is meant to summarize the experience of going through this process and offer some guidance on areas that may be confusing. The steps to complete this task along with notes on the experience will be listed below.
Assumptions:
Knowledge of creating Azure Storage Accounts, Azure File Shares, and Synchronizing on-premise Active Directory user accounts to Azure AD with Azure AD Connect is assumed. It is also assumed that you have inserted data into the Azure File Share with a supported tool, like Azure File Sync, AzCopy, Windows Explorer, etc. Depending on the security posture needed for a production environment, this configuration would likely have tighter access controls. For our demonstration purposes, this configuration is being used for functionality and convenience.
Steps:
- Join the Azure Storage Account containing the file share to AD (https://docs.microsoft.com/en-us/azure/storage/files/storage-files-identity-ad-ds-enable)
Run “Join-AzStorageAccountForAuth” cmdlet to join Storage account to Azure AD as shown here:
$ResourceGroupName = "My-Resource-Group-Name"
$StorageAccountName = "My-Sub-Name"
$Domain = "My-FQDN"
Import-Module -Name AzFilesHybrid
Join-AzStorageAccountForAuth `
        -ResourceGroupName $ResourceGroupName `
        -StorageAccountName $StorageAccountName `
        -DomainAccountType "ComputerAccount" # Default is set as ComputerAccount `
        -Domain $Domain
- Sync AD Users that need to map the drives to Azure AD using Azure AD Connect.
Note: These accounts cannot be privileged accounts in Active Directory because Azure AD Connect will not sync those accounts to Azure AD.
- Synchronize/Rotate Azure Storage Account AD Computer Object Password to your Azure Storage Account (https://docs.microsoft.com/en-us/azure/storage/files/storage-files-identity-ad-ds-update-password).
Note: If you omit this process, your AD users will NOT be able to access the Azure File Share as intended
Connect-AzAccount -Environment "AzureCloud" #Adjust as-necessary
$ResourceGroupName = "My-Resource-Group-Name"
$StorageAccountName = "My-Sub-Name"
Ipmo AzFilesBybrid
Update-AzStorageAccountADObjectPassword `
        -RotateToKerbKey kerb2 `
        -ResourceGroupName $ResourceGroupName `
        -StorageAccountName $StorageAccountName
- Assign share permissions: Assign Azure Storage Share Level Access roles (“SMB Roles”) to sync’d AD Users (https://docs.microsoft.com/en-us/azure/storage/files/storage-files-identity-ad-ds-assign-permissions)
Note: There are three built-in Azure SMB Roles that can be used to control access at the Azure File Share Level. These are share-level permissions; NTFS permissions do NOT control access at the Azure File Share level.
- Administratively Modify/Assign NTFS permissions (Only If Needed): The following scenarios will determine your path to assigning NTFS permissions:
- Your permissions are fine and do not need modified: Skip to Step 8
- Your permissions need to be changed and you have an AD Sync’d user that has the permissions to make the needed changes via mapped drive: Skip to Step 8
- Your permissions need to be changed and you do NOT have a Sync’d user that has NTFS permissions to do it, follow the code block below: Keep in mind that this method of mapping is using the storage account key and not a user account so proceed with caution.
$StorageAccountName = "My-Sub-Name"
$AzureFileShare = "My-Share-Name"
$connectTestResult = Test-NetConnection -ComputerName "$StorageAccountName.file.core.windows.net" -Port 445
if ($connectTestResult.TcpTestSucceeded)
{
  net use X: "$StorageAccountName.file.core.windows.net$AzureFileShare" /user:Azure<StorageAcctName> '<StorageAccessKey>'
}
else
{
  Write-Error -Message "Unable to reach the Azure storage account via port 445. Check to make sure your organization or ISP is not blocking port 445, or use Azure P2S VPN,   Azure S2S VPN, or Express Route to tunnel SMB traffic over a different port."
}
- If you used Step 5: Set ACL’s on File system in Azure Share (https://docs.microsoft.com/en-us/azure/storage/files/storage-files-identity-ad-ds-configure-permissions)
- If you used Step 5: Remove Drive Mapping Using Storage account key. If you used the script from above, you can use the following script to remove the drive mapping as the storage account key. This step is necessary so that you are able to successfully map the drive with your user account, as described in step 8.
Note: It is not recommended to keep the drive mapped with the Storage Account Key.
net use X: /DELETE
- Map a drive to your Azure File Share using your AD user account (Windows Explorer, Command-Line, PowerShell, etc.)
- Once the drive is mapped, make any necessary NTFS ACL Changes as-needed.
- Troubleshooting: If you encounter issues with this process, try the following tools for troubleshooting/debug information:
- https://docs.microsoft.com/en-us/azure/storage/files/storage-troubleshoot-windows-file-connection-problems#unable-to-mount-azure-files-with-ad-credentials
- Specifically, the following PowerShell command can expose many things that could be causing problems:
Connect-AzAccount -Environment "AzureCloud" #Adjust as-necessary
$ResourceGroupName = "My-Resource-Group-Name"
$StorageAccountName = "My-Sub-Name"
Ipmo AzFilesBybrid
Debug-AzStorageAccountAuth -StorageAccountName $StorageAccountName -ResourceGroupName $ResourceGroupName -Verbose
References:
Overview – On-premises AD DS authentication to Azure file shares | Microsoft Docs
Enable AD DS authentication to Azure file shares | Microsoft Docs
Control access to Azure file shares – on-premises AD DS authentication | Microsoft Docs
Control what a user can do at the file level – Azure file shares | Microsoft Docs
Mount Azure file share to an AD DS-joined VM | Microsoft Docs
Update AD DS storage account password | Microsoft Docs
by Contributed | Mar 23, 2021 | Technology
This article is contributed. See the original author and article here.
During the past three months, we posted a short series of whitepapers on the Visio Enthusiasts LinkedIn group about the development history of some of our favorite Visio products and capabilities. But since that group is private, you might have missed it.
Now, all three whitepapers from our under-the-hood series are available for you to download at the bottom of this blog post. We’ve also included a short summary of each, so you can read about the product or capability that’s most interesting to you (although we hope you’ll read all three).
The Visio Enthusiasts group is a great place to interact with other professional diagrammers and the internal Visio product group. It’s also where you can find exclusive content, including an upcoming series about enabling remote work with Visio. Select the link above to send us a request to join. We hope to see you in there!
Data Visualizer: simple but powerful data visualization
Data visualization tools are essential for analyzing information, exposing unique data to everyone in the organization, and making data-driven decisions. To enable all this, we developed Data Visualizer, an easy-to-use tool that quickly converts your Excel process map data into visual diagrams. Read this whitepaper to learn how we tested early ideas before landing on the Data Visualizer wizard; taught the tool how to refresh diagrams, handle interactions, and write back to the source code; and, just last year, launched the Data Visualizer add-in for Visio.
Visio layout: automating flowchart layouts
With so many ways to visualize data, it can be difficult to find the best layout for an aesthetic diagram. That’s why we developed Visio layout, a set of algorithms that work in the background to help you make smart decisions about shapes and semantic logic. For example, if you insert a shape in a diagram, Visio layout will add the appropriate connectors; and if you remove that shape, it will connect the remaining shapes. Read this whitepaper to learn how we developed Visio layout to automate the design of professional-looking diagrams.
Visio for the web: from desktop to browser and beyond
Five years ago, you could only create and edit Visio diagrams on the desktop client. Sharing those diagrams required manual workarounds, making it difficult to gather, collate, and incorporate input from across the organization. It was these challenges that prompted the development of Visio for the web. This under-the-hood whitepaper takes you on the journey from Visio Viewer to the Visio web app and the design considerations it took to get there, from load time optimizations to extensibility.
For questions or feedback about Visio, please email us at tellvisio [at] microsoft.com. Keep visiting the Visio Tech Community and follow us Twitter to stay current on the latest Visio releases. Remember to join the Visio Enthusiasts LinkedIn group for access to exclusive content and networking opportunities with your diagramming peers. All three whitepapers mentioned in this blog are available to download below.
by Scott Muniz | Mar 23, 2021 | Security, Technology
This article is contributed. See the original author and article here.
Adobe has released security updates to address a vulnerability affecting ColdFusion. An attacker could exploit this vulnerability to take control of an affected system.
CISA encourages users and administrators to review Adobe Security Bulletin APSB21-16 and apply the necessary updates.

by Contributed | Mar 23, 2021 | Dynamics 365, Microsoft 365, Technology
This article is contributed. See the original author and article here.
Join us for a 90-minute webinar on April 8 at 9 AM Pacific Time to learn about the new capabilities in Dynamics 365 Field Service 2021 release wave 1, including: A simplified set-up experience. New schedule board and map capabilities. How knowledge articles and virtual assistants on the mobile app help technicians. A new portal for your customers to self schedule and view a technician’s estimated arrival time. We’ll discuss how to enable these capabilities in your environment and you’ll have an opportunity to ask questions of product team members. Speakers: David Clarke, Program Manager Vinay Nalam, Senior Program Manager Jason Cohen, Senior Program Manager Jonathan Baker, Senior Program Manager Dhruv Goel, Senior Program Manager Sanjay Jethva, Senior Product Marketing Manager Rag Guru, Program Manager How to watch To watch live, fill out a short form to register. You can also view the recording on-demand after the webinar. Next steps Dynamics 365 Field Service enables organizations to dispatch technicians to customer locations to provide installation, repair, or maintenance services. To learn more, check out the documentation or the Field Service video playlist
The post Webinar: See what’s new in Dynamics 365 Field Service 2021 release wave 1 appeared first on Microsoft Dynamics 365 Blog.
Brought to you by Dr. Ware, Microsoft Office 365 Silver Partner, Charleston SC.
by Contributed | Mar 23, 2021 | Technology
This article is contributed. See the original author and article here.
In this installment of the weekly discussion revolving around the latest news and topics on Microsoft 365, hosts – Vesa Juvonen (Microsoft) | @vesajuvonen, Waldek Mastykarz (Microsoft) | @waldekm are joined by London-based Products and Services Director at Content+Cloud and Microsoft MVP Chris O’Brien | @ChrisO_Brien. Topics discussed in this session include: Organizational coder vs influencer, work-life balance and prioritization, the importance of sustained focus, Partner opportunity in the cloud and success tied to being agile and innovating rapidly – attributes in a successful organization’s DNA! Finally, AI and Automation – options and Synapse. Microsoft and the Community delivered 18 articles and videos this last week. This session was recorded on Monday, March 22, 2021.
This episode was recorded on Monday, March 22, 2021.
These videos and podcasts are published each week and are intended to be roughly 45 – 60 minutes in length. Please do give us feedback on this video and podcast series and also do let us know if you have done something cool/useful so that we can cover that in the next weekly summary! The easiest way to let us know is to share your work on Twitter and add the hashtag #PnPWeekly. We are always on the lookout for refreshingly new content. “Sharing is caring!”
Here are all the links and people mentioned in this recording. Thanks, everyone for your contributions to the community!
Microsoft articles:
Community articles:
Additional resources:
If you’d like to hear from a specific community member in an upcoming recording and/or have specific questions for Microsoft 365 engineering or visitors – please let us know. We will do our best to address your requests or questions.
“Sharing is caring!”
by Contributed | Mar 23, 2021 | Technology
This article is contributed. See the original author and article here.
During Microsoft Ignite March 2021 four new security focussed exams were announced.
Each of the exams are currently in Beta format, meaning when you sit them you won’t get your result straight away, but don’t let that put you off sitting them! ;)
The four exams that were released focus across Microsoft Azure and Microsoft 365, around security, identity and compliance. Each of the exam is aimed at different roles within the organisation. From the fundamentals aspect to folks who implement technical solutions. Let’s take a look at each exam and point you in the direction of some study material.
Exam SC-900: Microsoft Security, Compliance, and Identity Fundamentals
This is the fundamentals exam aimed at anyone who is familiar with the fundamentals of security, compliance and identity. Much like the other fundamental exams this isn’t aimed at technical roles, it is aimed at anyone that is familiar with the theme.
There are several learning paths within Microsoft Learn that can help guide you towards sitting this exam.
Exam SC-200: Microsoft Security Operations Analyst
Understanding the risks towards your organisation, reducing them and introducing improvements is a Security Analysts’ job and this exam is aimed at people who are performing that role within their organisation. Anyone working with Microsoft Azure Sentinel, Azure Defender, Microsoft 365 Defender, and third-party security products should be looking at this exam.
There are eight learning paths at Microsoft Learn that can assist you in your preparations for this exam.
Exam SC-300: Microsoft Identity and Access Administrator
This exam is aimed at those that take care of their organisation’s identity and access management systems, primarily Azure Active Directory (Azure AD). This involves a full range of tasks, from creating users and group to planning an identity governance strategy.
To help you prepare for this exam there are several learning paths that can help prepare you for the exam at Microsoft Learn.
Exam SC-400: Microsoft Information Protection Administrator
This exams is focussed towards those that are responsible for translating requirements and compliance controls within their organisation into the technical implementation. Specifically those topics around information protection, data loss prevention and information governance within Microsoft 365.
There are several detailed Learning Paths within Microsoft Learn that can help guide you through the areas that will be tested within this exam.
Preparing for the exams
I think regardless of the exam you are sitting and the experience you have with the topic you should be looking at doing some study towards it, even if it’s just a refresher and looking through notes very quickly. You never know when you might find something you didn’t know that is being asked within the exam. ;) I covered off more about the exam preparation process and some tips in my
All you need to know about Microsoft Exams.
Good luck with what ever exam is on your radar, and do let us know in the comments which ones you are working towards!

by Contributed | Mar 22, 2021 | Technology
This article is contributed. See the original author and article here.
If you find the SQL Server related performance counter objects are missing, you can try below steps to get it back
For example, my instance name is STD2016, and now open the command window with Administrator
1. unload the counter. cd to the Binn folder of your instance, by default, the folder path should be
C:Program FilesMicrosoft SQL ServerMSSQLXX.INSTANCENAMEMSSQLBinn
And then run unlodctr command, if you are using the default instance, just use
unlodctr MSSQLSERVER
For me, it is unlodctr MSSQL$STD2016, the format is MSSQL$INSTANCENAME
2. Load the counter. Under the Binn folder you will see a file begins with “perf-MSSQL$”, the name format is
perf-MSSQL$INSTANCENAMEsqlctr.ini.
For default instance, use
lodctr perf-MSSQLSERVERsqlctr.ini
For mine, it is
lodctr perf-MSSQL$STD2016sqlctr.ini

3. Restart the remote registry key service
NET STOP “Remote Registry” & NET START “Remote Registry”

4. Close the performance counter and open it again, you will be able to see it


Recent Comments