
by Contributed | Mar 30, 2021 | Technology
This article is contributed. See the original author and article here.
Background
Azure Batch supports mounting Azure file share with a Azure Batch pool. Our official document only has sample for C#. In this Blog, we will include the following content:
- Mount Azure file share via Azure PowerShell for Windows and Linux.
How to access the mounting files for tasks.
How Azure Batch agent implements mounting.
- Troubleshoot the failure of mounting.
Access to the mounting drive manually.
- Manually mount Azure file share via RDP/SSH.
Pre-requirement
- Prepare an Azure Batch account.
- Prepare a Azure Storage account with Azure Fileshare in the same region as the Batch account.
- Prepare Azure PowerShell or use Azure CloudShell from Portal.
Steps:
- Log in to your subscription in Azure PowerShell:
Connect-AzAccount -Subscription "<subscriptionID>"
- Get the context for your Azure Batch account:
$context = Get-AzBatchAccount -AccountName <batch-account-name>
- For Windows, the following script will create an Azure Batch pool with these settings:
- Azure File share mounting disk “S”
- Image: “WindowsServer”, “MicrosoftWindowsServer”, “2016-Datacenter”, “latest”
- VM size: STANDARD_D2_V2
- Dedicated Compute Nodes: 1
- Low priority Compute Nodes: 0
$fileShareConfig = New-Object -TypeName "Microsoft.Azure.Commands.Batch.Models.PSAzureFileShareConfiguration" -ArgumentList @("<Storage-Account-name>", https://<Storage-Account-name>.file.core.windows.net/batchfileshare1, "S", "Storage-Account-key")

$mountConfig = New-Object -TypeName "Microsoft.Azure.Commands.Batch.Models.PSMountConfiguration" -ArgumentList @($fileShareConfig)

$imageReference = New-Object -TypeName "Microsoft.Azure.Commands.Batch.Models.PSImageReference" -ArgumentList @("WindowsServer", "MicrosoftWindowsServer", "2016-Datacenter", "latest")

$configuration = New-Object -TypeName "Microsoft.Azure.Commands.Batch.Models.PSVirtualMachineConfiguration" -ArgumentList @($imageReference, "batch.node.windows amd64")

New-AzBatchPool -Id "<Pool-Name>" -VirtualMachineSize "STANDARD_D2_V2" -VirtualMachineConfiguration $configuration -TargetDedicatedComputeNodes 1 -MountConfiguration @($mountConfig) -BatchContext $Context
- For Linux, the following script will create an Azure Batch pool with these settings:
- Azure File share mounting disk “S”
- Image: “ubuntuserver”, “canonical”, “18.04-lts”, “latest”
- VM size: STANDARD_D2_V2
- Dedicated Compute Nodes: 1
- Low priority Compute Nodes: 0
$fileShareConfig = New-Object -TypeName "Microsoft.Azure.Commands.Batch.Models.PSAzureFileShareConfiguration" -ArgumentList @("<Storage-Account-name>", https://<Storage-Account-name>.file.core.windows.net/batchfileshare1, "S", "<Storage-Account-key>", "-o vers=3.0,dir_mode=0777,file_mode=0777,sec=ntlmssp")

$mountConfig = New-Object -TypeName "Microsoft.Azure.Commands.Batch.Models.PSMountConfiguration" -ArgumentList @($fileShareConfig)

$imageReference = New-Object -TypeName "Microsoft.Azure.Commands.Batch.Models.PSImageReference" -ArgumentList @("ubuntuserver", "canonical", "18.04-lts", "latest")

$configuration = New-Object -TypeName "Microsoft.Azure.Commands.Batch.Models.PSVirtualMachineConfiguration" -ArgumentList @($imageReference, "batch.node.ubuntu 18.04")


New-AzBatchPool -Id "<Pool-Name>" -VirtualMachineSize "STANDARD_D2_V2" -VirtualMachineConfiguration $configuration -TargetDedicatedComputeNodes 1 -MountConfiguration @($mountConfig) -BatchContext $Context
How to access the mount files
For Windows:
- We use the Drive path directly to access the files.
- For example, I have a file out.txt under path S:folder1 as shown below:

- The task can access the file by the following command:
cmd /c "more S:folder1out.txt & timeout /t 90 > NULL"
- Then you will see the result in the output file:

For Linux:
- We can use the environment variable “AZ_BATCH_NODE_MOUNTS_DIR” or the path directly.
- For example, here is the command of the task to access file via environment variable:
/bin/bash -c 'more $AZ_BATCH_NODE_MOUNTS_DIR/S/folder1/out.txt; sleep 20s'
- Here is the output file:

Troubleshoot the failure of mounting
How Azure Batch agent implements mounting:
For Windows:
Azure Batch uses cmdkey to add credential for Azure Batch account, then issue the mount command via “net use”.
net use g: <storage-account-name>.file.core.windows.net<fileshare> /u:AZURE<storage-account-name> <storage-account-key>
For Linux:
Batch agent installs package cifs-utils ,then will issue the mount command.
How to check the mounting logs
- When mounting failed, you may observe the following error:

- We are not able to find more detailed information about the error via Azure Batch Portal or Azure Batch Explorer. So we need to RDP/SSH to the node and check related log files.
- For Windows, we can connect to the node via Remote Desktop as shown below(the screenshot is from Batch Explorer):

- The log file “fshare-S.log” is under path D:batchtasksfsmounts.
- In this sample, we can find the following messages:
CMDKEY: Credential added successfully.
System error 86 has occurred.
The specified network password is not correct.
You can refer to this document to troubleshoot Azure Files problems in Windows:
https://docs.microsoft.com/en-us/azure/storage/files/storage-troubleshoot-windows-file-connection-problems
- For Linux, we can connect to the node via SSH as shown below:

- You can find the log file “fshare-S.log” under /mnt/batch/tasks/fsmounts.
- In this sample, the account key was wrong and the message is “permission denied”.

You can refer to the following document to troubleshoot Azure Files problems in Linux:
https://docs.microsoft.com/en-us/azure/storage/files/storage-troubleshoot-linux-file-connection-problems
If you are not able to RDP/SSH, you can check the batch logs directly.
- Navigate to the node and click “upload batch logs” as shown below:

- You will be able to download the logs from the selected Azure Storage account:

- You can check the log named “agent-debug” and will see some error messages.
- You will find the same error messages as shown below.
..20210322T113107.448Z.00000000-0000-0000-0000-000000000000.ERROR.agent.mount.filesystems.basefilesystem.basefilesystem.py.run_cmd_persist_output_async.59.2912.MainThread.3580.Mount command failed with exit code: 2, output:
CMDKEY: Credential added successfully.
System error 86 has occurred.
The specified network password is not correct.
- It’s the same to get the logs for Linux.
Manually mount Azure File share
If you are not able identify the cause of failure, you can RDP/SSH to the node and manually mount the Azure File share to narrow down this issue.
Here are the detailed steps:
- You can create a pool without mounting configuration by the following command(let’s take Windows for example).
$imageReference = New-Object -TypeName "Microsoft.Azure.Commands.Batch.Models.PSImageReference" -ArgumentList @("WindowsServer", "MicrosoftWindowsServer", "2016-Datacenter", "latest")

$configuration = New-Object -TypeName "Microsoft.Azure.Commands.Batch.Models.PSVirtualMachineConfiguration" -ArgumentList @($imageReference, "batch.node.windows amd64")

New-AzBatchPool -Id "<Pool-Name>" -VirtualMachineSize "STANDARD_D2_V2" -VirtualMachineConfiguration $configuration -TargetDedicatedComputeNodes 1  -BatchContext $Context
- After the node reaches idle status, you can connect to the node via RDP.
- You can go to the Azure File Share Portal and get the Azure PowerShell command for mount as shown below:

- Then you can enter the command inside the node and mount the Azure File share.

- If there is any connection issue, you may observe the error message:

- You can troubleshoot Networking related issue in this way.
Access to the mounting drive manually.
When the mounting is successful, you can manually access the drive S directly in Linux in the following path:
/mnt/batch/tasks/fsmounts/S
However, you will get access denied when accessing the drive S in Windows:

- This is because Azure Batch agent only grants access for Azure Batch tasks in Windows.
- When RDP to the node, the user account doesn’t have access to the mounting drive.
- You need to use cmdkey to add the credential for yourself in cmd:
cmdkey /add:"<storage-account-name>.file.core.windows.net" /user:"Azure<storage-account-name>" /pass:"<storage-account-key>"
- After the credential is added, you will be able to access the S drive directly.

by Contributed | Mar 30, 2021 | Technology
This article is contributed. See the original author and article here.
Outlook for iOS and Android brings together email, calendars, contacts and files in one app so you can quickly connect, organize, and get things done. Over the last year, Outlook has worked on several enhancements designed to provide a clear separation between work and personal accounts, in addition to, helping users quickly identify external messages.
Account switching
When composing new messages, visual cues have been added so users know which account or email address they are sending from. For example, when a user uses their Office 365 account for work, it will clearly show the account at the top of their new message.
When Intune app protection policies (APP) are in play, users are prevented from changing the from address whenever there is data populated in the subject or message body (including attachments). This ensures that the data is protected and cannot be accidentally sent from the wrong account. Outlook iOS and Android has recently improved the visual cues to alert users when the from address cannot be changed.
From address cannot be changed
Contact separation
When composing messages or calendar invites, Outlook for iOS and Android will only show the people and email addresses of the account context you are using. For example, if you are drafting an email from your work account, Outlook iOS and Android suggests recipients based on your work contacts, keeping contacts from your personal account accessible, but separate. Likewise, searching the directory only returns contacts from the work account. This way a user doesn’t accidentally select the personal email address of a colleague, when they meant to send to the colleague’s work address.
 Account contact separation during compose
Organization logo
Upcoming in the second half of 2021, Outlook for iOS and Android will improve avatars by introducing support for organization logos. This feature will further enable users to differentiate between work and personal accounts.
Organization logos are defined within Azure Active Directory company branding, utilizing the square logo (if the dark theme square logo is configured, Outlook for iOS and Android will use that when the app is configured for dark mode). When considering a logo, we recommend not using logos with transparency, unless the logo looks good on white, light grey, dark grey, and black backgrounds. As Outlook needs to ensure users know that the logo is a button, transparent logos will appear with a light or dark background depending on the app’s theme, which may hinder logo recognition depending on the logo’s colors. For more information on how to configure the logo, see Add branding to your organization’s sign-in page | Microsoft Docs.
Outlook for iOS and Android checks for the existence of an organization logo once per day. Once detected, users will see the logo in the left-hand navigation flow and during compose events. The organization logo appears only if the user has more than one account loaded within the app. Also, the organization logo is not used for multiple accounts from the same tenant, like when the user has shared or delegated mailboxes. Instead, Outlook falls back to displaying the account description’s first initial.
 Organization logo avatar
External sender tag
Exchange Online recently released support for organizations to protect against spam and phishing threats by making it easier for users to identify messages from external senders. Outlook for iOS and Android is one of the first platforms to take advantage of this new functionality.
After an Exchange Online administrator enables the functionality using the cmdlet Set-ExternalInOutlook, users will see an external tag displayed for email messages from external senders.
 External tagged messages
We hope these enhancements improve your user’s everyday usage of Outlook for iOS and Android. If you have any questions, please let us know.
Ross Smith IV
Principal Program Manager
Customer Experience Engineering

by Contributed | Mar 30, 2021 | Technology
This article is contributed. See the original author and article here.
In this installment of the weekly discussion revolving around the latest news and topics on Microsoft 365, hosts – Vesa Juvonen (Microsoft) | @vesajuvonen, Waldek Mastykarz (Microsoft) | @waldekm are joined by Italy/US-based Senior Consultant at his own company PiaSys.com, PnP Team member, and Microsoft MVP Paolo Pialorsi | @paolopia.
Topics discussed in this session include the SharePoint 20th anniversary party, changes in PnP since Paolo’s last appearance as a guest on the show 2 years ago, PnP Provisioning Engine, the value of the PnP Core SDK, and the scoop on Paolo’s weekly video tutorials. A very interesting deep dive on the approach behind PnP Sites Core library (Now PnP Core SDK – the Modern developer experience for building apps for SPO and Microsoft Teams in .NET with a Microsoft Graph first, falling back to SharePoint Rest APIs approach).
The trio wraps up pondering the future of SPFx – perhaps a new name?, server-side capabilities?, v2.00?. In the last week Microsoft and Community members delivered 22 articles and videos.
This episode was recorded on Monday, March 29, 2021.
These videos and podcasts are published each week and are intended to be roughly 45 – 60 minutes in length. Please do give us feedback on this video and podcast series and also do let us know if you have done something cool/useful so that we can cover that in the next weekly summary! The easiest way to let us know is to share your work on Twitter and add the hashtag #PnPWeekly. We are always on the lookout for refreshingly new content. “Sharing is caring!”
Here are all the links and people mentioned in this recording. Thanks, everyone for your contributions to the community!
Events:
Microsoft articles:
Community articles:
Additional resources:
If you’d like to hear from a specific community member in an upcoming recording and/or have specific questions for Microsoft 365 engineering or visitors – please let us know. We will do our best to address your requests or questions.
“Sharing is caring!”
by Contributed | Mar 30, 2021 | Technology
This article is contributed. See the original author and article here.
Introduction
In this post, I will introduce trial and error and its consequences as a Scrum Master and developer to improve the efficiency of project management and the quality of output.
Prerequisites
Team members other than me (product owners, designers … etc) have a lot of experience in waterfall development and less agile / scrum development.
Initial state
- Backlog
- Project management
- Issue/Bug tracking system
- Version control: Using Git built into Backlog
Since development efficiency is poor with Backlog, which does not have CI (continuous integration) / CD (continuous delivery) function, I proposed to use Azure DevOps Services, but it is not translated into Japanese. Was rejected because of.
Similarly, Azure DevOps Server was rejected because it had to be operated and maintained by itself.
Initial issue
- No CI
- No CD
- User stories are not prioritized
No CI
We were using Backlog didn’t have CI.
Also, Azure DevOps Services, Azure DevOps Server with CI / CD wasn’t available, so the developers had to prepare the CI themselves.
We chose GitHub Actions because the version control used in the project is Git, and if the scope of influence is GitHub Actions, it is limited to developers.
I have fixed this issue by synchronizing the Git repository on Backlog with the Git repository on GitHub.
No CD
We were using Backlog didn’t have CD.
Also, Azure DevOps Services, Azure DevOps Server with CI / CD wasn’t available, so the developers had to prepare the CD themselves.
GitHub Actions adopted in CI was also available on CD, so by GitHub Actions, fixed this issue.
User stories are not prioritized
We were using Backlog didn’t have “priority”.
As a result, we couldn’t sort the user stories in order of priority, and we had to use some other tool to sort the user stories in order of priority.
Excel was the one that product owners were accustomed to.
However, it was difficult to change the priority easily in Excel.
Specifically, the product owner needs to take the following steps when changing the priority of the user story.
- Insert a line in the priority of the user story product owner want to include.
- Write the user story on the inserted line.
- (When the one with the lower priority is made higher or the one with the higher priority is made lower) Delete the line of the user story before moving.
This task was more troublesome than the product owner had imagined.
As a result, there were many problems such as, the user story that the product owner forgot to delete remains, the product owner intended to add the user story but accidentally deletes the user story, Backlog or Excel user stories has not been updated.
As a result, the entire Scrum team was confused, with missing user stories to do in the sprint and user stories that didn’t have to be done, and the velocity remained low.
New issues arose as a result of each solution
Enormous DevOps tax
As a result of each product owner and developer solving the problem at hand, it became necessary to use multiple tools properly for the team as a whole.
Also, since it is troublesome for each member to see all of the multiple tools, some members work without looking at the information contained in the tools.
Specifically, the following happened frequently:
There was an error in the resolution of the image created by the designer. The developer had incorporated Danger into CI conducted by GitHub Actions.
Danger acting as CI pointed out that the resolution of the image created by the designer is incorrect. However, the designer did not see the results or suggestions of GitHub Actions, so the error was not resolved. Our team followed the rule not to merge the changes if a warning occurred in CI. As a result, images with incorrect resolutions were not merged until the errors were corrected.
The team took the following steps to correct the mistake.
- Tell the designer verbally or with a chat tool that the resolution of the image created is incorrect.
- The designer recreates the image.
- Check if the Danger that acted as CI is correct.
The mistake wasn’t fixed in one go, and the team repeated this procedure over and over again.
As a result, it happened that no user story was done within the sprint.
Drastic solution
The whole team understood that even if each of them did what they thought was good for the team, it was only a partial optimization, not an overall optimization.
So, in the situation where we are now on a zero basis, we discussed in retrospect what should be prioritized to solve.
Despite various opinions, in summary, we agreed that “everyone would use a common tool.”
The tool chosen was the initially rejected Azure DevOps Services.
Haste makes waste.
By adopting Azure DevOps Services, we have been in front of us until now. All the issues that existed have been resolved.
- Enormous DevOps tax -> All information is always in Azure DevOps Services. So, DevOps tax does not occur because it is aggregated.
- No CI -> CI with Azure Pipelines
- No CD -> CD with Azure Pipelines
- User stories are not prioritized -> Azure Boards allow prioritized user stories
At the same time, there were no new challenges.
And with the adoption of Azure DevOps Services, our velocity has increased tenfold.
by Contributed | Mar 30, 2021 | Technology
This article is contributed. See the original author and article here.
In this new episode of Azure Unblogged I had the chance to speak to Will Griers about pricing up your Azure File environment. We discuss the various different storage tiers that are available, how to choose the right one for your organization as well as how to optimize your costs. We also chat about the newly released Reserved Instances.
You can watch the video here or on Channel 9.
Useful Links:
Azure Files Documentation
Azure Files Pricing
Store and share files in your app with Azure Files
by Contributed | Mar 29, 2021 | Technology
This article is contributed. See the original author and article here.
The 17th cumulative update release for SQL Server 2016 SP2 is now available for download at the Microsoft Downloads site. Please note that registration is no longer required to download Cumulative updates.
To learn more about the release or servicing model, please visit:
by Contributed | Mar 29, 2021 | Technology
This article is contributed. See the original author and article here.
By Neil Johnson – Principal Program Manager | Microsoft Endpoint Manager – Intune
Microsoft 365 for Mac, or Microsoft 365 apps for Mac as it’s now known, is a key part of any Microsoft 365 deployment. The Office team has been hard at work making our Mac story the best it possibly can be over the past few years.
The current version has been redesigned based on our Fluent UI which matches Apple’s new Big Sur UI. It makes native use of Apple Silicon processors for improved performance and battery life, but how do you get it deployed to your users?
This article covers all the options available, the advantages and disadvantages of each of them, and why you would choose one over the others. We wrap up with guidance over the scenarios each one might be best used for.
Microsoft 365 Apps for Mac deployment methods via Intune
There are three different mechanisms that we can use within Microsoft Intune to get Microsoft 365 Apps deployed to Macs. Each has its own advantages and disadvantages.
- Mac App Store via Volume Purchase Program (VPP)
- Microsoft Content Delivery Network
- Intune Scripting Agent for Mac
Let’s look at each of these in turn.
1. Deploying Microsoft 365 Apps for Mac via Volume Purchase Program (VPP)
Microsoft 365 for Mac is published to the Mac App Store, which means that end users can install it themselves if they have an Apple ID. Additionally, if you have an Apple Business Manager account, you can you use Intune to push apps from the Mac app store directly to your devices.
Microsoft 365 app suite in the macOS App Store
Steps to deploy Office via Apple Volume Purchase Plan (VPP)
This method is dependent on having an Apple VPP token configured already. Before following these steps ensure that you’ve followed our documentation on this here.
Once you have an Apple Business Manager VPP token synchronised with Intune, you can use the following steps to license and assign Office Apps to your users.
- Open https://business.apple.com/#main/appsandbooks
- Click in the search menu box, change Type to “Mac” and search for “Microsoft”.
 Microsoft apps in the Apple Volume Purchase Plan (VPP) Apps and Books console
- Select the Application that you want to assign licenses to.
- Assign the Application to your organization and enter in the number of licenses that you need. Since there’s no cost for these apps it makes sense to enter more licenses than you will need (within reason).
 Example screenshot of purchasing the Microsoft Word app with license count
- Once you have entered the values, click Get. The Application will temporarily show as Processing.
 Example screenshot of the Microsoft Word app “Processing”.
- After a few minutes it will update and show the number of licenses you have available.
 Example screenshot of available licenses for the Microsoft Word app
- Repeat the process for the other applications that you intend to use.
Open the Microsoft Endpoint Manager admin center and select Tenant Administration > Connectors and tokens > Apple VPP Tokens.
Select the Token you want to sync and click Sync in the ellipsis menu.
 Available Apple VPP Tokens and Sync button location in the MEM admin center
- Still in the Microsoft Endpoint Manager admin center open Apps > macOS and filter for unassigned apps then type “Microsoft” into the search bar.
 macOS apps and Filter location in the MEM admin center
- Select each app that you wish to deploy and assign it to an Azure AD group.
- Select the Application > Properties > Assignments (right at the bottom) > Edit.
- Under “Required” select Add group and search for the right group in Azure AD.
- Configure the assignment settings and click OK.
- Assignment Settings > Mode = Included
- App settings > License type = Device Licensing
- App settings > Uninstall on device removal = Yes
- Click “Review and Save”. After review click “Save” to complete the assignment.
- Repeat the assignment for the rest of the Office apps that you want to be deployed.
- To check the configuration, trigger an MDM sync on a user’s device that was assigned the applications. The apps should begin to download and install within a few minutes of the sync completing.
Advantages |
Disadvantages |
- It makes use of Apple’s content caching, which can greatly improve deployment efficiency (Note: Intune can also be used to configure your content caches)
- It’s possible to deploy the individual apps.
- Easy to configure if you already have Apple Business Manager.
- You can configure the apps to uninstall on unenrollment.
- You can send an uninstall command to remove unwanted apps.
|
- Teams is not yet in the Mac App Store (could be deployed via scripting agent)
- You cannot control which update channel to use.
- When OneDrive is deployed via VPP it will have a different bundleID than if it was installed via a standalone installer.
- VPP: com.microsoft.OneDrive-mac
- CDN:com.microsoft.OneDrive
- Updates via this approach can be unpredictable, especially if apps are permanently open.
|
If you require a relatively simple deployment of the Microsoft 365 App suite and have investments in both Apple Business Manager and Apple Content caching, then this mechanism of Microsoft 365 Apps for macOS deployment may be the most suitable.
2. Deploying Microsoft 365 Apps for Mac via the Microsoft Content Delivery Network
This mechanism is supported natively by Microsoft Intune. It is as simple as checking a box and providing a group of users to deploy it to. Those users will receive the entire Microsoft 365 Apps (which includes Teams and the Microsoft Auto update tool).
Steps to deploy Office via the Microsoft Content Delivery Network
- Open the Microsoft Endpoint Manager center and select Apps > macOS > Add
- Under Select “App Type” choose Microsoft 365 Apps > macOS
 Selecting the Microsoft 365 Apps in the MEM admin center
- Adjust the Suite description details as required and click Next to continue.
 Microsoft 365 Apps for macOS – App properties in the MEM admin center
- Assign Scope Tags if you need them, click Next.
- Under Required click “Add group” and search for an appropriate group to target the Microsoft 365 Apps for Mac to.
 Microsoft 365 App Suite for macOS – Assignment properties in the MEM admin center
- Click Next, review, and then click Create to assign the Microsoft 365 Apps to the Azure AD group.
- To check the configuration, trigger an MDM sync on a user’s device that was assigned the applications. The apps should begin to download and install within a few minutes of the sync completing.
Note: This process will install the entire Microsoft 365 Apps for macOS suite, including Teams. However, it is possible to control which apps are installed via plist. We have a sample plist for this on our GitHub repo here. The instructions for deploying a preference file can be found here.
Advantages |
Disadvantages |
- Easy to deploy.
- Includes the Microsoft Autoupdate (MAU) tool which can be configured via plist to auto update and deploy insider builds of Office for testing to some users (covered later).
- Possible to create a local MAU cache server for updates.
|
- Large initial download size (1.8GB) and doesn’t use local caching.
|
If you don’t have Apple Business Manager or Apple Content caching and you need the entire suite, plus Teams, this is probably the easiest way to get Office 365 Business Pro for Mac installed.
3. Deploying Microsoft 365 Apps for Mac via the Intune Scripting Agent for Mac
This approach uses the Intune scripting agent to download and install the Office suite or individual apps. There are examples of this approach on our Intune Shell Samples GitHub Repo.
Our GitHub Repo has two main scripts that help in this circumstance.
- Deploy entire Office Suite
- Deploy individual Office Suite apps
These two scripts do the same thing. Once they are deployed onto the Mac, they attempt to download the installer package and then install it. The main benefit here is that you get additional flexibility about the installation process.
This is a sample of some code from installOfficeBusinessPro.sh which will look for a local copy of the installer before downloading from the CDN servers. You would need to handle the downloading of the latest installer package regularly. We have an example script to do this here.
localcopy="http://192.168.68.150/OfficeforMac/OfficeBusinessPro.pkg”
weburl="https://go.microsoft.com/fwlink/?linkid=2009112"
tempfile="/tmp/office.pkg"

#
# Check to see if we can access our local copy of Office
#
curl -s --connect-timeout 30 --retry 300 --retry-delay 60 -L -o $tempfile $localcopy
if [ $? == 0 ]; then

     echo "$(date) | Local copy of $appname downloaded at $tempfile"

else

    echo "$(date) | Couldn't find local copy of $appname, need to fetch from CDN"
    echo "$(date) | Downloading $appname from CDN"

    curl -s --connect-timeout 30 --retry 300 --retry-delay 60 -L -o $tempfile $weburl
    if [ $? == 0 ]; then

         echo "$(date) | Success"

    else

         echo "$(date) | Failure"
         exit 5

    fi

fi
The Individual Office apps script has an array that you can specify the specific applications that you want to use. The entries within this array are the <id> values from here.
# Edit AppstoInstall array with "id" values from
https://macadmins.software/latest.xml for the apps you want to install
# Note: This script only handles installation of pkg files, DMG and ZIP files will NOT work.
AppsToInstall=(   "com.microsoft.word.standalone.365"
                  "com.microsoft.excel.standalone.365"
                  "com.microsoft.powerpoint.standalone.365"
                  "com.microsoft.outlook.standalone.365"
                  "com.microsoft.onenote.standalone.365"
                  "com.microsoft.onedrive.standalone"
                  "com.microsoft.skypeforbusiness.standalone"
                  "com.microsoft.teams.standalone"
                  )
Steps to deploy Microsoft 365 Apps for Mac via the Intune Scripting agent
Example: Deploying Outlook, Word, PowerPoint, and OneDrive to a Mac via the scripting agent.
- Download a copy of our sample file installOfficeSuiteIndividualApps.sh and save it to your device.
- Open the file in your text editor of choice and modify the AppsToInstall array to only include Outlook, Word, PowerPoint and OneDrive.
# Note: This script only handles installation of pkg files, DMG and ZIP files will NOT work.
AppsToInstall=(     "com.microsoft.outlook.standalone.365"
                    "com.microsoft.word.standalone.365"
                    "com.microsoft.powerpoint.standalone.365"
                    "com.microsoft.onedrive.standalone"
)
- Mark the script as executable by opening a Terminal session and using the chmod +x command. Assuming that you downloaded the script to ~/Downloads type:
chmod +x ~/Downloads/installOfficeSuiteInidividualApps.sh
- If possible, find a test device and copy the script across. Run it as root by typing:
sudo ~/Downloads/installOfficeSuiteInidividualApps.sh
- Open the Microsoft Endpoint Manager admin center and Devices > macOS > Shell Scripts > Add
- Enter a Name and Description and click Next.
 Creating a new custom macOS script in the MEM admin center
- Click in the file browse UI in the Upload script dialog and select the saved installOfficeSuiteInstallIndividualApp.sh file.
- Run script as signed-in user = No
- Hide script notifications on device = Not configured
- Script frequency = Not configured
- Set the Max number of retries to 3, Run and leave the rest as not configured.
 Custom macOS script – Script settings in the MEM admin center
- Assign Scope Tags if you need them, click Next.
- Under “Required” click Add group and search for an appropriate group to target the script to.
 Custom macOS script – Assignment settings in the MEM admin center
- Click Next, review, and then click Create to assign the script to the Azure AD group.
- The Intune script agent runs on an 8hr check-in cycle but can be manually triggered by the end user.
- Open the Company Portal app (sign-in if prompted).
- Select the device you are using.
- Click Check Settings under the ellipses menu.
 “Check status” location in the Company Portal for macOS
- The script agent will check-in against the service and attempt to run the script.
- The script will log to this log file.
/Library/Intune/Scripts/installOfficeSuiteIndividual/installOfficeSuiteIndividual.log
- The Intune script agent itself creates a daily log in this location.
/Library/Logs/Microsoft/Intune
Advantages |
Disadvantages |
- Fastest install time.
- Additional logging.
- Can deploy either entire suite or individual apps.
- Possible to cache the initial installation files on local webserver.
- Possible to create a local MAU cache server for updates.
- Includes the Microsoft Autoupdate (MAU) tool which can be configured via plist to auto update and deploy insider builds of Office for testing to some users (covered later).
|
- Requires additional server infrastructure for caching.
- Requires bash scripting skills.
- Additional infrastructure complexity.
|
Controlling Microsoft 365 apps for Mac updates with Microsoft AutoUpdate (MAU)
If you are deploying Microsoft 365 Apps for Mac via the CDN (or script agent) you will notice that updates are handled via the Microsoft AutoUpdate tool. To see this, open any of the Office apps and click on Help > Check for Updates.
 Screenshot of the Microsoft AutoUpdate (MAU) tool
In the Microsoft AutoUpdate menu, click Advanced to see the Update Channel and if the app is configured for Automatic Updates.
 Screenshot of the Microsoft AutoUpdate (MAU) tool and Preferences options
The MAU tool can be configured by deploying Intune property lists. You can even control deadlines for individual app updates as described here. The complete list of available keys for MAU can be found here.
We have three common examples on our GitHub Repo:
Let’s look at these plist examples and how we might use them in a typical deployment where we have a mixture of standard users on the Current channel and a group of early adopters on Preview or Beta.
Note: More information on Office Insiders content for Mac can be found here.
Below is the plist for our production users. The important keys here are:
- ChannelName: Tells MAU which version of Office to install
- DisableInsiderCheckbox: Prevents the end user from changing the update channel
- UpdateCache: Tells MAU where to look locally for updates (see MAU Cache)
<key>AcknowledgedDataCollectionPolicy</key>
<string>RequiredAndOptionalData</string>
<key>ChannelName</key>
<string>Current</string>
<key>UpdateCache</key>
<string>http://192.168.68.150/MAU</string>
<key>HowToCheck</key>
<string>AutomaticDownload</string>
<key>DisableInsiderCheckbox</key>
<true/>
<key>EnableCheckForUpdatesButton</key>
<true/>
<key>ExtendedLogging</key>
<false/>
<key>SendAllTelemetryEnabled</key>
<true/>
<key>StartDaemonOnAppLaunch</key>
<true/>
<key>UpdateCheckFrequency</key>
<integer>720</integer>
The Beta plist is the same but with one exception:
<key>ChannelName</key>
<string>Beta</string>
We would assign the property lists as follows:
- Current Office 365 for Mac users
- Assign com.microsoft.autoupdate2_current.plist to the same group that Office 365 Business application or deployment script was assigned to
- Exclude your Beta Office 365 Business users group
- Beta Office 365 for Mac users
- Assign com.microsoft.autoupdate2_beta.plist to your Beta Office 365 Business users group
Steps to configure in Intune:
- Open the Microsoft Endpoint Manager admin center and Devices > macOS > Configuration Profiles > Create Profile > Preference File > Create.
- Set a Name and Description and click Next.
- Enter the preference domain name as: com.microsoft.autoupdate2
- Click on the file browser UI and select the current plist that you downloaded from our GitHub site. Then click Next.
 Microsoft AutoUpdate PLIST for Standard users – Preference file settings
- Assign Scope Tags if you need them, click Next.
- Under “Required” click Add group and search for the same group that you assigned Office 365 for Mac Pro to.
- Under “Excluded Groups” click Add group and search for the group(s) that you are going to assign the Beta and/or Preview plist to.
 Microsoft AutoUpdate PLIST for Standard users – Assignment settings
- Click Next, Review the content and then click Create.
Now we have the ‘Current’ config deployed, let’s create one for our ‘Beta’ users.
- Click Devices > macOS > Configuration Profiles > Create Profile > Preference File > Create.
- Set a Name and Description and click Next.
- Enter the preference domain name as: com.microsoft.autoupdate2
- Click on the file browser UI and select the Beta plist that you downloaded from our GitHub site. Then click Next.
 Microsoft AutoUpdate PLIST for InsideFast users – Preference file settings
- Assign Scope Tags if you need them, click Next.
- Under “Required” click Add group and search for the group that you want to use to assign Microsoft 365 apps for macOS Beta channel to.
- Do not put anything in Excluded groups.
 Microsoft AutoUpdate PLIST for InsideFast users – Assignment settings
- Click Next, Review the content and then click Create
- Click Devices > macOS > Configuration Profiles > Search for “AutoUpdate” and you should have two Preference File policies, one for InsiderFast users and one for Standard.
 Configuration Profiles for macOS search result for “auto” in the MEM admin center
- To check the configuration, trigger an MDM sync on a user’s device that is in the Current group and then repeat for another user in the Beta group. After sync the Microsoft AutoUpdate tool should reflect the changes.
- This is what a user in the Beta group should see once their device has completed it’s next MDM sync.
 Microsoft AutoUpdate (MAU) tool – Preference settings
 Microsoft AutoUpdate (MAU) tool – Available updates
Note: To troubleshoot MAU property list files look on the target machine under /Library/Managed Preferences for com.microsoft.autoupdate2.plist. If this file is present, it means that Intune has deployed the configuration.
- To check the contents of the deployed plist use the following commands:
% cp /Library/Managed Preferences/com.microsoft.autoupdate2.plist ~/Desktop
% plutil -convert xml1 ~/Desktop/com.microsoft.autoupdate2.plist
% cat ~/Desktop/com.microsoft.autoupdate2.plist
Once converted from binary to HTML the plist should look like it did in the original Intune plist.
<?xml version="1.0" encoding="UTF-8"?>
<!DOCTYPE plist PUBLIC "-//Apple//DTD PLIST 1.0//EN" "http://www.apple.com/DTDs/PropertyList-1.0.dtd">
<plist version="1.0">
<dict>
    <key>AcknowledgedDataCollectionPolicy</key>
    <string>RequiredAndOptionalData</string>
    <key>ChannelName</key>
    <string>Beta</string>
    <key>DisableInsiderCheckbox</key>
    <false/>
    <key>EnableCheckForUpdatesButton</key>
    <true/>
    <key>ExtendedLogging</key>
    <false/>
    <key>HowToCheck</key>
    <string>AutomaticDownload</string>
    <key>SendAllTelemetryEnabled</key>
    <true/>
    <key>StartDaemonOnAppLaunch</key>
    <true/>
    <key>UpdateCheckFrequency</key>
    <integer>720</integer>
</dict>
</plist>
- The Microsoft Autoupdate app generates a log file in the following location.
/Library/Logs/Microsoft/autoupdate.log
Summary
There are three ways to handle Microsoft 365 apps for macOS deployment with Intune. There are no right and wrong solutions here, each is applicable in certain circumstances.
Most environments should start with the Intune CDN method of deployment combined with a custom plist for the Microsoft AutoUpdate agent as described in this post. This method provides the best mixture of complexity, flexibility and is the easiest to support for most scenarios.
Deployment Method
|
Use when…
|
Apple Volume Purchase Plan (VPP)
|
- You have Apple Business Manager and you have deployed Apple Content caching.
- You don’t need to support Beta or Preview builds.
- You don’t need to ensure that the Microsoft 365 apps for macOS are up to date.
|
Intune CDN
|
- You want to deploy with the least amount of effort.
- Your network can cope with the initial download demands (1.8G per device).
- You want to ensure that the Microsoft 365 apps for macOS are updated reliably.
- You want to have some users on Beta or Preview for early adopter testing.
- You want to take advantage of Microsoft AutoUpdate cache locally.
|
Intune Scripting Agent
|
- Speed of download and install is important.
- You need additional logging.
- You want to locally cache the initial download.
- You want to take advantage of Microsoft AutoUpdate cache locally.
- You want to have some users on Beta or Preview for early adopter testing.
- You want to ensure that the Microsoft 365 apps for macOS are updated reliably.
- You want to deploy specific apps and not just the entire suite.
- You have some in-house bash scripting skills (or time to learn).
|
We’ll be writing more content for macOS over the remainder of this year, so feel free to let us know scenarios that you’d like us to cover.
Let us know if you have any questions by replying to this post or reaching out to @IntuneSuppTeam on Twitter.
by Contributed | Mar 29, 2021 | Technology
This article is contributed. See the original author and article here.
Howdy folks,
I’m excited to share the latest Active Azure Directory capabilities that will streamline your hybrid identity, monitoring, and B2B user experiences. These updates help you achieve a more unified identity management from a single control plane and enrich experiences to help provide seamless and secure collaboration with guest users.
Unified identity management
- Public preview of AD FS sign-ins in Azure AD reporting – AD FS sign-ins can now be added to Azure AD activity reporting, giving organizations a unified view of their hybrid identity infrastructure and helping them along their identity modernization journey. This sign-in activity appears in the “Federated” column of Azure AD sign-in reports for customers using the latest version of Azure AD Connect Health. Customers can stream this activity and analyze in their own SIEM tools like Azure Sentinel, or they can use the Azure AD integration with Azure Monitor and Log Analytics to unlock insights and build dashboarding within the Azure portal. Log Analytics now has a stream called “ADFS SignIns”, which contains the same schema as the sign-in data in the logs, and Azure Monitor has a new pre-built “Sign-In Report” workbook.
- General availability of tenant creation activity in Azure AD audit logs – Whenever a user creates a new Azure AD tenant, that activity is now recorded in the Azure AD audit logs of the tenant the user was signed into with the Azure portal, not just the logs of the newly created tenant. The log activity includes the new tenant ID, the UPN and Object ID of the user that created the tenant, and the tenant creation time and date. Admins can use this to more effectively monitor their entire organization and better maintain an inventory of all their tenants.

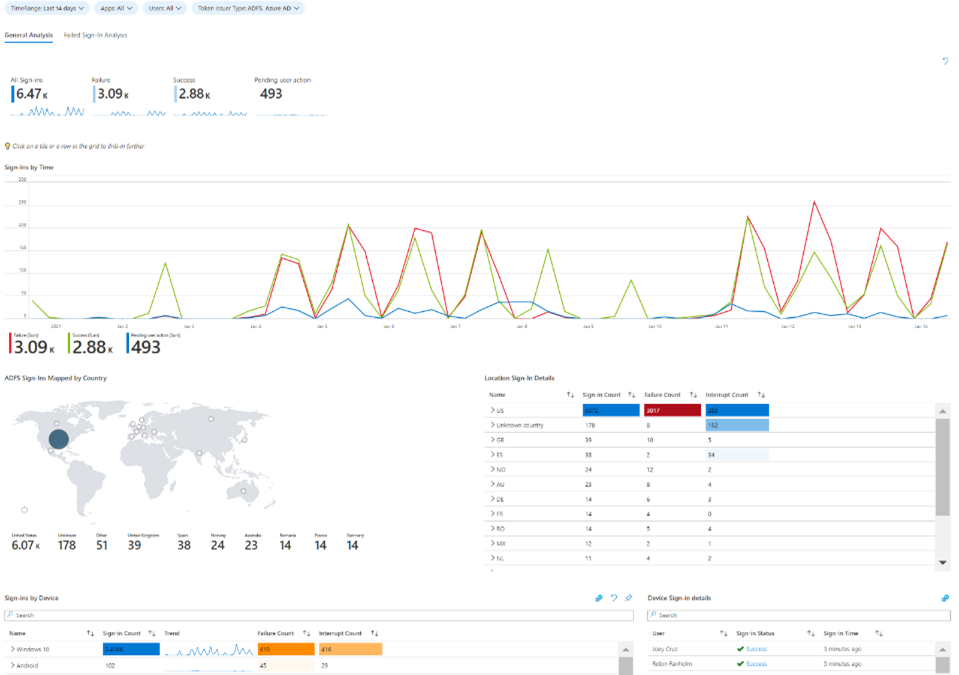
Azure Monitor workbook for Azure AD and AD FS sign-in reporting
External Identities
- Email one-time passcode for B2B collaboration in Arlington/Government Cloud – Organizations in the Microsoft Azure Government cloud can now enable guests to redeem invitations with email one-time passcode (email OTP). Guest users can still collaborate with partners in the Azure Government cloud by requesting and entering a temporary code to sign-in to shared resources.
As always, we’d love to hear your feedback or suggestions in the comments or on Twitter (@AzureAD).
Alex Simons (@Alex_A_Simons)
Corporate VP of Program Management
Microsoft Identity Division
Learn more about Microsoft identity:
by Contributed | Mar 29, 2021 | Technology
This article is contributed. See the original author and article here.
Windows Terminal is great, I use it for all my command line work. It automatically detects new shells that are installed on your system, like the shell for Ubuntu or PowerShell Core 7. Unfortunately, it doesn’t detect the Developer Command Prompt and Developer PowerShell for Visual Studio. Luckily, you can add them yourself!
The steps are rather simple:
- Open Windows Terminal
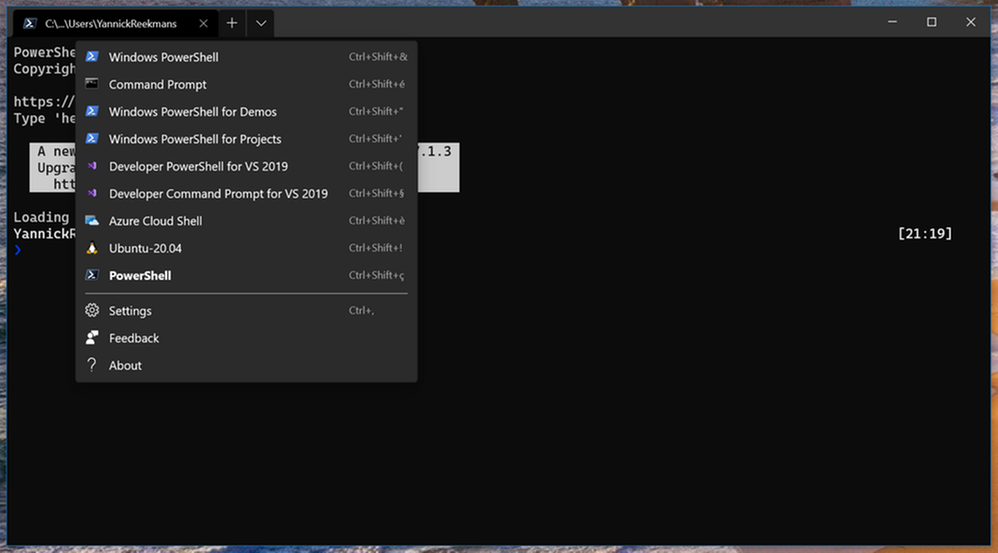
- Open the Settings through the UI (see screenshot) or with Ctrl+,
- In the
settings.json file that opens in your favorite code editor, locate the lists array inside the profiles object

Inside that lists array, you can add your additional profiles. In this case, for the Visual Studio command prompts, just use the following snippet:
            {
                "name": "Developer PowerShell for VS 2019",
                "commandline": "powershell.exe -noe -c "&{$vsPath = &(Join-Path ${env:ProgramFiles(x86)} 'Microsoft Visual StudioInstallervswhere.exe') -property installationpath; Import-Module (Join-Path $vsPath 'Common7ToolsMicrosoft.VisualStudio.DevShell.dll'); Enter-VsDevShell -VsInstallPath $vsPath -SkipAutomaticLocation}"",
                "icon": "%ProgramFiles(x86)%Microsoft Visual Studio2019EnterpriseCommon7IDEAssetsVisualStudio.70x70.contrast-standard_scale-180.png"
            },
            {
                "name": "Developer Command Prompt for VS 2019",
                "commandline": "%comspec%  /k "%ProgramFiles(x86)%Microsoft Visual Studio2019EnterpriseCommon7ToolsVsDevCmd.bat"",
                "icon": "%ProgramFiles(x86)%Microsoft Visual Studio2019EnterpriseCommon7IDEAssetsVisualStudio.70x70.contrast-standard_scale-180.png"
            },
Save the settings.json file, and now the new options show when opening a new tab:

Time to do your Visual Studio command line work in the fancy new Windows Terminal!
by Contributed | Mar 29, 2021 | Technology
This article is contributed. See the original author and article here.
The March 2021 Cumulative Update Preview release for Windows includes the following time zone updates for Volgograd, Russia:
- Individuals and organizations in Volgograd were recommended to temporarily set the time zone on their devices to “(UTC+3:00) Moscow, St. Petersburg” from December 27, 2020 at 02:00.
- Beginning with the March 2021 Cumulative Update Preview, Volgograd will now move back to Windows time zone, “(UTC+3:00) Volgograd”. Note that the offset is UTC+3:00 instead of the earlier UTC+4:00 for Volgograd.
- This can be done in one of the two ways:
- Select the Windows logo key, type “time zone”, and select Change the time zone. From the time zone dropdown, select “(UTC+3:00) Volgograd”.
- Navigate to Control Panel > Date and Time > Change time zone. From the time zone dropdown, select “(UTC+3:00) Volgograd”. Select OK to apply the change.
- This change is for customers running the following Windows 10 versions:
- Windows 10, version 1809
- Windows 10, version 1903
- Windows 10, version 1909
- Windows 10, version 2004
- Windows 10, version 20H2
- Volgograd customers running other, supported versions of Windows will see the relevant changes in the April 2021 monthly quality update.
For Microsoft’s official policy on DST and time zone changes, please see Daylight saving time help and support. For information on how to update Windows to use the latest global time zone rules, see How to configure daylight saving time for Microsoft Windows operating systems.

Recent Comments