This article is contributed. See the original author and article here.
Final Update: Monday, 15 March 2021 00:21 UTC
We’ve confirmed that all systems are back to normal with no customer impact as of 03/15, 00:21 UTC. Our logs show the incident started on 03/14 , 23:42 UTC and that during the 39 minutes that it took to resolve the issue some of customers experienced ingesting telemetry in East US 2 intermittent data latency, data gaps and incorrect alert activation.
Root Cause: The failure was due to one of the dependent services being unhealthy.
Incident Timeline: 0 Hours & 39 minutes – 03/14, 23:42 UTC through 03/15, 00:21 UTC
We understand that customers rely on Application Insights as a critical service and apologize for any impact this incident caused.
This article is contributed. See the original author and article here.
Final Update: Monday, 15 March 2021 02:43 UTC
We’ve confirmed that all systems are back to normal with no customer impact as of 3/15, 02:15 UTC. Our logs show the incident started on 3/15, 00:00 UTC and that during the two hours and 15 minutes that it took to resolve the issue approximately 10,000 customers experienced delayed telemetry ingestion.
Root Cause: The failure was due to a failure in a back end service that Application Insights relies on.
Incident Timeline: 2 Hours & 15 minutes – 3/15, 00:00 UTC through 3/15, 02:15 UTC
We understand that customers rely on Application Insights as a critical service and apologize for any impact this incident caused.
-Jack
Initial Update: Monday, 15 March 2021 01:15 UTC
We are aware of issues within Application Insights in the East US region and are actively investigating. Some customers may experience data ingestion latency.
Next Update: Before 03/15 02:30 UTC
We are working hard to resolve this issue and apologize for any inconvenience. -Jack
This article is contributed. See the original author and article here.
Final Update: Saturday, 03 April 2021 15:32 UTC
We’ve confirmed that all systems are back to normal with no customer impact as of 4/3, 15:00 UTC. Our logs show the incident started on 04/03, 14:30 UTC and that during the 30 minutes that it took to resolve the issue some customers may have experienced intermittent data gaps and incorrect alert activation in UK West region.
Root Cause: The failure was due to issue in one of our dependent service.
Incident Timeline: 30 minutes – 04/03, 14:30 UTC through 04/03, 15:00 UTC
We understand that customers rely on Application Insights as a critical service and apologize for any impact this incident caused.
This article is contributed. See the original author and article here.
Final Update: Sunday, 14 March 2021 09:41 UTC
We’ve confirmed that all systems are back to normal with no customer impact as of 03/14, 08:45 UTC. Our logs show the incident started on 07/14, 07:55 UTC and that during the 50 minutes that it took to resolve the issue some customers may have experienced data access issues with Application Insights Live Metrics in East US Region.
Root Cause: The failure was due to a backend dependency.
Incident Timeline: 50 minutes – 03/14, 07:55 UTC through 03/14, 08:45 UTC
We understand that customers rely on Application Insights as a critical service and apologize for any impact this incident caused.
-Soumyajeet
Initial Update: Sunday, 14 March 2021 08:46 UTC
We are aware of issues within Application Insights and are actively investigating. Some customers may experience delayed or missed Log Search Alerts and Data Access in East US region.
Work Around: none
Next Update: Before 03/14 11:00 UTC
We are working hard to resolve this issue and apologize for any inconvenience. -Soumyajeet
This article is contributed. See the original author and article here.
When you’re juggling work and personal tasks, having clearly defined to-do lists can help reduce stress and improve productivity. Microsoft To Do helps you manage your tasks so you can get more time for yourself. It seamlessly syncs your tasks across devices, so you always have access to them, whether you use To Do on Android, iPhone, Mac, Windows, or the web.
In the third installment of our six tips series, we’ll show you some nifty ways to make the most out of To Do on your iOS device. (Check out our other six tips articles for Windows and Android.)
1. Use Siri to add tasks and open lists in To Do
Want a super-fast way to add a task or open a list in To Do? We’ve got you covered. Here’s how to add “Open list” or “Add task” as shortcuts in Siri:
Adding a task with Siri
Head to your To Do settings and tap on Siri Shortcuts, then tap on the plus icon + next to Add Task.
Pick the phrase you want to use with Siri. For example, if you want a shortcut to add something to your grocery list, you can change the When I say phrase to “Add groceries”.
Under Do, select Add task and pick the name of the list you want to add tasks to.
If you want new tasks to be marked as important, come with reminders, or be added to My Day, tap on Show More and configure it the way you want. Once you’re done, select Back > Add to Siri.
Opening a list with Siri
Head to your To Do settings and tap on Siri Shortcuts, then tap on the plus button next to Open List.
Pick the phrase you want as your shortcut, like “Open grocery list”.
Under Do, select Add task, then select List and pick your grocery list.
Select Back to go to the Add to Siri page, then select Add to Siri.
2. Create shortcuts to your lists on your device’s home screen
In To Do for iOS, you can create shortcuts to your lists on your home screen. (Note: you’ll need to install the Siri Shortcuts app to be able to do this.)
Here’s how to add shortcuts to your lists:
Create a Siri shortcut to open a list.
Open the Shortcuts app and open the created shortcut.
Tap the three dots to see more options. Tap on the option to add the shortcut to your home screen.
Check that the shortcut shows up on your home screen.
In To Do for iOS, you can create shortcuts. Or, if you’re using iOS 14, you can add a shortcut with the Shortcuts widget.
3. Glance at your tasks from the iOS 14 widgets
If you’re using iOS 14, you can check out a To Do list from your home screen with the new Microsoft To Do widgets. To set this up:
Long press on any empty space on your home screen, then tap the plus icon [] to open the widgets menu.
Search for To Do or scroll down to find Microsoft To Do, then add the widget of your choice.
You don’t need to fiddle around with due dates and reminder times when creating a task. When typing a task’s title, include when it’s due or when you want to be reminded in that title and Microsoft To Do will create a task with that due date or reminder time.
5. View your Microsoft To Do lists in Apple’s Reminders app Microsoft To Do is integrated with Apple’s Reminders app so you can view your To Do lists in Reminders if you use iOS 12 or later. Here’s how to link your Microsoft To Do account with Apple’s Reminders app:
Open your device’s settings and select Reminders > Add Account.
Add the email address associated with your Microsoft To Do account. When you open Apple’s Reminders app, you should be able to see your Microsoft To Do lists.
Note: currently shared lists and smart lists like My Day, Planned, Assigned to you, Important, and Flagged email won’t show up in Apple’s Reminders app.
6. Swipe actions
You can take a number of actions on a task just by swiping left or right. By swiping, you can:
Delete a task. Tap on the task, swipe from right to left, tap the trash can icon, and confirm that you want to delete the task.
Add a task to My Day. Tap on the task, swipe from left to right, and select the sun icon . Once a task is added to My Day, you can swipe from left to right again to remove it.
Move a task from one list to another. Tap on the task, swipe from left to right, and select the icon that looks like a list with an arrow. Tap it and pick the list you want to move your task to.
We hope these tips help you out! We’d love to hear your feedback. Let us know in the comments below or connect with us on Twitter and Facebook. You can also write to us at todofeedback@microsoft.com.
This article is contributed. See the original author and article here.
This article was written by Tracy Van der Schyff, a Business Applications and Office Apps & Services MVP, from South Africa. She shares her personal journey to support educators and teachers globally through community efforts.
To identify and celebrate success, we need to have empathy and compassion for the challenges that our fellow #HumansofIT experience. Low self esteems can make us wonder if we add any value, and this cannot be further from the truth. Never forget that an extended hand lifts someone up, and that together we can make a difference and overcome the greatest of challenges life presents us with.
To understand why this success story is so important to me, I must first share a glimpse into my colourful life with you. We all have a purpose of being (even multiples), some have figured it out, some of us are creating it for ourselves, and others are still searching.
I spent many years searching and at 40, I had an epiphany with relation to my “purpose”. It all started with an image. The image was of the Ikigai Venn Diagram. Although this is the “western interpretation” and more accurately represents a Purpose Venn Diagram. Still, it had a profound impact on my life.
Ikigai & doing your part
My most important realisation was that I had never given myself enough credit to say that I was good at something, which meant that I felt unbalanced and that I had no purpose. As soon as I gained awareness of this “self-abuse” I was subjecting myself to, I focused even more on enabling others, especially when they do not have the means to do so themselves. It became clear as daylight that millions of others were doing the same, not believing in themselves and due to this, not achieving what they are capable of.
Over the next couple of years I wrote / created nearly a thousand blogs & videos (see more about my crazy personal challenge here) and joined various social media groups across Facebook, LinkedIn and Twitter to help support the incredible #HumansofIT out there.
Of course, 2020 delivered a curve ball and I saw the group rapidly grow from 10,000 members to 60,000. Most of those being teachers in desperate need of support. I saw something in this group during the year which both scared me and inspired me. The emotions in the group went through the typical stages of the Kubler Ross Change Model Curve: Shock, denial, frustration, depression, experiment, decision and eventually integration.
It broke my heart as I could see that many of these teachers did not have the internal IT support in their companies / institutions they needed. I was also overwhelmed with gratitude towards the thousands who were helping (Microsoft employees, MVP’s, and community members) by answering questions and making suggestions to help these educational superheroes navigate these incredibly difficult times. Also, never losing sight, that by helping, we were all having a positive impact on our future (learners / students).
The Kubler Ross Change Curve – Success story 1
Towards the end of 2020 I noticed a change in the group. The teachers started supporting each other, sharing tips and tricks, cool new features and in general being more positive. This of course being the “experiment, decision and eventually integration” phase. I was overjoyed. A self-sustaining ecosystem of community support and love had evolved, right in front of our eyes.
Although not my success story to tell, it is a success story that needs to be highlighted and from the bottom of my heart – thank you to everyone who was (and is) part of that process.
ADvTECH Group – Success story 2
This brings me to the second success story. I have had the privilege to work with ADvTECH Group in South Africa, which consists of many schools and tertiary divisions. During 2020 I ‘nervously’ reached out to see how they were doing. I was pleasantly surprised when their overall experience had been positive, even though they had also moved completely to just using Microsoft Teams during this period. I was convinced that they must have done something different, which they had.
Soon Allie Thompson (Wieczorek) and I were “scheming ideas” on how to tell this story at Microsoft Ignite, which of course happened on the 4th of March, 2021. I was fortunate to be the moderator for this incredible panel which consisted of a EdTech Admin, Teacher & Student. I was so inspired by the passion, compassion, and empathy they share, and I am sure you will be as well.
So, block out 30 minutes in your calendar, go get a cup of coffee or tea and watch the video recording to see how they approached the most difficult “test” the education space has ever been challenged with and not only survived, but thrived.
This article is contributed. See the original author and article here.
Data is king, of course.
IoT technologies have sprung up to collect data from anything you can imagine, from the status of the fan in a building’s air conditioning unit to the noise level of the lathe on a factory floor. Businesses have sprung up turning that data into insights, and those insights into actions that drive value. For example, monitoring the sensors in the buildings on the Microsoft Puget Sound campus, and in the equipment attached to those buildings, has helped Microsoft reduce electrical consumption by over 20 percent. Generally speaking, securely connecting sensors to a cloud-based system with analytics and dashboards is a recipe for improving operations and the environment.
There are two primary ways sensors can connect to the cloud-based system. The most common way is for some separate application to query the sensor for the data, either directly from the cloud or using a on-premises gateway to query the sensor and push the data to the cloud. The other way is for a sensor with more compute power to create a direct connection to the cloud and push the data. Which of these methods is used depends upon the capabilities of the sensor, and the enterprise architecture into which the data is to be pumped. Two concerns that are top of mind with either of these methods are the cost-performance and the security of the data.
Consider the common scenario of monitoring the quality of the air inside or outside of buildings. It is important for understanding the environment and for enabling building owners to provide a healthier place for people to live and work. Sensors are available on the market which measure the levels of harmful chemicals and particles in the air, and the task for the enterprise is to select a sensor and how to get those readings into a centralized system or dashboard that allows the enterprise to take whatever actions are appropriate based upon the levels detected.
Most of the existing air quality sensors are standalone devices that can only respond to queries. The disadvantage of this method in the context of a large enterprise monitoring environment is that it requires a separate application (a gateway) to issue those queries and forward the data. This introduces additional cost and management effort, as well as potentially increasing security risks if the gateway needs to be accessed remotely (for example over RDP). A company by the name of Sysinno has an alternative to this, with an air quality sensor that can directly and securely connect to the cloud without the need of a local gateway using an onboard Azure Sphere chip from Microsoft. The onboard Azure Sphere thus reduces operating cost and complexity, and it does so in a highly secure manner.
We’ve written a whitepaper to show how to build an end-to-end solution using the Sysinno iAeris air quality sensor and a number of Azure IoT elements. In addition to showing how to configure the Sysinno detector to send data to Azure IoT Hub, the paper shows how to write an Azure function to send the data to SQL Server, and how to create Power BI and Time Series Insights (TSI) dashboards to display real-time and historical data. At this point, the air quality data could be consumed by any enterprise monitoring system, and furthermore be accessed by a tool such as Dynamics 365 Field Service for generating maintenance work orders or building-wide alerts to occupants. More broadly, the whitepaper shows how to easily build an end-to-end workflow for capturing, storing, and displaying certain types of IoT data. You could use the code shown to display room temperatures, occupancy, noise levels, traffic, or almost any other data for which you have a sensor.
To read the article and see the code, please follow this link to the Sysinno website.
This article is contributed. See the original author and article here.
In our exploration of how to run GraphQL on Azure, we’ve looked at the two most common aspects of a GraphQL server, queries and mutations, so we can get data and store data. Today, we’re going to look at the third piece of the puzzle, subscriptions.
What are GraphQL Subscriptions
In GraphQL, a Subscription is used as a way to provide real-time data to connected clients. Most commonly, this is implemented over aWebSocketconnection, but I’m sure you could do it with long polling or Server Sent Events if youreallywanted to (I’ve not gone looking for that!). This allows the GraphQL server to broadcast query responses out when an event happens that the client issubscribedto.
Let’s think about this in the context of the quiz game we’ve been doing. So far the game is modeled for single player, but if we wanted to add multiplayer, we could have the game wait for all players to join, and once they have, broadcast out a message via a subscription that the game is starting.
Defining Subscriptions
Like queries and mutations, subscriptions are defined as part of a GraphQL schema, and they can reuse the types that are available within our schema. Let’s make a really basic schema that contains a subscription:
type Query {
    hello: String!
}

type Subscription {
    getMessage: String!
}

schema {
    query: Query
    subscription: Subscription
}
The subscriptiontypethat we’re defining can have as many different subscriptions that clients can subscribe via, and each might return different data, it’s completely up to the way your server wants to expose real-time information.
Implementing Subscriptions on Azure
For this implementation, we’re going to go back to TypeScript and useApollo. Apollo have some really great docs on how toimplement subscriptions in an Apollo Server, and that’ll be our starting point.
But before we can start pushing messages around, we need to work out what is going to be the messaging backbone of our server. We’re going to need some way in which the server and communicate with all connected clients, either from within a resolver, or from some external event that the server receives.
In Azure, when you want to do real-time communications, there’s no better service to use thanSignalR Service. SignalR Service takes care of the protocol selection, connection management and scaling that you would require for a real-time application, so it’s ideal for our needs.
Creating the GraphQL server
In the previous posts, we’ve mostly talked about running GraphQL in a serverless model onAzure Functions, but for a server with subscriptions, we’re going to useAzure App Service, and we can’t expose a WebSocket connection from Azure Functions for the clients to connect to.
When it comes to implementing the integration with SignalR, Apollo uses thegraphql-subscriptionsPubSubEngineclass to handle how the broadcasting of messages, and connections from clients.
So that means we’re going to need an implementation of that which uses SignalR, and thankfully there is one,@aaronpowell/graphql-signalr-subscriptions(yes, I did write it :squinting_face_with_tongue:).
We’ll start by adding that to our project:
npm install --save /graphql-signalr-subscriptions
You’ll need tocreate a SignalR Service resourceand get the connection string for it (I usedotenvto inject it for local dev) so you can create PubSub engine. Create a newresolvers.tsfile and create theSignalRPubSubinstance in it.
import { SignalRPubSub } from "@aaronpowell/graphql-signalr-subscriptions";

export const signalrPubSub = new SignalRPubSub(
    process.env.SIGNALR_CONNECTION_STRING
);
We export this so that we can import it in ourindex.tsand start the client when the server starts:
// setup ApolloServer
httpServer.listen({ port }, () => {
    console.log(
        ` Server ready at http://localhost:${port}${server.graphqlPath}`
    );
    console.log(
        ` Subscriptions ready at ws://localhost:${port}${server.subscriptionsPath}`
    );

    signalrPubSub
        .start()
        .then(() => console.log(" SignalR up and running"))
        .catch((err: any) => console.error(err));
});
It’s important to note that you must callstart()on the instance of the PubSub engine, as this establishes the connection with SignalR, and until that happens you won’t be able to send messages.
Communicating with a Subscription
Let’s use the simple schema from above:
type Query {
    hello: String!
}

type Subscription {
    getMessage: String!
}

schema {
    query: Query
    subscription: Subscription
}
In thehelloquery we’ll broadcast a message, which thegetMessagecan subscribe to. Let’s start with thehelloresolver:
So ourhelloresolver is going to publish a message with the nameMESSAGEand a payload of{ getMessage: “…” }to clients. The name is important as it’s what the subscription resolvers will be configured to listen for and the payload represents all the possible fields that someone could select in the subscription.
A resolver for a subscription is a little different to query/mutation/field resolvers as you need to provide asubscribemethod, which is what Apollo will invoke to get back the names of the triggers to be listening on. We’re only listening forMESSAGEhere (but also only broadcasting it), but if you added anotherpublishoperation with a name ofMESSAGE2, thengetMessagesubscribers wouldn’t receive that. Alternatively,getMessagecould be listening to a several trigger names, as it might represent an aggregate view of system events.
Conclusion
In this post we’ve been introduced to subscriptions in GraphQL and seen how we can use the Azure SignalR Service as the backend to provide this functionality.
You’ll find the code for the SignalR implementation of subscriptionshereand the full examplehere.
This article is contributed. See the original author and article here.
I’ve been doing a lot of work recently with GraphQL onAzure Functionsand something that I find works nicely is the schema-first approach to designing the GraphQL endpoint.
The major drawback I’ve found though is that you start with a strongly typed schema but lose that type information when implementing the resolvers and working with your data model.
So let’s have a look at how we can tackle that by building an application with GraphQL on Azure Functions and backing it with a data model inCosmosDB, all written in TypeScript.
To learn how to get started with GraphQL on Azure Functions, check out the earlier posts in this series.
Creating our schema
The API we’re going to build today is a trivia API (which uses data fromOpen Trivia DBas the source).
We’ll start by defining a schema that’ll represent the API as a file namedschema.graphqlwithin thegraphqlfolder:
Our schema has defined two core types,QuestionandAnswer, along with a few queries and a mutation and all these types are decorated with useful GraphQL type annotations, that would be useful to have respected in our TypeScript implementation of the resolvers.
Creating a resolver
Let’s start with the query resolvers, this will need to get back the data from CosmosDB to return the our consumer:
This matches thequeryportion of our schema from the structure, but how did we know how to implement the resolver functions? What arguments do we get toquestionandgetRandomQuestion? We know thatquestionwill receive anidparameter, but how? If we look at this in TypeScript there’sanyall over the place, and that’s means we’re not getting much value from TypeScript.
Here’s where we start having a disconnect between the code we’re writing, and the schema we’re working against.
Enter GraphQL Code Generator
Thankfully, there’s a tool out there that can help solve this for us,GraphQL Code Generator. Let’s set it up by installing the tool:
npm install --save-dev @graphql-codegen/cli
And we’ll setup a config file namedconfig.ymlin the root of our Functions app:
This will generate a file namedgenerated.tswithin thegraphqlfolder using ourschema.graphqlas the input. The output will be TypeScript and we’re also going to generate the resolver signatures using thetypescriptandtypescript-resolversplugins, so we best install those too:
Now we can hover over something likeidand see that it’s typed as astring, but we’re still missing a piece, what isdataStoreand how do we know what type to make it?
Creating a data store
Start by creating a new file nameddata.ts. This will house our API to work with CosmosDB, and since we’re using CosmosDB we’ll need to import the node module:
Why CosmosDB? CosmosDB have just launched aserverless planwhich works nicely with the idea of a serverless GraphQL host in Azure Functions. Serverless host with a serverless data store, sound like a win all around!
With the module installed we can implement our data store:
This class will receive aCosmosClientthat gives us the connection to query CosmosDB and provides the two functions that we used in the resolver. We’ve also got a data model,QuestionModelthat represents how we’re storing the data in CosmosDB.
To make this available to our resolvers, we’ll add it to the GraphQL context by extendingindex.ts:
import { ApolloServer } from "apollo-server-azure-functions";
import { importSchema } from "graphql-import";
import resolvers from "./resolvers";
import { dataStore } from "./data";

const server = new ApolloServer({
    typeDefs: importSchema("./graphql/schema.graphql"),
    resolvers,
    context: {
        dataStore
    }
});

export default server.createHandler();
If we run the server, we’ll be able to query the endpoint and have it pull data from CosmosDB but our resolver is still lacking a type fordataStore, and to do that we’ll use a custom mapper.
Custom context types
So far, the types we’re generating are all based off what’s in our GraphQL schema, and that works mostly but there are gaps. One of those gaps is how we use the request context in a resolver, since this doesn’t exist as far as the schema is concerned we need to do something more for the type generator.
Let’s define the context type first by adding this to the bottom ofdata.ts:
export type Context = {
    dataStore: DataStore;
};
Now we can tell GraphQL Code Generator to use this by modifying our config:
We added a newconfignode in which we specify thecontextTypein the form of<path>#<type name>and when we run the generator the type is used and now thedataStoreis typed in our resolvers!
Custom models
It’s time to run our Function locally.
npm start
And let’s query it. We’ll grab a random question:
{
    getRandomQuestion {
        id
        question
        answers
    }
}
Unfortunately, this fails with the following error:
Cannot return null for non-nullable field Question.answers.
If we refer back to ourQuestiontype in the GraphQL schema:
This error message makes sense asanswersis a non-nullable array of non-nullable strings ([String!]!), but if that’s compared to our data model in Cosmos:
These field resolvers will receive aparentas their first argument that is theQuestionModeland expect to return the type as defined in the schema, making it possible to do mapping of data between types as required.
If you restart your Azure Functions and execute the query from before, a random question is returned from the API.
Conclusion
We’ve taken a look at how we can build on the idea of deploying GraphQL on Azure Functions and looked at how we can use the GraphQL schema, combined with our own models, to enforce type safety with TypeScript.
We didn’t implement the mutation in this post, that’s an exercise for you as the reader to tackle.
You can check out the full example, including how to connect it with a React front end, onGitHub.
This article is contributed. See the original author and article here.
This blog will provide an overview ofModern application development. I will first define the modern application development approach. Then delve into the ‘7 building blocks’ of the approach starting with cloud native architecture, followed by AI, Integration, Data, Software delivery, Operations, and Security.
Each segment will define and explain the ‘building block’ and how the modern application development approach leverages the ‘building blocks’ to produce more robust applications.
Modern application developmentis an approach that enables you to innovate rapidly by using cloud-native architectures with loosely coupled microservices, managed databases, AI, DevOps support, and built-in monitoring.
The resulting modern applications leverage cloud native architectures by packaging code and dependencies in containers and deploying them as microservices to increase developer velocity using DevOps practices.
Subsequently modern applications utilize continuous integration and delivery (CI/CD) technologies and processes to improve system reliability. Modern apps employ automation to identify and quickly mitigate issues applying best practices like infrastructure as code and increasing data security with threat detection and protection.
Lastly, modern applications are faster by infusing AI into native architecture structures to reduce manual tasks, accelerating workflows and introducing low code application development tools to simplify and expedite development processes.
According to The Cloud Native Computing Foundation (CNCF), cloud native is defined as “Cloud-native technologies empower organizations to build and run scalable applications in modern, dynamic environments such as public, private, and hybrid clouds.
Containers, service meshes, microservices, immutable infrastructure, and declarative APIs exemplify this approach.
These techniques enable loosely coupled systems that are resilient, manageable, and observable. Combined with robust automation, they allow engineers to make high-impact changes frequently and predictably with minimal toil.”
Utilizing that definition, what are the key tenants of a cloud-native approach, and how does each tenant benefit you?
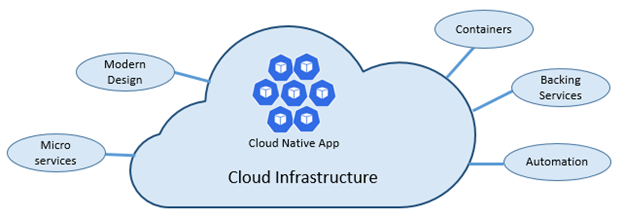
As stated above, cloud-native architectures center on speed and agility. That speed and agility are derived from 6 factors:
1.Cloud infrastructure
2.Modern design
3.Microservices
4.Containers
5.Backing services
6.Automation.
Cloud infrastructureis themost important factorthat contributes to the speed and agility of cloud-native architecture.
3 Key Factors
1.Cloud-native systems fully leverage the cloud service model using PaaS compute infrastructure and managed services.
2.Cloud-native systems continue to run as infrastructure scales in or out without worrying about the back end because the infra is fully managed.
3.Cloud-native systems have auto scaling, self-healing, and monitoring capabilities.
Modern Design is highly effective in part due to theTwelve-Factor Application method, which is a set of principles and practices that developers follow to construct applications optimized for modern cloud environments.
Most Critical Considerations for Modern Design
1.Communication — How front ends communication with back-end services, and how back-end services communicate with each other.
2.Resiliency — How services in your distributed architecture respond in less-than-ideal scenarios due to the in-process, out-process network communications of microservices architecture.
3.Distributed Data — How do you query data or implement a transaction across multiple services?
4.Identity — How does your service identify who is accessing it and their allotted permissions?
What are Microservices?
Microservices are built as a distributed set of small, independent services that interact through a shared fabric.
1.Each microservice has an autonomous lifecycle and can evolve independently and deploy frequently.
2.Each microservice can scale independently, enabling services to scale to meet demand.
Those microservices are then packaged a container image, those images are stored in container registry. When needed you transform the container into a running container instance, to utilize the stored microservices. How do containers benefit cloud native apps?
1.Provide portability and guarantee consistency across environments.
2.Containers can isolate microservices and their dependencies from the underlying infrastructure.
3.Smaller footprints than full virtual machines (VMs). That smaller size increases density, the number of microservices, that a given host can run at a time.
Cloud native solutions also increase application speed and agility via backing services.
2.Treating backing services as attached resources enables the services to attach and detach as needed without code changes to the microservices that contain information, enabling greater dynamism.
Lastly, cloud-native solutions leverage automation. Using cloud-native architectures your infrastructure and deployment are automated, consistent, and reputable.
Benefits of Automation
1.Infrastructure as Code (IaC)avoids manual environment configuration and delivers stable environments rapidly at scale.
2.Automated deployment leverages CI/CD to speed up innovation and deployment, updating on-demand; saving money and time.
The second building block in the modern application development approach is Artificial intelligence (AI).
What comprises artificial intelligence? How do I add AI to my applications?Azure Artificial Intelligenceis comprised of machine learning, knowledge mining, and AI apps and agents. Under the apps and agent’s domain there are two overarching products,Azure Cognitive ServicesandBot Service, that we’re going to focus on.
Cognitive services are a collection of domain specific pre-trained AI models that can be customized with your data. Bot service is a purpose-built bot development environment with out-of-the-box templates. To learn how to add AI to your applications watch the short video titled “Easily add AI to your applications.”
Innate Benefits
User benefits:Translation, chatbots, and voice for AI-enabled user interfaces.
Business benefits:Enhanced business logic for scenarios like search, personalization, document processing, image analytics, anomaly detection, and speech analytics.
Modern Application Development unique benefit:
Enable developers of any skill to add AI capabilities to their applications with pre-built and customizable AI models for speech, vision, language, and decision-making.
Why is integration needed, and how is it accomplished?
Integration is needed to integrate applications by connecting multiple independent systems. The four core cloud services to meet integration needs are:
1.A way to publish and manage application programming interfaces (APIs).
2.A way to create and run integration logic, typically with a graphical tool for defining the workflow’s logic.
3.A way for applications and integration technologies to communicate in a loosely coupled way via messaging.
4.A technology that supports communication via events
What are the benefits of Azure integration services and how do they translate to the modern app dev approach?
Azure meets all four needs, the first need is met by Azure API management, the second is met by Azure Logic Apps, the third is Azure Service Bus, and the final is met by Azure Event Grid.
The four components of Azure Integration Services address the core requirements of application integration. Yet real scenarios often require more, and this is where the modern application development approach comes into play.
Perhaps your integration application needs a place to store unstructured data, or a way to include custom code that does specialized data transformations.
Azure Integration Services is part of the larger Azure cloud platform, making it easier to integrate data, APIs, and into your modern app to meet your needs.
You might store unstructured data in Azure Data Lake Store, for instance, or write custom code using Azure Functions, to meet serverless compute tech needs.
The fourth building block is data, and more specifically managed databases.
What are the advantages of managed databases?
Fully managed, cloud-based databases provide limitless scale, low-latency access to rich data, and advanced data protection — all built in, regardless of languages or frameworks.
How does the modern application development approach benefit from fully managed databases?
Modern application development leverages microservices and containers, the benefit to both technologies is their ability to operate independently and scale as demand warrants.
To ensure the greatest user satisfaction and app functionality the limitless scale and low-latency access to data enable apps to run unimpeded.
What constitutes modern development software delivery practices?
Modern app development software delivery practices enable you to meet rapid market changes that require shorter release cycles without sacrificing quality, stability, and security.
The practices help you to release in a fast, consistent, and reliable way by using highly productive tools, automating mundane and manual steps, and iterating in small increments through CI/CD and DevOps practices.
A compound of development (Dev) and operations (Ops), DevOps is the union of people, process, and technology to continually provide value to customers. DevOps enables formerly siloed roles — development, IT operations, quality engineering, and security — to coordinate and collaborate to produce better, more reliable products.
By adopting a DevOps culture along with DevOps practices and tools, teams gain the ability to better respond to customer needs, increase confidence in the applications they build, and achieve development goals faster.
DevOps influences the application lifecycle throughout itsplan,develop,deliver, andoperatephases.
Plan
In the plan phase, DevOps teams ideate, define, and describe features and capabilities of the applications and systems they are building. Creating backlogs, tracking bugs, managing agile software development with Scrum, using Kanban boards, and visualizing progress with dashboards are some of the ways DevOps teams plan with agility and visibility.
Develop
The develop phase includes all aspects of coding — writing, testing, reviewing, and the integration of code by team members — as well as building that code into build artifacts that can be deployed into various environments. To develop rapidly, they use highly productive tools, automate mundane and manual steps, and iterate in small increments through automated testing and continuous integration.
Deliver
Delivery is the process of deploying applications into production environments and deploying and configuring the fully governed foundational infrastructure that makes up those environments.
In the deliver phase, teams define a release management process with clear manual approval stages. They also set automated gates that move applications between stages until they’re made available to customers.
Operate
The operate phase involves maintaining, monitoring, and troubleshooting applications in production environments. In adopting DevOps practices, teams work to ensure system reliability, high availability, and aim for zero downtime while reinforcing security and governance.
Under continuous integration, the develop phase — building and testing code — is fully automated. Each time you commit code, changes are validated and merged to the master branch, and the code is packaged in a build artifact.
Under continuous delivery, anytime a new build artifact is available, the artifact is automatically placed in the desired environment and deployed. With continuous deployment, you automate the entire process from code commit to production.
Operations The sixth building block is operations to maximize automation.
How do you maximize automation in your modern application development approach?
With an increasingly complex environment to manage, maximizing the use of automation helps you improve operational efficiency, identify issues before they affect customer experiences, and quickly mitigate issues when they occur.
Fully managed platforms provide automated logging, scaling, and high availability. Rich telemetry, actionable alerting, and full visibility into applications and the underlying system are key to a modern application development approach.
Automating regular checkups and applying best practices like infrastructure as code and site reliability engineering promotes resiliency and helps you respond to incidents with minimal downtime and data loss.
The seventh building block is multilayered security.
Why do I need multi-layered security in my modern applications?
Modern applications requiremultilayered securityacross code, delivery pipelines, app runtimes, and databases. Start by providing developers secure dev boxes with well-governed identity. As part of the DevOps lifecycle, use automated tools to examine dependencies in code repositories and scan for vulnerabilities as you deploy apps to the target environment.
Enterprise-grade secrets and policy management encrypt the applications and give the operations team centralized policy enforcement. With fully managed compute and database services, security control is built in and threat protection is executed in real time.
Conclusion While modern application development can seem daunting, it is an approach that can be done iteratively, and each step can yield large benefits for your team.

.jpeg")


.gif")


Recent Comments