
by Contributed | Apr 22, 2021 | Technology
This article is contributed. See the original author and article here.
What’s a capstone project?
University College London (UCL) created the UCL Industry Exchange Network (UCL IXN), which partner their students with organizations worldwide. Organizations define a project, and the student picks something that they can relate to and are passionate about.
The goal of those capstone projects is to provide real-world experience to acquired academic knowledge. Through experience, students learn about the industry. They learn about best practices and how to work on a project with deliverables.
Learn more about the UCL Industry Exchange Network by visiting the UCL IXN website.
What’s Project 15 and how it works?
Project 15, on the other hand, is an effort to accelerate conservation and ecosystem sustainability projects with the latest Internet Of Things (IoT) technologies. This is done through an Open Source Software platform.
The platform is made to take you 80% of the way. In comparison, the student only provides the remaining 20% — no need to design a cloud architecture from scratch when all the components are already linked together. We can get started faster and achieve our preservation goals just as quickly.
Learn more about Project 15 by visiting their website.
Get the code that power Project 15 now on GitHub.
Student Capstone Projects
There were many projects this year, but two of them kept our attention. The first project helped us keep track of elephants through Machine Learning Computer Vision. Tracking where the elephants are, where they are going, and how they are doing is vital to ensure that they are kept away from poachers.
The second project is about tracking red pandas through the jungle to ensure their wellbeing. To help preserve their ecosystem, they use Azure Custom Vision to help identify the red pandas in an area and ensure their health.
If you love elephants, we have a bonus for you. The Elephant Edge challenge in which we participated this year also helps in conserving elephants through GPS tracking, GPS fence, visual and sound monitoring.
The amount of work that was done through student projects is incredible. If you want to know more, you need to watch our upcoming events.
Upcoming events
You can watch a Livestream with details and demos of all those projects! You can Register Now, or you can catch the Livestream on Learn TV at 8am PDT (UTC-7).
While we are talking about events and sustainability, do not miss the Microsoft IoT Hack for Sustainability. We have up to $10,000 in prizes, and it’s worth registering. The deadline to participate is May 24th, 2021, at 5pm EDT.
Training Resources
If you want to make a difference, you can start by using the Learn modules the students used while building those projects. Among the modules that will inspire you is Classify Endangered Bird Species with Custom Vision.
Do not forget to get started with Project 15 by retrieving the code from GitHub!.
by Contributed | Apr 22, 2021 | Technology
This article is contributed. See the original author and article here.
Deploy LAPS, Check! You’re all set, right? Maybe…
Hi team, Eric Jansen here again; I’m back after being reminded by a friend and reader that I’ve been away for too long. I’m trying to be better about it since I have a ton of content that I’d like to share and talk about, but these days it all comes down to time.
In today’s blog, I’d like to quickly talk about the Local Administrator Password Solution (aka LAPS). It’s nothing new and has been around for some time. If you aren’t familiar with it, take a look at the documentation, found here: Download Local Administrator Password Solution (LAPS) from Official Microsoft Download Center
It short, it is a solution that allows computers to publish a generated password, for a defined local admin account, to an attribute on itself in Active Directory. For a bit more detail, here are the bullet points from the “How Does LAPS Work?” section in the link above:
The core of the LAPS solution is a GPO client-side extension (CSE) that performs the following tasks and can enforce the following actions during a GPO update:
- Checks whether the password of the local Administrator account has expired.
- Generates a new password when the old password is either expired or is required to be changed prior to expiration.
- Validates the new password against the password policy.
- Reports the password to Active Directory, storing it with a confidential attribute with the computer account in Active Directory.
- Reports the next expiration time for the password to Active Directory, storing it with an attribute with the computer account in Active Directory.
- Changes the password of the Administrator account.
The password can then be read from Active Directory by users who are allowed to do so. Eligible users can request a password change for a computer.
The sentence highlighted above is what I’ll be focusing on today. One of the things that I do is travel around to different customers and audit various things that fall into the technologies that I support. In my experience, when I bring up the topic of LAPS during an audit, and want to take a peek into their setup, it’s somewhat common to hear them say something similar to the following: “No, we’re good, we already set it up and it’s working great!” With that, they want to move on to more pressing matters – which is fine because, well, they’re the customer. But just like when you’re writing a book, or preparing a speech, sometimes you need an ‘attention getter‘ – something to grab their attention to open their eyes – and this is how I do it:
“I say ok, that’s fine, but maybe we could just run one command really fast….as a regular user (with no administrative rights to the environment).”
I have them run the following:
Get-ADComputer -Filter * -Properties MS-Mcs-AdmPwd | Where-Object MS-Mcs-AdmPwd -ne $null | FT Name, MS-Mcs-AdmPwd
And this is when the hook is set… In a LOT of cases, that command is run and then computers start scrolling off the screen showing the local administrator passwords in the clear, and no hacking was involved. Then you see jaws drop and the admin(s) saying…” but we checked this – we used the Find-AdmPwdExtendedRights PowerShell cmdlet and remediated everything.” That may be true, you checked it years ago when you deployed LAPS, but things change and that’s why you must constantly audit your environment.
So how does this happen? Usually (based on my experience) the issue is a training issue, and usually the issue is computer specific (i.e., not inherited). The issue happens because permissions are incorrectly and unknowingly given by an admin to a computer object that gives non-administrative users too many rights. When I say rights, specifically I’m talking about extended rights.
Here is a snip from the LAPS Operations Guide that talks about it:
========================================================================================
Permissions
The Active Directory infrastructure offers advanced tools for implementation of the security model for this solution by allowing for per-attribute Access Control Lists (ACLs) and implementing confidential attributes for password storage. There are four sets of rights that need to be modified.
Removing Extended Rights
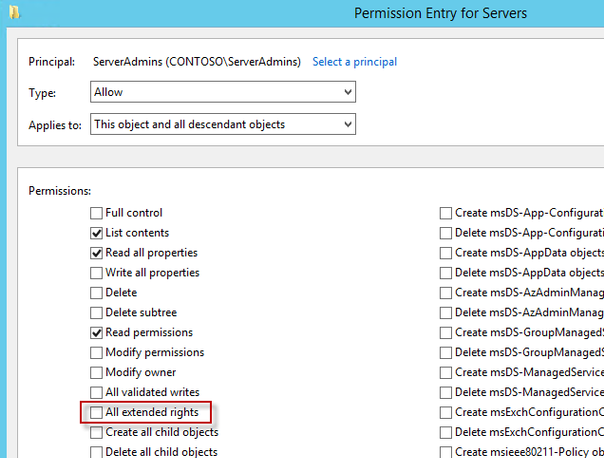
To restrict the ability to view the password to specific users and groups you need to remove “All extended rights” from users and groups that are not allowed to read the value of attribute ms-Mcs-AdmPwd. This is required because the All Extended rights/permissions permission also gives permission to read confidential attributes.
Inherited Permissions
If you want to do this for all computers, you will need to repeat the next steps on each OU that contains those computers. You do not need to do this on sub containers of already processed OUs unless you have disabled permission inheritance.
- Open ADSIEdit
- Right Click on the OU that contains the computer accounts that you are installing this solution on and select Properties.
- Click the Security tab
- Click Advanced
- Select the Group(s) or User(s) that you don’t want to be able to read the password and then click Edit.
- Uncheck All extended rights
Important: This will remove ALL extended rights, not only CONTROL_ACCESS right, so be sure that all roles will retain all necessary permissions required for their regular work.
To quickly find which security principals have extended rights to the OU you can use PowerShell cmdlet. You may need to run Import-module AdmPwd.PS if this is a new window.
Find-AdmPwdExtendedrights -identity <OU name> | Format-Table

If the output is truncated as the number of trustees having permissions is long, focus on a specific OU and run:
Find-AdmPwdExtendedrights -identity Memphis | Format-list
ObjectDN : OU=memphis,OU=members,DC=herbertm01,DC=lab
ExtendedRightHolders : {NT AUTHORITYSYSTEM, HERBERTM01domDomain Admins, contoso-domMember-HelpDesk1-Memhpis}
Direct Permissions
“All extended rights” may also be set through direct, non-inherited Access Control Entries (ACEs) on the computer objects. This might have been done manually by the customer or with a script or provisioning system.
The second common source for ACEs with the extended rights access is the schema default for computers. By default, it contains the “Account Operators” group with full control, which will also grant sufficient permissions to read the local Administrator password:

In a delegated administration environment where the Account Operators are meant to be used for Domain User Accounts only and no or little permissions should be granted to computers, you may need to review changing or even removing this ACE from the schema default.
You also need to develop a solution to remove this ACE from all computers managed by LAPS.
========================================================================================
What I see most commonly are ‘Direct Permissions’ modifications on computer objects, as discussed above. This could be due to lack of knowledge, flawed account provisioning code, laziness, or any number of things. I see this most during the staging of computer accounts before a domain join operation. In this scenario, a process for this is either not established, incorrectly established, or is just plain circumvented. Here’s just one example (but I’m also curious to see what others in the field are seeing, so comment on your findings if you would) :
An admin manually pre-stages a computer account and they want to give the end user the ability to add their own machine to the domain (perhaps for environments where the ms-DS-MachineAccountQuota has been locked down), or they want a certain user, or users, to be able to modify something on the computer object. Whatever the reason, they just give “Domain Users” full control or some sort of delegated control over the computer object just because ‘it works’. The most common principals that I see used are “Domain Users”, “Authenticated Users”, “BUILTINUsers”, and “Everyone” with these excessive rights on the newly created computer objects. So now, consider a new Jr. admin joining the team and his new mentor shows him the processes, and now we have two admins doing said process. Eventually, this gets out of control and as time goes by, there could be hundreds or thousands of machines that have their local administrator passwords available to potentially ‘Everyone’. That’s when things can get bad. I don’t even want to mention what kinds of machines I’ve found in my travels that could have been breached.
The point is that things change and everything needs to be audited. But finding and fixing the permissions alone isn’t the answer. Education and training need to be a part of the solution. With all of that said, go forth and run that one line and let me know what you find. OK, run the command, but I don’t really want to know what you find. ;) Afterwards, if you have any hits, and I hope you don’t, I’d suggest that you fix any findings ASAP by removing any incorrectly distributed extended rights.
So how do we fix this? Well, I explain above, and show the checkbox that you need to remove, but if you had hundreds or thousands of these computers to fix, that’s a lot of clicking, so here’s some sample code for you to fix it programmatically.
<#
.Synopsis
   Removes unauthorized access from the most commonly seen default groups that shouldn't have rights to read the AD stored local admin account password for the given computer - 'Everyone', 'BUILTINUsers', 'Domain Users', and 'Authenticated Users'.

.DESCRIPTION
   Removes unauthorized access from the most commonly seen default group that shouldn't have rights to the CONTROL_ACCESS (as seen if using DSAcls) / ExtendedRights (as seen if using Get-ACL) permission on computer accounts.
   Holders of this right have permission to read the admin account password for the given computer.  In addition to checking to see if these default groups have ExtendedRights specifically, I also check to see if they have 'Full Control',
   which is seen as 'GenericAll'.  Full control obviously includes ExtendedRights, but since all rights are included, there's no need to individually list them, so it's labelled 'GenericAll', and filters just looking for 'ExtendedRights'
   would miss those ACEs.

   The Alpha version of this function only removes non-inherited ACEs from specific computer objects only.

.EXAMPLE
   Remove-AdmPwdExtendedRights -ComputerName <ComputerName>

   Displays the Access Control Entries (ACEs) within the Access Control List (ACL) that contain either Full Control or that had Extended Rights, for any of the following groups defined as the Identity Reference:

   'Everyone', 'BUILTINUsers', 'Domain Users', and 'Authenticated Users'

   The variablized ACL has those ACEs removed, but prompts for confirmation that you're sure that you want write the modified ACL to the computer object in AD.

.EXAMPLE
   Remove-AdmPwdExtendedRights -ComputerName <ComputerName> -Force

   Displays the Access Control Entries (ACEs) within the Access Control List (ACL) that contain either Full Control or that had Extended Rights, for any of the following groups defined as the Identity Reference:

   'Everyone', 'Domain Users', and 'Authenticated Users'

   The variablized ACL has those ACEs removed, DOES NOT PROMPT for modification confirmation and attempts to write the modified ACL to the computer object in AD.

.NOTES
This is an Alpha version of this function with very limited testing.  See Disclaimer below.

Alpha Version - 20 April 2021

When looking at ACLs in AD, and trying to understand what you're seeing in the output of a Get-ACL on an AD Object, reference the following Microsoft Documentation which shows the ActiveDirectoryAccessRule Class:

https://docs.microsoft.com/en-us/dotnet/api/system.directoryservices.activedirectoryaccessrule?redirectedfrom=MSDN&view=net-5.0

or this which shows the Object ACE structure:

https://docs.microsoft.com/en-us/windows/win32/api/winnt/ns-winnt-access_allowed_object_ace?redirectedfrom=MSDN

Info based on the filter criteria in the function below:

ActiveDirectoryRights include permission types
IdentityReference Contains Security Principals
AccessControlType is the Access to the Right (ie Allow or Deny)
ObjectType is the string form of the rightsGUID attribute of the control access right -
    -Below I filter for 00000000-0000-0000-0000-000000000000, which is the equivalent ALL - so 'Read ALL Properties', or 'Write ALL Properties', but in our case it's 'ALL Extended Rights".

This article shows how an ADSI ACE is read:

https://docs.microsoft.com/en-us/windows/win32/ad/reading-a-control-access-right-set-in-an-objectampaposs-acl

   Disclaimer:

 This is a sample script.  Sample scripts are not supported under any Microsoft standard support program or service. The sample scripts are provided AS IS without warranty of any kind. Microsoft further disclaims all implied warranties including, without limitation, any implied warranties of merchantability or of fitness for a particular purpose. The entire risk arising out of the use or performance of the sample scripts and documentation remains with you. In no event shall Microsoft, its authors, or anyone else involved in the creation, production, or delivery of the scripts be liable for any damages whatsoever (including, without limitation, damages for loss of business profits, business interruption, loss of business information, or other pecuniary loss) arising out of the use of or inability to use the sample scripts or documentation, even if Microsoft has been advised of the  possibility of such damages.

 AUTHOR: Eric Jansen, MSFT
#>

function Remove-AdmPwdExtendedRights
{
    [CmdletBinding()]
    [Alias()]
    Param
    (
        # Computer Object in AD to target for removal of Extended Rights.
        [Parameter(Mandatory=$false,
                   ValueFromPipelineByPropertyName=$true,
                   Position=0)]
        $ComputerName,

        # Computer Object in AD to target for removal of Extended Rights.
        [Parameter(Mandatory=$false,
                   ValueFromPipelineByPropertyName=$true,
                   Position=1)]
        [Switch]$Force,

        # OU in AD to target for removal of Extended Rights.
        [Parameter(Mandatory=$false,
                   ValueFromPipelineByPropertyName=$true,
                   Position=2)]
        $OrganizationalUnit
    )


    try
    {

        $ComputerDN = $(Get-ADComputer $ComputerName).distinguishedname
        $ACL = Get-ACl AD:$($ComputerDN)
        $ACEsWithDefinedGroups = $ACL.Access | where {$_.IdentityReference -Match "Everyone" -or $_.IdentityReference -eq "BUILTINUsers" -or $_.IdentityReference -Match "Domain Users" -or $_.IdentityReference -Match "Authenticated Users"}

        If($ACEsWithDefinedGroups){

        $ExtendedRightACEs = $ACEsWithDefinedGroups |
        where {$_.isInherited -eq $false -and $_.ActiveDirectoryRights -match "ExtendedRight" -and $_.AccessControlType -eq "Allow" -and $_.objectType -eq "00000000-0000-0000-0000-000000000000"}

        $FullControlACEs = $ACEsWithDefinedGroups |
        where {$_.isInherited -eq $false -and $_.ActiveDirectoryRights -match "GenericAll" -and $_.AccessControlType -eq "Allow"}


            ForEach($ACE in $ExtendedRightACEs){
            Write-Host "Removing the Following ACE from the ACL: " -NoNewline -ForegroundColor Gray
            Write-Host "ActiveDirecoryRights: $($ACE.ActiveDirectoryRights); IdentityReference: $($ACE.IdentityReference); AccessControlType: $($ACE.AccessControlType)"
            $ACL.RemoveAccessRule($ACE) | Out-Null
            }

            ForEach($ACE in $FullControlACEs){
            Write-Host "Removing the Following ACE from the ACL: " -NoNewline -ForegroundColor Gray
            Write-Host "ActiveDirecoryRights: $($ACE.ActiveDirectoryRights); IdentityReference: $($ACE.IdentityReference); AccessControlType: $($ACE.AccessControlType)" -ForegroundColor Red
            $ACL.RemoveAccessRule($ACE) | Out-Null
            }

            If($ExtendedRightACEs -ne $null -or $FullControlACEs -ne $null){

                If($Force){
                Set-Acl -AclObject $ACL -Path AD:$ComputerDN
                }
                Else{

                    do
                    {
                      $Answer = Read-Host "Write Changes to $($ComputerName) ACL? (Y/N)"

                      IF($Answer.ToLower() -eq "y"){
                      Set-Acl -AclObject $ACL -Path AD:$ComputerDN
                      }
                      ElseIf($Answer.ToLower() -eq "n"){
                      Return
                      }

                    }
                    until ($Answer.ToLower() -eq "y" -or $Answer.ToLower() -eq "n")

                }


            $ACEsWithDefinedGroups = $PostACL.Access | where {$_.IdentityReference -Match "Everyone" -or $_.IdentityReference -eq "BUILTINUsers" -or $_.IdentityReference -Match "Domain Users" -or $_.IdentityReference -Match "Authenticated Users"}

            $ExtendedRightACEs = $ACEsWithDefinedGroups |
            where {$_.isInherited -eq $false -and $_.ActiveDirectoryRights -match "ExtendedRight" -and $_.AccessControlType -eq "Allow" -and $_.objectType -eq "00000000-0000-0000-0000-000000000000"}

            $FullControlACEs = $ACEsWithDefinedGroups |
            where {$_.isInherited -eq $false -and $_.ActiveDirectoryRights -match "GenericAll" -and $_.AccessControlType -eq "Allow"}

                If($ExtendedRightACECheck -eq $null -and $FullControlACEs -eq $null){
                Write-Host "Successfully removed ExtendedRights from $($ComputerName)" -ForegroundColor Green
                }
                Else{
                Write-Warning "Something didn't go as expected..."
                }

            }

        }
        Else{
        Write-Host "There were no ACE's that included 'Everyone', 'BUILTINUsers', 'Domain Users', or 'Authenticated Users'."
        }


    }
    catch
    {
        $_.exception.message
    }

}
The Remove-AdmPwdExtendedRights function that I’ve written above works, but since I wrote it just days before posting this (since I just wanted to get this content out there), it has both limited testing and a list of other limitations that I wanted to point out:
- I don’t give the user of the script a parameter to define their own groups, I only filter for what I most commonly see as far as groups that shouldn’t have rights: ‘Everyone’, ‘BUILTINUsers’, ‘Domain Users’, and ‘Authenticated Users’.
- With that said, if you wanted to add your own groups for removal, you’ll need to edit the function to add them to the filter or add your own parameter. If I add that functionality, I’ll update the blog.
- As of right now, it only fixes computers where the permissions were modified directly on the individual computer object, it doesn’t modify any OU permissions that the computer inherits. I’m debating on fixing this for a future update, but for now, you’ll need to make permission changes to any incorrectly ACLs OU’s separately.
- As of right now, the function is written to just remove the offending ACE(s) of a single computer object to be fixed, but I could easily build a loop into it so that it can fix a whole list. For the time being though, I chose not to since you may want to include other operations into your bulk fix actions. Yeah, I could have made additional parameters for the additional recommended actions (more on that below), but that would do more than what the function name alludes to, so I chose to keep it separate.
- Instead of just unchecking the one box for “All extended rights”, I wipe out the whole ACE, so you may not like that. Here’s an example of what I mean:
- I run the command above as a regular user and collect my list of computer objects that have excessive rights, and I find machines that have additional rights defined in that same ACE, such as this guy:

- The offending checkbox is checked, but so is ‘All validated writes’… Well, I wipe it all out. You’d just need to verify that this wouldn’t have any impact on your environment. If so, and you just need the one box unchecked, then you would need to modify the sample code.
- In addition to looking just for those common groups to have ‘All Extended Rights’, I also check to see if they have ‘Full Control’. If they do, I also remove that ACE.
- I run it through the function, and modify the ACL that’s stored in a variable, and then ask if it’s ok to write the change to AD, so it warns you before making and change, shows what would be removed, and gives you the option to opt out (unless -Force is used and then it just does it).
OK, so you have the code, and you have a list of machines that need to be fixed, now what? We write a small script that loops through all the vulnerable computer objects, and run the Remove-AdmPwdExtendedRights function for each computer object. But remember in the limitations section for the function, in the third bullet, I mentioned that you may want to take additional remediation actions, and you do. You’ll also want to modify the ‘ms-Mcs-AdmPwdExpirationTime’ attribute on the vulnerable computer objects, changing it to the current time, so that upon the next group policy refresh, the client-side extension updates its password and writes it back to Active Directory, rendering the old password useless. You can do this by using the Reset-AdmPwdPassword cmdlet that’s in the AdmPwd.PS module, among other ways.
After all of that, run the original command again to see what has and what has not been fixed, and re-evaluate. Maybe that ‘regular user’ is part of a different group that gives them the ability to see the password, or maybe there was an incorrect delegation to the OU that the computer object resides in. It may take a little more investigation, but it shouldn’t be hard to find and fix the rest of the computer objects.
Finally, after fixing the permissions issues, and then resetting those machines’ passwords, you may want to consider investigating logons to those machines with the local administrator account with that machines’ associated LAPS password to find possible compromise. After all, finding the local admin account to use is not that hard of a task.
In addition to the above information, review the guidance in the link below. It talks about default ACLs for when staging machine accounts, best practices for staging said machine accounts, and other scenarios where some users can read passwords for some computers without being delegated the permissions to do so.
LAPS and permission to join computer to domain | Microsoft Docs
Until next time!

by Contributed | Apr 22, 2021 | Technology
This article is contributed. See the original author and article here.
HoloLens 2, just like its predecessor, is a powerful Windows 10 device that operates handsfree and immerses its users into the world of Mixed Reality. Now the HoloLens is not all fun and games (although RoboRaid is a blast!) as these devices are currently being used in a plethora of industries such as manufacturing, emergency services, utilities and more to enable new ways to conduct daily activities. Just like any device that requires access to an organizations network and data, the HoloLens in most cases requires management via that organization’s IT department.
The following video provides a quick overview of what is involved in architecting a HoloLens 2 management solution.
https://aka.ms/HoloLens-2-Deployment-Overview-Video
Lets now breakdown the basics as to what is required to manage and deploy the HoloLens 2.
- An Azure account is required to be able to login to the Azure Portal: aka.ms/NewAzureAccount
- Azure Active Directory, Microsoft’s cloud-based solution for identity management, is required to authenticate the user operating the HoloLens 2. This insures secure access of your organizations resources via the HoloLens 2. Microsoft has created an Azure Active Directory QuickStart guide to get you started which can be found here: aka.ms/azuread-quickstart
- Next you will need to setup a mobile device management (MDM) solution to control the use of the HoloLens 2 when connecting to your organization’s resources and to manage the apps the HoloLens 2 is allowed to operate. A QuickStart detailing steps on mobile device management authority can be found here: aka.ms/MDMAuthority
- Once the MDM Authority has been set, you will need to add users and assign MDM licenses to these users in order of thier devices to be managed. The Create a user in Inture QuickStart can be found here: aka.ms/Create-Intune-User
- With the user created and MDM license assigned, you will now want to create a security group to ensure all users in that group recieve the same type of management. A possible example would be the assignment of permissions to construction workers operating on a new build that use the HoloLens to identify build points they are assigned to complete.
Utilizing said maangement group would ensure all workers recieve the same level of device enablement whereas thier supervisors could be assigned to another group with elevated capabilites to assign tasks to the workers. The QuickStart on management group creation can be found here: aka.ms/Create-Intune-Management-Group
- Next we will setup the ability of automatic enrollement of the HoloLens 2 via the Microsoft Endpoint Manager. This will simplify the Out of Box Experiance (OOBE) for the end users powering up thier HoloLens 2 devices for the first time and tailor it specifically to your organization’s requirements. The Automatic Enrollment QuickStart for Intune can be found here: aka.ms/Win10AutoEnrollment
With the general HoloLens 2 management and security setup completed, your organization can now assign the HoloLens 2 devices to the users as needed.
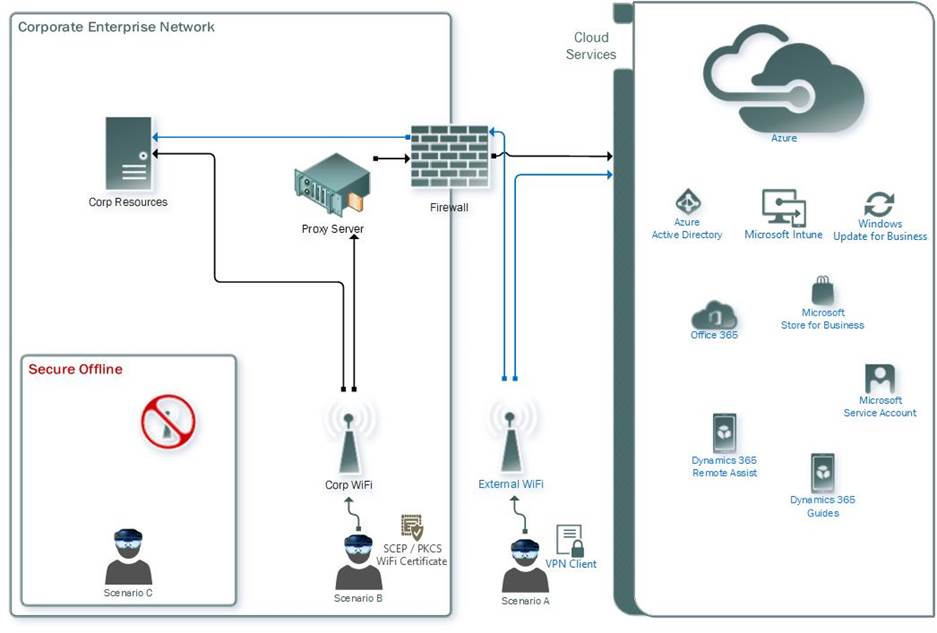
Understanding that some organizations have additonal requirements for thier HoloLens deployments, Microsoft has created documentation on three different specialized scenarios that may be better inline with the requirements of your organization. The following QuickStart provides detailed steps surrounding these scenarios: aka.ms/HoloLens2DeployScenarios
by Contributed | Apr 22, 2021 | Technology
This article is contributed. See the original author and article here.
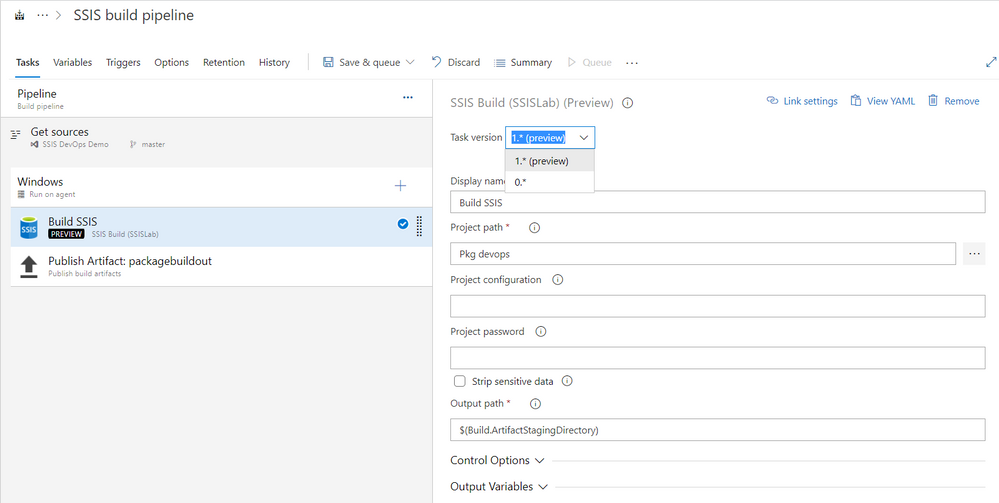
SSIS DevOps Tools released new version of SSIS Build task and SSIS Deploy task. Major enhancements include:
- SSIS Build task version 1.* (Preview)
- Remove the dependency on Visual Studio and SSIS designer. Build task can run on Microsoft-hosted agent or self-hosted agent with Windows OS and .NET framework 4.6.2 or higher.
- No need of installing out-of-box components.
- Support protection level EncryptionWithPassword and EncryptionAllWithPassword.
- SSIS Deploy task version 1.* (Preview)
- Support protection level EncryptionWithPassword and EncryptionAllWithPassword.
Use new version of SSIS Build task:
- Microsoft-hosted agent or self-hosted agent Windows OS and .NET framework 4.6.2 or higher
- Add SSIS Build task and select Task version as 1.* (Preview). Default version is 0.*.
- 1.* only properties:
Project Password
Password of the SSIS project and its packages. This argument is only valid when the protection level of the SSIS project and packages is EncryptSensitiveWithPassword or EncryptAllWithPassword. For package deployment model, all packages must share the same password specified by this argument.
Strip Sensitive Data
Convert the protection level of the SSIS project to DontSaveSensitve if this value is true. When protection level is EncryptSensitiveWithPassword or EncryptAllWithPassword, the argument Project Password must be correctly set. This option is only valid for project deployment model.
Use new version of SSIS Deploy task:
- Add SSIS Deploy task and select Task version as 1.* (Preview). Default version is 0.*.
- 1.* only properties:

Please refer to this page for more detail usage. If you have questions, visit Q&A.

by Contributed | Apr 22, 2021 | Technology
This article is contributed. See the original author and article here.
Storage > Storage Accounts
- Encryption scopes in Azure Storage now generally available
Compute>Virtual Machines and Virtual machine scale sets
- Virtual machine scale sets with flexible orchestration mode are now available in public preview in the Azure portal
General > Management + Governance
- New Management Group UX: Introducing a tree hierarchy, get started page, security tab and more
Intune
- Updates to Microsoft Intune
Let’s look at each of these updates in greater detail.
Storage > Storage Accounts
Encryption scopes in Azure Storage now generally available
Encryption scopes introduce the option to provision multiple encryption keys in a storage account for blobs. Previously, customers using a single storage account for multi-tenancy scenarios were limited to using a single account-scoped encryption key for all the data in the account. With encryption scopes, customers now can provision multiple encryption keys and choose to apply the encryption scope either at the container level (as the default scope for blobs in that container) or at the blob level. Encryption scopes in Azure Storage now generally available.
The key that protects an encryption scope may be either a Microsoft-managed key or a customer-managed key in Azure Key Vault. Customers can also choose to enable automatic rotation of a customer-managed key that protects an encryption scope. When customers generate a new version of the key in their Key Vault, Azure Storage will automatically update the version of the key that is protecting the encryption scope, within a day.
Please refer to our documentation on encryption scopes for more details on the feature.
To create an encryption scope in the Azure portal
- Sign into Azure portal
- Click on ‘More Services’
- Click on ‘Storage Accounts’

- Click on ‘Encryption’ in the table of contents

- Navigate to the ‘Encryption scopes’ tab

- Click ‘Add’ to create an encryption scope and configure as desired

Compute>Virtual Machines and Virtual machine scale sets
Virtual machine scale sets with flexible orchestration mode are now available in public preview in the Azure portal
Virtual machine scale sets with flexible orchestration mode helps customers simplify the deployment, management, and scalability of their applications. This new capability provides full control of the individual VMs within a scale set, like Availability Sets, while increasing high availability for large deployments (thousands of VMs). However, scale sets will now be able to provide several additional features compared to Availability Sets, such as higher levels of reliability and performance, ability to deploy VMs in conjunction with load balancers, support for Availability Zones etc. Virtual machine scale sets with flexible orchestration mode are now available for public preview in Azure portal.
Demo steps to enable flexible orchestration mode preview:
To be able to use flexible orchestration mode you must register your subscription for preview of this feature. Follow the documentation to register your subscription.
Demo steps to a Create VMSS UX:
- Click ‘Create a resource’

- Search for ‘Virtual machine’, then select one of the options for a Virtual Machine

- Click ‘Create’

- In ‘Create a virtual machine scale set’ Basics tab select Orchestration mode to ‘Flexible (preview)’

- Follow instructions on the page to configure the rest of the settings. See documentation to learn more.
Demo steps to Create VM UX:
- Click ‘Create a resource’

- Search for ‘Virtual machine’, then select one of the options for a Virtual Machine

- In ‘Create a virtual machine’ Basics tab select ‘Availability’ options to ‘Virtual machine scale set (preview)’

- Select an existing Virtual machine scale set or create new one.

- Follow instructions on the page to configure the rest of the settings. See documentation to learn more.
General > Management + Governance
New Management Group UX: Introducing a tree hierarchy, get started page, security tab and more
The new management groups Azure portal experience provides a visual hierarchy of management groups to organize your subscriptions and resources for unified policy, security, access control and more. Traverse through the tree structure and expand or collapse nodes of management groups to build or navigate through your structure. You can also now click on a single management group to add subscriptions and apply governance conditions.
Our new experience includes the following changes:
- A new ‘Get Started’ page for first time users with links to documentation and examples of tree structures for planning

On the Management groups homepage, users can view and manage subscriptions in three ways:
- Click on the ‘Subscriptions’ tab on the Management groups homepage which shows all subscriptions at Root level
- Click on a single management group, navigate to the ‘Subscriptions’ tab
- NEW: Click directly on a display name to drill down to the details of single management group view
- Note: We removed the ‘details’ button
- Click on a subscription count via the tree view columns (Child subscriptions and Total subscriptions)
- Added aggregated counts of subscriptions to understand hierarchy faster

- Note: We removed the Role column
- Management groups where a user does not have owner/contributor access are now explicit through disabled links
- However, if a user has access to subscriptions within a disabled management group, they can still view these subscriptions
- NEW: More information provided in Essentials of a single management group (details view)
- Added Path
- Added Subscription count
- Added a clickable parent group for faster upward traversal of structure

- In the single management group view, we added a new section called ‘Governance’. Our current offerings include:
- Security
- Policy
- Deployments

- We added the ability to select subscriptions directly contained in a management group. You can also view all subscriptions included in its child groups.
- You can select a scope by checking/unchecking the ‘Only show direct children’ checkbox
- NEW: Security Center menu item to view secure score and recommendations for single management group

INTUNE
Updates to Microsoft Intune
The Microsoft Intune team has been hard at work on updates as well. You can find the full list of updates to Intune on the What’s new in Microsoft Intune page, including changes that affect your experience using Intune.
Azure portal “how to” video series
Have you checked out our Azure portal “how to” video series yet? The videos highlight specific aspects of the portal so you can be more efficient and productive while deploying your cloud workloads from the portal. Check out our most recently published videos:
Next steps
The Azure portal has a large team of engineers that wants to hear from you, so please keep providing us your feedback in the comments section below or on Twitter @AzurePortal.
Sign in to the Azure portal now and see for yourself everything that’s new. Download the Azure mobile app to stay connected to your Azure resources anytime, anywhere. See you next month!

by Contributed | Apr 21, 2021 | Technology
This article is contributed. See the original author and article here.
Earlier this year, Packt released a new book…

http://aka.ms/VS2019Book
But I should be honest. I was involved in this book. Let me find a version of the cover with my name on it…

There you go. I wrote the foreword! It was a great and wonderful thing! At least, I think it was. I really can’t remember what I wrote. I’ll go read it…
Oh, I like how I opened the foreword…
“By combining Visual Studio Code and Visual Studio (VS), the brand is over two times more commonly used by developers than any other environment (Stack Overflow, 2019). What that means is that this topic for 80% of all developers.”
Have you thought about that? In this day and age, when there are so many IDE options for developers to pick from, they simply are choosing Visual Studio. There are many reasons why developers want to use Visual Studio, including compatibility with languages and tools, as well as various feature sets.
And that’s really what this book is about. As I said/wrote in my foreword, the authors (Paul Schroeder and Aaron Cure) have cracked the code! If you apply the snippets, templates, git tips, and extension-based practices that you’ll find in this book, then not only will you become more efficient, but you’ll also become your team’s hero and thought leader!
Before I move on, did you notice how weird the subtitle was in the top version of the book cover? Let’s inspect it:
“A developer’s guide to mastering in core skills with the IDE and unlock advanced productivity secrets.”
You could probably read that sentence for 20 minutes before you decipher and interpret all its secrets. Moving on…
Let’s take a look at what the topics are…
- Flavors of Visual Studio
- Keyboard Shortcuts
- IDE Tips and Tricks
- Working with a Repository
- Working with Snippets
- Database Explorers
- Compiling, Debugging, and Versioning
- Introduction to Project and Item Templates
- Creating Your Own Templates
- Deploying Custom Templates
- Overviewing Visual Studio 2019 Extensions
- Overviewing VS Code Extensions
- CodeMaid is Your Friend
- Be Your Team’s Hero with CodeGenHero
- Secure Code with Puma Scan
- Appendix: Other Popular Productivity Extensions
I know what you’re thinking! You’re thinking, “Is overviewing a word?” Yes, yes it is a word! More specifically, it’s the present participle of a word.
Anyway, the reason why I wanted to write the foreword (and blog about it), is because I truly believe in the value. Developers don’t use templates, especially, to the degree that they could. Plus, you’ll peruse a plethora of other topics that you’d be wise to glean from.
Also, one interesting tidbit is that the author is partially at fault for the extension featured in chapter 14, CodeGenHero. So check that out!
Whilst perusing the Amazons, I saw the reviews for the book, and they’re pretty impressive. I want to give you just the titles of the reviews here, so you can see what I mean:
- “Useful Visual Studio shortcuts, Git-Jitsu, snippet and debugging knowledge here.” – Dan Hermes
- “Clear and concise with good examples to draw upon for furthering learning.” – Robert Frey
- “This one is a must have!” – Binit Datta
- “Learn everything about Visual Studio 2019.” – Yusuf
- “Excellent for those with some C# programming experience.” – Ben Miller
This book is great for noobs and still useful for ratchety, engineering curmudgeons. So check it out, and leave a review on the Amazons:
Remember to keep your mask on your face, your feet on the ground, and your head in the Cloud!
Ed
by Contributed | Apr 21, 2021 | Technology
This article is contributed. See the original author and article here.
Joao Couto VP, SAP Business Unit, Microsoft
This blog post has been co-authored by Prakash Pattaiyan, Principal Program Manager, SAP on Azure
Enterprises are rapidly adopting cloud, reducing their reliance on in-house managed infrastructure by turning to Microsoft Azure to benefit from hyperscale features, agility, and gain competitive advantage. Yet, for organizations running mission-critical instances such as SAP, the journey to cloud can appear to be complex with high risk and uncertainty.
Migrating SAP systems to the cloud comes with unique business and technical challenges as compared to other enterprise applications. Most organizations require an accelerated timeline, from discovery to go live, with zero to no downtime and implementation of best practices.
Transforming your SAP to cloud will require a fundamental examination of your infrastructure, data and business processes. To accelerate this phase, teams will need to quickly find inventory and ensure target architecture is properly sized to realize the full benefits of SAP on Azure. Post migration planning, IT organizations should look to avoid the high risk and uncertainty of the cloud migration by using repeatable processes and implementation of best practices from a Microsoft and SAP certified solution.
Customers need a solution that minimizes the risk and reduces cost by leveraging an automation factory that ensures repeatability and scalability all while achieving a technically and financially optimized SAP on Azure environment. To reduce the complexity, accelerate the timeline and ensure success, Microsoft has partnered with Protera, an SAP-certified, Microsoft Gold Cloud Partner as a Preferred Partner for SAP migrations to Azure.
Leveraging Automation to Accelerate Migration and Reduce Complexity
Based on the experience of over 500 migrations and management of over 2500 systems, Protera has developed a smarter way to migrate and manage SAP on Azure combining the most up-to-date knowledge of SAP and Azure with a powerful platform, Protera FlexBridge®. Customers choosing Microsoft Azure can take advantage of Protera services and Protera FlexBridge® to shorten their journey to Azure and modernize their SAP operations to quickly achieve their transformation objectives with the following:
SAP on Azure Transformation Assessment Customers currently running SAP use the Protera FlexBridge® platform to generate and validate their transformation plans to Azure, whether As-Is, Technical, SAP HANA or SAP S/4HANA.
The assessment includes:
- Current state analysis, migration methodology, project timeline, and migration readiness
- Collection of customer environment data including hypervisor, operating system, database, network, storage, and application metrics by utilizing Azure Migrate and FlexBridge ABAP Assessment App
- Possible Transformations options are provided for the customer’s SAP Applications
- Target architecture table and diagram showing type and version of operating system, database, SAP application Azure VM SKU, storage SKU, and network interfaces
- Cost for migration, Azure IaaS with PAYGO and Reserved terms, and managed services
Clarification of customer engagement (testing, etc.) defining roles & responsibilities for the migration project; Recommendations on backup and security
Intelligent Provisioning and Migration Quickly and securely migrate and optimize your SAP and related applications on Azure using powerful automations powered by Protera FlexBridge® which includes:
- Rapid provisioning of Azure infrastructure including: networking, security groups, VMs built from customer or Marketplace images and storage
- Migration automation to orchestrate the steps to migrate each server to Azure by using certified tools including Azure Migrate, SAP SWPM and SAP SUM and monitor migration health
Managed SAP on Azure Services Run SAP and related systems on Azure at a lower cost, increased performance, higher service levels and greater visibility, with continuous optimization using automations to operate consistently at scale. Services include:
- Dashboard of operational metrics including SLA, performance metrics for Azure as well as SAP application performance
- Service desk integration to customers’ service desk
- Azure spend analysis and optimization
- SAP Maintenance Automation
- Operating System, Database and SAP patching
- SAP System Copy
- Environment snoozing to reduce cost
Through the preferred partnership between Microsoft and Protera, multiple teams at both companies are committed to work together to simplify and accelerate SAP migrations to Azure for our customers using the powerful automation tool Protera FlexBridge®. Microsoft customers can leverage this expanded partnership to take advantage of the repeatable, automated, low risk migration methods that fit to the approved templates of SAP and Microsoft. We are very excited to have Protera as Microsoft’s Preferred Partner for SAP on Azure migrations.
Learn More
If you would like to learn more about Protera
eBook: A Smarter Cloud for Your SAP
Solution Brief: Protera Flexbridge® for SAP on Azure
To learn more about migrating SAP on Azure, visit:
SAP on Azure Migration – SAP Intelligent Enterprise | Microsoft Azure
by Contributed | Apr 21, 2021 | Technology
This article is contributed. See the original author and article here.
CU2 for BizTalk Server 2020 is now available for download.
For details on fixes and download link, please follow the master KB:
https://support.microsoft.com/help/5003151
You may want to bookmark this index page for updates related to BizTalk Server:
https://support.microsoft.com/help/2555976
As with CU1, the EN download is available by default. All other language packages will be made available on need basis. If a download is not available for the supported BizTalk language that you need, please contact us for the same.
As a quick reminder, for BizTalk Developer Tools please also update/install version 3.13.2.0 of the BizTalk Server Visual Studio extension in addition to installing the CU package. The extension can be installed from https://marketplace.visualstudio.com/items?itemName=ms-biztalk.BizTalk or from within Visual Studio – Manage Extensions. Please note that we have not updated the extension since CU1 so you can skip this step if you have already installed it previously.
by Contributed | Apr 21, 2021 | Technology
This article is contributed. See the original author and article here.
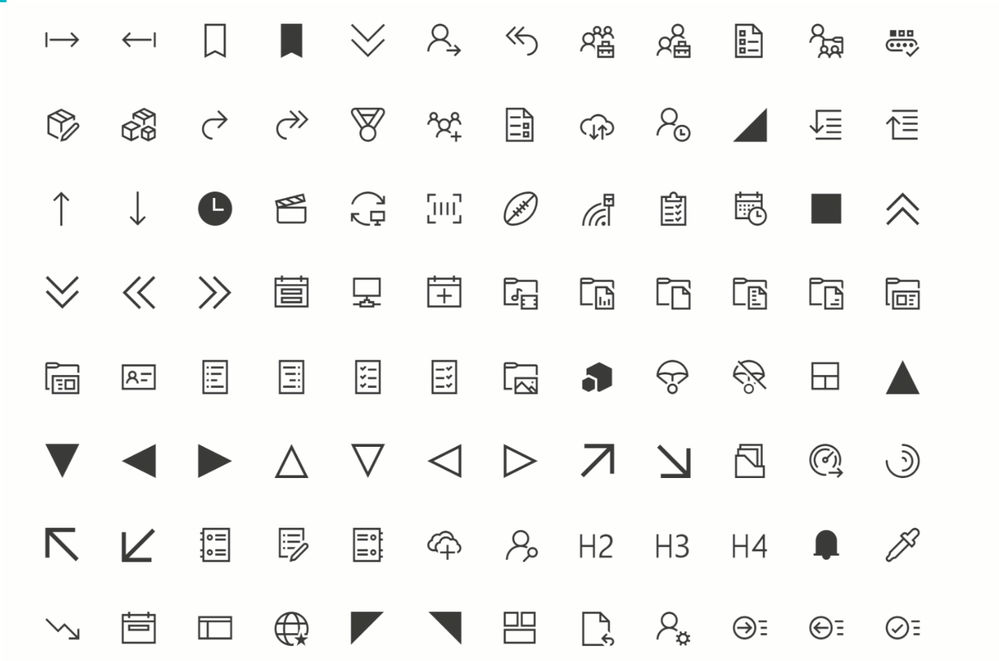
Fluent UI icons
Power Apps offers you a variety of icons – and recently, there were nice additions announced and rolled out. But if we want to create even more appealing apps, it makes sense to extend our pretty little icon library. Microsoft provides us with Fluent UI.
Fluent UI is a collection of UX frameworks for creating beautiful, cross-platform apps that share code, design, and interaction behavior
One part of Fluent UI is the iconography
How to get Fluent UI icons
You can browse through the icons in the Fluent UI icons tool, but there is right-click download option. As a developer, you can import Fluent UI iconography (and more) into your applications; for Power Apps, there a different way how to use them:
Use a community-driven tool to import icons to Power Apps
there are several tools available to get Fluent UI icons into Power Apps; find two of them here:
However, if you only want to use a few specific icons for an app or would like to try them out, you can head over to the Fluent UI repository on GitHub and right-click-download the icons. After that, you upload them to your Power App and can use them like any other image. Super cool: You get all icons as .svg files, which have three significant advantages:
.svg are transparent, which means you have no extra work to remove any background
.svg are lossless scalable, which means that you blow them up as you like it
.svg have are usually smaller than .jpg files of the same quality – this will have an excellent effect on the performance of your app
Pop-Ups
Screens in Power Apps are perfect for displaying information that should always be shown. But what if we only want to show some more content occasionally? Pop up to the rescue!

To create a pop up effect, create:

a rectangle that overlays the content that our user now should not focus on – good idea to have it filled grey and semi-transparent
a rectangle, smaller than the GreyOutRectangle, filled in in brighter background-color
a text label which shows the information
a cancel icon
Group these controls; it’s easier to work with them then.
Now create a textlabel (or a button, or an image… something that our user will click on to see the pop up).
Set the .onSelect property of this label to UpdateContext({isShowPopUp:true})
Set the .onSelect propert of the cancel icon to UpdateContext({isShowPopUp:false})
Set the .visible property of the whole PopUp Group tp isShowPopUp
This way, we set the isShowPopUp variable to true, if the user clicks the label, which will make the PopUp visible. As soon as the user clicks the cancel icon, the isShowPopUp variable is set to false, which means that the group will not be shown anymore!
Create an expand- and collapse able menu
As we need to deal with all screen estate carefully, it is a fantastic idea to have a menu that can expand and collapse. To create this, we need
a collection that holds the screens that we want our users to allow to navigate to
a gallery, which displays the items of our collection
a Hamburger Menu icon, which sets a variable to control the width of the gallery
- collection
To have icons (which will show while the menu is collapsed) and text (that will show up right next to our icons when the menu is expanded), we will first upload a few svgs (see above) and then refer to them in our collection:
ClearCollect(

NavigationMenu,

{

Row: 1,

Title: "About",

Image: ic_fluent_lightbulb_24_regular

},

{

Row: 2,

Title: "Flights",

Image: ic_fluent_airplane_take_off_24_regular

},

{

Row: 3,

Title: "Hotels",

Image: ic_fluent_bed_24_regular

},

{

Row: 4,

Title: "People",

Image: ic_fluent_people_32_regular

}

)

)
- Gallery
We create a gallery and set the .items property to our collection
We set the .width property to If(!IsExpand, 200, 50) or similar – first value is the expanded width, second is the non-expanded (collapsed) width.
As we want to pretty things up a little bit,
- Hamburger menu
we add a hamburger menu icon and set its .onSelect property to Set(IsExpand, !IsExpand)
- adjust all other controls on the screens
Now work on the .X property of all labels, buttons, images, etc. Set it to
If(!IsExpand, <original value>,<originalvalue>-150)
Our result should look something like this:

Feedback and what’s next?
What are your little tricks to make apps look more beautiful? I am curious to learn from you! Please comment below!
by Contributed | Apr 21, 2021 | Technology
This article is contributed. See the original author and article here.
Late last year, the Open-Source Databases on Azure Team announced the Preview release of Azure Database for MySQL Flexible Server to provide customers with greater control and manageability. Today, we’re pleased to let you know that the PowerShell module for MySQL Flexible Server is now available. Developers can use now use PowerShell to manage MySQL Flexible Servers and dependent resources. Detailed development documentation and examples are available in the topic Az.MySql.
Provision a server quickly and easily
To provision an instance of MySQL Flexible Server, developers can run the following command:
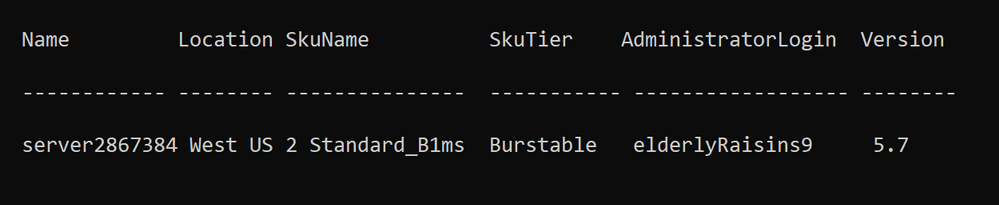
$server = New-AzMySqlFlexibleServer

Creating Resource Group group28382412...
Creating new vnet vnet-server2867384 in resource group group28382412...
Creating new subnet subnet- server2867384 in resource group group28382412 and delegating it to Microsoft.DBforMySQL/flexibleServers...
Creating MySQL server server2867384...
Your server is using sku Standard_D2ds_V4 (Paid Tier). Please refer to https://aka.ms/mysql-pricing for pricing details...
Creating database flexibleserverdb...
The example above shows that the module creates the associated resource group, default database, and network resource – the default network option is to create a server within a VNET and subnet.
Server properties (e.g., location, SKU, storage size etc.) are set to default values. To see all the properties in the $server object, run to following command:
Write-Host ($server | Format-List | Out-String)
For example, the generated password is saved as a SecureString in SecuredPassword.
Provision a server with private or public access
To set up an instance of MySQL Flexible Server more quickly, the w-AzMySqlFlexibleServer cmdlet provides options for private and public accessibility. As a result, you can create a server with a private network or a network open to public access. The detailed scenarios are below.
Private access
To set up a network with private access, use the following commands.
Scenario |
Command |
Existing VNET and Subnet (name or resource Id) |
New-AzMySqlFlexibleServer –Vnet <vnet name/Id> -Subnet <subnet name/Id> |
Existing VNET (name or resource Id) |
New-AzMySqlFlexibleServer -Vnet <vnet name/Id> |
New VNET and Subnet – provide name |
New-AzMySqlFlexibleServer -Vnet <vnet name> -Subnet <subnet name> -VnetPrefix 10.0.0.0/16 -SubnetPrefix 10.0.0.0/24 |
Public access
To set up a network with public access, use the following commands.
Scenario |
Command |
Allow all IPs from 0.0.0.0-255.255.255.255 |
New-AzMySqlFlexibleServer -PublicAccess All |
Allow access to your client IP only |
New-AzMySqlFlexibleServer -PublicAccess <Client IP> |
Allow all IPs within a range |
New-AzMySqlFlexibleServer -PublicAccess <Start IP>-<End IP> |
Allow access to all Azure Services |
New-AzMySqlFlexibleServer -PublicAccess 0.0.0.0 |
No public access, but add allowed IPs later* |
New-AzMySqlFlexibleServer -PublicAccess none |
*You need to add allowed IPs using the `New-AzMySqlFlexibleServerFirewallRule` command.
Connect to your server easily
After provisioning your instance of MySQL Flexible Server, you can easily test the connection and obtain the connection string in the programming language you are using.
To test the connection to your server and try out a simple query, use the Test-AzMySqlFlexibleServerConnect cmdlet
PS C:> Get-AzMySqlFlexibleServerConnect -ResourceGroupName PowershellMySqlTest
-Name mysql-test -AdministratorLoginPassword $password

The connection testing to mysql-test.database.azure.com was successful!

PS C:> Get-AzMySqlFlexibleServerConnect -ResourceGroupName PowershellMySqlTest
-Name mysql-test -AdministratorLoginPassword $password -Query "SELECT * FROM test"

col
-----
1
2
To obtain the connection string for programming language in which you are developing, use the Get-AzMySqlFlexibleServerConnectionString cmdlet.
PS C:> Get-AzMySqlFlexibleServerConnectionString -Client Python
-ResourceGroupName PowershellMySqlTest -Name mysql-test

cnx = mysql.connector.connect(user=mysql_user, password="{your_password}", host="mysql-test.mysql.database.azure.com", port=3306, database="{your_database}", ssl_ca="{ca-cert filename}", ssl_disabled=False)

PS C:> Get-AzMySqlFlexibleServer -ResourceGroupName PowershellMySqlTest
-ServerName mysql-test | Get-AzMySqlFlexibleServerConnectionString -Client PHP

$con=mysqli_init(); mysqli_real_connect($con, "mysql-test.mysql.database.azure.com", "mysql_test", {your_password}, {your_database}, 3306);
Additional resources
For more information, consult the following resources.
You can also manage MySQL Flexible Servers by using the Azure CLI or SDKs at your convenience. To develop on other platforms, check out the following resources.

Recent Comments