
by Contributed | Apr 21, 2021 | Technology
This article is contributed. See the original author and article here.
Earlier this year, Packt released a new book…

http://aka.ms/VS2019Book
But I should be honest. I was involved in this book. Let me find a version of the cover with my name on it…

There you go. I wrote the foreword! It was a great and wonderful thing! At least, I think it was. I really can’t remember what I wrote. I’ll go read it…
Oh, I like how I opened the foreword…
“By combining Visual Studio Code and Visual Studio (VS), the brand is over two times more commonly used by developers than any other environment (Stack Overflow, 2019). What that means is that this topic for 80% of all developers.”
Have you thought about that? In this day and age, when there are so many IDE options for developers to pick from, they simply are choosing Visual Studio. There are many reasons why developers want to use Visual Studio, including compatibility with languages and tools, as well as various feature sets.
And that’s really what this book is about. As I said/wrote in my foreword, the authors (Paul Schroeder and Aaron Cure) have cracked the code! If you apply the snippets, templates, git tips, and extension-based practices that you’ll find in this book, then not only will you become more efficient, but you’ll also become your team’s hero and thought leader!
Before I move on, did you notice how weird the subtitle was in the top version of the book cover? Let’s inspect it:
“A developer’s guide to mastering in core skills with the IDE and unlock advanced productivity secrets.”
You could probably read that sentence for 20 minutes before you decipher and interpret all its secrets. Moving on…
Let’s take a look at what the topics are…
- Flavors of Visual Studio
- Keyboard Shortcuts
- IDE Tips and Tricks
- Working with a Repository
- Working with Snippets
- Database Explorers
- Compiling, Debugging, and Versioning
- Introduction to Project and Item Templates
- Creating Your Own Templates
- Deploying Custom Templates
- Overviewing Visual Studio 2019 Extensions
- Overviewing VS Code Extensions
- CodeMaid is Your Friend
- Be Your Team’s Hero with CodeGenHero
- Secure Code with Puma Scan
- Appendix: Other Popular Productivity Extensions
I know what you’re thinking! You’re thinking, “Is overviewing a word?” Yes, yes it is a word! More specifically, it’s the present participle of a word.
Anyway, the reason why I wanted to write the foreword (and blog about it), is because I truly believe in the value. Developers don’t use templates, especially, to the degree that they could. Plus, you’ll peruse a plethora of other topics that you’d be wise to glean from.
Also, one interesting tidbit is that the author is partially at fault for the extension featured in chapter 14, CodeGenHero. So check that out!
Whilst perusing the Amazons, I saw the reviews for the book, and they’re pretty impressive. I want to give you just the titles of the reviews here, so you can see what I mean:
- “Useful Visual Studio shortcuts, Git-Jitsu, snippet and debugging knowledge here.” – Dan Hermes
- “Clear and concise with good examples to draw upon for furthering learning.” – Robert Frey
- “This one is a must have!” – Binit Datta
- “Learn everything about Visual Studio 2019.” – Yusuf
- “Excellent for those with some C# programming experience.” – Ben Miller
This book is great for noobs and still useful for ratchety, engineering curmudgeons. So check it out, and leave a review on the Amazons:
Remember to keep your mask on your face, your feet on the ground, and your head in the Cloud!
Ed
by Contributed | Apr 21, 2021 | Technology
This article is contributed. See the original author and article here.
Joao Couto VP, SAP Business Unit, Microsoft
This blog post has been co-authored by Prakash Pattaiyan, Principal Program Manager, SAP on Azure
Enterprises are rapidly adopting cloud, reducing their reliance on in-house managed infrastructure by turning to Microsoft Azure to benefit from hyperscale features, agility, and gain competitive advantage. Yet, for organizations running mission-critical instances such as SAP, the journey to cloud can appear to be complex with high risk and uncertainty.
Migrating SAP systems to the cloud comes with unique business and technical challenges as compared to other enterprise applications. Most organizations require an accelerated timeline, from discovery to go live, with zero to no downtime and implementation of best practices.
Transforming your SAP to cloud will require a fundamental examination of your infrastructure, data and business processes. To accelerate this phase, teams will need to quickly find inventory and ensure target architecture is properly sized to realize the full benefits of SAP on Azure. Post migration planning, IT organizations should look to avoid the high risk and uncertainty of the cloud migration by using repeatable processes and implementation of best practices from a Microsoft and SAP certified solution.
Customers need a solution that minimizes the risk and reduces cost by leveraging an automation factory that ensures repeatability and scalability all while achieving a technically and financially optimized SAP on Azure environment. To reduce the complexity, accelerate the timeline and ensure success, Microsoft has partnered with Protera, an SAP-certified, Microsoft Gold Cloud Partner as a Preferred Partner for SAP migrations to Azure.
Leveraging Automation to Accelerate Migration and Reduce Complexity
Based on the experience of over 500 migrations and management of over 2500 systems, Protera has developed a smarter way to migrate and manage SAP on Azure combining the most up-to-date knowledge of SAP and Azure with a powerful platform, Protera FlexBridge®. Customers choosing Microsoft Azure can take advantage of Protera services and Protera FlexBridge® to shorten their journey to Azure and modernize their SAP operations to quickly achieve their transformation objectives with the following:
SAP on Azure Transformation Assessment Customers currently running SAP use the Protera FlexBridge® platform to generate and validate their transformation plans to Azure, whether As-Is, Technical, SAP HANA or SAP S/4HANA.
The assessment includes:
- Current state analysis, migration methodology, project timeline, and migration readiness
- Collection of customer environment data including hypervisor, operating system, database, network, storage, and application metrics by utilizing Azure Migrate and FlexBridge ABAP Assessment App
- Possible Transformations options are provided for the customer’s SAP Applications
- Target architecture table and diagram showing type and version of operating system, database, SAP application Azure VM SKU, storage SKU, and network interfaces
- Cost for migration, Azure IaaS with PAYGO and Reserved terms, and managed services
Clarification of customer engagement (testing, etc.) defining roles & responsibilities for the migration project; Recommendations on backup and security
Intelligent Provisioning and Migration Quickly and securely migrate and optimize your SAP and related applications on Azure using powerful automations powered by Protera FlexBridge® which includes:
- Rapid provisioning of Azure infrastructure including: networking, security groups, VMs built from customer or Marketplace images and storage
- Migration automation to orchestrate the steps to migrate each server to Azure by using certified tools including Azure Migrate, SAP SWPM and SAP SUM and monitor migration health
Managed SAP on Azure Services Run SAP and related systems on Azure at a lower cost, increased performance, higher service levels and greater visibility, with continuous optimization using automations to operate consistently at scale. Services include:
- Dashboard of operational metrics including SLA, performance metrics for Azure as well as SAP application performance
- Service desk integration to customers’ service desk
- Azure spend analysis and optimization
- SAP Maintenance Automation
- Operating System, Database and SAP patching
- SAP System Copy
- Environment snoozing to reduce cost
Through the preferred partnership between Microsoft and Protera, multiple teams at both companies are committed to work together to simplify and accelerate SAP migrations to Azure for our customers using the powerful automation tool Protera FlexBridge®. Microsoft customers can leverage this expanded partnership to take advantage of the repeatable, automated, low risk migration methods that fit to the approved templates of SAP and Microsoft. We are very excited to have Protera as Microsoft’s Preferred Partner for SAP on Azure migrations.
Learn More
If you would like to learn more about Protera
eBook: A Smarter Cloud for Your SAP
Solution Brief: Protera Flexbridge® for SAP on Azure
To learn more about migrating SAP on Azure, visit:
SAP on Azure Migration – SAP Intelligent Enterprise | Microsoft Azure
by Contributed | Apr 21, 2021 | Technology
This article is contributed. See the original author and article here.
CU2 for BizTalk Server 2020 is now available for download.
For details on fixes and download link, please follow the master KB:
https://support.microsoft.com/help/5003151
You may want to bookmark this index page for updates related to BizTalk Server:
https://support.microsoft.com/help/2555976
As with CU1, the EN download is available by default. All other language packages will be made available on need basis. If a download is not available for the supported BizTalk language that you need, please contact us for the same.
As a quick reminder, for BizTalk Developer Tools please also update/install version 3.13.2.0 of the BizTalk Server Visual Studio extension in addition to installing the CU package. The extension can be installed from https://marketplace.visualstudio.com/items?itemName=ms-biztalk.BizTalk or from within Visual Studio – Manage Extensions. Please note that we have not updated the extension since CU1 so you can skip this step if you have already installed it previously.
by Contributed | Apr 21, 2021 | Technology
This article is contributed. See the original author and article here.
Fluent UI icons
Power Apps offers you a variety of icons – and recently, there were nice additions announced and rolled out. But if we want to create even more appealing apps, it makes sense to extend our pretty little icon library. Microsoft provides us with Fluent UI.
Fluent UI is a collection of UX frameworks for creating beautiful, cross-platform apps that share code, design, and interaction behavior
One part of Fluent UI is the iconography
How to get Fluent UI icons
You can browse through the icons in the Fluent UI icons tool, but there is right-click download option. As a developer, you can import Fluent UI iconography (and more) into your applications; for Power Apps, there a different way how to use them:
Use a community-driven tool to import icons to Power Apps
there are several tools available to get Fluent UI icons into Power Apps; find two of them here:
However, if you only want to use a few specific icons for an app or would like to try them out, you can head over to the Fluent UI repository on GitHub and right-click-download the icons. After that, you upload them to your Power App and can use them like any other image. Super cool: You get all icons as .svg files, which have three significant advantages:
.svg are transparent, which means you have no extra work to remove any background
.svg are lossless scalable, which means that you blow them up as you like it
.svg have are usually smaller than .jpg files of the same quality – this will have an excellent effect on the performance of your app
Pop-Ups
Screens in Power Apps are perfect for displaying information that should always be shown. But what if we only want to show some more content occasionally? Pop up to the rescue!

To create a pop up effect, create:

a rectangle that overlays the content that our user now should not focus on – good idea to have it filled grey and semi-transparent
a rectangle, smaller than the GreyOutRectangle, filled in in brighter background-color
a text label which shows the information
a cancel icon
Group these controls; it’s easier to work with them then.
Now create a textlabel (or a button, or an image… something that our user will click on to see the pop up).
Set the .onSelect property of this label to UpdateContext({isShowPopUp:true})
Set the .onSelect propert of the cancel icon to UpdateContext({isShowPopUp:false})
Set the .visible property of the whole PopUp Group tp isShowPopUp
This way, we set the isShowPopUp variable to true, if the user clicks the label, which will make the PopUp visible. As soon as the user clicks the cancel icon, the isShowPopUp variable is set to false, which means that the group will not be shown anymore!
Create an expand- and collapse able menu
As we need to deal with all screen estate carefully, it is a fantastic idea to have a menu that can expand and collapse. To create this, we need
a collection that holds the screens that we want our users to allow to navigate to
a gallery, which displays the items of our collection
a Hamburger Menu icon, which sets a variable to control the width of the gallery
- collection
To have icons (which will show while the menu is collapsed) and text (that will show up right next to our icons when the menu is expanded), we will first upload a few svgs (see above) and then refer to them in our collection:
ClearCollect(

NavigationMenu,

{

Row: 1,

Title: "About",

Image: ic_fluent_lightbulb_24_regular

},

{

Row: 2,

Title: "Flights",

Image: ic_fluent_airplane_take_off_24_regular

},

{

Row: 3,

Title: "Hotels",

Image: ic_fluent_bed_24_regular

},

{

Row: 4,

Title: "People",

Image: ic_fluent_people_32_regular

}

)

)
- Gallery
We create a gallery and set the .items property to our collection
We set the .width property to If(!IsExpand, 200, 50) or similar – first value is the expanded width, second is the non-expanded (collapsed) width.
As we want to pretty things up a little bit,
- Hamburger menu
we add a hamburger menu icon and set its .onSelect property to Set(IsExpand, !IsExpand)
- adjust all other controls on the screens
Now work on the .X property of all labels, buttons, images, etc. Set it to
If(!IsExpand, <original value>,<originalvalue>-150)
Our result should look something like this:

Feedback and what’s next?
What are your little tricks to make apps look more beautiful? I am curious to learn from you! Please comment below!
by Contributed | Apr 21, 2021 | Technology
This article is contributed. See the original author and article here.
Late last year, the Open-Source Databases on Azure Team announced the Preview release of Azure Database for MySQL Flexible Server to provide customers with greater control and manageability. Today, we’re pleased to let you know that the PowerShell module for MySQL Flexible Server is now available. Developers can use now use PowerShell to manage MySQL Flexible Servers and dependent resources. Detailed development documentation and examples are available in the topic Az.MySql.
Provision a server quickly and easily
To provision an instance of MySQL Flexible Server, developers can run the following command:
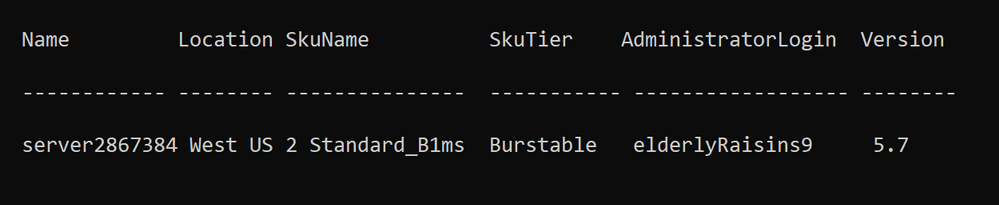
$server = New-AzMySqlFlexibleServer

Creating Resource Group group28382412...
Creating new vnet vnet-server2867384 in resource group group28382412...
Creating new subnet subnet- server2867384 in resource group group28382412 and delegating it to Microsoft.DBforMySQL/flexibleServers...
Creating MySQL server server2867384...
Your server is using sku Standard_D2ds_V4 (Paid Tier). Please refer to https://aka.ms/mysql-pricing for pricing details...
Creating database flexibleserverdb...
The example above shows that the module creates the associated resource group, default database, and network resource – the default network option is to create a server within a VNET and subnet.
Server properties (e.g., location, SKU, storage size etc.) are set to default values. To see all the properties in the $server object, run to following command:
Write-Host ($server | Format-List | Out-String)
For example, the generated password is saved as a SecureString in SecuredPassword.
Provision a server with private or public access
To set up an instance of MySQL Flexible Server more quickly, the w-AzMySqlFlexibleServer cmdlet provides options for private and public accessibility. As a result, you can create a server with a private network or a network open to public access. The detailed scenarios are below.
Private access
To set up a network with private access, use the following commands.
Scenario |
Command |
Existing VNET and Subnet (name or resource Id) |
New-AzMySqlFlexibleServer –Vnet <vnet name/Id> -Subnet <subnet name/Id> |
Existing VNET (name or resource Id) |
New-AzMySqlFlexibleServer -Vnet <vnet name/Id> |
New VNET and Subnet – provide name |
New-AzMySqlFlexibleServer -Vnet <vnet name> -Subnet <subnet name> -VnetPrefix 10.0.0.0/16 -SubnetPrefix 10.0.0.0/24 |
Public access
To set up a network with public access, use the following commands.
Scenario |
Command |
Allow all IPs from 0.0.0.0-255.255.255.255 |
New-AzMySqlFlexibleServer -PublicAccess All |
Allow access to your client IP only |
New-AzMySqlFlexibleServer -PublicAccess <Client IP> |
Allow all IPs within a range |
New-AzMySqlFlexibleServer -PublicAccess <Start IP>-<End IP> |
Allow access to all Azure Services |
New-AzMySqlFlexibleServer -PublicAccess 0.0.0.0 |
No public access, but add allowed IPs later* |
New-AzMySqlFlexibleServer -PublicAccess none |
*You need to add allowed IPs using the `New-AzMySqlFlexibleServerFirewallRule` command.
Connect to your server easily
After provisioning your instance of MySQL Flexible Server, you can easily test the connection and obtain the connection string in the programming language you are using.
To test the connection to your server and try out a simple query, use the Test-AzMySqlFlexibleServerConnect cmdlet
PS C:> Get-AzMySqlFlexibleServerConnect -ResourceGroupName PowershellMySqlTest
-Name mysql-test -AdministratorLoginPassword $password

The connection testing to mysql-test.database.azure.com was successful!

PS C:> Get-AzMySqlFlexibleServerConnect -ResourceGroupName PowershellMySqlTest
-Name mysql-test -AdministratorLoginPassword $password -Query "SELECT * FROM test"

col
-----
1
2
To obtain the connection string for programming language in which you are developing, use the Get-AzMySqlFlexibleServerConnectionString cmdlet.
PS C:> Get-AzMySqlFlexibleServerConnectionString -Client Python
-ResourceGroupName PowershellMySqlTest -Name mysql-test

cnx = mysql.connector.connect(user=mysql_user, password="{your_password}", host="mysql-test.mysql.database.azure.com", port=3306, database="{your_database}", ssl_ca="{ca-cert filename}", ssl_disabled=False)

PS C:> Get-AzMySqlFlexibleServer -ResourceGroupName PowershellMySqlTest
-ServerName mysql-test | Get-AzMySqlFlexibleServerConnectionString -Client PHP

$con=mysqli_init(); mysqli_real_connect($con, "mysql-test.mysql.database.azure.com", "mysql_test", {your_password}, {your_database}, 3306);
Additional resources
For more information, consult the following resources.
You can also manage MySQL Flexible Servers by using the Azure CLI or SDKs at your convenience. To develop on other platforms, check out the following resources.

by Contributed | Apr 21, 2021 | Technology
This article is contributed. See the original author and article here.
The tempdb is a system database that holds the temporary user objects and internal objects.
Azure SQL DB
In Azure SQL DB tempdb is not visible under System Databases after connecting with SSMS but it is still important in order to avoid workload problems due to the limitations that it has. This limitations are different with the service level objective that we choose between:
For DTU purchase model the limits will be this and for vCore we can find the TempDB max data size (GB) under each service objective here.
Azure Managed Instance
In Managed Instance tempdb is visible and it is split in 12 data files and 1 log file:
All system databases and user databases are counted as used storage size as compared to the maximum storage size of the instance.
To check the values for this sizes we can run this query:
select top 1
    used_storage_gb = storage_space_used_mb/1024,
    max_storage_size_gb = reserved_storage_mb/1024
from sys.server_resource_stats order by start_time desc
For Managed Instance we have two service tiers: General Purpose and Business Critical for which the max tempdb size is:
General Purpose |
Business Critical |
Limited to 24 GB/vCore (96 – 1,920 GB) and currently available instance storage size.
Add more vCores to get more TempDB space.
Log file size is limited to 120 GB. |
Up to currently available instance storage size. |
Issues due to tempdb usage
When executing a huge transaction with million of rows and high tempdb usage we might get the following error message:
Msg 40197, Level: 20, State: 1, Procedure storedProcedureName, the service has encountered an error processing your request. Please try again. Error code 1104
This does not give too much information but by executing the following:
select * from sys.messages where message_id = 1104
we will get more context on it:
TEMPDB ran out of space during spilling. Create space by dropping objects and/or rewrite the query to consume fewer rows. If the issue still persists, consider upgrading to a higher service level objective.
Some other errors that we might get:
- 3958 Transaction aborted when accessing versioned row. Requested versioned row was not found. Your tempdb is probably out of space. Please refer to BOL on how to configure tempdb for versioning.
- 3959 Version store is full. New versions could not be added. A transaction that needs to access the version store may be rolled back. Please refer to BOL on how to configure tempdb for versioning.
- 3966 Transaction is rolled back when accessing version store. It was marked as a victim because it may need the row versions that have already been removed to make space in tempdb. Not enough disk space allocated for tempdb, or transaction running for too long and may potentially need the version that has been removed to make space in the version store. Allocate more space for tempdb, or make transactions shorter.
- log for database ‘tempdb’ is full due to ‘ACTIVE_TRANSACTION’ and the holdup lsn is (196:136:33).
To investigate this ones this queries should be useful:
dbcc sqlperf(logspace)

select name, log_reuse_wait_desc, * from sys.databases

SELECT * FROM tempdb.sys.dm_db_file_space_usage
GO

Select * from sys.dm_tran_version_store_space_usage
GO

SELECT * FROM sys.dm_exec_requests where open_transaction_count > 0
go
ACTIVE_TRANSACTION:
SQL Server will return a log_reuse_wait_desc value of ACTIVE_ TRANSACTION if it runs out of virtual log files because of an open transaction. Open transactions prevent virtual log file reuse, because the information in the log records for that transaction might be required to execute a rollback operation.
To prevent this log reuse wait type, make sure you design you transactions to be as short lived as possible and never require end user interaction while a transaction is open.
To reduce tempdb utilization we will need to look at the common tempdb usage areas which are:
- Temp tables
- Table variables
- Table-valued parameters
- Version store usage (associated with long running transactions)
- Queries that have query plans that use sorts, hash joins, and spools
To identify top queries that are using temporary tables and table variables we can use this query
To monitor the tempdb utilization the below query can be run with a 15 minute delay (it will print “high tempdb utilization” if the usage exceeds 90%):
DECLARE @size BIGINT
DECLARE @maxsize BIGINT
DECLARE @pctused BIGINT
DECLARE @unallocated BIGINT
DECLARE @used BIGINT

SELECT @size = Sum (size),
       @maxsize = Sum (max_size)
FROM   tempdb.sys.database_files
WHERE  type_desc = 'ROWS'

SELECT @unallocated = Sum (unallocated_extent_page_count)
FROM   tempdb.sys.dm_db_file_space_usage

SELECT @used = @size - @unallocated

SELECT @pctused = Ceiling (( @used * 100 ) / @maxsize)

--select @used, @pctused
IF ( @pctUsed > 90 )
  BEGIN
      PRINT Cast (Getutcdate() AS NVARCHAR(50))
            + N': high tempdb utilization'
  END
GO
Other useful links
by Contributed | Apr 21, 2021 | Technology
This article is contributed. See the original author and article here.
SharePoint Syntex brings advanced AI-powered content management to Microsoft 365. During Microsoft Ignite last month, we highlighted new capabilities in Syntex that can help you scale your expertise and turn content into knowledge.. And now, we have even more new capabilities to share, which we’ve outlined below.
Developer Support
Patterns and Practices Core SDK Syntex API support
A summary of what’s included/supported:
- Checking whether a site is a Syntex Content Center site
- Listing the content understanding models in a Syntex Content Center site
- Publishing or unpublishing a content understanding model from a library (supports batching)
- For a given model list the libraries to which the model was published
- Classify and extract existing content:
- A single file can be classified & extracted.
- A library can be classified and extracted – by default previously classified and extracted files are skipped, but there’s an option to re-process all the files in a library.
Patterns and Practices PowerShell Syntex Support
Administrators and developers can now mange, export and import custom models using PowerShell cmdlets and scripts. These enhancements will help you manage releases across development/test/production systems, or for packaging and reusing models across multiple customer environments, especially for our CSPP (Content Services Partner Program) partners.
You can find SharePoint Syntex support in PnP PowerShell (which uses the implementation):
NOTE: the above five cmdlets are specific to SharePoint Syntex, but there are also changes done to other cmdlets to enable Syntex content understanding model export and import:
- Get-PnPSiteTemplate: updated to handle content understanding model export. Using Get-PnPSiteTemplate -Out MyModels.pnp -Handlers SyntexModels all models of a Content Center site are exported.
- Invoke-PnPSiteTemplate: updated to handle content understanding model import. Using Invoke-PnPSiteTemplate -Path .MyModels.pnp the exported models are imported again.
Document understanding model management.
Models need to grow and change over time, so we’ve also added new features to manage document understanding models:
- Extractor rename: You can rename entity extractors, mapping them to new or existing columns.
- Model rename: You can rename a published model, mapping them to new or existing content types.
- Model copy: You can duplicate a model and its training fields. Also, you can add the copy to a new library, or use the copy as the basis or template for a new model.
Custom environment support for form processing models
Previously, we only supported training and hosting Syntex form processing models built in AI Builder in the default Power Platform environment. If you have created additional environments, you can now provision those with the Syntex app and select that environment in the Admin Center set-up.
License enforcement
We know license enforcement is crucial to help IT staff align usage to entitlements. If you’re not licensed, or your Syntex licensing (including trials) expires or is canceled:
- You won’t see the content center template when creating new sites in the Microsoft 365 admin center.
- In the Content Center, you’ll no longer see options for model creation or editing. In libraries with published models, you’ll no longer have access to the model details panel, the classify and extract ribbon, and the AI Builder link for form processing; you won’t be able to process files on upload.
- You’ll also receive notifications regarding your license in the notification banner and as an exception message during form processing.
Also, if you reactivate your license, you’ll be able to resume working with your models and content centers as before.
While we’re excited to share these product updates, there are many more to come as we continue to gather and act on feedback from our customers, partners, and internal team members.
To stay up to date on product announcements each month, please subscribe to our newsletter. Thank you.
by Contributed | Apr 21, 2021 | Technology
This article is contributed. See the original author and article here.
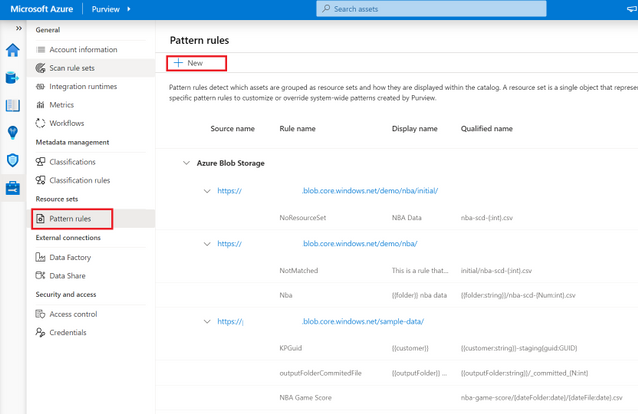
At-scale data processing systems typically store a single table in a data lake as multiple files. This concept is represented in Azure Purview by using resource sets. A resource set is a single object in the data catalog that represents a large number of assets in storage. To learn more, see the resource set documentation.
When scanning a storage account, Azure Purview uses a set of defined patterns to determine if a group of assets is a resource set. In some cases, Azure Purview’s resource set grouping may not accurately reflect your data estate. Resource set pattern rules allow you to customize or override how Azure Purview detects which assets are grouped as resource sets and how they are displayed within the catalog.
Pattern rules are currently supported in public preview in the following source types:
- Azure Data Lake Storage Gen2
- Azure Blob Storage
- Azure Files
To learn more on how to create resource set pattern rules, see our step-by-step how-to documentation!

by Contributed | Apr 21, 2021 | Technology
This article is contributed. See the original author and article here.
Azure Purview, the unified data governance service that helps customers maximize the business value of data is now available in the UK South and Australia East, in public preview. Get started by creating a Purview account, see Quickstart: Create an Azure Purview account in the Azure portal.
For the full set of regions that Azure Purview is currently available in as a public preview offering, see Azure Purview Availability.
by Contributed | Apr 21, 2021 | Technology
This article is contributed. See the original author and article here.
Initial Update: Wednesday, 21 April 2021 17:57 UTC
We are aware of issues within Application Insights and are actively investigating. Some customers may experience data access issue and delayed or missed alerts.
- Work Around: None
- Next Update: Before 04/21 21:00 UTC
We are working hard to resolve this issue and apologize for any inconvenience.
-Saika

Recent Comments