by Contributed | Apr 26, 2021 | Technology
This article is contributed. See the original author and article here.
Initial Update: Monday, 26 April 2021 20:56 UTC
We are aware of issues within Application Insights and are actively investigating. Some customers in West US 2 may experience data loss for metric data. This may cause failed or misfired alerts.
- Work Around: none
- Next Update: Before 04/26 23:00 UTC
We are working hard to resolve this issue and apologize for any inconvenience.
-Ian
by Contributed | Apr 26, 2021 | Technology
This article is contributed. See the original author and article here.
We’re pleased to announce the availability of forced failover for Azure Database for MySQL – Flexible Server in all zone redundant regions. This functionality enables you to manually force a failover to test functionality with your application scenarios, which can help to prepare you in case of any outages.
When you trigger a failover, the standby replica is activated to become the primary server with the same database server name by updating the DNS record. While client connections are disconnected, you can automatically reconnect them to resume operations if you have implemented retry-logic, which is recommended for cloud native applications.
Before the forced failover begins, a pop-up window displays the estimated time for completion of the operation by factoring the recency of the last checkpoint and the current transactions running on the primary server.
Forcing a failover in Azure Database for MySQL – Flexible Server using the Azure Portal
To force a failover from your primary server to a standby instance of Flexible Server, perform the following steps:
- In the Azure portal, select an existing instance of Azure Database for MySQL Flexible Server that has high availability enabled.
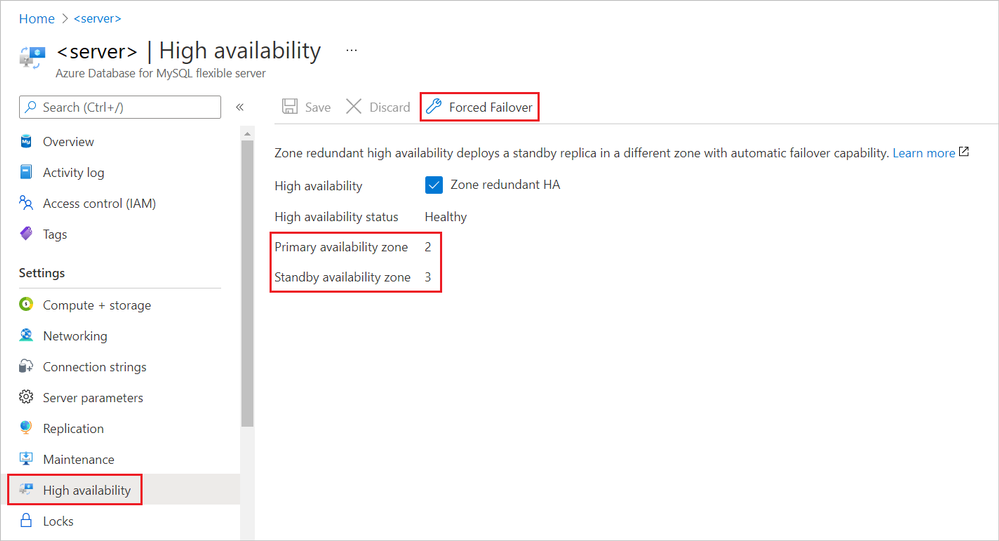
- On the page associated with the selected server, under Settings, select High availability.
- On the High availability page, make a note of the values associated with Primary availability zone and Standby availability zone.
We’ll compare these numbers to similar values we get after the failover completes.
- To initiate the manual failover procedure, select Forced Failover.
A pop-up window displays the estimated failover time, estimated based on the current workload on the primary server and the recency of the last checkpoint.

- Read the message, and then select OK.
An “Initiating the failover process…” notification appears. Then, after failover to the standby server completes successfully, second notification appears.

- Compare the new Primary availability zone and the Standby availability zone to the values before the failover.

Notice that the value of the Primary availability zone is now the original value of the Standby availability zone.
As you can see, the forced failover process is easy to accomplish and use in your own environment. Azure Database for MySQL Flexible Server also offers automatic failover using zone redundant high availability. For more information, see High availability concepts in Azure Database for MySQL Flexible Server.

by Contributed | Apr 26, 2021 | Technology
This article is contributed. See the original author and article here.
As we already know, many organizations started to use Microsoft Teams for collaboration, chat, and audio/video meetings which adoption skyrocketed due to the pandemic that began in early 2020. Microsoft Teams became the backbone for many organizations to survive during this pandemic work from home scenarios.
Now employees are planning/returning to work or after a long time. They are finding difficulty joining Teams meeting with from existing conference rooms for many reasons; most of them are listed below. Let me explain what organizations can do to join Teams meeting from these conference rooms one by one and will cover Microsoft Licensing and FAQs at the end of this blog post.
Note: Devices listed in each section are simply recommendations, I highly recommend you to test, pilot and pick the right device for your setup. Please visit http://aka.ms/teamsdevices for more information. Before reading this document, I highly recommend watching this 7 mins video to learn about Microsoft Teams Room.
- The existing conference room only has a conference speaker on the table.
- The existing conference room only has a monitor/projector and speakerphone for audio.
- The existing conference room is the latest Cisco Rooms, recently invested.
- The existing conference room is a native Zoom Conference room.
- The existing conference room is a legacy room (Cisco, Bluejeans/Polycom etc.).
- The existing conference room has a dedicated PC to use as a conference room device.
- The existing legacy boardroom or executive rooms doesn’t work with Teams meeting.
- The existing training room is not designed to work with Microsoft Teams.
- Executive office room small side table setup doesn’t work with Teams meeting.
- The existing conference room is setup with Surface Hub in Skype only mode, doesn’t work with Teams meeting.
- Teams Audio/Video device in Clinicians and Patient room.
The existing conference room only has a conference speaker on a table.
For various reasons, organizations deployed only speaker in this setup. Users will arrive at the conference room with their laptops and join the meeting by dialing a phone number or calling back from the meeting into the phone number labelled on the conference phone. If Teams users who scheduled meeting has Audio conference license or meeting has Dial-in info, users can dial into the meeting. Nothing changes for the user except, they won’t be able to project on a large screen.
Sample: Modern Teams Room for huddle space
Organizations can easily convert this room into Microsoft Teams video Conference room. Assuming this is a small huddle room, my single favorite device that has everything built-in for the room would be Yealink VP59 Teams Video phone that has HDMI output to connect with large screen. Crestron Teams Video Phone and Lenovo Think Smartview are also good choices to use in small rooms.
 Sample: Modern Teams Room with Video
Some of my personal recommended devices for small/huddle rooms would fit in quickly and easy to set up.
Note: Requires monitor in the room to connect the video.
- Poly Studio X30
- Yealink A20
- Logitech Rally Bar Mini
- Audiocodes RXV80
There are many other options, and we are continuously adding more partner devices; please visit https://aka.ms/teamsdevices
Additionally, Microsoft Surface Hub2 would be superb for this space, where users can join Teams meeting with Audio/Video and can whiteboard and collaborate.
The existing conference room only has a monitor/projector and speakerphone for audio.
Usually, the existing conference room where only a monitor or projector and desktop speakerphone to dial into a meeting is installed.
Employees require their laptop into the conference room, plug into HDMI or wireless HDMI input device (for example: Clickshare or AirMedia) and share screen to discuss the meeting agenda. Since there is no Video camera and Video is limited to an employee’s laptop. Not a great experience. Organizations can easily convert this room into Microsoft Teams video Conference room.
 Sample: Modern Teams room for the medium size room
Some of my personal recommended Teams Room devices for medium-sized rooms would fit in quickly and easy to set up.
- Logitech TAP with Rally Sound System
- Crestron Room Systems
- Yealink Room System MVC800
There are many other options, and we are continuously adding more partner devices; please visit https://aka.ms/teamsdevices
Microsoft Surface Hub would be superb for this space, where users can join Teams meeting with Audio/Video and can whiteboard and collaborate. It will be ideal to have both Surface HUB and MTR deployed in this room to have not only Audio/Video experience but also can collaborate together with remote participants in real-time.
The existing conference room is the latest Cisco Conference room.
Because Cisco Room devices are recently deployed, it is unlikely organizations will replace them with Microsoft Teams Room native devices. In this case, you can integrate Cloud Video Interop Service from Cisco, Poly, Pexip or Bluejeans. CVI is a SaaS service from partners that can be quickly set up in the cloud, nothing to deploy on-premise and apply a license to each Office365 user who will schedule a meeting. You can also enable one-button join or one-touch dial into Cisco devices, allowing users to walk into the conference room and join Teams meeting with one touch. CVI Partners offers a Trial service, highly recommended to enable at least two partner CVI solutions running Pilot and later you can finalize with one.
Some Cisco Rooms Webex Boards, Room devices and Desk pros) also supports WebRTC; please discuss with the Cisco rep. WebRTC enables Teams meeting to join from existing Cisco rooms without CVI in place; however, there are some limitations on experience.
The existing conference room is a native Zoom Conference room.
Many customers adopted Zoom and started their journey to equipped Room devices with their native solutions. These native Zoom devices provided an excellent meeting experience while users were at the office. Because organizations are now shifting to Microsoft Teams, it’s natural for users to schedule and join the meeting from conference room devices.
What are the options?
Option1: Keep Zoom room as is; enable/use Direct Guest method to join Teams meeting
Option2: Integrate Cloud Video Interop Service from Cisco, Poly, Pexip or Bluejeans. CVI is a SaaS service from partners that can be quickly set up in the cloud, nothing to deploy on-premise and apply a license to each Office365 user who will schedule a meeting and going to use Zoom rooms
Option3: Convert Zoom Rooms to Teams Native (Newer models)
The majority of newer models of Room devices from partners Poly, Crestron, Yealink, Logitech and a few others hardware supports both platforms. You can reach out to your partner and repurpose your device converting to Microsoft Teams Room Native.
Option4: Convert Zoom Rooms to Teams Native (Older models)
I have seen many customers deployed older model Zoom rooms, such as IPAD, on the table; this is unsupported for Teams Rooms. In this case, you will need to discuss with your AV Vendor or Partner to replace with Native Teams Room listed here: http://aka.ms/teamsdevices
I also often asked by customers, can I still use the existing NUC and deploy the Teams Room image to make Teams Room? The answer is no. Unless the Microsoft Teams Room is certified by Microsoft, it’s an unsupported device. I do not recommend going down this path to build your device methodology. In some cases, existing Microsoft Teams certified peripherals you can repurpose, for example, Logitech Meetup camera, Logitech Rally sound system, Huddly Camera, Polycom Cameras etc.
So, what do I do with IPAD and the existing PC that came with zoom rooms? You can repurpose PC for users office or home and IPAD to join Teams meeting from Teams App installed in IPAD as a secondary device for the office or home users.
The existing conference room is a legacy room (Cisco, Bluejeans/Polycom etc.).
The legacy conference room usually is expensive to manage and maintain. It is highly recommended to convert to Modern Teams Room.
Here are some recommended steps.
Step1: Deploy Cloud Video Interop service
It is a journey to modernize rooms, and that takes time/budget and planning. In the meantime, to utilize existing legacy rooms with Teams, you can integrate Cloud Video Interop Service from Cisco, Poly, Pexip or Bluejeans. CVI is a SaaS service from partners that can be quickly set up in the cloud, nothing to deploy on-premise and apply a license to each Office365 user who will schedule a meeting. You can also enable One Touch Dial (OTD) on Polycom/Poly room systems and personal systems (along with CVI) for OTD calendaring to Teams (and OTD to Zoom, WebEx, BJN, etc). Please discuss with Poly rep for details.
CVI Partners offers a Trial service, highly recommended to enable at least two partner CVI solutions running Pilot and later you can finalize with one.
Step2: Engage Microsoft Teams Devices Partners for Pilot
Most Microsoft Teams Certified devices partners provide loaner/test units for a couple of weeks to let organizations try Microsoft Teams Room devices. Deploy and Test, and you will be surprised how easy to deploy, use and maintain.
Step3: Start planning to replace with Microsoft Teams Room
Step4: Engage with Microsoft Account representative to see if there is any FastTrack room offer. FastTrack room offers white-glove room deployment at no cost to customers to try. This program changes every year; please ask your Microsoft Account rep for details.
The existing conference room has a dedicated PC to use as a conference room device.
This is an interesting one. I have witnessed many conference rooms with fully loaded Windows PC where users will log in with their credentials and join the Meeting app. This is not an intuitive, secure, nor modern way of using the shared device in the conference room.
It is highly recommended to remove all PC and their peripherals and deploy certified Microsoft Teams Room, either Windows or Android version. Surface Hub2 would also be the perfect choice for this room as well.
Engage with Microsoft Account representative to see if there is any FastTrack room offer. FastTrack room offers white-glove room deployment at no cost to customers to try. This program changes every year; please ask your Microsoft Account rep for details.
Some of my personal recommended Teams Room devices for medium-sized rooms would fit in quickly and easy to set up.
- Logitech TAP with Rally Sound System
- Crestron Room Systems
- Yealink Room System MVC800
There are many other options, and we are continuously adding more partner devices; please visit https://aka.ms/teamsdevices
The existing boardroom or executive rooms doesn’t work with Teams meeting.
The boardroom, executive room are usually large, deployed with many peripheral components such as ceiling speaker and mic, DSPs, video switchers, wireless microphones, multi-camera support.
Step1: The organization should integrate Cloud Video Interop Service from Cisco, Poly, Pexip or Bluejeans. Apply CVI license to Executive Assistants and Executives who will most likely schedule Teams meeting and walk into a conference room to start the meeting.
Step2: Deploy Microsoft Teams Room
We have many Partner solutions that can be integrated with existing room peripherals setup, replacing central console, i.e. Cisco/Polycom or other solution. Often times there are lights and blinds, controls also integrated with the room console; therefore highly recommended to discuss with your AV design partner and design/deploy/integrate accordingly.
Here are some recommended products that can be deployed into Large/Boardroom or Executive rooms. Please visit http://aka.ms/teamsdevices for more information.
- Poly – Studio X series – Small meeting room / Focus room / Executive office / Room system | Teams devices (microsoft.com)
- Poly – G Series – Midsize meeting room / Large meeting room | Teams devices (microsoft.com)
- Yealink – MVC II series – Extra large meeting room / Education / Large educational spaces / Healthcare | Teams devices (microsoft.com)
- Crestron – UC C160 Series – Midsize meeting room | Teams devices (microsoft.com)
- Logitech – Tap with Rally – Midsize meeting room | Teams devices (microsoft.com)
 Sample: Teams Executive/Large Conference room
 Sample: Teams Executive/Large Conference room
The existing Training room is not designed to work with Microsoft Teams.
Training rooms usually are super large, require a better audiovisual system. In most cases, training rooms are only equipped with a projector or multiple large monitors. Organizations can easily integrate Microsoft Teams room into large rooms in this scenario. Crestron, Yealink and Poly, HP and Dell all can provide their specific models that can work with Large Meeting training spaces. Recently Shure line of products is also certified for Teams which can be perfect audio peripherals for the meeting room. There are more products info in http://aka.ms/teamsdevices
A large Training room can be a complex setup to provide the best experience for trainees. My recommendation is to discuss with AV Partner and design a custom room that will be native to Microsoft Teams Room.
 Sample: Training and Divisible Rooms
 Sample: Training and Divisible Room
Executive office room small conference side table setup, enabling Teams meeting.
Many executive offices have small conference room table on the side. As you can relate to this picture, there is either desk phone or conference phone on the table for Executives to join meetings by dialing into meeting phone number. This setup is not intuitive, modern nor has video.

Organizations can easily enable this conference room with simple to deploy Microsoft Teams Room Android devices. Here are few devices you can deploy.
- Teams Video Phone VP59
- Poly Studio X30
- Yealink A20
- Logitech Rally Bar Mini
- Audiocodoes RXV80
There are many other options, and we are continuously adding more partner devices; please visit https://aka.ms/teamsdevices
Executives most likely going to use MFA on his/her account therefore Windows based MTR is not recommended. Windows MTR will reboot after receiving new updates automatically and MFA wont let it completely be ready after reboot.
The existing conference room is setup with Surface Hub in Skype only mode, doesn’t work with Teams meeting
Unless your IT configured Surface hub enable for Microsoft Teams meeting, users wont be able to do one click join in Surface Hub. Please visit this blog to enable Surface Hub with Teams meeting. Download the Microsoft Teams app for Surface Hub – Microsoft Tech Community
Teams Audio/Video device in Clinicians and Patient room
Healthcare providers are adopting Teams to streamline multiple applications into one. For example, Tigertext, Vocera, Paging App, Zoom, Webex etc. Teams Audio/Video personal device also can be deployed in clinicians and patient bedside to enable Audio/video to discuss with patient remotely. This will not only save time, but it will make virtual rounding much faster. This opens many possibilities for Clinicians to be more effective and taking care patient safely specially during this pandemic.
 Sample Patient Examine Room
Licensing: Microsoft Teams Rooms licenses – Microsoft Teams | Microsoft Docs
Microsoft has two (Standard and Premium) dedicated SKUs for licensing meetings and calling on a per-device basis for meeting room devices (such as Microsoft Teams Rooms, Microsoft Surface Hub, and collaboration bars for Microsoft Teams). Organizations not supposed to use any other licensing other than the Microsoft Teams Room license.
Difference between Standard and Premium License.
Great meeting room experiences: Meet the new Microsoft Teams Rooms Standard and Premium – Microsoft 365 Blog
Enable Teams Room with Voice (Telephone Capability)
You can enable the Microsoft Teams Room or Surface Hub device to be used as a standard Telephone (without a meeting). The use case would be dialing any phone number, dialing into meetings like old days, etc. To enable this, you will need a Phone System plus Calling Plan license from Microsoft. The phone system license is included in the Microsoft Teams Room standard or premium license. You can add a Domestic or International Calling plan license to the user account, which enables a dial pad in Microsoft Teams Room to make a phone call without the meeting.
 MTR With Dialpad and Zoom/Cisco Meeting enabled
Frequently asked Questions:
- Microsoft Teams Room be deployed in any PC Hardware?
No, Only Microsoft Certified Partner Teams devices can be deployed.
- Do I need to create AD Account for Room?
Most likely no, you already should have Room AD Account to reserve room which you can apply MTR License to make it Teams Room account and use that account in MTR console to sign-in.
- Do I need Deskphone or Conference phone in addition to MTR
No, MTR will have full Audio/Video and Telephone capabilities
- Can I connect MTR with my Telephone PBX so I don’t need Calling Plan?
Yes, you can, you can deploy Direct Routing to integrate Teams with on-premises voice trunks
- Do I need to join MTR with Domain?
It will be ideal to secure MTR by deploying Intune and Conditional Access. If not, you can join to domain, keep it in separate OU and do not push regular windows related GPOs and Applications. This MTR Windows will not be accessible by users nor requires any application other than MTR App. MTR will get updates from Windows update automatically, ensure its not blocked for updates.
- How do I troubleshoot for Quality issues?
IT Admins can review Call Analytics for quality issues. Coming soon, there will be real-time quality and performance data you will be able to review.
- Any prerequisites before deploying MTR?
Ensure MTR has Account setup according to this documentation: Deploy Microsoft Teams Rooms with Microsoft 365 or Office 365 – Microsoft Teams | Microsoft Docs
- Can I join Zoom and Webex Meeting from MTR?
Yes, you can however you have to enable from MTR Touch console. Only admin has access to enable.
- Who do I call if there is an issue?
You can call MTR vendor for hardware related issues. If there is Account or meeting related issues, you can call Microsoft to open case. If you have MTR Premium license, Microsoft will monitor and provide proactive support.
- How do I monitor MTR?
You can monitor MTR from Teams Admin Center Manage your devices in Microsoft Teams – Microsoft Teams | Microsoft Docs
by Contributed | Apr 26, 2021 | Technology
This article is contributed. See the original author and article here.
In this blog post, we describe our work on enabling machine learning (ML) inference (aka scoring) of previously trained ML models using the newly introduced language extensions of SQL Server 2019. By implementing a set of APIs, users can interface SQL Server with an external process (such as an ML runtime in our scenario) in order to move data and results between the main execution engine and the external process (which will perform the model scoring). As we will show in this post, this method is more efficient and more intuitive than performing model scoring using SQL Server’s ML Services capability via Python scripts.
To ground the description of such an external language implementation for model scoring with a concrete example, we will discuss scoring for ONNX models, as well as models that can be converted to ONNX (e.g., TensorFlow, PyTorch, scikit-learn). However, the technique described here is generic and can be used to invoke any other ML runtime.
Implementing ONNX as an external language allows users of any existing SQL Server 2019 installation to score ONNX models. There are several benefits to this approach:
- Users can take advantage of faster times for scoring ONNX models over data in SQL Server compared to implementations using SQL Server’s Python capabilities. As we will show, example prediction queries (invoking logistic regressions and decision trees) are about 1.3–2x faster when compared to the Python implementation. They are also much easier to express in a few lines of code, as opposed to a few tens of lines for the Python case.
- Following an implementation as the one we describe in this blog post for ONNX, users can create other external languages for efficiently invoking any other ML runtime of their choice, such as PyTorch or TensorFlow. Note that we will not release our implementation at this point, but interested users can perform a similar implementation following the design in this blog post.
- Given the extensibility framework has a C++ interface, users can directly embed any custom C/C++ code for model scoring just by implementing the API methods we describe below.
Note that another alternative is SQL Server’s native scoring capability using the PREDICT keyword for scoring ONNX models. Although this capability is available on Azure SQL Edge and Azure SQL Managed Instance (in preview), it is not yet present in all SQL Server flavors, including on-premises versions.
Example Usage
1. Language Registration
The first step to use ONNX as an external language is to register that language in SQL Server with the following command.
CREATE EXTERNAL LANGUAGE ONNX
FROM (CONTENT=N'onnxextension.zip', FILE_NAME=N'onnxextension.dll')
To perform the language registration, we point to the onnxextension.zip file that contains the onnxextension.dll. This dll includes our implementation of the extensibility framework C++ APIs, as we will describe later.
2. Stored Procedure Creation
Next, the user can create a stored procedure that uses the ONNX external language we registered above to perform model scoring of a model over some data using the sp_execute_external_script capability. The procedure takes as input the ID of the model to be used for scoring (the model is stored as a binary object in a SQL Server table and is identified by that ID) and a SQL query that defines the data to be used.
CREATE OR ALTER PROCEDURE dbo.sp_onnx_scoring (@model_id int, @input_query nvarchar(max))
AS
BEGIN
DECLARE @model_binary varbinary(max) = (SELECT Data FROM models WHERE id = @model_id);
EXECUTE sp_execute_external_script
    @language = N'ONNX',
    @script = N'',
    @input_data_1=@input_query,
    @parallel = 1,
    @params = N'@model varbinary(max)',
    @model = @model_binary
WITH RESULT SETS (("length of stay" bigint))
END;
The example stored procedure declares (by setting the @language variable) that it is using the ONNX external language extension (created earlier). The input data is read into the @input_data_1 variable and the model is read into the @model_binary and @model variables.
The ‘EXECUTE sp_execute_external_script’ invokes execution of the language extension. The setting of @parallel to 1 enables parallel (multi-threaded) execution of the language extension.
The ‘WITH RESULT SETS’ directive specifies the return types of the results. In this case, the model returns an integer. In general, the type of the result returned by the model should match or be able to be implicitly converted to the type specified in the ‘RESULT SETS’ clause.
3. Model Scoring
The stored procedure needs to be saved once and can then be invoked later for scoring different models with input data as follows.
EXEC sp_onnx_scoring <model num>, “SELECT <feature list> FROM dbo.patients_table"
The ‘EXEC’ command in the example invokes the stored procedure with a model number and a T-SQL query string that specifies the input data consisting of all rows and a subset of columns (used as features for the model) from a database table (patients_table). The model number identifies a model that is stored as a binary string (along with other models) in another table in the database.
High-Level Architecture
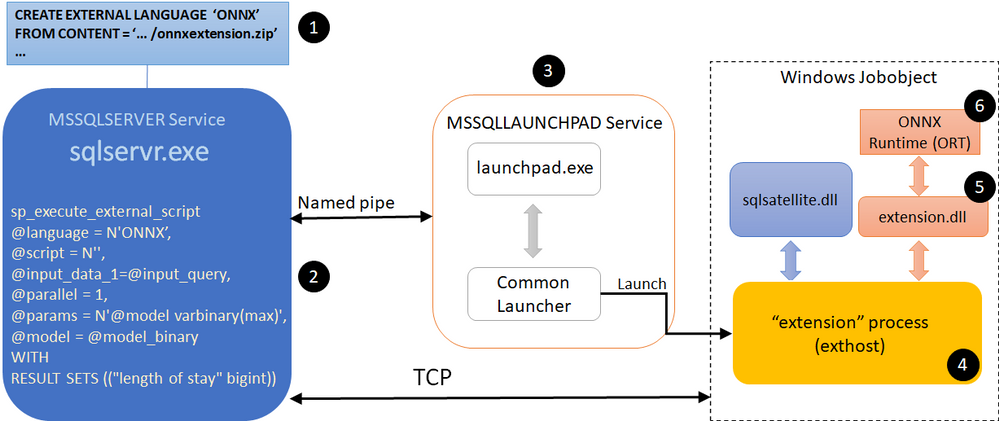
Fig. 1. High-level architecture diagram of ONNX extension for SQL Server
Figure 1 shows a high-level architecture of the implementation of ONNX as external language in SQL Server. The steps/components marked with a numbered circle are briefly described below.
- User registers an external language named ONNX with SQL Server. We describe the creation of this language extension in the Extension Implementation section later in this blog post. Our implementation is packaged in the file ‘onnxextension.zip’ shown in Figure 1.
- User executes a T-SQL query that invokes sp_execute_external_script with ONNX as the language.
- SQL Server communicates with the Launchpad service to launch the exthost external process (4).
- The exthost process loads the extension dll (5) that was registered for ONNX in step 1.
- The extension dll loads the ONNX runtime dll (6).
- The ONNX runtime dll provides the functionality for scoring the ONNX models.
Extension Implementation
As we mentioned earlier, SQL Server 2019 introduced the extensibility framework that users can exploit to create their own language extension and invoke execution in that language through T-SQL queries. This framework consists of a set of C++ APIs that users can implement to copy data and parameters from SQL Server, perform operations on that data, and return results and performance telemetry to SQL Server. Reference implementations of Java, R, and Python using this extensibility framework have been open-sourced.
We now briefly discuss how some of the APIs of the SQL Server language extensibility framework can be implemented to support ONNX as an external language. The implementation is compiled into a dll that can then be registered with SQL Server for this external language (step 1 in the architecture description shown earlier).
The Windows and SQL Server data types used in the code snippets below for the implementation are the same as those used in the other open-sourced reference implementations for the extensibility framework, e.g., in Java as an external language.
- Init: This is called by exthost when the dll associated with the language extension is loaded. Our implementation of ONNX as an external language loads the ONNX runtime (ORT for short) dll in Init. ORT provides the functionality to score ONNX models. The code snipped below shows how the ORT dll can be loaded.
	LPCWSTR onnxDllPath = L"onnxruntime.dll";
	std::wstring fullPath = wstr.get();
	fullPath += L"onnxruntime.dll";
	auto load_result = LoadLibraryExW(fullPath.c_str(), NULL, 0);
	const OrtApi *api = OrtGetApiBase()->GetApi(ORT_API_VERSION);
	……
	return SQL_SUCCESS;
Note that the ONNX extension dll needs to be built with the delay load dlls option set for linker input properties, with the ORT dll specified as the dll to be delay loaded.
The OrtApi type definition is provided by the ORT C runtime API. The ORT_API_VERSION is set to the value corresponding to the ORT version, e.g., 4 for ORT v1.4.
We will call methods provided by the ORT by dereferencing the ‘api’ pointer. In Init, we call the api->CreateEnv(…) method provided by the ORT to create the runtime environment.
The call to Init and its execution corresponds to steps 4 and 5 of the architecture description shown earlier.
- GetInterfaceVersion: This is called by exthost to get the version number of the extensibility API implemented by the extension. For example, the value returned would be 2 for Version 2 of the API.
return EXTERNAL_LANGUAGE_EXTENSION_API;
- InitSession: This is called by exthost once per inference session. The ONNX extension should copy the values of the function arguments to variables in the extension that can be retrieved by the other functions implemented by the extension. For example, the variables can be part of a class, an object of which is allocated on the heap during Init, and then this object is used by the rest of the functions.
- InitColumn: This is called by exthost once per column (attribute) of the input data on which the model scoring will be done in this inference session. The ONNX extension should copy and save the values of the function arguments.
- InitParam: This is called by exthost to pass other arguments of the sp_execute_external_script command for this inference session. One of the arguments is the “@model” string along with its value, which was set by the user script to the binary string of the model. The ONNX extension should copy and save this model, e.g., using memcpy as shown in the code snippet below.
	if (!strcmp(reinterpret_cast<const char *>(ParamName), "@model")) {
		SQLPOINTER m_modelPtr = new unsigned char[StrLen_or_Ind];
		std::memcpy(m_modelPtr, ArgValue, StrLen_or_Ind);
	}
	……
	return SQL_SUCCESS;
- Execute: This is called by exthost to score the model on the input data for this inference session. There are several steps that are executed in the function.
- Map Types: First, the ONNX extension maps the SQL types (enums) of the input data to the types understood by the ORT. This can be done by looking up a mapping table that tells how to do the translation.
- Create Context: Then, it creates a context for scoring the model by calling ORT methods, e.g., api->CreateSessionOptions(…), api->SetIntraOpNumThreads(…), api-> SetInterOpNumThreads(…), api->SetSessionGraphOptimizationLevel(…), api->CreateSessionFromArray(…), etc.
- Score Model: Then it scores the model by calling ORT methods, e.g., api->CreateTensorWithDataAsOrtValue(…), api->Run(…)
- Save Results: It then saves the predictions returned by the ORT.
- Return number of output columns: Finally, it returns the number of columns in the output of the predictions by setting the ‘*OutputSchemaColumnsNumber’ parameter of the Execute function. The return value of the Execute function is SQL_SUCCESS.
- GetResultColumn: This is called by exthost for each of the columns for the prediction results. The number of columns has been returned by the Execute function as described above. The ONNX extension returns the data type and size for the corresponding column.
- GetResults: This is called by exthost once for the inference session to get the results of the model predictions. The code snippet below shows that the number of rows in the results as well as the results are returned. Here variable DataBuffer is of type BYTE* and it holds the prediction results obtained during the Execute function call as described above.
	*RowsNumber = elemCount;
	*Data = reinterpret_cast<SQLPOINTER *>(&(DataBuffer));
	……
	return SQL_SUCCESS;
- CleanupSession: This is called by exthost once for the inference session. The ONNX extension deallocates variables that is allocated for this inference session.
Performance Comparisons
We evaluated the performance of the following three different ways of scoring ONNX models with SQL Server. We used a SQL Server 2019 installation.
- PREDICT: This uses SQL Server’s built-in PREDICT keyword for scoring ONNX models using the ONNX Runtime. It is currently publicly available only in Azure SQL Edge and Azure SQL Managed Instance (in preview).
- Ext. C++: This uses the ONNX as external language capability described in this blog post.
- Ext. Python: This uses SQL Server’s capability to invoke Python as an external process for invoking the ONNX Runtime to score ONNX models.
We used an input dataset ranging in size from 10K rows to approx. 3M rows. We measure end-to-end query runtimes, that include the total prediction time over all the rows in the particular table, with scoring for two ML models, namely a Decision Tree and a Logistic Regression. We average the runtimes over five executions of the same query.

Fig. 2. Query execution times with inference using different input sizes and models.
Figure 2 shows the average query run times as a function of the number of rows in the input data set, which is also equal to the number of predictions done with the models.
We make the following two observations from these experimental results.
- Ext. Python is significantly slower (2.7x–30.5x, depending on the model and number of input rows) than PREDICT. As an example, for 3M rows, Ext. Python takes about 2.9x (Decision Tree) to 2.7x (Logistic Regression) as much time as PREDICT.
- Ext. C++ results in query run times that are in between PREDICT (1.9x–22.4x slower than PREDICT) and Ext. Python (which is 2.7x–30.5x slower than PREDICT), leading to 1.3–2.1x speedups when compared to Ext. Python. For example, for 3M rows, Ext. C++ takes about 1.9x as much time as PREDICT in contrast to the 2.7x–2.9x time taken by Ext. Python. For approximately 0.3M rows and Decision Tree model, Ext. C++ takes about 2.6x whereas Ext. Python takes about 5.4x as much time as PREDICT, resulting in Ext. C++ being about 2x faster than Ext. Python for scoring the given model on the same input dataset.

Fig. 3. Query slowdowns, relative to in-process PREDICT, for different input sizes and models.
Figure 3 shows the average query run times relative to that with PREDICT with the same number of input rows. At small number of input rows, the computation for the model scoring is small. So, the overheads of setting up the external execution environment dominates. At larger input sizes, the slowdown values become smaller. In all cases, the slowdowns with Ext. C++ are smaller than with Ext. Python.
Summary
SQL Server 2019’s C++ extensibility framework offers a powerful capability to users for calling a wide range of ML model scoring engines to score corresponding ML models on tabular data provided by SQL Server. Our implementation enables users to perform scoring of ONNX models faster and more intuitively than with the existing Python execution. This blog post also provided an overview of how users can write their own ML engine interfacing extensions with the new extensibility framework.
Acknowledgments
We thank Ivan Popivanov, Jasraj Dange, Michelle Wallig, Carlo Curino, and members of the SQL Server extensibility team for their help and feedback on this work.
References
- SQL Server 2019
- Native scoring using the PREDICT T-SQL function with SQL machine learning
- Machine learning and AI with ONNX in SQL Edge
- Machine Learning Services in Azure SQL Managed Instance (preview)
- Extensibility architecture in SQL Server Machine Learning Services
- Python language extension in SQL Server Machine Learning Services
- R language extension in SQL Server Machine Learning Services
- sp_execute_external_script
- Extending Relational Query Processing with ML Inference
- SQL Server Language Extensions
- CREATE EXTERNAL LANGUAGE (Transact-SQL)
- Extensibility architecture in SQL Server Language Extensions
- Extensibility Framework API for SQL Server
- SQL Server Language Extensions project
- ONNX Runtime
- ONNX Runtime C API
by Contributed | Apr 26, 2021 | Technology
This article is contributed. See the original author and article here.
Our Excel team strives to provide its customers with rich experiences that increase productivity in Excel for the web. Recently, we shared how we’ve continued to better navigate and manipulate your Excel files in a browser, making working in and navigating around a workbook and other interactions, faster and smoother. Today, we’re excited to introduce new features and capabilities to help you easily format your data with color and style along with a new mini toolbar, table improvements, and more. In this article, we cover:
- Custom color palettes
- Cell styles gallery
- Draw & erase borders
- Mini toolbar
- Table improvements
- New printing experience (coming soon)
Custom color palette
Match your brand colors or fine tune your color choices with custom color palettes:
- Select from a wide range of color options via the more colors dialog box by simply dragging the color slider
- Change color shade by dragging your cursor around the more colors rectangle and view your selection in the preview box
- Input RGB values or hex values directly for easy color selection
Cell styles gallery
Keep the formatting of your data consistent so it’s easy to read and understand by applying cell styles such as fonts, number formats, and cell borders and shading.

Draw & erase borders
Highlight your data or differentiate one set of data from another by adding or removing cell borders. Pick Draw Border to add outer borders, Draw Border Grid to add gridlines, or Erase Borders to erase them.

Mini toolbar
Right click to get quick access to most common formatting commands via the new mini toolbar.

Table improvements
Tables are muscle memory for many Excel users, and we want to continue bringing you a more consistent table experience across Excel on the desktop and Excel for the web, from design and styling to naming to total rows and more:
- Select table design and styling options


New printing experience (coming soon)
See what you’re printing and customize it the way you want it with the new printing experience in Excel for the web, now supporting print preview with page layout settings:
- Set print area: active sheet, entire workbook, or current selection
- Insert/delete page breaks

These are just some of the latest improvements, many more are coming soon!
Your feedback helps shape the future of Excel for the web. Please let us know how you like a particular feature and what we can improve upon—send us a smile or frown.
Want to know more about Excel for the web? See What’s new in Excel for the web and subscribe to our Excel Blog to get the latest updates. Stay connected with us and other Excel fans around the world – join our Excel Community and follow us on Twitter.
Thank you!
by Contributed | Apr 26, 2021 | Technology
This article is contributed. See the original author and article here.
The following is the fifth and final on a series of articles by @Ali Youssefi that we have been cross-posting into this Test Community Blog for a couple of months now. These articles were first published by Ali in the Dynamics community but since the topic related with Testing, Quality and Selenium, we though it would makes sense to publish here as well.
If you didn’t get a chance to catch the previous parts of these series, please have a look the links below:
Otherwise, please read ahead!
Summary
EasyRepro is an open source framework built upon Selenium allowing automated UI tests to be performed on a specific Dynamics 365 organization. This article will cover incorporating EasyRepro into a DevOps Build pipeline, allowing us to begin the journey toward automated testing and quality. We will cover the necessary settings for using the VSTest task and configuring the pipeline for continuous integration and dynamic variables. Finally we will review the test result artifacts providing detailed information about each unit test and test run.
Getting Started
If you haven’t already, please review the previous articles showing how to create, debug and extend EasyRepro. This article assumes that the steps detailed in the first article titled Cloning locally from Azure DevOps have been followed. This approach will allow our test design team to craft and share tests for quality assurance across our DevOps process.
The Run Settings File
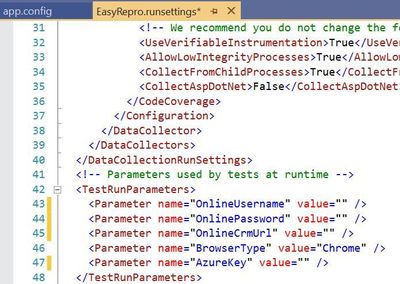
The run settings file for Visual Studio unit tests allow variables to be passed in similar to the app.config file. However this file is specific to Visual Studio tests and can be used in the command line and through Azure DevOps pipelines and test plans. Here is a sample to create a runsettings file.
The image above shows how to implement the TestRunParameters needed for EasyRepro unit tests. You can also find an example in the Microsoft.Dynamics365.UIAutomation.Sample project called easyrepro.runsettings. The runsettings file can be used to set the framework version, set paths for adapters, where the result artifacts will be stored, etc. In the Settings section below we will point to a runsettings file for use within our pipeline.
The ClassInitialize Data Attribute
The ClassInitialize data attribute is used by Visual Studio unit tests to invoke the constructor of a test class. This decoration coupled with the runsettings file will allow us to pass in a TestContext object containing the run parameters.
Properties

The configuration values from the runsettings file are included in the Properties object similar to the app.config file. For usage with EasyRepro we will want to leverage the .ToSecureString extension method which will help us when logging into the platform. Below is an example using this extension method.

Setting up the Build Pipeline
In the first article Test Automation and EasyRepro: 01 – Getting Started, we discussed how to clone from GitHub to a DevOps Git repository which we can then clone locally. The examples below follow this approach and assume you have cloned locally from Azure DevOps Git repo.
The first thing to setting up the Build Pipeline is to navigate to the DevOps organization and project. Once inside the project, click on the Pipelines button to create a Build Pipeline. Tasks here require resolving the NuGet package dependencies, building a solution with MS Build and running unit tests using the VS Test task as shown in the image below.

The core task is the VsTest which will run our Visual Studio unit tests and allow us to dynamically pass values from the Build pipeline variables or from files in source control. The section below goes into the VsTest task, specifically version 2.0.
Reviewing the VsTest task

Test Files
The test file field needs to point to a working directory, dictated by the Search folder field, to locate the compiled unit test assemblies. When using the default task this field looks for assemblies with the word test. If you’re starting with the Sample project from EasyRepro you will need to change this to look for the word Sample as shown above. When this task is run you can confirm if the correct assembly is found in the log for the task.
Test Filter Criteria
The test filter criteria field is used to help limit the scope of the unit tests run within the unit test assembly. Depending on the data attribute decorations you can restrict the unit test run task to only run specific tests. The criteria can be somewhat challenging if you haven’t worked with them before so I’d suggest using the Visual Studio Command Prompt to test locally to better understand how this will work in Azure DevOps Pipelines.

The above image shows an example of using the TestCaseFilter argument to run a specific test class. This argument can be used to run specific classes, priorities, test categories, etc. For instance
More information on the test filter criteria can be found here.
Settings File
The settings file field works with the vstest.console.exe utilizing the “/Settings” argument but allows the ability to pick a file from the repository directly. This field is customizable to also work with Build Pipeline variables which I’ll describe next.

Override Test Run Parameters
Overriding test run parameters is useful when we want to reuse the same test settings but pass in variables from the Build Pipeline. In the example below I’m replacing the parameters from the runsettings file on the left with Build Pipeline variables on the right.

Below are my pipeline variables I’ve defined. This allows me to check in a runsettings file but not have to modify parameters before committing. The values can be plain or secure strings which you will have to take into account if you plan to use one or the other. These variables can also be provided at run time when we queue the build.

Enabling the Continuous Integration Trigger

Enabling the continuous integration trigger allows developers to craft their unit tests and have our build pipeline run on push of a commit. This is configured from the Triggers tab on the pipeline which will bring up the above image. To enable, check the box for ‘Enable continuous integration’ and set which branch you want to have this fire off on. This doesn’t restrict a tester from queuing a build on demand but does help us move forward towards automation!
Running the Build Pipeline
To kick off the build pipeline, commit and push changes to your unit tests as you would any Git commit. Once the push is finished you can navigate to the Azure DevOps org and watch the pipeline in action. Below is a recording of a sample run.

Exploring the Results File
The results of the unit tests can be found in the build pipeline build along with the logs and artifacts. The test results and artifacts are also found in the Test Runs section of the Azure Tests area. The retention of these results are configurable within the Azure DevOps project settings. Each build can be reviewed at a high level for various test result statuses as shown below:

The summary screen includes the unit tests ran and information about failed tests that can be used to track when a regression began. Columns shown include the last time a test ran and what build it began to fail on.

When investigating a failed unit test a link to a new or existing bug can be added. This is useful to help track regressions and assign to the appropriate team. Bugs can be associated from the test run or specific unit test and include links to the build, test run and test plan. The exception message and stack trace are automatically added if linked from the failed unit test.

Each test run includes a test results file that can be downloaded and viewed with Visual Studio. The test artifacts can also be retained locally for archiving or reporting purposes. The contents of the test can be extracted and transformed to be used by platforms such as PowerBI or Azure Monitor.

Its key to point out that when used with a Azure Test Run these results can be retrieved via the API and reported on directly. Below is an image of the response from the Test Run.

Next Steps
Including Unit Tests as a Continuous Delivery Quality Gate
Building and running our EasyRepro tests with Build Pipelines represent an important first step into your journey into DevOps as well as what has been called Continuous Quality. Key benefits here include immediate feedback and deep insights into high value business transactions. Including these types of tests as part of the release of a Dynamics solution into an environment is paramount to understanding impact and providing insight.
Including Code Analysis as a Continuous Delivery Quality Gate
One thing I’d like to point out is that UI testing can help ensure quality but this should be coupled with other types of testing such as security testing or code analysis. The PowerApps Product Group has a tremendously valuable tool called the PowerApps Project Checker for code analysis. Project Checker can help identify well documented concerns that may come up as part of our deployment. This tool can be used via PowerShell or from the PowerApps Build Tasks within the Visual Studio Marketplace. It can also be run from the PowerApps portal in a manual fashion if desired.
This code quality step can be included as part of the extraction of modifications from your development or sandbox environments or as a pre step before packaging a managed solution for deployment. For additional detail there is a wonderful post by the Premier Field Engineer team documenting how to include this task into your pipelines. Special thanks to Premier Field Engineers’ Paul Breuler and Tyler Hogsett for documenting and detailing the journey into DevOps.
I highly recommend incorporating this important step into any of your solution migration strategies even if you are still manually deploying solutions to better understand and track potential issues.
Scheduling Automated Tests
Scheduling tests can be done in various ways, from build and release pipelines to Azure Test Plans. For pipelines triggers can be used to schedule based off a predetermined schedule. Azure Test Plans allow for more flexibility to run a specific set of tests based off of test cases linked to unit tests. To find out more about setting this up, refer to this article.
Conclusion
This article covers working from a local version of EasyRepro tests and how to incorporate into a Azure DevOps Build Pipeline. It demonstrates how to configure the VsTest task, how to setup triggers for the Build Pipeline and how to review Test Results. This should be a good starting point into your journey into DevOps and look forward to hearing about it and any question you have in the comments below.
At the Microsoft Test Team, we have followed this tutorial and often use EasyRepro for our UI-Test related needs for Dynamics 365, please stay tune for a Tips and Trick related to EasyRepro, until next time!

by Contributed | Apr 26, 2021 | Dynamics 365, Microsoft 365, Technology
This article is contributed. See the original author and article here.
If small and midsized businesses (SMBs) have one thing in common, it is that they are all unique. Differentiate or fail is especially true when it comes to small and midsized business strategy. The secret sauce is what helps leaders of these companies blaze new trails and disrupt industries with innovative products and services. However, disrupting industries requires more than passion and great ideas; SMBs also need the ability to quickly adapt business and operating models to deliver on their vision and brand promises. And the level of business agility required for success takes an ecosystem to deliver.
Adapt faster with Dynamics 365 Business Central
Microsoft Dynamics 365 Business Central provides a connected cloud business management solution for growing SMBs. Connected means you can bring together your finance, sales, services, and operations teams within a single application to get the insights needed to drive your business forward and be prepared for what’s next. While the out-of-the-box capabilities meet the needs for standard business operations, Dynamics 365 Business Central offers operational flexibility to help SMBs adapt faster to changing market conditions and customer expectations.
Our customers use Microsoft Power Platform, connected to Dynamics 365 Business Central, Office 365, Microsoft Azure, and hundreds of other apps, to further analyze data, build solutions, automate processes, and create virtual agents. Microsoft Power Apps turns ideas into organizational solutions by enabling everyone to build custom apps that solve unique business challenges.
We also work closely with our partners to support unique business processes, workflows, and operational models at scale. Our partners build a solution based on industry best practices, so you don’t have to recreate the wheel. You can find over 1,400 apps on Microsoft AppSource to easily tailor and extend Dynamics 365 Business Central to meet unique business or industry-specific needs. Filter for Dynamics 365 Business Central on AppSource and you will find apps for everything from A to Z allocations, banking, and construction to warehousing, XML, yield, and zoning.
At our Directions North America partner conference on April 26, 2021, we will introduce some new applications that will be coming soon to Microsoft AppSource, including:
- Bill.com streamlines accounts payables and receivables automation workflows and payments: Announced earlier this month, Bill.com will integrate with Dynamics 365 Business Central and Microsoft Dynamics GP. Bill.com is a leading provider of cloud-based software that automates complex back-office financial operations for SMBs. Mutual customers will now be able to take control of their financial processes, save time, and scale with confidence through the power of the integrations’ accounts payables (AP) and accounts receivables (AR) intelligent automation workflows and payments. The Bill.com and Microsoft Dynamics 365 automatic sync is now live. Find out more information on the Bill.com Sync with Microsoft Dynamics 365.
- Square lets you accept payments quickly, easily, and securely: Make accepting card payments fast, painless, and secure so that you don’t miss a sale. Whether you’re selling in person, online, or on the go, Square helps you get paid fast, every time. Using the Square Payments app from AppSource will automatically sync with Dynamics 365 Business Central so you can keep track of all of your payments in one place.
- ODP Corporation (parent company of Office Depot) digital procurement platform: As announced on February 22, 2021, the ODP Corporation is partnering with Microsoft to transform how businesses buy and sell. ODP is working to bring the power of their new digital procurement technology platform to Dynamics 365 Business Central customers to help them realize immediate purchase savings and procurement automation. This exciting integration will be coming later in 2021.
Work smarter with Dynamics 365 Business Central
As Dynamics 365 Business Central is part of the Microsoft cloud, our customers also have the ability to extend the solution using Office 365, including Teams, Outlook, Excel, and Word. Don’t let disconnected processes and systems hold your people back. Connecting your business application with productivity tools can help support remote work, improve security, and control costs. Ensure your people can be more collaborative, productive, and impactful by seamlessly connecting Dynamics 365 Business Central with Microsoft 365 apps.
No matter how you choose to manage customer workflows, processes, and unique models, Dynamics 365 Business Central provides the operational foundation and flexibility that is required for success.
Independent Software Vendors (ISVs) and Business Central partners can learn more at Dynamics 365 Business Central the Directions North America virtual event on April 26-28, 2021.
The post Success for small and midsized businesses requires agility appeared first on Microsoft Dynamics 365 Blog.
Brought to you by Dr. Ware, Microsoft Office 365 Silver Partner, Charleston SC.
by Contributed | Apr 26, 2021 | Technology
This article is contributed. See the original author and article here.
In the previous episode, we described how you can easily use PowerBi to represent Microsoft 365 data in a visual format. In this episode, we will explore another way you can interact with the Microsoft 365 Defender API. e will describe how to automate data analysis and hunting using Jupyter notebook.
Automate your hunting queries
While hunting and conducting investigations on a specific threat or IOC, you may want to use multiple queries to obtain wider optics on the possible threats or IOCs in your network. You may also want to leverage queries that are used by other hunters and use it as a pivot point to perform deep analysis and find anomalous behaviors. You can find a wide variety of examples in our Git repository where various queries related to the same campaign or attack technique are shared.
In scenarios such as this, it is sensible to leverage the power of automation to run the queries rather than running individual queries one-by-one.
This is where Jupyter Notebook is particularly useful. It takes in a JSON file with hunting queries as input and executes all the queries in sequence. The results are saved in a .csv file that you can analyze and share.
Before you begin
JUPYTER NOTEBOOK
If you’re not familiar with Jupyter Notebooks, you can start by visiting https://jupyter.org for more information. You can also get an excellent overview on how to use Microsoft 365 APIs with Jupyter Notebook by reading Automating Security Operations Using Windows Defender ATP APIs with Python and Jupyter Notebooks.
VISUAL STUDIO CODE EXTENSION
If you currently use Visual Studio Code, make sure to check out the Jupyter extension.

Figure 1. Visual Studio Code – Jupyter Notebook extension
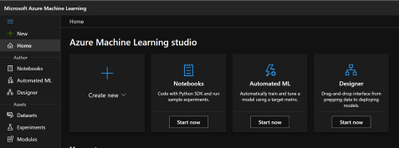
Another option to use Jupyter Notebook is the Microsoft Azure Machine Learning service.
Microsoft Azure Machine Learning is the best way to share your experiment with others and for collaboration.
Please refer to Azure Machine Learning – ML as a Service | Microsoft Azure for additional details.
Figure 2. Microsoft Azure Machine Learning
In order to create an instance, create a resource group and add the Machine Learning resource. The resource group lets you control all of the resources from a single entry point.

Figure 3. Microsoft Azure Machine Learning – Resource
When you’re done, you can run the same Jupyter Notebook you are running locally on your device.

Figure 4. Microsoft Azure Machine Learning Studio
App Registration
The easy way to access the API programmatically is to register an app in your tenant and assign the required permissions. This way, you can authenticate using the application ID and application secret.
Follow these steps to build your custom application.

Figure 5. App registration
Select “NEW REGISTRATION“.

Figure 6. Register an application
Provide the Name of your app, for example, MicrosoftMTP, and select Register.
Once done, select “API Permission“.

Figure 7. API Permissions
Select “Add a permission“.

Figure 8. Add permission
Select the “APIs my organization uses“.

Figure 9. Alert Status

Figure 10. Request API permission
Search for Microsoft Threat Protection and select it.

Figure 11. Microsoft Threat Protection API
Select “Application Permission“.

Figure 12. Application Permissions
Then select:
- AdvancedHunting.Read.All
- Incident.Read.All

Figure 13. Microsoft 365 Defender API – Read permission
Once done select “Add permissions“.

Figure 14. Microsoft 365 Defender API – Add permission
Get Started
Now that we have the application ready to access the API via code, let’s try to see is any of the Qakbot queries shared in Microsoft 365 Defender Git produce any results.

Figure 15. Microsoft 365 Defender – Hunting Queries
The following queries will be used in this tutorial:
Javascript use by Qakbot malware
Process injection by Qakbot malware
Registry edits by campaigns using Qakbot malware
Self-deletion by Qakbot malware
Outlook email access by campaigns using Qakbot malware
Browser cookie theft by campaigns using Qakbot malware
Detect .jse file creation events
We need to grab the queries that we want to submit and populate a JSON file with this format. Please be sure that you are properly managing the escape character in the JSON file (if you use Visual Studio Code (VSCode) you can find extensions that can make the ESCAPE/UNESCAPE process easiest, just pick your favorite one).
[
        {
            "Description": "Find Qakbot overwriting its original binary with calc.exe",
            "Name": "Replacing Qakbot binary with calc.exe",
            "Query": "DeviceProcessEvents | where FileName =~ "ping.exe" | where InitiatingProcessFileName =~ "cmd.exe" | where InitiatingProcessCommandLine has "calc.exe" and InitiatingProcessCommandLine has "-n 6" and InitiatingProcessCommandLine has "127.0.0.1" | project ProcessCommandLine, InitiatingProcessCommandLine, InitiatingProcessParentFileName, DeviceId, Timestamp",
            "Mitre": "T1107 File Deletion",
            "Source": "MDE"
        }
]
Once you have all your queries properly filled, we must provide the following parameters to the script in order to configure the correct credential, the JSON file, and the output folder.

Figure 16. Jupyter Notebook – Authentication
Because we registered an Azure Application and we used the application secret to receive an access token, the token is valid for 1 hour. Within the code verify if we need to renew this token before submitting the query.

Figure 17. Application Token lifetime validation
When building such flow we should take into consideration Microsoft 365 Defender Advanced hunting API quotas and resources allocation. For more information, see Advanced Hunting API | Microsoft Docs.

Figure 18. API quotas and resources allocation taking into consideration
We run the code by loading the query from the JSON file we defined as input. We then view the progress and the execution status on screen.

Figure 19. Query Execution
The blue message indicates the number of queries that is currently running and its progress.
The green message shows the name of the query that is being run.
The grey message shows the details of the submitted query.
If there are any results you will see the first 5 records, and then all the records will be saved in a .csv file in the output folder you defined.

Figure 20. Query results – First 5 records
Bonus
You can post the summary of the query execution in a Teams channel, you need to add Incoming Webhook in your teams.

Figure 21. Incoming Webhook
Then you need to select which Teams channel you want to add the app.

Figure 22. Incoming Webhook – add to a team
Select “Set up a connector”.

Figure 23. Incoming Webhook – Setup a connector
Specify a name.

Figure 24. Incoming Webhook – Config
Now you need to copy the URL, then paste the URL in the Jupyter Notebook.

Figure 25. Incoming Webhook – teamurl variable
Then remove the comment from the latest line in the code to send the message to Teams.

Figure 26. Incoming Webhook – teamsurl variable
You should receive a similar message like the following in the Teams channel:

Figure 27. Query result summary – Teams Message
Conclusion
In this post, we demonstrated how you can use the Microsoft 365 Defender APIs and Jupyter Notebook to automate execution of hunting queries playbook. We hope you found this helpful!
Appendix
For more information about Microsoft 365 Defender APIs and the features discussed in this article, please read:
The sample Notebook discussed in the post is available in the github repository
Microsoft-365-Defender-Hunting-Queries/M365D APIs ep3.ipynb at master · microsoft/Microsoft-365-Defender-Hunting-Queries (github.com)
As always, we’d love to know what you think. Leave us feedback directly on Microsoft 365 security center or start a discussion in Microsoft 365 Defender community
by Contributed | Apr 26, 2021 | Technology
This article is contributed. See the original author and article here.
Howdy folks,
I’m excited to share the latest Active Azure Directory news, including feature updates, support depreciation, and the general availability of new features that will streamline administrator, developer, and end user experiences. These new features and feature updates show our commitment to simplifying identity and access management, while also enhancing the kinds of customization and controls our customers need.
New features
- Embed Azure AD B2C sign-in interface in an iframe (Preview): Customers have told us how jarring it is to do a full-page redirect when users authenticate. Using a custom policy, you can now embed the Azure AD B2C experience within an iframe so that it appears seamlessly within your web application. Learn more in the documentation.

- Custom email verification for Azure AD B2C (GA): You can send customized email to users that sign up to use your customer applications, with a third-party email provider such as Mailjet or SendGrid. Using a Azure AD B2C custom policy, you can set up an email template, From: address, and subject, as well as support localization and custom one-time password (OTP) settings. Learn more in the documentation.

- Additional service and client support for Continuous Access Evaluation (CAE) – MS Graph service & OneDrive clients on all platforms (Windows, Web, Mac, iOS, and Android) start to support CAE at the beginning of April. Now OneDrive client access can be terminated immediately right after security events, like session revocation or password reset, if you have CAE enabled in your tenant.
We’re always looking to improve Azure AD in ways that benefit IT and end users. Often, these updates originate with the suggestions of users of the solution. We’d love to hear your feedback or suggestions for new features or feature updates in the comments or on Twitter (@AzureAD).
Alex Simons (@Alex_A_Simons)
Corporate VP of Program Management
Microsoft Identity Division
Learn more about Microsoft identity:
by Contributed | Apr 26, 2021 | Technology
This article is contributed. See the original author and article here.
Initial Update: Monday, 26 April 2021 15:43 UTC
We are aware of issues within Log Analytics and are actively investigating. Some customers may experience data access issues and delayed or missed Log Search Alerts in West US region.
- Work Around: None
- Next Update: Before 04/26 18:00 UTC
We are working hard to resolve this issue and apologize for any inconvenience.
-Soumyajeet

Recent Comments