This article is contributed. See the original author and article here.
Later this year, Microsoft will launch a new Publisher program to modernize our Dynamics 365 Business Central ISV approach to support a cloud-first strategy. This new approach will ensure all future customers can choose Dynamics 365 Business Central online, while also finding the right apps on Microsoft AppSource to meet their unique requirements. This change will require ISVs to have a cloud-first strategy by the end of 2022 for their solutions listed as Microsoft AppSource apps.
The new Publisher program replaces the Registered Solution Program (RSP) and the Certified for Microsoft Dynamics (CfMD) program, which will be deprecated after being in place for more than a decade.
We’ll share details about the new Publisher program closer to launch. In the meantime, the following guidance will ensure that you are ready to transition:
Publishers with a cloud-first strategy in place are set up for success. ISVs who have modernized their existing C/AL solutions by converting them into AL and full extensions, and published those Apps to Microsoft AppSource, will be more competitive. These publishers will be able to adapt faster and can focus more on their prospects and customers, instead of writing code.
The Publisher program will reward partners with a cloud-first strategy by freeing them from program fees or additional test efforts, outside of what is required for publishing to Microsoft AppSource.
This policy doesn’t mean publishers are required to have a cloud-only approach. If partners comply with the cloud-first approach, they’ll be able to easily implement Business Central online, on-premises, and partner-hosted apps.
Better serve your customers by bringing existing Dynamics NAV or Dynamics 365 Business Central code-customized solutions into Microsoft AppSource. As of April 2021, Microsoft AppSource hosts almost 1,500 apps specifically built for Dynamics 365 Business Central. Over the past few years, hundreds of our partners have embraced this transition and incorporated a cloud-first strategy. Those who have transitioned to Microsoft AppSource have shared with us how they and their customers benefited from that investment.
To remain competitive, relevant, and provide digital transformation strategies to customers, we are asking all our partners to embark on a modernization journey. If there is a strong business case to continue selling to new customers, then you should avoid further delay and bring your apps to Microsoft AppSource.
From September 2022 onward, we will introduce gradually increasing fees for publishers whose resellers have sold on-premises solutions to new customers without an equivalent cloud-based solution. The fees will only be applied to sales in countries where the Dynamics 365 Business Central online service is available. Solutions registered to existing customer licenses before the program cut-off date will not be impacted by program fees. However, adding new non-AppSource solutions after the cut-off date will be impacted.
Avoid fees by creating a transition plan now. The longer you wait to bring your solutions into Microsoft AppSource, the more fees you will incur.
This change also means that publishers now have a shared responsibility with their resellers to only resell cloud-first solutions to new customers.
Just like the RSP and CfMD programs, the new Publisher program is designed to drive customer-obsession behavior, not revenue, and promote a cloud-first strategy for publishers. Our objective is to ensure customers can choose cloud deployments without exception.
Next steps
Further details about the program will be shared in the coming months. We understand that our partners are in different stages of their modernization journey. We’ve put together learning and coaching resources to support you in your transition journey. Please reach out to your regional operational center if you have any questions or concerns. We’ll connect you with the best resource to further your path forward.
This article is contributed. See the original author and article here.
In this blog post, I will show you how you can set up, configure and customize Windows Sandbox in Windows 10 using advanced Windows Sandbox config files. Windows Sandbox is based on Hyper-V technology and allows you to spin up an isolated, temporary desktop environment where you can run untrusted software.
What is Windows Sandbox
Windows Sandbox provides a lightweight desktop environment to run applications in isolation safely. Software installed inside the Windows Sandbox environment remains “sandboxed” and runs separately from the host machine.
A sandbox is temporary. When it’s closed, all the software and files and the state are deleted. You get a brand-new instance of the sandbox every time you open the application.
Software and applications installed on the host aren’t directly available in the sandbox. If you need specific applications available inside the Windows Sandbox environment, they must be explicitly installed within the environment.
Windows Sandbox has the following properties:
Part of Windows: Everything required for this feature is included in Windows 10 Pro and Enterprise. There’s no need to download a VHD.
Pristine: Every time Windows Sandbox runs, it’s as clean as a brand-new installation of Windows.
Disposable: Nothing persists on the device. Everything is discarded when the user closes the application.
Secure: Uses hardware-based virtualization for kernel isolation. It relies on the Microsoft hypervisor to run a separate kernel that isolates Windows Sandbox from the host.
Efficient:Uses the integrated kernel scheduler, smart memory management, and virtual GPU.
You can learn more about Windows Sandbox on Microsoft Docs and if you are interested in how Windows Sandbox works, check out the Windows architecture here.
How to install Windows Sandbox
To get started with Windows Sandbox, you will need to have the following prerequisites:
Windows 10 Pro, Enterprise or Education build 18305 or later (Windows Sandbox is currently not supported on Home SKUs)
64-bit architecture
Virtualization capabilities enabled in BIOS
At least 4 GB of RAM (8 GB recommended)
At least 1 GB of free disk space (SSD recommended)
At least two CPU cores (four cores with hyperthreading recommended)
You can install Windows Sandbox as an additional feature in the Control Panel or by simply running the following PowerShell command as administrator:
After running that command, you will need to restart your computer, and after the reboot, you can start using the Windows Sandbox directly from the Start menu.
Customize Windows Sandbox with Configuration Files
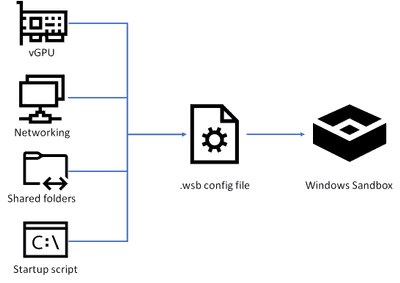
By default, Windows Sandbox spins up a default image. However, in many cases, you want to spin up a customized environment with already preinstalled tools or access to local files. For that, you can use config files that allow you to customize the sandbox during startup. The sandbox configuration files are formatted as XML and use the .wsb file extension.
Customize Windows Sandbox with Configuration Files
Today, you can configure four different settings to configure the Windows Sandbox.
vGPU (virtualized GPU): Enable or disable the virtualized GPU. If vGPU is disabled, the sandbox will use Windows Advanced Rasterization Platform (WARP).
Networking: Enable or disable network access within the sandbox.
Mapped folders: Share folders from the host withreadorwritepermissions. Note that exposing host directories may allow malicious software to affect the system or steal data.
Logon command: A command that’s executed when Windows Sandbox starts.
Audio input: Shares the host’s microphone input into the sandbox.
Video input: Shares the host’s webcam input into the sandbox.
Protected client: Places increased security settings on the RDP session to the sandbox.
Printer redirection: Shares printers from the host into the sandbox.
Clipboard redirection: Shares the host clipboard with the sandbox so that text and files can be pasted back and forth.
Memory in MB: The amount of memory, in megabytes, to assign to the sandbox.
To create a configuration file, open your editor of choice and create a file with the file extension “.wsb”. Now you can start building the config using XML.
Windows Sandbox Configuration Files WSB Files
Let’s start with a simple configuration file, which mounts the Downloads folder of the local machine into the Windows Sandbox as read-only. This allows you to use the files from your Downloads folder in your Sandbox. However, the Sandbox cannot write back to that folder.
In addition, we also use the Command part to open up the explorer.exe with the mounted Downloads folder when the Windows Sandbox starts.
I saved this as “Sandbox Map Download Folder.wsb“. To start Windows Sandbox with the configuration file, double click the configuration file or open it up in the console.
Windows Sandbox Configuration Files start from Windows Terminal
After that, Windows Sandbox will open with the mounted Downloads folder.
Windows Sandbox Mounted Folder
Another example I want to share here is how you can run a script to modify or installed software. In this case, I want to have a Windows Sandbox with Visual Studio Code installed. For that, I use the folder option to mount a folder with a script, and within that script, I have the installation commands. After the Windows Sandbox has started, it will run the script from the mounted folder using the command option.
REM Download VSCode
curl -L "https://update.code.visualstudio.com/latest/win32-x64-user/stable" --output C:usersWDAGUtilityAccountDesktopvscode.exe

REM Install and run VSCode
C:usersWDAGUtilityAccountDesktopvscode.exe /verysilent /suppressmsgboxes
These are just some of the examples of how you can customize your Windows Sandbox environments. If you want to learn more, check out Microsoft Docs.
Make Visual Studio Code handle .wsb file with XML
By default, editors don’t necessarily know about the wsb file extension and that this includes XML syntax. In Visual Studio Code, you can open up the Settings (JSON) and add the following to the files.associations.
Visual Studio Code
In the JSON settings, search forfiles.associations. Note: The searched section might be there or not.
If it is not there, add the following:
"files.associations": {
      "*.wsb": "xml"
}
Conclusion
I hope this provides you with a short overview of how you can customize the Windows Sandbox. I am interested in what customization you are running. If you have any questions, feel free to leave a comment or share your customization.
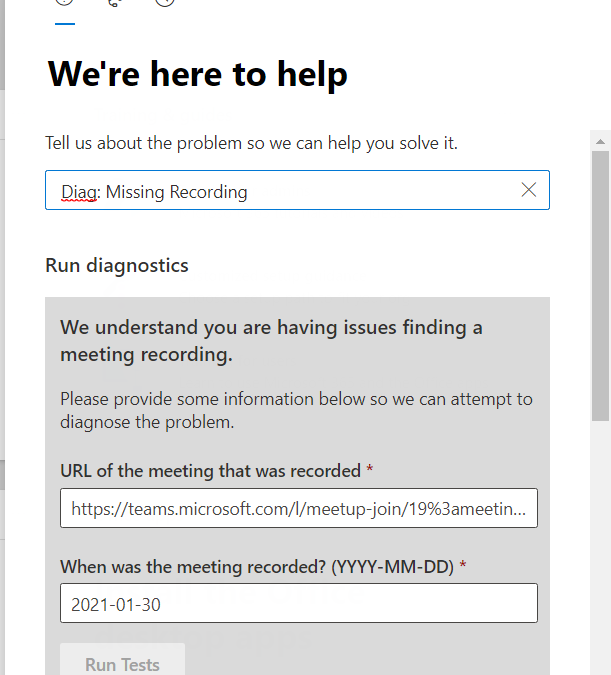
This new Diagnostic can find missing Meeting Recordings in the event they are lost or misplaced. To access the Diagnostic in your M365 Admin Portal, type Diag: Missing Recording into the Need Help or New Service Request description box:
Notice that the Diagnostic requires a Meeting Join URL, one way to get that is from the Meeting details page in the Teams client. Find the Meeting Chat, then click on the three lines top right:
And then you can copy the link:
From there, you simply need the Date the meeting occurred. Note that we only keep Meeting Recording telemetry for 30 days, so if the meeting recording is older than 30 days, you’ll need to try one of the manual methods in the troubleshooting article linked above.
Enter your meeting join URL and date in YYYY-MM-DD format:
And then click on Run Tests. In my case, here is the result:
And this indicates that my Meeting Recording was saved to OneDrive, and provides a link to our troubleshooting article with instructions on how to go find it in OneDrive. The Diagnostic can detect if the user’s storage is still Stream as well, and those instructions (how to find the recording file in Stream) are there too. For this example, here’s where I found my missing recording:
We hope this Diagnostic is helpful in situations where the Meeting Recording file can’t be found after a meeting. Please give it a try and let us know how it went in the comments below.
This article is contributed. See the original author and article here.
This post is co-authored with Yulin Li, Yinhe Wei, Qinying Liao, Yueying Liu, Sheng Zhao
Voice is becoming increasingly popular in providing useful and engaging experiences for customers and employees. The Text-to-Speech (TTS) capability of Speech on Azure Cognitive Services allows you to quickly create intelligent read-aloud experience for your scenarios.
In this blog, we’ll walk through an exercise which you can complete in under two hours, to get started using Azure neural TTS voices and enable your apps to read content aloud. We’ll provide high level guidance and sample code to get you started, and we encourage you to play around with the code and get creative with your solution!
What is read-aloud
Read-aloud is a modern way to help people to read and consume content like emails and word documents more easily. It is a popular feature in many Microsoft products, which has received highly positive user feedback. A few latest examples:
Play My Emails: In outlook iOS, users can listen to their incoming email during the commute to the office. They can choose from a female and a male voice to read the email aloud, anytime their hands may be busy doing other things.
Edge read aloud: In recent chromium-based edge browser, people can listen to the web pages or pdf documents when they are doing multi-tasking. The read-aloud voice quality has been enhanced with Azure neural TTS, which becomes the ‘favorite’ feature to many (Read the full article).
Immersive reader is a free tool that uses proven techniques to improve reading for people regardless of their age or ability. It has adopted Azure neural voices to read aloud content to students.
Listen to Word documents on mobile. This is an eyes-off, potentially hands-off modern consumption experience for those who want to do multitask on the go. In specific, this feature supports a longer listening scenario for document consumption, now available with Word on Android and iOS.
With all these examples and more, we’ve seen clear trending of providing voice experiences for users consuming content on the go, when multi-tasking, or for those who tend to read in an audible way. With Azure neural TTS, it is easy to implement your own read-aloud that is pleasant to listen to for your users.
The benefit of using Azure neural TTS for read-aloud
Azure neural TTS allows you to choose from more than 140 highly realistic voices across 60 languages and variants that enables fluid, natural-sounding speech, with rich customization capabilities available at the same time.
High AI quality
Why is neural TTS so much better? Traditional TTS is a multi-step pipeline, and a complex process. Each step could involve human, expert rules or individual models. There is no end-to-end optimization in between, so the quality is not optimal. The AI based neural TTS voice technology has simplified the pipeline into three major components. Each component can be modeled by advanced neural deep learning networks: a neural text analysis module, which generates more correct pronunciations for TTS to speak; a neural acoustic model, like uni-TTS which predicts prosody much better than the traditional TTS, and a neural vocoder, like hifiNet which creates audios in higher fidelity.
With all these components, Azure neural TTS makes the listening experience much more enjoyable than the traditional TTS. Our studies repeatedly show that the read-aloud experience integrated with the highly natural voices on the Azure neural TTS platform can significantly increase the time that people spend on listening to the synthetic speech continuously, and greatly improve the effectiveness of their consumption of the audio content.
Broad locale coverage
Usually, the reading content is available in many different languages. To read aloud more content and reach more users, TTS needs to support various locales. Azure neural TTS now supports more than 60 languages off the shelf. Check out the details in the full language list.
By offering more voices across more languages and locales, we anticipate developers across the world will be able to build applications that change experiences for millions. With our innovative voice models in the low-resource setting, we can also extend to new languages much faster than ever.
Rich speaking styles
Azure neural TTS provides you a rich choice of different styles that resonate your content. For example, the newscast style is optimized for news content reading in a professional tone. The customer service style supports you to create a more friendly reading experience for conversational content focusing on customer support. In addition, various emotional styles and role-play capabilities can be used to create vivid audiobooks in synthetic voices.
Here are some examples of the voices and styles used for different types of content.
Language
Content type
Sample
Note
English (US)
Newscast
Aria, in the newscast style
English (US)
Newscast
Guy, in the general/default style
English (US)
Conversational
Jenny, in the chat style
English (US)
Audiobook
Jenny, in multiple styles
Chinese (Mandarin, simplified)
Newscast
Yunyang, in the newscast style
Chinese (Mandarin, simplified)
Conversational
Yunxi, in the assistant style
Chinese (Mandarin, simplified)
Audiobook
Multiple voices used: Xiaoxiao and Yunxi
Different styles used: lyrical, calm, angry, disgruntled, angry, embarrassed, with different style degrees applied
These styles can be adjusted using SSML, together with other tuning capabilities, including rate, pitch, pronunciation, pauses, and more.
Powerful customization capabilities
Besides the rich choice of prebuilt neural voices, Azure TTS provides you a powerful capability to create a one-of-a-kind custom voice that can differentiate your brand from others. Using Custom Neural Voice, you can build a highly realistic voice using less than 30 minutes of audio as training data. You can then use your customized voices to create a unique read-aloud experience that reflects your brand identity or resonate the characteristics of your content.
Next, we’ll walk you through the coding exercise of developing the read-aloud feature with Azure neural TTS.
How to build read-aloud features with your app
It is incredibly easy to add the read-aloud capability using Azure neural TTS to your application with the Speech SDK. Below we describe two typical designs to enable read-aloud for different scenarios.
In this design, the client directly interacts with Azure TTS using the Speech SDK. The following steps with the JavaScript code sample provide you the basic process to implement the read-aloud.
Step 1: create synthesizer
First, create the synthesizer with the selected language and voices. Make sure you select a neural voice to get the best quality.
const config = SpeechSDK.SpeechConfig. fromAuthorizationToken(“YourAuthorizationToken”, “YourSubscriptionRegion”);
config.SpeechSynthesisVoiceName = voice;         config.SetSpeechSynthesisOutputFormat(SpeechSynthesisOutputFormat.Riff24Khz16BitMonoPcm);
const player = new SpeechSDK.SpeakerAudioDestination();
var audioConfig  = SpeechSDK.AudioConfig.fromSpeakerOutput(player);
var synthesizer = new SpeechSDK.SpeechSynthesizer(config, audioConfig);
Then you can hook up the events from the synthesizer. The event will be used to update the UX while the read-aloud is on.
player.onAudioEnd = function (_) {
          window.console.log("playback finished");
  };
Step 2: Collect word boundary events
The word boundary event is fired during synthesis. Usually, the synthesis speed is much faster than the playback speed of the audio. The word boundary event is fired before you get the corresponding audio chunks. The application can collect the event and the time stamp information of the audio for your next step.
    synthesizer.wordBoundary = function (s, e) {
          window.console.log(e);
          wordBoundaryList.push(e);
        };
Step 3: Highlight word boundary during audio playback
You can then highlight the word as the audio plays, using the code sample below.
    setInterval(function () {
        if (player !== undefined) {
          const currentTime = player.currentTime;
          var wordBoundary;
          for (const e of wordBoundaryList) {
            if (currentTime * 1000 > e.audioOffset / 10000) {
              wordBoundary = e;
            } else {
              break;
            }
          }
          if (wordBoundary !== undefined) {
            highlightDiv.innerHTML = synthesisText.value.substr(0, wordBoundary.textOffset) +
                    "" + wordBoundary.text + "" +
                    synthesisText.value.substr(wordBoundary.textOffset + wordBoundary.wordLength);
          } else {
            highlightDiv.innerHTML = synthesisText.value;
          }
        }
      }, 50);
In this design, the client interacts with a middle layer service, which then interacts with Azure TTS through the Speech SDK. It is suitable for below scenarios:
It is required to put the authentication secret (e.g., subscription key) on the server side.
There could be additional related business logics such as text preprocessing, audio postprocessing etc.
There is already a service to interact with the client application.
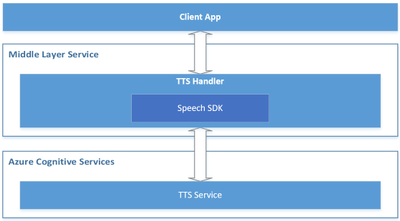
Below is a reference architecture for such design:
Reference architecture design for the server-side read-aloud
The roles of each component in this architecture are described below.
Azure Cognitive Services – TTS: the cloud API provided by Microsoft Azure, which converts text to human-like natural speech.
Middle Layer Service: the service built by you or your organization, which serves your client app by hosting the cross-device / cross-platform business logics.
TTS Handler: the component to handle TTS related business logics, which takes below responsibilities:
Wraps the Speech SDK to call the Azure TTS API.
Receives the text from the client app and makes preprocessing if necessary, then sends it to the Azure TTS API through the Speech SDK.
Receives the audio stream and the TTS events (e.g., word boundary events) from Azure TTS, then makes postprocessing if necessary, and sends them to the client app.
Client App: your app running on the client side, which interacts with end users directly. It takes below responsibilities:
Sends the text to your service (“Middle Layer Service”).
Receives the audio stream and TTS events from your service (“Middle Layer Service”), and plays the audio to your end users, with UI rendering like real-time text highlight with the word boundary events.
Comparing to the client-side read-aloud design, the server-side read-aloud is a more advanced solution. It can cost higher but is more powerful to handle more complicated requirements.
Recommended practices for building a read-aloud experience
The section above shows you how to build a read-aloud feature in the client and service scenarios. Below are some recommended practices that can help to make your development more efficient and improve your service experience.
Segmentation
When the content to read is long, it’s a good practice to always segment your reading content to sentences or short paragraphs in each request. Such segmentation has several benefits.
The response is faster for shorter content.
Long synthesized audio will cost more memory.
Azure speech synthesis API requires the synthesized audio length to be less than 10 minutes. If your audio exceeds 10 minutes, it will be truncated to 10 minutes.
Using the Speech SDK’s PullAudioOutputStream, the synthesized audio in each turn could be easily merged into one stream.
Streaming
Streaming is critical to lower the latency. When the first audio chunk is available, you can start the playback or start to forward the audio chunks immediately to your clients. The Speech SDK provides PullAudioOutputStream, PushAudioOutputStream, Synthesizing event, and AudioDateStream for streaming. You can select the one that best suites the architecture of your application. Find the samples here.
Besides, with the stream objects of the Speech SDK, you can get the seek-able in-memory audio stream, which works easily for any downstream services.
Tell us your experiences!
Whether you are building a voice-enabled chatbot or IoT device, an IVR solution, adding read-aloud features to your app, converting e-books to audio books, or even adding Speech to a translation app, you can make all these experiences natural sounding and fun with Neural TTS.
Let us know how you are using or plan to use Neural TTS voices in this form. If you prefer, you can also contact us at mstts [at] microsoft.com. We look forward to hearing about your experience and developing more compelling services together with you for the developers around the world.
This article is contributed. See the original author and article here.
As more and more enterprises embrace Azure, complete end-to-end automation for standing up workloads in the cloud is one of the most important steps to running at scale. The latest release (2020-09-01) of the Microsoft.Subscription resource provider enables subscription creation via templates. To get started you first need to ensure billing agreements are in place and you can find details on that process here. Once this is done, a new subscription can be created for the proper workload and billing account. Once created, the subscription can be referred to with an alias throughout your code or templates.
Here’s a look at a subscription resource in a template:
Of particular note is the “scope” property. Subscriptions are a tenant level resource in Azure and must be PUT to the tenant scope which the property allows.
The prereqs for creating subscriptions is to identify the billing scope for the subscription. You can find more information about billing scopes in this doc. A sample script for looking up billing information can be found here.
The next step, when using templates for subscription creation, is to determine the scope for the template deployment itself. All templates are deployed to a specific scope; most commonly this is a resourceGroup, but template deployments can be done at the subscription, managementGroup or tenant scope as well. The scope of the deployment does not need to match the scope of the resources that are deployed though it often does. For our template sample, we’ll describe a scenario, or rather tenant, where no subscriptions (or resourceGroups) exist and we’ll deploy to a managementGroup. It doesn’t matter which managementGroup we choose for the deployment because the subscription itself will be created at the tenant scope and placed in the default managementGroup, unless a different one is specified. If this is still a little confusing, just focus on the subscription resource itself. This resource must be deployed to the tenant scope and the examples will show how to use the “scope” property to indicate that.
Note, that you must have permissions to create template deployments at the scope you target. Also, the permission to deploy a template at a scope does not automatically give permissions to create any other resource, so you do need to ensure that you have the necessary permissions to create the resources in your template, if any, as well. That should cover everything about permission.
A QuickStart sample for deploying a subscription can be found here. The command for deploying this template is just like deploying any other template and following our example would be:
This will deploy the template to the “root” managementGroup for the tenant. Again, remember that you must have permission to deploy to that scope, in this case the root managementGroup. If you don’t have that permission, you can deploy the template to any other managementGroup, subscription or resourceGroup. Also a reminder that even though the subscription is created at the tenant scope, the template deployment does not need to match that scope.
So far, this is a very simple example, but you can also create a subscription and deploy resources to that subscription in the same template. There is a little more orchestration required here because you’re actually targeting multiple scopes within the same template. And, in order to target the subscription, you need the subscriptionId or GUID that was assigned to the subscription when it was created. This next sample will perform each of these steps:
Create the subscription (this is shown in the previous sample)
Retrieve the subscriptionId from the newly created alias
3. Pass that subscriptionId to the next deployment in the template
"type": "Microsoft.Resources/deployments",
"apiVersion": "2020-10-01",
"name": "[concat('nested-createResourceGroup-', parameters('resourceGroupName'))]",
"location": "[parameters('location')]",
"properties": {
    "expressionEvaluationOptions": {
        "scope": "inner"
    },
    "mode": "Incremental",
    "parameters": {
        "subscriptionId": {
            // this cannot be referenced directly on the subscriptionId property of the deployment so needs to be nested one level
            "value": "[reference(resourceId('Microsoft.Resources/deployments', concat('createSubscription-', parameters('subscriptionAlias')))).outputs.subscriptionId.value]"
        },
...
4. Create a new deployment in the new subscription that creates the resourceGroup
And then finally deploy the resources to that resourceGroup.
That’s more complex than just creating a subscription because all of the orchestration is handled within a single template.
If your scenario requires a different scope of deployment or more steps then you may not want to include in that single template. If I wanted to break this down into multiple steps for orchestration in a pipeline it can be as simple as two steps.
Step 1 – Create the Subscription
Performing this step separately can be useful if you do not want to provide a user or service principal with permission to create template deployments at a given scope. Once the subscription is created, the principal that created the subscription is an owner of that subscription and can deploy templates to that newly created subscription. This means that the only permission the principal needs outside of the subscription, is the permission to create one.
At this writing, the Azure PowerShell does not have a built-in command to create a subscription but you can always invoke any Azure REST api using the Invoke-AzRestMethod. This script shows how to do that to create a subscription through an alias resource using the following command.
You need to set the correct parameter values for the billingAccount and enrollmentAccount which you can discover using this script from the top of this article.
Step 2 – Deploy the template.
Next, keeping with our greenfield scenario, where the subscription is created in the same workflow or pipeline that deploys this next template, we’ll create a subscription-level deployment. If we were running an automated pipeline, this sample would be a good example for the next step. The sample will create a new resourceGroup in the subscription, lock it and assign a principal access to that resourceGroup. From here you could deploy resources to the subscription (or resourceGroup) or simply make it available for the principal to use.
That’s a quick overview of how to leverage this new capability, in just a few scenarios, that you can use to automate new workloads in Azure. Let me know how it goes or if you have any questions about automating subscription creation in your environments.
This article is contributed. See the original author and article here.
Initial Update: Wednesday, 28 April 2021 11:33 UTC
We are aware of issues within Log Analytics and are actively investigating. Some customers may experience data access and delayed or missed Log Search Alerts in West US region.
Work Around: None
Next Update: Before 04/28 16:00 UTC
We are working hard to resolve this issue and apologize for any inconvenience. -Soumyajeet
This article is contributed. See the original author and article here.
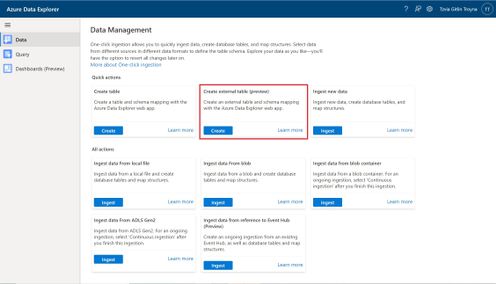
An external table is a schema entity that references data stored outside the Azure Data Explorer database. Azure Data Explorer Web UI can create external tables by taking sample files from a storage container and creating schema based on these samples. You can then analyze and query data in external tables without ingestion into Azure Data Explorer. For information about different ways to create external tables, see create and alter external tables in Azure Storage or Azure Data Lake.
One of the most common scenarios for External table is with historian data (e.g. data that need to be stored due to legal requirements, log records for longer retention period, etc.) that need to be query rarely.
Please read create an external table document for detailed explanation, here are some highlighted points.
1. at the Source Page, In Link to source, enter the SAS URL of your source container. You can add up to 10 sources (You can remove the 10 limitation by using the create external table command at the Query page). The first source container will display files below the File filters. In a later step, you will use one of these files to generate the table schema.
2. At the Schema Page, in the right-hand side of the tab, you can preview your data. On the left-hand side, you can add partitions to your table definitions to access the source data more quickly and achieve better performance.
3. At the Summary Page, you can query this table using the query buttons or with external_table() function. For more information on how to query external tables, see Querying an external table.
This article is contributed. See the original author and article here.
The new Exchange admin center (EAC) is a modern, accessible, web-based management portal for managing Exchange Online that is based on the Microsoft 365 admin center experience. The new EAC is simple and accessible, and it enables you perform tasks like restoring mailboxes, migrating data, and much more.
Since entering Public Preview in June 2020, over half a million admins around the world have used it. We thrived on the feedback of our early adopters and we have steadily improved the new EAC with the help from a great community of early users.
Today, we are excited to announce that the new EAC is now generally available for customers (including GCC customers) in 10 languages. With this announcement, we are also releasing a new dashboard, new usability features, and several intelligent reports to help admins be more productive in their work. The new EAC is expected to be available to customers in GCC High at the end of May 2021, and to customers in DoD at the end of June 2021.
Here are some highlights:
Personalized Dashboard, Reports, Insights – The new EAC offers actionable insights and includes reports for mail flow, migration, and priority monitoring.
Azure Cloud Shell – Cloud Shell is a browser-accessible shell that provides a command-line experience built with Azure management tasks in mind. It enables admins to choose a shell experience that best suits their workstyle.
Mailbox management and recover deleted items – Recipient management is one of the most crucial tasks that admins perform. The new EAC now includes easier mailbox management.
Modern, simplified management of Groups – The new EAC also enables you to create and manage 4 types of groups: Microsoft 365 Groups, distribution lists, mail-enabled security groups, and dynamic distribution lists.
Migration – The new EAC supports various kinds of migrations, including cross-tenant migrations for M&A scenarios, and automation Google Workspace/G-Suite migrations.
This article is contributed. See the original author and article here.
Final Update: Wednesday, 28 April 2021 02:39 UTC
We’ve confirmed that all systems are back to normal with no customer impact as of 04/27, 02:10 UTC. Our logs show the incident started on 04/27, 01:46 UTC and that during the 24 minutes that it took to resolve the issue 5% of customers experienced data access issues and delayed or missed alerts in South East Australia.
Root Cause: Engineers determined that backend storage device became unhealthy.
Mitigation: Engineers determined that the service is auto recovered by Azure platform.
Incident Timeline: 24 minutes – 04/27, 01:46 UTC through 04/27, 02:10 UTC
We understand that customers rely on Azure Log Analytics as a critical service and apologize for any impact this incident caused.


Recent Comments