
by Contributed | Apr 27, 2021 | Technology
This article is contributed. See the original author and article here.
We continue to expand the Azure Marketplace ecosystem. For this volume, 79 new offers successfully met the onboarding criteria and went live. See details of the new offers below:
|
Applications
|
|
Ansys Digital Twin: Ansys Digital Twin enables industrial manufacturers to enhance asset condition monitoring, predictive maintenance, and performance with high-speed physics simulations of equipment response in electromagnetics, fluid and thermal dynamics, and structural mechanics.
|
 |
Assist Me Plugin: Assist Me helps businesses and organizations in the United Kingdom extend web accessibility services to people with disabilities. Through Assist Me, users can visit websites and adjust presentation elements such as navigation, text color, text size, letter spacing, and line height.
|
 |
C3 AI Suite: The C3 AI Suite provides comprehensive services to build enterprise-scale AI applications 40 times to 100 times faster. Its extensible, model-driven abstraction layer dramatically enhances data scientist and application developer productivity.
|
 |
Capisol: Integrating into on-premises or cloud IT and accounting systems, the Capisol platform takes care of all documentation and distribution needs required in day-to-day business, such as invoicing, scanning documents, linking online records, and backing up data.
|
 |
Capital Markets DataHub: DataHub ingests data from more than 80 banks, custodians, prime brokers, and other data providers to supply investment managers with analytics and consistent calculations across multiple functions. DataHub allows users to store data centrally without having to set up their own database.
|
 |
CentOS 8.3: This ready-to-use image from Cloud Maven Solutions provides CentOS 8.3 with TCP Networking Stack version 4.16. CentOS is a Linux distribution that’s functionally compatible with its upstream source, Red Hat Enterprise Linux.
|
 |
Cosmos Energy: The distributive virtualized architecture of the Cosmos playout engine allows broadcasters to spin up both over-the-top and traditional TV channels in a few minutes, lowering costs.
|
 |
DataVisor Device Intelligence for Mobile and Web: DataVisor Device Intelligence addresses threats from device manipulation: particularly bot traffic and attacks that target mobile apps. The solution collects data at the source to detect compromised devices resulting from emulators, rooted devices, and repackaged apps.
|
 |
DataVisor Enterprise ML Pro for Fraud and AML: DataVisor Enterprise Pro enables companies building AI and machine learning models to proactively manage fraud and risk. It provides full model transparency and explainability with model governance to meet compliance requirements.
|
 |
DCP Legal – Data Compliance Solution: DCP Legal helps organizations manage the data governance process to comply with the GDPR in Europe and the KVKK in Turkey. DCP Legal automates the intake and fulfillment of privacy rights requests, simplifying compliance programs.
|
 |
Deployment and operation for the OSDU platform: Cegal’s OSDU data platform as a service provides a vendor-neutral solution for exploration and production (E&P) companies in the oil and gas industry. Customers own their data and can pick and choose the apps they need, rather than being locked to the apps of a specific vendor. |
 |
ECLIPSE Social Care Case Management: Built with input from more than 500 social workers, ECLIPSE supports care workers who assist people with disabilities, mental illnesses, or health problems. Use ECLIPSE to reduce administration through automation and integrate client data and financial information for better decision-making.
|
 |
Finabox Platform (Web, Apps, and Back Office): With Finabox from Bankingly, financial institutions can offer their customers high-quality online banking and mobile banking. Finabox is ideal for institutions managing less than $15 million in assets.
|
 |
Gimmal Migrate: Gimmal Migrate simplifies migrations from OpenText to Microsoft 365. Gimmal Migrate’s analysis wizards for discovery and deep analytics enable preplanning for your migration strategy, helping you avoid a long and complex process.
|
 |
GR Manager 365: GR Manager 365 is designed for any organization that works with government agencies. The system integrates with Microsoft 365 to support collaboration, access privileges, confidentiality, and contact management.
|
 |
iFinder Enterprise Search: iFinder Enterprise Search from Intrafind improves results by deploying AI to deliver smart search. The solution is optimized for Microsoft Azure and can help you centralize access while getting the information you need from structured and unstructured data.
|
 |
KX Insights: This virtual machine offered by First Derivatives deploys KX Insights and its kdb+ database, which provide fast and efficient time-series streaming analytics services. Developers can use KX Insights to build and deploy cloud-native kdb+ applications on Microsoft Azure.
|
 |
Lifecycle Manager 365: Lifecycle Manager 365 lets you create and control a schedule for purchasing, delivering, installing, and servicing complex technical equipment over its lifecycle. It operates at the project level, the account level, and the equipment level.
|
 |
LogiGuard Managed Service: LogiGuard, an AI-enabled security platform, quickly identifies threats while actively learning and protecting your business. LogiGuard can be centrally managed by Microsoft Azure Sentinel.
|
 |
MAKONIUM: MAKONIUM is an all-in-one solution for time tracking and resource management. Integrated Microsoft Word templates allow easy generation of time statements, and a customer relationship management component enables direct integration instead of redundant APIs.
|
 |
Microsoft SQL Server 2017 with ERBuilder: This virtual machine offered by Apps4Rent provides Microsoft SQL Server 2017 on Windows Server 2019, along with ERBuilder, a free visual tool for database modeling. ERBuilder allows you to manage an unlimited number of tables and create keys, views, domains, and more. |
 |
NetFoundry ZTNA on Private Edge Zones: NetFoundry ZTNA provides simple, zero-trust optimized connectivity between Microsoft Azure Stack Edge and any site, edge device, cloud, or application. Orchestrate and control your networks without having to manage the underlying infrastructure.
|
 |
Ocerra AP Automation: This software from Ocerra helps businesses automate the accounts payable process by using invoice data capture, workflows, integration with enterprise resource planning systems, and reporting.
|
 |
Power Analytics Portal: Built on Microsoft Power BI Embedded technology, BITECHSOL’s Power Analytics Portal lets you share Power BI reports with employees and external users via the web.
|
 |
PriceFlow Manager 365: PriceFlow Manager 365 is a price calculation system designed for large enterprises that generate complex proposals involving different parameters and delivery conditions. The system tracks the reconciliation process state at each stage and generates the final proposal.
|
 |
QR Code Generator API: qRCodeMe, also known as QR Code Creator API and qR Code Maker API, is a cross-browser REST API that software developers can use in product labeling, e-commerce, item identification, and more.
|
 |
QuiQi: QuiQi enables restaurants to fulfill online orders and offer menu access via QR code. Customers scan a QR code or an NFC tag at their table with their smartphone to access the menu and pay with a credit card.
|
 |
QViz.io Instance: Engineers, developers, and product managers can use QViz.io’s predictive quality insights to help manage release-related risks during product development. QViz.io’s dashboard provides actionable information about application health and historical quality data.
|
 |
SCK Groupware Gitgo: SCK Groupware Gitgo is a collaboration solution that supports working in a non-face-to-face environment in connection with Microsoft Teams. It offers video conferencing, chat, document sharing, electronic payment, and more. This app is available only in Korean.
|
 |
Semantix Digital Sales: Digital Sales from Semantix is a one-stop-shop platform for e-commerce that enables businesses to manage the entire sales cycle, from generation to order management to support. This app is available only in Portuguese.
|
 |
Shipstation Insights: Shipstation from Kanerika is an out-of-the-box solution built on Microsoft Power BI. Designed for the logistics and distribution sectors that work with perishable goods, Shipstation enhances visibility into orders and shipment records. Users can analyze data by channel, customer, routes, and more.
|
 |
Smart Connected PIV (Power Industrial Vehicles): Built for the asset and production value chain, Birlasoft’s Smart Connected PIV (Power Industrial Vehicles) enables real-time monitoring, performance analysis, and operational safety on the shop floor and in warehouses. The solution does not collect personally identifiable information.
|
 |
Software-Defined Network as a Service: An alternative to legacy hardware and open-source VPNs, Perimeter 81’s Secure Network as a Service allows users to easily set up secure connections to Microsoft Azure and on-premises resources without any external assistance.
|
 |
Sports AI Editor: Data Stadium’s Sports AI Editor lets you connect multiple video clips on the web without dedicated video-editing software. Create playlists and choose playback options, then share sports highlights and other clips across multiple devices. This app is available only in Japanese.
|
 |
Stay in Touch 365 SaaS: Intended for use with Microsoft Dynamics 365, Beringer Technology Group’s Stay in Touch 365 searches for any active accounts, contacts, and leads who are not on an active marketing list, then creates three new marketing lists, giving you an easy way to engage.
|
 |
Supplier Warranty Recovery (RealWarranty): RealWarranty from Real Variable Digital Assetservices is an aftermarket supplier warranty recovery product to complement SAP or other enterprise resource planning systems used in supply chain transactions. RealWarranty is a blockchain-powered solution.
|
 |
Supply Chain Collaboration (RealCollab): RealCollab from Real Variable Digital Assetservices provides purchase order traceability throughout the supply chain. Gain a permanent audit trail for every purchase order and track orders via RealCollab’s blockchain ledger.
|
 |
The Asite Platform: Consisting of a supply chain, a project portfolio, and an asset performance management solution, the Asite Platform enables organizations working on large capital projects to build with seamless information sharing.
|
 |
ThousandEyes (By Cisco): See beyond your edge and get visibility into your networks and external dependencies outside your control. ThousandEyes provides digital experience monitoring and visibility of cloud, network, and internet dependencies.
|
 |
Vecos Smart Lockers: Eliminating the need for keys or batteries, Vecos is an electronic locker management system on Microsoft Azure specially developed for activity-related and flexible workplaces. Vecos makes flexible and dynamic workplaces possible.
|
 |
Vidispine Media Supply Chain: Vidispine by Arvato Systems helps centralize, organize, and distribute media and metadata. The VidiCoder service decodes and encodes all standard broadcast, film, and distribution formats.
|
 |
Vidispine Production Asset Management: Manage video production workflows with this tool from Arvato Systems. By integrating EditMate as an Adobe panel, your editor will now be able to manage projects as well as collaborate with other editors.
|
 |
ViiBE: Video can be more effective than voice communication when detailing technical incidents. ViiBE is a video assistance and ticketing web app designed for help desk support. Customers can enable the ViiBE app through their Microsoft Dynamics 365 platform to access video communication and collaborative tools.
|
 |
Voca Conversational IVR for Microsoft Teams: Voca from AudioCodes upgrades the touchtone interactive voice response (IVR) experience to a conversational one, letting calling customers talk their way through an IVR menu designed for Microsoft Teams.
|
 |
WorkPoint 365 Management System: WorkPoint Management System is a comprehensive solution for monitoring key performance indicators, process documentation, and non-conformity reporting so you can meet all your business needs.
|
 |
Workpuls: Workpuls is employee-monitoring software intended to drive greater performance and provide insights about your people and processes. The lightweight desktop app is installed on employee devices and runs in the background, capturing activity data, such as apps being used and websites being visited.
|
Consulting services
|
 |
6-Week Proof of Concept: Any Domain AI/ML/NLP/Computer Vision: IOP Technologies will build a machine learning model based on your data using Microsoft Azure Machine Learning services and other components, such as Azure Databricks, Azure Data Lake, Azure Cosmos DB, or Azure Data Warehouse.
|
 |
10-Week Implementation: Azure Managed Services: Do your business applications run on virtual machines on-premises? If you want to leverage the benefits of the cloud, PHAT Consulting’s DevOps, backend automation, microservices, and Kubernetes experts can help you.
|
 |
Advanced Networking Service: 6-Week Implementation: SCK can build Microsoft Azure networks for high availability and increased security, configure hybrid networks, and control network flow using a network virtual appliance. This service is available only in Korean.
|
 |
AI Machine Learning Operations (MLOps): 10-Week Implementation: Kainos utilizes end-to-end DevOps and machine learning technologies on Microsoft Azure, industry best-practice playbooks, and model IP to enable organizations to transition from tactical to strategic use of data science.
|
 |
Azure Application Modernization: 1-Week Assessment: Invoke’s offering is designed to identify and assess the feasibility and ROI of migrating one or more applications to Microsoft Azure. Your Invoke engineer will identify the applications that will deliver innovation value.
|
 |
Azure Data Analytics: 2-Week Implementation: Cloud Conduction can implement a cloud data platform, migrating your data to the cloud from over 90 types of data sources. Azure Synapse Analytics prepares your data and Microsoft Power BI enables visualization and analysis.
|
 |
Azure DevOps Automation: 3-Week Implementation: Cloud Conduction will automate deployments to any cloud with Azure DevOps. Your organization will have fully working multi-stage continuous integration/continuous delivery (CI/CD) pipelines to production.
|
 |
Azure Migration Proof of Concept: 1 Week: Tener Technologies’ proof of concept provides a test bed for migrating your workloads and applications to the cloud. This engagement includes migrating an application, virtual machine, or database to Microsoft Azure.
|
 |
Azure Rapid IoT Prototyping Proof of Concept: Create your own IoT device connected to Microsoft Azure to automate business processes and provide cost-effective feedback for your project. Apollogic will test your innovative ideas to help transform your business digitally.
|
 |
CANCOM AHP on Azure: 10-Day Implementation: CANCOM will develop an implementation plan for a modern workplace on Microsoft Azure with a turnkey architecture for secure access to all business-relevant applications and data. This service is available only in German.
|
 |
Cloud Adoption Accelerator: 8-Week Implementation: Following the Microsoft Cloud Adoption Framework, Invero will take you from strategy and planning to skills readiness and workload migration. This white-glove solution accelerates your Microsoft Azure cloud adoption.
|
 |
Cloud Migration: Variable-Length Implementation: Expertware’s migration services help move your workloads to Microsoft Azure, either from on-premises datacenters or from other cloud environments, without interruption to your business operations and in line with your strategic objectives.
|
 |
Cloud Optimization: Variable-Length Implementation: Expertware’s Microsoft Azure analysis and optimization service includes monitoring and customizing your cloud environment. Data from your environment is used to identify any required tuning or optimization opportunities.
|
 |
Cloud Readiness Assessment: 2-Week Assessment: Logicalis Asia’s Cloud Readiness Assessment provides a rapid analysis of your IT assets and non-Azure workloads, detailing the full cost and effort involved in moving them to the cloud.
|
 |
Compliance Workshop: 1 Day: Asurgent will guide you through the compliance process for Microsoft Azure, Microsoft 365, the General Data Protection Regulation (GDPR), and the CLOUD Act. This service is available only in Swedish.
|
 |
Cybersecurity: 5-Day Assessment: ISOLUTIONS’ cybersecurity assessment will examine your IT environment, identify unmanaged devices, establish controls to mitigate risks, and provide a best practices report.
|
 |
Diagnostic Prediction: 10-Week Implementation: This solution from VIQTOR DAVIS is a Microsoft Azure-based platform that predicts and ranks the likely diagnosis for a given entity ontology and set of symptoms. The entity presenting symptoms may be a human or a machine.
|
 |
Do SIEM Better with Azure Sentinel: 4-Week Production Proof of Concept: Ascent Solutions can help you evaluate Microsoft Azure Sentinel and quickly get you started integrating with the Microsoft security stack and third-party data sources.
|
 |
Expertware Cloud Readiness Assessment: Expertware’s cloud readiness assessment ensures a smooth migration to Microsoft Azure. The assessment aims to understand your business strategy and objectives in order to create a roadmap to Azure.
|
 |
Eyetech Azure Managed Service: Optimize your cloud operations with Eyetech. With a deep understanding of adoption, internet protocols, and process capabilities, the Microsoft Azure specialists can help you assess, deploy, and support your Azure environment.
|
 |
Implement Azure Kubernetes Service: 4 Weeks: Kubernetes services are becoming the norm for orchestration of containerized applications. SCK provides consulting services to build applications using Microsoft Azure Kubernetes Service. This service is available only in Korean.
|
 |
Implement Azure Stack HCI & Edge Hybrid Cloud: 4 Weeks: SCK will build a Microsoft Azure hybrid cloud environment for you based on either Azure Stack Edge Pro or Azure Stack HCI, a new hyperconverged infrastructure operating system. This service is available only in Korean.
|
 |
Implement Windows Virtual Desktop: 4 Weeks: If remote work with BYOD support is required for your external users, you will need a virtual desktop infrastructure. SCK can deploy Windows Virtual Desktop on Microsoft Azure. This service is available only in Korean.
|
 |
Optimize the Cloud: NEC Australia will review your Microsoft Azure environment and discover, analyze, and report on cost optimization targets. Continuous monitoring of Azure service performance metrics will identify idle, unused, unoptimized, or underutilized services. |
 |
Production-Ready Cloud Platform: This managed service from Logicalis is a preconfigured secure landing zone on Microsoft Azure that gives you a set of tools, documentation, and best practices to accelerate your cloud journey and enable IT transformation.
|
 |
Production-Ready Cloud Platform Managed Service: Logicalis UK’s Production-Ready Cloud is a tried-and-tested framework on Microsoft Azure to help you transform your business with a scalable and secure cloud platform delivered in a fast, cost-effective, and controlled way.
|
 |
Virtual Apps & Windows Virtual Desktop: 2-Week Implementation: Veracloud’s Windows Virtual Desktop engagement delivers accelerated deployment to support your remote application and desktop scenarios, including legacy solutions during your application modernization journey.
|
 |
Windows Virtual Desktop: 1-Hour Briefing: This briefing will give you an overview of how Windows Virtual Desktop along with Wipro virtuadeskTM can add value to your cloud journey. Wipro will help you understand the capabilities and cost implications of Windows Virtual Desktop.
|
 |
Windows Virtual Desktop: 3-Week Proof of Concept: Windows Virtual Desktop combines the scalability, security, and cost benefits of Microsoft Azure and Microsoft 365. ISOLUTIONS’ offer consists of a workshop and the initial configuration of Windows Virtual Desktop resources.
|
 |
Windows Virtual Desktop: Implementation in 5 days: Choose Mayasoft to implement Windows Virtual Desktop for your remote workers. The combination of the highly accessible infrastructure that Microsoft Azure provides and Mayasoft’s professional services ensure an excellent user experience.
|
 |
Windows Virtual Desktop Proof of Concept: Windows Virtual Desktop provides the ability to scale remote desktop access. RBA’s proof of concept will get your company started with Windows Virtual Desktop on Microsoft Azure using the Windows 10 multisession operating system.
|
 |
Windows Virtual Desktop Walkthrough: Free 2-Hour Workshop: In this workshop, Veracloud will demonstrate how Windows Virtual Desktop can be implemented for maximum benefit and low cost. Veracloud will provide expert recommendations for your workloads and how to achieve security and compliance.
|
 |
Work From Home Using Windows Virtual Desktop: 10-Day Implementation: Cloud 9 Infosystems ensures that your employees can always work remotely by using Windows Virtual Desktop on Microsoft Azure. Cloud 9 Infosystems follows best practices and has the subject matter expertise to help you manage your workforce and environments.
|
|
by Contributed | Apr 27, 2021 | Technology
This article is contributed. See the original author and article here.
GitHub is well-known as a platform where software developers host their code and collaborate with their teams on a project. In this article, we’ll show you how you can use the GitHub model to do the same thing and collaborate seamlessly on your research papers.
This blog post is co-authored with Ornella Altunyan, because we believe that GitHub is a great technology and tool to be used beyond pure software development.
What is Git, GitHub, and how it all works
The first thing you’ll want to do is set up Git. Git is the version control system that runs behind the scenes of any GitHub project—it’s what allows you to collaborate with others, go back to previous versions of your project, and view changes made by different members of your team. You may want to use Git from a command-line, but in the beginning, it might be easier to use the GitHub Desktop client.
Projects on GitHub are organized in repositories. You’ll create a new repository for your research paper, and choose who you want to have access. All your files, whether you’re using Markdown, LaTeX, or another typesetting or markup language (more on that later!) will live in this repository. You’ll want to clone the repository to your local machine, so that you have a copy of your files on your local machine.
The source of truth for your paper will live on the main branch of your repository – this branch is initialized when you create your repository. You can create multiple branches for different sections of your paper, and edit and merge them into your main branch when you’re finished. A commit is a snapshot of your repository at a given moment, and it might contain a set of changes that you’ve made to the information on a specific branch.
This is just a short introduction to all the features you can take advantage of when you use GitHub to collaborate on your research papers. Keep reading for more information, and a sample workflow that you can use to get started.
What should and should not be stored in Git
It is important to understand that GitHub is not a replacement for file storage, or a convenient storage for binary files. It was originally designed to be used as a source code repository, and thus it allows you to track changes between text documents. If you are planning on collaborating on Word documents, setting up a shared OneDrive location is a much better choice. For this reason, many people don’t consider GitHub to be a convenient collaboration platform for editing documents. However, scientists often write their papers in text format, most often – TeX or LaTeX. This makes it very convenient to use GitHub as a collaboration platform. It is one of the reasons we believe that GitHub is a very beneficial collaboration platform for scientists.
Why GitHub?
Using Git will give you many advantages:
Tracking changes between different editions of a document. Text documents can be easily compared to each other using the GitHub interface. This is useful even when you are working on a paper alone, because all changes are tracked, and you can always roll back to any previous state.
Working on different branches of the document and merging branches together. There are a few different styles of using Git for collaboration, so-called Git workflows. With branches, you and your collaborators can all work on specific parts of your project without conflicts, for prolonged periods of time.
Accepting contributions to your paper/code from outside. Github has a convenient mechanism of pull requests – suggestions from other users, that you can then approve and merge into the main content. For example, the Web Development for Beginners course was developed and hosted on GitHub originally by a group of around 10 people, and now it has more than 50 contributors, including people who are translating the course into different languages.
If you are very advanced (or have some friends who are into DevOps), you can setup github action to automatically create a new PDF version of your paper every time changes are made to the repository.
LaTeX or Markdown?
Most of the scientists write their papers in LaTeX, mostly because a lot of workflows in academia is focused around it, including paper templates, etc. There are also some good collaboration platforms specific to TeX, for example, Overleaf (but it will not give you as much control on your versioning and collaboration features as git).
However, writing in LaTeX also includes quite a lot of overhead, meaning that many layout features are quite verbose, for example:
subsection{Section 1}

begin{itemize}

  item Item 1

  item Item 2

end{itemize}
In the world of software development, there is a perfect format for writing formatted text documents – Markdown. Markdown looks just like a plain text document, for example, the text above would be formatted like this:
## Section 1


* Item 1

* Item 2
This document is much easier to read as plain text, but it is also formatted into nice looking document by Markdown processors. There are also ways to include TeX formulae into markdown using specific syntax.
In fact, it’s been a few years that I write all my blog posts and most of text content in Markdown, including posts with formulae. For scientific writing, the great markdown processor (as well as live editing environment) integrated with TeX is madoko – I highly recommend to check it out. You can use it from web interface (which has github integration), and also an open-source command-line tool to convert your markdown writing into either LaTeX, or directly to PDF.
While you may continue using LaTeX with git, I encourage you to look into markdown-based writing options. By the way, if you have some writing in different formats, eg. Microsoft Word, it can be converted to Markdown using a tool called pandoc
Sample workflow
Main thing that git does is to allow you to structure your writing (whether it is code or scientific paper) into chunks called commits. Your code is tracked in the local repository, and once you have done some changes – you need to specifically commit them. Then, you can also synchronize your commits with others by using some remote common repository, called upstream.
Sounds complicated? When using GitHub Desktop most of the tasks are completely automated for you. Below we will describe the simplest way you can collaborate on a paper with your colleagues.
Create a new repository on GitHub. I set the visibility to Private so I can decide which collaborators I’d like to invite to contribute later.

Select Set up in Desktop to quickly set up your repository in GitHub Desktop.

Next, you’ll need to create a local clone of the repository on your machine. You may be prompted to reauthenticate to GitHub during this step.

- I already have a couple of Markdown files that I’ve started working on saved to my computer. I can select View the files of your repository in Finder to open the folder where my local copy of the repository is stored, and drag in the files for my Table of Contents, Section 1, and Bibliography from my computer.
Now, when I go back to GitHub Desktop, I can see those files have been added to my repository. I want to commit those files to the main branch. I can also publish my branch to push those changes to GitHub, and make them accessible to others who I’ll collaborate with.

- Next, I’m going to create a new branch so I can go off and work on Section 2 of my paper. I’ll automatically end up on that branch after it has been created. There are a couple of options you’ll be able to select from for making changes to your file in this branch:
- You can create a Pull Request from your current branch – if I wanted my colleague to be able to review the changes I’ve made in this branch, I’d use this option and send her the PR for review.
- You can also open the repository in your external editor. I use VS Code to edit my files, so I can add section 2 of my paper there, and then commit it to my section2 branch.
- If I already have section 2 of my paper saved somewhere on my computer, or if my colleague has sent me something they’ve worked on, I can follow the same workflow as above and check out the files in my repository on my machine, and add/remove files that way.
- If I just need to make a small change, I’d open my repository in the browser and edit from there.
I can open my repository in GitHub to check out all of the files and information. This is the link I’d send to a colleague if I wanted them to be able to clone the code onto their local machine, and help me out with some sections.

Since I’ve made my repository private, I’ll need to add collaborators in the Settings pane.

- Once I’m happy with Section 2 of my paper, I can go ahead and merge it into the main branch of my repository. I switch over to the main branch, then choose a branch to merge into main, and choose section2. Then, I’ll want to push my changes back up to GitHub so that the main branch is updated with the newest changes for any future collaborators.

This is one example of a Git workflow you can use in conjunction with GitHub Desktop to collaborate on a research paper with your colleagues. There are several other ways that may serve your needs better—you may want to use the command line with VS Code, or edit your files on GitHub in the browser. Whatever method works for you is the best method, as long as you’re able to accomplish your goals.
Further reading and useful links

by Contributed | Apr 27, 2021 | Dynamics 365, Microsoft 365, Technology
This article is contributed. See the original author and article here.
If you haven’t registered for Microsoft Business Applications Summit, now’s the perfect time to sign up and explore the full line-up of learning sessions, featured speakers, Q&A sessions, and networking opportunities. The packed line-up will stream to you live and on-demand, at no cost, on Tuesday, May 4, 2021, starting at 7:30 AM Pacific Time. Register now for Microsoft Business Applications Summit and read on for what to expect during this year’s digital event.
Why attend Microsoft Business Applications Summit?
Microsoft Business Applications Summit is unlike any other event we host each year. Here are three great reasons to attend this year’s Summit:
- Explore the tech that will move your business forward: We’re spotlighting innovation across Microsoft business applications that help you unify your data, adapt your business to new market conditions, and empower everyone in your organization to solve tough challenges.
- Fine-tune your skills: Expand your knowledge base and turn your expertise into greater outcomes for your business. Learn and explore many of the new capabilities across Microsoft Power Platform.
- Connect with the community: Even in a digital format, the event offers you great opportunities to engage with a community of power users and technical architects like you. Plus, you’ll hear first-hand from engineers tips, tricks, and best practices to make the most of the digital tools you and your team use every day.
What to expect
The day kicks off with pre-show content at 7:30 AM Pacific Time. Be sure to attend these featured presentations.
8:15 AM to 9:15 AM Pacific Time
Opening key segments with James Phillips and Alysa Taylor
James Phillips, President, Digital Transformation Platform, and Alysa Taylor, Corporate Vice President, Business Applications and Global Industry Marketing, will catch you up on the latest product strategy, highlights from the latest release wave for Microsoft Dynamics 365 and Microsoft Power Platform, and real-world stories from global brands.
10:45 AM to 11:15 AM Pacific Time and 1:45 PM to 2:15 PM Pacific Time
Microsoft Power BI vision, roadmap, and special announcement
Join Arun Ulag, Corporate Vice President for Power BI, and others from the Power BI team to get an insider look at the Power BI strategy and roadmap, and get a first-hand look at capabilities heading your way from 10:45 AM to 11:15 AM Pacific Time. At 1:45 PM Pacific Time, tune in for a special Power BI announcement that you won’t want to miss.
9:45 AM to 10:15 AM Pacific Time
Empower every dev to go faster with Microsoft Power Apps
Catch up on new low-code capabilities for Power Apps that empower everyone to create apps. Charles Lamanna, who leads the Engineering team for the Low Code Application Platform, will demo a variety of capabilities and scenarios, share customer success stories, and provide a roadmap of new features heading to Power Apps this year.
10:45 AM to 11:15 AM Pacific Time
Elevating end-to-end experiences and building deeper relationships
Join Muhammad Alam, Corporate Vice President for Dynamics 365, for an engaging look at digital tools to break down boundaries to empower everyone in the organization to create new value through customer obsession.
Live sessions with Q&A (9:45 AM to 3:15 PM Pacific Time)
Attend virtual sessions that will grow your expertise and lead to greater business outcomes from industry leaders and moderators who will help field your questions live throughout the presentations. After the event, you’ll be able to watch the sessions and even more content on-demand. Choose from a variety of sessions, including:
This is just a sample of the day’s line-up of featured sessionsexplore the full session catalog to plan your day.
Live experiences in the Connection Zone (9:45 AM to 3:15 PM Pacific Time)
Join us for live experiences in the Connection Zone where you can connect with Microsoft and other attendees in a variety of ways, including:
- Ask the Experts: Microsoft subject matter experts will answer your questions in real-time about content you consumed in the Featured Sessions.
- Learn Live: Guided online experiences with a subject matter expert who will walk and talk through Microsoft Learn modules.
- Humans of IT: Discover the intersection between humanity and tech through inspirational stories.
- Cloud Skills Challenge: Participate in interactive learning modules and hone your skills in Business Applications focused challenges.
- Table Talks: Share insights with other attendees in an ongoing live chat. Then, listen to community leads highlight what’s been discussed.
- Product Roundtables: Participate in two-way discussions with the product teams where they’ll listen to your feedback and help shape the future of Microsoft products.
Explore the full line-up of Connection Zone experiences.
Get ready to go digital
Don’t forget to register for Microsoft Business Applications Summit and invite your team to join us for Dynamics 365 and Power Platform-focused content on turning data into action, opportunities to hone their skills, the chance to connect with experts, and engage with the community. We hope you’ll join us!
The post Your guide to Microsoft Business Applications Summit 2021 appeared first on Microsoft Dynamics 365 Blog.
Brought to you by Dr. Ware, Microsoft Office 365 Silver Partner, Charleston SC.
by Contributed | Apr 27, 2021 | Technology
This article is contributed. See the original author and article here.
Why is storage so important for Data Engineering? Learn how storage impacts the performance of your database solution. In this episode with MVP Argenis Fernandez, we will go over the basics of I/O, what the different access patterns are for the database engine and how to tell when there is an issue with underlying storage for your database.
Watch on Data Exposed
Resources:
by Contributed | Apr 27, 2021 | Technology
This article is contributed. See the original author and article here.
Initial Update: Tuesday, 27 April 2021 15:24 UTC
We are aware of issues within Log Analytics and are actively investigating. Some customers may experience data access issues and delayed or missed Log Search Alerts in West US region.
- Work Around: None
- Next Update: Before 04/27 19:30 UTC
We are working hard to resolve this issue and apologize for any inconvenience.
-Soumyajeet
by Contributed | Apr 27, 2021 | Technology
This article is contributed. See the original author and article here.
By Neil Johnson – Principal Program Manager | Microsoft Endpoint Manager – Intune
The recommended methods of deploying apps with Microsoft Intune are the built-in app deployment features for Edge, Office and Defender. We also support Mac App Store and line-of-business apps. However, there are occasions where an application you need is not made by Microsoft, is not in the Mac App Store, and is not supported by the Intune line of business App Wrapping Tool.
Before we get into the details, it’s important that you understand the supportability of the process we are about to discuss:
Important: From a support perspective, Microsoft fully supports Intune and its ability to deploy shell scripts to macOS. However, Microsoft does not support the scripts themselves, even if they are on our GitHub repository. They are provided for example only and you are responsible for anything that they may do within your environment. Always test!
For the remainder of this post, I’m going to walk you through an example for how to approach the scenario where you need to do a bit of scripting. The steps we’re going to take are as follows:
- Identify a web location from which to download the app.
- Write a bash script to download the installer and install the app.
- Deploy the bash script using the Intune scripting agent.
Again, please do see the caveat above regarding supportability and also testing! I work with several customers who are really familiar with scripting and deploying so I’m sharing best practices and a few things we’ve all learned along the way.
Example Application Deployment: GNU Imagine Manipulation Program (GIMP)
We’re using Gimp here for a simple example. Gimp you can completely deploy following the steps outlined in our app wrapping post. The app makes a great example, too, to deploy through the scripting agent.
Step 1 – Obtaining the binary
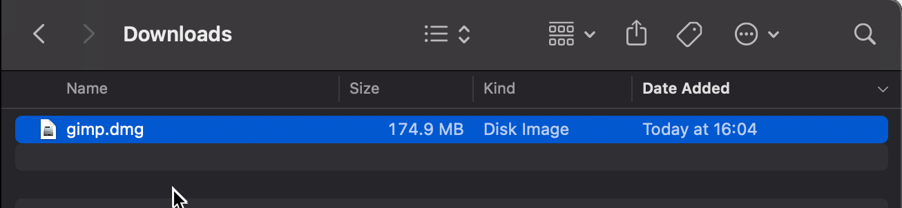
First things first, we need to get a copy of Gimp. To do that we’ll head to the Gimp website and download the latest stable version. Save the file as gimp.dmg in the Downloads directory.
Screenshot of the gimp.dmg macOS app in the Downloads directory
Step 2 – Uploading to Azure Blob storage
Now that we have our installation file, we can upload to Azure so it’s ready for us to use. Setting up Azure Blob storage is outside the scope of this article, but you can find documentation here: Introduction to blob storage – Azure Storage | Microsoft Docs.
Note: It is not a requirement to use Azure storage – see the note on download URL later in this post.
Upload gimp.dmg to Azure Blob storage:
- Go to portal.azure.com > Storage Accounts > “your storage account” and select the container you wish to use for macOS app deployments.
- Click Upload > Provide the file path to gimp.dmg and click upload again.
- Once uploaded, you will see your file listed in the container.
 Example of gimp.dmg uploaded in an Azure storage account
- Click on gimp.dmg and make a note of the URL in the properties. In my case, the URL is https://neiljohn.blob.core.windows.net/macapps/gimp.dmg
Note on Blob storage security: If you do not want to permit anonymous access to your Blob storage binaries you can set the access level to your container to ‘Private’ (no anonymous access) and generate a SAS access URL instead. The rest of this process will remain the same but the URL you use will have additional information encoded at the end.
 Screenshot showing that setting container “macapps” public access level is Private when public access disallowed
Note on download URLs: If you don’t have Azure Blob storage, you can use the public download URL for Gimp from their website here instead. I like using Azure because it gives us more control over the process and the version that we install, but the rest of the process in this post will work fine using either Azure Blob storage or the public download URL from the Gimp servers.
Step 3 – Write the bash script to download and install Gimp
In this section we will walk through an example shell script from the Intune Shell Script GitHub Repository to download and install Gimp.
We’re going to require a couple of things before we begin:
- Download the example installGimp.sh file from here and save it to your local drive.
- Download and install a copy of Visual Studio Code.
Open the installGimp.sh file in Visual Studio Code. The bits we might want to change are shown on lines 20-27. These variables control how the script will behave. Let’s look at them in some more detail.
# User Defined variables
weburl="https://neiljohn.blob.core.windows.net/macapps/gimp.dmg"
appname="Gimp"
app="Gimp.app"
logandmetadir="/Library/Logs/Microsoft/IntuneScripts/installGimp"
processpath="/Applications/Gimp.app/Contents/MacOS/gimp"
terminateprocess="false"
autoupdate=”false”
- weburl is the http URL of the installation files that we need. In this example we are using Azure Blob storage to host the file, but it could be any http endpoint that will be accessible from the client. The script will attempt to autodetect the installer type based on the file that is downloaded.
- appname is mostly used in the log, but is also used to generate the metadata file path for storing the last updated date.
- app is the actual name of the Application. It is used by the script to check if the app is already installed. The script will copy the application files found on the DMG to /Applications/$app. The best way to find out what this should be set to is to install the application manually on your Mac and then run ls -la /Applications from a terminal prompt and use the same name in the app variable.
- logandmetadir this is the directory that the script will use to store the installation log and to store the metadata for the last version update. This should be unique for each application that you deploy.
- processpath this is used to check if the application is running or not. Mac applications have a strict directory format, so one of the quickest methods is to run ls -Fl /Applications/Gimp.app/Contents/MacOS/*. This will return a list of files, it’s usually easy to guess which one is the main application by the name, in our case /Applications/Gimp.app/Contents/MacOS/gimp.
- terminateprocess is used to control what the script does if it finds the application is running. If this value is set to false, the script will check for the applications process and wait for it to be closed before installing. If the value is set to true, the script will detect that the application is running and terminate the main process before installing. For most end user applications leave this set to false.
- autoupdate is used to control how the script behaves when it’s run after the app is installed. If autoupdate is set to true the script will exit since it assumes that the app will handle updates itself. If set to false, the script will compare current and last update times on the URL header and update if there is a newer version.
For this example, the only thing that you need to change here is the weburl to your Azure Blob storage location (or use the public download URL https://download.gimp.org/mirror/pub/gimp/v2.10/osx/gimp-2.10.22-x86_64-3.dmg). The rest of the script can be left as is, but it is a good idea to read through it to ensure that you understand what it does.
Now we have our script, we need to test it. The easiest way to do that is to run it on a test device.
We need to make the script executable with chmod which we will run in a terminal window.
Neils-MacBook-Pro:Gimp neiljohnson$ chmod +x ~/Downloads/installGimp.sh
Next, we can give the script a test run to check that it works. We need to run it as root so don’t forget the sudo command.
Neils-MacBook-Pro:Gimp % sudo ./installGimp.sh
Fri  9 Apr 2021 15:12:42 BST | Creating [/Library/Logs/Microsoft/IntuneScripts/installGimp] to store logs

##

# Fri  9 Apr 2021 15:12:42 BST | Logging install of [Gimp] to [/Library/Logs/Microsoft/IntuneScripts/installGimp/Gimp.log]


Fri  9 Apr 2021 15:12:42 BST | Checking if we need Rosetta 2 or not
Fri  9 Apr 2021 15:12:42 BST | Waiting for other [/usr/sbin/softwareupdate] processes to end
Fri  9 Apr 2021 15:12:42 BST | No instances of [/usr/sbin/softwareupdate] found, safe to proceed
Fri  9 Apr 2021 15:12:42 BST | [Intel(R) Core(TM) i9-9880H CPU @ 2.30GHz] found, Rosetta not needed
Fri  9 Apr 2021 15:12:42 BST | Checking if we need to install or update [Gimp]
Fri  9 Apr 2021 15:12:42 BST | [Gimp] not installed, need to download and install
Fri  9 Apr 2021 15:12:42 BST | Dock is here, lets carry on
Fri  9 Apr 2021 15:12:42 BST | Starting downlading of [Gimp]
Fri  9 Apr 2021 15:12:42 BST | Waiting for other [curl] processes to end
Fri  9 Apr 2021 15:12:42 BST | No instances of [curl] found, safe to proceed
Fri  9 Apr 2021 15:12:42 BST | Downloading Gimp
Fri  9 Apr 2021 15:13:13 BST | Downloaded [Gimp.app] to [/var/folders/zz/zyxvpxvq6csfxvn_n0000000000000/T/tmp.WlgvmHH8/gimp.dmg]
Fri  9 Apr 2021 15:13:13 BST | Detected install type as [DMG]
Fri  9 Apr 2021 15:13:13 BST | Waiting for other [/Applications/Gimp.app/Contents/MacOS/gimp] processes to end
Fri  9 Apr 2021 15:13:13 BST | No instances of [/Applications/Gimp.app/Contents/MacOS/gimp] found, safe to proceed
Fri  9 Apr 2021 15:13:13 BST | Waiting for other [installer -pkg] processes to end
Fri  9 Apr 2021 15:13:13 BST | No instances of [installer -pkg] found, safe to proceed
Fri  9 Apr 2021 15:13:13 BST | Waiting for other [rsync -a] processes to end
Fri  9 Apr 2021 15:13:13 BST | No instances of [rsync -a] found, safe to proceed
Fri  9 Apr 2021 15:13:13 BST | Waiting for other [unzip] processes to end
Fri  9 Apr 2021 15:13:13 BST | No instances of [unzip] found, safe to proceed
Fri  9 Apr 2021 15:13:13 BST | Installing [Gimp]
Fri  9 Apr 2021 15:13:13 BST | Mounting Image
Fri  9 Apr 2021 15:13:30 BST | Copying app files to /Applications/Gimp.app
Fri  9 Apr 2021 15:22:28 BST | Un-mounting [/var/folders/zz/zyxvpxvq6csfxvn_n0000000000000/T/tmp.WlgvmHH8/Gimp]
Fri  9 Apr 2021 15:22:28 BST | [Gimp] Installed
Fri  9 Apr 2021 15:22:28 BST | Cleaning Up
Fri  9 Apr 2021 15:22:28 BST | Fixing up permissions
Fri  9 Apr 2021 15:22:30 BST | Application [Gimp] succesfully installed
Fri  9 Apr 2021 15:22:31 BST | Writing last modifieddate [Tue, 06 Apr 2021 14:04:10 GMT] to [/Library/Logs/Microsoft/IntuneScripts/installGimp/Gimp.meta]
Once that’s done, try to launch the Gimp application to check that it installed correctly and that it works ok. Press CMD+Space and type in ‘Gimp’, then press Return. The Gimp splash screen should appear, and the application should start.
 Screenshot of the GIMP splash screen
Assuming everything went well to this point, all we need to do now is to deploy the script via Intune.
Step 4 – Deploy the bash script via the Intune scripting agent.
At this point we have a script that we’re confident works when we run it locally and so the next step is to upload it to Intune and assign it to some test users to check that it behaves as we expect when it’s run via the Intune Scripting Agent.
To deploy the script via Intune:
- Sign in to the Microsoft Endpoint Manager admin center.
- Select Devices > macOS > Shell scripts > Add
- Enter a Name and Description for the script and click Next
- Enter the script details
- Select the ~/Downloads/InstallGimp.sh script file
- Run script as signed in user: No
- Hide script notification on devices: Yes
- Script frequency: Every 1 day (this is to handle updates, more on this later)
- Number of times to retry if script fails: 3
 Example script properties for macOS scripts in Intune
- Click Next.
- Assign Scope Tags if you need them, click Next.
- Under Required click Add group and search for an appropriate group to target the script to. Note: At this stage a test group would probably be wise.
- Click Next, review and then Add to complete the assignment.
Next, we need to find a test device that we can use to check the deployment on.
- Identify a test device that is enrolled into Intune as a user in the group that you assigned the script to.
- On that device press CMD+Space and type ‘Company Portal’ and press Enter.
- If prompted, click Sign In and enter the users’ credentials.
- In the Company Portal app, press Option+CMD+S to trigger a device check-in. Note, doing this on the device via Company Portal calls the script agent to check-in. Also, if you do this from the Microsoft Endpoint Manager admin center, the script agent will not check-in at the same time.
The final step on the client Mac is to check that the app has installed, and we can launch it. Press CMD+Space and type “Gimp” and press Enter. The Gimp app should launch.
 Example of launching the Gimp app to validate app installation on a macOS device
At this stage we’re happy that the script deploys the app successfully. All that is left is to set the assignment policy of the script to include all the users that you need to install the Gimp app to.
Handling version updates
Some apps handle updates automatically and some apps don’t. For this example, Gimp doesn’t automatically update so we’re going to need to handle that. Luckily, the example script already handles updates so all that we need to do is to upload a newer version of gimp.dmg to Blob storage or change the URL in the script to a newer version on the Gimp website. It’s really that simple.
If you want more detail, when we created our script policy in Intune, we set the schedule to run every day. To prevent the script from installing Gimp every time it runs, there are a few functions to handle updates and downloads.
- updateCheck()
This function first checks the autoupdate variable. If set to true and the app is already installed, the script exits, If set to false it compares the last-modified http header of the file that we downloaded to install last time against the current last-modified date of the download URL. If the dates are the same, the script drops out with nothing to do. If they are different, the script will attempt to download and install the update.
- waitForProcess()
This function is called just before the app is installed. It pauses the script while the given process is running. If the app is running the script will wait until it is closed by the end user. The end user is not prompted, the script will run silently in the background. If you set terminateprocess=”true” the function will attempt to terminate the app.
We can see these functions in action simply by running the script twice. On a test machine, if we download installGimp.sh and run it twice, on the second time through we’ll see the following log entry.
Neils-MacBook-Pro:Gimp % % sudo ./installGimp.sh

##
# Tue  6 Apr 2021 14:46:09 BST | Logging install of [Gimp] to [/Library/Logs/Microsoft/IntuneScripts/installGimp/Gimp.log]


Tue  6 Apr 2021 14:46:09 BST | Checking if we need Rosetta 2 or not
Tue  6 Apr 2021 14:46:09 BST | [Intel(R) Core(TM) i9-9880H CPU @ 2.30GHz] found, Rosetta not needed
Tue  6 Apr 2021 14:46:09 BST | Checking if we need to install or update [Gimp]
Tue  6 Apr 2021 14:46:09 BST | [Gimp] already installed, let's see if we need to update
Tue  6 Apr 2021 14:46:10 BST | No update between previous [Tue, 06 Apr 2021 12:03:05 GMT] and current [Tue, 06 Apr 2021 12:03:05 GMT]
Tue  6 Apr 2021 14:46:10 BST | Exiting, nothing to do
We can see from the log that there has been no update and so the script doesn’t re-install Gimp.
To show the update process working, update the gimp.dmg file in Azure Blob storage. Repeat steps 1 and 2 above.
- Download the application DMG.
- Upload the DMG to Azure Blob storage.
During step 2, make sure that you use the same file name and that you check the Overwrite if files already exist checkbox.
 Screenshot of the Overwrite if files already exist checkbox option in Intune
Once the upload is complete, re-run the script on the test device.
Neils-MacBook-Pro:Gimp % sudo ./installGimp.sh

##
# Tue  6 Apr 2021 15:05:23 BST | Logging install of [Gimp] to [/Library/Logs/Microsoft/IntuneScripts/installGimp/Gimp.log]


Tue  6 Apr 2021 15:05:23 BST | Checking if we need Rosetta 2 or not
Tue  6 Apr 2021 15:05:23 BST | [Intel(R) Core(TM) i9-9880H CPU @ 2.30GHz] found, Rosetta not needed
Tue  6 Apr 2021 15:05:23 BST | Checking if we need to install or update [Gimp]
Tue  6 Apr 2021 15:05:23 BST | [Gimp] already installed, let's see if we need to update
Tue  6 Apr 2021 15:05:23 BST | Update found, previous [Tue, 06 Apr 2021 12:03:05 GMT] and current [Tue, 06 Apr 2021 14:04:10 GMT]
Tue  6 Apr 2021 15:05:23 BST | Starting downlading of [Gimp]
Tue  6 Apr 2021 15:05:23 BST | Waiting for other Curl processes to end
Tue  6 Apr 2021 15:05:23 BST | No instances of Curl found, safe to proceed
Tue  6 Apr 2021 15:05:23 BST | Octory found, attempting to send status updates
Tue  6 Apr 2021 15:05:23 BST | Updating Octory monitor for [Gimp] to [installing]
Tue  6 Apr 2021 15:05:24 BST | Downloading Gimp
Tue  6 Apr 2021 15:06:00 BST | Downloaded [Gimp.app]
Tue  6 Apr 2021 15:06:00 BST | Checking if the application is running
Tue  6 Apr 2021 15:06:00 BST | [Gimp] isn't running, lets carry on
Tue  6 Apr 2021 15:06:00 BST | Installing [Gimp]
Tue  6 Apr 2021 15:06:00 BST | Octory found, attempting to send status updates
Tue  6 Apr 2021 15:06:00 BST | Updating Octory monitor for [Gimp] to [installing]
Tue  6 Apr 2021 15:06:00 BST | Mounting [/tmp/gimp.dmg] to [/tmp/Gimp]
Tue  6 Apr 2021 15:06:21 BST | Copying /tmp/Gimp/*.app to /Applications/Gimp.app
Tue  6 Apr 2021 15:15:43 BST | Un-mounting [/tmp/Gimp]
Tue  6 Apr 2021 15:15:44 BST | [Gimp] Installed
Tue  6 Apr 2021 15:15:44 BST | Cleaning Up
Tue  6 Apr 2021 15:15:44 BST | Fixing up permissions
Tue  6 Apr 2021 15:15:46 BST | Application [Gimp] succesfully installed
Tue  6 Apr 2021 15:15:46 BST | Writing last modifieddate [Tue, 06 Apr 2021 14:04:10 GMT] to [/Library/Logs/Microsoft/IntuneScripts/installGimp/Gimp.meta]
Tue  6 Apr 2021 15:15:46 BST | Octory found, attempting to send status updates
Adapting the example script to something else: Yammer
We have our Gimp script working as we want, but what about other installer files? In this example, we are going to look at modifying the InstallGimp.sh script to handle Yammer, which is also provided as a DMG file.
The completed script for Yammer is available here. If we look at a comparison of changes between the installGimp.sh and installYammer.sh scripts, we can see that the only differences are on lines 21-27.
 Comparison of changes between the installGimp.sh and installYammer.sh scripts
The changes on line 6 are just a description of the script. Lines 20-27 are variables that are discussed in more detail in Step 3 above.
# User Defined variables
weburl="https://aka.ms/yammer_desktop_mac"
appname="Yammer"
app="Yammer.app"
logandmetadir="/Library/Logs/Microsoft/IntuneScripts/installYammer"
processpath="/Applications/Yammer.app/Contents/MacOS/Yammer"
terminateprocess="false"
autoUpdate=”false”
Note: That in this example we are not using Azure blob storage but the normal download URL for Yammer. After editing the script we then follow the steps in Step 4 – Deploy the bash script via the Intune scripting agent above. Once deployed, we can go to the Mac and trigger a manual check-in and then check the logs on our target Mac.
For Yammer, our new policy ID is: 010f31ef-1cfc-441b-a409-fc75e838c5d0
From the IntuneMDMDaemon*.log file we see the following:
IntuneMDM-Daemon | I | *10068 | ScriptPolicyHandler | Running script policy PolicyID: 010f31ef-1cfc-441b-a409-fc75e838c5d0
IntuneMDM-Daemon | I | *10068 | ScriptPolicyHandler | Delivering user notification. PolicyID: 010f31ef-1cfc-441b-a409-fc75e838c5d0, BlockExecutionNotifications: true
IntuneMDM-Daemon | I | 12959 | ScriptPolicyHandler | Script ran PolicyID: 010f31ef-1cfc-441b-a409-fc75e838c5d0, TotalRetries: 0, Status: Success, ExitCode: 0
IntuneMDM-Daemon | I | 12959 | ScriptPolicyHandler | Script policy succeeded PolicyID: 010f31ef-1cfc-441b-a409-fc75e838c5d0, TotalRetries: 0, ExitCode: 0
IntuneMDM-Daemon | I | 12959 | ScriptPolicyHandler | Adding script to scheduler PolicyID: 010f31ef-1cfc-441b-a409-fc75e838c5d0
And from the /Library/Logs/Microsoft/IntuneScripts/installYammer/Yammer.log we see the following:
Sat 10 Apr 2021 17:38:30 BST | Creating [/Library/Logs/Microsoft/IntuneScripts/installYammer] to store logs

##
# Sat 10 Apr 2021 17:38:30 BST | Logging install of [Yammer] to [/Library/Logs/Microsoft/IntuneScripts/installYammer/Yammer.log]


Sat 10 Apr 2021 17:38:30 BST | Checking if we need Rosetta 2 or not
Sat 10 Apr 2021 17:38:30 BST | Waiting for other [/usr/sbin/softwareupdate] processes to end
Sat 10 Apr 2021 17:38:30 BST | No instances of [/usr/sbin/softwareupdate] found, safe to proceed
Sat 10 Apr 2021 17:38:30 BST | [Intel(R) Core(TM) i9-9880H CPU @ 2.30GHz] found, Rosetta not needed
Sat 10 Apr 2021 17:38:30 BST | Checking if we need to install or update [Yammer]
Sat 10 Apr 2021 17:38:30 BST | [Yammer] not installed, need to download and install
Sat 10 Apr 2021 17:38:30 BST | Dock is here, lets carry on
Sat 10 Apr 2021 17:38:30 BST | Starting downlading of [Yammer]
Sat 10 Apr 2021 17:38:30 BST | Waiting for other [curl] processes to end
Sat 10 Apr 2021 17:38:30 BST | No instances of [curl] found, safe to proceed
Sat 10 Apr 2021 17:38:30 BST | Downloading Yammer
Sat 10 Apr 2021 17:38:49 BST | Unknown file type [/var/folders/zz/zyxvpxvq6csfxvn_n0000000000000/T/tmp.U6LKs7Fb/yammer_desktop_mac], analysing metadata
Sat 10 Apr 2021 17:38:49 BST | Downloaded [Yammer.app] to [/var/folders/zz/zyxvpxvq6csfxvn_n0000000000000/T/tmp.U6LKs7Fb/install.dmg]
Sat 10 Apr 2021 17:38:49 BST | Detected install type as [DMG]
Sat 10 Apr 2021 17:38:49 BST | Waiting for other [/Applications/Yammer.app/Contents/MacOS/Yammer] processes to end
Sat 10 Apr 2021 17:38:49 BST | No instances of [/Applications/Yammer.app/Contents/MacOS/Yammer] found, safe to proceed
Sat 10 Apr 2021 17:38:49 BST | Installing [Yammer]
Sat 10 Apr 2021 17:38:49 BST | Mounting Image
Sat 10 Apr 2021 17:38:56 BST | Copying app files to /Applications/Yammer.app
Sat 10 Apr 2021 17:39:14 BST | Un-mounting [/var/folders/zz/zyxvpxvq6csfxvn_n0000000000000/T/tmp.U6LKs7Fb/Yammer]
Sat 10 Apr 2021 17:39:14 BST | [Yammer] Installed
Sat 10 Apr 2021 17:39:14 BST | Cleaning Up
Sat 10 Apr 2021 17:39:14 BST | Fixing up permissions
Sat 10 Apr 2021 17:39:14 BST | Application [Yammer] succesfully installed
To validate the installation, launch the Yammer app by pressing CMD+Space and typing “Yammer” and then Enter. Assuming everything works as expected, the next step is to repeat step 4 above (Deploy the bash script with Intune Scripting Agent) and assign it to your users.
What about other package types? APP or PKG?
This approach can be used for any macOS installer that can be triggered from the shell. The script attempts to determine the correct installer type from the downloaded file.
More examples using the same script can be found here:
The best way to get started is to download one of the example scripts and modify it for your application.
Some of the examples use weburls on Azure blob storage and others pull directly from the source download sites (like Company Portal). The script uses curl -OJL <url> to download the installer and create the temp file.
Note: If the app you are trying to deploy is provided to you as an .app file, you can compress the app into a ZIP and use the examples above.
All the examples include a function to handle Rosetta 2 deployment for Apple Silicon devices. That means these scripts can be deployed straight to an M1 Mac and it will automatically handle the installation of Rosetta 2 so that the application can run.
Troubleshooting
Using Microsoft Endpoint Manager admin center
Intune also reports the status of each script in the UI.
- Open the Microsoft Endpoint Manager admin center.
- Select Devices > macOS > Shell scripts and select the script you want to troubleshoot.
- Click on Device Status and then select the device you are troubleshooting.
- Click on Show details and Intune will display the last output from the script.
 Example screenshot of the GIMP app Device status in Intune
If we need more information, we can use the Intune script agent to gather logs from the Mac for us remotely.
- Click on Collect Logs and enter in the name of the log file you want to retrieve. In our example that is /Library/Logs/Microsoft/IntuneScripts/installGimp/Gimp.log.
 Example screenshot of collecting logs with the GIMP application in Intune
- The next time that the script agent checks in (8 hour cycle), the logs will be returned to Intune. You can force this by having the end user open Company Portal and clicking Check Settings.
Note: On the device, in the IntuneMDMDaemon log file you can see log upload requests and completions by searching for “LogUploadResultItem”.
IntuneMDM-Daemon | I | 255380 | PersistenceManager | Storing LogUploadResultItem
IntuneMDM-Daemon | I | 256078 | PersistenceManager | Getting all LogUploadResultItem
IntuneMDM-Daemon | I | *235677 | PersistenceManager | Deleting all LogUploadResultItem
IntuneMDM-Daemon | I | 256953 | PersistenceManager | Getting all LogUploadResultItem
- Once the logs have been returned, the Download logs button will be shown. Click this to download the device logs as a zip file.
 Example screenshot of the “Download logs” button in Intune
- Inside the zip file will be the file we requested, plus the two Intune script agent (user) and daemon (root) logs, which are always returned.
 Example screenshot of the Downloaded logs from Intune
To make sense of the logs, it’s useful to know the policy ID of the script we are troubleshooting. We can get this from the Microsoft Endpoint Manager admin center.
- Open the Microsoft Endpoint Manager admin center.
- Select Devices > macOS > Shell scripts.
- Find the script in the list and click on it, make a note of the policyID in the browser URL. We will use it to filter the log
In my example, the URL is: https://endpoint.microsoft.com/#blade/Microsoft_Intune_DeviceSettings/ConfigureWMPolicyMenu/overview/policyId/7edf5358-c157-437a-8bc0-0a4889b20ae4/policyType/1.
The easiest way to view the logs is via the Console app.
- Press CMD+Space and type ‘Console’ and press Enter, this will open the Console app.
- Click on File > Open and navigate to the IntuneMDMDaemon*log.
- Paste the policyID from step 3 above into the search box and it should filter the log for only the lines referring to our script.
 Example screenshot of filtering out the IntuneMDMDaemon*log on a macOS device
The key things to look for in the IntuneMDMDaemon log are as follows:
- Running script policy PolicyID: 7edf5358-c157-437a-8bc0-0a4889b20ae4
- Script policy succeeded PolicyID: 7edf5358-c157-437a-8bc0-0a4889b20ae4
Note: You can also view the logs directly on the Mac if you have access. Use Console again to view them.
- /Library/Logs/Microsoft/Intune [For scripts that do not run as the end user]
- ~/Library/Logs/Microsoft/Intune [For scripts that do run as the end user]
Script Log
This is the log that is generated by each script so the output will be different depending on what you put in your script. The best way to view is in the Console app. Search for ‘Gimp’. The log file output should look very similar to the output we saw when we ran the script manually.
 Example screenshot of the log output for the GIMP app on a macOS device
Version Reporting
One of the biggest problems with this approach of app deployment is that apps deployed in this way do not show up in the ‘managed apps’ list for each managed Mac in Intune. To help mitigate this a little, we can use Intune’s custom attribute feature to run a shell script on the Mac and return the version of our app.
We have an example custom attribute script to return the version of a Mac app here.
To deploy the custom attribute script:
- Download the example script to ~Downloads. Open in Visual Studio Code and modify/test as required
- Open the Microsoft Endpoint Manager admin center
- Select Devices > macOS > Custom attributes > Add
- Enter a Name and Description for the script and click Next
- Set the data type of attribute to String
- Select the ~/Downloads/fetchGimpversion.sh
- Click Next
- Assign Scope Tags if you need them, click Next
- Under Required click Add group and search for an appropriate group to target the script to
- Click Next, review and then Add to complete the assignment
The next time that the Intune macOS script agent checks-in to Intune, it will run the script and return the value. To see a list of the returned values:
- Open the Microsoft Endpoint Manager admin center
- Select Devices > macOS > Custom attributes
- Select the custom attribute you created > Device Status
 Example screenshot of the previously created Custom attributes in Intune
This report can be exported to a CSV file if required.
Obviously, this is a basic example, but it could be expanded to return any information that you can gather from a shell script.
Summary
Hopefully this blog and example scripts have provided some guidance around the possibilities of deploying apps via the Intune script agent and Azure Blob storage (or other web hosting sites).
This approach is especially useful for applications that cannot be deployed via the other App deployment scenarios that Intune provides.
Advantages |
Disadvantages |
- Extremely flexible.
- No need for build certificate to sign custom packages.
- More detailed logging capabilities.
- Can handle dependencies (such as Rosetta on M1 devices).
|
- Requires some bash scripting skills.
- Apps deployed via this method don’t show up in “Managed Apps” UI in Intune. Can mitigate this somewhat with ‘custom attributes’.
- The scripts deployed run at your own risk and you are entirely responsible for them and any damage they may do.
|
For more information on deploying scripts with Intune see our documentation here. We also have a broader set of shell script examples on the Intune team GitHub Repository.
Let us know if you have any questions by replying to this post or reaching out to @IntuneSuppTeam on Twitter.
by Contributed | Apr 27, 2021 | Technology
This article is contributed. See the original author and article here.
Introduction:
This document provides information about overall working of LLAP daemons and performance considerations. In general, performance tuning is an ongoing act and there is no silver bullet to solve all your performance issues. Performance improvements should be done in two stages, performance analysis and performance tuning. In the performance analysis step, goal is to find the bottlenecks and areas to focus; and the second step is do incremental tuning for the bottlenecks identified.
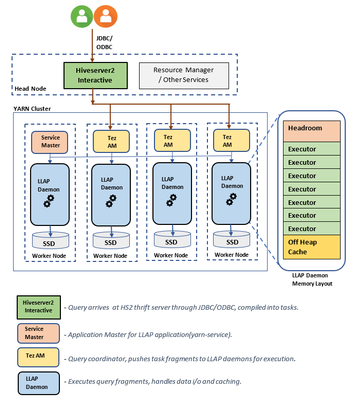
LLAP Architecture/Components:
LLAP execution and sizing configurations:
The following are some of the configurations that can be adjusted based on your workload for improved performance. Please refer to Azure HDInsight LLAP sizing guide for detailed information here.
- Use dedicated YARN queue for LLAP daemons, this ensures the priority scheduling and resource management for other applications.
Total Memory available for LLAP queue per worker node can be calculated as follows:
This value depends on the total amount of memory available for all YARN containers on a node(yarn.nodemanager.resource.memory-mb) and the percentage of capacity configured for llap queue (yarn.scheduler.capacity.root.llap.capacity).
Total memory for LLAP queue on worker node = Total memory available for all YARN containers on a node x Percentage of capacity for llap queue.
Please note: If your workload is read-only operations, then setting it as high as 90% of the capacity should work. However, if your workload is mix of update/delete/merge operations using managed tables, it’s recommended to give 85% of the capacity for llap queue. The remaining 15% capacity can be used by other tasks such as compaction etc. to allocate containers from the default queue. That way tasks in the default queue won’t deprive YARN of resources.
For E32 v3 worker, this value is (200 GB x 0.85) = 170 GB.
- Configure number of concurrent queries same to the for the peak usage scenario to avoid manual intervention because Autoscale events don’t change the Hive configuration Maximum Total Concurrent Queries in Ambari. This means that the Hive Server 2 Interactive Service can handle only the given number of concurrent queries at any point of time even if the Interactive Query daemons count are scaled up and down based on load and schedule.
Note (Limitation wrt AutoScaling):
In case of autoscale-enabled Interactive Query clusters, an autoscale up/down event also scales up/down the number of Interactive Query daemons to the number of active worker nodes. The change in the number of daemons is not persisted in the num_llap_nodes configuration in Ambari. If Hive services are restarted manually, the number of Interactive Query daemons is reset as per the configuration in Ambari.
If the Interactive Query service is manually restarted, you need to manually change the num_llap_node configuration (the number of node(s) needed to run the Hive Interactive Query daemon) under Advanced hive-interactive-env to match the current active worker node count.
- Configure yarn.scheduler.maximum-allocation-vcores.
This value indicates the maximum number of virtual CPU cores for every container request at the Resource Manager. Requesting a higher number of vcores than this value won’t take effect. It’s a global property of the YARN scheduler. For LLAP daemon container, this value can be set to 75% of total available vcores. The remaining 25% should be reserved for Node Manager, Data Node, and other services running on the worker nodes.
For E32 v3 VMs and 75% of total 32 vcores can be used by LLAP daemon container, the recommended value is 24.
- Configure LLAP daemon size:
LLAP daemon container size = (Total memory for LLAP queue on a workernode) – (Tez AM memory per node) – (Service Master container size)
There is only one Service Master (Application Master for LLAP service) on the cluster spawned on one of the worker nodes. For calculation purpose, we consider one service master per worker node.
For E32 v3 worker node, HDI 4.0 - the recommended value is (170 GB - 4 GB - 1 GB)) = 165 GB
- Number of executors per LLAP daemon:
This value depends on the number of vcores, the amount of memory used per executor, and the amount of total memory available for LLAP daemon container. The number of executors can be oversubscribed to 120% of available vcores per worker node.
For E32 v3, the recommended value for num of executors is (32 vcores x 120%) ~= 38 on each worker node considering 3GB per executor.
- Configure hive.llap.io.threadpool.size to value same as number of executors.
Recommendation is to monitor heap usage at peak workloads and increase the number of executors making sure that Number of executors times heap usage per executor does not exceed total llap daemon heap size.
For example, let’s assume that the LLAP daemon is configured for 20 executors and 80 GB of heap size, but your max heap space usage is 60GB. Then the average use per executor is 3 GB (60 GB divided by 20 executors). In such cases, your configured heap is underutilized, and you still have a 20GB room (80 GB – 60 GB). You can increase number of executors by 6 (20 GB/3GB ~= 6) from 20 to 26. This provides increased task parallelism and may result into higher throughput.
A thumb rule would be, for each LLAP daemon,
(Number of executors x Heap size per executor (Tez container size)) <= (total heap size for LLAP daemon)
You can get the information for heap space usage and executor’s usage from Grafana dashboards for each individual daemon as well as the average for all daemons. Pick the max value for calculations.
Increasing number of executors beyond the above-mentioned thumb rule may provide you better performance at a times but can also result into occasional failures and instability. Please refer to HDInsight Hive/LLAP sizing guide for details.
- Configuration: hive.llap.daemon.yarn.container.mb:
LLAP daemon runs as a YARN container on each worker node. The total memory size for the LLAP daemon container depends on the following factors. LLAP daemon container memory consists of the following components :
- Head room
- Heap memory used by executors (Xmx)
- In-memory cache per daemon (its off-heap memory size, not applicable when SSD cache is enabled)
- In-memory cache metadata size (applicable only when SSD cache is enabled)
Headroom size: This size indicates a portion of off-heap memory used for Java VM overhead (metaspace, threads stack, GC, data structures, etc.). Generally, this overhead is about 6% of the heap size (Xmx). To be on the safer side, this value can be calculated as 6% of total LLAP daemon memory size.
For E32 v3, the recommended value is ceil(170 GB x 0.06) ~= 10 GB.
Heap size(Xmx:( It is amount of heap memory available for all executors. Total Heap size = Number of executors x 3 GB
For E32 v3, this value is 38 x 3 GB = 114 GB
LLAP cache size: LLAP supports both in-memory (RAM) and SSD cache. The cache size calculation would differ when SSD cache is enabled. Setting hive.llap.io.allocator.mmap = true will enable SSD caching. When SSD cache is enabled, some portion of the RAM memory will be used to store the metadata (headers, index, etc) for the cached data on SSD. The metadata is expected to be approximately 8% of SSD cache size and it is stored in off-heap memory.
SSD Cache in-memory metadata size = LLAP daemon container size – (Head room + Heap size)
For E32 v3, with HDI 4.0, SSD cache in-memory metadata size = 170 GB - (4 GB + 114 GB) = 52 GB
When SSD cache is disabled, the in-memory cache is amount of memory that is left after taking out Headroom size and Heap size from the LLAP daemon container size.
In-memory(off-heap) cache size = LLAP daemon container size – (Head room + Heap size)
Recommendation is to monitor the LLAP cache uses by checking Grafana dashboards or running sample workload queries via beeline and checking execution summary. LLAP is optimized for interactive queries, if you are running ETL workloads that refer to data only once would not benefit from caching. In such cases, you can disable caching by setting “hive.llap.io.enabled=false” at session level.
- Adjusting Map Join memory:
This configuration determines the threshold for MapJoin selection by Hive optimizer that considers over subscription of memory from other executors to have more room for in-memory hash tables to allow more map join conversions. Considering 3 GB per executor, this size can be oversubscribed to 3 GB, but some heap memory may also be used for sort buffers, shuffle buffers, etc. by the other operations.
For E32 v3, with 3 GB memory per executor, it's recommended to set this value to 2048 MB.
- The values for num_llap_nodes, num_llap_nodes_for_llap_daemons are recommended to be set as same as the number of LLAP worker nodes.
- Depending the volume of data being queried and result, tune tez.grouping.max.size and tez.grouping.min.size. Decrease for better latency or Increase for more throughput.
Data Storage Format:
Data storage format plays a critical role in Hive/LLAP performance.
- It is recommended to use ORC data storage format for taking advantage of efficient compression, fast reads. ORC gives the best performance overall.
- Avoid using Text-based storage formats for large production systems. If you have data generated in Text formats (CSV, JSON, etc.) , you can create a Hive external hive table, and then convert it to ORC format for regular querying and analysis. (For example: CREATE TABLE orc_table STORED AS ORC AS SELECT * FROM text_table)
Both ORC and Parquet provide a highly efficient way to store Hive data in a columnar format. LLAP implementation natively supports ORC and Parquet where LLAP does not have to perform additional encoding/decoding steps. Also, it supports efficient vectorized operations on the data stored in these formats.
Hive/LLAP optimizer and execution engine can make use of metadata/indexes that are stored alongside data in ORC or Parquet format. Some of the queries can directly be served from metadata/indexes without requiring scanning through the whole data.
In the case of text formats (CSV, JSON, etc.), LLAP would require additional steps to encode/decode data before it is stored in the cache and used in vectorized operations. This overhead may contribute to delays in processing the data.
Depending on your environment, you can further tune your ORC storage formats to optimize Hive/LLAP performance by using bloom filters, configuring compression type, stripe size, using partitions, and buckets.
Hiveserver2 Interactive High Availability
Hiveserver2 Interactive (HSI) supports high availability (HA) in the form of an Active/Passive standby configuration. Only one HSI can be in Active mode, whilst one or more additional HSI instances are in passive standby mode and ready to takeover on Active HSI failure.
To connect to the active leader HSI instance, clients use dynamic service discovery. For example:
jdbc:hive2://<zookeeper_quorum>;serviceDiscoveryMode=zooKeeperHA;zooKeeperNamespace=hiveserver2-interactive
It is important to note that zooKeeperHA service discovery mode is distinct from zooKeeper discovery mode used with traditional Hiveserver2.
With zooKeeperHA, the Hive connection will iterate through the list of HSI instances registered in ZooKeeper and identify the elected leader. The node information (hostname:port) for the leader is returned to the client, allowing it to connect to the Active HSI instance.
If the Active HSI loses its leadership (for example, a long GC pause resulting in session/connection timeout or network split) leadership is revoked.
Before implementing HSI HA you should confirm that all JDBC and ODBC drivers used within your organization include support for zooKeeperHA service discovery.
LLAP Resource Monitoring and Recommendations
- Hive Interactive UI:
Currently, Hive Interactive UI does not work for ESP LLAP clusters. The following workaround can be applied to make it work.
Step-1: Add the below configs in Ambari:
hive.server2.webui.use.spnego -> true
hive.server2.webui.spnego.principal -> HTTP/_HOST@domain.com e.g. HTTP/_HOST@SECUREHADOOPRC.ONMICROSOFT.COM for tip clusters
hive.server2.webui.spnego.keytab ->/etc/security/keytabs/spnego.service.keytab
Custom hive-site:
hive.users.in.admin.role -> Comma Separated list of users who can access UI e.g. rsadmin2 (for tip clusters) or * if we want all users to be able to access.
Step – 2: Restart Hive
All the pages work except for /logs in HS2UI - need to backport [HIVE-14737] Problem accessing /logs in a Kerberized Hive Server 2 Web UI – ASF JIRA (apache.org)
Sample Curl command to access these pages programmatically:
curl –negotiate -u : http://hn0-kevx5t.securehadooprc.onmicrosoft.com:10502/jmx
The following table details the available UI pages and useful endpoints for metric scraping etc.
http://<host>:15002
|
Active sessions, open queries, and last 25 closed queries overview
|
http://<host>:15002/jmx
|
Hiveserver2 system metrics
|
http://<host>:15002/conf
|
Current Hiveserver2 configuration
|
http://<host>:15002/peers
|
Overview of Hiveserver2 Interactive instances in the cluster
|
http://<host>:15002/stacks
|
Show a stack trace of all JVM threads
|
http://<host>:15002/llap.html
|
Status of the LLAP daemons
|
Text
|
http://<host>:15002/conflog
|
Each LLAP daemon has a Monitor that listens on port 15002 by default. You can use the LLAP status command or the LLAP Daemons tab on the Hiveserver2 Interactive Web UI to quickly determine where the LLAP daemons are running.
Set hive.tez.exec.print.summary to true in order to report data and metadata cache hits and misses for each query you run.
LLAP Executor metrics and LLAP Cache metrics Dashboard:

Make sure your execution slots are available to run the query fragments. Also, check Evicted, Killed and Rejected task requests. If more than 90% of your execution slots are occupied, then system you may have to scale-out your LLAP cluster to be able to handle increased workload.
Run sample queries (especially long running) from your workload and find out how many resources they consume for a better understanding of the overall workload. Also, accommodate for any future additional workload.
Using beeline, you can set the following at session level and run your queries.
set hive.tez.exec.print.summary=true;
set hive.query.results.cache.enabled=false;
- Analyze query execution summary
Find out time consumed in different stages of query processing.

- Analyze LLAP Cache usage:
Usually, higher the DATA_HIT number better the performance as data can be directly read from the cache and no additional IO is required.

- Analyze LLAP Tasks execution pattern
With an active workload management plan, you will have to run your sample queries with actual user, group or app name based on your query pool mapping in your resource plan.
More time spent in SPECULATIVE_RUNNING and SPECULATIVE_QUEUED would mean that the query pool corresponding to the query needs more resource in the pool and it is using resources from the other query pools when possible. However, these speculative tasks will get evicted when other query pools need resources to serve its queries.

References:
https://docs.microsoft.com/en-us/azure/hdinsight/interactive-query/hive-llap-sizing-guide
https://docs.microsoft.com/en-us/azure/hdinsight/interactive-query/apache-interactive-query-get-started
https://docs.microsoft.com/en-us/azure/cloud-services/cloud-services-sizes-specs#dv2-series

by Contributed | Apr 27, 2021 | Technology
This article is contributed. See the original author and article here.
What do you do when you realize you are using too much paper? Rifling through filing cabinets, storage boxes and stacks of paper in search of necessary documents leads to productivity loss and environmental impact.
The Intrazone continues to spotlight Microsoft partners, the people and companies who deliver solutions and services to empower our customers to achieve more. In our 10th partner episode, we talk with Jason Burian (VP of product management | KnowledgeLake) and his customer, Tye Eyden (Collaboration business systems analyst | New Belgium Brewing).
In this episode, we focus on the needs of a growing company, New Belgium Brewing, faced with numerous challenges. They desperately wanted to move away from paper-based processes. With their portfolio of beers growing, and a second brewing facility coming online, they needed help from partner, KnowledgeLake, to optimize digitize invoices, improve employee time and efficiency while maintaining environmental stewardship, making world class beer, and having fun.
Like the Lorax, KnowledgeLake speaks for the trees. And we’re all listening.
Grab your favorite bevvy, and … on with the show.
https://html5-player.libsyn.com/embed/episode/id/18867890/height/90/theme/custom/thumbnail/yes/direction/backward/render-playlist/no/custom-color/247bc1/
Subscribe to The Intrazone podcast! Listen this partner episode on KnowledgeLake with New Belgium Brewing + show links and more below.
Left-to-right: Jason Burian (VP of product management | KnowledgeLake) and his customer, Tye Eyden (Collaboration business systems analyst | New Belgium Brewing). [The Intrazone guests]
Link to articles mentioned in the show:
Subscribe today!
Listen to the show! If you like what you hear, we’d love for you to Subscribe, Rate and Review it on iTunes or wherever you get your podcasts.
Be sure to visit our show page to hear all the episodes, access the show notes, and get bonus content. And stay connected to the SharePoint community blog where we’ll share more information per episode, guest insights, and take any questions from our listeners and SharePoint users (TheIntrazone@microsoft.com). We, too, welcome your ideas for future episodes topics and segments. Keep the discussion going in comments below; we’re hear to listen and grow.
Subscribe to The Intrazone podcast! Listen this partner episode on KnowledgeLake with New Belgium Brewing.
Thanks for listening!
The SharePoint team wants you to unleash your creativity and productivity. And we will do this, together, one partner at a time.
The Intrazone links
+ Listen to other Microsoft podcasts at aka.ms/microsoft/podcasts.
![Left to right [The Intrazone co-hosts]: Chris McNulty, director (SharePoint/Viva – Microsoft) and Mark Kashman, senior product manager (SharePoint – Microsoft).](https://www.drware.com/wp-content/uploads/2021/04/fb_image-89.jpeg "Chris-Mark_in-studio.jpg") Left to right [The Intrazone co-hosts]: Chris McNulty, director (SharePoint/Viva – Microsoft) and Mark Kashman, senior product manager (SharePoint – Microsoft).
Left to right [The Intrazone co-hosts]: Chris McNulty, director (SharePoint/Viva – Microsoft) and Mark Kashman, senior product manager (SharePoint – Microsoft).
 The Intrazone, a show about the Microsoft 365 intelligent intranet (aka.ms/TheIntrazone)

by Scott Muniz | Apr 27, 2021 | Security, Technology
This article is contributed. See the original author and article here.
Official websites use .gov
A .gov website belongs to an official government organization in the United States.

Secure .gov websites use HTTPS A
lock ( )
) or
https:// means you’ve safely connected to the .gov website. Share sensitive information only on official, secure websites.
by Scott Muniz | Apr 27, 2021 | Security, Technology
This article is contributed. See the original author and article here.
Google has released Chrome version 90.0.4430.93 for Windows, Mac, and Linux. This version addresses vulnerabilities that an attacker could exploit to take control of an affected system.
CISA encourages users and administrators to review the Chrome Release Note and apply the necessary updates.


Recent Comments