by Contributed | Apr 29, 2021 | Technology
This article is contributed. See the original author and article here.
The Office Add-ins developer platform team has new updates to share this month on Office Add-ins Patterns and Practices. PnP is a community effort, so if you are interested in contributing, see our good first issue list.
Use Outlook event-based activation to set the signature (preview)
This sample uses event-based activation to run an Outlook add-in when the user creates a new message or appointment. The add-in can respond to events, even when the task pane is not open. It also uses the setSignatureAsync API. If no signature is set, the add-in prompts the user to set a signature, and can then open the task pane for the user.
Contributors
Thank you to our contributors who are actively helping each month with the PnP-OfficeAddins community effort.
Want to contribute?
PnP is a community effort by developers like you. Check out our good first issue list as a great place to help with some samples. Feel free to contribute to existing samples or create new ones.
About Office Add-ins Patterns & Practices (PnP)
Office Add-ins PnP is a Microsoft-led, community driven effort that helps developers extend, build, and provision customizations on the Office platform the right way by providing guidance and help through official documentation and open-source initiatives. The source is maintained in GitHub where anyone can participate. You can provide contributions to the samples, reusable components, and documentation. Office Add-ins PnP is owned and coordinated by Office engineering teams, but the work is done by the community for the community.
You can find code samples for Office Add-in development in the Office Add-ins PnP repo. Some samples are also documented in the Office Add-ins docs, such as Open in Excel.
Additional resources
Learn more by joining the monthly Office Add-ins community call.
by Contributed | Apr 29, 2021 | Technology
This article is contributed. See the original author and article here.
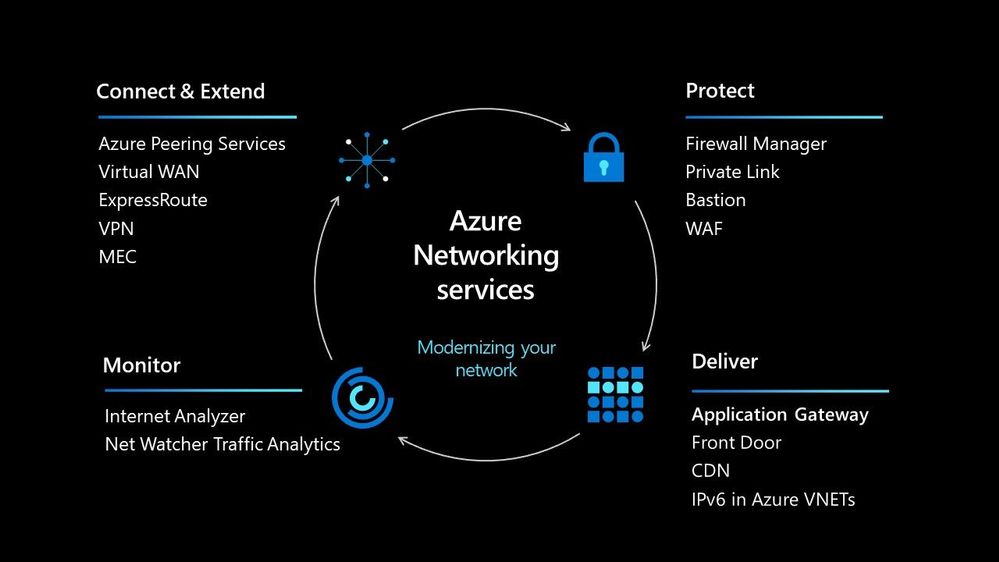
In today’s world we must be able to scale our workloads, whether that be dealing with an internal workload or an external workload serving your organisations’ customers. There are lots of options available to you to implement that scale and deal with the traffic to your workload, let’s walk through some of the options within Azure and help you understand their use cases.
Azure Load Balancer
The Azure Load Balancer is one of the first options that you have to help deal with scaling your workload. It supports TCP/UDP based protocols such as HTTP, HTTPS and SMTP and other protocols used within real-time voice and video messaging applications. It helps you distribute traffic to your backend virtual machines and is a fully managed service.

With the load balancer you can distribute traffic either from external traffic or for internal traffic. The Azure Load balancer works on Layer 4 of the OSI model and is a transparent load balancer. Meaning it won’t do anything to the packets that it receives and just sends to them onto the endpoint should depend on the routing algorithm. The Azure Load Balancer has a lot of features, one that I love is the outbound connection feature, which allows you to configure all outbound traffic from your virtual network to the Internet to be displayed as from the frontend IP of the load balancer.
Azure Application Gateway
The Azure Application Gateway is an HTTP or HTTPs load balancer and behaves differently to the networking load balancer. It will take the connection coming into it, terminate and start a new connection to the backend endpoint based on its routing algorithms. This opens new possibilities such as redirections or URL rewrites or header changes.

Two of my favourite features of the Azure Application Gateway are connection draining and autoscaling. Both help give you confidence of running your environment and help save on operational costs.
With connection draining it helps you to gracefully remove backend endpoints to carry out planned maintenance or upgrades. With autoscaling it can start to scale out or in based on the traffic pattern to your Application Gateway. This not only helps to eliminate the guessing game of over provisioning workloads and helps to avoid your operations teams having to manually scale out or in when traffic spikes.
Azure Traffic Manager
The Azure Traffic Manager is a DNS-based load balancer, it allows you to distribute traffic across your public facing applications. With the traffic manager it will use DNS to direct requests from your users to the appropriate endpoint based on the traffic-routing method that you have configured. Your endpoints can be any Internet-facing service hosted inside OR outside of Azure.

With Traffic Manager you can help to provide great performance to your end users with distributed endpoints through out the globe. The features that I really enjoy is the Real User Measurements and Traffic View features. They can be used to give you a real insight into where your users are based and the performance they are experiencing. And the data that is collected can really help you make informed decisions on how to develop your application in the future.

Azure Front Door
Azure Front Door works at Layer 7 of the OSI model and based on your routing method you can ensure that your customer is routed to the fastest and most available endpoint on offer. Like Traffic Manager, Front Door is resilient to failures, including failures to an entire Azure region. With Front Door you can offload SSL and certificate management, define a custom domain, and provide application security with integrated Web Application Firewall (WAF), with a ton of other features as well.

Your end points can be based within Azure or elsewhere. No matter where or what your endpoints are Front Door will help provide the best experience for your end user.
Azure DDoS Protection Basic is integrated into the Front Door platform by default and helps to defend against the most common and frequently occurring Layer 7 DNS query floods and layer 3 and 4 volumetric attacks that target public endpoints.
Azure Web Application Firewall
Azure Web Application Firewall (WAF) can also be used to protect your Front Door and Application Gateway implementations. Because the WAF policies are “global resources” you can apply the same policy to your Front Door and Application Gateway implementations and have a consistent approach to prevention and detection.

Which one?
There are times when it’s not a question of which one should I use, as there are scenarios when you would use two of these options together to provide the best experience all round. In preview there is a feature within the Azure Portal where it will walk you through some questions and give some advice on the best options for you – Load Balancing – help me choose.
Each of the load balancer have unique features and unique use cases, and as I said can often be used in combination together. For examples of how to use them in different scenarios be sure to check out the Azure Architecture Centre for reference architecture diagrams to get your imagination sparked!
by Contributed | Apr 28, 2021 | Technology
This article is contributed. See the original author and article here.
Hi All,
After 5 public previews I am thrilled to announce the release candidate build of AKS on Azure Stack HCI! If you have not tried out AKS on Azure Stack HCI there is no better time than the present. You can evaluate the AKS on Azure Stack HCI release candidate by registering for the Public Preview here: https://aka.ms/AKS-HCI-Evaluate (If you have already downloaded AKS on Azure Stack HCI – this evaluation link has now been updated with the release candidate).
The release candidate build has a number of fixes and improvements in response to the feedback that we have been receiving from y’all over the past months.
There is a lot to cover – but here are some highlights:
Networking improvements –
We have further extended our networking configuration options, so that you can now configure separate networks for each Kubernetes cluster you want to deploy. You can even place separate Kubernetes clusters on separate VLANs. With this release we are also now providing full support for Calico networking (in addition to our previous support for Flannel).
Storage improvements –
We are now including a new CSI storage driver that allows you to use SMB & NFS shares for read-write many storage. This is in addition to our existing driver for VHDX based storage. We have also made updates to our Linux worker nodes to enable the use of OpenEBS on top of AKS on Azure Stack HCI.
Updated Kubernetes Versions –
In this update we have updated the supported Kubernetes versions to:
- Linux: 1.17.13, 1.17.16, 1.18.10, 1.18.14, 1.19.6, 1.19.7
- Windows: 1.18.10, 1.18.14, 1.19.6, 1.19.7
We have done a lot of work “behind the scenes” to increase the reliability of deployment – and made numerous improvements to the usability of our PowerShell and Windows Admin Center based experiences.
Once you have downloaded and installed the AKS on Azure Stack HCI release candidate – you can report any issues you encounter, and track future feature work on our GitHub Project at https://github.com/Azure/aks-hci. And, like with past releases, if you do not have the hardware handy to evaluate AKS on Azure Stack HCI you can follow our guide for evaluating AKS-HCI inside an Azure VM: https://aka.ms/aks-hci-evalonazure.
I look forward to hearing from you all!
Cheers,
Ben
by Contributed | Apr 28, 2021 | Technology
This article is contributed. See the original author and article here.
Have you deployed multiple applications in your HCI cluster? Do you have application workloads in your cluster that need access to the Internet? Do you have remote users accessing application workloads in your HCI cluster? If the answer to any of these questions is yes, please read on to find out how you can protect your workloads from unauthorized access and cyber-attacks (Internal or External).
Problem: Need for network security and issues with traditional approaches
Network security is a top concern for organizations today. We are faced with increasing breaches, threats, and cyber risk. Cyber criminals are targeting high business impact data with sophisticated attacks designed to bypass perimeter controls. Once inside the company network, attackers are free to move from one system to another, in search of sensitive or personally identifiable information. These breaches can go unnoticed for a long time.
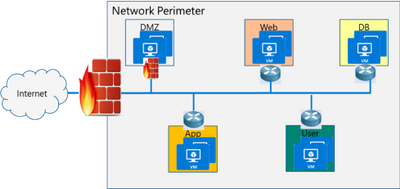
Network segmentation has been around for a long time to isolate high value data and systems. In traditional networks, security is set at the edge, where North-south communication takes place (interactions that are travelling in and out of the datacenter). This secures intranet from outside world. But offers little protection in the modern hybrid cloud world, where the perimeter has all but evaporated and a large portion of the traffic flows east-west, or server to server, between applications.
If you look at the topology below, end points can communicate with each other freely within VLANs or subnets behind a firewall. Infections on one of these servers are not contained and can easily spread to other servers.
Organizations may use physical firewalls to protect east west traffic. But that has its own drawbacks. Significant network resource utilization bottlenecks are created by sending east-west communication through a physical firewall. If firewall capacity is exhausted, security can be scaled by replacing with larger firewall or adding additional physical firewall, which is cumbersome and expensive.
Moreover, the use of physical firewalls can also create additional latency for certain applications. All traffic must traverse a physical firewall to be segmented, even when residing on the same physical server.
Solution: Microsegmentation in Azure Stack HCI
The ideal solution to complete protection is to protect every traffic flow inside the data center with a firewall, allowing only the flows required for applications to function. This is the Zero Trust Model.
Microsegmentation is the concept of creating granular network policies between applications and services. This essentially reduces the security perimeter to a fence around each application or virtual machine. The fence can permit only necessary communication between application tiers or other logical boundaries, thus making it exceedingly difficult for cyber threats to spread laterally from one system to another. Logical boundaries can be completely custom. They can be your different environments: Dev, Test, Production. Or different types of applications, or different tiers within an application. This securely isolates networks from each other and reduces the total attack surface of a network security incident.
With Azure Stack HCI, you can define granular segmentation for your applications and workloads and protect them from both external and internal attacks. This is achieved through a distributed firewall, enabling administrators to define access control lists to restrict access for workloads attached to traditional VLAN networks and overlay networks. This is a network layer firewall, allowing or restricting access based on source and destination IP addresses, source and destination ports and network protocol. You can read more about this here.
IMPORTANT: The microsegmentation policies can be applied to all Azure Stack HCI workloads attached to traditional VLAN networks.
The firewall policies are configured through the management plane. You have multiple options here – standard REST interface, Powershell, Windows Admin Center (WAC) and System Center Virtual Machine Manager (SCVMM). The management plane sends the policies to a centralized control plane, Network Controller. This ships as a Server role in Azure Stack HCI OS. Network Controller pushes the policies to all the applicable Hyper-V hosts, and the policies are plumbed at the vSwitch port of virtual machines. Network Controller also ensures that the policies stay in sync, and any drift is remediated.

Configure and manage microsegmentation in Azure Stack HCI
There are two high level steps to configure microsegmentation for HCI. First, you need to setup the Network Controller and then, configure microsegmentation policies.
Setup Network Controller
Network Controller can be setup using SDN Express Powershell scripts or the Windows Admin Center (WAC) or through System Center Virtual Machine Manager (SCVMM).
Windows Admin Center
If you are deploying HCI for the first time, you can use the Windows Admin Center deployment wizard to setup Network Controller. SDN deployment is Step 5 of the wizard. This deploys the Network Controller component of SDN. Detailed instructions for launching this wizard, setting up the HCI cluster and setting up Network Controller is provided here. In the default case, you need to provide only two pieces of input:
- Path to the Azure Stack HCI OS vhdx file. This is used to deploy the Network Controller VMs.
- Credentials to join the Network Controller VMs to the domain and local admin credentials.
If you do not have DHCP configured on your management network, you will need to provide static IP addresses for the Network Controller VMs. A demo of the SDN setup is provided below:
SDN Express Scripts
If you already have an existing HCI cluster, you cannot deploy SDN through Windows Admin Center today. This support is coming soon.
In this case, you can deploy Network Controller (NC) component of SDN using SDN Express scripts. The scripts are available in the official Microsoft SDN github repository. The scripts need to be downloaded and executed on a machine which has access to the HCI cluster management network. Detailed instructions for executing the script are provided here.
The script takes a configuration file as input. Template file can be found in the github repository here. You will need the provide/change the following parameters to setup Network Controller for microsegmentation on traditional HCI VLAN networks:
- VHDPath: VHDX file path used by NC VMs. Script must have access to this file path.
- VHDFile: VHDX file name used by NC VMs.
- JoinDomain: domain to which NC VMs are joined.
- Management network details (ManagementSubnet, ManagementGateway, ManagementDNS, ManagementVLANID): This is the management network of the HCI cluster.
- DomainJoinUsername: Username to join NC VMs to the domain
- LocalAdminDomainUser: Domain user for NC VMs who is also local admin on the NC VMs
- RestName: DNS name used by management clients (such as Windows Admin Center) to communicate with NC
- Details of NC VMs (ComputerName, HostName, ManagementIP, MACAddress): Name of NC VMs, Host name of Server where NC VMs are located, management network IP Address of NC VMs, MAC address of NC VMs
- HyperVhosts: Host server names in the HCI cluster
- NCUserName: NC Administrator account. Should have permission to do everything needed by someone administering the NC (primarily configuration and remoting). Usually, this can be same as LocalAdminDomainUser account.
Some other important points:
- The parameters VMLocation, SDNMacPoolStart, SDNMacPoolEnd can use default values.
- The following sections should be blank: Muxes, Gateways (Muxes = @())
- If you are deploying microsegmentation for VLAN networks, you should keep the PA network details section blank. Otherwise, if you are deploying overlay networks, please fill in that section.
- Rest of the parameters below the PA network section can be commented out.
A sample file is shown below:

Configure Microsegmentation Policies
Once Network Controller is setup, you can go ahead and deploy your microsegmentation policies.
- The first step is to create a logical network for your workloads hosted on VLAN networks. This is documented here.
- Next, you need to create the security ACL rules that you want to apply to your workloads. This is documented here.
- Once the ACL rules have been created, you can apply them to the network or a network interface.
- For applying ACLs to a traditional VLAN network, see instructions here.
- For applying ACLs to a virtual network, see instructions here.
- For applying ACLs to a network interface, see instructions here.
After the ACL rules have been applied to the network, all virtual machines in that network will get the policies and will have restricted access based on the rules. If the ACL rule has been applied to a network interface, the network interface will get the policies and will have restricted access based on the rules.
So, as you can see, with microsegmentation, you can protect every traffic flow in your HCI cluster, allowing only the flows required for your applications to function. Please try this out and give us feedback at sdn_feedback@microsoft.com. Feel free to reach out for any questions as well.
by Contributed | Apr 28, 2021 | Technology
This article is contributed. See the original author and article here.
We have released a new early technical preview of the JDBC Driver for SQL Server which contains a few additions and changes.
Precompiled binaries are available on GitHub and also on Maven Central.
Below is a summary of the new additions and changes.
Added
- Added replication connection option #1566
Fixed
- Fixed an issue where
trustStorePassword is null when using applicationIntent=ReadOnly #1565
- Fixed an issue where redirected token contains named instance in servername #1568
Getting the latest release
The latest bits are available on our GitHub repository, and Maven Central.
Add the JDBC preview driver to your Maven project by adding the following code to your POM file to include it as a dependency in your project (choose .jre8, .jre11, or .jre15 for your required Java version).
<dependency>
  <groupId>com.microsoft.sqlserver</groupId>
  <artifactId>mssql-jdbc</artifactId>
  <version>9.3.1.jre11</version>
</dependency>
Help us improve the JDBC Driver by taking our survey, filing issues on GitHub or contributing to the project.
Please also check out our
tutorials to get started with developing apps in your programming language of choice and SQL Server.
David Engel
by Contributed | Apr 28, 2021 | Technology
This article is contributed. See the original author and article here.
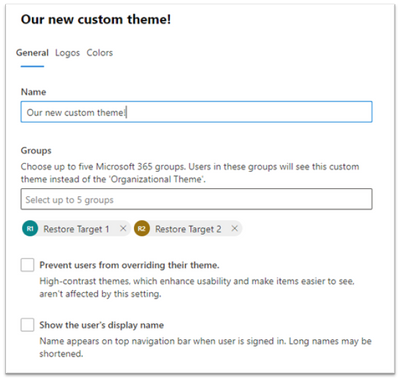
We are so excited to announce an enhanced theming experience for tenants. We have started rolling out the improvements and will be generally available by late May 2021. Through the Microsoft 365 admin center, start playing around with colors and logos and assign custom themes to different Microsoft 365 groups in your organization! The organizational theme is what appears in the top navigation bar for people in your organization.
Creating a new theme dialogue
How to get started
To get started, in the Microsoft 365 admin center navigate to Settings > Org Settings > Organizational profile click on Organizational Themes. From there you can add up to 4 custom themes. Each theme can be customized with different logos and colors. Admins can specify theme logos and specify the URL where users will navigate to when they select the logo.
.gif") Applying a custom theme
Applying a custom theme
What is exciting about these improvements?
- Specify a different logo for dark mode
- Create themes for different groups
- Get instant accessibility feedback on your theme
Read more about the exciting updates here!

by Contributed | Apr 28, 2021 | Technology
This article is contributed. See the original author and article here.
Best practices for incorporating AZ-900 and AI-900 into the curriculum with the University of Lincoln
Guest post by Derek Foster, Associate Professor in Computer Science at University of Lincoln, Microsoft Learn Educator Ambassador.
The School of Computer Science at the University of Lincoln is investing in ensuring students are equipped for excellent career opportunities in high-growth areas such as Cloud Computing and AI. An enabler of this is offering students certification courses such as AZ-900 Microsoft Azure Fundamentals and AI-900 Microsoft Azure AI Fundamentals as part of their degree programmes. Students at Lincoln have taken over 1500 Microsoft certification exams over the last 3 years with the current focus on the new cloud-based Microsoft Fundamentals courses.
Embedding certification in an academic programme is an optimal approach for sustaining a graduate pipeline that meets the needs of industry. This can be taken further by offering academic credit for certification, something Lincoln is working on now for its new MSc Cloud Computing programme. Programmes that include certification can be positioned as ‘industry ready’, an attractive attribute for prospective applicants. Students benefit greatly from the industry-transferable skills they learn during a certification course and provide worthy additions to their graduate CV.
Student engagement is key for achieving certification. There are a number of approaches to support positive engagement when rolling out certification as part of a degree programme. These are outlined below:
Integrate inside a course– This includes integrating the learning materials of a Microsoft Fundamentals course within the academic course and mapping them to the academic learning objectives. This is the most involved approach and requires careful planning.

Integrate alongside a course – This approach is based on running a Fundamentals course alongside a separate academic course, with opportunities for sharing similar knowledge and understanding areas between both courses. This is a relatively low-barrier approach and offers a degree of flexibility.

Integrate as a standalone course – This is the most flexible approach and presents the lowest barriers for integration. A Fundamentals course is typically run as a standalone extra-curricular learning opportunity for your students, or as a short Continuing Professional Development (CPD) course for staff. It is not dependent upon any other academic course and can be run during, or outside a semester.

At Lincoln we find that regardless of the approach to rolling out certification, students much preferred certification courses to be run as academic-led, as opposed to student-led where all learning is undertaken independently. We also suggest that if your school is new to certification then start a pilot trial of your preferred Microsoft Fundamentals course and run it as a standalone, extra-curricular course. This will give you the experience and knowledge needed to think about next steps for your school and tighter integration if your programmes.
Students are keen to engage with activities during their programme that will enhance their career opportunities and can also support their studies in their academic modules. For example the Microsoft Azure Data Fundamentals course is suitable for aligning with Database and Data Science courses, while the Microsoft Azure AI Fundamentals course is great to align with academic AI courses.
Below are some quotes from our students at Lincoln on certification:


Giving students the opportunity to take certification courses and exams as part of their degree programme keen is a fantastic approach to support students with getting ready for industry. The Microsoft Learn for Educators programme support educators with the tools and knowledge necessary to run certification courses. The School of Computer Science at the University of Lincoln is part of this programme and finds the learning materials and community around it an invaluable resource.
If you would like to find out more about incorporating Microsoft Fundamentals certification courses as part of a degree programme then please view the associated webinar here, which was part of the Microsoft Education Skills Webinar series.
Resources on Cloud Curriculum
Published Papers in the ACM Digital Library

by Contributed | Apr 28, 2021 | Technology
This article is contributed. See the original author and article here.
It’s that time of the year for northern hemisphere schools! Time to plan your end of year activities, close out the current school year and ensure you are set-up for success in the new school year or for summer school.
Geri Gillespy, from the Microsoft EDU customer engagement team, has collected many of the best practices and resources into a simple End of Year Guide for IT admins and educators to help make this transition as simple as possible. These guides include check lists with ideas for getting your systems ready and cover everything from archiving teams and collecting devices to updating your to communication procedures. There’s even information on supporting summer school programs for students and staff.
Download the guides below and start your end of school process today!
Download April, 2021 IT Admin Guide
Download April, 2021 Educator Guide
As always, we would love to hear from each of you to learn more about how you prepare for the end of a school year. Your unique experiences and insights are extremely valuable to Microsoft product teams and to other educators around the world. Please post your tips, comments and best practices below to share with the community. See you in the communities!
by Contributed | Apr 28, 2021 | Technology
This article is contributed. See the original author and article here.
You’re about to kick-off another exciting project, this time you and your team will be working for the first time in a cloud based data solution using Azure Synapse Analytics. You want to benefit from your team’s past experience when deploying data solutions on-premises: to use DevOps as a preferred software development methodology, and to use three distinct environments: a Development environment that will serve as a playground, where features can be built, experimented and enhanced as needed; then an intermediate environment, UAT, where it is expected that all these features can be tested as a whole, integrated with other applications, quality ensured and approved by end users; last, a Production environment, where these features can be approved and exposed to users and applications.
In this article we are going to demonstrate how you can use Azure Synapse Analytics integrated with an Azure DevOps Git repository to achieve these goals.
Before you Start…
…make sure you have provisioned and configured the following Azure resources in your local environment:
Azure DevOps
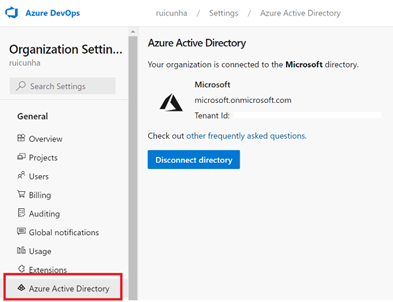
- Make sure you have an Azure DevOps Organization (https://aex.dev.azure.com/) that is connected to your Tenant’s AAD:
- Create a new project under your Azure DevOps Organization. Name the project “synapse-cicd-demo” and for demonstration purposes, keep the project visibility as “Private”. Select “Create” to provision your new project.

- Make sure you have installed the “Synapse Workspace Deployment” Microsoft extension in your Azure DevOps Organization. You can check this by navigating to your “Azure DevOps” home page and by clicking on “Organization settings” on the bottom left corner. From the left-menu , under “General” select “Extensions“. Look under the “Installed” extensions. If you don’t have the Synapse Workspace Deployment extension installed, just hit the “Browse Marketplace” button and search for “Synapse Workspace Deployment” (include double quotes in the search bar to narrow your search). Follow the installation instructions.
Azure Resource Groups
Create one Resource Group per environment, to logically hold and isolate the provisioned resources (DEV, UAT and PRD).
For each Resource Group, provide the following configuration values :
Resource Group Name: rg-cicddemo-<env_suffix>
Region: *Choose the region that is right for you
Azure Synapse Workspace
Create one Azure Synapse Workspace per environment (DEV, UAT and PRD). For each instance of Synapse Workspace, provide the following configuration values :
Workspace Name: syn-cicddemo-workspace-<env_suffix>
Resource Group: rg-cicddemo-<env_suffix>
Managed Resource Group: mrg-cicddemo-<env_suffix>
ADLS Gen2 Account Name: dlscicddemo<env_suffix>
File system name: fs-dlscicddemo-<env_suffix>
Important Note: When provisioning the Azure Synapse Workspace, keep the “Assign myself the Storage Blob Data Contributor role on the Data Lake Storage Gen2 account to interactively query it in the workspace.” option checked.

Storage Accounts
Create one ADLS Gen2 Storage Account per environment (DEV, UAT and PRD). For each instance, provide the following configuration values:
Resource Group: rg-cicddemo-<env_suffix>
Storage Account Name: stgcicddemo<env_suffix>
Performance: Standard
Account Kind: Storage V2
Replication: LRS

Azure Key Vault
Create one instance of Azure Key Vault per environment (DEV, UAT and PRD).For each Key Vault instance, provide the following configuration values:
Resource Group: rg-cicddemo-<env_suffix>
Key vault Name: akv-cicddemo-<env_suffix>
Permission Model: Vault access policy
Add a new access policy:
Configure from template: Key & Secret Management
Key Permissions: Select only “Get” & “List”
Secret Permissions: Select only “Get” & “List”
Select principal: Select the Synapse Workspace principal “syn-cicddemo-workspace-<env_suffix>”
Add a new secret:
Upload options: Manual
Name: adls-blob-key
Value: Paste the connection string to your storage account stgcicddemo<env_suffix>.
Note:To obtain the connection string, navigate to the storage account resource page and under Settings, select “Access Keys“.
Select “Show keys” and copy the “Connection String” value under “Key1“.


Step 1 : Setup your code repository in Synapse Workspace
Before you proceed with your Synapse artifacts creation, you need to setup the Workspace code repository. Make sure you perform all the actions below using your Development Synapse Workspace only. The UAT and Production environments are Live Synapse Workspaces, they don’t need to be integrated with your Git Repository as changes to the features code are only made in the development workspace.
Follow these steps to start configuring your code repository:
- In your “syn-cicddemo-workspace-dev” Synapse Workspace, navigate to the “Manage Hub” and under “Source Control” select “Git Configuration“.

- Select “Configure” to start the configuration process.
- Select “Azure DevOps Git” as the Repository type and then select your Azure Active Directory. Hit the “Continue” button.
- Provide your “Azure DevOps organization name” , your “Project name” and your “Repository name” (both as “synapse-cicd-demo).
- When prompted for the “Collaboration Branch”, create a new branch and name it “master”. Keep the Publish branch as “workspace_publish” and your Root folder as “/“.
Note: If you have any existing resources in the workspace you can import those resources to the master branch by checking the “Import existing resources to repository” option. Otherwise you can keep this option unchecked.

- Hit the “Apply” button to finish the repository configuration. When prompted to specify the working branch, choose to create a new branch as it will act as your new feature branch. As an example, you can name this working branch as “new_feature”. When you apply your settings you will end up with a similar configuration as below:

Step 2 : Create your artifacts in the Development Synapse Workspace
Now it’s time to have some artifacts created in the Development Workspace so they can be automatically deployed to the UAT environment and then to the Production environment. To achieve that, you need to perform the following steps:
Important note: before you begin, make sure you are working under the “new_feature” branch.
- Navigate to the “Integrate” Hub and hit the (+) sign to create a new Pipeline.

- Rename the pipeline as “p_cicd_demo” and add a “Wait” activity just for demo purposes. When connected to a Git Repository you don’t need to publish your changes as you do in Synapse Live mode, you can commit (save) your changes by selecting “Commit”.
- Navigate to the “Manage Hub” and select “Linked Services” under “External Connections“. Create a new Linked Service and choose Azure Key Vault as the connector. Name your Linked Service as “LS_AKV” and specify the Base URL (you can get this URL from your Key Vault Overview page). Before you apply your changes, don’t forget to test your Linked Service connection.

- The next step is to create a Linked Service to your storage account. Configure your Linked Service as follows:

By completing this last step, you should have the following Workspace artifacts created in your “new_feature” branch ready to be delivered to the CI/CD Pipeline:
Pipeline: p_cicd_demo
Linked Services: LS_AKV (Azure Key Vault) and LS_BLOB (Azure Blob Storage)
Step 3 : CI/CD – Synapse Workspace
Now that you have created some Synapse Workspace artifacts to deploy, you need to shift your attention to the CI/CD aspect of Azure Synapse. First, you need to publish your new features into the collaboration branch (“master”) and deploy the ARM templates into the Azure DevOps Git repository (“workspace_publish” branch). These templates will be used to deploy your features in the UAT and PROD environments.
- Make sure you are using the “new_feature” branch and select “Create pull request”.

- You will be redirected to the “Pull Requests” page in your Azure DevOps project. Provide a title for your first pull request and then select “Create” .
- You can now proceed by (optionally) approving the pull request and by selecting “Complete” .
- Keep the default “Merge Type” settings as “Merge (no fast forward)” and select “Complete Merge”.
- After completing the pull request, it’s time to publish our changes to the Workspace and to generate and save the ARM templates in the publish branch (“workspace_publish”).
- Back to your Development Synapse Workpace, select the “master branch” and hit the “Publish” button.

You can validate that your new artifacts are available in the workspace by switching to Synapse Live mode:

Step 4 : CI/CD – Azure DevOps
Now that you have your code in the Synapse Development Workspace ready to be deployed to a new target environment, it’s now time to prepare all the Azure DevOps configuration to automate this deployment.
- Navigate to your Azure DevOps project page and from the left-menu, under “Pipelines“, select “Library“.
- Create two Variable Groups: one for UAT (UAT_Environment) and another one for PRD (PROD_Environment). During the configuration of these Variable Groups, add a new variable “Environment” and set the value as “uat” and “prd” respectively. Apply your changes by selecting “Save“.

- The next step is to create a Release Pipeline. From the left-menu, under “Pipelines“, select “Releases” and then select “New Pipeline“
- When prompted to “Select a template“, start with an “Empty Job” and then name the Stage 1 as “UAT“

- Select “Variables” tab and then select the “Pipeline variables” blade. As an example, you are going to add these variables below to your release pipeline. These variables are using the newly created Variable Group variable $(Environment) as it will be necessary when overriding template parameters during the deploy of the release to the target environment. Hit the “Save” button to apply your changes

- Now it’s time to add variable groups to our release pipeline. This is done by linking the Release Pipeline to the Variable Groups. In this case, you are going to link the new release pipeline to the “UAT_Environment” and “PROD_Environment” Variable Groups. Select the “Variable groups” tab.

- Hit the “Link variable group” button and select “UAT_Environment“. Under Variable group scope, select “Stages” and select the “UAT” stage. Select “Link” to apply your changes and then hit the “Save” action button to save your changes.
Note: You will link the “PRD_Environment” Variable Group later, when configuring the PRD stage. Just skip it for now.
- Select the “Pipeline” tab and select “+ Add” to add an artifact to your Release Pipeline. Provide the following information and hit the “Add” to save your changes.

- To configure the “UAT” stage, select the “Tasks” tab. You are going to add a new task to the “Agent job“. Hit the “+” button to add a new task and then search for “Synapse Workspace Deployment“. Click on the Synapse task and select “Add” to add this extension to your Agent job.
- Under the “Agent job” blade, click on the “Synapse deployment task” and provide the following configuration settings:
Display Name: provide a name for your task
Template: specify your Workspace ARM template. Hit the (…) action button to navigate to your Artifact folder and select the “TemplateForWorkspace.json” file

Template parameters: repeat the same process as above, but now you have to select the “TemplateParametersForWorkspace.json” file
Synapse workspace connection type: provide your subscription (some authorization to configure an Azure service connection might be necessary so if that’s the case, hit the “Authorize” button.
Synapse workspace resource group: rg-cicddemo-$(Environment)
Synapse workspace name: syn-cicddemo-workspace-$(Environment)
OverrideParameters: Specify any ARM parameters that you want to override when deploying from source to target environment. In this example, we will override the workspace name, the key vault URI and the workspace storage account URl. The parameter names can be found in workspace_publish branch (“TemplateParametersForWorkspace.json”).


Important Notes:
$(workspacename) , $(keyvaulturl) and $(workspacestorage) : these are the Pipeline Variables you have creates in step 5.
$(Environment) is the Variable Group variable that you have created in step 2.
You don’t need to override the Blob Linked Service “LS_BLOB_properties_typeProperties_connectionString_secretName” parameter as the secret name “adls-blob-key” is the same for all environments (for example, it would be necessary to override this parameter if we had defined the secret name as adls-blob-key-dev for DEV, adls-blob-key-uat for UAT or adls-blob-key-prd for PROD).
- Once you have completed the task configuration, from the upper right corner, hit the “Save” button and select “Create Release” to initiate the release deployment into the UAT environment.
- Click on the “UAT” stage and then select “Create” to create your new release. After creating your release, select “View Releases” and you should now see your new release “Release-1” under the “Releases” tab ready to be deployed. Now you can click on the “UAT” stage name under “Stages” header attribute.

- Hit the “Deploy” button to start the deploy of your release

- Keep track of the deploy progress by selecting the “Logs” tab. When the deploy gets finished, you can also download the logs for troubleshooting purposes. The deploy of your first release to the UAT Synapse Workspace will probably result in a similar error like shown in these figures:

Click on the error message above to expand the log window to get more details:

- Most likely this Authorization error is due to missing Synapse RBAC permissions in the target Synapse Workspace (UAT). You need to navigate to the UAT Synapse Workspace “Manage Hub“, select “Access Control” under “Security” and “+ Add” a role assignment to the Service Principal of Azure DevOps service.
- Select the “Synapse Artifact Publisher” role and then copy the Service Principal ID from the log error message and paste in the “Select user”. Make sure the Service principal is selected and then hit the “Apply” but to confirm your changes.
Important Note: To avoid facing a similar error when deploying to the PROD environment, you can repeat these Role Assignment steps in the PROD Synapse Workspace.

Back to the Azure DevOps Release page, we can hit again the “Deploy” button to redeploy the release. Check the “Logs” tab to confirm that all the steps were succeeded.


Step 5 : Validate your deploy in UAT Synapse Workspace
Now that your first release was successful, we need to validate the deployment to the UAT Synapse Workspace. Follow these steps:
- Use the Azure Portal to navigate to the UAT Synapse Workspace
- From the left-menu, select the “Integrate Hub” and confirm the deploy of the newly created pipeline “p_cicd_demo“
- Now select the “Manage Hub“, and confirm the deploy of the newly created Linked Services. Click on the Azure Key Vault Linked Service you will notice that the Base URL is now pointing to the UAT Key Vault address. Test your Linked Service connection to make sure everything is working as expected: you are connecting to the UAT Key Vault.

Step 6 : UAT Deploy Automation and Production release management
So far, you have successfully configured your DEV Synapse Workspace CI/CD integration and the manual release of your Synapse artifacts from the Development Environment to the UAT environment.
This step will help you automating the deploy of your Development features to the UAT environment and to have them manually approved and triggered to the final PROD environment:
- Navigate to your Azure DevOps Project, and from the left-menu, under “Pipelines“, select “Releases” and hit the “Edit” button to modify your “New release pipeline“
- Mouse over the UAT stage and hit the “Clone” icon to duplicate the UAT stage.

- Click on the “Copy of UAT” stage and rename it to “PROD“. Click on the “1 job, 1 task” link on the “PROD” stage.

- Select the “Variables” tab and then select “Variable groups“. It’s now time to link the PRD_Environment variable group to the PROD stage. Hit the “Link variable group” button and select the “PRD_Environment” variable group. Make sure you select “PROD” stage under “Variable Group scope” option. Hit the “Link” button to apply your changes. Verify that the scope of each variable group is correct. To adjust the scope of your Variable Groups you just need to mouse over the Variable Group name and click the “More Actions…” button to modify the scope (figure below).

- Select the “Pipeline” tab. You are going to setup the deployment automation from DEV to UAT by clicking on the Thunderbolt icon on the “DEV” artifact (figure below).
- Enable the “Continuous deployment trigger” and under “Branch filters” select the “workspace_publish” branch. By doing this, a release to the UAT environment will be triggered only if there is a Git push that contains one or more commits to this branch. Hit the “Save” button to save your changes.

- Now click the “Pre-deployment conditions” icon on the “PROD” stage. To control the release to Production , in this example you will setup the user(s) (release manager(s)) responsible for approving or rejecting the deployment of your new features from UAT to PROD.

Under “Pre-deployment approvals“, specify the user(s) responsible for approving or rejecting the release to PROD environment

Close the “Pre-deployment conditions” form and select “Save” to apply your changes.

Step 7: End-to-End validation of your CI/CD pipeline
Now that you have configured your new release pipeline to deploy your DEV artifacts into UAT and PRD, it’s now time to make a final test and see how things work from an end-to-end perspective. As an example, execute the following actions:
- Open you DEV Synapse Workspace “syn-cicddemo-workspace-dev“, and make sure you select your “new_feature” branch. Edit you Azure Key Vault Linked Service. Type something like “This text will automatically appear in UAT and in PRD if manually approved” in the Linked Service description and save your changes.
- Select the option to create a new pull request:

- Select “Create” to proceed with the creation of the pull request, and then hit the “Complete” button. When prompted to complete the pull request, keep the default settings and select “Complete merge“.
- After completing the Pull Request, you can go back to your DEV Synapse Workspace and select your “master” branch. Hit the “Publish” button to deploy your changes to the Dev Workspace and to publish the ARM templates to your workspace_publish branch. This will trigger your UAT “Release-2“. As you can see, under “Stages” the UAT blue icon represents that the stage is in progress and the PROD stage has not started.

Once the UAT stage is completed, you will notice a blue icon in your PROD stage, and if you mouse over a tooltip will be displayed saying the release approval is pending.

- Hit the “PROD” button and then select “Approve“. A few seconds after your approval, the PROD stage will begin the release deployment to the Production Synapse Workspace. Wait a few seconds until you see both stage icons as successful:

- Now open the Production Synapse Workspace to confirm the deployment of Synapse Artifacts. Select the “Manage Hub” and under “External connections” select “Linked services“. Open the Linked Service to Azure Key Vault. You’ll notice the Linked Service Description as “This text will automatically appear in UAT and in PRD if manually approved” and you can test your Linked Service connection to the AKV url: “https://kv-cicddemo-prd.vault.azure.net/”.
Congratulations, you have successfully deployed your Synapse artifacts from the Development environment to the UAT and PROD environments!

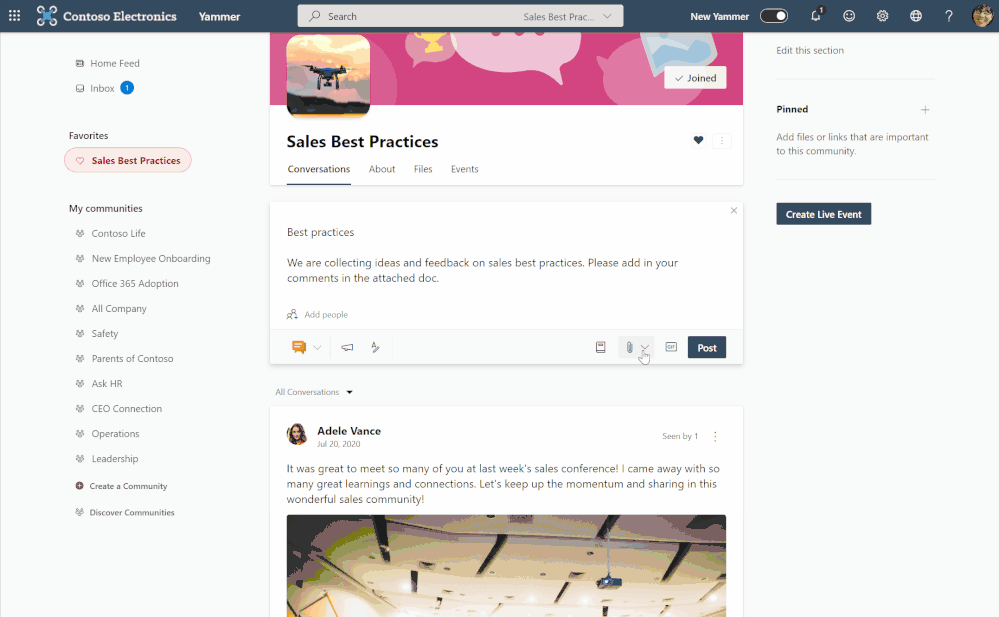
by Contributed | Apr 28, 2021 | Technology
This article is contributed. See the original author and article here.
Yammer along with OneDrive offers employees a way to come together to connect and collaborate. Check out the latest OneDrive blog for more details on the latest ways to use these products together, including:
- Bring together diverse groups and build communities in Yammer
- Easily upload OneDrive files into Yammer discussions
- Selecting files from Shared libraries
- Securely sharing and managing files
Learn more on our latest episode of Sync Up, a OneDrive podcast to hear the experts discuss Yammer and how OneDrive supports tech engagement among your employees.
https://html5-player.libsyn.com/embed/episode/id/18830042/height/90/theme/custom/thumbnail/yes/direction/backward/render-playlist/no/custom-color/f99400/

Recent Comments