by Contributed | Apr 30, 2021 | Technology
This article is contributed. See the original author and article here.
Welcome to the April edition of What’s new in Teams – the monthly post where we’re keeping you updated on all the new features and innovation that we have made available in Microsoft Teams.
This month we’re also excited to announce we’ve launched our new Microsoft Teams Instagram account. Go check it out for fun updates and new ways to engage with the product.
Let’s check out all the new features we have delivered this month:
Meetings and webinars
Devices
Chat and Collaboration
Management
Frontline worker
Government
Meetings and webinars
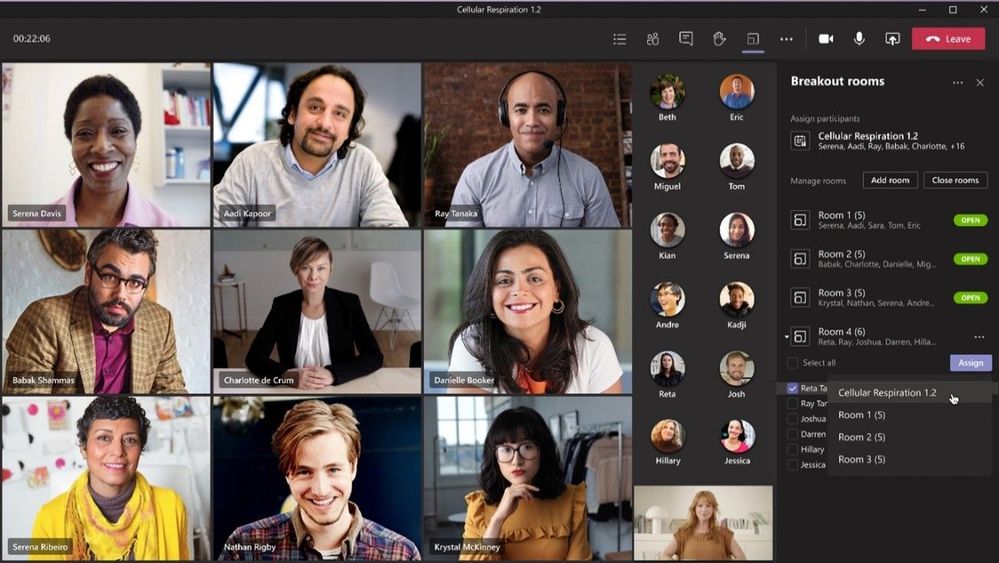
Breakout room retention and participant reassignment
Organizers can now reassign participants even when rooms are opened. Previously, you could only reassign when rooms were closed. Breakout room assignments also now persist over multiple sessions. These features are useful for efficiently managing discussions and ensuring the right participants are in each breakout. Learn more
Invite-only meeting options
A new meeting setting is now available in Teams meeting options that automatically sends those who were not originally invited by the organizer to the lobby. For example, if an invitee forwards a meeting invitation to a colleague, when that person tries to join, they’ll be directed to wait in the lobby until the host selects to admit them. This helps prevent those uninvited from joining the meeting. Learn more

Polls in Teams meetings has advanced capabilities for expanded options, intelligent suggestions and analytics
Attendees and guest attendees on mobile devices can now participate in Polls in Teams meetings. Also, discover intelligent poll suggestions to prepare relevant poll questions quickly and analyze responses to take swift action post-meeting. Learn More

Enhanced meeting creation and expiration policies
For added security and compliance, Teams meetings and join links are disabled for users whose scheduling permissions have been revoked. Previously, a user could continue to reuse their old meeting join links after their scheduling capabilities have been disabled. This policy update automatically expires those old meeting links so they can’t be reused.
Improvements to audio permissions settings for attendees
As a meeting presenter and organizer, you can now manage attendee audio permissions with greater flexibility. Attendees no longer need to request to speak for you to allow them to unmute, and you also have the ability to prevent individual attendees from unmuting. Learn more
External presenter support for Live Events
For Live Events created in Teams, you can allow anonymous users who do not have an Microsoft Service Account (MSA) or Azure Active Directory (AAD) identity to be a presenter. This makes it easier for people outside of your organization to deliver presentations for your Live Events. Learn more
Producer Management in Teams Live Events
You can now manage a live event as a Producer in a separate Teams window, so you can simultaneously support the event, while still collaborating with others on Teams.
Custom Backgrounds on iOS for Teams meetings
Custom backgrounds are now available on iOS. Select from Microsoft provided backgrounds or one of your own directly from your iOS mobile device. Now you can make your video meetings more fun and personal while you’re on the go. Learn more

Teams casting from Android and iOS Teams App
For quick ad-hoc meetings that don’t require a formal scheduled meeting, users can leverage Teams casting to wirelessly connect to a Teams Room and display content from their mobile device. Users can broadcast their screen and share content stored locally on their device or accessible via Teams or OneDrive. Learn more
Devices
Microsoft Teams Rooms on Windows updates
Microsoft Teams Rooms on Windows, version 4.8.19.0, is available in the Teams Admin Center. The latest update includes:
- Improved meeting join experience – Customers using Advanced Threat Protection safe link service can now reliably offer external users a seamless meeting join experience. Organizations using a third-party URL rewrite service just need to add teams.microsoft.com domain to their exception list.
Microsoft Teams Rooms on Android updates
- Center of room meeting console support – Meeting participants can now control the center of room touch control console the same way they do on Windows devices, using directional keys to navigate. The touch console includes calendar functionality to view current and upcoming meetings, ability to view participants or add more, and features the most common meeting and calling functionalities. Currently available with Poly TC8 and Yealink CTP18 devices.

Improved display experience in Microsoft Teams Rooms
Get a full view of a conference room’s daily schedule, join a meeting, and interact with common features like calling—right from the easy-to-navigate, front of-room display screen.
Join meetings from the room console in personal mode
Bring more Microsoft Teams Rooms experiences to meetings by signing in with your personal credentials and navigating from the center-of-room touchscreen console. From the console, you can apply background effects, record the meeting, and initiate whiteboarding to share with both in room and remote participants.

Intelligent detection and remediation for Microsoft Teams Rooms
The service in Microsoft Teams Rooms Premium uses Microsoft Defender for Endpoint to provide advanced threat protection capabilities that can detect incidents, vulnerabilities, and missing security KBs. The service will take action based on these detections to apply necessary updates, keeping your rooms secure and ready to go. Learn more
Threat detection and security update management for Microsoft Teams Rooms
The service in Microsoft Teams Rooms Premium uses Microsoft Defender for Endpoint to provide advanced threat protection capabilities that can detect incidents, vulnerabilities, and missing security KBs. The service will take action based on these detections to apply necessary updates, keeping your rooms secure and ready to go.
Microsoft and Surface Accessories Certified for Teams
The first line up of Microsoft and Surface devices certified for Teams include the Microsoft Modern USB & Wireless headsets, providing both a wired and wireless option for headsets that keep Teams call controls at user’s fingertips. Additionally, we have the first Surface audio device certified for Teams. This premium headset has a dedicated Teams button and an advanced microphone system to provide great voice clarity in your meetings.

For users who prefer audio to be amplified by speakerphone, the new Microsoft Modern USB-C Speaker captures and delivers sound such that users are heard clearly in their calls and meetings. A convenient Teams button brings up the interface and a simple USB-C wire keeps users connected all day.

The new Microsoft Modern Webcam lets you be seen clearly in their video calls and meetings and activates Teams features like background blur and replacement. It can be easily attached to a laptop, monitor, or tripod and connected to a PC or docking station via USB cable. 1080p video, 78 degree field of view, and True Look technology makes this device great for personal office use. And when you don’t want to be on video, a privacy shutter slides closed with an LED indicator letting you know when you are and are not seen in meetings.

New web cameras from Poly and Yealink
The Yealink UVC20 is a personal web camera designed for easy plug and play functionality. Connect to a laptop or monitor, a privacy shutter lets you switch off video when you need to and a powerful 5 megapixel camera let’s you be seen even in low or backlit conditions.

The Poly Studio P5 is the first web camera from the brand designed entirely with the personal office in mind. It’s compact form factor, exceptional camera optics, and digital zoom technology work for where users work, allowing you to show up to your video calls and meetings with confidence and clarity.

Lower-cost phones from Audiocodes and Yealink
The Audiocodes C435HD and the Yealink MP52 are two new phones with a lighter weight experience bringing them to a lower price point. Now you can experience the same richness of a Teams call with devices better suited for your budget.

Chat and collaboration
Product feedback tool in Microsoft Teams
We are here to listen for your feedback. Teams automatically reviews the feedback that you submit, and provide help documentation related to the topic, if available. Additionally, once enabled by Teams administrator, you have the option to share your email address when submitting feedback in Teams, to allow for Microsoft to follow-up with you.
Windows 10 native notifications in Teams
You can now choose the style of your notifications: built-in Teams or Windows native notifications. The latter brings a suite of benefits, like respecting focus assist mode which enables you to avoid distracting notifications when you need to focus, and integrating with Windows 10 action center to helps you review your notifications in one place. If you have a Windows build 10.0.17763.288 or higher, you can make this change in Teams notifications settings.

Visual update to Microsoft Teams mobile app on Android and iOS
The Teams mobile app has a new visual look and feel that delivers new headers, icons, and styling along with the ability to automatically switch to dark theme when you set your device to dark.
Organize chats in mobile app
In the Teams mobile app, you are now able to pin chats and filter the Chat list. This is great for when you quickly want to get back into important conversations! Pinned chats are also rolling out on Android shortly.
Emoji library and GIFs in mobile app on Android and iOS
In the Teams mobile app, there is an expanded library of emojis, and the ability to trim GIFs directly in the app.
Management
Preconfigured website tab in Team Templates
As an admin you can now add a URL of their choice to the website tab in a team template. When the end-user creates a team using the pre-built template, it will include the preset website you specified, making it easier to distribute standardized content to the entire organization. End-users can access important web resources, such as company sites, commonly visited pages, online documents, from their team with minimal manual set up.

App customization and branding
With the app customization and branding capability, app developers are able to specify if they want to provide the option for their customers to customize the app. If the developers provide this option, admins are able to customize app properties like app name, descriptions, icons and more to deliver a branded app experience right within Teams.

Teams user usage report in Teams client
The Teams user usage report provides you a view into your Teams activities and usage. You can generate insights and metrics on a per-team and cross-team basis to understand your interaction with peers and across the organization. The reports are generated with privacy in mind, so only you can your own data.
Anonymous user usage reports
As a Teams admin you have the option to anonymize user data, protecting user privacy while viewing, downloading, sharing, and accessing the Teams usage report data. Once enabled, personally identifiable information like username, email addresses, and Active Directory IDs are anonymized.
Custom policy packages
Custom policy packages enable Teams admins to configure their own set of policy packages tailored to users with similar roles in their organization. We have also added the capability to assign policy packages to a group so you can assign multiple policies to a group of users.
Frontline worker
Time Clock APIs
New APIs (Application Programming Interface) for Time Clock allows integrations into your organization’s Time & Attendance system. to enable rules for how early or late someone can clock-in/out and new processes like a health screening survey that must be completed before clocking-in for the day. Learn more

Shift Settings & Permissions
With the Teams Shifts Policy, an organization can now allow users who aren’t the owner of a Teams site to be able to edit and manage Shift schedules, approve swaps, and authorize time off requests. This enables you as a managers or supervisor to have schedule ownership without having to be the owners of the entire Teams site, reducing instances of accidentally deleting or modifying the Teams site. Learn more

Enhanced tasks publishing capabilities
We have enhanced task publishing so operations and corporate teams can more clearly manage and plan their task distribution to frontline locations. As a member of a publishing team you can now see separate Drafts, Published, and Unpublished sections to easily see which task lists are at which stage of their lifecycle. We’ve also made it easier to see the impact of publishing tasks at a glance with an updated summary that displays the number of tasks and the number of recipient teams, so you can easily confirm that everything looks right before sending. Learn more

Government
These features currently available to Microsoft’s commercial customers in multi-tenant cloud environments are now rolling out to our customers in US Government Community Cloud (GCC), US Government Community Cloud High (GCC-High), and/or United States Department of Defense (DoD).
Manage meeting options
Organizers are now able to modify the user experience across desktop, mobile, and web by using the new Meeting Options to customize their meeting safety and security settings. Meeting Options can be accessed in the Teams meeting invitation details in Outlook and Teams Calendar. Available in GCC-High.
Invite-only meeting options
A new meeting setting is now available in Teams meeting options that automatically sends those who were not originally invited by the organizer to the lobby. For example, if an invitee forwards a meeting invitation to a colleague, when that person tries to join, they’ll be directed to wait in the lobby until the host selects to admit them. This helps prevent those uninvited from joining the meeting. Available in GCC. Learn more
Enhanced meeting creation and expiration policies
For added security and compliance, Teams meetings and join links are disabled for users whose scheduling permissions have been revoked. Previously, a user could continue to reuse their old meeting join links after their scheduling capabilities have been disabled. This policy update automatically expires those old meeting links so they can’t be reused. Available in GCC.
Improvements to audio permissions settings for attendees
Meeting presenters and organizers can now manage attendee audio permissions with greater flexibility. Attendees no longer must request to speak for the organizer or presenters to allow them to unmute, and presenters and organizers can prevent individual attendees from unmuting instead of all attendees at once. Available in GCC. Learn more
More labels in Planner
Labels are a quick, visual way to categorize similar tasks in Planner and we’ve increased the number of labels to help you get even more organized. You can now add up to 25 labels in all different colors to your tasks in Planner web, mobile, and in Microsoft Teams. Available in GCC, GCC-High and DoD. Available for GCC, GCC-High and DoD. Learn more
New way to update the Teams Rooms app
You can now use Teams meetings and calling functionality in your Teams Rooms on Windows. IT Admins can easily perform a manual update. Simply download and run an offline app update PowerShell script to your Teams Rooms devices. Follow the steps in this article to get started. Available in GCC-High.
Out of Office Setting
Let others know that you are not available by scheduling your Out of Office in Teams. During this time, your presence status changes to “Out of Office” and your status message is displayed when someone reaches out to you via chat. Additionally, your Outlook calendar and automatic replies are updated accordingly. Available for GCC.
by Contributed | Apr 29, 2021 | Technology
This article is contributed. See the original author and article here.
I received this great content from our partner team at NetApp. I felt it will be good to post this as Moodle is a very popular platform, and widely used all over the globe.
Thanks for your great contribution :
Moodle is one of the most popular and widely adopted free, open-source learning management systems written in PHP. Acquiring more than 30% market share globally, there are more than 180,000 Moodle customers worldwide. Moodle customers vary across industry verticals spanning Education Institutions, Enterprises, IT companies, FSI Institutions, etc.
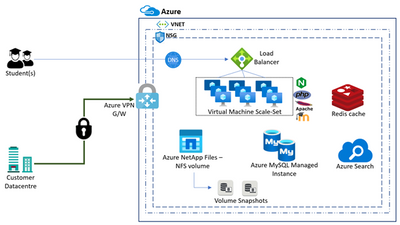
Azure NetApp Files is an Azure service for migration and running the most demanding enterprise file-workloads in the cloud: native SMBv3.0 and NFS(v3.0 and v4.1) file shares, databases, SAP, and high-performance computing applications, with no code, changes.
Moodle architecture relies on NFS storage for content storage.
With Azure NetApp Files, we can set up native NFS v3 or NFS v4.1 volume. Steps for the same are listed here:
Pre-requisites
- You need to have access to Azure portal and active subscription to provision resources
- You must have already set up a capacity pool.
- A subnet must be delegated to Azure NetApp Files.
- The NFS client should be in the same VNet or peered VNet as the Azure NetApp Files volume. Connecting from outside the VNet is supported; however, it will introduce additional latency and decrease overall performance.
- Ensure that the NFS client is up-to-date and running the latest updates for the operating system.
Create an Azure NFS volume
- Click the Volumes blade from the Capacity Pools blade. Click + Add volume to create a volume.

- In the Create a Volume window, click Create, and provide information for the following fields under the Basics tab:
- Volume name
Specify the name for the volume that you are creating.
A volume name must be unique within each capacity pool. It must be at least three characters long. You can use any alphanumeric characters.
You cannot use default or bin as the volume name.
- Capacity pool
Specify the capacity pool where you want the volume to be created.
- Quota
Specify the amount of logical storage that is allocated to the volume.
The Available quota field shows the amount of unused space in the chosen capacity pool that you can use towards creating a new volume. The size of the new volume must not exceed the available quota.
- Throughput (MiB/S)
If the volume is created in a manual QoS capacity pool, specify the throughput you want for the volume.
If the volume is created in an auto QoS capacity pool, the value displayed in this field is (quota x service level throughput).
- Virtual network
Specify the Azure virtual network (VNet) from which you want to access the volume.
The VNet you specify must have a subnet delegated to Azure NetApp Files. The Azure NetApp Files service can be accessed only from the same VNet or from a VNet that is in the same region as the volume through VNet peering. You can also access the volume from your on-premises network through Express Route.
- Subnet
Specify the subnet that you want to use for the volume.
The subnet you specify must be delegated to Azure NetApp Files.

If you have not delegated a subnet, you can click Create new on the Create a Volume page. Then in the Create Subnet page, specify the subnet information, and select Microsoft.NetApp/volumes to delegate the subnet for Azure NetApp Files. In each VNet, only one subnet can be delegated to Azure NetApp Files

- Click Protocol, and then complete the following actions:
- Select NFS as the protocol type for the volume.
- Specify the file path that will be used to create the export path for the new volume. The export path is used to mount and access the volume.
The file path name can contain letters, numbers, and hyphens (“-“) only. It must be between 16 and 40 characters in length. The file path must be unique within each subscription and each region

- Click Review + Create to review the volume details. Then click Create to create the volume.
The volume you created appears in the Volumes page.
Azure NetApp Files NFS v3 volumes support NFS multipathing with nconnect in many Linux Client OS. For Best performance, it is recommended to size the VM SKUs correctly to support Azure accelerated networking and nconnect while deploying VMs in the Scale-Set, in addition to checking guest OS support for nconnect.
Instructions for mounting ANF NFS volumes on Moodle application server(s) are as below:
You can mount or unmount a volume for Windows or Linux virtual machines as necessary. The mount instructions for Linux virtual machines are available on Azure NetApp Files:
Requirements
- You must have at least one export policy to be able to access an NFS volume.
- To mount an NFS volume successfully, ensure that the following NFS ports are open between the client and the NFS volumes:
- 111 TCP/UDP = RPCBIND/Portmapper
- 635 TCP/UDP = mountd
- 2049 TCP/UDP = nfs
- 4045 TCP/UDP = nlockmgr (NFSv3 only)
- 4046 TCP/UDP = status (NFSv3 only)
Steps
- Click the Volumes blade, and then select the volume for which you want to mount.
- Click Mount instructions from the selected volume, and then follow the instructions to mount the volume.

- If you are mounting an NFS volume, ensure that you use the vers option in the mount command to specify the NFS protocol version that corresponds to the volume you want to mount.
- If you are using NFSv4.1, use the following command to mount your file system: sudo mount -t nfs -o rw,hard,rsize=65536,wsize=65536,vers=4.1,tcp,sec=sys $MOUNTTARGETIPADDRESS:/$VOLUMENAME $MOUNTPOINT
Note
If you use NFSv4.1, ensure that all VMs mounting the export use unique hostnames.
- If you want to have an NFS volume automatically mounted when an Azure VM is started or rebooted, add an entry to the /etc/fstab file on the host.
For example: $ANFIP:/$FILEPATH /$MOUNTPOINT nfs bg,rw,hard,noatime,nolock,rsize=65536,wsize=65536,vers=3,tcp,_netdev 0 0
- $ANFIP is the IP address of the Azure NetApp Files volume found in the volume properties blade.
- $FILEPATH is the export path of the Azure NetApp Files volume.
- $MOUNTPOINT is the directory created on the Linux host used to mount the NFS export.
NFS storage with Moodle application typically hosts a large number of files and folders. Azure NetApp Files snapshot capabilities can be very useful with quick recovery of these files or folders or entire volumes or revert the entire volume from snapshot state.
by Contributed | Apr 29, 2021 | Technology
This article is contributed. See the original author and article here.
The FastTrack for Azure SAP Team would like to share the new Getting Started Guide for SAP on Azure with Azure DevOps.
This Getting Started Guide is always pointing to official SAP on Azure documentation which outlines best practises, supported configurations together with hints to SAP requirements (SAP notes). The guide however will help filter the information that is needed for a specific project and scenario.
This guide helps you create a project pre-populated with tasks and filtered links to all key documentation for a particular scenario at no additional license cost using the Azure DevOps Generator here.
Generating a project in Azure DevOps allows you to assign tasks and steps to teams and users with all relevant information for deploying SAP on Azure successfully. The project is always linked to the latest Microsoft documentation and contains queries for specific scenarios for SAP infrastructure, and integration topics.
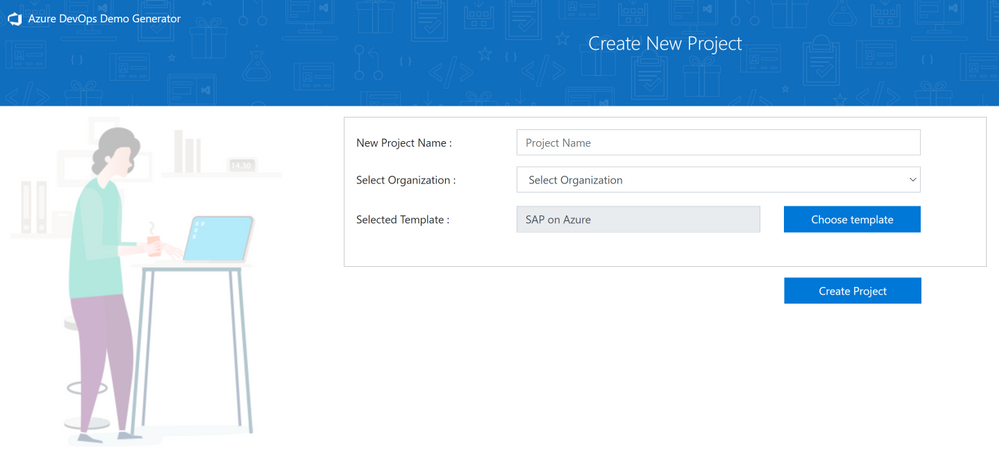
Project Creation
To create a project in Azure DevOps you will need a valid user and organization. Details on how to create a user, organisation and project in Azure DevOps Generator can be found here.
Once the user and organization has been created and you have signed in you can create a new project using the SAP on Azure template.
Enter a Project Name, select your organization and then choose the SAP on Azure template.

Create Project. After a short progress update the project, team and AzureDevOps elements will be provisioned ready for use.

Using AzureDevOps
Selecting Navigate to project will take you directly into Azure DevOps to begin reviewing Boards, Backlogs and Queries for your project team.

Selecting Backlogs on the main menu will show the full SAP on Azure Getting Started guide covering all topics by User Story and Task.

This list can be filtered on your own SAP on Azure project by selecting Queries and then All to view Shared Queries for different scenarios. As an example, you can select SAP on SQL Server and then Run Query from the action menu to only see the Stories and Tasks that apply the deploying SAP on Azure using the Microsoft SQL Server database.

The filtered list allows different action items to be assigned to team members and provides a checklist of the different tasks which also can be used as project plan.
To get the most out of using AzureDevOps for your SAP on Azure project please review the main documentation here.
by Contributed | Apr 29, 2021 | Technology
This article is contributed. See the original author and article here.
The Azure Sphere 21.04 feature release includes the following components:
- Updated Azure Sphere OS
- Updated Azure Sphere SDK for Windows and for Linux
- Updated Azure Sphere extensions for Visual Studio and for Visual Studio Code
There’s also a new version of the reference development board (RDB) design, new or updated samples, and a new Application note on Wi-Fi configuration options.
If your devices are connected to the internet, they will receive the updated OS from the cloud. You’ll be prompted to install the updated SDK on next use, or you can install it now. To install the latest SDK, see the installation Quickstart for Windows or Linux:
New and changed features in the 21.04 release
Peripheral configuration locking
Azure Sphere chips now have the ability to lock a peripheral configuration. This prevents an attacker from reassigning peripherals even if code is compromised. Thus, peripheral configuration locking adds another layer of security.
Time sync changes
The 21.04 release changes the client ports used by the Azure Sphere device. Previously, the device always used client source port 124. After this release it will use a random UDP client source port between 32678-61000. If this port fails, Azure Sphere then attempts to use port 124 as the UDP client source port.
Ethernet enabled by default
The 21.04 release changes the way the ethernet interface is enabled. Previously, a developer needed to call the Networking_SetInterfaceState command to enable ethernet. After this release, ethernet will automatically be enabled on first reboot after an ethernet board configuration is loaded.
Wi-Fi improvements
The Wi-Fi client performs background scanning at regular intervals. In some cases the client could disconnect when the wi-fi background scan occurred at the same time that a device registered a “beacon lost” signal. We have introduced an offset in the two signals so the system will now listen for beacon signals beyond the scan time.
Delete a product or device group with the CLI
CLI support for deleting a product is now available using the azsphere product delete command.
CLI support for deleting a device group is now available using the azsphere device-group delete command.
View statistics on total memory usage
The azsphere device app show-memory-stats command returns memory usage statistics on total memory usage, user mode usage, and peak user-mode usage for applications running on an attached device. The device must have the appDevelopment device capability configured to run this command.
Support for crash data collection
Optional diagnostic data can now be configured using the CLI to collect a full Linux core dump when an application or system service crashes. You can give consent to enable crash dump collection by using the –allow-crash-dumps-collection parameter in the azsphere device-group update command.
Write capabilities added to Azure Sphere Explorer for Visual Studio or Visual Studio Code
Azure Sphere Explorer for Visual Studio now has the ability to create and update products and device groups. Other changes were made to both the Visual Studio and Visual Studio Code versions of Azure Sphere Explorer to make them functionally equivalent.
Multiple device support in Azure Sphere Explorer for Visual Studio or Visual Studio Code
Azure Sphere Explorer now supports multiple connected devices. One device can be chosen as the active device for a given project. Deployment and debugging of the project is then done on the active device.
New and updated samples, code snippets, and Gallery items
The 21.04 release includes a refactored Azure IoT sample, a new code snippet, and several new items in the Azure Sphere Gallery.
Refactored Azure Sphere sample app for connecting to Azure IoT
Updates to the Azure IoT sample include:
- Dedicated guidance (READMEs) for each starter scenario (connect to Azure IoT Hub or Azure IoT Central) and for each add-on scenario (connecting via the device provisioning service and/or via Azure IoT Edge).
- Refactored codebase with smaller, easier-to-assemble pieces.
- Support for Azure IoT Plug and Play (PnP) – so that the device’s data model “template” is auto-populated when using Azure IoT Central or a PnP-aware client connected to Azure IoT Hub.
- Updated best practice for using the Azure IoT C SDK, in particular to enable connections via the device provisioning service to be established asynchronously.
New code snippet on memory usage
A new code snippet on memory usage demonstrates how to detect and handle unexpected memory usage.
Github gallery samples
More than 10 new projects added to the Azure Sphere Gallery GitHub repository, including:
- tools to evaluate networks’ compatibility with Azure Sphere OS.
- tools to use the littlefs file system.
- a complete design of a realtime demo device (balancing robot), including software, hardware, and mechanical designs.
Hardware reference design changes
Changes to the hardware design of the MT3620 reference development board (RDB) have been made for version 1.7. These changes have been identified through extensive use of the board (both internally and via customer feedback) and as a result of software changes that have enabled features such as Power Down that were not supported at the time the board was originally designed.
The MCU programming and debugging interface has been modified to include a second schematic showing a circuit that enables the PC and reset button to bring a device out of Power Down mode. This is a backwards-compatible change with no changes required to the SDK.
For more information on the 21.04 release, please see the What’s new in Azure Sphere in the customer documentation. To learn about Azure Sphere OS feeds and setting up an evaluation device group, see Azure Sphere OS feeds and Set up devices for OS evaluation.
For self-help technical inquiries, please visit Microsoft Q&A or Stack Overflow. If you require technical support and have a support plan, please submit a support ticket in Microsoft Azure Support or work with your Microsoft Technical Account Manager. If you would like to purchase a support plan, please explore the Azure support plans.
by Contributed | Apr 29, 2021 | Technology
This article is contributed. See the original author and article here.
In our previous installment of Understanding Pipeline Failures and Error Handling, we introduced the difference between TRY-CATCH logic and DO-IF-ELSE logic.
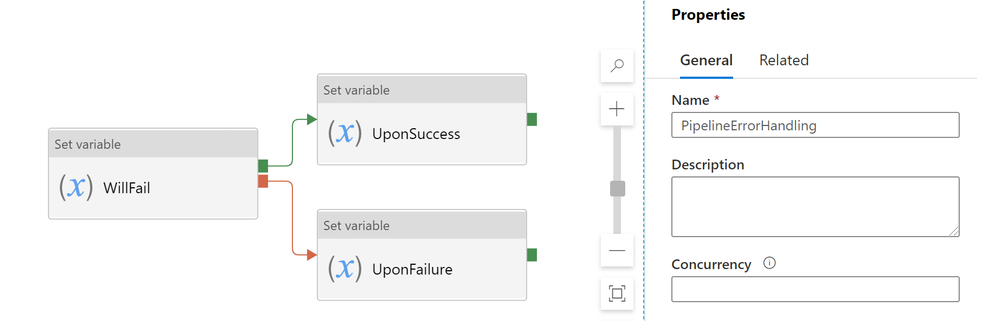
Just a memory refresher, DO-IF-ELSE logic defines both Upon_Success and Upon_Failure paths
If we execute this pipeline, with WillFail activity failing, the whole pipeline will be marked as Failed, as expected

Sometimes users may want a more elegant error handling in their pipeline: despite branching activity (WillFail in this case) failed, I do not want to mark the whole pipeline as Failed, maybe because
- I do not want to block downstream dependent tumbling windows, in case of tumbling window dependency
- branching activity is used to look up a control table, and sometimes it is expected to return empty results and throw an error
To implement the desired behavior, customers may consider DO-IF-SKIP-ELSE block: adding a dummy UponSkipped to the end of the UponSuccess path, like this

If we run this pipeline, WillFail will still fail, but the pipeline will be marked as SUCCESS

In the monitoring view, you can see the difference a dummy UponSkipped activity can make. Notice that PipelineErrorHandlingSuccess is defined with the addition dummy activity, while PipeErrorHandling is not. (And the additional pipeline duration comes from the extra 5 seconds in the dummy wait activity)

Technical reasons for the difference is that, Azure Data Factory defines pipeline success and failures as follows:
- Evaluate outcome for all leaves activities. If a leaf activity was skipped, we evaluate its parent activity instead
- Pipeline result is success if and only if all leaves succeed
Here is an expanded table summarizing the difference:
Approach |
Error Handling Defines |
When Activity Succeeds |
When Activity Fails |
TRY-CATCH |
Only Upon Failure path |
Pipeline shows Success |
Pipeline shows Success |
DO-IF-ELSE |
Upon Failure paths
+
Upon Success path
|
Pipeline shows Success |
Pipeline shows Failure |
DO-IF-SKIP-ELSE |
Upon Failure paths
+
Upon Success path (with a dummy Upon Skipped activity at the end)
|
Pipeline shows Success |
Pipeline shows Success |
by Contributed | Apr 29, 2021 | Technology
This article is contributed. See the original author and article here.
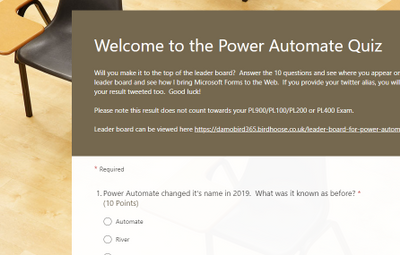
Here is an example Power Automate solution where we query a real SharePoint List acting as a Quiz Leader Board on my dev tenant and bring the contents to this very blog post (at the bottom of the page). Using the Power Automate and the HTTP trigger we can retrieve, embed and display content from our Office 365 environments.
The competition is rife at the top of this Leader Board. The aim is to get 100% and it is ordered by last completed to give everyone a chance to be top, albeit I am sorry to say that there is no official badge for this one.
Want to test your Power Automate knowledge? Click Here
For the first flow of two, using Microsoft Forms and Power Automate I have built a pretty standard process. The user completes the quiz, the form gives them feedback on how well they have done and I capture the answers to a SharePoint List – seen below.

I use the when a new [form] response is submitted trigger and during the next couple of actions I calculate their score again (based on their answers) as the score is not passed back to the Cloud Flow via the Response Body.

What’s the Score?
In order to calculate the score I have created an array via a compose action and used the equals expression. If the response equals the answer, it will return true. I then use a filter action on the item() of each output from the select and filter on true. This will leave me with an array of true values. During the create item score field and tweet action, I use the length() expression (i.e. length of array from 10 possible true answers) to return the number of answers equaling true and multiply by 10 to get the percentage correct.

The final stage of this flow is a condition where I check to see if the user has supplied a twitter handle. If it’s not empty I tweet out their score. The only disappointment here is that Twitter will not let you tag users due to spamming  any attempt to include an @ result in it being stripped out.
The Leader Board
The interesting piece though, is the second flow, using the HTTP trigger action to present the leader board to the web and seen below (at least until my premium trial has not expired). Using the trigger we can run an action to get items, prepare HTML table rows using a select action and send back a response to the website in a fraction of a second. The end user loading the website almost doesn’t know it’s happening, albeit there is a slight delay for the flow to run, i’ll admit. Did you notice the delay in this page loading?

The reponse to the embedded IFrame on my Blog and indeed this article which is simply calling the url provided by the HTTP Request trigger is an HTML table. I create the table header and then using the select action body, I use the join() expression to join the elements of the array with ” into a string and complete the HTML table.

I’m not a web developer and I am sure that there will be slicker ways to embed the results of the http response into your site and for that I would be grateful to hear from those with experience but what do you think of this idea? Are you on the leader board yet?
As things stand – here is the leader board. Can you resist not talking part? Click Here
Tweets with your result will be posted via my twitter handle DamoBird365
Meanwhile, if you are looking for a certificate for your efforts, fill out my form here
Happy quizzing 
by Contributed | Apr 29, 2021 | Technology
This article is contributed. See the original author and article here.
This post will guide you through the process of how to use the Power Apps Language Toolkit to extract a Power Apps .msapp file.
why would you want to have the source code files?
To make your app reusable, so that more people can benefit from it, you will want to share the source code files. Unfortunately, when you save your Canvas App from Power Apps Studio, it is saved in one opaque .msapp file. To be able to get the source files, you will need to use the Power Apps Language Toolkit to extract all files from the .msapp file. This way,
- developers can not only open the source code in their code editor of choice but can effectively manage the code of a Canvas app in GitHub or Azure DevOps. This makes a huge difference as we can’t look into .msapp files.
- makers can still open the .msapp file to easily import an app sample into their environment
Prerequisites
To be able to use the Power Apps Language Toolkit, you will need to
- install Visual Studio Code
- install .NET Core 3.1.x (x64)
- download the Power Apps Language Toolkit
- extract the Power Apps Language Toolkit to a local folder
- open that local folder
- locate the build.cmd file
- rightclick, Run as Administrator
- in the Pop up Window, select more info
- select Run anyway
Please note, that command Prompt will open, show a few lines and then close automatically again.
Please also not, that you can now find a bin folder in the local folder you extracted the PowerApps Language Toolkit to. In this bin folder, you will find a Debug folder and inside of the Debug folder you will find a PASopa folder.
Download the .msapp file
- go to [make.powerapps.com](https://make.powerapps.com)
- log in
- open your app in edit mode
- select File
- select Save as
- select This Computer
- select Download
- move the downloaded .msapp file to your folder in which you extracted the PowerApps Language Toolkit as well
unpack .msapp file
- Now that we have the .msapp file of the app:
- press the WINDOWS key on your keyboard and search for Command Prompt (first few letters should do)
- run as an Administrator
- copy the path of the PASopa folder
- type in Command Prompt `cd <your PASopa path>`
- copy the path of the .msapp file
- create a new folder in your app folder
- copy the path of that new folder
- type in Command Prompt `pasopa -unpack <your msappfile path> <new folder path>`
Please note that you will now find all source code files in that new folder. You can open the folder in a code Editor of your choice, for example Visual Studio Code.
submit as a sample
Well done! If you like to contribute with your app to the PnP Power Apps sample gallery , you can submit your app with these source code files here. To do so, follow these steps:
Now you can submit these source code files as a sample. Please
Please do not forget to provide as well a `README.md` file which explains what your sample is about.
If this all sounds confusing to you and you are new on GitHub – you are more than welcome to attend the Sharing Is Caring sessions, where we guide you through using GitHub and making your first PR.
Sharing Is Caring :sparkling_heart:
by Contributed | Apr 29, 2021 | Technology
This article is contributed. See the original author and article here.
With Azure SQL Managed Instance, you don’t need MS DTC to run distributed transactions! You can now migrate to Azure or build distributed applications with Managed Instance which natively supports cross-instance T-SQL and .NET distributed transactions.
With recent modernization, distributed transactions are supported between Managed Instances as the only supported transaction participants. If your application runs .NET or T-SQL distributed transactions on SQL Server and of course requires MS DTC for that, you can now migrate to Azure SQL Managed Instance and distributed transactions will simply work. Also, if you need to build a multi-server environment in the cloud that needs to run queries in a transactionally consistent fashion, Managed Instance with native support for distributed transactions is a great place for your app.
Distributed transactions on Managed Instance can easily be setup with two simple steps:
- Create Server trust group.
- Ensure there is network connectivity between your instances.
In the rest of the blog, you will get more info on how to easily setup your Managed Instance to run distributed transactions.
Creating a Server trust group
Server trust group (STG) is an entity that manages security requirements for running distributed transactions. You can create it in Azure Portal, or via Azure PowerShell or Azure CLI.
Here is an example of Azure PowerShell script that creates STG for two Managed Instances.
Login-AzAccount
Select-AzSubscription -SubscriptionId “c829c89a-0931-4310-a49c-fa8f42a8cff2”
$managedInstanceList = @()
$managedInstanceList += Get-AzSqlInstance -Name “sqlmi1” -ResourceGroupName “rg1”
$managedInstanceList += Get-AzSqlInstance -Name “sqlmi2” -ResourceGroupName “rg1”
New-AzSqlServerTrustGroup -ResourceGroupName “rg1” -Location “West Europe” -Name “stg1” -GroupMember $managedInstanceList -TrustScope “GlobalTransactions”
Network connectivity
For distributed transactions to work, there must be a network connectivity between Managed Instances. If instances are on different virtual networks, VNET peering needs to be setup.
Additionally, port 5024 and port range 11000-12000 need to be allowed for outbound and inbound VNET traffic in the Network Security Groups assigned to Subnets that host Managed Instances.
Note: when Server trust group is not created, or there is no network connectivity between instances, distributed transaction will fail with following error message.
Msg 8510, Level 20, State 3, Line 14
Enlist operation failed: Global Transaction failed. SQL Server could not register with Microsoft Distributed Transaction Coordinator (MS DTC) as a resource manager for this transaction. The transaction may have been stopped by the client or the resource manager.
Distributed Transaction examples
With STG and network settings in place, you can run distributed transactions across Managed Instances with linked servers.
Here’s an example with two SELECT queries against master database.
SET XACT_ABORT ON

BEGIN DISTRIBUTED TRANSACTION

	— select from local server

	SELECT * FROM master.sys.databases

	— select from remote, linked server

	SELECT * FROM [linked_server_02].master.sys.databases

COMMIT
Here is another example with INSERT queries against user databases.
SET XACT_ABORT ON

BEGIN DISTRIBUTED TRANSACTION

	— insert into local server

	INSERT INTO db01.dbo.t01 (tag, utc_time)

		VALUES (‘distributed_transaction_tag’, GETUTCDATE())

	— insert into remote, linked server

	INSERT INTO [linked_server_02].db01.dbo.t01 (tag, utc_time)

		VALUES (‘distributed_transaction_tag’, GETUTCDATE())

COMMIT
Additional examples with .NET TransactionScope are available in the documentation.
by Contributed | Apr 29, 2021 | Technology
This article is contributed. See the original author and article here.
Microsoft is pleased to announce the final release of the recommended security configuration baseline settings for Microsoft 365 Apps for enterprise, version 2104. Please download the content from the Microsoft Security Compliance Toolkit, test the recommended configurations, and implement as appropriate. If you have questions or issues, please let us know via the Security Baseline Community or this post.
This baseline builds on the previous Office baseline we released mid-2019. The highlights of this baseline include:
- Restrict legacy JScript execution for Office to help protect remote code execution attacks while maintaining user productivity as core services continue to function as usual.
- Expanded macro protection requiring application add-ins to be signed by a trusted publisher. Also, turning off Trust Bar notifications for unsigned application add ins and blocking them to silently disable without notification.
- Block Dynamic Data Exchange (DDE) entirely.
Also, see the information at the end of this post regarding updates to Security Policy Advisor and Office Cloud Policy Services.
The downloadable baseline package includes importable GPOs, a script to apply the GPOs to local policy, a script to import the GPOs into Active Directory Group Policy, updated custom administrative template (SecGuide.ADMX/L) file, all the recommended settings in spreadsheet form and a Policy Analyzer rules file. The recommended settings correspond with the administrative templates version 5146, released March 22, 2021.
Changes since the Draft
A couple small changes were made since the Draft baseline released last month.
- Naming – We were reminded shortly after the Draft released (which was actually reviewed) that we no longer call the product Office 365 ProPlus, it will now be referred to as Microsoft 365 Apps for enterprise.
- GPO changes – We removed the Application Guard settings, while secure, there are conditions where preventing users from exiting App Guard may have an unacceptable end-user productivity impact as Application Guard continues to evolve to handle more file types and active content.
GPOs included in the baseline
Most organizations can implement the baseline’s recommended settings without any problems. However, there are a few settings that will cause operational issues for some organizations. We’ve broken out related groups of such settings into their own GPOs to make it easier for organizations to add or remove these restrictions as a set. The local-policy script (Baseline-LocalInstall.ps1) offers command-line options to control whether these GPOs are installed.
The “MSFT M365 Apps for enterprise 2104” GPO set includes “Computer” and “User” GPOs that represent the “core” settings that should be trouble free, and each of these potentially challenging GPOs, each of which is described later:
- “Legacy JScript Block – Computer” disables the legacy JScript execution for websites in the Internet Zone and Restricted Sites Zone.
- “Legacy File Block – User” is a User Configuration GPO that prevents Office applications from opening or saving legacy file formats.
- “Require Macro Signing – User” is a User Configuration GPO that disables unsigned macros in each of the Office applications.
- “DDE Block – User” is a User Configuration GPO that blocks using DDE to search for existing DDE server processes or to start new ones.
Restrict legacy JScript execution for Office Apps
The JScript engine is a legacy component in Internet Explorer which has been replaced by JScript9. Some organizations may have Office applications and workloads relying on this component, therefore it’s important to determine whether legacy JScript is being used to provide business-critical functionality before you enable this setting. Blocking the legacy JScript engine will help protect against remote code execution attacks while maintaining user productivity as core services continue to function as usual. As a security best practice, we recommend you disable legacy JScript execution for websites in Internet Zone and Restricted Sites Zone. We’ve enabled a new custom setting called “Restrict legacy JScript execution for Office” in the baseline and provided it in a separate GPO “MSFT M365 Apps for enterprise 2104 – Legacy JScript Block – Computer” to make it easier to deploy. Learn more about Restrict JScript at a Process Level.
Note: It can be a challenge to identify all applications and workloads using the legacy JScript engine, it’s often used by a webpage by setting the script language attribute in HTML to Jscript.Encode or Jscript.Compact, it can also be used by the WebBrowser Control (WebOC). After the policy is applied, Office will not execute legacy JScript for the internet zone or restricted site zone websites. Therefore, applying this Group Policy can impact the functionalities in an Office application or add-ins that require the legacy JScript component and users aren’t notified by the application that legacy JScript execution is restricted. Modern JScript9 will continue to function for all zones.
Important: If you disable or don’t configure this Group Policy setting, legacy JScript runs without any restriction at the application level.
Comprehensive blocking of legacy file formats
In the last Office baseline we published, we blocked legacy file formats in a separate GPO that can be applied as a cohesive unit. There are no changes to the legacy file formats recommended to block.
Blocking DDE entirely
Excel already disabled Dynamic Data Exchange (DDE) as an interprocess communication method, and now Word added a new setting “Dynamic Data Exchange” that we have configured to a disabled state. Because of the new addition from Word the existing GPO has been renamed to “MSFT M365 Apps for enterprise 2104 – DDE Block – User”.
Macro signing
The “VBA Macro Notification Settings” policy has been updated for Access, Excel, PowerPoint, Publisher, Visio, and Word with a new option. To further control macros we now recommend that macros also need to be signed by a Trusted Publisher. With this new recommendation macros not digitally signed by a Trusted Publisher will be blocked from running. Learn more at Upgrade signed Office VBA macro projects to V3 signature.
Note: Enabling “Block macros from running in Office files from the Internet” continues to be considered part of the main baseline and should be enforced by all security-conscious organizations.
Other changes in the baseline
- New policy: “Control how Office handles form-based sign-in prompts” we recommend enabling and blocking all prompts. This results in no form-based sign-in prompts displayed to the user and the user is shown a message that the sign-in method isn’t allowed.
- New policy: We recommend enforcing the default by disabling “Disable additional security checks on VBA library references that may refer to unsafe locations on the local machine” (Note: This policy description is a double negative, the behavior we recommend is the security checks remain ON).
- New policy: We recommend enforcing the default by disabling “Allow VBA to load typelib references by path from untrusted intranet locations”. Learn more at FAQ for VBA solutions affected by April 2020 Office security updates.
- New dependent policy: “Disable Trust Bar Notification for unsigned application add-ins” policy had a dependency that was missed in the previous baseline. To correct, we have added that missing policy, “Require that application add-ins are signed by Trusted Publisher”. This applies to Excel, PowerPoint, Project, Publisher, Visio, and Word.
- Removed from the baseline: “Do not display ‘Publish to GAL’ button”. While this setting has been there for a long time, after further research, we believe this setting is used to ensure good deployment practices and not to mitigate security concerns.
Deploy policies from the cloud, and get tailored recommendations for specific security policies
Deploy user-based policies from the cloud to any Microsoft 365 Apps for enterprise client through the Office cloud policy service. The Office cloud policy service allows administrators to define policies for Microsoft 365 Apps for enterprise and assign these policies to users via Azure Active Directory security groups. Once defined, policies are automatically enforced as users sign in and use Microsoft 365 Apps for enterprise. No need to be domain joined or MDM enrolled, and it works with corporate-owned devices or BYOD. Learn more about Office cloud policy service.
Security Policy Advisor can help give you insights on the security and productivity impact of deploying certain security policies. Security Policy Advisor provides you with tailored recommendations based on how Office is used in your enterprise. For example, in most customer environments, macros are typically used in apps such as Excel and only by specific groups of users. Security Policy Advisor helps you identify groups of users and applications where macros can be disabled with minimal productivity impact, and optionally integrate with Microsoft Defender for Office to provide you details on who is being attacked. Learn more about Security Policy Advisor.
When can I expect the next release of M365 Apps for enterprise Security Baseline?
In the future we will align the release of new security baselines with the M365 Apps for enterprise semi-annual channel releases, every 6 months usually in June and December. If there are no new policies to consider at that time, we will evaluate again 6 months later.
As always, please let us know your thoughts by commenting on this post.
by Contributed | Apr 29, 2021 | Technology
This article is contributed. See the original author and article here.
This webinar covers the exciting announcements made at Ignite, as well as what’s next for Compliance Manager.
Watch on-demand
Resources:
Microsoft Compliance Manager – Microsoft 365 Compliance | Microsoft Docs
Announcing general availability of Microsoft Compliance Manager – Microsoft Tech Community
This webinar was presented on April 20, 2021, and the recording can be found here .
Attached to this post are:
- The FAQ document that summarizes the questions and answers that came up over the course of both webinars.
- A PDF copy of the presentation.
Thanks to those of you who participated during the two sessions and if you haven’t already, don’t forget to check out our resources available on the Tech Community.
Thanks!
@Robin_Baldwin on behalf of the MIP and Compliance CXE team

Recent Comments