This article is contributed. See the original author and article here.
Azure Defender for IoT is a unified security solution for identifying IoT/OT devices, vulnerabilities, and threats. It enables organizations to secure entire IoT/OT environments, whether there is a need to protect existing IoT/OT devices or build security into new IoT innovations.
Azure Defender for IoT offers agentless network monitoring that can be deployed on physical hardware or virtualized environment and a lightweight micro agent that supports standard IoT operating systems. OT (Operational Technology) is used to monitor Industrial equipment rather than traditional Network IT resources.
Azure Sentinel can be used to integrate with Defender for Security Orchestration, Automation, and Response (SOAR) capabilities enables automated response and prevention using built-in OT-optimized playbooks.
This Blogpost presents two topics to support enterprises and enable a quick start with IoT/OT:
Onboard an agentless Defender for IoT sensor for PoC/Evaluation purpose.
Integration of Defender for IoT with Azure Sentinel for unified security management across IoT/OT landscape.
Prerequisites and Requirements
This capture describes the requirements to set up the environment.
A network switch that supports traffic monitoring via SPAN port.
Create or use an existing Azure IoT Hub service. IoT Hub is required to manage IoT devices and security.
An existing Azure Sentinel deployment for unified security management experience for Defender for IoT alerts.
Install the Defender for IoT Sensor
The installation takes a while and requires several reboots during the installation.
Before you can start the installation, there is a need to download the installation software. The ISO for the installation can be found in Azure Portal > Azure Defender for IoT > Set up a sensor > Purchase an appliance and install software > Download.
For my lab environment, I decided to use a Vmware ESXI server. I created a guest VM with 4 CPU cores, 8 GB of RAM, 128 GB of hard drive, and 2 virtual network cards for the sensor. One virtual card will be later used for the management interface, and the second one for the SPAN port. I prepared the environment for my lab as follow:
For installing the sensor, I attached the downloaded ISO to the sensor guest VM to kick off the installation.
For the initial configuration, select a language.
Select SENSOR-RELEASE-version Office.
Configure the architecture and the network properties.
Use eth0 for the management network (interface) and eth1 for the input interface (SPAN port) and click “y” to accept the configuration.
After few minutes, CyberX and support credentials appear. Copy the passwords for later usage.
Support: The administrative user for user management.
CyberX: The equivalent of root for accessing the appliance.
Select Enter to continue.
Once the installation is finished, you can access the management console via the configured IP address during the installation.
Once the sensor is installed, now it’s time to prepare the sensor as a cloud-connected sensor. In this mode, the sensor would send the alerts to Event Hub to share them with Azure services such as Azure Sentinel.
For the next step, there a need for an activation file. The Activation files contain the instructions for the management mode of the sensor.
To get the activation file, perform the following steps.
From the Azure Portal, navigate to Defender for IoT > Start discovering your network / Onboard sensor.
Define a name for the sensor, choose the subscription, select On the cloud, select an IoT Hub or create one, use a Display name and click to Register.
Now the Activation file is generated and can be downloaded for the next step. Download the file and save it for the next step to activate the sensor in cloud-connected mode.
Activate the agentless Sensor
The following steps are required to activate the sensor and to perform the initial setup.
Log on to the management console from your browser and the CyberX credential, which was pre-defined, including password during the installation.
After sign in from the Activation page, upload the Activation File, which was saved in preview steps, approve the Terms and Conditions and click Activate.
After activation, I would recommend some best practices to follow:
Create a new Admin account for management and only use the CyberX and support account if there is a need for it.
Change the sensor’s name and, if required, the network settings in the network configuration settings.
Validate the Sensor
After logging in to the management console, the sensor can be validated.
I see the SPAN input is functional, and data is streamed from the mirror port.
The sensor also discovered the asset as well as built a network map based on the discovery.
Integrate with Azure Sentinel
As the sensor is operated in a cloud-connected mode, the integration into Azure Sentinel is a one-click experience.
To enable the data connector in Azure Sentinel, open the Azure Portal and navigate to Azure Sentinel > Data connectors and search for the Azure Defender for IoT connector, then click to Open connector page.
And click to connect your Subscription to stream IoT Hub alerts into Azure Sentinel.
In the Next Steps selection, you can enable the Create incidents based on Azure Security Center for IoT alerts analytics rule to create incidents that Azure Sentinel can manage.
Additionally, use the Azure Defender for IoT Alerts workbook to gain insights into your IoT data workloads from Azure IoT Hub managed deployments, monitor alerts across all your IoT Hub deployments, and detect devices at risk act upon potential threats.
With the enabled data connector, you can manage the Defender for IoT incidents in Azure Sentinel. Please check the SecurtityAlert table for all the alert data from Defender for IoT.
SecurityAlert | where ProductName == “Azure Security Center for IoT”
| sort by TimeGenerated
Or from the Azure Sentinel Incident dashboard.
Summary
In this blog post, I covered the deployment of an agentless Defender for IoT sensors and the integration with Azure Sentinel to manage the security incidents.
Stay tuned for other IoT-related content in this channel.
This article is contributed. See the original author and article here.
Hello blog readers
One of recurring questions during my customer engagements on Azure Monitor is: how do I set alert state to either Acknowledged or Closed with no manual intervention?
This question is broader and deeper than it appears. In fact, linked to the pure and simple alert state there are often ITSM processes coming along. State is just an alert property that can have only 1 of the 3 following values at a given time: New, Acknowledged or Closed. Should you want to read more about Azure Monitor alerts (including their states) you can find more information in the official Microsoft documentation at Overview of alerting and notification monitoring in Azure – Azure Monitor | Microsoft Docs.
Hence, when it comes to the state, we also need to consider other actors. In a simple scenario, where have notifications and no ITSM processes, we can automate alert state management using Azure Automation to fire a runbook that sets the alert state on schedules. Differently, on mature customers or high integrated IT environments, where alerts are part of the incident management process(es), we must consider that alert states have to be managed in line with the ITSM integration. The below diagram quickly describes the scenario for alerts lifecycle when the ITSM integration is in place:
Azure Monitor <–> ITSM integration flow
So, provided that you have evaluated the best scenario according to the company’s business needs, the idea shared here is very easy and works very well especially with metrics-based alerts where you have a stateful alert approach.
With log-search based alerts, the situation can become a bit more complex since these alerts are stateless.
Looking at the alerts from Azure Monitor – Alerts blade,
Azure Monitor Alert Dashboard
you may have noticed that among all the columns, we have one called Monitor condition, whose value is sometime set to Fired or Resolved, and one called Signal type.
Let us start with the Signal type one. This one stands for the repository (and hence the type of data we are going to use for the alert: Metrics or Logs) where the data is stored. It is important to understand that because the type of data is what drives the value in the Monitor condition column. This column is showing the status of the object/aspects we created the alert for.
But why it sometime shows as resolved and sometimes not? The answer is exactly in the value reported by the Signal type column. When Signal type is Metrics or Health, it means that we are using data whose certainty is guaranteed 100%. In other words, that type of data will always be produced, collected and stored in Azure, so we can check whether an issue has been resolved or not and set the Monitor condition property value accordingly. This certainty makes the alerts stateful. For more info you can check the Understand how metric alerts work in Azure Monitor documentation at https://docs.microsoft.com/en-us/azure/azure-monitor/alerts/alerts-metric-overview
Differently, when it is Log there is no assurance that we either collected or received data. Think about an on-prem environment in which we have several dependencies as part of the trip to Azure Log Analytics. Think about what happen when we lose Internet connectivity or the monitoring agent just stops, or the server is powered off. How can we make sure the issue is resolved if we have no data confirming it? This uncertainty makes the log-based alerts stateless. Should you need more info, you can refer to the Log alerts in Azure Monitor documentation, specifically looking at the State and resolving alerts paragraph.
With all that said we now have a better idea of what to do to set our alert state in both scenarios (Metrics/Health and logs).
Since we proved so far that using Metrics or Health as signal type we always have the correct and up-to-date condition, we can just look at that the MonitorCondition property value and set the alert state to Closed. In that case the simple automation runbook I am suggesting below can help:
<#
.SYNOPSIS
    This sample automation runbook is designed to set the metric or health based alerts to Closed.


.DESCRIPTION
    This sample automation runbook is designed to set the metric or health based alerts to Closed. It looks for all the alerts in the provided time range and for each,
    it will check the value of the MonitorCondition property. Should it be equal to Resolved, we set the state property to Closed.
    This runbook requires the Az.AlertsManagement PowerShell module which can be found at https://docs.microsoft.com/en-us/powershell/module/az.alertsmanagement/?view=azps-5.6.0

    NOTE: TimeRange parameter only accepts the value reported in the ValidateSet. This is in line with the underlying API requirements that is
    documented at https://docs.microsoft.com/en-us/rest/api/monitor/alertsmanagement/alerts/getall#timerange


.PARAMETER TimeRange
    Required. The TimeRange on which we query the alerts.


.EXAMPLE
    .Close-ResolvedAlerts.ps1 -TimeRange 1d

.NOTES
    AUTHOR:   Bruno Gabrielli
    VERSION:  1.0
    LASTEDIT: Dec 08th, 2020
#>

#Parameters
param(
    [ValidateSet('1h', '1d', '7d', '30d')]
    [string] $TimeRange = '1d'
)

#Inizialiting connection to the AutomationAccount
[String]$connectionName = "AzureRunAsConnection"
try
{
    #Get the connection "AzureRunAsConnection "
    $servicePrincipalConnection=Get-AutomationConnection -Name $connectionName

    #"Logging in to Azure..."
    $nullOut = (Add-AzAccount `
     -ServicePrincipal `
     -TenantId $servicePrincipalConnection.TenantId `
     -ApplicationId $servicePrincipalConnection.ApplicationId `
     -CertificateThumbprint $servicePrincipalConnection.CertificateThumbprint `
     -WarningAction:Ignore)

    #"Setting context to a specific subscription"
    $nullOut = (Set-AzContext -SubscriptionId $servicePrincipalConnection.SubscriptionId -WarningAction:Ignore)

    $inactiveAlerts = (Get-AzAlert -MonitorCondition Resolved -State New -TimeRange $TimeRange)

    if($inactiveAlerts)
    {
        foreach($alert in $inactiveAlerts)
        {
            Write-Output "Setting state to 'Closed' for alert '$($alert.Name)' which had the monitor condition set to '$($alert.MonitorCondition)' and the state set to '$($alert.State)'"
            Update-AzAlertState -AlertId $alert.Id -State Closed
        }
    }
    else
    {
        Write-Output "No inactive (Resolved) alerts in the specified '$($TimeRange)' period."
    }
}
catch
{
    if (!$servicePrincipalConnection)
    {
        $ErrorMessage = "Connection $connectionName not found."
        throw $ErrorMessage
    }
    else
    {
        Write-Error -Message $_.Exception
        throw $_.Exception
    }
}
As opposite to Metrics or Health based alerts, the Log based alerts need to be managed differently. Here we must look first for the MonitorService property value, making sure that it is equal to “Log Analytics”. After that we need to make some assumptions based on the LastModified property value. Based on the log-based alerts nature, we might assume that if an alert has not been changed later than the TimeRange parameter value we provided, we could close it. We will get a new one soon if the corresponding issue has not been resolved in the meantime. Here below you can find another sample runbook for that purpose:
<#
.SYNOPSIS
    This sample automation runbook is designed to set the Log Analytics based alerts to Closed.


.DESCRIPTION
    This sample automation runbook is designed to set the Log Analytics based alerts to Closed. It looks for all the alerts in the provided time range and for each,
    it will check the value of the MonitorService property. Should it be equal to Log Analytics and last modified later than TimeRange, we set the state property to Closed.
    This runbook requires the Az.AlertsManagement PowerShell module which can be found at https://docs.microsoft.com/en-us/powershell/module/az.alertsmanagement/?view=azps-5.6.0

    NOTE: TimeRange parameter only accepts the value reported in the ValidateSet. This is inline with the underlying API requirements that is
    documented at https://docs.microsoft.com/en-us/rest/api/monitor/alertsmanagement/alerts/getall#timerange


.PARAMETER TimeRange
    Required. The TimeRange on which we query the alerts.


.EXAMPLE
    .Close-ResolvedAlerts.ps1 -TimeRange 1d

.NOTES
    AUTHOR:   Bruno Gabrielli
    VERSION:  1.0
    LASTEDIT: Jan 21st, 2021
#>

#Parameters
param(
    [ValidateSet('1h', '1d', '7d', '30d')]
    [string] $TimeRange = '1d'
)

#Inizialiting connection to the AutomationAccount
[String]$connectionName = "AzureRunAsConnection"
try
{
    #Get the connection "AzureRunAsConnection "
    $servicePrincipalConnection=Get-AutomationConnection -Name $connectionName

    #"Logging in to Azure..."
    $nullOut = (Add-AzAccount `
     -ServicePrincipal `
     -TenantId $servicePrincipalConnection.TenantId `
     -ApplicationId $servicePrincipalConnection.ApplicationId `
     -CertificateThumbprint $servicePrincipalConnection.CertificateThumbprint `
     -WarningAction:Ignore)

    #"Setting context to a specific subscription"
    $nullOut = (Set-AzContext -SubscriptionId $servicePrincipalConnection.SubscriptionId -WarningAction:Ignore)

    $inactiveAlerts = (Get-AzAlert -MonitorService 'Log Analytics' -State New -TimeRange $TimeRange)

    if($inactiveAlerts)
    {
        foreach($alert in $inactiveAlerts)
        {
            if($alert.LastModified -le ((Get-date).add(-$TimeRange)))
            {
                Write-Output "Setting state to 'Closed' for alert '$($alert.Name)' which had the monitor service equal to $($alert.MonitorService), monitor condition set to '$($alert.MonitorCondition)' and the state set to '$($alert.State)'"
                Update-AzAlertState -AlertId $alert.Id -State Closed
            }
        }
    }
    else
    {
        Write-Output "No inactive (Resolved) alerts in the specified '$($TimeRange)' period."
    }
}
catch
{
    if (!$servicePrincipalConnection)
    {
        $ErrorMessage = "Connection $connectionName not found."
        throw $ErrorMessage
    }
    else
    {
        Write-Error -Message $_.Exception
        throw $_.Exception
    }
}
Both sample runbook codes requires the Az.AlertsManagement PowerShell module to be imported into your Automation Account.
With all the ingredients and knowledge, you just have to import the 2 scripts as new runbooks:
Azure Automation Runbooks
and schedule them to run on your preferred interval which can be different from the value you used as TimeRange parameter:
Azure Automation Schedules
Thanks for reading this one till the end,
Bruno.
Disclaimer
The sample scripts are not supported under any Microsoft standard support program or service. The sample scripts are provided AS IS without warranty of any kind. Microsoft further disclaims all implied warranties including, without limitation, any implied warranties of merchantability or of fitness for a particular purpose. The entire risk arising out of the use or performance of the sample scripts and documentation remains with you. In no event shall Microsoft, its authors, or anyone else involved in the creation, production, or delivery of the scripts be liable for any damages whatsoever (including, without limitation, damages for loss of business profits, business interruption, loss of business information, or other pecuniary loss) arising out of the use of or inability to use the sample scripts or documentation, even if Microsoft has been advised of the possibility of such damages.
This article is contributed. See the original author and article here.
This is thenext installment of our blog series highlighting Microsoft Learn Student Ambassadors who achieved the Gold milestone and have recently graduated from university. Each blog in the series features a different student and highlights their accomplishments, their experience with the Student Ambassadorscommunity, and what they’re up to now.
Today we meet Ayush Chauhan who is from India and graduated in December from JECRC University located in the city of Jaipur in Rajasthan in India.All the students interviewed so far have been very forthcoming in sharing their history and their experience, but Ayush kicked off the interview with a declarative “I have lots of things to say”, which was terrific!
Responses have been edited for clarity and length.
When you became a Student Ambassador in 2017, did you have specific goals you wanted to reach, such as attaining a particular skill or quality? What were they? Did you achieve them?
I applied on the Student Ambassador website.I was just obsessed with Microsoft from the Windows Lumia age, and I didn’t know what the future was holding for me. My goal was to be able to write code or build software that will help people, or that will impact the developer and different communities. When I was creating a video to submit on the application, it was the first time I got my hands on Node.js& Bot framework. I learned it using Microsoft Docs, and I have never stopped learning since then. So yes, I was able to achieve my goal.
How has being in the Student Ambassador community impacted you in general besides helping you develop additional tech skills?
I landed my first internship in the second year just because of the bot I developed for my Student Ambassador application.
Being in this program, I got to learn from experts, and it has impacted my life because I was winningcompetitions, around 10 hackathons. It gave me huge confidence toothat I can build anything I can think of and go on any stage to represent it. Microsoft has impacted me a lot in three years. It has accelerated my learning and ability to build anything I can imagine.
What were the accomplishments that you’re the proudest of? And please give us details.
I won the 2018 India Capgemini Tech Challenge. I was in my third year at university,and over 3,500 working professionals participated in the Azure category. We had to build a chatbot, so I built a SAAS to help book writers to format or digitalize their writings without needing to wait for a person to write. It was the first time I realized that I can do anything, and age and appearance don’t matter. The only thing that matters is hard work and practice.
I built a dataset of 100 women’s colleges to help with the diversity and inclusion in our events.It created an opportunity to invite 5000+ STEM students to participate in global events and feel included in the tech community.
I was proud of the projects that I built in hackathons whether I won them or not. They involved everything from helping elder people with IoT home automation, to a chatbot for newborn children’s parents that can resolve their queries, and much more.
You graduated a couple few months ago. So what have you been up to since graduation?
After graduation I joined the School of Accelerated Learning, a startup[editor’s note: India’s first-ever hybrid coding bootcamp for millennials looking to build tech-focused careers]. I have been working to build quality and relevant education for the tech world. So, it is exactly what I believe in. It’s exactly how this program has empowered me to do. We don’t believe in theoretical curriculums or traditional classrooms. We believe in getting everyone ready for the future despite them being from diverse backgrounds. We tell them how to build industry-driven products by themselves. We explain them concepts, we try to build their mindset. We do activities that help them grow their innovation and built a tech-enabled environment that nurtures their growth mindset.
And I was working in the open-source community. Every time you go on GitHub and see a repository with a “deploy to Azure button” – I made that button, I redesigned it.
If you could redo things, is there anything you would have done differently while you were a Student Ambassador? Or would you have done things the same?
I don’t think I would try to redo something because what’s happened, happened. My failures made me what I am today.
If you were to describe theStudent Ambassadorscommunity to a student who is interested in joining, what would you say to them?
I’ll say “Hey, do you want to make some cool like-minded friends from all over the world? Do you want to gain knowledge and experience the future of productivity with Microsoft? Do want to have the benefits of Visual Studio Enterprise subscriptions?. Also do you want to learn from industry experts and also get a Microsoft certification? Well, this program has covered all of these benefits in a single package, so you won’t stop learning because of less resources or no exposure.”
What advice would you give to new Student Ambassadors?
Always have the audacity to curiously ask questions. There is always a solution of how you can solve a hard-coded error. For that you need to avoid a know-it-all mindset. Don’t just react on knowledge you’ve heard or seen. Go a step ahead, try to learn it all, implement it all. Whatever you want to build, whatever you see, whatever you want to know or add to your skill set, you should just go and learn it all. Learning is something that doesn’t expire with age.
What is your motto in life, your guiding principle?
I go with the flow always. I never say no to any opportunity even if I know I’ll be failing. I wake up every day knowing there’s something for me to learn.Nothing worth having comes easy. There’s so much love and energy to get up and run again, even after you fall if you love what you do.Also, I take care of burnouts. It’s surprising how something you love so much can hurt you a lot. I take breaks to recover, so I play games and listen to music in that time.
This article is contributed. See the original author and article here.
The API Management is a proxy to the backend APIs, it’s a good practice to implement security mechanism to provide an extra layer of security to avoid unauthorized access to APIs.
Configuring OAuth 2.0 Server in APIM merely enables the Developer Portal’s test console as APIM’s client to acquire a token from Azure Active Directory. In the real world, customer will have a different client app that will need to be configured in AAD to get a valid OAuth token that APIM can validate.
Prerequisites
To follow the steps in this article, you must have:
Azure subscription
Azure API Management
An Azure AD tenant
API Management supports other mechanisms for securing access to APIs, including the following examples:
Subscription keys End-users who need to consume the APIs must include a valid subscription key in HTTP requests when they make calls to those APIs.
Client Certificate The second option is to use Client Certificates. In API Management you can configure to send the client certificates while making the API calls and validate incoming certificate and check certificate properties against desired values using policy expressions.
Restrict caller Ips The third option is Restrict caller Ips – It (allows/denies) calls from specific IP addresses and/or address ranges which is applied in the <ip-filter>Policy.
Securing the Back End API using OAuth2.0 Another option is using OAuth 2.0, Users/services will acquire an access token from an authorization server via different grant methods and send the token in the authorization header. In the inbound policy the token can be validated.
Azure AD OAUTH2.0 authorization in APIM
OAUTH 2.0 is the open standard for access delegation which provides client a secure delegated access to the resources on behalf of the resource owner.
Note: In the real world, you will have a different client app that will need to be configured in AAD to get a valid OAuth token that APIM can validate.

The below diagram depicts different client applications like Web application/SPA, Mobile App and a server process that may need to obtain a token in Non-Interactive mode. So you must create a different App Registration for the respective client application and use them to obtain the token.
In this Diagram we can see the OAUTH flow with API Management in which:
The Developer Portal requests a token from Azure AD using app registration client id and client secret.
In the second step, the user is challenged to prove their identity by supplying User Credentials.
After successful validation, Azure AD issues the access/refresh token.
User makes an API call with the authorization header and the token gets validated by using validate-jwt policy in APIM by Azure AD.
Based on the validation result, the user will receive the response in the developer portal.
Different OAuth Grant Types:
Grant Flow
Description
Use Case
Authorization Code
It is the most used grant type to authorize the Client to access protected data from a Resource Server.
Used by the secure client like a web server.
Implicit
It is intended for user-based clients who can’t keep a client secret because all the application code and storage is easily accessible.
Used by the client that can’t protect a client secret/token, such as a mobile app or single page application.
Client Credentials
This grant type is non interactive way for obtaining an access token outside of the context of a user.
It is suitable for machine-to-machine authentication where a specific user’s permission to access data is not required.
Resource Owner password Credentials
It uses the username and the password credentials of a Resource Owner (user) to authorize and access protected data from a Resource Server.
For logging in with a username and password (only for first-party apps)
High-level steps required to configure OAUTH
To configure Oauth2 with APIM the following needs to be created:
Register an application (backend-app) in Azure AD to represent the protected API resource.
Register another application (client-app) in Azure AD which represent a client that wants to access the protected API resource.
In Azure AD, grant permissions to client(client-app) to access the protected resource (backend-app).
Configure the Developer Console to call the API using OAuth 2.0 user authorization.
Add the validate-jwt policy to validate the OAuth token for every incoming request.
Register an application (backend-app) in Azure AD to represent the API.
To protect an API with Azure AD, first register an application in Azure AD that represents the API. The following steps use the Azure portal to register the application.
Search for Azure Active Directory and select App registrations under Azure Portal to register an application:
Select New registration.
In the Name section, enter a meaningful application name that will be displayed to users of the app.
In the Supported account types section, select an option that suits your scenario.
Leave the Redirect URI section empty.
Select Register to create the application.
On the app Overview page, find the Application (client) ID value and record it for later.
Select Expose an API and set the Application ID URI with the default value. Record this value for later.
Select the Add a scope button to display the Add a scope page. Then create a new scope that’s supported by the API (for example, Files.Read).
Select the Add scope button to create the scope. Repeat this step to add all scopes supported by your API.
When the scopes are created, make a note of them for use in a subsequent step.
Register another application (client-app) in Azure AD to represent a client application that needs to call the API.
Every client application that calls the API needs to be registered as an application in Azure AD. In this example, the client application is the Developer Console in the API Management developer portal.
To register another application in Azure AD to represent the Developer Console:
Follow the steps 1 – 6. mentioned in the previous section for registering backend app.
Once the App registered, On the app Overview page, find the Application (client) ID value and record it for later.
Create a client secret for this application to use in a subsequent step.
From the list of pages for your client app, select Certificates & secrets, and select New client secret.
Under Add a client secret, provide a Description. Choose when the key should expire and select Add. When the secret is created, note the key value for use in a subsequent step.
Authorization Code:
In Authorization code grant type, User is challenged to prove their identity providing user credentials. Upon successful authorization, the token end point is used to obtain an access token.
The obtained token is sent to the resource server and gets validated before sending the secured data to the client application.
Enable OAuth 2.0 in the Developer Console for Authorization Code Grant type
At this point, we have created the applications in Azure AD, and granted proper permissions to allow the client-app to call the backend-app.
In this demo, the Developer Console is the client-app and has a walk through on how to enable OAuth 2.0 user authorization in the Developer Console. Steps mentioned below:
In Azure portal, browse to your API Management instance and Select OAuth 2.0 > Add.
Provide a Display name and Description.
For the Client registration page URL, enter a placeholder value, such as http://localhost.
For Authorization grant types, select Authorization code.
Specify the Authorization endpoint URL and Token endpoint URL. These values can be retrieved from the Endpoints page in your Azure AD tenant.
Browse to the App registrations page again and select Endpoints.
Important
Use either v1 or v2 endpoints. However, depending on which version you choose, the below step will be different. We recommend using v2 endpoints.
If you use v1 endpoints, add a body parameter named resource. For the value of this parameter, use Application ID of the back-end app.
If you use v2 endpoints, use the scope you created for the backend-app in the Default scope field. Also, make sure to set the value for the accessTokenAcceptedVersion property to 2 in your application manifest in Azure AD Client APP and Backend app.
Next, specify the client credentials. These are the credentials for the client-app.
For Client ID, use the Application ID of the client-app.
For Client secret, use the key you created for the client-app earlier.
Immediately following the client secret is the redirect_urls
Go back to your client-app registration in Azure Active Directory under Authentication.
.paste the redirect_url under Redirect URI, and check the issuer tokens then click on Configure button to save.
Now that you have configured an OAuth 2.0 authorization server, the Developer Console can obtain access tokens from Azure AD.
The next step is to enable OAuth 2.0 user authorization for your API. This enables the Developer Console to know that it needs to obtain an access token on behalf of the user, before making calls to your API.
Go to APIs menu under the APIM
Select the API you want to protect and Go to Settings.
Under Security, choose OAuth 2.0, select the OAuth 2.0 server you configured earlier and select save.
Calling the API from the Developer Portal:
Now that the OAuth 2.0 user authorization is enabled on your API, the Developer Console will obtain an access token on behalf of the user, before calling the API.
Copy the developer portal url from the overview blade of apim
Browse to any operation under the API in the developer portal and select Try it. This brings you to the Developer Console.
Note a new item in the Authorization section, corresponding to the authorization server you just added.
Select Authorization code from the authorization drop-down list, and you are prompted to sign in to the Azure AD tenant. If you are already signed in with the account, you might not be prompted.
After successful sign-in, an Authorization header is added to the request, with an access token from Azure AD. The following is a sample token (Base64 encoded):
Select Send to call the API successfully with 200 ok response.
Validate-jwt policy to pre-authorize requests with AD token:
Why JWT VALIDATE TOKEN?
At this point we can call the APIs with the obtained bearer token.
However, what if someone calls your API without a token or with an invalid token? For example, try to call the API without the Authorization header, the call will still go through.
This is because the API Management does not validate the access token, It simply passes the Authorization header to the back-end API.
To pre-Authorize requests, we can use <validate-jwt> Policy by validating the access tokens of each incoming request. If a request does not have a valid token, API Management blocks it.
We will now configure the Validate JWT policy to pre-authorize requests in API Management, by validating the access tokens of each incoming request. If a request does not have a valid token, API Management blocks it.
Browser to the APIs from the left menu of APIM
Click on “ALL APIS” and open the inbound policy to add the validate-jwt policy(It checks the audience claim in an access token and returns an error message if the token is not valid.) and save it.
Go back to the developer portal and send the api with invalid token.
You would observe the 401 unauthorized.
Modify the token from authorization header to the valid token and send the api again to observe the 200-ok response.
Understanding <validate-jwt> Policy
In this section, we will be focusing on understanding how <validate-jwt> policy works (the image in the right side is the decoded JWT Token)
The validate-jwt policy supports the validation of JWT tokens from the security viewpoint, It validates a JWT (JSON Web Token) passed via the HTTP Authorization header If the validation fails, a 401 code is returned.
The policy requires an openid-config endpoint to be specified via an openid-config element. API Management expects to browse this endpoint when evaluating the policy as it has information which is used internally to validate the token. Please Note : OpenID config URL differs for the v1 and v2 endpoints.
The required-claims section contains a list of claims expected to be present on the token for it to be considered valid. The specified claim value in the policy must be present in the token for validation to succeed.
The claim value should be the Application ID of the Registered Azure AD Backend-APP.
The following diagram shows what the entire implicit sign-in flow looks like.
As mentioned, Implicit grant type is more suitable for the single page applications. In this grant type, The user is requested to signin by providing the user credentials
Once the credentials are validated the token is returned directly from the authorization endpoint instead of the token endpoint.
The token are short lived, and a fresh token will be obtained through a hidden request as user is already signed in.
NOTE : To successfully request an ID token and/or an access token, the app registration in the Azure portal – App registrations page must have the corresponding implicit grant flow enabled, by selecting ID tokens and access tokens in the Implicit grant and hybrid flows section.
Implicit Flow – DEMO
The configuration for the implicit grant flow is similar to the authorization code, we would just need to change the Authorization Grant Type to “Implict Flow” in the OAuth2.0 tab in APIM as shown below.
After the OAuth 2.0 server configuration, The next step is to enable OAuth 2.0 user authorization for your API under APIs Blade :
Now that the OAuth 2.0 user authorization is enabled on your API, we can test the API operation in the Developer Portal for the Authorization type : “Implict”.
Once after choosing the Authorization type as Implicit, you should be prompted to sign into the Azure AD tenant. After successful sign-in, an Authorization header is added to the request, with an access token from Azure AD and APIs should successfully return the 200-ok response:
Client Credentials flow
The entire client credentials flow looks like the following diagram.
In the client credentials flow, permissions are granted directly to the application itself by an administrator.
Token endpoint is used to obtain a token using client ID and Client secret, the resource server receives the server and validates it before sending to the client.
Client Credentials – Demo
In Client Credential flow, The OAuth2.0 configuration in APIM should have Authorization Grant Type as “Client Credentials”
Specify the Authorization endpoint URL and Token endpoint URL with the tenant ID
The value passed for the scope parameter in this request should be (application ID URI) of the backend app, affixed with the .default suffix : ”API://<Backend-APP ID>/.default”
Now that you have configured an OAuth 2.0 authorization server, The next step is to enable OAuth 2.0 user authorization for your API.
Now that the OAuth 2.0 user authorization is enabled on your API, we can test the API operation in the Developer Portal for the Authorization type : “Client Credentials”.
Once after choosing the Authorization type as Client Credentials in the Developer Portal,
The sign in would happen internally with client secret and client ID without the user credentials.
After successful sign-in, an Authorization header is added to the request, with an access token from Azure AD.
The Resource Owner Password Credential (ROPC) flow allows an application to sign in users by directly handling their password.
The ROPC flow is a single request: it sends the client identification and user’s credentials to the Identity Provided, and then receives tokens in return.
The client must request the user’s email address and password before doing so. Immediately after a successful request, the client should securely release the user’s credentials from memory.
Resource Owner Password Credentials – Demo
Disclaimer: The new developer portal currently does not support the ROPC type and being worked upon by the Engineering team.
We will be covering the Demo in Legacy Developer Portal on ROPC as new portal does not support this type yet.
Please note that legacy portal is going to get expired in 2023.
The OAuth2.0 server configuration would be similar to the other grant types, we would need select the Authorization grant types as Resource Owner Password :
You can also specify the Ad User Credentials in the Resource owner password credentials section:
Please note that it’s not a recommended flow as it requires a very high degree of trust in the application and carries risks which are not present in other grant types.
Now that you have configured an OAuth 2.0 authorization server, the next step is to enable OAuth 2.0 user authorization for your API.
Now that the OAuth 2.0 user authorization is enabled on your API, we will be browsing to the legacy developer portal and maneuver to the API operation
Select Resource Owner Password from the authorization drop-down list
You will get a popup to pass the credentials with the option to “use test user” if you check this option it will be allowing the portal to sign in the user by directly handling their password added during the Oauth2.0 configuration and generate the token after clicking on Authorize button :
Another option is to uncheck the “test user” and Add the username and password to generate the token for different AD User and hit the authorize button
The access token would be added using the credentials supplied:
Select Send to call the API successfully.
Please note that the validate jwt policy should be configured for preauthorizing the request for Resource owner password credential flow also.
Things to remember
The portal needs to be republished after API Management service configuration changes when updating the identity providers settings.
Common issues when OAuth2.0 is integrated with API Management:
Problem faced while obtaining a token with Client Credential Grant Type:
Error Snapshot:
Solution:
This error indicated that scope api://b29e6a33-9xxxxxxxxx/Files.Read is invalid.
As client_credentials flow requires application permission to work, but you may be passing the scope as Files.Read which is a delegated permission(user permission) and hence it rejected the scope.
To make it work, we would need to use default application scope as “api://backendappID/.default”
II. Receiving “401 Unauthorized” response
Solution:
You may be observing 401 unauthorized response returned by validate-jwt policy, its is recommended to look at the aud claims in the passed token and validate-jwt policy.
You can decode the token at https://jwt.io/ and reverify it with the validate-jwt policy used in inbound section: For example:
The Audience in the decoded token payload should match to the claim section of the validate-jwt policy:
<claim name=”aud”>
<value>api://b293-9f6b-4165-xxxxxxxxxxx</value>
</claim>
Validate-JWT policy fails with IDX10511: Signature validation failed:
When we go to test the API and provide a JWT token in the Authorization header the policy may fail with the following error:
This uri will point to a set of certificates used to sign and validate the jwt’s. You may find that the keyId (in this sample “CtTuhMJmD5M7DLdzD2v2x3QKSRY“) does exist there.
Something like this:
{
“keys”: [{
“kty”: “RSA”,
“use”: “sig”,
“kid”: “CtTuhMJmD5M7DLdzD2v2x3QKSRY“,
“x5t”: “CtTuhMJmD5M7DLdzD2v2x3QKSRY”,
“n”: “18uZ3P3IgOySln……”,
“e”: “AQAB”,
“x5c”: [“MII…..”]
So it seems that it should be able to validate the signature.
If you look at the decoded jwt you may see something like this:
This requires extra checking that validate-jwt does not do. Getting a token for the Graph api and Sharepoint may emit a nonce property. A token used to make calls to the Azure management api, however, will not have the nonce property.
The ‘nonce’ is a mechanism, that allows the receiver to determine if the token was forwarded. The signature is over the transformed nonce and requires special processing, so if you try and validate it directly, the signature validation will fail.
The validate jwt policy is not meant to validate tokens targeted for the Graph api or Sharepoint. The best thing to do here is either remove the validate jwt policy and let the backend service validate it or use a token targeted for a different audience.
Validate-JWT policy fails with IDX10205: Issuer validation failed
Here is an example configuration a user might have added to their policy:
<validate-jwt header-name=”Authorization” failed-validation-httpcode=”401″ failed-validation-error-message=”Unauthorized. Access token is missing or invalid.”>
This error message gets thrown when the Issuer (“iss”) claim in the JWT token does not match the trusted issuer in the policy configuration.
Azure Active Directory offers two versions of the token endpoint, to support two different implementations. AAD also exposes two different metadata documents to describe its endpoints. The OpenID Config files contains details about the AAD tenant endpoints and links to its signing key that APIM will use to verify the signature of the token. Here are the details of those two endpoints and documents (for the MSFT AAD tenant):
The error usually occurs because the user is using a mix between V1 and V2. So they request a token from V1 endpoint but configured <openid-config> setting pointing to V2 endpoint, or vice versa.
To resolve this issue you just need to make sure the <validate-jwt> policy is loading up the matching openid-config file to match the token. The easiest way is to just toggle the open-id config url within the policy and then it will move beyond this part of the validation logic.
<validate-jwt header-name=”Authorization” failed-validation-httpcode=”401″ failed-validation-error-message=”Unauthorized. Access token is missing or invalid.”>
Just switch out the openid-config url between the two formats, replace {tenant-id-guid} with the Azure AD Tenant ID which you can collect from the Azure AD Overview tab within the Azure Portal
This article is contributed. See the original author and article here.
In the State of CSS 2020 survey, the Tailwind CSS becomes the number 1 CSS Framework in terms of Satisfaction and Interest in the last 2 years. It also gets the awards for The Most Adopted Technology. It seems a lot of developers like this framework. Based on my experience, this framework can help us rapidly build UI by reducing complexity when styling the UI.
State of CSS 2020 Survey — CSS Frameworks result
In this article, I will share my setup to use the Tailwind CSS in a SharePoint Framework (SPFx) project.
Prepare the SPFx Project
Prepare your SPFx project. I use a newly generated SPFx project (v1.11) but you can also use your existing SPFx project.
Install Modules
Install all modules needed by executing the command below:
Initialize Tailwind CSS by executing the command below:
npx tailwind init -p –full
The command will create the tailwind.config.js in the project’s base directory. The file contains the configurations, such as colors, themes, media queries, and so on.
The command will also create the postcss.config.js file. We need PostCSS because we will use Tailwind CSS as a PostCSS plugin.
Inject Tailwind CSS Components and Utilities
We need to create a CSS file that will be used to import Tailwind CSS styles.
Create an assets folder in the project’s base directory
The code will add the tailwindcss subtask to the SPFx Gulp Build task. It will also purge (remove unused styles) the Tailwind CSS for build with ship flag:
gulp build –ship
or
gulp bundle –ship
Add Reference to The Generated Tailwind CSS
We need to add reference the generated Tailwind CSS by adding the import code in your main .ts webpart file:
import ‘../../../assets/dist/tailwind.css’;
That’s it!
Now you can use Tailwind CSS utilities in your SPFx project.
Result
You might be familiar with the below result except it’s not using styles from the 74-lines scss/css file anymore.
Below is the updated React component that’s using the Tailwind CSS utility classes for styling.
This article is contributed. See the original author and article here.
The Mako™ Core SDK from Global Graphics Software is perfectly placed to help software vendors and service providers integrate with Universal Print. Our SDK can help developers analyze, edit, and convert the documents at the heart of Universal Print workflows.
Case study: Modifying print job payloads
As a part of Universal Print, developers get access to a set of Microsoft Microsoft Graph APIs that allows analysis and modification of print job payload data. This feature enables a few different scenarios, including adding security (e.g. redactions or watermarks) to a Universal Print-based workflow.
The diagram below shows a software vendor’s implementation for modifying print job payloads using Universal Print and the Graph APIs.
In the scenario, the ISV creates a service which uses the Mako SDK to modify the payload. This service could be implemented as an Azure Serverless Function or App Service deployment. Either of these would expose an endpoint which is called by the Graph’s change notifications when a print job has been sent.
Once notification has been received, the service downloads the payload and uses Mako to analyze and modify it. Once modified, the payload can be uploaded again and redirected.
Mako fits this type of workflow perfectly, since it can handle multiple page description languages (PDLs), including those commonly used in printing such as PDF, PostScript, PCL/XL and XPS.
The Mako SDK also has a PDL-agnostic document object model (DOM), meaning that your integration can edit the print job payload in the same way, regardless of the PDL you’ve been given.
Existing integrations
If you have an existing Universal Print integration, it’s likely that Mako already supports your environment, making switching easy!
The Mako SDK supports both cloud and on-premise deployments, including Azure and containerized workloads. We support many desktop and mobile environments including Windows, Linux (including Alpine), Android, iOS and MacOS.
It’s also likely that your integration uses a programming language that we already support: we natively wrote the SDK in C++ for the perfect balance of performance and ease-of-use, but we distribute it as beautifully wrapped libraries for C#, Java and Python too.
See it in action
We’ve integrated Mako into Universal Print ourselves and used it to automatically redact print jobs as they go through a Universal Print workflow. Watch at the recording of our Mako live coding webinar to see it in action.
Try it out
We’d be excited to talk to you about your Universal Print project and see how we can help. For more information about Mako, visit globalgraphics.com/mako
Thank you for reading this blog! My name is John van Zetten, a passionate teacher at the Hoornbeeck College.
Hoornbeeck College is a Community College in the Netherlands. On 6 locations we offer 131 different studies over 4 departments. Each study prepares the student for a place in the professional field, ranging from mechanics to doctor’s assistants and from management assistants to software developers. Currently we have around 10000 students. In this blog I will focus on the training area for IT Professionals. In this study we teach our students everything they need to work in the field as an IT administrator. A couple of things that pass in review: data communications with Cisco, service management, Linux, Microsoft Office, security, scripting, and cloud-computing. The cloud-computing courses are based on Microsoft 365 and Microsoft Azure, as these are the two most used cloud platform in the SMB in the Netherlands.
With Azure growing in the Netherlands over the last years we felt the need to embed this in our curriculum for our IT Professionals. Also: our students needed to buy an expensive laptop to run the virtual machines we use to give them hands-on experience with the technology we teach. So, we were facing two challenges: students need to have knowledge and hands-on experience with Azure, and we needed to lower cost for our course.
We started with the second bit as this was the easiest to do and because we expected that with using Azure as our primary work-load platform (instead of the students’ laptops) the students get the hands-on experience as well. A certification path was not part of our considerations at that moment. Only one instructor was certified in Azure Fundamentals AZ900 exam at that moment.
We choose our lessons series on Windows Server to host them in Azure instead of VMware Workstation. After working in/with Azure for two years, we started looking for a way to not only let them use Azure as a workload platform but also give them broader knowledge of cloud-computing and Azure. After experimenting with different teaching materials, we decided to use the Microsoft Learn for Educators curriculum for Azure Fundamentals. There were three main reasons for that:
The materials provided by Microsoft are up-to-date and complete: Everything covered in the official AZ-900 exam has a place in the course materials.
The course has a nice mix between explanation and hands-on experience via labs: the provided slide-decks give a good overview of Azure and comes with hands-on labs that you can either walk through as a teacher or let the students work through it by themselves.
It is compact, the whole curriculum could be packed into 20 hours or less: With a strong focus on the right things, there is plenty of time available for exam preparation our more hands-on experience.
Teaching with this material gives students a great chance of passing the Azure Fundamentals AZ-900 exam and adding this valuable certification to their resume. We are currently at an >75% first pass rate for AZ-900.
Implementing new course-materials always come with certain challenges. I want to share a couple of our lessons learned here:
Students need hands-on experience for good exam results. As mentioned before, we started using Azure before we jumped on the certification train. This means that our student already had quite a bit of hands-on experience before they take their exams. All students agreed that if they did not have the hands-on experience like they had, it would have been much harder to pass the exam. So, I would like to recommend to you to give them as much hands-on experience as possible. The labs provided by Microsoft are a good starting point but expanding this with other materials is very valuable.
New technology is not only a challenge for students but for teachers as well. So, if you want to implement Azure in your curriculum, make sure that you spent a decent amount of time to train your colleagues and get them to at least the Fundamentals level. The trainer-the-trainer sessions on the Learning Download Center are a good resource to do this, also the Virtual Educator Prep Sessions (VEPS) give a lot of input. Getting your feet wet is simply the best option to learn these things.
Teaching Azure means that you teach a platform that literally changes every 30 days or so. This gives a never-ending challenge of keeping you own knowledge and learning materials up to date. Keeping an eye on the roadmap so you know what is coming and be prepared! Microsoft runs various technical and training events throughout the year to help keep you upto date Microsoft Ignite and Microsoft Build are the key developer conferences.
As stagnation means decline, we are always looking for opportunities to build an even better curriculum. Currently we are looking at these options:
Microsoft 365 is a very big growth area here in the Netherlands and therefore we are implementing the Microsoft 365 Fundamentals (MS-900) to our curriculum.
As a passionate teacher and Microsoft Learn for Educators Ambassador, I am happy to share more of my insights and learn from your experience to make our lessons better together!
This article is contributed. See the original author and article here.
Welcome to the monthly Healthcare and Life Sciences blog recap, April edition! Check out the highlights below:
Power BI
Ingest Healthcare Open Data into Azure and Power BI using New GitHub Repository: Greg Beaumont, Microsoft Senior Intelligence Technical Specialist, built a repository of healthcare open data in GitHub called Power Pop Health. The solution contains low code/no code/no PowerShell deployment, so anyone can use it with nothing more than an Azure subscription and Power BI. Read more about the solution here.
Excel Analyst in a Day with Power BI: Explore how Excel and Power BI are best used together and how Excel and Power BI can be integrated in Microsoft Teams and SharePoint online. Click here to learn more and register for the event.
Dashboard in a Day with Power BI: Interested in participating in a free Power BI workshop? Click here to learn how.
Embed Power BI Reports in Healthcare EMR: Learn more about how healthcare providers are embedding Power BI reports from their EMRs/EHRs. Click here to register for the event.
Power BI at Microsoft Business Applications Summit: Join the Power BI team and learn about the next features, demos, roadmap for Power BI. Click here to learn more.
Microsoft Teams Rooms
Transitioning to Microsoft Teams Video Conference Rooms: Are your employees returning to work? Learn how to configure existing conference rooms for Teams meetings. Click here to learn more.
Confessions of Health Geeks
Microsoft Nurses Heeding the Call of Service: Learn from Molly McCarthy and Kathleen McGrow as they discuss the complexities of volunteering at a COVID-19 vaccination clinic and their hopes for the future of the COVID-19 vaccination process. Click here to watch.
Health Plan Member Experience Improvement: Microsoft’s Director of Population Health, Amy Berk, discusses some of the forces driving health plan member experience improvement. Click here to learn more.
Diversity in Clinical Trials and Drug Development: In this podcast, Claire Bonaci discusses the importance of diversity and inclusion in pharma and life sciences, specifically the importance of diversity in clinical trials. Watch the podcast here.
Tackling health inequity:Dr. Zafar Chaundry, SVP and CIO at Seattle Children’s Hospital shares how he and his team are working to expand access to healthcare and improve health equity in the greater Seattle area. Click here to watch.
MidDay Café
MidDay Café Re-launch: The MidDay Café is temporarily pausing until the re-launch on May 10th. The new format will be shorter with different content. Read the announcement here.
January’s HLS Blog Contributors:
Michael Gannotti, Principal Technical Specialist, Microsoft Teams
I live in Nottingham, UK with my family: My wife, my son who is 18 and my daughter who is 11. I am from an Iranian background that live in the UK from 2003 when I started my MSc then PhD in Computer Science at the University of Nottingham (UoN). After graduation, I became a research fellow in the same university and worked in this position for 8 years. Then I moved to Nottingham Trent University (NTU) and became a senior lecturer at the Department of Computer Science. This all means that by now, I have been in Nottingham “Universities” for 18 years (i.e., as old as son!).
Well, it starts from the last year, just in the middle of COVID lock down, that I [unnecessarily!] taking Artificial Intelligence module leadership. Although I had research background in AI and have been in the AI community and research groups, teaching AI was relatively new for me. By the way, I took leadership for the 3rd year AI module, and recently became “Computer Science – AI” Course Leader. This course is newly proposed and approved following marketing research at NTU, and will hopefully get the first students in 2022-23 academic year. Moreover, we run AI modules for MSc Computer Science and MSc Data Analytics students, and finally for Degree Apprenticeship courses. (imagine how all these arrangements took place in COVID Lockdown)
Sorry, let’s comeback… eventually at the same time of taking all of those responsibilities, I was told that Microsoft and NTU are teamed up to expand collaborations, not only for infrastructure but also for computer science education. Particularly there have been some communications between our head of department (Prof Ahmad Lotfi) and Clare Riley (HE engagement manager for Microsoft UK) that Microsoft can support free materials and certification of “Azure AI Fundamental” for a limited number of students and staff.
This was a start of making some changes to the AI module and reach to a win-win situation: For students to learn more up-to-date and practical materials that what they’d have supposed to learn, and get a free certificate by the time they graduate from NTU! For us as academics, it was a risk of doing this as a pilot program that if runs successfully can showcase a good industrial collaboration and will be continued more widely. Ahmad asked me if I can lead this pilot program, and the answer was [again unnecessarily] yes!
Leveraging Microsoft Azure-AI Fundamental
How did I incorporate the MS Learn for Educators teaching materials into the existing materials? What about assessment? Timing?… These were questions to be answered. I was myself new to Azure-AI so all of these had to be a learning-teaching experience.
The decision to make the changes was done in November 2020. By that time, no substantial change would have been allowed for a module.
The first thing I did was asking my students: Do you want to get this certificate or want me to leave it for the next year students?! Take it or leave it! If you take it, then we need to work together for good: be tolerant about unexpected changes and uncertainties. I asked them to expect changes from the start of term 2 (January 2021). I received positive messages, although in online teaching, understanding the actual views were not easy, and to be honest I still do not have a strong feeling what my students think about this program – let’s be optimistic for now!
I planned my new year holidays to learn Azure-AI myself, and plan for the changes in materials and assessments. The module revamping challenge was that I needed to draw a line between the materials that are being assessed in the module exam/coursework and those which are just needed for taking the MS test. On the other hand, there are something that are covered in the Microsoft materials that are not being asked in the Microsoft test (such as coding). I followed an assessment pattern like this:
I will write later how did I incorporate the AI-900 into assessment elements (exam and coursework) together with the challenges and limitations I had.
Impact on Learning
It is perhaps too soon to fully evaluate the learning outcomes. I know that the students (and the school) were complaining about overloading unnecessary theoretical AI materials and wished a practical-focus revamp of the module. This year, although the participation was not high, there are positive feedback from the students that appreciate the change, and expressing that the modules was interesting to follow particularly when it comes to the incorporated AI-900 materials. The other evaluation result I have now, is the final stage of the coursework (out of 4), in which I asked the students to add an Azure service to their chatbot (the subject of the coursework). I just finished marking of this coursework component and I can observe more engagement and better marks for this component.
A better evaluation is to be done after the module exam as well as after the AI-900 certification test.
What Else for Now and Future?
Well, I did not limit myself to incorporating AI-900 to a particular module only. As an academic, there are many other educational benefits from Microsoft materials and technologies I can take. I would like to give some headlines here and continue on each in some later posts.
AI-900 is just incorporated into another module that I teach: Artificial Intelligence for Degree Apprenticeship course (today is its last day). The settings are different from the ordinary 3rd year AI module, due to the number of students, their maturity, their existing employment and the very short module length.
MSc projects are fantastic routes to incorporate Microsoft technology into research out of the pre-defined and limited teaching materials. I defined an MSc project to develop an Azure-based AI solution which uses fuzzy logic as the core technique. The student who picked the project up is starting the work, and I hope to get good result – updates to follow.
Active using of Azure VMs for labs. Due to more than a year in COVID, it looks like that blended labs, i.e., combining face-to-face lab-based teaching with home-based works will remain with us for some times. To have a consistent working environment for all students, Particularly for running AI-900 practical sessions, Azure VM can be used as the platform for both groups of students. This is undergoing.
International collaboration for AI teaching in High Schools
Within IEEE CIS (Computational Intelligence Society), I participate in a subgroup called High School Outreach Subcommittee with members around the globe. In the recent 2021 meeting, the members welcomed my idea in adapting Azure-AI learning materials for high school teaching activities of this committee, such as in summer schools and short courses, even as competition programs. More updates are to follow.
This article is contributed. See the original author and article here.
April 2021 brought some great new offerings: Immersive Reader: SharePoint pages and news posts, Events Web Part: Audience Targeting, SharePoint site templates, Microsoft Lists for iOS: iPad support, Manage Microsoft Lists for iOS using InTune APP, Microsoft Lists: Visualize date with Power BI, OneDrive sync 64-bit for Windows, and more. Details and screenshots below, including our audible, “groundhog, shadow-casted” companion: TheIntrazone Roadmap Pitstop: April 2021 podcast episode – all to help answer, “What’s rolling out now for SharePoint and related technologies into Microsoft 365?”
In the podcast episode, I chat with Nicole Woon (LinkedIn | Twitter), program manager on the SharePoint at Microsoft focused on all things site templates. We dig into all about the new templates, their history from the SharePoint Look Book – moving into Microsoft 365, and insights into what you can expect next for templatizing your intranet.
Nicole Woon, program manager at Microsoft [Intrazone guest], with little Mark Kashman [co-host] in the bottom right corner during our interview over Teams.
HELP AMPLIFY | India is experiencing one of the worst outbreaks of COVID cases since the start of the pandemic. Many of our colleagues and friends in India are greatly impacted. We wish to amplify the COVID resource website my colleague Prarthana Sannamani manages for anyone that will benefit from it. Thank you for considering sharing it. We are grateful the U.S. government is mobilizing to help. And as Satya Nadella shared, “Microsoft will continue to use its voice, resources, and technology to aid relief efforts, and support the purchase of critical oxygen concentration devices.”
All features listed below began rolling out to Targeted Release customers in Microsoft 365 as of April 2021 (possibly early May 2021).
Inform and engage with dynamic employee experiences
Build your intelligent intranet on SharePoint in Microsoft 365 and get the benefits of investing in business outcomes – reducing IT and development costs, increasing business speed and agility, and up-leveling the dynamic, personalized, and welcoming nature of your intranet.
Immersive Reader is coming to SharePoint pages and news posts
The Microsoft Immersive Reader tech, currently built into Word, OneNote, Outlook, Teams, and other Microsoft apps, will soon be available for SharePoint pages and news posts. The Immersive Reader uses proven techniques to improve reading and writing for people regardless of their age or ability.
Click the Immersive Reader button to minimize aspects of the SharePoint site to best focus on the text of the page or news article.
Viewers of SharePoint pages and news posts will see a button on the page command bar to open the Immersive Reader. Note: In this initial release, the Immersive Reader will only read content contained in text web parts.
This provides the ability to target specific audiences per event within the SharePoint Events Web Part. Meaning you can target specific events to different audiences – aligning with in-place options to personalize your intranet experience.
When you turn on audience targeting, you can make it so certain events within the Events web part appear, or don’t, for certain people and/or groups.
Knowing about events in your organization is great. Seeing the set of events that are meant for you based on role, region and distinct team or org, even better.
SharePoint site templates (Nicole Woon); merge in with Next steps
This new SharePoint release of scenario-based site templates will help you expand what’s possible with content, pages, and web parts while helping you quickly get started building your own site. Each template contains pre-populated content and web parts that are fully customizable to meet the needs of your organization.
You’ll find Microsoft-provided templates when you create new sites in Microsoft 365, alongside any custom templates you may have deployed.
Current set of scenario-based site templates:
Communication site templates
Department – Engage and connect viewers with departmental news and resources.
Leadership connection – Build community by connecting leadership and team members.
Learning central – Showcase learning and training opportunities.
New employee onboarding – Streamline and refine new hire onboarding process.
Showcase – Spotlight a product, event, or team using visual content.
Topic – Engage viewers with informative content like news and announcements.
Blank – Create your own custom site starting with a blank home page.
Team site templates
Event planning – Coordinate and plan event details with your team.
Project management – Create a collaboration space for your project team.
Training and courses – Prepare course participants for learning opportunities.
Training and development team – Plan opportunities to help others learn and grow.
Team collaboration – Manage projects, share content, and stay connected with your team.
Teamwork updates across SharePoint team sites, OneDrive, and Microsoft Teams
Microsoft 365 is designed to be a universal toolkit for teamwork – to give you the right tools for the right task, along with common services to help you seamlessly work across applications. SharePoint is the intelligent content service that powers teamwork – to better collaborate on proposals, projects, and campaigns throughout your organization – with integration across Microsoft Teams, OneDrive, Yammer, Stream, Planner and much more.
iPad support now available in Microsoft Lists for iOS
Track what matters most from the comforts of a larger touch screen device. We’re pleased to share Microsoft Lists for iOS now supports iPad. AKA, no more Lists at 2x. You’ll get a beautiful native experience to track, manage and share your information.
With the extra screen real estate, you can easily search for lists, list items, and tap directly into your favorite and recent lists – directly from the home screen. Lists looks great in both portrait and landscape modes. And it mirrors the Lists Web experience, blended within the common design of iOS.
Microsoft Lists for iOS on an iPad, showing the main home screen with Search, and Favorites and Recent lists (left), and working on an individual ‘New Candidates’ list (right).
Once in a list, you’ll swipe up and down, left to right to navigate your list. You’re able to tap into a specific list item to see it’s full view form. And you can refine the view of information using filter, group by, and tapping into individual fields to make changes to drop-down menus or enter text.
The app now also supports conditional access deployment through Azure admin portal. Please note that ‘Require app protection policy’ is supported which provides higher level of assurance. Lists app doesn’t currently support ‘Require approved client app’ grant access.
We are excited to announce the arrival of a new guided experience in Lists that will make it easy to create business intelligence reports in Power BI using your list data as your source.
From within Microsoft Lists, click Integrate > Power BI > Visualize this list to open your data into a new Power BI dashboard.
List users will see a new menu option in Integrate > Power BI > Visualize this list, which allows users to create a new Power BI report using that list. With just one click, you’ll be able to autogenerate a basic report and customize the list columns that are shown in the report. To take further advantage of Power BI, go into Edit mode. Once a report is saved and published, it will appear in the same submenu under Integrate> Power BI.
Once your list is open in Power BI, you can edit it (showing Edit mode), publish the custom dashboard back to your list, and share it.
Users without either of those licenses will be prompted by Power BI to sign up for a 60-day free trial of Power BI Pro when they attempt to save a new report or edit or view an existing report. You can turn off self-service sign-up so that the option for a trial is not exposed to List users, click here. Users with a Power BI free license may only visualize their list data but cannot publish nor view reports.
We’re excited to announce that the 64-bit OneDrive sync client for Windows is now available as a public preview. This has been a long awaited and highly requested feature. You can now download the 64-bit version for use with OneDrive work, school, and home accounts.
Note : If you have a 64-bit operating system with an x64-based processor, you can choose to install either the 32-bit or 64-bit OneDrive. For ARM64 devices, you should continue to use the 32-bit OneDrive. Computers running 64-bit versions of Windows generally have more resources—such as processing power and memory.
Exclude specific files from OneDrive sync on macOS
This new feature setting will allow you to exclude newly added OneDrive files from syncing to the cloud by file name or extension on macOS devices. This setting lets you enter keywords to prevent the OneDrive sync app from uploading certain files to OneDrive or SharePoint. You can enter complete names, such as “setup.exe” or use the asterisk (*) as a wildcard character to represent a series of characters, such as *.pst.
Exclude certain file types when using OneDrive sync for macOS.
If you enable this setting, the sync app doesn’t upload new files that match the keywords you specified. No errors appear for the skipped files, and the files remain in the local OneDrive folder.
This is an updated experience when you receive email attachments. We are updating the look and contents of the attachments and consolidating all options under a single menu (like Outlook for Mac and Outlook for Windows).
Start working on Outlook attachments with them in OneDrive as you begin to edit and share them beyond the initial email.
What this means for people with OneDrive enabled, they will see new options in this menu and in the attachment previewer for Word, Excel, and PowerPoint files, to directly begin editing Office attachments in the corresponding browser or desktop app – beginning the storage and collaboration from the SharePoint files platform – a single source of truth – not multiple versions of file attachments.
Upcoming Microsoft Lists virtual workshops – May 10-14, 2021
“Go further with Microsoft Lists” – Microsoft will deliver five FREE virtual workshops across various time zones. Just pick your time zone and join in. We’ve got a lot of great presenters from the product team. See how Lists evolve from SharePoint lists to empower individuals and teams to create, share and track information – including innovation in Microsoft Teams.
We will teach you how to use and create views, configure conditional formatting, adjust forms and more. Plus, we will highlight extending lists with the integrated Power Platform and answer all frequently, or infrequently, asked questions; in fact, you can submit a question in advance to ensure we cover it.
“Go further with Microsoft Lists” – five, free Microsoft workshops across time zones (May.10-14.2021)
Get ready to become a Microsoft Lists pro, for free. Learn all you can do with Microsoft Lists – your smart information tracking app in Microsoft 365.
Follow me to catch news and interesting SharePoint things: @mkashman; warning, occasional bad puns may fly in a tweet or two here and there, plus my new blog on Substack: The Kashbox.
Thanks for tuning in and/or reading this episode/blog of the Intrazone Roadmap Pitstop – April 2021 (blog/podcast). We are open to your feedback in comments below to hear how both the Roadmap Pitstop podcast episodes and blogs can be improved over time.
Engage with us. Ask those questions that haunt you. Push us where you want and need to get the best information and insights. We are here to put both our and your best change management foot forward.
Stay safe out there on the road’map, and thanks for listening and reading.
Thanks for your time,
Mark Kashman – senior product manager (SharePoint/Lists) | Microsoft)
The Intrazone Roadmap Pitstop – April 2021 graphic showing some of the highlighted release features.
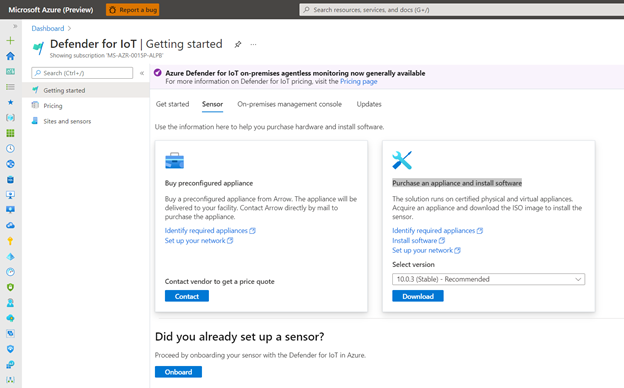


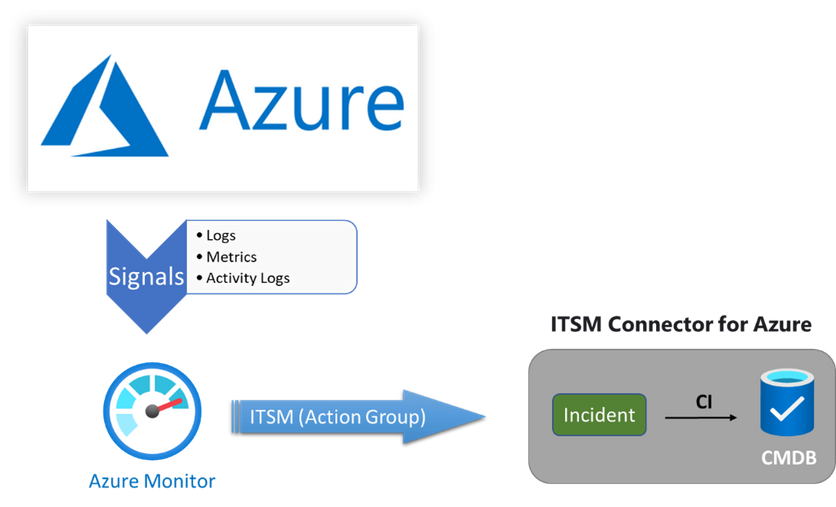


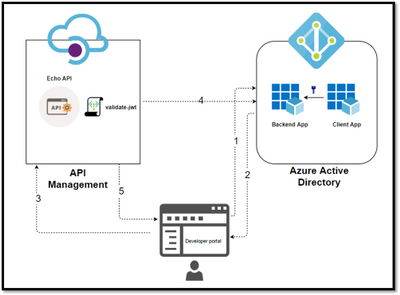


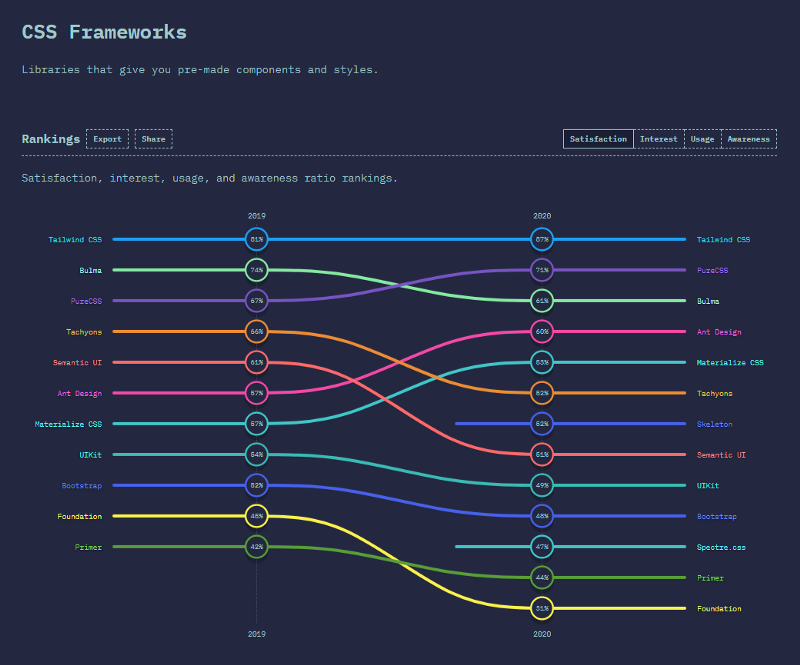


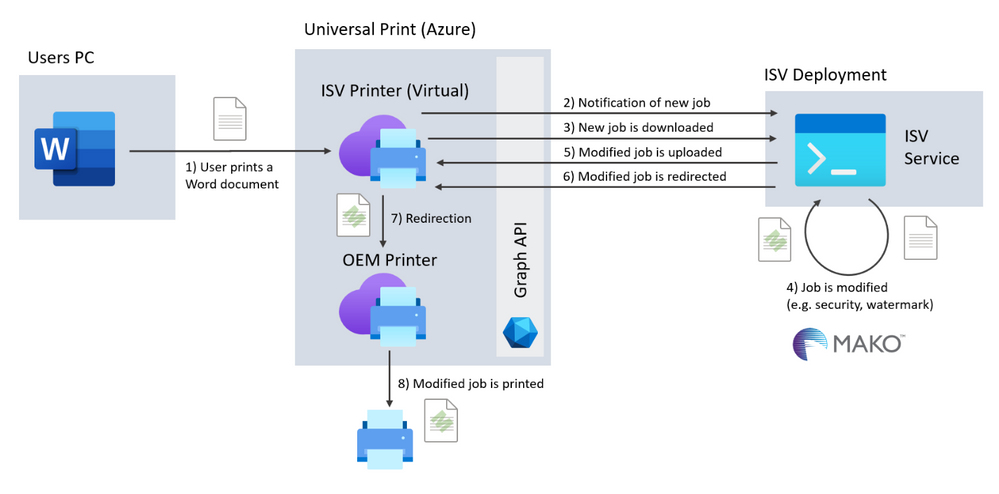


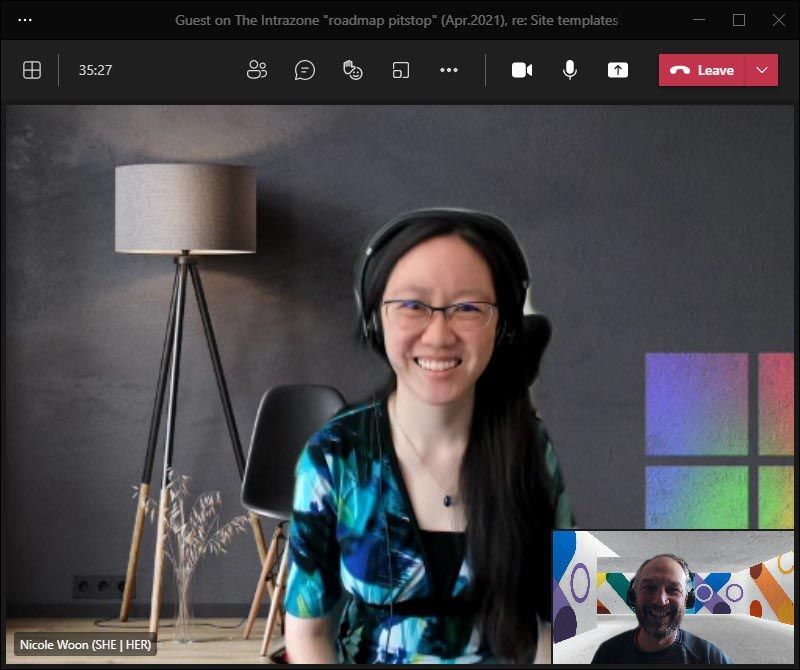


Recent Comments