by Contributed | Jun 11, 2021 | Technology
This article is contributed. See the original author and article here.
Final Update: Friday, 11 June 2021 08:45 UTC
We’ve confirmed that all systems are back to normal with no customer impact as of 06/11, 06:39 UTC. Our logs show the incident started on 06/11, 08:10 UTC and that during the 1 Hours & 31 minutes that it took to resolve the issue, customers ingesting telemetry in Southeast Asia geographical region may have experienced intermittent data latency, data gaps and incorrect alert activation.
- Root Cause: The failure was due to an issue with one of our dependent service.
- Incident Timeline: 1 Hours & 31 minutes – 06/11, 06:39 UTC through 06/11, 08:10 UTC
We understand that customers rely on Azure Log Analytics as a critical service and apologize for any impact this incident caused.
-Vyom
by Contributed | Jun 11, 2021 | Technology
This article is contributed. See the original author and article here.
With the growth of internet and mobile, building the cross platform real-time chat experience into your application also becomes a very common need, for example patient and doctor chat in healthcare, customer support chat in eCommerce, student and teacher chat in remote education, players chat in eGaming, instant chat for social media or live video stream, and so on. The real-time chat experience offers several values to your application to help your customers success:
- Instant and efficient communication to faster problem resolution.
- Collaboration and purposeful conversation to overcome business challenges.
- Smooth built-in experience to improve the customer service and loyalty.
- Cross platform support to empower the customer to discovery easily.
In general, there are some fundamental and critical needs for an application with build-in real-time chat experience:
- Real-time chat experience with users.
- Management of user and group.
- Notification and popup.
- AI-enabled, e.g., language moderator, bot, etc.
- Typing indicator.
But it is not easy to build these functionalities into your application from scratch. You may have the issues to achieve the real-time performance, handles hosting, scalability, load balancing and other infrastructure related challenges, adapt with multiple client platforms, etc. Now, the Azure Web PubSub service which is a fully managed service give the opportunity to you to enable the real-time capability to your application with native and serverless WebSockets support.
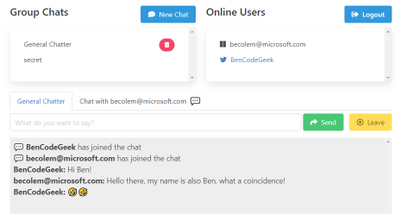
Let’s follow with Ben Coleman together to build a serverless Chatr web application and learn how does he leverage the advantages of the Azure Web PubSub and Azure Static Web Apps to achieve this easily and quickly.
What’s the Chatr?
Chatr is a simple real-time, multi-user chat application, highlighting the ease of building applications on top of two of Azure services: Azure Web PubSub and Azure Static Web Apps. The Chatr application provides many of the features you might expect; a way to sign in and authenticate, group chats, user to user private chats, a global online user list, idle (away from keyboard) detection and more. However it was built to be a way to learn and showcase possibilities rather than a fully fledged and production grade chat system.
Chatr consists of four components:
- The client or frontend, which users interact with – This is written in JavaScript and uses Vue.js
- The backend service, which provides message processing & event handling, written in Node.js
- A globally available but secure Websockets service – provided by Azure Web PubSub
- Persistence state storage and key value store – provided by Azure Table Storage
A diagram will help illustrate how these all interact, and some of the main message & data flows. Let’s explore these components in more detail.

Use Web PubSub to build the scalable backend
The Azure WebPubSub service works hand in hand with the Chatr backend, to provide the core chat functionality. This is done through ‘event handlers’ within Azure WebPub sub, these handlers enable an upstream service to receive client side WebSocket messages as “events”. These events are HTTP messages, which the service can then react to. These events supports both a range of built-in system events (e.g. client connecting or disconnecting) but also custom application specific events, in the case of Chatr there are many of these such events, for example “joinChat” or “userEnterIdle” etc.
The backend uses the service client of the Web PubSub SDK for Node.js, which can be instantiated easily. Here we are storing configuration details such as the connection string in an Azure Function App Settings, and obtain it them securely through environmental variables.
const { WebPubSubServiceClient } = require('@azure/web-pubsub')
const CONN_STR = process.env.PUBSUB_CONNECTION_STRING
const HUB = process.env.PUBSUB_HUB
const serviceClient = new WebPubSubServiceClient(CONN_STR, HUB)
Within the Function itself we can handle any event sent to us from clients by binding to HTTP trigger POST requests and processing them as follows. For example, the code below shows how Chatr handles when a user has created a new shared group–chat. When doing so they send an event called “createChat”, when handling this we get the properties we require from both the headers and the HTTP body, (the special ‘ce’ headers are populated by Azure Web PubSub), then store into state and finally notify all clients about the new chat with an outbound message.
const eventName = req.headers['ce-eventname']
const userId = req.headers['ce-userid']

if (eventName === 'createChat') {
  // Build custom event payload
    const chatPayload = {
    id: req.body.id,
    name: req.body.name,
    owner: userId
    }

  // ... Update state, removed for brevity ...

  // Send message to all clients with custom JSON payload
  // Will be routed via Azure Web PubSub with WebSocket protocol
  serviceClient.sendToAll({
    chatEvent: 'chatCreated',
    data: JSON.stringify(chatPayload),
  })
}
Build frontend with extensive platform and host easily with Static Web Apps
The Chatr frontend consists of a JavaScript static app or SPA (single page application) built on the Vue.js framework, this is hosted using the Azure Static Web App service as a set of HTML and JS files. This Azure service aside from just hosting static content, also provides Chatr a means to sign in and authenticate users and also a way to host the backend Azure Function service. The frontend establishes a secure connection to Azure Web PubSub using WebSockets, no SDK or client libraries are required making it quick easy to use. Let’s walk through the frontend together.
Setup connection between application and backend service
The clients first request a way to access to Azure Web PubSub by calling a REST endpoint on our backend which in turn obtains a client access URL (which includes an access token) this is done using the same serviceClient described above, as this is done server side it provides a way to restrict access and secure the application. In the case of Chatr all users are permitted to request an access URL. The userId in the code below has been fetched previously through a call to Azure Static WebApps, for the purposes of Azure Web PubSub. It’s simply a string and has no special meaning.
// Get URL & token to connect to Azure Web Pubsub
res = await fetch(`/api/getToken?userId=${userId}`)
let token = await res.json()

// Now connect to Azure Web PubSub using the URL we obtained
let ws = new WebSocket(token.url, 'json.webpubsub.azure.v1')
We only use standard modern JavaScript APIs like fetch and WebSocket this means the Chatr frontend can be deployed without any bundling or WebPack stage. Also note how we use the ‘json.webpubsub.azure.v1′ subprotocol when establishing the connection, this extension to plain WebSockets provides a range of additional capabilities which are used by Chatr such as; client to client messaging (without a round trip to the server), a means to join send messages to groups (which is how Chatr provides group chats) and also a way to send custom events which are routed to the service as described above.
Send custom event or message
Sending a custom event from the client is very simple, for example.
ws.send(
  JSON.stringify({
    type: "event",
    event: "createChat",
    dataType: "json",
    data: { name: chatName, id: chatId },
  })
);
Chat messages between users are sent a very similar way, except leveraging the ‘sendToGroup‘ message type. Rather than plain text strings (which are also supported) we enrich the messages we send with meta data such as the userId of who sent the message and send a JSON payload. It’s important to note these messages are not relayed by the Chatr backend we described above, they are handled entirely by the Azure Web PubSub service without any backend or server code.
ws.send(
  JSON.stringify({
    type: "sendToGroup",
    group: chatId,
    dataType: "json",
    data: {
      message: message,
      fromUserId: userId,
    },
  })
);
Summary
We’ve just scratched the surface of what the Chatr sample app does, and we’ve not covered details such as how state is stored using Azure Tables or how the authentication wrappers of Azure Static WebApps are used. However I hope what we have shown illustrates some of the power and flexibility of Azure Web PubSub. If you are looking for more details about this application, you can refer to the Chatr repo on GitHub where the code is hosted, along with information and docs on how to deploy it to Azure and run it yourself.
Next Steps
If you are trying to build your first real-time application with Azure Web PubSub, you could also get more helpful resources from the getting stated contents. We are looking forward your feedback and ideas to help us become better via Azure Feedback Forum!
by Contributed | Jun 11, 2021 | Technology
This article is contributed. See the original author and article here.
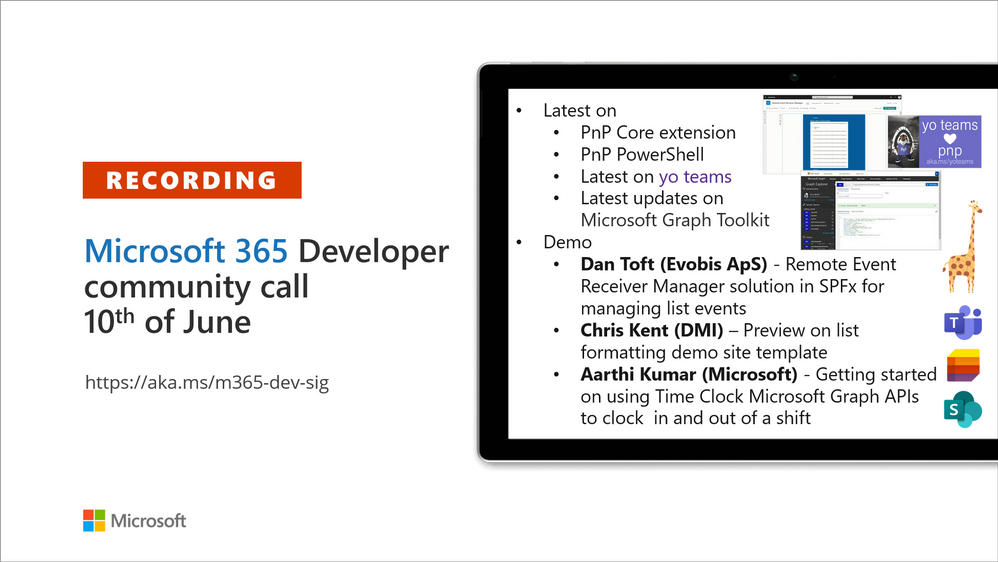
Recording of the Microsoft 365 – General M365 development Special Interest Group (SIG) community call from June 10, 2021.
Call Summary
Summer break and community call schedule updates reviewed. You are invited to join the Viva Connections private preview! Preview the new Microsoft 365 Extensibility look book gallery. Looking to get started with Microsoft Teams development? Don’t miss out our Teams samples gallery, and the new Microsoft 365 tenant – script samples gallery – scripts for PowerShell and CLIs. Sign up and attend one of a growing list of events hosted by Sharing is Caring this month. Check out the new PnP Teams Quickstart.
Recent PnP project releases include: PnP Core SDK v1.2.0 GA, PnP Framework v1.5.0 GA, PnP PowerShell v1.6.0 GA, Yo teams – generator-teams v3.2.0 GA, yoteams-build-core V1.2.0 GA + v1.2.1 Preview, yoteams-deploy v1.0.0 GA and finally component updates to Microsoft Graph Toolkit (MGT) v.2.2.0 GA.
Open-source project status: (Bold indicates new this call)
Project |
Current Version |
Release/Status |
PnP .NET Libraries – PnP Framework |
v1.5.0 GA |
Version 1.6.0 – Summer 2021 |
PnP .NET Libraries – PnP Core SDK |
v1.2.0 GA |
Version 1.3.0 – Summer 2021 |
PnP PowerShell |
v1.6.0 GA |
|
Yo teams – generator-teams |
v3.2.0 GA |
|
Yo teams – yoteams-build-core |
v1.2.0 GA, v1.2.1 Preview |
|
Yo teams – yoteams-deploy |
v1.1.0 GA |
|
Yo teams – msteams-react-base-component |
v3.1.0 |
|
Microsoft Graph Toolkit (MGT) |
v2.2.0 GA |
Regular component updates |
Additionally, 1 new Teams samples were delivered in the last 2 weeks. The host of this call was Vesa Juvonen (Microsoft) |@vesajuvonen. Q&A takes place in chat throughout the call.
Actions:
- Join on the Viva Connections private preview! | aka.ms/viva/connections/preview/register
- Feedback wanted: Regarding PnP PowerShell – “What if we did not return classic CSOM objects from the cmdlets?” Comments to: @erwinvanhunen.
- Save the date to the Microsoft Teams monthly community call on the 15th of June @ 8 AM PT | https://aka.ms/microsoftteamscommunitycall
- Register for Sharing is Caring Events:
- First Time Contributor Session – June 29th (EMEA, APAC & US friendly times available)
- Community Docs Session – June 23rd
- PnP – SPFx Developer Workstation Setup – June 17th
- PnP SPFx Samples – Solving SPFx version differences using Node Version Manager – June 24th
- Ask Me Anything – Teams Dev – July
- First Time Presenter – June 30th
- More than Code with VSCode – June 16th
- Maturity Model Practitioners – June 15th
- PnP Office Hours – 1:1 session – Register
- Download the recurrent invite for this call – http://aka.ms/m365-dev-sig
- Call attention to your great work by using the #PnPWeekly on Twitter.
Microsoft Teams Development Samples: (https://aka.ms/TeamsSampleBrowser)

Thank you for joining for today’s PnP Community call. The auditorium was packed.
Demos delivered in this session
Remote Event Receiver Manager solution in SPFx for managing list events –
A very simple web part that lets users view, add and delete remote event receivers in lists. Review what is a Remote Event Receiver, Strengths and Weaknesses, and when/not to consider using Power Automate to accomplish task. Use the sample to quickly identify Event Receivers in lists across a tenant without having to connect to PowerShell or go to a REST API.
Preview on list formatting demo site template – as an alternative to going to GitHub to pull samples, the Community team is experimenting with an additional layout option – List Formatting Sample Showcase pages that display fully functional samples Power Users can manipulate, drill in to view/customize data, and get additional details in GitHub – from within a browser! You may even adopt this formatting in your own tenant. Available soon.
Getting started on using Time Clock Microsoft Graph APIs to clock in and out of a shift – the time tracking component (Time Clock APIs) in the Teams Shifts Application provides clock in / out, timesheet edit and more capabilities that auto-syncs to Payroll / T&A apps like Cronos, Workday, ADP, Ceridian SAP. Call the APIs to integrate with your customer’s payroll and T&A systems using Time Clock APIs (beta). Supports CRUD operations and WebHooks. Request handling guidance in the documentation.
Thank you for your work. Samples are often showcased in Demos.
Topics covered in this call
- PnP .NET library updates – Bert Jansen (Microsoft) | @O365bert – 10:31
- PnP PowerShell updates – Erwin van Hunen (Valo Intranet) | @erwinvanhunen – 12:59
- yo Teams updates – Wictor Wilén (Avanade) | @wictor – 14:23
- Microsoft Graph Toolkit updates – Beth Pan (Microsoft) | @beth_panx – 16:42
- Microsoft Teams Samples – Bob German (Microsoft) | @Bob1German – 18:22
Demo: Remote Event Receiver Manager solution in SPFx for managing list events – Dan Toft (Evobis ApS) | @tanddant – 20:22
Demo: Preview on list formatting demo site template – Chris Kent (DMI) | @theChrisKent – 31:32
Demo: Getting started on using Time Clock Microsoft Graph APIs to clock in and out of a shift – Aarthi Kumar (Microsoft) – 41:20
Resources:
Additional resources around the covered topics and links from the slides.
General resources:
Upcoming Calls | Recurrent Invites:
General Microsoft 365 Dev Special Interest Group bi-weekly calls are targeted at anyone who’s interested in the general Microsoft 365 development topics. This includes Microsoft Teams, Bots, Microsoft Graph, CSOM, REST, site provisioning, PnP PowerShell, PnP Sites Core, Site Designs, Microsoft Flow, PowerApps, Column Formatting, list formatting, etc. topics. More details on the Microsoft 365 community from http://aka.ms/m365pnp. We also welcome community demos, if you are interested in doing a live demo in these calls!
You can download recurrent invite from http://aka.ms/m365-dev-sig. Welcome and join in the discussion. If you have any questions, comments, or feedback, feel free to provide your input as comments to this post as well. More details on the Microsoft 365 community and options to get involved are available from http://aka.ms/m365pnp.
“Sharing is caring”
Microsoft 365 PnP team, Microsoft – 11th of June 2021
by Contributed | Jun 11, 2021 | Technology
This article is contributed. See the original author and article here.
This article helps you to Deploy an existing Asp.net Core Web API project as Guest executable to Service Fabric Cluster.
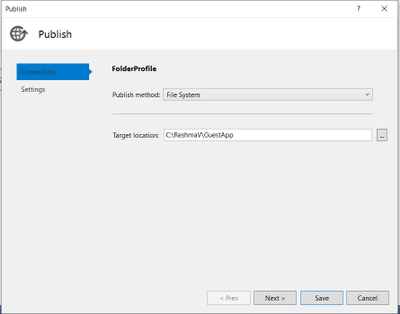
Step 1: Publish Asp.Net Core Application to Folder.
Right-click the .NET Core project and click Publish.
Create a custom publish target and name it appropriately to describe the final published service.

You have now published the service to a directory.
Go to the path where Project is published, you will see an exe created for your project.

Step 2: Creating a Guest Service Fabric Application
- Choose File -> New Project and Create a Service Fabric Application. The template can be found under Visual C# -> Cloud. Choose an appropriate project name as this will reflect the name of the application that is deployed on the Cluster.
- Choose the Guest Executable template. Under the Code Package Folder, browse to previously published directory of service.
- Under Code Package Behavior you can specify either Add link to external folder or Copy folder contents to Project. You can use the linked folders which will enable you to update the guest executable in its source as a part of the application package build.
- Choose the Program that needs to run as service and specify the arguments and working directory if they are different. In below example we are using Code Package.
- Click on Create.

If your Service needs an endpoint for communication, you can now add the protocol, port, and type to the ServiceManifest.xml
For example:
<Endpoint Protocol=”http” Name=”AccountServiceEndpoint” Type=”Input” Port=”5000″ />
The Application Url and Port can be verified from launchSettings.json of your Asp.Net Core Web API project.
Sample for reference:
{
“iisSettings”: {
“windowsAuthentication”: false,
“anonymousAuthentication”: true,
“iisExpress”: {
“applicationUrl”: “http://localhost:62871“,
“sslPort”: 0
}
},
“$schema”: “http://json.schemastore.org/launchsettings.json“,
“profiles”: {
“IIS Express”: {
“commandName”: “IISExpress”,
“launchBrowser”: true,
“launchUrl”: “weatherforecast”,
“environmentVariables”: {
“ASPNETCORE_ENVIRONMENT”: “Development”
}
},
“webapi2”: {
“commandName”: “Project”,
“launchBrowser”: true,
“launchUrl”: “weatherforecast”,
“environmentVariables”: {
“ASPNETCORE_ENVIRONMENT”: “Development”
},
“applicationUrl”: “https://localhost:5001;http://localhost:5000“
}
}
}
Service Manifest file:
<Endpoints>
<Endpoint Name=”GuestExecProjectTypeEndpoint” Protocol=”http” Type=”Input” Port=”5000″ />
</Endpoints>
Now, you are set to deploy the Guest Executable Project to Service Fabric cluster.
Step 3: Deploy the Guest Application to Azure Service Fabric cluster

From SFX:

Step 4: Accessing the Web API from Cluster Node
RDP inside the node and Hit the API endpoint.
Eg: http://localhost:5000/weatherforecast

In case you are not sure, in which port application is listening, please find an alternative way to check:
If deployed in Azure:
- RDP inside the node and get the Process ID of exe.
- Run netstat -ano

Reference: https://docs.microsoft.com/en-us/azure/service-fabric/service-fabric-deploy-existing-app
https://docs.microsoft.com/en-us/azure/service-fabric/service-fabric-guest-executables-introduction
by Contributed | Jun 11, 2021 | Technology
This article is contributed. See the original author and article here.
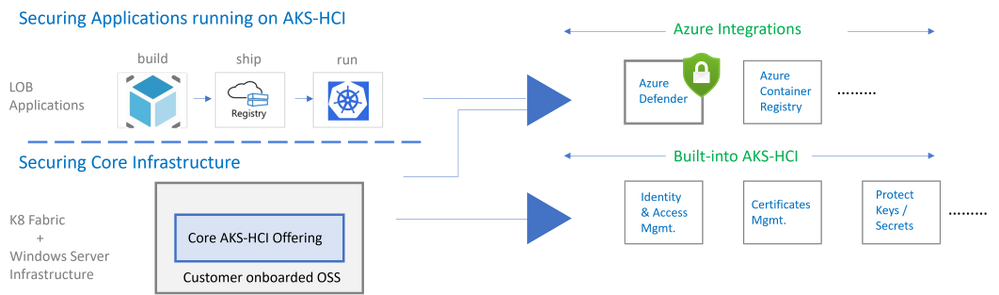
AKS-HCI integration with Azure Defender for Kubernetes bring security capabilities that cover both protection and detection controls.
AKS-HCI security includes securing the K8 fabric and applications that are deployed on it. This is achieved by a combination of in-box/built-in security features and integration with Azure services as shown below.

AKS-HCI is a validated Azure Arc Enabled Kubernetes distribution. Azure Arc enabled clusters are connected to Azure via Arc when they are deployed. This allows automatic deployment of specific Arc extensions that provide monitoring and observability out of the box. Extensions greatly simplify onboarding; customers can deploy Azure integrations with just a few clicks or API calls. Azure Arc enabled Kubernetes ensures that you always have the latest bits and can automatically apply updates as they become available.
Azure Defender is Azure Security Center‘s integrated cloud workload protection platform (CWPP), bringing advanced, intelligent, protection of Azure and hybrid resources and workloads.
Azure Defender for Kubernetes is an Azure Defender service that continuously monitors for threat and raises alerts to defend Kubernetes clusters. Azure Defender for Kubernetes supports AKS-HCI clusters, leveraging Arc extensions capabilities. This integration between AKS-HCI and Azure Defender for Kubernetes brings the following two distinct advantages:

As shown in the figure below AKS-HCI clusters are integrated into the Azure Security Center portal

Types of Attacks on Kubernetes Containers detected by Azure Defender for Kubernetes
Azure Defender Kubernetes plan offers protection of Kubernetes clusters, both at the orchestration layer and at the node level. The orchestration layer protection monitors Kubernetes API operations to find suspicious and malicious activities in the Kubernetes control plane.
With MITRE ATT&CK’s approach of methodically outlining the possible threats, Microsoft built the Threat Matrix for Kubernetes, which the first attempts to systematically map the attack surface of Kubernetes. An updated version of the matrix was released earlier this year.
In this blog you can find more details on Azure Defender detections with their correlation to MITRE ATT&CK® for Containers matrix techniques.
The figure below describes the progression of single alert across the different phases (as defined in the MITRE ATT&CK framework)

Some examples of attacks that could be potentially high risk

For the full list of Kubernetes security alerts along with their relevance to MITRE tactics see: Azure Defender page
FAQs
How does Azure Defender for Kubernetes work under the hood
You can refer to the architectural overview in this link. Further details in a blog from Yossi Weizman.
Q: Do I need to subscribe to Azure Defender before I can add Azure Defender Extension to my Arc enabled Kubernetes Cluster
AKS-HCI is an Azure Arc enabled Kubernetes distribution with an Azure subscription provided as part of the set-up process. To use Azure Defender for Kubernetes threat monitoring the admin needs to add Azure Defender for Kubernetes to the Azure subscription. For more information refer to this link.
Q: Is there is free tier for Azure Defender for Arc enabled Kubernetes
Currently, Azure Defender for Azure Arc Enabled Kubernetes is in public preview, during public preview there is no charge for AKS-HCI clusters. The pricing details will be available when the feature is Generally Available.
Q: Where can I find deployment steps
AKS-HCI is a validated Azure Arc enabled Kubernetes deployment, the deployment steps can be found on this link.
Q: Does Azure Defender for Kubernetes generate alerts for both windows and linux worker nodes
Orchestration level alerts that come from api-server and K8 apis are supported agonistic of Operating System. Run-time alerts such as process inspections for malware, privilege escalations etc are OS dependent. Run-time alerts are planned in the near future.
Q: Does integration with Azure Defender for Kubernetes cover alerts for servers
No, there is a separate subscription for covering alerts for server, for more information on Azure Defender for servers please refer to this link here
by Contributed | Jun 10, 2021 | Technology
This article is contributed. See the original author and article here.
The 11th cumulative update release for SQL Server 2019 RTM is now available for download at the Microsoft Downloads site. Please note that registration is no longer required to download Cumulative updates.
To learn more about the release or servicing model, please visit:
• CU11 KB Article: https://support.microsoft.com/en-us/help/5003249
Starting with SQL Server 2017, we adopted a new modern servicing model. Please refer to our blog for more details on Modern Servicing Model for SQL Server
• Microsoft® SQL Server® 2019 RTM Latest Cumulative Update: https://www.microsoft.com/download/details.aspx?id=100809
• Update Center for Microsoft SQL Server: https://docs.microsoft.com/en-us/sql/database-engine/install-windows/latest-updates-for-microsoft-sql-server
by Contributed | Jun 10, 2021 | Technology
This article is contributed. See the original author and article here.
In this month’s call we’ll be highlighting an exciting Service Fabric customer success story, their onboarding journey, and learnings.
June 17th 10:00am PDT: https://aka.ms/sfcommunityqa
Agenda:
- Customer success story: Innovian’s Journey with Service Fabric
- Product updates
- Q&A
As usual, there is no need to RSVP – just navigate to the link to the call and you are in.
We have posted recordings of all our past Service Fabric Community call here.
If you would like to suggest a topic or provide a talk please reach out or let us know in a call. We try to focus on topics related to various components of the Service Fabric platform, provide updates about new features and services, upcoming releases, and highlight solutions developed by our customers that benefit the community.
by Contributed | Jun 10, 2021 | Technology
This article is contributed. See the original author and article here.
Starting today, you can use PowerShell in tandem with Microsoft Graph APIs to utilize the Windows Update for Business deployment service. In case you aren’t yet familiar with it, the Windows Update for Business deployment service provides cloud-based control over the approval, scheduling, and safeguarding of content delivered from Windows Update—enabling you to meet your organization’s update and compliance goals no matter where your devices are on the planet.
In addition to Microsoft Graph APIs (currently in public preview), you can also use the Microsoft Graph PowerShell SDK to explore the latest functionality of the deployment service and quickly script and automate common update actions. It provides a simple way to get total control over how updates are deployed to your organization.
Now let’s dive into a concrete example to demonstrate how you can leverage deployment service capabilities through PowerShell.
Walkthrough: How to deploy an expedited quality update
Let’s say that Microsoft releases an update addressing a a high-priority security vulnerability or a quality fix for a critical line of business application that is crucial for your organization. In this case, you may want to deploy this update faster than your default update ring configuration. With PowerShell and the Windows Update for Business deployment service, you can deploy an expedited update, which overrides your default steady-state update settings and deploys the latest available updates so that your managed devices meet the minimum required Windows revision as quickly as possible.
Prerequisites
Before getting started, the following prerequisites must be met:
Assigning user roles for delegated permissions in PowerShell
Once you have confirmed that your tenant and devices meet the deployment service prerequisites, ensure your user account has one of the following permissions configured:
- Global Admin Role in Azure Active Directory
- Intune Admin Role in Azure Active Directory
- Policy and Profile Manager Role in Microsoft Intune
At least one of these roles is required for a user to be authorized to interact with the deployment service, and a new Windows Update Administrator role will be coming to Azure AD soon. To learn more, see Assign Azure AD roles to users and Assign a role to an Intune user.
Getting started with the Microsoft Graph PowerShell SDK
If you don’t already use PowerShell, your next step is to install a supported version of PowerShell. To learn how, see install PowerShell for your operating system.
Once you’ve installed PowerShell, ensure that you are running the latest version of the Microsoft Graph PowerShell SDK to be able to use the deployment service’s commands. You can install the SDK in PowerShell Core or Windows PowerShell using the following command:
Install-Module Microsoft.Graph
If you have already installed the Microsoft Graph PowerShell SDK, you can update the SDK and its dependencies using the following command. You must use version 1.6.0 or higher to use the deployment service:
Update-Module Microsoft.Graph
From this point on, every command will use the prefix Mg, which stands for Microsoft Graph. The deployment service is currently available through the beta endpoint of the Microsoft Graph, so you’ll need to set your user profile to the appropriate API contract.
Select-MgProfile -Name "beta"
Finally, use the Connect-MgGraph command to sign in. You’ll need to sign in with an account assigned to one of the required roles to consent to the permissions specified under scopes in this command.
Connect-MgGraph -Scopes "WindowsUpdates.ReadWrite.All"

Once the Graph PowerShell SDK is installed and you are signed in, you’re ready to start scripting common actions in the deployment service.
If you’re using an automated script instead of the PowerShell console, you can use the PSCredential Class to automate usernames, passwords, and credentials.
Step 1: Get a list of available updates
With expedited updates, you can speed the installation of quality updates like the most recent Update Tuesday release or an out-of-band security update for a zero-day flaw. An expedited deployment policy enables your devices below the minimum specified revision to override their default update posture and update as quickly as possible to the latest available update.
Let’s start by querying the deployment service catalog to get a list of security updates that can be specified as the minimum compliance bar for an expedited update. Below is an example of a query to the catalog that shows the quality updates available to expedite from most recent to last.
Get-MgWindowsUpdatesCatalogEntry -Filter "microsoft.graph.windowsUpdates.qualityUpdateCatalogEntry/isExpeditable eq true"
The output of the query will look something like this:

Step 2: Create a deployment
Now we’ll create an expedited deployment. The content to deploy is specified using the releaseDate key (which specifies a compliance floor), and the device restart grace period is determined using the daysUntilForcedReboot property. Below is an example of creating a deployment for an expedited quality update.
New-MgWindowsUpdatesDeployment -Content @{"@odata.type" = "microsoft.graph.windowsUpdates.expeditedQualityUpdatereference"; "releaseDate" = "2021-05-11"}
When the command successfully creates a deployment, it outputs something along the lines of the following:

Step 3: Assign devices to the deployment audience
Finally, let’s assign devices to the expedited deployment just created. Devices can be assigned directly or via an updatable asset group. Below is an example of adding an Azure AD device to a deployment using its ID. The DeploymentID comes from the response of the previous command.
Update-MgWindowsUpdatesDeploymentAudience -DeploymentID "a257062d-b716-43b9-99339-d13ea06eeeec" -AddMembers @(@{"id" = "dae37284-9dae-453a-aa61-dee371139090"; "@odata.type" = "Microsoft.graph.WindowsUpdates.azureADDevice"})
There’s no output from this command. Once you have assigned devices to the deployment audience, the deployment service will begin expediting updates as quickly as possible! You’ll be able to check the status of each device as your deployment progresses using Update Compliance.
Wrapping up
We hope that this example provides you with a practical tool for managing and responding to situations that require rapid deployment of quality updates while illustrating how you can use PowerShell to interact with the deployment service more generally. We encourage you to expedite an update within your organization and explore the broader set of capabilities available within the deployment service. Stay tuned for more examples!
by Contributed | Jun 10, 2021 | Technology
This article is contributed. See the original author and article here.
Watch this webinar, hosted by David Magar, Microsoft Principal Program Manager, to learn how the Premium Gen 2 service update increases the value your organization gets from Power BI Premium, how to set expectations in your org on what Power BI premium can do and how to manage your premium investments well.
Register for the Power BI Premium Gen 2 Webinar
by Contributed | Jun 10, 2021 | Technology
This article is contributed. See the original author and article here.
Hear Microsoft leaders present the latest announcements about Azure Arc–enabled data services as well as news about other Azure Arc and Azure Stack HCI offerings. Also, watch engineering demos on how to organize and govern environments and use native Azure services—like data services—to run them outside of Azure datacenters. And, listen to customers discuss how they’re using Azure to achieve their goals and turn their hybrid strategies into reality.
Register for the free, two-hour Azure Hybrid and Multicloud Digital Event on June 29 from 9:00 AM–11:00 AM Pacific Time and learn how to be more productive and agile by extending Azure management and running Azure data services across your on-premises, multicloud, and edge environments. The event kicks off with a short keynote followed by these deep dives into key topics and real companies’ experiences:
- Be among the first to hear a major Azure Arc announcement. Learn how to bring cloud capabilities to your data workloads across hybrid and multicloud environments.
- Intel and Microsoft: Partnering to deliver scalable, secure, and flexible hybrid infrastructure to customers.
- Run Azure data services anywhere with the latest developments in Azure Arc–enabled data services. See how SKF Group and Dell Technologies are getting the most out of the latest generation of hybrid data offerings.
- Quickly build, deploy, and update apps anywhere with Azure Arc. Learn how to ensure governance, compliance, and security for all deployments.
- Get consistent operations and security for hybrid and multicloud environments—and learn to automate systems to meet security, governance, and compliance standards.
- Modernize your datacenter and use Azure Stack HCI hybrid capabilities to help improve availability and performance across environments.
- Hear from Azure engineers and experts about hybrid services, including:
- Azure Arc and Azure Arc-enabled data services.
- Azure Stack HCI
- Azure Kubernetes Service on Azure Stack HCI
You’ll also have the chance to get answers to your hybrid questions from product experts during the live chat and from Microsoft leaders during the live Q&A panel.
Join us to hear more about these benefits, engage with Microsoft leaders and product experts, and explore solutions from the cloud built for hybrid. We hope to see you there!
Azure Hybrid and Multicloud Digital Event
Tuesday, June 29, 2021
9:00 AM–11:00 AM Pacific Time (UTC-7)
Delivered in partnership with Intel.
REGISTER NOW >

Recent Comments