![[Guest Blog] One person’s attempt to address the gender imbalance in tech](https://www.drware.com/wp-content/uploads/2021/06/fb_image-70-472x675.jpeg)
by Contributed | Jun 11, 2021 | Technology
This article is contributed. See the original author and article here.
This blog was written by Windows Development and Internet of Things (IoT) MVP Bryn Lewis. Bryn shares his work with students at an independent girl’s school, provides ideas, and seeks input for getting students to embrace a career in tech.
I have been in the software business for 30+ years building solutions predominately on the Microsoft platform. Over the years I have worked in a variety of areas including healthcare, industrial process control, mobile radio, online gambling, a couple of dotBombs, finance, and the Internet of Things(IoT). In the 2000’s I worked for Microsoft Consulting Services(MCS) in Auckland, New Zealand for a couple of years.
These days, to pay the bills, I work on an Azure Platform as a Service(PaaS) based Fintech application for managing portfolios of foreign currency instruments. My “side hustle” is building IoT solutions for customers with the Azure IoT Services. Recently, I have been working on an open source project which provides the “plumbing” for connecting embedded devices over low power wireless technologies like LoRaWAN to the Azure IoT Services.
I am also really interested in how IoT can be used for good in citizen science and education which has been at the core of one of my other projects…
For the last six years I have run weekly sessions for senior students at St Margaret’s College an independent girls’ school in Christchurch, New Zealand.
The sessions are a combination of coding, electronics, and hard materials which I continuously adapt to align with the interests of the students. The sessions compete with the school production, debating, rowing, and other official school activities so there are usually only 4-6 students.
I have always struggled with balancing making it fun/interesting and not too geeky/boring. After quite a bit of “trial and error”, (in the first year it felt like a lot of error) I found the best approach was students building “passion projects” (often with an IoT component) which were a blend of coding, electronics and hard materials.
Passion Projects
One student, who was always listening to music on her iPod, built an MP3 player with the music stored on a MicroSD, a 16×2 LCD displaying the current track and time. It had a battery powered real-time clock to keep track of the time and a five button UI (next/previous track, volume up/down and play/pause).

At the end of the term she said, “I’m so pleased it works but so over U2″ (I chose the playlist, figured Nine Inch Nails wouldn’t have been appropriate). I was so pleased when she went to Otago University to do a computing degree.
Mathematics by stealth
This student’s parents were first responders and her passion project was building something to monitor a patient’s pulse rate and core temperature. We started with an ear-clip sensor which could detect a heartbeat. Then she wrote code to count the individual heartbeats and convert that to beats per minute (BPM). Like a nurse manually taking a patient’s pulse, she started with counting the number of heartbeats in 15 seconds then multiplying by 4 to get the BPM.
There were many revisions where she tried longer and shorter periods, measuring the duration between heartbeats, then different averaging approaches until the solution was quick to get a reading, accurate and responsive.

Mathematics went from a chore to something with a practical application.
Physics by stealth
This is another student working out how to convert X/Y/Z acceleration G values into pitch and yaw.

The whiteboard desks are great but do make a mess of the cuffs of white school shirts.
Skills build over time
One student had been coming to the after-school sessions for several years. This allowed her to develop her skills to a high enough level to build a quite complex solution. She built a SmartAG sensor for orchards for her final year project. She was awarded a University Scholarship for this project and is off to Otago University to study Information Systems and Law.

It has a robust weather proof enclosure, solar panel + lithium polymer(LiPo) battery, soil moisture, temperature + humidity sensor and a microcontroller which sends telemetry over a LoRa wireless link to a basestation.

The basestation uploads the sensor data to Azure IoT Central where it can be viewed in a series of dashboards.
It’s not easy but every so often the stars align and a passion project can also result in academic success as well.
Why do I run the classes
When I was at University in the late 80’s there were lots of women in the first year classes but the numbers fell quite rapidly to between 0-5% in my final year. I have now been in the industry for more than thirty years, the gender balance has never been great and in some specialist areas, like embedded development, it is really abysmal.
Walking home one day I happened to listen to this NPR podcast. Which lead me down a rabbit hole…
So why aren’t there many women in IT now?


There have been great female role models in tech including:
This is Margaret Hamilton at the Houston Mission Control Center

Code: Debugging the Gender Gap explores this issue in depth

One of the key things identified in podcasts and books was the need for positive role models for female students so I figured a middle-aged (ok mid 50s) balding guy was better than nothing.
Call To Action
One of my favourite books as a child was the Lorax by Dr. Seuss. So, in the words of the Onceler, “Unless someone like you cares a whole awful lot, nothing is going to get better. It’s not.”
So, do you care enough to try and make a difference to the gender balance in computing? Then, go find a nearby school, talk to some teachers. Share with them your knowledge and help young women to understand that technology can be fun and interesting, as well as a genuine career path.
Sometimes it can be immensely satisfying and other times disappointing. But in my experience, it’s so worthwhile.

by Contributed | Jun 11, 2021 | Technology
This article is contributed. See the original author and article here.
Guest Blog Teaching Assistant: Patrick Chao

Applications that utilize machine learning have greatly improved human life in many fields. One such application is to help people who are blind or with low vision learn about their visual surroundings using computer vision. By creating such applications, people with visual impairments can more independently accomplish daily tasks such as recognizing the denomination of currency, whether their socks match, and what flavor of yogurt they select to eat for breakfast. To spur research in developing such applications, a series of VizWiz datasets were created to support several AI challenges. One such dataset challenge includes images taken by visually impaired users and an associated question about each image.

In the course “Introduction to Machine Learning,” in the spring semester of 2021, Professor Danna Gurari invited all 19 UT Austin graduate students in the class to join the visual question answering challenge. In this challenge, students would analyze the images taken by visually impaired people and their questions to each image and train a model to predict whether a question can be answered. Therefore, students would learn how to process image and text data, and combine them to train models. Before the challenge, students learned the fundamental theories of machine learning; however, the students were from various backgrounds and only few students had programming experience. For most of them, this would be their first machine learning challenge.

In the class, Professor Gurari introduced various methods of extracting features in Scikit-learn. Meanwhile, the professor also introduced how to use the powerful Azure API to extract more advanced features during in-class labs. After a brief introduction, even the students who did not have programming experience could easily apply Azure’s services to practice advanced feature extraction tasks for both images and text. Moreover, even if the students encountered problems, Azure provided clear documentation and learning resources so that students could explore on their own and quickly learn how to use the powerful services. The services also inspire the students with more ideas for designing experiments and finally help them train better models to complete the challenge.
Within two weeks, 70% of students completed the challenge, and almost half of the models performed with an accuracy over 60%. Students with many majors, such as User Experience, English Literature, and Library Science were all able to complete this machine learning challenge with the power of Azure services.
[1] https://vizwiz.org/
[2] https://vizwiz.org/tasks-and-datasets/vqa/
Additional Learning Resources
Interested in learning more about AI and Vision see the following:
Detect objects in images with the Custom Vision service – Learn | Microsoft Docs
Classify images with the Custom Vision service – Learn | Microsoft Docs
Explore computer vision in Microsoft Azure – Learn | Microsoft Docs
Process images with the Computer Vision service – Learn | Microsoft Docs
Classify images with the Microsoft Custom Vision Service – Learn | Microsoft Docs
Process and classify images with the Azure cognitive vision services – Learn | Microsoft Docs
Identify faces and expressions by using the Computer Vision API in Azure Cognitive Services – Learn | Microsoft Docs
Classify endangered bird species with Custom Vision – Learn | Microsoft Docs
Use AI to recognize objects in images by using the Custom Vision service – Learn | Microsoft Docs
Introduction to Computer Vision with PyTorch – Learn | Microsoft Docs
by Contributed | Jun 11, 2021 | Technology
This article is contributed. See the original author and article here.
The Microsoft Learn Student Ambassadors community is for students—like you—who want to use tech to solve real-world problems with like-minded peers, establish themselves as mentors and leaders in their community, and amplify their impact.
Student Ambassadors get the opportunity to connect with other students around the world (from 102 countries and counting!), foster their own online communities, get training and earn certifications, and tackle practical challenges, all while building key technical and soft skills to help them succeed. They can also make meaningful progress on the socially significant issues that they care about.
“I found the Student Ambassador program to be full of like-minded individuals who share an equal passion for a better world with the help of technology.”
–Basu, first-year student at ITI Institute
Let’s start at the very beginning.
So you’ve read about the community. Maybe you have a friend who is a Student Ambassador or you’ve attended an event hosted by one or you’ve read about some of the recent graduates and their experience in the community. Maybe you’ve even checked out the infographic to find out who the Student Ambassadors are, what they’re all about, and how diverse the community is. You decide to send in your application*, and hopefully you’re selected to become a Student Ambassador during one of our quarterly application reviews. What happens next?
The global community of Student Ambassadors is the heart of the program, and upon acceptance, you’re immediately connected to every other fellow Ambassador via Microsoft Teams as well as with Microsoft mentors who are there to help you along your journey.
You can collaborate with other students who share your passion in dedicated Leagues focused on various technologies and social issues and apply your collective skills towards solving real-world challenges together. You’ll then have the opportunity to show off your work in local and global challenges like the Microsoft Imagine Cup and student hackathon events. And if you’re not yet sure what your passion is, it’s okay. As long as you’re willing to explore different things and try them out, you are definitely welcome in our community!
You’ll have support from Microsoft in the form of unique access to experts like Cloud Advocates and MVPs who can offer remote mentorship, guide your League’s efforts, and provide opportunities for you to be part of the team while you prepare for graduation. These experts are also here to help you plan and run your events as you help skill people in your own local communities.
Microsoft makes it easier for you to make progress on the issue or technology that means the most to you by providing tools to help you–like monthly Azure credits, free access to Microsoft 365 apps like PowerPoint and Excel, cloud services like OneDrive and Microsoft Teams, and development tools in Visual Studio, as well as free software from our technology partners like Techsmith’s Snagit screen capture software and the Camtasia screen recorder and video editor.
Plus, you can start building valuable career skills with self-guided online courses with Microsoft Learn. If there’s a topic you’re interested in, whether it’s Machine Learning, Python, Azure static web apps, or something else, master it at your own speed with these courses that provide step-by-step guidance. When you’re done, you can get access to a free certification exam!
There are numerous event opportunities:
- Attend virtual events held by subject matter experts from Microsoft and other organizations that focus on technical skilling and professional development
- Attend virtual events held by fellow Student Ambassadors who want to share their knowledge and passion with other students.
- In turn, you’ll pay it forward and share your knowledge and passion by hosting events and offering guidance to other students. By providing your expertise and empowering your peers, you expand your impact and separate yourself from the pack by becoming a leader in your local tech community. On average, each Student Ambassador-hosted event reaches 63 peers!
- Score opportunities to attend Microsoft-hosted events. You’ll be able to attend the annual virtual Student Ambassadors Summit consisting of tech demos, panel discussions, and networking opportunities all aimed at helping you build your skills and amplify your impact in the community. You might even be invited to share your knowledge as a speaker at other events like Microsoft Build!
- And of course, there will be social/team building activities because what would a community be without those?
There are certain milestones that can be achieved by Student Ambassadors,. The first 2 are self-paced, so you get to determine when you want to attain the next level, while the 3rd one is by Microsoft team nomination only and is reserved for outstanding Ambassadors who go above and beyond in serving their community. With each milestone you reach, you are awarded additional awesome benefits.
Overall, the program was exactly what I needed as a student.
It offered me a supportive community where I could be myself, thrive, and work towards building something that was much greater than myself. This community gave me a chance to not only develop technical skills and soft skills but also have connections to cherish even after leaving the program.
–Sabiha, recent Student Ambassador graduate
So, are you ready to be a part of a global community where you can connect with peers, learn from practical experience, and teach others about the topics that drive you? Then apply to join the Microsoft Learn Student Ambassadors program today!
If you’re into tech, if you’re into learning, if you’re into being part of student communities, just join this program. Don’t think twice.
–Sukhman, recent Student Ambassador graduate
Twitter: @MSFTImagine | Instagram: @MicrosoftImagineCup | YouTube: MSFTImagine | Facebook: @MSFTImagine
*Applications are accepted all year long.
by Contributed | Jun 11, 2021 | Technology
This article is contributed. See the original author and article here.
We typically release our quarterly Cumulative Updates (CUs) for Exchange Server on the third Tuesday of a month. In June 2021, that would be June 15th. Today we want to let you know that the June CUs for Exchange Server will be released two weeks later, on June 29th instead. In addition to bug fixes and incorporating previous Security Updates (SUs) for Exchange Server, we are taking a little bit of extra time to finish adding a new security feature to Exchange Server.
Today’s Security Landscape
Security is a top priority for Microsoft and our customers, especially as cyberattacks increase in frequency and level of sophistication. The cybersecurity landscape has fundamentally changed, as evidenced by large-scale, complex attacks, and signals that phishing and human-operated ransomware are on the rise. Microsoft is now actively tracking more than 40 nation-state actors and over 140 threat groups across 20 countries—a number that used to be a handful. More than ever, it is critical to keep your on-premises infrastructure secure and up-to-date, including all your Exchange servers. This is a continuous process in which you:
- Use the Exchange Server Health Checker script to inventory your Exchange servers.
- Use the Exchange Update Wizard to get steps for installing the latest updates on your Exchange server(s).
This past March, we released SUs for critical vulnerabilities in Exchange Server, and we actively worked through our customer support teams, third-party hosters, and our partner network to help customers secure their environments and respond to associated threats from the attacks occurring against on-premises Exchange Server. In addition to releasing the one-click Exchange On-Premises Mitigation Tool (EOMT) last March, we also released automatic mitigation for Exchange Server in Microsoft Defender Antivirus and System Center Endpoint Protection. As with EOMT, these were interim mitigations designed to help protect customers who needed extra time to install the available SU.
When the June CU is released on June 29th, only the March and June CUs will be supported for any future Exchange Server SUs. If you are not yet running the March CU, now is a great time to get current.
Introducing Exchange Server integration with AMSI
In response to the fast-changing threat landscape, in the June CUs for Exchange 2016 and Exchange 2019, we are introducing integration between Exchange Server and the Windows Antimalware Scan Interface (AMSI). AMSI exists in Windows Server 2016 and later, and the new integration is available in Exchange 2016 and Exchange 2019 when running on either of those operating systems. For Exchange 2016, AMSI integration is available only when running on Windows Server 2016. It is not available for Exchange 2016 running on Windows Server 2012 or Windows Server 2012 R2.
AMSI integration in Exchange Server provides the ability for an AMSI-capable antivirus/antimalware solution to scan content in HTTP requests sent to Exchange Server and block a malicious request before it is handled by Exchange Server. The scan is performed in real-time by any AMSI-capable antivirus/antimalware solution that runs on the Exchange server as the server begins to process the request. This provides automatic mitigation and protection which compliments the existing antimalware protection in Exchange Server to make your Exchange servers more secure than ever.
The AMSI integration in Exchange Server works with any AMSI-capable anti-virus/antimalware solution. By default, Microsoft Defender Antivirus (MDAV), an AMSI-capable solution, is automatically enabled and installed on endpoints and devices that are running Windows 10 and Windows Server 2016 and later. If you haven’t installed an antivirus/antimalware application, Exchange Server AMSI integration will work with MDAV. If you install and enable another antivirus/antimalware app, MDAV will automatically turn off. And if that other app is AMSI-capable, the Exchange Server integration will work with that app. If you uninstall the other app, MDAV will automatically turn back on, and the Exchange Server integration will work with MDAV.
There are specific benefits when using MDAV on Exchange Server:
- MDAV dynamically fetches signatures that match malicious content. If Microsoft learns about an exploit that can be blocked, a new MDAV signature can be deployed to block the exploit from affecting Exchange.
- Leveraging existing technology to add signatures for malicious content;
- Leveraging the expertise of Microsoft’s malware research team for adding signatures;
- Applying best practices that Defender already applies for adding other signatures.
We are working hard and are excited to deliver this new AMSI integration to you later this month on June 29th. Thank you for your patience!
–The Exchange Team

by Contributed | Jun 11, 2021 | Technology
This article is contributed. See the original author and article here.
We continue to expand the Azure Marketplace ecosystem. For this volume, 78 new offers successfully met the onboarding criteria and went live. See details of the new offers below:
|
Applications
|
|
Aidemy Premium Plan Cloud AI Course: The Cloud AI Development Course provides Microsoft Azure environments and datasets from Microsoft Japan along with content creation cooperation to help you learn about data science in practice. This offer is available only in Japanese.
|
 |
Alitek Watch Power Automate Management Console: Alitek Watch provides notifications, monitoring, tracking, and analysis of flows to enhance the capabilities of Microsoft Power Automate and improve ROI. With Alitek Watch, flows are logically categorized into process groups where responders can be assigned to resolve flow errors.
|
 |
Ampliphae SaaSGuard: Tired of using time-consuming spreadsheets and manual audits to manage your SaaS applications? Ampliphae SaaSGuard takes the risk out of using cloud-delivered SaaS applications by identifying and securing all SaaS applications in use across your organization.
|
 |
Apache Web Server with AlmaLinux 8: Cognosys provides this preconfigured image of Apache HTTP Server 2.4.37 with AlmaLinux 8. Apache HTTP Server is one of the most popular web servers on the Internet, and AlmaLinux OS is an open-source project designed to fill the gap left by the demise of the CentOS stable release.
|
 |
Blackbaud GrantsConnect: Blackbaud’s GrantsConnect helps corporations and corporate foundations streamline their grants and sponsorships programs from online applications through payment processing. Easily create and manage grant review workflows, develop applications and forms, and pull ad-hoc reports.
|
 |
Caloudi VM 2.3: Caloudi’s VM 2.3 contains AI prediction modules and preconfigured environments with specified application versions. This VM environment is specialized for clients who have already contacted Caloudi for cloud migration.
|
 |
Cryptosense Analyzer License Management Server: Cryptosense Analyzer Platform (CAP) integrates with Microsoft Azure Key Vault to deliver powerful insights into how you use cryptography. CAP enables security architects and compliance teams to ensure sensitive data remains protected when it is deployed in the public cloud.
|
 |
Data Governance and Data Catalog: OvalEdge uses machine learning and advanced algorithms to automatically organize and catalog your data so that it is easily retrievable with everyday language. Empower your teams to find, organize, and secure relevant data.
|
 |
Databunker server ready + support from Linnovate: Databunker on Microsoft Azure provides strong personal-data protection for your customer records without expensive custom coding. The easy-to-manage, cloud-ready solution provides secure storage, privacy compliance, and user privacy controls.
|
 |
Docker CE with AlmaLinux 8: Cognosys provides this preconfigured image of Docker Community Edition (CE) with AlmaLinux 8. Docker CE is ideal for developers and small teams looking to get started with Docker and experimenting with container-based apps.
|
 |
factoHR – Touchless Time & Attendance Management: factoHR is a mobile-driven time and attendance platform that enables businesses to automate their daily HR functions while delivering actionable insights to help organizations achieve business objectives faster.
|
 |
GlobalLinker Platform: DigiVation World’s GlobalLinker on Microsoft Azure is an AI-driven platform for connecting SMEs across the world to help users achieve their business goals.
|
 |
HxGN Connect: Hosted on Microsoft Azure, HxGN Connect is a cloud-native collaborative workspace that brings data and people into a unified view for shared awareness, collaboration, and action. See and act on shared data to solve today’s problems together with HxGN Connect.
|
 |
HYAS Insight for Microsoft Azure Sentinel: HYAS Insight for Microsoft Azure Sentinel is a threat investigation and attribution solution that uses exclusive data sources and non-traditional mechanisms to improve visibility and productivity for analysts, researchers, and investigators.
|
 |
IN-D.ai – Coding and Claims Automation: IN-D Coding and Claims Automation uses artificial intelligence to classify documents based on provider and document type, digitize scanned documents, and automate invoice data extraction and ICD10 and CPT coding.
|
 |
Jenkins with AlmaLinux 8: This preconfigured image from Cognosys provides Jenkins with AlmaLinux 8. Written in Java, Jenkins is an open-source tool that provides continuous integration services for software development.
|
 |
LAMP with AlmaLinux 8: Cognosys provides this preconfigured image of LAMP with AlmaLinux 8. LAMP is an archetypal model of web service solution stacks, named as an acronym of its original components: Linux OS, Apache HTTP Server, MySQL relational database management system, and the PHP programming language.
|
 |
MariaDB 10 with Red Hat 8.3: Cognosys provides this preconfigured image of MariaDB 10.3.27 with Red Hat 8.3. MariaDB Server is a popular open-source relational database created by the original developers of MySQL.
|
 |
Nastel Navigator: Nastel Navigator delivers web-based administration and control of Apache Kafka, IBM MQ, and Tibco EMS to dramatically reduce the operational risk of delivering a multi-cloud digital strategy. Features include automated audited deployment, secure DevOps self-service, and full lifecycle management.
|
 |
NewCOS for Managed Voice: Available only in Spanish, NewCOS helps organizations optimize the management of unified communications solutions, including Microsoft Teams and Skype for Business. Increase productivity and reduce costs with a comprehensive, trusted communications platform.
|
 |
NGINX with AlmaLinux 8: Cognosys provides this preconfigured image of NGINX with AlmaLinux 8. NGINX is an all-in-one API gateway, cache, load balancer, web application firewall, and web server. Use NGINX instead of a hardware load balancer to innovate without infrastructure constraints.
|
 |
Ondato Facial Biometric Authentication: Ondato’s biometric authentication tool on Microsoft Azure helps businesses remotely and automatically validate returning customers’ identities and grant them access to services while meeting personal data protection laws.
|
 |
Ondato Secure Remote Meetings: Ondato’s Secure Remote Meetings solution enables you to keep your virtual meeting, conference, or event protected from unwanted intruders and background monitoring by using fully automated authentication tools.
|
 |
OpenJDK 11 with AlmaLinux 8: This preconfigured image from Cognosys provides OpenJDK 11.0.10 with AlmaLinux 8. OpenJDK (Open Java Development Kit) is an open-source implementation of the Java Platform, Standard Edition (Java SE).
|
 |
Pachyderm Enterprise License: Pachyderm Enterprise is an end-to-end data science platform built on Kubernetes and designed to enable automated machine learning workflows at scale. Deploy Pachyderm for data version control and lineage across models and experiment tracking.
|
 |
PeopleCore SaaS: Businesses need a human resources information system (HRIS) to manage their most valuable asset: their people. PeopleCore SaaS is comprehensive, customizable HRIS solution designed to help companies meet their organizational goals and requirements.
|
 |
PostgreSQL with AlmaLinux 8: Cognosys offers this preconfigured image of PostgreSQL with AlmaLinux 8. PostgreSQL is a popular open-source relational SQL database management system for developing web-based software applications.
|
 |
Project Online Task Sync App: PPM Works’ Task Sync App for Project Online delivers a simplified way to update Project tasks from anywhere using your mobile or desktop device. Save time and money with automated task updates and built-in reporting.
|
 |
RocketChat and Jitsi with support from Linnovate: An all-in-one open-source communication platform, Rocket.Chat-Jitsy server is an integrated application that combines Rocket.Chat and Jitsy to make audio and video calling, chatting, and conferencing simple and secure.
|
 |
Sally Sales Assistant: Natively integrated with Microsoft Dynamics 365, Sally is a chatbot that helps your employees find their way around the CRM system via Microsoft Teams. This application is available only in German.
|
 |
SynCloud – AI Cloud Cost Management Solution: SynCloud is an AI-powered cost management solution that enables you to discover and visualize cloud spend across your organization’s cloud services.
|
 |
TOPinFORM: Targeted to all types of fitness-related businesses, TOPinFORM is a studio management solution that facilitates the management of customers, contracts, billing, facility access, and more. This application is available only in German.
|
 |
VZOR Apps Monitor: Monitor your entire ecosystem of business applications with VZOR Apps Monitor. The solution monitors user experience and the integration layer while enabling interoperability of various applications and business platforms to help ensure operational continuity.
|
 |
VZOR Brain Monitor: An optional module of the VZOR Suite 360-Degree Platform, VZOR Brain Monitor provides early detection of incidents in monitored business services, predicts behaviors, and defines confidence thresholds. This download requires that you have VZOR Infra Monitor or Apps Monitor installed.
|
 |
VZOR Business Monitor: Centralize, integrate, and consolidate your organization’s data with VZOR Business Monitor, a comprehensive solution that enables you to capture, save, analyze, and present reports with customizable dashboards.
|
.png") |
Windows Server 2019 with FTP (FileZilla): Belinda CZ offers this preconfigured image of Windows Server 2019 with FileZilla, an open-source, cross-platform FTP and FTPS solution. This version of Windows Server 2019 is ideal for small and large businesses.
|
 |
WordPress with AlmaLinux 8: Cognosys provides this preconfigured image of WordPress 5.7 with AlmaLinux 8. WordPress is an open-source content management system based on PHP and MySQL.
|
 |
Zentera zCenter 6.5.2: Zentera’s secure access service edge (SASE) offering, CoIP Access Platform, delivers zero-trust network access and micro-segmentation capabilities that are critical for securing modern hybrid and multi-cloud environments.
|
Consulting services
|
 |
4-Week Implementation on ARO by rockPLACE: rockPLACE offers deployment services based on the Azure Red Hat OpenShift adoption plan to implement a container orchestration platform on Microsoft Azure. This service is available only in Korean.
|
 |
ACTS Azure Health Check: 2-Week Assessment: The ACTS Azure Health Check Assessment is a remote engagement that provides extended visibility into your cloud infrastructure. ACTS will assess your organization’s governance, operations, security, compliance, and cost while addressing common IT hurdles.
|
 |
AI as a Service: 6-Week Implementation: Offered as a managed service on Microsoft Azure, eCraft’s AI as a Service delivers a ready-made Microsoft Azure-based platform, templates, experts, and a standardized production process for building and operating AI solutions at scale.
|
 |
AI Strategy for Azure: 2-Hour Scoping Workshop: Define a clear artificial intelligence strategy to establish the sustainable use of Microsoft Azure data and AI services across your organization in this free workshop from Innovation Process Technology.
|
 |
App Innovate: 1-Week Assessment: In this one-week engagement, Tallan will evaluate up to five applications from a people, process, and technology perspective to ensure post-assessment recommendations meet the needs of your users. Modernize your applications with Tallan and Microsoft Azure.
|
 |
Azure Active Directory & Saviynt for Enterprise IGA: 5-Day Assessment: This assessment from Oxford Computer Group will show how Saviynt’s Identity Governance and Administration platform extends the governance functionality of Microsoft Azure Active Directory, adding intelligent access requests, risk-based access certifications, and more.
|
 |
Azure Backup Solution: 2-Hour Briefing: Available only in French, Upper-Link’s free briefing will show you how you can benefit from backing up your organization’s data, servers, and virtual machines to Microsoft Azure.
|
 |
Azure Cloud Cost Optimization: 1-Week Assessment: Navisite’s Azure Cloud Cost Optimization service delivers immediate discounts on key Microsoft Azure services, includes access to the powerful CloudCheckr tool for optimizing Azure cost and security, and provides direct access to a dedicated team of FinOps experts.
|
 |
Azure Defender for IoT: 4-Week Implementation: Quickly gain confidence in your industrial control system’s cybersecurity environment and boost your IoT projects’ time to market with Smartis’s implementation of Microsoft Azure Defender for IT.
|
 |
Azure DevOps Maturity: 4-Week Assessment: Sourced Group’s Azure DevOps Maturity Assessment is designed for those responsible for your engineering processes, operational compliance, and innovative enablement. Gain a competitive edge and release applications faster while boosting security and quality.
|
 |
Azure DevSecOps: 5-Week Implementation: Using its iterative DevACT (assess, consult, transform) framework, Mastek will partner with you to build a DevSecOps roadmap to drive organizational transformation across people, processes, and technology.
|
 |
Azure Infrastructure Audit: 3-Day Assessment: In this three-day assessment, ODM Computers will evaluate your organization’s Windows Server infrastructure to determine the next steps for optimizing the environment using Microsoft Azure services. This offer is available only in Spanish.
|
 |
Azure Managed Services: 1-Week Assessment: Navisite offers a robust set of managed services for Microsoft Azure, including architecture design, migration plan creation, testing and execution, and production implementations, to help you optimize your Azure investment.
|
 |
Azure Migration Audit: 4-Day Assessment: Looking to migrate your business applications and services to Microsoft Azure? Available only in Spanish, ODM Computers’ four-day assessment will identify elements that can be successfully migrated or transformed.
|
 |
Azure Secure Score: 8-Week Implementation: Razor Technology offers support and consulting services using the Secure Score feature in Microsoft Azure Security Center to prioritize, triage, and track your company’s security landscape. Quickly improve identity, threat protection, and compliance across your organization.
|
 |
Build Your IoT Vision: 10-Week Implementation: In this 10-week engagement, MaibornWolff will work with your team to design and implement a production-ready IoT solution based on Microsoft Azure IoT.
|
 |
Cisco Cloud ACI on Azure: 3-Week Implementation: Extend the capabilities of Cisco Application Centric Infrastructure (ACI) to Microsoft Azure in this three-week implementation from Logicalis. Easily achieve business continuity and disaster recovery mandates while enabling consistent policy, security, and operations in your hybrid multi-cloud environment.
|
 |
Cloud Computing: 10-Day Implementation: Devoteam Alegri’s 10-day implementation will help ensure you meet your pharmaceutical or healthcare organization’s compliance requirements using Microsoft Azure services. This offer is available only in German.
|
 |
Cloud Navigator: 1-Day Assessment: Available only in German, Orange Networks’ Cloud Navigator assessment will demonstrate how you can use Microsoft Azure PaaS services, Microsoft Power BI, and PowerShell to manage your compliance processes. Deliverables include recommendations for action and clearly defined next steps.
|
 |
Cloud Strategy for Azure: 2-Hour Scoping Workshop: This free workshop from Innovation Process Technology will help you define your organization’s cloud strategy and establish a sustainable Microsoft Azure environment customized to your business needs.
|
 |
Cloud Z DB: 2-Week Implementation: SK will implement its Cloud Z DB solution, a dedicated management database as a service (DBaaS) platform providing a variety of features suitable for enterprise environments. This service is available only in Korean.
|
 |
Data & AI: 2-Day Strategy Assessment: The Data Analysis Bureau offers this assessment to guide you on your AI, data, and analytics journey with the implementation of Microsoft Azure services. Deliverables include an action plan with clearly defined next steps to start a proof of concept or pilot your initial data concepts in Azure.
|
 |
Data Analytics with Azure Synapse Analytics: 1-Hour Briefing: Learn how a modern data analytics solution using Microsoft Azure Synapse Analytics and Power BI can accelerate your business intelligence and reporting solutions in this free briefing from The Unbelievable Machine Company.
|
 |
Data Envision: 2-Day Workshop: Crayon will meet with your decision makers to enhance their understanding of Microsoft Azure services; identify opportunities, advantages, and risks in your organization’s data strategy; and deliver a strategic roadmap and recommendations for implementation.
|
 |
Data Governance & Protection: 1-Week Implementation: Optiv Security’s data governance and protection implementation will help your business improve Microsoft Azure security safeguards, reduce risk through effective data control and visibility, secure data with automated labeling and set policies, and more.
|
 |
Data Liberation Network – 4-Week Implementation: Scamander Solutions will implement its Data Liberation Network, a secure, scalable data-based network built on Microsoft Azure, in this four-week engagement. This service is available only in Dutch.
|
 |
Data Strategy: 2-Week Assessment: Tallan’s two-week assessment will give you a robust view of your current data strategy, along with recommendations to help your organization succeed with Microsoft Azure services for your data analytics and business goals.
|
 |
DBA as a Service: 1-Month Implementation: Whether you have an on-premises, hybrid, or cloud-based ERP solution, AccTech Systems’ DBA as a Service offering helps you manage and monitor any ERP data platform running on Microsoft Azure infrastructure.
|
 |
Developing an End2End Cloud Strategy: 5-Week Workshop: In this comprehensive five-week workshop, MaibornWolff will walk you through the seven spheres of a successful cloud journey: infrastructure, applications, methodology, organization, business, security, and governance.
|
 |
DevOps: 1-Week Assessment: Credera’s assessment includes a review of your DevOps processes and maturity level along with your current Microsoft Azure DevOps and GitHub Enterprise tooling. Credera then provides a comprehensive DevOps analysis covering critical success factors, an implementation roadmap, and more.
|
 |
DevOps: 2-Day Workshop: Credera’s two-day workshop includes a briefing on current DevOps technologies, a review of your DevOps understanding and usage, and the identification of prioritized opportunities for DevOps optimization using Microsoft Azure DevOps and GitHub Enterprise in your organization.
|
 |
Migrate SAP to Azure: 10-Week Implementation: Realtech offers end-to-end migration services for any business looking to migrate its existing or new SAP environments to Microsoft Azure. This service includes all aspects of planning and coordination to ensure a successful migration.
|
 |
Modernize Data Platform: 4- to 8-Week Implementation: Get insights on any data and take advantage of the flexibility to build and deploy machine learning models on-premises or in the cloud with this Microsoft Azure-based data platform implementation from Officeline.
|
 |
Moodle LMS: 5-Day Implementation: Information Technology of Egypt will implement Moodle on Microsoft Azure according to your organization’s requirements. Moodle is a learning management system (LMS) designed to make creating long-distance education, training, and other online learning programs easier to set up and use.
|
 |
SAP to Azure Migration: 2-Week Assessment: Based on the Microsoft Cloud Adoption Framework for Azure, BGP Management Consulting’s SAP to Microsoft Azure assessment will identify the cloud adoption path that best fits your business, define a migration strategy and plan, and optimize your SAP workload.
|
 |
SAS Viya Deployment in Azure: 1-Hour Assessment: Learn how your business can benefit from moving its SAS Viya data platform to Microsoft Azure in this free assessment from Analytium. Topics include migration readiness, architecture options, and migration strategies.
|
 |
Virtual Desktop & Productivity: 1-Week Proof of Concept: IFI Techsolutions’ free proof of concept provides insight into how you can modernize your organization with Windows Virtual Desktop, enabling employees to access data and applications remotely. Deliverables include support documentation and recommendations for next steps.
|
 |
Windows Virtual Desktop: 4-Day Proof of Concept: ODM Computers’ experts will deploy the infrastructure for the Windows Virtual Desktop service, enabling you to test an application, see how the virtual desktop solution works, and determine how much it would cost to implement.
|
 |
Workload Assessment: 6-Day Assessment: New Signature will review your application and infrastructure estate to determine whether each application should be rehosted, refactored, rebuilt, rearchitected, retired, or replaced.
|
 |
wSOC: 6-Week Implementation: Wragby Business Solutions & Technologies offers this six-week implementation of the Wragby Security Operations Center (wSOC), a suite of modern and intelligent security solutions built on Microsoft Azure that provide increased security for remote workers.
|
|

by Contributed | Jun 11, 2021 | Technology
This article is contributed. See the original author and article here.
MDM policy processing on Windows 10 with Microsoft Endpoint Manager, a closer look
Kenneth van Surksum is an Enterprise Mobility MVP from The Netherlands. Kenneth works as a modern workplace consultant at Insight24 and specializes in building modern workplace solutions on top of Microsoft 365. Kenneth is co-founder of the Windows Management User Group Netherlands (WMUG_NL), which recently rebranded to the Workplace Ninja User Group Netherlands, and organizes (virtual) community meetings on a regular basis. Kenneth loves to speak about technical topics related to his daily work. Kenneth is Microsoft Certified Trainer and has multiple certifications, including the VMware vExpert award. For more, check out Kenneth’s Twitter @kennethv

Step by Step Manage Windows Server in Azure with Windows Admin Center
Robert Smit is an EMEA Cloud Solution Architect at Insight.de and is a current Microsoft MVP Cloud and Datacenter as of 2009. Robert has over 20 years of experience in IT with experience in the educational, healthcare and finance industries. Robert’s past IT experience in the trenches of IT gives him the knowledge and insight that allows him to communicate effectively with IT professionals. Follow him on Twitter at @clusterMVP

Does your Application use deprecated features of SQL Server or SQL Azure?
Sergio Govoni is a graduate of Computer Science from “Università degli Studi” in Ferrara, Italy. Following almost two decades at Centro Software, a software house that produces the best ERP for manufacturing companies that are export-oriented, Sergio now manages the Development Product Team and is constantly involved in several team projects. For the provided help to technical communities and for sharing his own experience, since 2010 he has received the Microsoft Data Platform MVP award. In 2011, he contributed to writing the book: SQL Server MVP Deep Dives Volume 2. Follow him on Twitter or read his blogs in Italian and English.

Azure Monitor Insights for Arc enabled Kubernetes Clusters anywhere
James van den Berg has been working in ICT with Microsoft Technology since 1987. He works for the largest educational institution in the Netherlands as an ICT Specialist, managing datacenters for students. He’s proud to have been a Cloud and Datacenter Management since 2011, and a Microsoft Azure Advisor for the community since February this year. In July 2013, James started his own ICT consultancy firm called HybridCloud4You, which is all about transforming datacenters with Microsoft Hybrid Cloud, Azure, AzureStack, Containers, and Analytics like Microsoft OMS Hybrid IT Management. Follow him on Twitter @JamesvandenBerg and on his blog here.

Teams Real Simple with Pictures: Setting up Supervised Chat in Microsoft Teams
Chris Hoard is a Microsoft Certified Trainer Regional Lead (MCT RL), Educator (MCEd) and Teams MVP. With over 10 years of cloud computing experience, he is currently building an education practice for Vuzion (Tier 2 UK CSP). His focus areas are Microsoft Teams, Microsoft 365 and entry-level Azure. Follow Chris on Twitter at @Microsoft365Pro and check out his blog here.
by Contributed | Jun 11, 2021 | Technology
This article is contributed. See the original author and article here.
As following document indicated, File System Usage is a new metric being rolled out globally, no data is expected unless your app is hosted in an App Service Environment.
https://docs.microsoft.com/en-us/Azure/app-service/web-sites-monitor#understand-metrics
Therefore you may not use this metric for alert rule currently, even you can see this metric in alert rule setting UI.
As a workaround, we can create a WebJob to call following rest api that can get app service plan “File System storage’ utilization and then sent an email if met exceed usage situation.
https://management.azure.com /subscriptions/{sub}/resourceGroups/{rg}/providers/Microsoft.Web/serverfarms/{app service plan name}/usages?api-version=2019-08-01
Here is my demo steps for your reference.
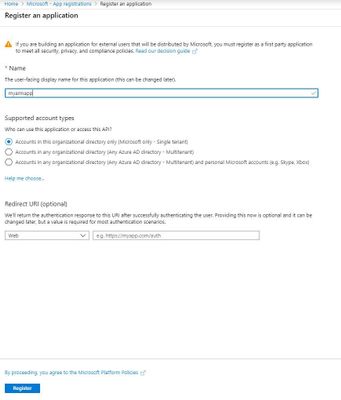
1.In order to call resource manager rest api, firstly I created service principal that can access resources.
Sign in to Azure Account through the Azure portal->Select Azure Active Directory->Select App registrations->Select New registration.
To access resources in subscription, assign the application to a role as contributor role.

Select the particular subscription that include your app service plan to monitor.

Select Access control(IAM)->Add role assignment, add the contributor role to application.

Get values for signing in.
Select Azure Active Directory->From App registrations in Azure AD, select your application.
Copy the Directory(tenant)ID and Application(client) ID and will use it later.

At this App registration, Create a new application secret, select Certificates & secrets->Select Client secrets -> New client secret.

Also copy this secret for later use.
For more details for above steps, please refer below link:
https://docs.microsoft.com/en-us/azure/active-directory/develop/howto-create-service-principal-portal
2.Create a new C# .net Core Console app in the visual studio for the web job development.

Install the latest stable 3.x version of the Microsoft.Azure.WebJobs.Extensions NuGet package, which includes Microsoft.Azure.WebJobs.
Here’s the Package Manager Console command for version 3.0.2:
Install-Package Microsoft.Azure.WebJobs.Extensions -version 3.0.2
Install the Active directory authentication package in Visual Studio.
The package is available in the NuGet Gallery.

Get an access token for the app in C# program.
In program.cs, add an assembly reference for the ActiveDirectory identity model:
using Microsoft.IdentityModel.Clients.ActiveDirectory;

And add a method to get an access token using previously copied tenantId, applicationId and client secret.

private static async Task<string> GetAccessToken(string tenantid, string clientid, string clientsecret)
        {
            string authContextURL = "https://login.microsoftonline.com/" + tenantid;
            var authenticationContext = new AuthenticationContext(authContextURL);
            var credential = new ClientCredential(clientid, clientsecret);
            var result = await authenticationContext.AcquireTokenAsync("https://management.azure.com/", credential);

            if (result == null)
            {
                throw new InvalidOperationException("Failed to obtain the JWT token");
            }


           return result.AccessToken;
        }
Now everything is set to make REST calls defined in the Azure Resource manager REST API.
We can add a method to call a following GET REST API for app service plan “File System storage’ utilization with the token gotten by above method and calculate if the current usage exceed limit.
https://management.azure.com/subscriptions/{sub}/resourceGroups/{rg}/providers/Microsoft.Web/serverfarms/{appserviceplan}/usages?api-version=2019-08-01
private static bool GetUsage(string URI, String token)
        {
            Uri uri = new Uri(String.Format(URI));

            // Create the request
            var httpWebRequest = (HttpWebRequest)WebRequest.Create(uri);
            httpWebRequest.Headers.Add(HttpRequestHeader.Authorization, "Bearer " + token);
            httpWebRequest.ContentType = "application/json";
            httpWebRequest.Method = "GET";

            // Get the response
            HttpWebResponse httpResponse = null;
            try
            {
                httpResponse = (HttpWebResponse)httpWebRequest.GetResponse();
            }
            catch (Exception ex)
            {
                Console.WriteLine(ex.ToString());
                return false;
            }

            string result = null;
            using (var streamReader = new StreamReader(httpResponse.GetResponseStream()))
            {
                result = streamReader.ReadToEnd();
            }
            Int64 currentvalue = Convert.ToInt64(JObject.Parse(result).SelectToken("value[10].currentValue").ToString());
            Int64 limit = Convert.ToInt64(JObject.Parse(result).SelectToken("value[10].limit").ToString());
            if (currentvalue > limit)//You can set your condition as your requirement
                return true;
            else
                return false;
}
Then in the execute method, will send email if the usage exceed. In this method I used SendGrid to implement emailing feature.
For more details regarding SendGrid configuration, please refer following link:
https://docs.microsoft.com/en-us/azure/sendgrid-dotnet-how-to-send-email
public static void Execute()
        {
            string tenantId = "yourtenandid";
            string clientId = "yourclientid";
            string clientSecret = "yourclientsecret";
            string restapiurl = "https://management.azure.com/subscriptions/{sub}/resourceGroups/{rg}/providers/Microsoft.Web/serverfarms/{appserviceplan}/usages?api-version=2019-08-01";

            var token = GetAccessToken(tenantId,clientId,clientSecret).Result;
            if (GetUsage(restapiurl, token))
            {
                var apiKey = ConfigurationManager.AppSettings["AzureWebJobsSendGridApiKey"].ToString();
                var client = new SendGridClient(apiKey);
                var msg = new SendGridMessage()
                {
                    From = new EmailAddress("loshen@microsoft.com", "DX Team"),
                    Subject = "henry",
                };
                msg.AddTo(new EmailAddress("loshen@microsoft.com", "Test User"));
                msg.AddContent("text/html", "<html><body>There is Alert for File sytem usage.</body></html>");
                var response = client.SendEmailAsync(msg).Result;
            }

        }
The complete code for program.cs would be like this:
using System;
using System.IO;
using System.Threading.Tasks;
using SendGrid;
using SendGrid.Helpers.Mail;
using System.Net;
using System.Configuration;
using Microsoft.IdentityModel.Clients.ActiveDirectory;
using Newtonsoft.Json;
using Newtonsoft.Json.Linq;

namespace HenryWebJob
{
    class Program
    {


        static void Main()
        {
            Execute();
        }
        public static void Execute()
        {
            string tenantId = "yourtenandid";
            string clientId = " yourclientid ";
            string clientSecret = "yourclientsecret";
            string restapiurl = " https://management.azure.com/subscriptions/{sub}/resourceGroups/{rg}/providers/Microsoft.Web/serverfarms/{appserviceplan}/usages?api-version=2019-08-01";

            var token = GetAccessToken(tenantId,clientId,clientSecret).Result;
            if (GetUsage(restapiurl, token))
            {
                var apiKey = ConfigurationManager.AppSettings["AzureWebJobsSendGridApiKey"].ToString();
                var client = new SendGridClient(apiKey);
                var msg = new SendGridMessage()
                {
                    From = new EmailAddress("loshen@microsoft.com", "DX Team"),
                    Subject = "henry",
                };
                msg.AddTo(new EmailAddress("loshen@microsoft.com", "Test User"));
                msg.AddContent("text/html", "<html><body>There is Alert for File sytem usage.</body></html>");
                var response = client.SendEmailAsync(msg).Result;
            }

        }

        private static async Task<string> GetAccessToken(string tenantid, string clientid, string clientsecret)
        {
            string authContextURL = "https://login.microsoftonline.com/" + tenantid;
            var authenticationContext = new AuthenticationContext(authContextURL);
            var credential = new ClientCredential(clientid, clientsecret);
            var result = await authenticationContext.AcquireTokenAsync("https://management.azure.com/", credential);

            if (result == null)
            {
                throw new InvalidOperationException("Failed to obtain the JWT token");
            }


           return result.AccessToken;
        }
        private static bool GetUsage(string URI, String token)
        {
            Uri uri = new Uri(String.Format(URI));

            // Create the request
            var httpWebRequest = (HttpWebRequest)WebRequest.Create(uri);
            httpWebRequest.Headers.Add(HttpRequestHeader.Authorization, "Bearer " + token);
            httpWebRequest.ContentType = "application/json";
            httpWebRequest.Method = "GET";

            // Get the response
            HttpWebResponse httpResponse = null;
            try
            {
                httpResponse = (HttpWebResponse)httpWebRequest.GetResponse();
            }
            catch (Exception ex)
            {
                Console.WriteLine(ex.ToString());
                return false;
            }

            string result = null;
            using (var streamReader = new StreamReader(httpResponse.GetResponseStream()))
            {
                result = streamReader.ReadToEnd();
            }
            Int64 currentvalue = Convert.ToInt64(JObject.Parse(result).SelectToken("value[10].currentValue").ToString());
            Int64 limit = Convert.ToInt64(JObject.Parse(result).SelectToken("value[10].limit").ToString());
            if (currentvalue < limit)//You can set your condition as your requirement
                return true;
            else
                return false;
        }
    }
}
Then schedule the webjob as every 5 minutes with Settings.job file.
{
  "schedule": "0 */5 * * * *"


  //    Examples:

  //    Runs every minute
  //    "schedule": "0 * * * * *"

  //    Runs every 15 minutes
  //    "schedule": "0 */15 * * * *"

  //    Runs every hour (i.e. whenever the count of minutes is 0)
  //    "schedule": "0 0 * * * *"

  //    Runs every hour from 9 AM to 5 PM
  //    "schedule": "0 0 9-17 * * *"

  //    Runs at 9:30 AM every day
  //    "schedule": "0 30 9 * * *"

  //    Runs at 9:30 AM every week day
  //    "schedule": "0 30 9 * * 1-5"
}
Publish the webjob to an webapp
In Solution Explorer, right-click the project and select Publish.

Then go the webapp->WebJobs, can see webjob running as scheduled.

For more details regarding webjob, can refer following link:
https://docs.microsoft.com/en-us/azure/app-service/webjobs-sdk-get-started
by Contributed | Jun 11, 2021 | Technology
This article is contributed. See the original author and article here.
If you look at the logins for a Managed Instance, you will notice two logins
that are created by default for any Managed Instance: WASDRGTenantMonitoringRO
and xtsuser (which is actually disabled). These logins are part of the internal role
Microsoft creates for DevOps purposes. These roles only have CONNECT and VIEW
SERVER STATE permissions, don’t have access to your data, and have no ability to
make any modifications.
https://testfabrikstorage001.blob.core.windows.net/adp300/Azure_SQL_Revealed.pdf
Regards, Paloma.-
by Contributed | Jun 11, 2021 | Technology
This article is contributed. See the original author and article here.
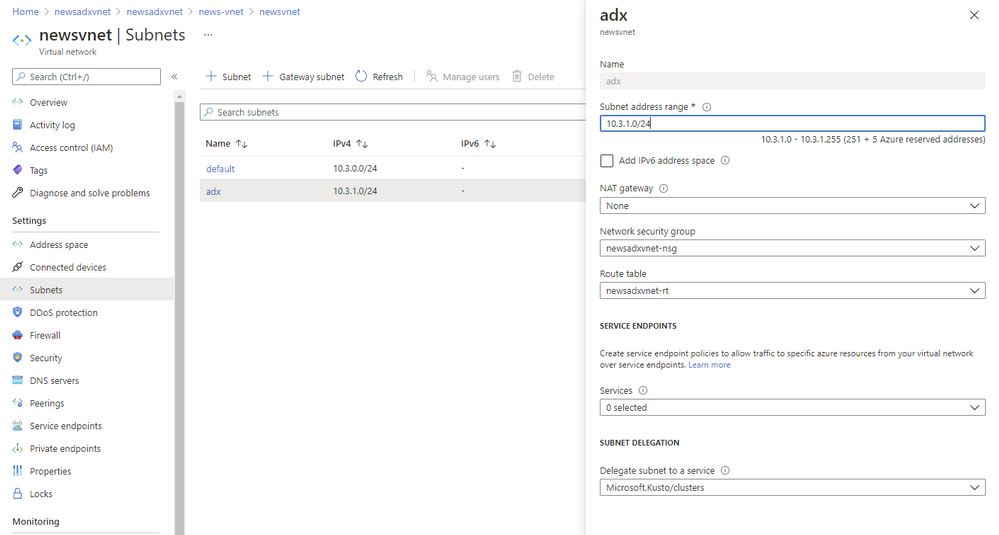
Subnet delegation enables you to designate a specific subnet for an Azure PaaS service of your choice that needs to be injected into your virtual network. When you delegate a subnet to Azure Data Explorer, you allow the service to establish some basic network configuration rules for that subnet, which help ADX to operate in a stable manner.
As a result, ADX adds a set of Network Intent Policies policies which are required for the service to work properly. In the past you had to create all of those Input and Output Network Security Group rules yourself and everytime we had to change some of the IPs you had to change some of them.

Benefits
Since beginning of June 2021 we are enforcing subnet delegation on the subnet you like to use for ADX. However we are aware of scenarios where customers need to opt-out because of certain requirements (Custom Private Link in the same subnet or company policies in general). For those situations we allow our customer to opt-out using the “preview features” configuration in the Azure portal. If you register for “Azure Data Explorer: opt out of subnet delegation” your ADX service deployments will not enforce subnet delegation to be enabled.


by Contributed | Jun 11, 2021 | Technology
This article is contributed. See the original author and article here.
Things are warming up in the northern hemisphere and heating up here at Microsoft with all the additional service updates becoming available. News the AzUpdate team will be covering this week includes Azure Migrate private endpoint support is now available in public preview, The need to upgrade to TLS 1.2 or above for secure MARS agent backups by September 1, 2020, updates in policy compliance for resource type policies and a powerful Microsoft Learn module of the week.
Azure Migrate private endpoint support available in public preview
Azure Migrate Private Link support enables organizations to securely connect to the Azure Migrate service over an ExpressRoute private peering or a site-to-site VPN connection. Azure Migrate: Discovery and Assessment and Azure Migrate: Server Migration tools can now be used to securely discover, assess, and migrate servers over a private network using Azure Private Link.
Azure Migrate Private Link support can now:
Leverage existing ExpressRoute private peering circuits for greater migration velocity.
Adhere to organizational policies and requirements to not traverse public endpoints.
Achieve additional network-level protection and guard against data exfiltration risks.
The functionality is now in public preview in all public regions. Get started on how to use Azure Migrate with private endpoints. Learn how to replicate data over ExpressRoute with Azure Migrate.
Sarah also has a great Azure Migrate overview video you can review.
Azure Backup: Upgrade to TLS 1.2 or above for secure MARS agent backups by September 1, 2021
As a part of Azure-wide initiative towards using TLS 1.2 by default and removing dependencies on older versions, the Azure Backup service is working towards shifting away from legacy protocols to ensure improved security for your backup data. Hence, older versions like TLS 1.0 and TLS 1.1 will no longer be supported. These changes are expected to take effect on September 1, 2021.
In order to continue using Azure Backup without any interruptions, please ensure all resources using the Microsoft Azure Recovery Services (MARS) agent are enabled to use TLS 1.2 or above. Please refer to the steps documented in our public documentation to take appropriate action to make sure your server configuration does not force use of legacy protocols.
General availability: Update in Policy Compliance for Resource Type Policies
Starting on June 16, 2021, policies where resource type is the only evaluation criterion (e.g. Allowed Resource Types, Disallowed Resource Types) will not have ‘compliant’ resources stored in compliance records. This means that if there are zero non-compliant resources, the policy will show 100% compliance. If there is one or more non-compliant resources, the policy will show 0% compliance, with the total resources equaling the non-compliant resources. This change is to address feedback that resource type policies skew overall compliance percentage data (which are calculated as compliant + exempt resources out of the total resources across all policies, deduped for unique resource IDs) due to a high number of total resources.
The resource type policy has a high total resource count, because it’s the only policy where all resources in the scope of the assignment count towards ‘total resources’. Other policies only consider applicable resource types to count towards total resources (i.e. VM extension policy would only count VMs in total resources).
Going forward, the resource type policies will only count the non-compliant resources (when ‘if’ statement evaluates to true) towards the total resources. So, if there are zero-non-compliant resources, the policy will show 100% compliance. Alternatively, if there are one or more non-compliant resources, the policy will show 0% compliance (since non-compliant resources = total resources). Aggregated with other policies, this logic would provide more accurate assessment of your overall environment.
If this is a concern, and if you’d like other resource types to be reflected as compliant resources, please include the statement ‘allOf:[ field: type in [list of resource types to be counted towards total]],’, as in the built-in policy definition ‘Storage accounts should be migrated to new Azure Resource Manager resources’.
If you have a support plan and need technical help, please create a support request.
Learn more.
Community Events
MS Learn Module of the Week
Introduction to Power Automate
Microsoft Power Automate is all about process automation. Power Automate allows anyone with knowledge of the business process to create repeatable flows that when triggered leap into action and perform the process for them.

Modules include:
- What is Power Automate and the business value it creates
- How two business are using Power Automate to provide better customer experiences
- See a video walkthrough of Power Automate
Learn more here: Introduction to Power Automate

Let us know in the comments below if there are any news items you would like to see covered in the next show. Be sure to catch the next AzUpdate episode and join us in the live chat.

Recent Comments