
by Contributed | Jun 17, 2021 | Technology
This article is contributed. See the original author and article here.
Introduction
Some time ago I had to help a customer in a PoC over the implementation of ELK Stack (ElasticSearch, Logstash and Kibana) on Azure VMs using Azure CLI. Then here are all steps you should follow to implement something similar.
Please note you have different options to deploy and use ElasticSearch on Azure
Data Flow
The illustration below refers to the logical architecture implemented to prove the concept. This architecture includes an application server, the Azure Redis service, a server with Logstash, a server with ElasticSearch and a server with Kibana and Nginx installed.

DescrDescription of components
Application Server: To simulate an application server generating logs, a script was used that generates logs randomly. The source code for this script is available at https://github.com/bitsofinfo/log-generator. It was configured to generate the logs in /tmp/log-sample.log.
Filebeat: Agent installed on the application server and configured to send the generated logs to Azure Redis. Filebeat has the function of shipping the logs using the lumberjack protocol.
Azure Redis Service: Managed service for in-memory data storage. It was used because search engines can be an operational nightmare. Indexing can bring down a traditional cluster and data can end up being reindexed for a variety of reasons. Thus, the choice of Redis between the event source and parsing and processing is only to index/parse as fast as the nodes and databases involved can manipulate this data allowing it to be possible to extract directly from the flow of events instead to have events being inserted into the pipeline.
Logstash: Processes and indexes the logs by reading from Redis and submitting to ElasticSearch.
ElasticSearch: Stores logs
Kibana/Nginx: Web interface for searching and viewing the logs that are proxied by Nginx
Deployment
The deployment of the environment is done using Azure CLI commands in a shell script. In addition to serving as documentation about the services deployed, they are a good practice on IaC. In this demo I’ll be using Azure Cloud Shell once is fully integrated to Azure. Make sure to switch to Bash:

The script will perform the following steps:
- Create the resource group
- Create the Redis service
- Create a VNET called myVnet with the prefix 10.0.0.0/16 and a subnet called mySubnet with the prefix 10.0.1.0/24
- Create the Application server VM
- Log Generator Installation/Configuration
- Installation / Configuration of Filebeat
- Filebeat Start
- Create the ElasticSearch server VM
- Configure NSG and allow access on port 9200 for subnet 10.0.1.0/24
- Install Java
- Install/Configure ElasticSearch
- Start ElasticSearch
- Create the Logstash server VM
- Install/Configure Logstash
- Start Logstash
- Create the Kibana server VM
- Configure NSG and allow access on port 80 to 0.0.0.0/0
- Install/Configure Kibana and Nginx
Note that Linux User is set to elk. Public and private keys will be generated in ~/.ssh. To access the VMs run ssh -i ~/.ssh /id_rsa elk@ip
Script to setup ELK Stack
The script is available here. Just download then execute the following:
wget https://raw.githubusercontent.com/ricmmartins/elk-stack-azure/main/elk-stack-azure.sh
chmod a+x elk-stack-azure.sh
./elk-stack-azure.sh <resource group name> <location> <redis name>

After a few minutes the execution of the script will be completed, then you have just to finish the setup through Kibana interface.
Finishing the setup
To finish the setup, the next step is to connect to the public IP address of the Kibana/Nginx VM. Once connected, the home screen should look like this:

Then click to create Explore my own. In the next screen click on Discover

Now click on Create index pattern

On the next screen type logstash on the step 1 of 2, then click to Next step

On the step 2 of 2, point to @timestamp

Then click to Create index pattern


After a few seconds you will have this:

Click on Discover on the menu

Now you have access to all indexed logs and the messages generated by Log Generator:

Final notes
As mentioned earlier, this was done for a PoC purposes. If you want add some extra layer for security, you can restrict the access adding HTTP Basic Authentication for NGINX or restricting the access trough private IPs and a VPN.
by Contributed | Jun 17, 2021 | Technology
This article is contributed. See the original author and article here.
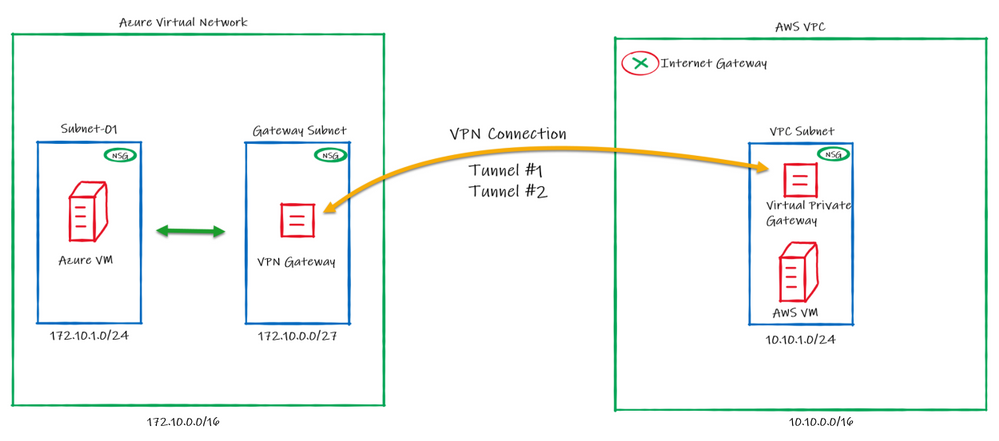
What if you can establish a connection between Azure and AWS using only managed solutions instead to have to use virtual machines? This is exactly what we’ll be covering on this article connecting AWS Virtual Private Gateway with the Azure VPN Gateway directly without worry to manage IaaS resources like virtual machines.
Below the draw of our lab:
Regarding the high availability, please note that on AWS, by default a VPN connection always will have 2 Public IPs, one per tunnel. On Azure it doesn’t happens by default and in this case you will be using Active/Passive from Azure side.
This means that we will be setting only one “node” from Azure VPN Gateway to establish two VPN connections with AWS. In case of a failure, the second node from Azure VPN Gateway will connect to AWS in a Active/Passive mode.
Configuring Azure
1. Crate a resource group on Azure to deploy the resources on that


Choose the subscription, the name and the region to be deployed:

2. Create a Virtual Network and a subnet


Define the subscription, resource group, name and region to be deployed:

Set the address space for the virtual network and for the subnet. Here I’m defining the virtual network address space to 172.10.0.0/16, changing the “default” subnet name to “subnet-01” and defining the subnet address range to 172.10.1.0/24:


3. Create the VPN Gateway
The Azure VPN Gateway is a resource composed of 2 or more VM’s that are deployed to a specific subnet called Gateway Subnet where the recommendation is to use a /27. He contain routing tables and run specific gateway services. Note that you can’t access those VM’s.
To create, go to your Resource Group, then click to + Add


Then fill the fields like below:

After click to Review + create, in a few minutes the Virtual Network Gateway will be ready:

Configuring AWS
4. Create the Virtual Private Cloud (VPC)

5. Create a subnet inside the VPC (Virtual Network)

6. Create a customer gateway pointing to the public ip address of Azure VPN Gateway
The Customer Gateway is an AWS resource with information to AWS about the customer gateway device, which in this case is the Azure VPN Gateway.

7. Create the Virtual Private Gateway then attach to the VPC


8. Create a site-to-site VPN Connection

Set the routing as static pointing to the azure subnet-01 prefix (172.10.1.0/24)

After fill the options, click to create.
9. Download the configuration file
Please note that you need to change the Vendor, Platform and Software to Generic since Azure isn’t a valid option:

In this configuration file you will note that there are the Shared Keys and the Public Ip Address for each of one of the two IPSec tunnels created by AWS:


After the creation, you should have something like this:

Adding the AWS information on Azure Configuration
10. Now let’s create the Local Network Gateway
The Local Network Gateway is an Azure resource with information to Azure about the customer gateway device, in this case the AWS Virtual Private Gateway


Now you need to specify the public ip address from the AWS Virtual Private Gateway and the VPC CIDR prefix.
Please note that the public address from the AWS Virtual Private Gateway is described at the configuration file you have downloaded.
As mentioned earlier, AWS creates two IPSec tunnels to high availability purposes. I’ll use the public ip address from the IPSec Tunnel #1 for now.

11. Then let’s create the connection on the Virtual Network Gateway


You should fill the fields according below. Please note that the Shared key was obtained at the configuration file downloaded earlier and In this case, I’m using the Shared Key for the Ipsec tunnel #1 created by AWS and described at the configuration file.

After a few minutes, you can see the connection established:

In the same way, we can check on AWS that the 1st tunnel is up:

Now let’s edit the route table associated with our VPC

And add the route to Azure subnet through the Virtual Private Gateway:

12. Adding high availability
Now we can create a 2nd connection to ensure high availability. To do this let’s create another Local Network Gateway which we will point to the public ip address of the IPSec tunnel #2 on the AWS

Then we can create the 2nd connection on the Virtual Network Gateway:

And in a few moments we’ll have:


With this, our VPN connection is established on both sides and the work is done.
13. Let’s test!
First, let’s add an Internet Gateway to our VPC at AWS. The Internet Gateway is a logical connection between an Amazon VPN and the Internet. This resource will allow us to connect through the test VM from their public ip through internet. This is not required for the VPN connection, is just for our test:

After create, let’s attach to the VPC:


Now we can create a route to allow connections to 0.0.0.0/0 (Internet) through the Internet Gateway:

On Azure the route was automatically created. You can check selecting the Azure VM > Networking > Network Interface > Effective routes. Note that we have 2 (1 per connection):

Now I’ve created a Linux VM on Azure and our environment looks like this:

And I did the same VM creation on AWS that looks like this:

Then we can test the connectivity betweeen Azure and AWS through our VPN connection:


by Contributed | Jun 17, 2021 | Technology
This article is contributed. See the original author and article here.
permalink: https://aka.ms/FTAISVmultitenant-data
reference links permalink: https://aka.ms/FTAISVmultitenant-data-resources
The very nature of an ISV’s business model is to provide a solution applicable to many customers. These multi-tenant solutions require multi-tenant database services as well. But how do you implement multitenancy in a database securely and at scale? How will I balance performance and cost?
In this video we’ll introduce you to the design considerations that impact multi-tenant architectures. We’ll then review some of the core design patterns used to implement multi-tenant solutions. For each pattern, we’ll discuss the pros, cons and tradeoffs you will need to consider when choosing a design pattern. Finally, we’ll review some of the tooling that is frequently used to support multi-tenant solutions.
by Contributed | Jun 17, 2021 | Technology
This article is contributed. See the original author and article here.
Effective June 17, 2021, Microsoft partners should utilize the process below to sign drivers for Windows 7, Windows Server 2008, and Windows Server 2008 R2 through the Partner Center for Windows Hardware.
- Remove existing signatures from driver binaries.
- Generate new catalog files using INF2CAT.
- Sign the security catalog files using the IHV/OEM certificate registered with the Partner Center for Windows Hardware.
- Add the driver to your HCK file.
- Sign the HCK file using the IHV/OEM certificate registered with the Partner Center for Windows Hardware.
- Submit the driver package to the Partner Center for Windows Hardware for signing.
- Download the signed driver bundle from the Partner Center for Windows Hardware.
As noted in our post on Changes to driver publication for Windows 7 SP1, Windows Server 2008 R2, and Windows Server 2008, Microsoft will discontinue the publication of drivers to Windows Update for Windows 7 SP1, Windows Server 2008, and Windows Server 2008 R2; however, signed drivers will continue to be made available to ensure optimal driver reliability for Volume Licensing customers who have elected to participate in an Extended Security Update (ESU) program. Windows 7, Windows Server 2008, and Windows Server 2008 R2 driver submissions for the Windows Hardware Compatibility Program (WHCP) will continue to be available through January 2023.
by Contributed | Jun 17, 2021 | Technology
This article is contributed. See the original author and article here.
On June 17, 2021, Microsoft will discontinue the publication of drivers to Windows Update for Windows 7 SP1, Windows Server 2008, and Windows Server 2008 R2. If your organization utilizes the Extended Security Updates (ESU) program, you will continue to have the ability to deploy drivers to your managed devices using Windows Server Update Services (WSUS_ and other supported methods.
As previously communicated, the SHA-1 Trusted Root Certificate Authority expired for Windows 7 SP1, Windows Server 2008, Windows Server 2008 R2 on May 9, 2021 and is no longer used by Microsoft. Due to the discontinuation and expiration of SHA-1 certificates, partners utilizing the Microsoft Trusted Root Program could publish incompatible SHA-2 signed drivers to unpatched Windows client and Windows Server devices. This, in turn, had the potential to cause degraded functionality or to cause devices to longer boot. This occurs because unpatched systems will have code integrity failures when presented with a SHA-2 signed driver.
To minimize the potential impact of these incompatibilities, Microsoft will discontinue publishing of SHA-2 signed drivers to Windows Update that target Windows 7 SP1, Windows Server 2008, Windows Server 2008 R2 devices on June 17, 2021. While these Windows versions reached the end of support on January 14, 2020, we are making this change to diminish disruptions for users who still remain on these versions of Windows. This includes:
- Any driver package submitted for multi-targeting for currently supported versions of Windows and Windows Server
- Any driver package targeting versions of Windows or Windows Server that have reached the end of support.
When this change occurs, a notification will be sent to the submitter and they will need to resubmit the shipping label for publishing after they have removed the unsupported versions.
Note: SHA-1 certificates are expired and are already no longer a publishing option for Windows Update.
|
Continuation of driver signing
Windows 7, Windows Server 2008, and Windows Server 2008 R2 driver submissions for the Windows Hardware Compatibility Program (WHCP) will continue to be available through January 2023. These submissions will continue to be made available to ensure optimal driver reliability for Volume Licensing customers who have elected to participate in the Extended Security Update (ESU) program.
We’re here to help
To test and certify hardware devices for Windows, we recommend that you utilize the Windows Hardware Certification Kit (Windows HCK) and follow the updated driver signing process for Windows 7, Windows Server 2008 and Windows Server 2008 R2 when submitting a driver package for signing via the Partner Center for Windows Hardware.
For more information on ESUs for Windows 7, see the Windows 7 end of support FAQ or the Window Server 2008 and 2008 R2 end of support FAQ. Partners seeking additional assistance are encouraged to reach out to their Microsoft account representatives.
by Contributed | Jun 17, 2021 | Technology
This article is contributed. See the original author and article here.
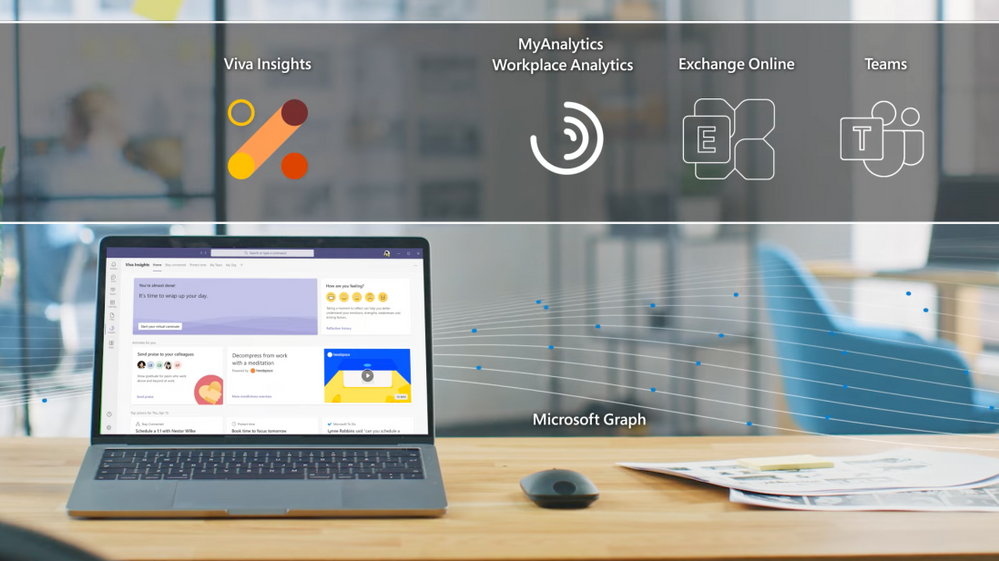
See how Microsoft Viva Insights delivers data-driven privacy, protected insights, and recommended actions to help individuals and teams improve productivity and wellbeing. Engineering leader, Kamal Janardhan, joins Jeremy Chapman for a deep dive and a view of your options for configuration.
If you’re new to Microsoft Viva, it comprises four modules that deliver new employee experiences across knowledge, communications, learning, and insights, all in the context of your work. These leverage the foundational technologies of Microsoft 365, Microsoft Graph and AI to deliver a modern employee experience platform.
With hybrid work at home and in the office as the new normal, Viva Insights gives individuals, managers, and leaders the insight to develop healthier work habits and a better work environment. It is an intelligent experience designed to leverage MyAnalytics, Workplace Analytics, and Exchange Online to deliver insights that recommend actions to help prioritize well-being and productivity.
As an individual: Get personalized reminders to book focus time or to take regular mental breaks. Integration with Headspace brings in guided meditations to help relax your mind.
As a manager and a leader: Get granular visibility into work patterns to detect trends like burnout. Stay more connected with your team and minimize attrition.
QUICK LINKS:
00:54 — What is Viva Insights?
02:52 — Individual user experience
07:43 — Configuration
08:40 — Manager & leader experience
09:42 — Org leader experience
10:43 — Customization
11:40 — Privacy
12:26 — Wrap up
Link References:
Unfamiliar with Microsoft Mechanics?
We are Microsoft’s official video series for IT. You can watch and share valuable content and demos of current and upcoming tech from the people who build it at Microsoft.
Keep getting this insider knowledge, join us on social:
Video Transcript:
– Up next, we’re joined by engineering leader, Kamal Janardhan to go deeper on Microsoft Viva Insights. We’re going to show you how it delivers data-driven privacy protected insights and recommended actions to help individuals and their teams improve their productivity and wellbeing, and your options for configuration. So Kamal, welcome back to Microsoft Mechanics.
– Thanks Jeremy. It’s great to be back on the show.
– And thanks so much for joining us today. So of course, before we get into Viva Insights, if you’re new to Microsoft Viva, it comprises four modules, with more to come, that deliver new employee experiences across knowledge, communications, learning, and insights, all in the flow of your work. Now, these leverage foundational technologies of Microsoft 365, Microsoft Graph, and AI to deliver a modern employee experience platform. In fact, you can learn more by watching our Essentials episode at aka.ms/VivaEssentials. Now, one of the foundational experiences in the new Viva platform is Viva Insights. So Kamal, can you explain what’s behind it?
– Glad to. So when the pandemic hit, it was a shock to all of us. And as we were developing the Viva Insights experience, we looked really closely at the impact of that shift. In fact, we recently published a work trend index report, which was based on a study of 30,000 employees across the world in 31 different countries. And that surfaced a few key learnings. First, that flexible work is here to stay. People want to be able to work anywhere, and this helps their productivity. Next, as we work remotely, it is harder for leaders and managers to stay in touch with their teams. And lastly, as a workforce overall, we’re all exhausted. In fact, our time spent in meetings has more than doubled.
– Right, I’ve got to say, I think these are all very relatable insights, both as individuals or as managers.
– Yes, because hybrid work at home and in the office is the new normal. We want to give individuals, managers, and leaders, the insight to develop healthier work habits and a better work environment. Viva Insights, as part of that employee engagement platform, is our intelligent experience designed to leverage MyAnalytics, Workplace Analytics, and Exchange Online to deliver these data-driven, privacy-protected insights that recommend actions to help prioritize well-being and productivity. For example, as an individual, I get personalized reminders to book focus time or to take regular mental breaks. Then, as a manager and a leader, Viva Insights gives me granular visibility into work patterns that can help me detect trends like burnout, so that I can stay more connected with my team and minimize attrition.
– Okay, so I think for many of the people watching the personal insights available to you as an individual will be familiar. That said, Viva Insights goes above and beyond what you may be used to, especially with Microsoft Teams integration and new employee experiences and those integrations with wellbeing partners, as well.
– It does, and given how much time we all spend in Teams, that’s essential. So let’s dive into the experience. Here, as you can see, I’ve already installed and pinned Viva Insights to my left navigation. In my home tab, I see a time of day greeting on the upper left. With all of us online so much, bringing a human face to these experiences is important. First, I’d like to highlight our brand new integration with Headspace. Now all the research tells us that cognitive breathers are essential to get work done. This capability brings in a curated set of guided meditations that help you relax your mind, like the one you can see here called Body Scan. And I can click through to find more meditation mindfulness exercises. These are short,bite-sized guided meditations that you can integrate into your routine, perhaps before the start of an important meeting, or as a quick break between back-to-back meetings, or to help you unwind at the end of your day. Now back to the home tab on the upper right, there’s a Reflections tab that encourages me to pause and tune in to how I am feeling. We know that taking a moment to reflect can improve emotional resilience. I’m feeling good, so I’ll click on a smiley face. And I also see that my reflection history over time is available to me through a view that is completely private. From here, I can set a reminder to make this a habit. I’ll keep the default at 4:00 p.m., but I can then see this over time and evaluate what I need to change about my routine. If I go back to the home tab, you also see that we’re aiming to create a more positive team culture. In the hybrid world, I can reach out to my coworkers and we know that when people feel isolated, we see as much as a 70% drop in reported productivity. Recognizing each other’s work through something like praise, like I am doing with Adele, goes a long way to bridging that distance. I can also send this to the Teams channel with a note, so everyone on the team sees this, and I can model the culture that I want to see in my team. Moving on to the Stay Connected tab, we’ve also made it easier for you to stay in touch with your colleagues. Here, you can do that by prioritizing time for regular one-on-one meetings with them, keeping up with their asks that are distributed across email chats and have all of them grouped into a single place, according to the relationships that matter.
– Right, and all this really helps in terms of making sure that you do what you’ve committed to doing.
– That’s right. Viva Insights aspires to help you manage your time and your mental energy by surfacing what is most important and helping you keep track of it. Now, protecting your time, we found, requires intentional action, because remote work often drives us to accept more meetings than normal because of a fear of missing out, FOMO. In the Protect Time tab, I can see my free slots and I can schedule my focus time to work uninterrupted on work that matters. In fact, when you book focus time, your Teams chats are muted to help you concentrate to pay yourself first. And later this year, we’ll be introducing a new focus mode, the features additional music from Headspace. Let me give you a first look at that new experience. Here, I can focus on my first task and I send a financial analysis to all my leads. After I’ve completed that task and hit the 25-minute mark, it prompts me to take a five-minute break. Then I can start on my next task, which is Q2 planning. Once that’s done, I can disconnect with another short break. And having this cognitive white space is key to helping me be more effective when I’m focusing.
– Right, and this is really a great way to make sure that you pace yourself and balance that feeling then of always being on.
– Yeah, so another example is how we remind you to switch off with an experience we call virtual commute. Now nobody loves a commute, but this guides you to close out your tasks to free up valuable mental space to preview what’s planned for tomorrow, and then reflect on how you felt about the day. Starting at the end of June, the virtual commute experience will also be integrated with Headspace, so you can tap directly into guided meditation at the end of your day. And coming later this year, Viva Insights will offer you the ability to set quiet time, so you can silence mobile notifications from Teams and Outlook after hours, as well as show you personalized insights to reflect on how many days you had without that after hours work in meetings, emails, and chats. This helps you as a knowledge worker to mindfully disconnect, particularly important for our frontline worker population.
– Okay, but I have to ask, how does Viva actually know in terms of the logical endpoints of your day, Viva Insights knows about your schedule and your calendar. Where does it get that information from?
– So Viva Insights, as all Viva, is built on M365. And in this case built on the calendar constructs of Exchange Online. So as I’ll show you, we give you the ability to click into the settings and configure this as appropriate for you. In this case, I’ll keep it at 5:00 p.m. Similarly, you can also set up the virtual commute reminder for when you want to start wrapping up for the day. Mine’s at 4:30, which gives me 30 minutes to wrap things up, to be prepped for the next day.
– Right, and although these personal insights are available for everyone, why don’t we keep on the topic of configuration. For our admins that are watching, what does it take then to light up all these capabilities across your org?
– The Viva Insights app is available by default in Microsoft Teams to all users with Exchange Online mailboxes. You can also make it more discoverable to users in the Teams admin center. So under Teams app set up policies and the pinned app section, just search for Insights. And then many of our customers just pin Viva Insights, where they want it. This works for PCs, Macs, and in the browser, and you can also configure it for select users using PowerShell. For example, you can configure experiences like Headspace for specific users in your organization. And you can learn more about all of this at aka.ms/SetVivaInsights. With the quiet time settings coming later this year, you’ll also be able to create a policy via Microsoft Endpoint Manager. And this mutes mobile notifications from Teams and Outlook after hours for the specific users in your organization like frontline workers.
– Got it, let’s switch gears though, to the managers and the leaders of organizations. What do those experiences look like?
– So I mentioned the disconnect that we’ve seen managers and leaders having with their workforce. If you have workplace analytics today, manager insights helps you understand factors that for example may be contributing to things like burnout and stress on your team. Here, I can see things like whether people are consistently working after hours. And this gives me a gauge on employee burnout, which we know leads to attrition. In this case, we see 60% of the team consistently works after hours. And I can also see how that compares to other teams like mine, and get tips to help the team unplug at the end of the day. If we move up under coaching and development, we use de-identified data from Outlook and Teams to summarize how much time my team gets on average per week with their managers for one-on-ones, and take steps to make the right thing happen. Under Team effectiveness, I can see the percentage of long and large meetings, which are less effective. And then I can take action to change the meeting habits for my team.
– Right, and these insights are really great I think for managers, but why don’t we switch to the org leader and what they can see?
– Here, we provide leader insights for the C-suite and business leaders who need that broad visibility across the entire organization. Just as with manager insights, we provide visibility to after hours works for teams, the leaders can visualize this across their entire company. Then if we move down, you’ll see a free up capacity insight. And this helps a leader understand overall work patterns that may be pushing people into this after hours work. Here, I see that 43% of our people spend half or more of that time in collaboration. And this tells me there’s probably not enough time for them to focus during regular working hours. Moving to the Employee engagement tab, I see an interesting insight around employee empowerment. It looks at the time that employees spend with managers and one-on-one meetings, as well as meetings co-attending with their manager. A combination of this high manager and employee one-on-one and meeting co-attendance, may indicate a need to foster delegation, which we know makes teams more effective.
– So as a leader then, you might want different pivots on the data. So can you customize those insights for different views?
– You can. Every company is different. So the ability to do deep customization with the help of a data analyst is key. We have several out-of-the-box Power BI templates that can get you up and running quickly. These help you identify challenge areas that would benefit from change initiatives, and then you can measure the impact of those changes over time. As an example, the Ways of working report enables me to quickly visualize burnout risk. I can then drill into specific roles or functional areas to understand where I should focus my efforts as a leader, and then define an action plan to improve wellbeing. If you want to explore the data even further, you can work with your analyst to create a custom query from scratch. And this looks at the data from multiple perspectives. You can also leverage our open source repository of low-code, pre-built functions that create even deeper insights that are tailored to your specific business challenges.
– Okay, so you’ve touched now on the privacy aspect in terms of information a few times during the show, but how does this work then for Viva Insights?
– The first thing I’d say is that it’s all part of the Microsoft trust promise. And trust is inherent in the design. For personal insights as an individual using Viva Insights, just like an email address to you is private, so are all your personal insights. As I mentioned for manager and leader insights, all the data is aggregated and de-identified, so individual information is never surfaced or discernible for a manager or leader. We also add for these manager insights, another layer of protection with differential privacy. And this introduces statistical noise, which makes it impossible to identify an individual based on the collaboration patterns of the team.
– Right, I know this is such a critical topic and part of how we’ve designed Viva Insights. It’s also really great to see all the different updates that we’ve made to the Viva Insights experience. And for the people watching though, what’s your recommendation of where they can go to learn more and get started?
– Try it out for yourself. Get personal insights and wellbeing experiences, as I showed you with integrated into Teams. For manager and leader insights, contact your Microsoft account representative and get started. You can learn more about what I showed you today at aka.ms/VivaInsights. And we look forward to hearing your feedback.
– Thanks so much Kamal. And of course, don’t forget to watch the rest of our Microsoft Viva series at aka.ms/VivaMechanics, and also keep checking back for the latest updates across Microsoft. Be sure to subscribe if you haven’t yet, and thanks so much for watching.
by Contributed | Jun 17, 2021 | Technology
This article is contributed. See the original author and article here.
Today, we had a question from a customer asking if could be possible to connect to the Private Endpoint of Azure SQL DB or Synapse using Azure SQL External Tables.
The current answer is not, due to, as outbound connections for Azure SQL External Tables are executing from backend nodes that are outside of any private endpoint addressing space.
In this situation, there is not possible and won’t be available in a near future, as alternative, using Azure SQL Managed Instance that allows to use cross database queries among the database that belongs to the same instance or you could use Linked Server.
by Contributed | Jun 17, 2021 | Technology
This article is contributed. See the original author and article here.
This article was written by Future Kortor (@fkortor) and Bojan Magusic (@Bojan Magusic).
Intro
The purpose of this article is to empower organizations to understand the difference between Secure Score in Azure Security Center and Microsoft Secure Score in Microsoft 365 Security center. This article also touches briefly on the Identity Secure Score in the Azure AD Portal and Microsoft Secure Score for Devices in the Microsoft 365 Security center but going into details on these products is outside of the scope of this article.
Secure Score Functionality
As companies migrate more and more workloads to the cloud, it’s important to ensure that any resources in the public cloud are secured by adhering to industry standards and best practices. While companies might have existing solutions for their on-premises environment, security controls in the cloud differ from those on-premises. As no two company environments are the same, the question becomes where do you start with improving your security posture? What actions should you prioritize? Here is where Secure Score comes into play! The idea behind the Secure Score functionality isprovide you with a measurement that helps understand your current security posture as well as a list of actions you can take to improve your security posture. Secure Score, continuously assesses your environment. Meaning as you take actions to increase your security posture or deploy new resources, these changes will be reflected in your Secure Score. By implementing recommendations you’re adhering to best practices which will effectively increase the measurement and enhance
Depending on the workloads in question, you might be interested in having a measurement solely for your Microsoft SaaS workloads. On the other hand, you might be interested in a measurement for your PaaS and IaaS workloads in Azure (and even hybrid or multi-cloud scenarios). Hence, the need to have a different Secure Score for each scenario, which provides you a measurement for the specific type of cloud computing service that you are utilizing:
- Secure Score: applicable for PaaS, IaaS, hybrid and multi-cloud workloads.
- Microsoft Secure Score appliable for Microsoft SaaS workloads.
The table below aims to highlight the high-level difference between the two scores.
Service Models
|
Cloud Computing Service Provider
|
Category
|
Name of Secure Score Functionality
|
Administration Portal
|
SaaS
|
Microsoft 365
|
Identity, Devices and Apps
|
Microsoft Secure Score
|
Microsoft 365 Security Center
|
PaaS
|
Azure
|
Feature Coverage for Azure PaaS Services
|
Secure Score
|
Azure Security Center Dashboard
|
AWS
|
Provided by AWS Security Hub
|
GCP
|
Provided by GCP Security Command Center
|
IaaS
|
Azure
|
Supported Platforms
|
Secure Score
|
Azure Security Center dashboard
|
GCP, AWS
|
Supported Platforms
|
On-premise
|
Supported Platforms
|
Important Note: Microsoft 365 Secure Score is broken down further for each category (i.e. Identity Secure Score), however this falls out of scope of this article. More information on this topic can be found here.
Observation: With cloud adoption, identity has become the new perimeter – the control plane for your organization’s infrastructure, regardless of the type of cloud computing services that is being used (IaaS, PaaS, SaaS or even on-premises). Protecting your organization’s identities is key. Therefore, both scores place a high value on protecting your identities and enabling MFA. will have a positive impact on both scores. Beyond protecting identities, you can treat these two scores as separate.
Now, let’s dive into each one of these two scores!
Secure Score in Azure Security Center
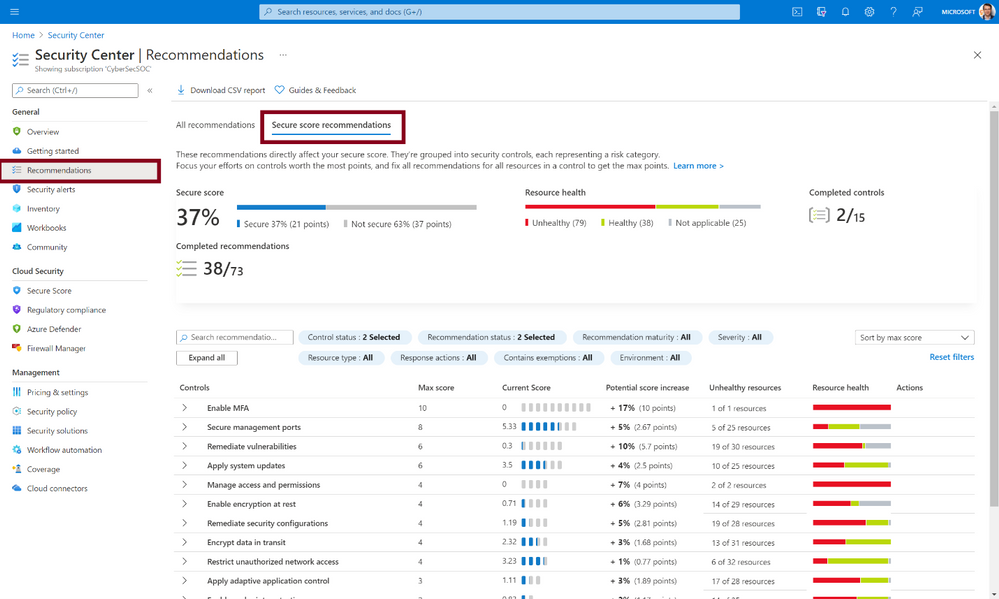
Secure Score is all about helping you improve your security posture with regards to your Azure resources (IaaS & PaaS) and even hybrid and multi-cloud workloads (i.e. AWS and GCP resources). When you select Secure Score in the Azure Security Center it shows you a list of security controls, where each security control has a list of recommendations. As you start addressing each one of those recommendations and you successfully address all the recommendations in a particular security control, your Secure Score will increase by a certain number of points (highlighted in the Potential score increase column). With your Secure Score increasing, your security posture will improve.
Figure 1: Secure Score in Azure Security Center Dashboard
Learn how Secure Score affects your governance.
Learn how to protect non-Azure resources.
Microsoft Secure Score in Microsoft 365 Security Center
Microsoft Secure Score is all about helping you improve your security posture with regards to Microsoft 365 services. The Microsoft Secure Score contains three distinct control and score categories:
- Identity (Azure Active Directory accounts and roles)
- Devices (Microsoft Defender for Endpoint)
- Apps (email and cloud apps, including Office 365 and Microsoft Cloud App Security)
At the time this was written, currently in Microsoft Secure Score there are recommendations for the following products:
- Microsoft 365 (including Exchange Online)
- Azure Active Directory
- Microsoft Defender for Endpoint
- Microsoft Defender for Identity
- Cloud App Security
- Microsoft Teams
Final Considerations:
The Secure Score functionality is all about helping you understand your current security posture and giving you a list of recommendations to proactively improve your security posture. Secure Score in Azure Security Center can help you understand how to improve the security posture of your Microsoft Azure IaaS and PaaS services (and even hybrid and multi-cloud). Microsoft Secure Score helps you understand how to improve your security posture when it comes to Identities, Devices and SaaS Applications in Microsoft 365. Both play a significant role in building a holistic security posture of your organization. Depending on how your organization is structured and which department (or team) is responsible for which workload, different teams and stakeholders might need to be involved to effectively improve the security posture of your organization. Hopefully, this article provides real value in understanding where you can find proactive guidance on how to improve your organizations security, depending on the workload in question. Remember, with each recommendation that you remediate, you are increasing your score and hardening your security defenses.
Reviewer:
@Yuri Diogenes, Principal PM
by Contributed | Jun 17, 2021 | Technology
This article is contributed. See the original author and article here.
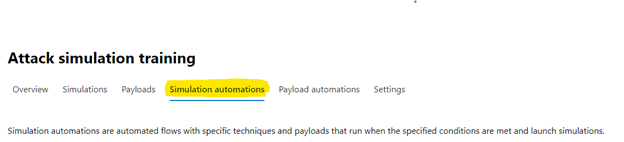
Simulation Automations
The modern enterprise, of any size, faces a challenge that the logistics involved in planning a phishing simulation exercise are often laborious and time-consuming to implement. So to help address this we are pleased to announce some extra functionality in Attack Simulation Training that we feel will bring some added benefits in this space by:
- Helping move away from the traditional approach of running quarterly or annual simulations, to a more always on ‘educating’ model, by scheduling simulations to launch at a higher frequency (being mindful of simulation and training fatigue of course).
- Letting you schedule simulations up to a year in advance, so you decide the parameters of your simulations once in advance then you are good to go.
- Introducing some randomization elements around send times and dates to help combat the crowdsource effect that can occur when running large simulation exercises.
You can access the new functionality by selecting the “Simulation automations” tab within the main experience.
When you create a simulation automation, the experience walks you through a wizard experience just like creating a manual simulation, with the addition of a few new steps.
- Payload selection – Here we allow you to manually select what payloads you would like to be in scope for the simulations, or alternatively you can opt to randomize, where we will take a random payload from the available library and use that.
- Simulation schedule – Here, you get to decide if you would like a randomized schedule or a more predictable fixed schedule. What is the difference?
A randomized schedule lets you select a start date and end date, the days of the week you would like to be in scope for delivery and after how many simulation launches would you like the automation to stop.
Once the automation is enabled, the simulations will be launched on random days between the dates you have specified. You can also choose to randomize the send times (to negate the water cooler effect of users receiving simulation messages at the same time and chatting about it).

A fixed schedule allows you to run automations in a more controlled manner. We take the same approach – you specify a start date and end date – however this time you are prompted to enter the cadence, either weekly or monthly and the parameters of how often you would like them to launch.
For example, you can schedule an automation to run once a week for a period of 7 weeks starting every Monday, or you can also opt to end the simulations by a particular date or after a specific number of occurrences that you define.

Government Cloud and Regional Availability Updates
Attack Simulation Training is now live in GCC:
Starting 15 June 2021, Attack Simulation Training will be generally available in our Government Community Cloud. If your organization has Office 365 G5 GCC or Microsoft Defender for Office 365 (Plan 2) for Government, you can use Attack Simulation Training in Microsoft 365 Defender to run realistic attack scenarios in your organization as described here. Please note that the service is not yet available in GCC-High or DoD environments and this is part of our future roadmap.
Attack Simulation Training is now live in new regions:
Starting 16 June 2021, Attack Simulation Training will be generally available to tenants in Latin America, Brazil, and Switzerland that have Microsoft 365 E5 or Microsoft Defender for Office 365 Plan 2. For any guidance on running simulations, please start here. For frequently asked questions, please refer to our FAQ page.
We hope you find the enhancements useful as you continue your journey of end-user education and behavior change. If you have any comments or feedback be sure to let us know.
by Scott Muniz | Jun 17, 2021 | Security
This article was originally posted by the FTC. See the original article here.
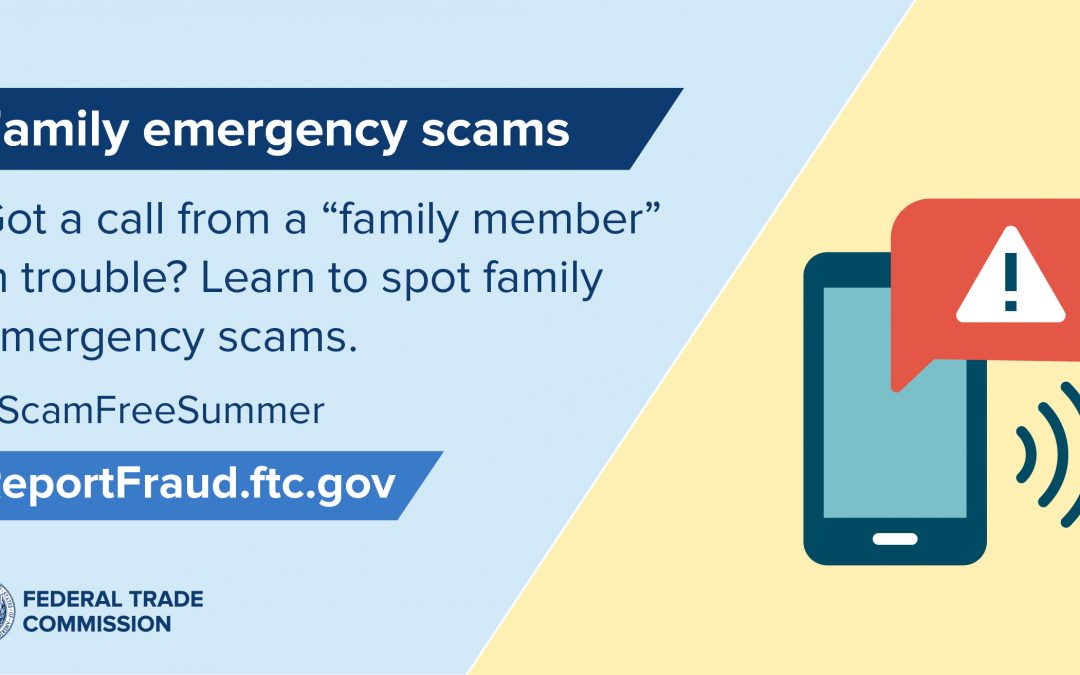
 Instead of telling you a ghost story around a summer campfire, we have an all-too familiar tale to share: Myra’s grandson, Jon, is in Mexico for the summer. They video chat every week. One day, Myra gets a call from someone who says he’s Max, a friend of Jon’s: “He was arrested last night and needs $500 for bail.” Max says the police took Jon’s passport, so he’ll need another $700 to get it back. He says not to tell Jon’s parents or anyone else because Jon is embarrassed.
Myra is scared at first — but she’s heard a thing or two that makes her suspicious. So she thanks “Max” for his concern, hangs up, and calls Jon right away. Jon, it turns out, is on his way to class, not in jail. And “Max” is nothing but a scammer.
Family emergency scams like this try to scare people into sending money to help a loved one in trouble. The fraud can play out in many ways, but the hustle is the same: the caller lies, tries to scare you, and rushes you to pay so you don’t have time to think twice or check things out before you send money. And once you do that, you’ll never get it back.
To avoid family emergency scams:
- Resist the urge to act immediately — no matter how dramatic the story is.
- Call or message your loved one who (supposedly) contacted you. Even though the caller says not to. But use a number you know is right, not one the caller gives you.
- Never send cash, gift cards, cryptocurrency, or money transfers. Once the scammer gets the money, it’s gone!
If you spot this or any other scam, report it to the FTC at ReportFraud.ftc.gov.

Brought to you by Dr. Ware, Microsoft Office 365 Silver Partner, Charleston SC.

Recent Comments