
by Contributed | Jun 18, 2021 | Technology
This article is contributed. See the original author and article here.
Azure Policy can give us the ability to audit settings inside a virtual machine using Guest Configuration. However, at this time we can’t remediate those machines because the feature is not yet available. This means that although we can see that a virtual machine is non-compliant there is little you can do about fixing it from the policy blade itself.
One of the built-in Guest Configuration policies can audit whether specific software is installed in a Windows machine, this could be a full software program or a specific agent. But then how do install the software based on the non-compliant policy result?
Thanks to Azure Policy state change events we can now detect when a resource changes it’s compliance settings and we can subscribe to these events using an Event Grid Subscription. I’ve used Event Grid in a previous post, but this time I’m going to use an Azure Automation runbook and some PowerShell to install the missing software package (PowerShell 7).
Pre-Requisite Deployment
I’m going to need several different resources to make this all work – so I’ve scripted everything up as Bicep templates and PowerShell scripts to run the deployment. All the files are in the GitHub repository, you can download them, and the only modification will be the names of the resources in deploy.ps1.
After updating those fields, you can run the script, it will complete the following steps.
- Deploy a new storage account.
- Deploy a container into the storage account called software where the MSI file is placed.
- Deploy a new automation account which is assigned a managed identity. This feature is currently in preview and simplifies the previous approach to giving permissions to an automation service principal.
- Deploy a couple of variables into the automation account which are used by the runbook.
- Assign Contributor permission to the automation account managed identity.
- Install all the Az modules required by the runbook (this does take a bit of time to complete).
- Assign the policy below to the resource group. This will install the Guest Configuration agent which is a pre-requisite for the software installation policy.

- Create a system topic to listen to the policy state changes.
It takes a while to deploy the initial template – but be patient. There is some output logging so you can see what the rest of the script does.
- Download the PowerShell 7 MSI and upload it to the storage account.
- Publish the runbook to the automation account
- Create a webhook for the runbook
- Deploy and Event Grid Subscription and the software installation policy.

The policies will be deployed to the resource group…

The software installation file is ready in the storage account…

And the Event Grid subscription is listening for policy events…

I’ve adjusted the filters for the events which I’m interested in – it should only fire the webhook when the software installation policy returns a non-compliant result.

Testing the Process
And now for some testing. I’ll create a standard Windows Server in the resource group by just going through the wizard – when complete my machine will not have PowerShell 7 installed (simply because it isn’t there out of the box).

Checking the Apps and Features on the server…

Things are going to start moving in this virtual machine, but at some point, that software installation policy is going to return a non-compliant result. This can happen either before or after the Guest Configuration agents are installed, now it doesn’t really matter. The Guest Configuration extension will eventually install and check for the installed application. It generally takes around 30 minutes for policy evaluation to complete – you can trigger an evaluation using PowerShell at any time by running.
Start-AzPolicyComplianceScan -ResourceGroupName SoftwareInstallation
It is called out in the documentation that state change events are only fired after the evaluation is complete. From my testing this took around 10 or so minutes so you have to patient.
While you wait, I’ll explain the runbook that is going to be run. The steps involved in this one are…
- Strip down the subject from the Event Grid event – the schema can be found here.
- Create a script object using a here-string and write that out to a script file in the runbook worker.
- Call the Invoke-AzVMRunCommand cmdlet on the virtual machine and run the script that is now in the runbook worker.
When it is eventually called – the extension runs the script which downloads and installs PowerShell from the storage account.
Back to the process and my software installation policy has returned a non-compliant result for my virtual machine. As I said before you need to wait until the evaluation cycle is complete before an event will be fired.

I’ve captured the policy event that was generated by the Azure platform and it is below – note how the fields correspond to our filters and the subject contains the affected resource id.

Now when I check the automation account I can see the job has been run and there are no errors in the runbook output which is a good sign…

Finally, when I log on to the server, I can see the application has installed…

The Guest Configuration service runs on its own timer, in turn it sends reports back to a guest assignment object. Azure Policy then performs its evaluation based on these objects so there is an inherent delay in a resource becoming compliant. However now that the extensions and software is installed eventually this resource will report back as compliant to the guest configuration object and finally the policy.

Well, there it is, a way to use Azure Policy and state change events to trigger automation and remediate guest configuration policies. You could use this to install multiple agents on your virtual machines without affecting existing DSC configurations or custom script extensions. As always some caveats with the testing: –
- My testing cases are small and in no way should reflect your own testing.
- This is hosted on GitHub – if there are issues or you make changes, please submit a PR for review.
by Contributed | Jun 17, 2021 | Technology
This article is contributed. See the original author and article here.
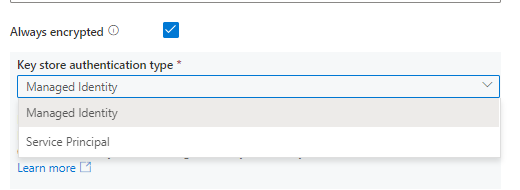
Always Encrypted is now supported in below connectors to protect sensitive data stored in databases for both source and sink in copy.
- Azure SQL Database connector
- Azure SQL Managed Instance connector
- SQL Server connector
by Contributed | Jun 17, 2021 | Technology
This article is contributed. See the original author and article here.
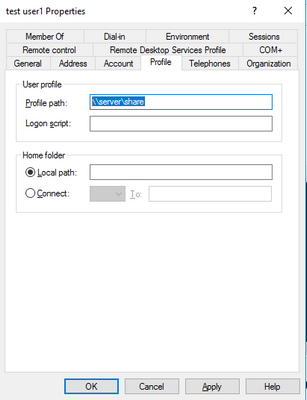
If you have many users using FSLogix profiles without issues and one or a few users who are consistently getting Temp profiles, check for the following:
Do they have either a Roaming profile path set or a Remote desktop services profile path set? If they have either clear them and then test. If they had them, then FSLogix should work properly. If it still doesn’t work properly, then you would need to leave those paths cleared and look for another issue causing problems as well.
If you have the AD powershell module loaded and ADSI you can run the following script (putting in the user name) and the script will check for that user. Or below the script are shown the locations to check in a User profile window in AD Users and Computers.
Script==================================(copy below this)
$Username = “user name”
$ADuser = Get-ADUser -identity $Username –properties *
$user = [ADSI]”LDAP://$ADuser”
Try #try is here because if there is no TS profile path it errors out.
{
if( $user.psbase.invokeget(“TerminalServicesProfilePath”))
{
Write-Host “You have a Terminal Services Profile path set as ” $user.psbase.invokeget(“TerminalServicesProfilePath”) “. Please clear this value for this user and any other FSLogix Profile Container user.”
}
else
{
write-host “No Terminal Services Profile path set.”
}
}
Catch
{
write-host “No Terminal Services Profile path set.”
}
$objTest1 = Get-ADUser -Identity $Username -properties *
if(!$objTest1.ProfilePath -eq “”)
{
Write-Host “You have a Roaming Profile path set as ” $objTest1.ProfilePath “. Please clear this value for this user and any other FSLogix Profile Container user.”
}
else
{
write-host “No Roaming Profile path set.”
}
End script ========================(end copy above this)
If you have values in either of the highlighted locations shown below, they need to be removed if you want FSLogix to operate properly. You can’t have two profile solutions trying to manage one profile. It doesn’t work.

by Contributed | Jun 17, 2021 | Technology
This article is contributed. See the original author and article here.
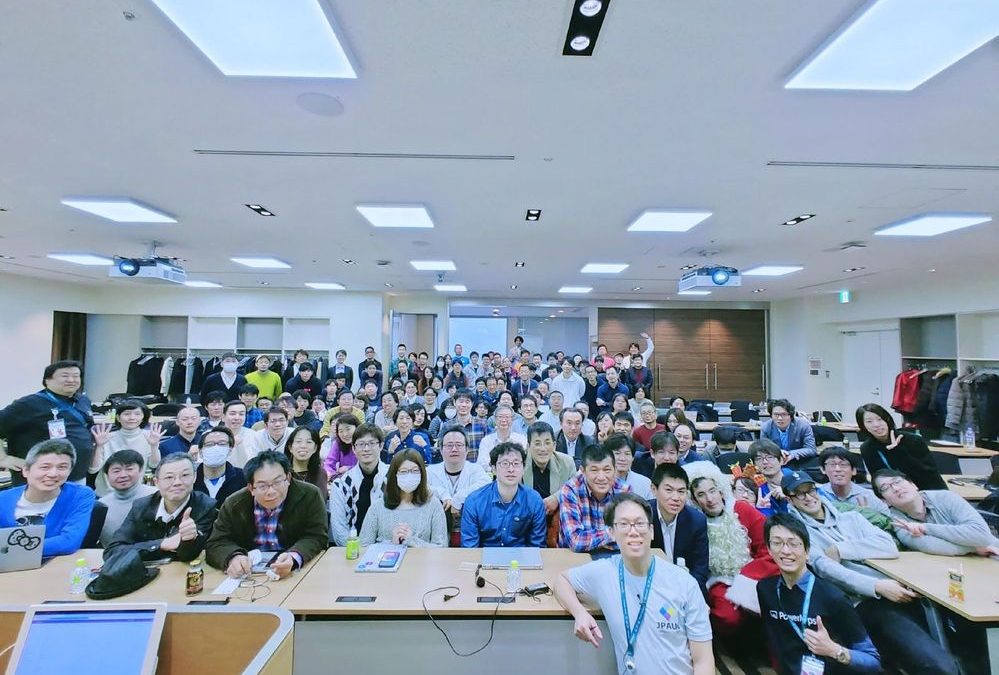
Japan is home to one of the most active Power Platform communities in the world.
For instance, the Japan Power Apps User Group has hosted more than 50 community events since 2018 — covering everything from tips to use cases and demonstrations. Not only that, the community leaders of Power Automate and Power BI communities are also very passionate about empowering the community members to learn together.
With the number of Power Platform users and citizen developers growing in Japan, let’s meet the brains behind the group, five Business Applications MVPs, and find out what makes their community so unique.
Business Applications MVP Makoto Maeda says that IT literacy is relatively low in young people and that the group offers a fun, interactive way to improve education.
“I’m sure that more people are getting to know how attractive Power Platform is, and I like to promote it by helping users make the best use of the services,” Makoto says.
“We learn together, share worries and talk about everything. The members give me joy, and so I’m always looking forward to seeing them virtually every week.”
In terms of the industry, MVP Hiroaki Nagao notes that more and more jobs are including Power Platform as a preferred skill, which is encouraging more and more people to learn the suite of software applications.
“In the future, I believe we will see more opportunities for people who have gained experience in the business sector to work as consultants who can improve and build their own business processes and environments. I think the role of citizen developer, including the Power Platform, has had a huge impact on the industry in terms of creating this new career path.”
MVP Ryota Nakamura says that the group actively supports the momentum toward citizen developers with instructive sessions, a fun atmosphere and social media interactions. Going forward, Ryota would like to “deliver technical sessions that align with the business story and share the collaboration story of various technologies beyond the communities.”
Another MVP who works closely with the group is Junichi Kodama. Junichi presents and blogs about his original apps created with Power Platform because he wants “everybody to know that anyone can build whatever applications they like.”
Likewise, MVP Teruchika Yamada simply wants more people to know the power of the platform.
“Community leaders have helped me a lot — so, I like to pay it forward to other members,” Teruchika says. “Whenever I receive kind words at a community event and on social media — ‘your information helped me’ — it makes me extremely happy.”
For more on the user group, see the community pages and Facebook, Japan Power Apps User Group.

![[Guest Blog] My Path from Computer Vision to Mixed Reality](https://www.drware.com/wp-content/uploads/2021/06/fb_image.bmp)
by Contributed | Jun 17, 2021 | Technology
This article is contributed. See the original author and article here.
This article is written by Harpreet S Sawhney, a Principal Computer Vision Architect at Microsoft Mixed Reality + HoloLens at Microsoft, who shares his journey from computer vision to mixed reality as a part of our Humans of Mixed Reality series.
How I discovered Hololens and am Loving It!
At the start of my graduate student stint, I took my first course in Computer Vision at UMass, Amherst. Computer vision is a field that uses computing, algorithms and software to understand the physical world of entities and humans via cameras, imaging and related sensors. Computer vision has transitioned from a boutique and esoteric research field worked on by a few university and industry labs in the 90s to a mainstream field that has transformed the world via deployed products and emerging technologies.
After working on almost all aspects of computer vision including Structure from Motion (SfM), object detection and tracking, 3D object recognition and video understanding at industry labs, I had the opportunity to experience a HoloLens demo at the Computer Vision and Pattern Recognition (CVPR) Conference in 2016. It’s safe to say that I have been hooked ever since.
It hit me that the next revolution in computing and peoples’ lives would be working with the physical world through a digital medium. The promise of Mixed Reality and HoloLens is tremendous. One of the biggest challenges in real-time, real world computer vision is building integrated multi-camera and multi-sensor systems on mobile platforms with synchronized data streams and on-board processing that will stand the test of dynamics of the platform, changing environments and environmental conditions.
When I first wore the HoloLens, I truly realized how beautiful the device worn on my head was. Capabilities such as integrated cameras, time-of-flight, inertial sensors, displays and processing created an integrated sensor-processor in a head-mounted compact format. If we ever get to a world in which the physical world is seamlessly augmented by an extension of our own visual and cognitive intelligence, then HoloLens is a significant first step in making that a reality.
When I joined the Analog Science team in HoloLens at Microsoft in 2017, I began to explore gaps and challenges needed to make HoloLens in enterprise applications a reality. I quickly found that one of the most sought after capabilities in enterprises was locking holograms to objects for collaborative design and marketing as this video demonstrates:
Microsoft HoloLens: Partner Spotlight with Ford ( https://www.youtube.com/watch?v=3QyA7HhIYkg )
This problem is technically challenging, but, if solved, would open up object-locked holograms to the world of mixed reality. Imagine this: a time in the future when all user manuals, maintenance manuals, and training manuals are in mixed reality. For example, I can simply walk up to my car and ask my HoloLens to show me how to check the oil in my car and it takes me through the steps in 3D, directly aligned to the relevant parts of my car right there in my garage! Even better, every car owner, technician and user has the same experience. Another exciting component: the manual only has to be created just once in the factory, and then used millions of times wherever that car or the object is in the world, independent of its surroundings and environmental conditions. This is called object-locking as contrasted with world-locking in which holograms attach to locations in the world that HoloLens provided out-of-the-box via head-tracking. Thus Object Understanding (OU) in the the Analog Science HoloLens team was born!
Believe it or not, I did the first data capture for algorithm development and experimentation with HoloLens in my own garage with my own car! The well-integrated and synchronized sensor suite not only enables real-time applications on the device, but also affords synchronized data captures for important offline development and performance evaluation. The key technology we developed for OU is automated detection and alignment of a Digital Twin (3D Model) of an object to its physical counterpart as shown for a car here.

|
Automatically detecting and aligning a Digital Twin (3D model) to its physical counterpart.
|
We also “discovered” a first-party product team, Dynamics 365 Guides, that makes on-the-job learning a magical experience for users, with automated and unobtrusive object detection using Azure Object Anchors and QR markers. Guides is a “killer app” for Mixed Reality and HoloLens, enabling 3D, in-situ workflows for training, task guidance and operations. A great example is demonstrated here.
Dynamics 365 Guides with HoloLens 2
We honed the HoloLens “Object Understanding” features by working closely with the Guides team as well as external partners such as Toyota. Object Understanding on HoloLens 2 was released as Public Preview in March 2021 under the banner of Azure Object Anchors (AOA) to achieve marker-less anchoring and the new experience will be available as Public Preview on August 1, 2021. A video of the integrated Guides + Object Anchors demo is here.
Object Anchors: Object Detection within Guides.
Examples of usage of Object Anchors by Toyota and others are here.

Azure Object Anchors – Object understanding with HoloLens
Object Anchors and its companion technology Azure Spatial Anchors are just the beginning in persistent location-locked and object-locked holographic content authoring and interaction. Imagine a world in the near future when people connect and collaborate with others as if they are together even when not physically present through Microsoft Mesh with spatial, object, and human augmentation that blurs the distinction between the digital and the physical!
That is the promise that drives me every day and helped blaze the path for my Computer Vision journey to HoloLens, Mixed Reality and Microsoft. I am thrilled to be creating the future of how humans work, play and live within the physical and human World in Mixed Reality!
#MixedReality #CareerJourneys
by Contributed | Jun 17, 2021 | Technology
This article is contributed. See the original author and article here.
Talking about your insecurities is an important way to stay mentally healthy, especially during a pandemic.
Making sure people have such an emotional outlet is the ethos behind Aus Ouvidos — a PowerApp that connects people to mental health experts during difficult times in Brazil.
Hosted on Azure and created with the Power Platform, Aus Ouvidos counts a multidisciplinary team that supplies qualified listening to better establish bonds, strengthen ties and generally help people through this delicate moment.
The platform was launched by MTAC Association Brazil, a not-for-profit organization led by MVP Heber Lopes. Heber says it is humbling to create a fully operational tool that provides psychological consultations free to the community.
“For us as technology professionals, it’s very gratifying to see our work helping people. To know that the dedicated effort is making a difference in the lives of those who need it most is incredible,” he says.
“The team’s motivation is to work with newly launched technologies, together with renowned professionals, and with the main objective of helping others.”
Heber says the team was inspired to create Aus Ouvidos to assist health professionals on the virus front line in the Latin American nation. This inspiration was then helped by Microsoft donations of Power Platform and Azure credits.
The consultations take place on Microsoft Teams, with psychologists also leveraging Microsoft Power Automate and Microsoft Graph to organize their schedules. Meanwhile, Power BI is used to analyze aggregated session volume data and manage demand.
Going forward, Heber hopes the team can create a chatbot to help answer patient questions and expand the service to other countries around the world.
“If you are interested in deploying Aus Ouvidos Services in your region, we are ready to scale to other support groups around the world,” Heber says.
For technology professionals who want to support the project, contact Heber via email.

by Contributed | Jun 17, 2021 | Technology
This article is contributed. See the original author and article here.
Investments in Azure and Microsoft 365 can streamline your transition to the cloud and make it easier to manage endpoints across your organization. Now let’s explore ways to develop and implement effective strategy to make that transition and help you create the “how” and “why” to leverage these solutions in your own environment.
Update
Updating means staying ahead of adversaries and competition with technology innovations to drive security and business results through:
- Better managing the risk of change in a fast-moving technology world with deployment rings keeping Windows up to date with the latest quality updates, feature updates, and security features managed by solutions like expedited updates and Windows Update for Business.
- Optimizing and de-duplicating bandwidth without sacrificing control to quickly deploy critical changes to improve security and productivity using Delivery Optimization.
- Reshaping processes to avoid determinism, embrace statistics, and becoming quality driven via Update Compliance or Desktop Analytics.
- Redefining how your organization manages technology to invest in on-going servicing capabilities not products, and driving the use of processes and not projects.
Extend
Extending means driving real cloud value while still benefiting from your existing investments using Microsoft 365 to:
- Stop migrating user data and state, or losing user data trapped on an endpoint, and instead use the endpoints as a local cache for OneDrive, Known Folder Redirection with OneDrive, and State Roaming technologies. Even when using your personal managed devices to access data, OneDrive allows for changes to follow you to your primary Windows device.
- Increase management reach while reducing infrastructure architecture, deployment, and operations cost in with cloud-based and cloud-attached management tools such Microsoft Endpoint Manager, or Microsoft Endpoint Configuration Manager with Tenant Attach and the Cloud Management Gateway.
- Deploy trusted, signed apps and minimize complex infrastructure using Modern Software Distribution & Package Manager technologies such as MSIX and the Windows Package Manager (Winget.)
- Manage and monitor your application portfolio, software, and endpoint health in a perimeter-free world using modern insights such as Endpoint Analytics.
Standardize
Standardization involves increasing security and manageability while reducing operational costs by sticking with well-known and proven solutions:
Revitalize
To revitalize means building long-term user satisfaction by standardizing on reliable applications and a dependable, more focused operating system. This involves:
- Deploying a cloud config to users that only need one or two apps in addition to their productivity apps.
- Eliminating constant repackaging with vendor-provided packages and durable customization packages for a better application lifecycle management strategy.
- Separating applications from the operating system and from each other as a security or reliability boundary using App and Guard Containers such as Windows Defender Application Control (WDAC) and MSIX.
- Managing application catalogs like a portal, with tools such as Endpoint Manager’s Software Center & Company Portal to manage security and user experience while directly integrating with distribution platforms with application portfolio management.
- Quickly recovering from reliability or security issues by building capability to rapidly reset and recover with technologies such as device reset.
Secure
Securing endpoints from the cloud involves providing the right balance of security and convenience, reducing attack surfaces, and increasing monitorability by:
Simplify
Ironically, implementing a zero-trust approach simplifies user interactions in a world where identity is the new perimeter by using a single powerful Windows identity across apps and endpoints. We recommend:
Wrapping up
As you can see, the “north star” for endpoint management transformation involves a holistic end-to-end solution set that simplifies operations, optimizes user experiences, and increases security using the best of suite culminating in a modern, cloud-managed Windows endpoint. Microsoft 365 provides this holistic solution across the entire framework. We hope these principles help you develop the proper framework for your organization.
Have feedback or a best practice to share? Drop a comment below!
by Contributed | Jun 17, 2021 | Technology
This article is contributed. See the original author and article here.
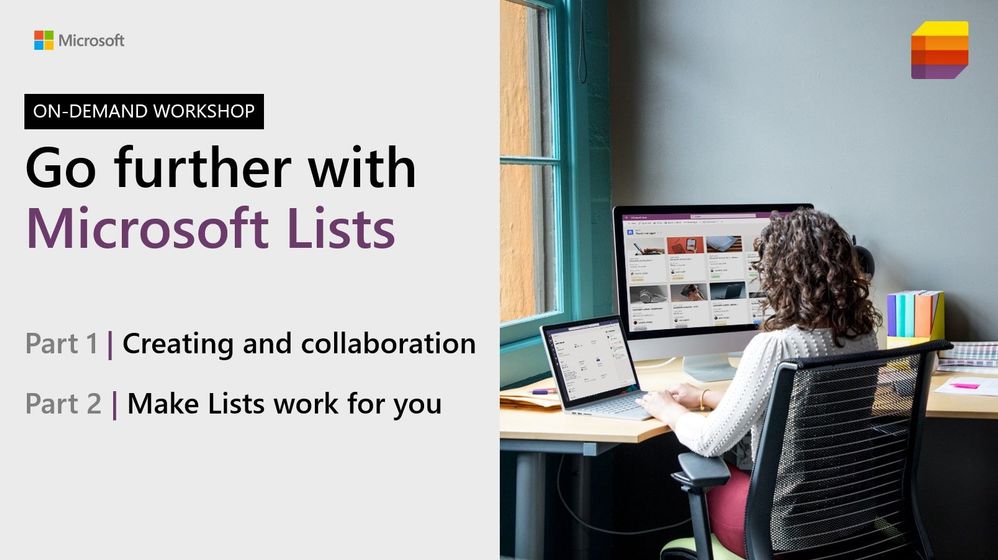
Go further with Microsoft Lists. You know you want to. And now you can – on-demand.
We recently delivered five live workshops across multiple time zones – and we learned a lot. We’ve refined the content based on feedback and tightened up a few additional things – mindful of your time and ease of consumption.
The result: We’ve got a great two-part, on-demand workshop – two videos wrapped in a single page with additional resources. Dig in and learn how you and your team can best utilize Microsoft Lists. We teach you how to use and create views, configure conditional formatting, adjust forms, use rules, and more. Plus, we highlight no-code and low-code solutions leveraging integrated tools from the Power Platform. You’ll also find materials to deliver the Lists workshop to your organization (PowerPoint, speaker notes, demo materials).
Jump into the Microsoft Lists on-demand workshop now! [for ease of copy/pasting and sharing with others: https://aka.ms/MSLists/workshop]
What you’ll find on the Lists workshop page…
Watch the two-part Microsoft Lists workshop on-demand (https://aka.ms/MSLists/workshop).
Microsoft Lists workshop, part 1: “Creating and collaborating”
We’ll start with the basics – clarity on what Lists is and what it isn’t – including addressing numerous frequently asked questions (FAQs). We’ll then focus on a variety of ways to create lists from the new Lists home page and from within Microsoft Teams – inclusive of using new ready-made templates. Lots of demos – lots of insight.
Microsoft Lists workshop, part 2: “Make Lists work for you”
Continuing from part 1, we turn to making lists work for you using filters, views, rules, and formatting. We end with a look at how Lists integrates with the Power Platform to take lists even further with custom forms, flows and reporting. We wrap up with the roadmap to share what’s coming next for Microsoft Lists.
BONUS | Host a Microsoft Lists workshop within your organization
Interested in conducting a Microsoft Lists training within your organization – to kick off a pilot or help ramp up your future list pros? We’ve provided a few helpful, downloadable resources to assist your internal Lists evangelism (commonly delivered in 3-4 hours) – PowerPoint with speaker notes and demo suggestions + content for demo’ing creating a list from Excel.
Jump into the Microsoft Lists on-demand workshop now! (if you haven’t yet already)
We, too, have updated our Lists resource and adoption centers – our core public destinations to learn and consume all things Microsfot Lists (blogs, videos, demos, podcasts, deployment resources, and more). Let us know what you think.
Happy workshopping!
Thank you, Mark Kashman – senior product manager (Microsoft Lists)
P.S. did you jump into the Microsoft Lists on-demand workshop yet? Just checking ;)
by Contributed | Jun 17, 2021 | Technology
This article is contributed. See the original author and article here.
Today, we are announcing the public preview of the ability to use custom Docker containers in Azure Machine Learning online endpoints. In combination with our new 2.0 CLI, this feature enables you to deploy a custom Docker container while getting Azure Machine Learning online endpoints’ built-in monitoring, scaling, and alerting capabilities.
Below, we walk you through how to use this feature to deploy TensorFlow Serving with Azure Machine Learning. The full code is available in our samples repository.
Sample deployment with TensorFlow Serving
To deploy a TensorFlow model with TensorFlow Serving, first create a YAML file:
name: tfserving-endpoint
type: online
auth_mode: aml_token
traffic:
  tfserving: 100

deployments:
  - name: tfserving
    model:
      name: tfserving-mounted
      version: 1
      local_path: ./half_plus_two
    environment_variables:
      MODEL_BASE_PATH: /var/azureml-app/azureml-models/tfserving-mounted/1
      MODEL_NAME: half_plus_two
    environment:
      name: tfserving
      version: 1
      docker:
        image: docker.io/tensorflow/serving:latest
      inference_config:
        liveness_route:
          port: 8501
          path: /v1/models/half_plus_two
        readiness_route:
          port: 8501
          path: /v1/models/half_plus_two
        scoring_route:
          port: 8501
          path: /v1/models/half_plus_two:predict
    instance_type: Standard_F2s_v2
    scale_settings:
      scale_type: manual
      instance_count: 1
      min_instances: 1
      max_instances: 2
Then create your endpoint:
az ml endpoint create -f endpoint.yml
And that’s it! You now have a scalable TensorFlow Serving endpoint running on Azure ML-managed compute.
Next steps
by Contributed | Jun 17, 2021 | Technology
This article is contributed. See the original author and article here.
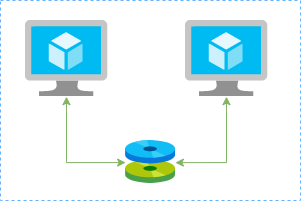
In this article I’ll show you how to create a redundtant storage pool using GlusterFS and Azure Shared Disks. GlusterFS is a network-attached storage filesystem that allows you to pool storage resources of multiple machines. Azure shared disks is a new feature for Azure managed disks that allows you to attach a managed disk to multiple virtual machines (VMs) simultaneously. Please note that enabling shared disks is only available to a subset of disk types. Currently only ultra disks and premium SSDs can enable shared disks. Check if the VM type you are planning to use support ultra or premium disks.
Our setup will consist in:
- An Azure Resource Group containing the resources
- An Azure VNET and a Subnet
- An Availability Set into a Proximity Placement Group
- 2 Linux VMs (Ubuntu 18.04)
- 2 Public IPs (one for each VM)
- 2 Network Security Groups (1 per VM Network Interface Card)
- A Shared Data Disk attached to the both VMs
I’ll be using the Azure Cloud Shell once is fully integrated to Azure and with all modules I need already installed.
Create SSH key pair
ssh-keygen -t rsa -b 4096
Create a resource group
New-AzResourceGroup -Name “myResourceGroup” -Location “EastUS”
Create virtual network resources
Create a subnet configuration
$subnetConfig = New-AzVirtualNetworkSubnetConfig `

  -Name “mySubnet” `

  -AddressPrefix 192.168.1.0/24
Create a virtual network
$vnet = New-AzVirtualNetwork `

  -ResourceGroupName “myResourceGroup” `

  -Location “EastUS” `

  -Name “myVNET” `

  -AddressPrefix 192.168.0.0/16 `

  -Subnet $subnetConfig
Create a public IP address for the VM01
$pip01 = New-AzPublicIpAddress `

  -ResourceGroupName “myResourceGroup” `

  -Location “EastUS” `

  -AllocationMethod Static `

  -IdleTimeoutInMinutes 4 `

  -Name “mypublicip01”
Create a public IP address for the VM02
$pip02 = New-AzPublicIpAddress `

  -ResourceGroupName “myResourceGroup” `

  -Location “EastUS” `

  -AllocationMethod Static `

  -IdleTimeoutInMinutes 4 `

  -Name “mypublicip02”
Create an inbound network security group rule for port 22
$nsgRuleSSH = New-AzNetworkSecurityRuleConfig `

  -Name “myNetworkSecurityGroupRuleSSH”  `

  -Protocol “Tcp” `

  -Direction “Inbound” `

  -Priority 1000 `

  -SourceAddressPrefix * `

  -SourcePortRange * `

  -DestinationAddressPrefix * `

  -DestinationPortRange 22 `

  -Access “Allow”
Create a network security group for the VM01
$nsg = New-AzNetworkSecurityGroup `

  -ResourceGroupName “myResourceGroup” `

  -Location “EastUS” `

  -Name “myNetworkSecurityGroup01” `

  -SecurityRules $nsgRuleSSH
Create a network security group for the VM02
$nsg = New-AzNetworkSecurityGroup `

  -ResourceGroupName “myResourceGroup” `

  -Location “EastUS” `

  -Name “myNetworkSecurityGroup02” `

  -SecurityRules $nsgRuleSSH
Create a virtual network card for VM01 and associate with public IP address and NSG
$nic01 = New-AzNetworkInterface `

  -Name “myNic01” `

  -ResourceGroupName “myResourceGroup” `

  -Location “EastUS” `

  -SubnetId $vnet.Subnets[0].Id `

  -PublicIpAddressId $pip01.Id `

  -NetworkSecurityGroupId $nsg.Id
Create a virtual network card for VM02 and associate with public IP address and NSG
$nic02 = New-AzNetworkInterface `

  -Name “myNic02” `

  -ResourceGroupName “myResourceGroup” `

  -Location “EastUS” `

  -SubnetId $vnet.Subnets[0].Id `

  -PublicIpAddressId $pip02.Id `

  -NetworkSecurityGroupId $nsg.Id
Create availability set for the virtual machines.
$set = @{

    Name = ‘myAvSet’

    ResourceGroupName = ‘myResourceGroup’

    Location = ‘eastus’

    Sku = ‘Aligned’

    PlatformFaultDomainCount = ‘2’

    PlatformUpdateDomainCount =  ‘2’

}

$avs = New-AzAvailabilitySet @set
Create the first virtual machine (myVM01)
Define a credential object
$securePassword = ConvertTo-SecureString ‘ ‘ -AsPlainText -Force

$cred = New-Object System.Management.Automation.PSCredential (“azureuser”, $securePassword)
Create a virtual machine configuration
$vmConfig = New-AzVMConfig `

  -AvailabilitySetId $avs.Id `

  -VMName “myVM01” `

  -VMSize “Standard_D4s_v3” | `

Set-AzVMOperatingSystem `

  -Linux `

  -ComputerName “myVM01” `

  -Credential $cred `

  -DisablePasswordAuthentication | `

Set-AzVMSourceImage `

  -PublisherName “Canonical” `

  -Offer “UbuntuServer” `

  -Skus “18.04-LTS” `

  -Version “latest” | `

Add-AzVMNetworkInterface `

  -Id $nic01.Id
Configure the SSH key
$sshPublicKey = cat ~/.ssh/id_rsa.pub

Add-AzVMSshPublicKey `

  -VM $vmconfig `

  -KeyData $sshPublicKey `

  -Path “/home/azureuser/.ssh/authorized_keys”
Create the VM
New-AzVM `

  -ResourceGroupName “myResourceGroup” `

  -Location eastus -VM $vmConfig
Create the second virtual machine (myVM02)
Define a credential object
$securePassword = ConvertTo-SecureString ‘ ‘ -AsPlainText -Force

$cred = New-Object System.Management.Automation.PSCredential (“azureuser”, $securePassword)
Create a virtual machine configuration
$vmConfig = New-AzVMConfig `

  -AvailabilitySetId $avs.Id `

  -VMName “myVM02” `

  -VMSize “Standard_D4s_v3” | `

Set-AzVMOperatingSystem `

  -Linux `

  -ComputerName “myVM02” `

  -Credential $cred `

  -DisablePasswordAuthentication | `

Set-AzVMSourceImage `

  -PublisherName “Canonical” `

  -Offer “UbuntuServer” `

  -Skus “18.04-LTS” `

  -Version “latest” | `

Add-AzVMNetworkInterface `

  -Id $nic02.Id
Configure the SSH key
$sshPublicKey = cat ~/.ssh/id_rsa.pub

Add-AzVMSshPublicKey `

  -VM $vmconfig `

  -KeyData $sshPublicKey `

  -Path “/home/azureuser/.ssh/authorized_keys”
Create the VM
New-AzVM `

  -ResourceGroupName “myResourceGroup” `

  -Location eastus -VM $vmConfig
Create a Shared Data Disk
$dataDiskConfig = New-AzDiskConfig -Location ‘EastUS’ -DiskSizeGB 1024 -AccountType Premium_LRS -CreateOption Empty -MaxSharesCount 2

New-AzDisk -ResourceGroupName ‘myResourceGroup’ -DiskName ‘mySharedDisk’ -Disk $dataDiskConfig
Attach the Data Disk to VM01
$dataDisk = Get-AzDisk -ResourceGroupName “myResourceGroup” -DiskName “mySharedDisk”

$VirtualMachine = Get-AzVM -ResourceGroupName “myResourceGroup” -Name “myVM01”

Add-AzVMDataDisk -VM $VirtualMachine -Name “mySharedDisk” -CreateOption Attach -ManagedDiskId $dataDisk.Id -Lun 0

update-AzVm -VM $VirtualMachine -ResourceGroupName “myResourceGroup”
Attach the Data Disk to VM02
$dataDisk = Get-AzDisk -ResourceGroupName “myResourceGroup” -DiskName “mySharedDisk”

$VirtualMachine = Get-AzVM -ResourceGroupName “myResourceGroup” -Name “myVM02”

Add-AzVMDataDisk -VM $VirtualMachine -Name “mySharedDisk” -CreateOption Attach -ManagedDiskId $dataDisk.Id -Lun 0

update-AzVm -VM $VirtualMachine -ResourceGroupName “myResourceGroup”
Create a proximity placement group
$ppg = New-AzProximityPlacementGroup -Location “EastUS” -Name “myPPG” -ResourceGroupName “myResourceGroup” -ProximityPlacementGroupType Standard
Move the existing availability set into a proximity placement group
$resourceGroup = “myResourceGroup”

$avSetName = “myAvSet”

$avSet = Get-AzAvailabilitySet -ResourceGroupName $resourceGroup -Name $avSetName

$vmIds = $avSet.VirtualMachinesReferences

foreach ($vmId in $vmIDs){

    $string = $vmID.Id.Split(“/”)

    $vmName = $string[8]

    Stop-AzVM -ResourceGroupName $resourceGroup -Name $vmName -Force

    }
$ppg = Get-AzProximityPlacementGroup -ResourceGroupName myResourceGroup -Name myPPG

Update-AzAvailabilitySet -AvailabilitySet $avSet -ProximityPlacementGroupId $ppg.Id

foreach ($vmId in $vmIDs){

    $string = $vmID.Id.Split(“/”)

    $vmName = $string[8]

    Start-AzVM -ResourceGroupName $resourceGroup -Name $vmName

    }
Configure the Disk on Linux VM01
ssh azureuser@13.82.29.9
Find the disk
lsblk -o NAME,HCTL,SIZE,MOUNTPOINT | grep -i “sd”
Partition a new disk
sudo parted /dev/sdb –script mklabel gpt mkpart xfspart xfs 0% 100%

sudo mkfs.xfs /dev/sdb1

sudo partprobe /dev/sdb1
Mount the disk
sudo mkdir /datadrive

sudo mount /dev/sdb1 /datadrive
Ensure mounting during the boot
sudo blkid
The ouput should be something similar to:
/dev/sdc1: LABEL=”cloudimg-rootfs” UUID=”5a9997c3-aafd-46e9-954c-781f2b11fb68″ TYPE=”ext4″ PARTUUID=”cbc2fcb7-e40a-4fec-a370-51888c246f12″

/dev/sdc15: LABEL=”UEFI” UUID=”2FBA-C33A” TYPE=”vfat” PARTUUID=”53fbf8ed-db79-4c52-8e42-78dbf30ff35c”

/dev/sda1: UUID=”c62479eb-7c96-49a1-adef-4371d27509e6″ TYPE=”ext4″ PARTUUID=”a5bb6861-01″

/dev/sdb1: UUID=”f0b4e401-e9dc-472e-b9ca-3fa06a5b2e22″ TYPE=”xfs” PARTLABEL=”xfspart” PARTUUID=”af3ca4e5-cb38-4856-8791-bd6b650ba1b3″

/dev/sdc14: PARTUUID=”de01bd39-4bfe-4bc8-aff7-986e694f7972″
sudo nano /etc/fstab
use the UUID value for the /dev/sdb1 device. Change by the UUID from your case and add the following at the end of the file:
UUID=f0b4e401-e9dc-472e-b9ca-3fa06a5b2e22 /datadrive xfs defaults,nofail 1 2
Configure the Disk on Linux VM02
ssh azureuser@40.114.24.217
Find the disk
lsblk -o NAME,HCTL,SIZE,MOUNTPOINT | grep -i “sd”
Partition a new disk
As the disk already was partitioned on the VM01, we can skip this step now.
Mount the disk
sudo mkdir /datadrive

sudo mount /dev/sda1 /datadrive
Ensure mounting during the boot
sudo blkid
The ouput should be something similar to:
/dev/sdb1: LABEL=”cloudimg-rootfs” UUID=”5a9997c3-aafd-46e9-954c-781f2b11fb68″ TYPE=”ext4″ PARTUUID=”cbc2fcb7-e40a-4fec-a370-51888c246f12″

/dev/sdb15: LABEL=”UEFI” UUID=”2FBA-C33A” TYPE=”vfat” PARTUUID=”53fbf8ed-db79-4c52-8e42-78dbf30ff35c”

/dev/sdc1: UUID=”d1b59101-225e-48f4-8373-4f1a92a81607″ TYPE=”ext4″ PARTUUID=”b0218b4e-01″

/dev/sda1: UUID=”f0b4e401-e9dc-472e-b9ca-3fa06a5b2e22″ TYPE=”xfs” PARTLABEL=”xfspart” PARTUUID=”dda03810-f1f9-45a5-9613-08e9b5e89a32″

/dev/sdb14: PARTUUID=”de01bd39-4bfe-4bc8-aff7-986e694f7972″
sudo nano /etc/fstab
use the UUID value for the /dev/sda1 device. Change by the UUID from your case and add the following at the end of the file:
UUID=f0b4e401-e9dc-472e-b9ca-3fa06a5b2e22 /datadrive xfs defaults,nofail 1 2
Install GlusterFS on Linux VM01
Please note that in my case the IPs 192.168.1.4 and 192.168.1.5 are the private ip’s from VM01 and VM02. Add those configuration on the /etc/hosts.
sudo nano /etc/hosts
192.168.1.4 gluster1.local gluster1

192.168.1.5 gluster2.local gluster2
sudo apt update

sudo apt install software-properties-common

sudo add-apt-repository ppa:gluster/glusterfs-7

sudo apt update

sudo apt install glusterfs-server

sudo systemctl status glusterd.service
Install GlusterFS on Linux VM02
Please note that the IPs 192.168.1.4 and 192.168.1.5 are the private ip’s from VM01 and VM02. Add those configuration on the /etc/hosts.
sudo nano /etc/hosts
192.168.1.4 gluster1.local gluster1

192.168.1.5 gluster2.local gluster2
sudo apt update

sudo apt install software-properties-common

sudo add-apt-repository ppa:gluster/glusterfs-7

sudo apt update

sudo apt install glusterfs-server

sudo systemctl status glusterd.service
Configure GlusterFS on Linx VM01
sudo gluster peer probe gluster2

sudo gluster peer status

sudo gluster volume create sharedvolume replica 2 gluster1.local:/datadrive gluster2.local:/datadrive force

sudo gluster volume start sharedvolume

sudo gluster volume status

sudo apt install glusterfs-client

sudo mkdir /gluster-storage
sudo nano /etc/fstab
Add the following at the end of the file:
gluster1.local:sharedvolume /gluster-storage glusterfs defaults,_netdev 0 0
sudo mount -a
Configure GlusterFS on Linx VM02
sudo gluster peer probe gluster1

sudo gluster peer status

sudo gluster volume status

sudo apt install glusterfs-client

sudo mkdir /gluster-storage
sudo nano /etc/fstab
Add the following at the end of the file:
gluster2.local:sharedvolume /gluster-storage glusterfs defaults,_netdev 0 0
sudo mount -a
Test
In one of the nodes, go to /gluster-storage and create some files:
ssh azureuser@myVM01

azureuser@myVM01:~# sudo touch /gluster-storage/file{1..10}
Then go to the another node and check those files:
ssh azureuser@myVM02

azureuser@myVM02:~# ls -l /gluster-storage

total 0

-rw-r–r– 1 root root 0 Apr  1 19:48 file1

-rw-r–r– 1 root root 0 Apr  1 19:48 file10

-rw-r–r– 1 root root 0 Apr  1 19:48 file2

-rw-r–r– 1 root root 0 Apr  1 19:48 file3

-rw-r–r– 1 root root 0 Apr  1 19:48 file4

-rw-r–r– 1 root root 0 Apr  1 19:48 file5

-rw-r–r– 1 root root 0 Apr  1 19:48 file6

-rw-r–r– 1 root root 0 Apr  1 19:48 file7

-rw-r–r– 1 root root 0 Apr  1 19:48 file8

-rw-r–r– 1 root root 0 Apr  1 19:48 file9
Now execute a shutdown on myVM02:
azureuser@myVM02:~# sudo init 0

Connection to 40.114.24.217 closed by remote host.

Connection to 40.114.24.217 closed.
Access myVM01 and you notice that you still with access to the files:
azureuser@myVM01:~$ ls -l /gluster-storage/

total 0

-rw-r–r– 1 root root 0 Apr  1 19:48 file1

-rw-r–r– 1 root root 0 Apr  1 19:48 file10

-rw-r–r– 1 root root 0 Apr  1 19:48 file2

-rw-r–r– 1 root root 0 Apr  1 19:48 file3

-rw-r–r– 1 root root 0 Apr  1 19:48 file4

-rw-r–r– 1 root root 0 Apr  1 19:48 file5

-rw-r–r– 1 root root 0 Apr  1 19:48 file6

-rw-r–r– 1 root root 0 Apr  1 19:48 file7

-rw-r–r– 1 root root 0 Apr  1 19:48 file8

-rw-r–r– 1 root root 0 Apr  1 19:48 file9
Now let’s create some new files:
azureuser@myVM01:~$ sudo touch /gluster-storage/new-file{1..10}

azureuser@myVM01:~$ sudo ls -l /gluster-storage/

total 0

-rw-r–r– 1 root root 0 Apr  1 19:48 file1

-rw-r–r– 1 root root 0 Apr  1 19:48 file10

-rw-r–r– 1 root root 0 Apr  1 19:48 file2

-rw-r–r– 1 root root 0 Apr  1 19:48 file3

-rw-r–r– 1 root root 0 Apr  1 19:48 file4

-rw-r–r– 1 root root 0 Apr  1 19:48 file5

-rw-r–r– 1 root root 0 Apr  1 19:48 file6

-rw-r–r– 1 root root 0 Apr  1 19:48 file7

-rw-r–r– 1 root root 0 Apr  1 19:48 file8

-rw-r–r– 1 root root 0 Apr  1 19:48 file9

-rw-r–r– 1 root root 0 Apr  1 20:00 new-file1

-rw-r–r– 1 root root 0 Apr  1 20:00 new-file10

-rw-r–r– 1 root root 0 Apr  1 20:00 new-file2

-rw-r–r– 1 root root 0 Apr  1 20:00 new-file3

-rw-r–r– 1 root root 0 Apr  1 20:00 new-file4

-rw-r–r– 1 root root 0 Apr  1 20:00 new-file5

-rw-r–r– 1 root root 0 Apr  1 20:00 new-file6

-rw-r–r– 1 root root 0 Apr  1 20:00 new-file7

-rw-r–r– 1 root root 0 Apr  1 20:00 new-file8

-rw-r–r– 1 root root 0 Apr  1 20:00 new-file9
Then just turn on the myVM02 and you will be able the see all files syncronized on myVM02:
azureuser@myVM02:~$ ls -l /gluster-storage/

total 0

-rw-r–r– 1 root root 0 Apr  1 19:48 file1

-rw-r–r– 1 root root 0 Apr  1 19:48 file10

-rw-r–r– 1 root root 0 Apr  1 19:48 file2

-rw-r–r– 1 root root 0 Apr  1 19:48 file3

-rw-r–r– 1 root root 0 Apr  1 19:48 file4

-rw-r–r– 1 root root 0 Apr  1 19:48 file5

-rw-r–r– 1 root root 0 Apr  1 19:48 file6

-rw-r–r– 1 root root 0 Apr  1 19:48 file7

-rw-r–r– 1 root root 0 Apr  1 19:48 file8

-rw-r–r– 1 root root 0 Apr  1 19:48 file9

-rw-r–r– 1 root root 0 Apr  1 20:00 new-file1

-rw-r–r– 1 root root 0 Apr  1 20:00 new-file10

-rw-r–r– 1 root root 0 Apr  1 20:00 new-file2

-rw-r–r– 1 root root 0 Apr  1 20:00 new-file3

-rw-r–r– 1 root root 0 Apr  1 20:00 new-file4

-rw-r–r– 1 root root 0 Apr  1 20:00 new-file5

-rw-r–r– 1 root root 0 Apr  1 20:00 new-file6

-rw-r–r– 1 root root 0 Apr  1 20:00 new-file7

-rw-r–r– 1 root root 0 Apr  1 20:00 new-file8

-rw-r–r– 1 root root 0 Apr  1 20:00 new-file9
As you can see the files was in sync and without any kind of data loss even in the case of one of the nodes was offline.


Recent Comments