by Contributed | Jun 29, 2021 | Technology
This article is contributed. See the original author and article here.
Windows Package Manager was announced at Build 2020 and has been in preview since. At Build 2021 the team announced version 1.0, you can see the Roadmap journey the team have been on over the past year and where they are heading here.
Now if you’ve never heard of Windows Package Manager before then in simplistic form it’s a tool that will help you manage the software/package/applications on your machine. It can help you install them, update them, and uninstall them. And a whole lot more. It’s an open-source project that the Microsoft team are excited to work on with the community.
What I want to do today is talk to you about how YOU can help the project.
The Windows Package Manager can help you install over 1,400+ packages or pieces of software onto your machine. If you install the Windows Package Manager and issue the command winget search <SomePackage> you will see what packages are available to install. This is where you can help. By growing that list. And today I want to talk to you about the best practices you should follow when submitting a new package into the Windows Package Manager repository.
Windows Package Manager Manifest Creator Preview
At Build 2021 the team launched another open-source tool, the Windows Package Manager Manifest Creator. This new tool will help you build out the manifest file that is needed to be able to install package or application via Windows Package Manager.
The Windows Package Manager Manifest Creator can be installed on your machine via the Windows Package Manager using the command winget install wingetcreate
Getting Involved
If you’ve ran the winget search <somepackage> command and not found the package or piece of software that you want to install, then you can help to add it to the repository to help you and others in the future.
First, you need to check the following things:
– GitHub account
– Windows Package Manager currently supports installers in the following formats: MSIX, MSI, and EXE, if the piece of software you want to install doesn’t have one of those kinds of installers it can’t be added to the repository.
– If the software comes in MSIX, MSI or EXE format it’s worth checking to see if someone else has already submitted it for consideration, you can do that by checking the current Pull Requests being worked on within the Community Repository
– If the software comes in MSIX, MSI or EXE format and someone else hasn’t already submitted it you need to make sure you have both the Windows Package Manager and Windows Package Manager Manifest Creator installed on your machine.
Now that checklist has been completed, it’s time to start to build the manifest needed.
You can start from scratch at creating your own manifest files, however there is a tool that can help you with the process that can make the whole process a lot easier.
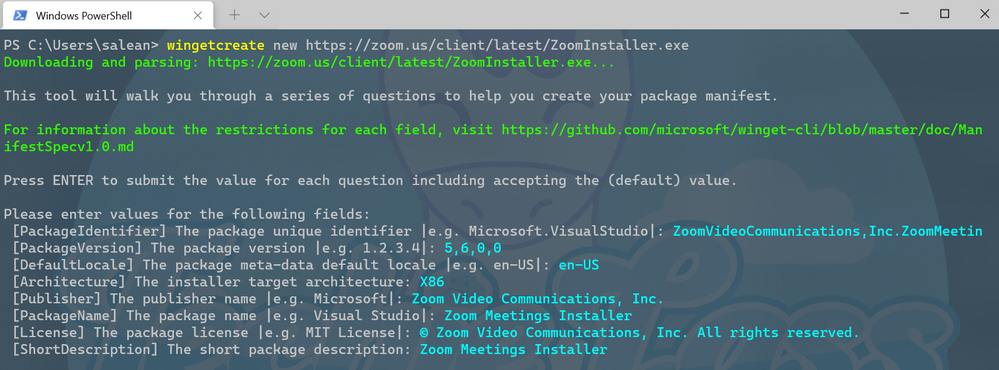
To kick start you should enter the command wingetcreate new
The tool will prompt you for the URL of the software package, this should be a publicly accessible URL and not something that is stored on your OneDrive or the like. The tool will start to query the file and pull some information out. It will start by suggesting a package identifier, package version, default language, the architecture the package will install on (think x86, x64, etc), publisher name, package name, package license and a description for the package. All this information helps people find and install the software.
WingetCreate example wizard
Custom Silent Switches
If the piece of software, you are trying to package up requires a bespoke install switch to make it install silently without any user input you can configure that within the installer.yaml file.
If we take the VMware Workstation Player as an example, we can see within its installer.yaml file it has a couple of configuration lines:
**Screenshot https://github.com/microsoft/winget-pkgs/blob/master/manifests/v/VMware/WorkstationPlayer/16.1.2/VMware.WorkstationPlayer.installer.yaml**
Tags
Another thing that can be done when submitting is adding in tags in your manifest files. Tags will help packages/software be found when folks are searching through the winget search command.
 Searching for anything that relates to audio
 Tags inside the VLC manifest file
These tags help expand the search results beyond the software maker or name of the software.
Validating and Testing
Now that you’ve setup the manifest files it’s time to validate them and test they work as they should before you are ready to submit to the repository.
The first thing to do is validate the manifest files, it will check the syntax and configures it confirms to the standards that it should. If you’ve went through the wingetcreate new process and made no manual changes to the files, then it should pass validation. However, if you have made some manual changes then there might be changes you need to make to pass the validation test.
The command to use to validate your manifest is winget validate –manifest <manifest path>
The path to your manifest file will vary depending on your setup, however it should have been displayed to you at the end of the wingetcreate process.
Once you’ve had the output from the validate command and everything is okay, you can now move on to testing the manifest installs the package/piece of software that you’ve set it up to do. You might have to test this on a separate machine or uninstall the software if you already have it installed to test this properly.
The command you need to use is winget install –manifest <manifest path>
Hopefully, this will go through without any issue and install the software as it should. If there are any issues, then you will need to look at resolving them and going through the process again until it works as expected.
Submitting the manifest
Now the manifest is validated and tested it’s time to submit your contribution to the Microsoft team to check and merge into the repository for the rest of the community to take advantage of.
The first thing to do is set up a Token, that is a GitHub personal access token that can help avoid you having to put your password into the command line for authentication to GitHub. If you haven’t set up a token before you can use this great guide from the GitHub team – Creating a personal access token.
Once you have the token you need to store it into your command line tool for winget to use, you do this by issue wingetcreate –store <token>
You are now ready to submit your creation to the Microsoft team for review. To do this you should issue the command wingetcreate submit <path to manifest>
This will create a repository store within you GitHub profile and then create a pull request on the Windows Package Manager repository.
When that command is complete, it will open a browser session to the pull request (PR). Here you will be asked to complete a checklist.

It will also start to kick off some automated tests, validating the manifest and testing it does what it should do. You can close your browser and check on this later, or you can watch it update its progress.
If any issues are detected you will have to address them, otherwise someone from the Windows Package Manager will check over the submission and either approve or give feedback on improvements.
The team do have some SLA’s that they are working on to ensure that your submissions are reviewed within a timely manner.
Call to Action
So, your call to action is look at Windows Package Manager, see if any of your favourite pieces of software aren’t there and get packaging!

by Contributed | Jun 28, 2021 | Technology
This article is contributed. See the original author and article here.
“I don’t have enough relevant data for my project”! Nearly every data scientist has uttered this sentence at least once. When developing robust machine learning models, we typically require a large amount of high-quality data. Obtaining such data and more so, labelled or annotated data can be time-consuming, tedious and expensive if we have to rely on experts. Hence, there is a compelling need to generate data for modelling using an automated or a semi-automated way. Specifically, in this work, we explore how we can utilize Open AI’s Generative Pre-trained Transformer 3 (GPT-3) for generating data to build models for identifying how credible news articles are.
GPT-3
GPT-3 is a language model that leverages deep learning to generate human-like text. GPT-3 was introduced by Open AI in May 2020 as a successor to their previous language model (LM) GPT-2. It is considered to be better than GPT-2. In fact, with around 175 billion trainable parameters, OpenAI GPT-3’s full version is one of the largest models trained so far.
Fake News Generation
In this blog post, we discuss the collaborative work between Microsoft’s ACE team and the Dataclair AI lab of O2 Czech Republic, where the goal is to identify fake news. Fake news is defined as a made-up story with an intention to deceive or to mislead. The general motive to spread such news is to mislead the readers, damage the reputation of any entity, or gain from sensationalism. The creation of a dataset for identifying credible news requires skilled annotators and moreover, the task of comparing proposed news articles with the original news articles itself is a daunting task as it’s highly subjective and opinionated. This is where the recent advances in natural language modelling and those in text generation capabilities can come to the rescue. We explore how new language models such as GPT-3 can help by generating new data.
We generate fake news data using GPT-3 by providing prompts that contain a few sample fake news articles in the Czech language. Doing something like this would have been unthinkable a few years ago, but the massive advancement of text generation through language models opened doors to such experiments. As the research paper describing GPT-3 shows, GPT-3 is very good at generating news articles of high quality that even humans are not capable of detecting as computer-generated:
The plot also shows how text generating models improved via having access to more parameters. GPT-3 is the furthest to the right and the plot conveys how accurately people were able to recognize generated articles from those written by humans.
Prompt Engineering
“Prompts” are a way to get the model to produce text by specifying an instruction in natural language and showing some demonstrations of how to follow the instructions well. GPT-3 has an incredible capacity to mimic writing styles. When the prompt is set up correctly, GPT-3 adheres to the example just enough to copy those underlying elements (for example: includes or excludes citations, etc.) and introduce a new twist to the generated text. It is even capable of creating its own complex arguments. Thus, it is not just a replication of pre-existing data, but a creation of new and original articles from which the model can learn.
An example of a prompt and parameters used to generate fake news are as follows in bold. The generated text is in italics.
Generate a news article based on the headline and with the same style of writing as given in the example.
Headline: Where do leftist extremists get the audacity to speak for the nation?
Text:
My fellow Czechs, we must shake off the shame that the USA, Brussels and other countries have been forced on us with the help of our own “experts” and “journalists”. The same people who are now digging into our nation with the help of a genuine community of the USA and Brussels – the Pekarová and other forces…
Parameters:
Temperature: 0.7, Max tokens: 1000, Top p: 1, Frequency penalty: 0, Presence penalty 0
From these parameters, the most important ones are temperature and max tokens. Temperature controls randomness in the text. Therefore, a temperature of 0.7 was chosen to produce less deterministic results that still follow the structure and writing style of the example. Max token value was set to 1000 tokens (~4000 characters) because this is the average length of a news article. It should be noted that when working with GPT-3, the process of finding the right parameters is about experimentation.
Admittedly, there are still challenges to deal with. One of them is the need to manually inspect if GPT-3 returns articles that are relevant and in the right credibility category. Due to the sensitivity of the topic of article credibility, data quality checks will need to be implemented. Another minor limitation is that while GPT-3 understands many articles that it has been trained on, it has problems when analysing newer topics. For example, it is unable to fully grasp the significance of COVID-19 and it usually avoids writing about it due to not having enough knowledge about the global pandemic. Thus, it generates less realistic articles when faced with such a topic.
Nevertheless, if those obstacles are kept in mind, GPT-3 can help make dataset creation faster and more reliable. This is something that the O2 CZ team plans to utilize for their disinformation recognition AI model. “Our model extracts different features (aggressivity, clickbait etc.) from the article via smaller extraction modules. Those features are then evaluated by the deep learning classification module and subsequently transformed into one number by the ensemble method. For the system to work, we need as many articles as possible for training the classification module, which we hope to obtain with the help of GPT-3,” described by Filip Trhlik, a Data Scientist at the Dataclair AI lab.

Disinformation recognition AI model diagram
In conclusion, artificially generating new data is a very exciting use case of language models and even though the data generated requires a small amount of manual inspection, it is very beneficial for downstream modelling tasks. The ability to generate a large amount of synthetic data in a short time is very promising.
by Contributed | Jun 28, 2021 | Technology
This article is contributed. See the original author and article here.
Managing long term log retention (or any business data)
The shared responsibility model of the public cloud helps us all pass of some of the burden that needed to be solved completely in-house. A notable example of this is the protection and retention of business-critical data, whether it be the digital copies of documents sent to customer’s, financial history records, call recordings or security logs. There are many types of records and objects that we have business, compliance, or legal reasons to ensure that an original point in time copy is kept for a set period.
One of the excellent features that enable this in Azure is Immutable storage, linked with Lifecycle management rules.
Protecting Security log exports
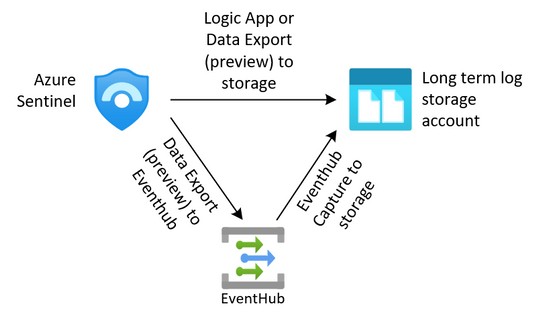
For security teams, this is often a requirement to keep the security logs from the SIEM for an extended period. We can export our data from our log analytics workspaces through several methods outlined in this article (hyperlink here). Once we have exported that data to an Azure storage account we need to protect it from change or deletion for the required time period. We also need to enforce our business rules in ensuring that data that is no longer needed is removed from the system.
The solution we are building here allows for the storage of these logs.
Immutable storage
Immutable storage for Azure Blob storage enables users to store business-critical data objects in a WORM (Write Once, Read Many) state. This state makes the data non-erasable and non-modifiable for a user-specified interval. For the duration of the retention interval, blobs can be created and read, but cannot be modified or deleted.
Immutable storage polices are two types.
- Time base Polices – These allow you to set the minimum retention period for the storage objects. During that time both writes and deletes to the object will be blocked. When the policy is locked (more on that later) the policy will also prevent the deletion of the storage account. Once the retention period has expired, the object will continue to be protected from write operations but delete operations can be executed.
- Legal Hold Policies – These polices allow for a flexible period of hold and can be removed when no longer needed. Legal hold polices need to be associated with one or more tags that are used as identifiers. These tags are often used to represent case or event ID’s. You can place a Legal Hold policy on any container, even if it already has a time-based policy.
For the purposes of this post, we are going to focus on the use of the time-based polies, but if you want to read more on legal hold polices, they can be found here.
Time based polices are implemented simply on a storage container through PowerShell, the Azure CLI or the Portal, but not through ARM templates. This article will go through the use of the portal, the PowerShell and CLI code can be found here.

When adding a new Time-based policy, you will need to specify the number of days to enforce protection, this is a number of days between 1 and 146,000 days (400 years – that’s a really long time). At the same time, you can allow for append blobs to continue to be appended to. For systems that are continually adding to a log through the use of Append Blobs (such as continuous export from Log Analytics), this allows them to keep appending to the blob while it is under the policy. Note that the retention time restarts each time a block is added. Also note that a Legal hold policy does not have this option, and thus will deny an append write if a placed on.

When a time-based policy is first created it starts in an unlocked state. In this state you can toggle the append protection and change the number of days of protection as needed. This state is for testing and ensuring all settings are set correctly, you can even delete the policy if it was created by mistake.

Once the policy settings are confirmed to be correct, it is then time to lock the policy.
Locking the policy is irreversible and after it cannot be deleted. You must delete the container completely, and this can only be done once there are no items that are protected from deletion by a policy. Once locked you can only increase the number of days in the retention setting (never decrease) five times.

Lifecycle management
While protecting the data from deletion or change is half of the problem, we must also consider enforcing removal of data in line with retention policies. We can also take additional actions to contain the costs of the storage account by altering the tiers of storage between Hot, Cool and Archive.
Lifecycle management rules of a storage account can automatically remove the storage objects we no longer need through a simple rule set.
Note: if you enable the Firewall on the storage account, you will need to allow “Trusted Microsoft Services”, otherwise the management rules will be blocked from executing. If your corporate security policy does not allow this exception, then you won’t be able to use the management rules outlined here, but you can implement a similar process though an alternate automation mechanism inside your network.
Lifecycle management rules are set at the Storage Account level and are simple enough to configure. For our logs we just want to set a rule to automatically delete the logs at the end of our retention period.
Again, we will be going through the creation using the portal, but these can be done through PowerShell or ARM template, instructions are here.
At the Storage account select Lifecycle management, and then Add a rule.

Give the rule a descriptive name and set the scope to capture all the appropriate objects that you need to manage.

Set the number of days you want to keep the object and then set the delete action.
Make sure that the number of days is longer than the immutable time-based policy otherwise the rule will not be able to delete the object.

Finally complete your rule.
The rule will continuously evaluate the storage account cleaning up any files that have past their required date.
Note: if you needed to keep some specific files for a more extended period, you could consider a Legal Hold policy on those objects that would then stop the management rule from processing them.
Long Term Costs
Storing these items for such an extended period can often lead into larger costs.
We can also add some additional rules to help us control the costs of the storage.
An important consideration here is the fact that the immutable storage policies will continue to allow us to move the storage between tiers while keeping the data protected from change or deletion.
Note: Lifecycle management rules for changing the storage tier today only apply to Block Blob, not Append Blob.
Going thought the same process as above to create a rule, though this time we set the last accessed number of days and then select the “move to cool” action. This will enable the system to move unused Block Blobs to the cool tier.

You can further enhance this with an additional rule to move the Block Blob to archive after a further date. There is no requirement to move to cold before moving to archive, so if that suits your business outcome you can move it directly to archive.

Keep in mind that analytical systems that leverage the storage system (such as Azure Data Explorer) won’t be able to interact with archived data and it must be rehydrated back to cool or hot to be used.
Timeline
With these two systems in place, we have set up our logs to be kept for our required period, manage out costs and then automatically removed at the end.

Summary
While in this article we have focused on applying the protection to the logs from the monitoring systems or SIEM, the process and protection applied here could suit any business data that needs long term retention and hold. This data could be in the form of log exports, call recordings or document images.
by Contributed | Jun 28, 2021 | Technology
This article is contributed. See the original author and article here.
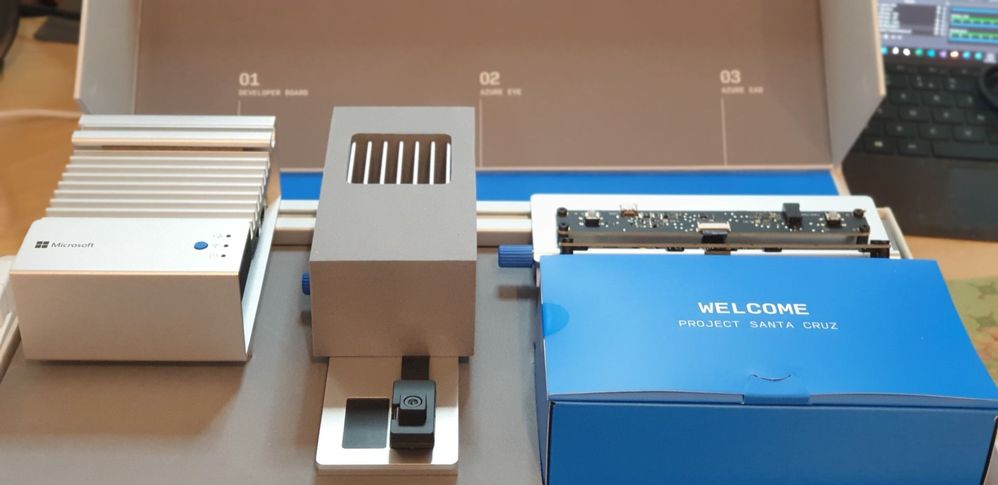
The Azure Percept is a Microsoft Developer Kit designed to fast track development of AI (Artificial Intelligence) applications at the Edge.
Percept Specifications
At a high level, the Percept Developer kit has the following specifications;
Carrier (Processor) Board:

- NXP iMX8m processor
- Trusted Platform Module (TPM) version 2.0
- Wi-Fi and Bluetooth connectivity
Vision SoM:

- Intel Movidius Myriad X (MA2085) vision processing unit (VPU)
- RGB camera sensor
Audio SoM:

- Four-microphone linear array and audio processing via XMOS Codec
- 2x buttons, 3x LEDs, Micro USB, and 3.5 mm audio jack
Percept Target Verticals
The Percept is a Developer Kit with a variety of target industries in mind. As such, Microsoft have created some pre-trained AI models aimed at those markets.

These models can be deployed to the percept to quickly configure the Percept to recognise objects in a set of environments, such as;
- General Object Detection
- Items on a Shelf
- Vehicle Analytics
- Keyword and Command recognition
- Anomaly Detection etc
Azure Percept Studio
Microsoft provide a suite of software to interact with the Percept, centred around Azure Percept Studio, an Azure based dashboard for the Percept.
Azure Percept Studio is broken down into several main sections;
Overview:

This section gives us an overview of Percept Studio, including;
- A Getting Started Guide
- Demos & Tutorials,
- Sample Applications
- Access to some Advanced Tools including Cloud and Local Development Environments as well as setup and samples for AI Security.
Devices:

The Devices Page gives us access to the Percept Devices we’ve registered to the solution’s IoT Hub.
We’re able to click into each registered device for information around it’s operations;

This area is broken down into;
- A General page with information about the Device Specs and Software Version
- Pages with Software Information for the Vision and Speech Modules deployed to the device as well as links to Capture images, View the Vision Video Stream, Deploy Models and so on
- We’re able to open the Device in the Azure IoT Hub Directly
- View the Live Telemetry from the Percept
- Links with help if we need to Troubleshoot the Percept
Vision:

The Vision Page allows us to create new Azure Custom Vision Projects as well as access any existing projects we’ve already created.
Speech:

The Speech page gives us the facility to train Custom Keywords which allow the device to be voice activated;

We can also create Custom Commands which will initiate an action we configure;

Percept Speech relies on various Azure Services including LUIS (Language Understanding Intelligent Service) and Azure Speech.
Other Resources
by Contributed | Jun 28, 2021 | Technology
This article is contributed. See the original author and article here.
Hello everyone, we are adding on to the Configuration Manager and the Microsoft cloud platform integration video series. Here is part 12 of the series. This series is recorded by Steve Rachui, a Microsoft principal customer engineer.
This session focuses on the ability to leverage ConfigMgr as the authority for synchronizing collections to Azure AD groups. The tutorial demonstrates how to configure this capability and demonstrates the synchronization in action. Steve discusses reasons why this capability is beneficial.
Posts in the series
Go straight to the playlist
by Contributed | Jun 28, 2021 | Technology
This article is contributed. See the original author and article here.
Looking to validate your applications for Windows 11? Test Base for Microsoft 365 can help.
A new operating system can bring back memories of application compatibility challenges. But worry not. Microsoft has embraced the ‘compatible by design’ mantra as part of the operating system (OS) development lifecycle. We spend a lot of time agonizing over how the smallest of changes can affect our app developer and customers. Windows 10 ushered in an era of superior application compatibility, with newer processes such as ring-based testing and flighting strategies to help IT pros pilot devices against upcoming builds of Windows and Office, while limiting exposure to many end users.
Microsoft is committed to ensuring your applications work on the latest versions of our software and Windows 11 has been built with compatibility in mind. Our compatibility promise states that apps that worked on Windows 7/8.x will work on Windows 10. Today we are expanding that promise to include Windows 11. This promise is backed by two of our flagship offerings:
- Test Base for Microsoft 365 to do early testing of critical applications using Windows 11 Insider Preview Builds.
- Microsoft App Assure to help you remediate compatibility issues at no additional cost.
What is Test Base for Microsoft 365?
A little less than a year ago, we announced the availability of a new testing service targeted at desktop applications called Test Base for Microsoft 365. Test Base for Microsoft 365 is a private preview Azure service that facilitates data-driven testing of applications. Backed by the power of data and the cloud, it enables app developers and IT professionals to take advantage of intelligent testing from anywhere in the world. If you are a developer or a tester, Test Base helps you understand your application’s ability to continue working even as platform dependencies such as the latest Windows updates change. It helps you test your applications without the hassle, time commitment, and expenditure of setting up and maintaining complex test environments. Additionally, it enables you to automatically test for compatibility against Windows 11 and other pre-release Windows updates on secure virtual machines (VMs) and get access to world-class intelligence for your applications.
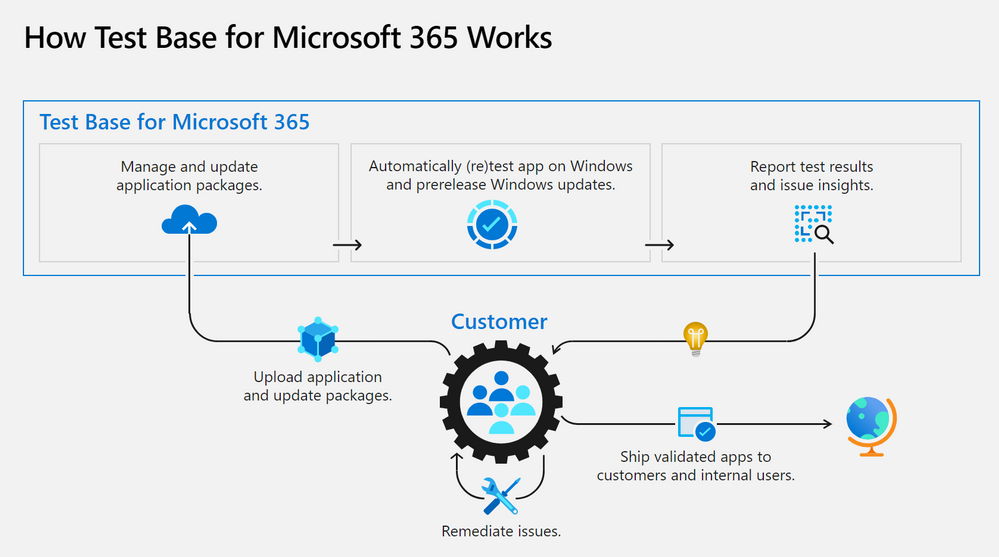
Once a customer is onboarded onto Test Base for Microsoft 365, they can begin by (1) easily uploading their packages for testing. With a successful upload, (2) the packages are tested against Windows updates. After validation, customers (3) can deep dive with insights and regression analysis. If the package failed a test, then the customer can leverage insights such as memory or CPU regressions to (4) remediate and then update the package as needed. All the packages being tested by the customer (5) can be managed in one place and this can help with such needs as uploading and updating packages to reflect new versions of applications.
Desktop Application Program
An important feature for desktop application developers is the ability to view detailed test results and analytics about the total count of failures, hangs, and crashes of applications post OS release. With the integration of Test Base link on the Desk Application Program (DAP) portal developers as part of this program now have access to the ability to track their application performance against the various post release version of Windows OS and subsequently, investigate the failures, replicate them, and apply appropriate fixes to their application for a better end user experience.
Apps and Test Base: coming soon
As a developer, you balance an ever-growing test matrix of testing scenarios. These include the various Windows updates including the monthly security updates. Combined with the challenges around limited infrastructure capacity, device configuration and setup, software licenses, automation challenges etc., testing could quickly turn into a costly operation. Test Base provides a Microsoft managed infrastructure that automates the setup and configuration of Windows builds on a cloud hosted virtual machine. Test Base will make it easy to validate your application with Windows 11 Insider Dev and Beta builds in an environment managed by Microsoft.
Test Base helps IT professionals focus their test efforts and get to the confidence they seek faster. Our initial offering is focused on critical line of business (LOB) applications from enterprises whose applications we all depend on. If you are an Intune customer, you will soon be able to find the link to Test Base on the LOB and Win32 application page on the Microsoft Endpoint Manager admin center.


Not only will you get test coverage against Windows 11, and current Windows security and feature updates, you will also get data insights and support on application failures such that you can quickly remediate applications prior to broad release across your organization.
What’s next on the roadmap for Test Base for Microsoft 365?
We are continuously gathering and collaborating on feedback to improve upon and prioritize the future for Test Base. Examples of capabilities that you can expect to light up in the future include asynchronous alerts & notifications, support for API based onboarding, intelligent failure analysis and support for Microsoft 365 client applications.
Join the Test Base community
If you are interested in onboarding your applications to Test Base, please sign up today.
We are actively engaging with application developers and enterprise customers now to add more value and help solve additional use cases. We would also like invite you to come join us on the new Test Base for M365 community on Tech Community so you can share your experiences and connect with others using the service.
by Contributed | Jun 28, 2021 | Technology
This article is contributed. See the original author and article here.
Claire Bonaci
You’re watching the Microsoft US health and life sciences, confessions of health geeks podcast, a show that offers Industry Insight from the health geeks and data freaks of the US health and life sciences industry team. I’m your host Claire Bonaci. On this episode guest host Molly McCarthy talks with Dr. Vickie Tiase, Director of Research science at New York Presbyterian Hospital. They discuss the future of nursing 2020 to 2030 Health Equity report, and how technology can assist in achieving the goals discussed in the report.
Molly McCarthy
Hi, good morning. It’s great to be here back on confessions of health geeks. And with me today I have Dr. Victoria Tiase. She’s the director of research science at New York Presbyterian. Welcome Dr. Tiase. It’s great to have you here.
Vickie Tiase
Hi, Molly. Thank you. It’s great to be with you. And certainly please feel free to call me Vicki, thank you for hosting this and really elevating the visit visibility of the reports. I’m excited to talk with you about it.
Molly McCarthy
Great. Thank you. I would love to give our listeners a brief background of yourself. And how you became involved with the future of nursing 2020 to 2030 charting a path to achieve health equity report.
Vickie Tiase
Yeah, absolutely. So you know, it was certainly my my honor and privilege to represent nursing specifically with technology and informatics expertise on this report. And you know, a little bit about my experience leading into the report kind of, you know, serves as a context for answering your question. So, you know, probably about 10 years ago, we had an effort in New York City called the New York City digital health accelerator, it was formed with this idea of bringing healthcare startups into New York City and have them be mentored by area hospitals. So at the time, I served as our hospitals mentor for that program, and I had a keen interest in piloting mobile health technologies, with our Washington Heights and Inwood patient populations, an underserved area in northern Manhattan. And there were two solutions that stood out. One was collecting medication data through an app called the actual meds using community health workers. And another one was called new health, where we provided the National Diabetes Prevention Program through a mobile app. And in both of these examples, it was, you know, really amazing to see the engagement from these patient populations. And, you know, I know there is great potential in technology, intervention equity, but we really need to gather evidence and share findings, and really think about using community acquired and patient generated health data in our nursing practice. So these are concepts that I wanted to infuse into the report. And I think given that experience and the intersection of some of my National Nursing informatics roles, within hims, and the alliance of nursing informatics, I was nominated for this committee, and then approached regarding my interest in serving, which I gladly said yes, it has been an amazing experience. Two plus years now working on the report with a very diverse interdisciplinary committee, and given COVID we actually received a six month extension to work on this report. So while we were initially slated to have the report out in December of 2020, it just came out last month, early May of 2021. So although it was an arduous process, I’m you know, super proud of the work that’s been done.
Molly McCarthy
Well, congratulations. I’ve been watching the the process and actually participated in the town hall on technology back in August of 2019. So I’m really excited to see the report, but probably even more excited to see how we as nurses can move these recommendations forward and actually take action. The ultimate goal of the report is the achievement of health equity in the United States built on strengthen nursing capacity and expertise, and I know there were multiple recommendations within the report around that and the role that nurses play. I think the report totaled around 503 pages from one I looked at again last night. From your perspective, and looking at the recommendations, do you have a sense of where the biggest opportunity is for nurses in terms of technology? And as well as roles for nurses and education for nurses, and just wanted your thoughts around that? Because I know that’s been your focus?
Vickie Tiase
Yeah, absolutely. Before I get to that question, I just wanted to say thank you for participating in that high tech, high touch Town Hall, it was, you know, really helpful for the committee to go across the country and really hear from the experts and gather evidence. This, I found to be very challenging from a technology and innovation perspective, since a lot of the work that we do in healthcare I.T. is implementing solutions very quickly, without a focus on publishing findings. So it was, you know, really helpful to hear from experts like yourself. But turning question, yeah. But turning to your question and the opportunities, you know, again, just to really, you know, Center, the purpose, and the vision for the report here, on everything that we did, as a committee was really looking through that health equity lens. And, you know, one of the big opportunities I see in the technology and informatics space is really linking to data. So I feel like that is first and foremost. So in order to address health equity, nurses need data, right, we can’t change what we can’t measure. So I think this is a real opportunity for screening tools that can collect social and behavioral determinants of health. You know, in short, social needs data. And it’s not only collecting it, but facilitating the sharing across settings, especially with community based organizations, which we find are not always electronic. So I think this is a real opportunity for us to think deeply about that interoperability component. And figuring out how, you know, nurses are, are generally bridge builders, like that’s what we do. So how can we leverage that talent and expertise of bridge building in a way that facilitates the sharing of data so that we can incorporate them into nursing practice in a meaningful way?
Molly McCarthy
Yeah, I love that. The bridge builder analogy, and I actually, you know, I think about nurses and I think about some of the roles I’ve played in my career. And it’s, I always use the analogy of the the hub of a wheel and all the spokes out to the different components of the care continuum. And really, that nurse is at the center with that patient. So how can we facilitate that patient throughout the system, as well as the data moving from from place to place, whether that’s patient generated data or data from an EMR, etc. So I think that’s a really important point that you bring out.
Vickie Tiase
Yeah, I like that. I think that idea of that that hub and spoke model also is connected to what I think is a another big message in the report, you know, globally, you know, around paying for nursing care. Right, so thinking about transitioning to value based reimbursement models. Nurses are already doing this stuff, right. But how can we measure the nursing contribution to that value? Right, so it’s often super difficult to measure and, and sometimes invisible even within our electronic systems. So one of the things that the report highlights is the need for a unique nurse identifier and how this is critical. You know, this can help us with a lot of things. It can help us associate the characteristics of nurses with patient characteristics within large data sets. And it can measure the nursing impact on patient outcomes, look at efficiencies, clinical effectiveness. So from my perspective, this is a huge message in the report that has the potential to make a really big difference as to how we look at health equity and look for mechanisms, especially around payment mechanisms to incentivize and move this work forward.
Molly McCarthy
Right? You know, I think that’s so important. And I’m definitely a proponent of the unique nurse identifier really from the concept of thinking about the cost of care and understanding the different costs of care. So that, you know, there’s appropriate reimbursement, quite frankly, for nursing care, but also from the perspective of a consumer, understanding the costs of care, so that there’s, you know, leading to price transparency, you know, understanding as a consumer, what we’re paying for care, and I think having an understanding of of nursing and our our role and what we do and the value, and $1 assigned to that I think it’s so important and moving healthcare forward. So I appreciate you pulling that out. And I know there was one other area that we were thinking about too from the report. And so I wanted you just to give you a few more minutes to talk about that third area.
Vickie Tiase
Absolutely. I think that the third big area, and you know, certainly this was front and center in this past year is, you know, the use of technology to effectively manage patient populations. So the use of telehealth, which includes telemedicine visits and remote patient monitoring and other forms of digital technology to increase patient access has just been, you know, transformative. But the trick here is that we, we really need to think about how to involve nurses in these processes. And especially, especially when we think about nurse practitioners, there are, believe it or not, still 27 states where, you know, nurse practitioners are not able to practice at the top of their license. So where their scope of practice limitations. So thinking about how those barriers that were lifted during COVID can be made permanent moving forward. I think that’s going to be important. And I think the other piece related to technology, which I know is something that you’re quite passionate about Molly is that the report also emphasizes that nurses can not only use these novel technologies, but also constructively inform and design the deployment and development of these technologies. And you know, from a health equity perspective, ensuring that they’re free of bias, and can augment our nursing processes rather than create additional burdens, right? So really using these in a way that matches nursing workflows, and getting nurses involved and engaged from the very beginning.
Molly McCarthy
Yes, yes, yes. I often say, you know, nurses need to be at the table, they need to be involved in the design and development of these solutions. And that’s kind of on a personal note where I’ve spent a lot of time in my career. So. So I think that I appreciate you highlighting that because I do think it’s, you know, as we look across the the technology continuum, so to speak, from the from even just, you know, concept to launch, nurses really need to be part of that discussion. And clinicians need to be part of that discussion, so that we’re coming up with solutions that make sense from a technological perspective, but also a clinical workflow perspective, as well as thinking about cost and patient outcomes. So that’s fantastic. The one as we close out here, and I know that we could spend a couple of hours talking about this. But thinking about that, recommendation number six, and I’m going to read it all public and private healthcare systems should incorporate nursing expertise in designing, generating, analyzing and applying data to support initiatives focused on social determinants of health and health equity, using diverse digital platforms, artificial intelligence, and other innovative technologies. That’s a lot in one recommendation, and what what is your takeaway from that? What is your as you think about that goal, as we think about nurses, what would be your Action around this?
Vickie Tiase
Sure, absolutely. So first of all, I am just so excited that we have a recommendation around this. For those that might know the first report well, back in 2010, there was one little mention of the EHR. And other than that there was almost nothing around technology. So I am I’m thrilled that the committee, you know, came up with this recommendation. And so in terms of the action steps, there are actually a couple of sub recommendations related to this, that is, you know, within chapter 11, for this recommendation. So the first one is that, you know, as I mentioned earlier, accelerating interoperability projects, so figuring out how we can build that nationwide infrastructure, specifically thinking about integrating SDoH data. And then related to that the second sub recommendation is thinking about the visualization of SDoH data. So how can we use standards and other ways to ensure that this isn’t an extra burden on nurses and these are brought into our nursing clinical decision making in a meaningful way? The third one, which I think is, which is also a ambitious recommendation is employing more nurses with informatics expertise. So I think in order to do this recommendation, that’s going to need to happen. So we’re going to need nurses that have informatics expertise to look at the large scale integrations, thinking about how to improve individual and population health using technology. And, and right now that that is lacking in parts of our country, right. And then the last two, so so one that we mentioned, ensuring that nurses and clinical settings have responsibility and the resources to innovate, design and evaluate the use of technology. Right. So it’s really empowering all nurses to do this. So I think that’s an important one. And then lastly, providing resources to facilitate telehealth delivered by nurses. So I think there’s a lot of pieces to this, as you mentioned, this is a big ambitious recommendation. But I think that the real point is that this is about looking at the evidence where we need to go and and we’ve got a decade to figure this out, hopefully sooner rather than later. But I think the next step here is really working on that roadmap and action items to collectively move this forward.
Molly McCarthy
Great, thank you. I know that we’re out of time, but I personally look forward to working with you and other of our nursing informaticists colleagues, really throughout the spectrum, whether they’re in a healthcare setting. You know, the other big piece that we didn’t get to touch on today is just the education, whether that’s undergraduate, masters, prepared PhD, you know, I’m a big proponent of bringing in technology and informatics into the undergraduate curriculum. And again, we don’t have time to go on to go into that today. But I look forward to continuing the partnership. And I know that Microsoft is really supportive of nurses and want to thank you for all the work that you’ve done on behalf of nurses.
Vickie Tiase
Thank you, Molly. Thanks for having me on and again for elevating the messages in this report. I look forward to working with you on this in the future. Thank you.
Claire Bonaci
Thank you all for listening. For more information, visit our Microsoft Cloud for healthcare landing page linked below and check back soon for more content from the HLS industry team.
Microsoft Cloud for Healthcare
by Contributed | Jun 28, 2021 | Technology
This article is contributed. See the original author and article here.
Last week, we announced Windows 11 to the world. Today, I want to share practical tips that will set you up for success as you plan for Windows 11 in your organization.
Windows 11 includes great new capabilities for end users and commercial organizations; capabilities developed in direct response to your feedback and perfectly suited to support hybrid work. There’s new value for IT, too, from the chip to the cloud. Windows 11 uses modern hardware to deliver the most secure Windows ever, with TPM and virtualization-based security support for everyone. We’ve also added over 1,000 new management controls to make it easier to move away from older management systems like Group Policy.
We know that every organization will need time to transition to Windows 11. You choose the pace at which you want to upgrade. Our goal is to support you so the effort is seamless and strategic. The deep investments you’ve made in Windows 10 will carry forward. Windows 11 is built on the Windows 10 code base so it’s natively compatible with the software and solutions you use today. In addition, Windows 11 and Windows 10 are designed to coexist, backed by a common set of security and management capabilities delivered by the Microsoft cloud.
Here are four key things you can do today to pave the way for a smooth integration of Windows 11 into your device estate:
Guidance to support you is now available in our Windows 11 documentation on Docs, but I’d like to highlight some specific best practices below.
Get started today
The easiest way to test the new features in Windows 11, and validate the devices and applications in your environment, is to join the Windows Insider Program for Business. Run Insider Preview Builds on individual devices, virtual machines, or across your organization. Submit and track feedback on any issues you happen to encounter in your environment.
Flighting readies you and early adopters for new features and capabilities. It also provides you with insights that can help you have a more successful broad rollout later on. The first flights of Windows 11 are now available in the Windows Insider Program Dev Channel so you can literally get started today.
Assess readiness
Application compatibility
As mentioned above, applications that work on Windows 10 work on Windows 11. It is still a good idea, however, to validate the applications in your environment, particularly any non-Microsoft security or endpoint management solutions, to ensure that they function as expected on Windows 11.
Windows 11 preserves the application compatibility promise we made with Windows 10. Should you encounter a compatibility issue with a Microsoft application, independent software vendor (ISV) application, or custom in-house line of business (LOB) application, App Assure can help. In addition to supporting Windows 11 and Windows 10, the service can also provide compatibility guidance related to the deployment of Azure Virtual Desktop and Microsoft Edge. Since 2018, App Assure has evaluated almost 800,000 apps. It is available at no additional cost for eligible Microsoft 365 and Windows 10 plans of 150+ licenses.
For software publishers, systems integrators, and IT administrators, Test Base for Microsoft 365 (currently in private preview) is a service that allows you to validate your apps across a variety of Windows feature and quality updates and environments in a Microsoft-managed Azure environment. Enterprise organizations can nominate their software publishers for participation by completing a short form—or software publishers can request enrollment directly.
Hardware readiness and compatibility
Start by reviewing the system requirements for Windows 11. Organizations looking to evaluate device readiness across their environments can expect this capability to be integrated into existing Microsoft solutions, such as Endpoint Analytics and Update Compliance, when Windows 11 reaches general availability later this year.
In general, most accessories and associated drivers that work with Windows 10 are expected to work with Windows 11. Check with your accessory manufacturer for specific details.
Create a plan
You will be able to upgrade eligible devices to Windows 11 at no cost when the upgrade reaches general availability later this year. While you evaluate which of your current devices meet the Windows 11 hardware requirements, you can start planning for other areas of our rollout. Specifically:
- Define early adopters representing a cross-section of users, devices, LOB application users, business units, and other relevant criteria. Prepare early adopters for the new experience. Send out communications that include links to relevant web pages and videos so they know what to expect. Summarize tips to help them take advantage of new features. Offer information on any specific scenarios you’d like them to validate and clearly outline the mechanisms they can use to provide feedback.
- Evaluate your infrastructure and tools. Before you deploy Windows 11, assess your deployment infrastructure (that is, tools such as Configuration Manager, Microsoft Intune, or similar) and current configurations (such as security baselines, administrative templates, and policies that affect updates). Do the tools themselves need to be updated? Do you have the right settings and policies defined to support devices once Windows 11 is installed? See Prepare for Windows 11 for helpful guidance to accomplish these tasks.
- Fine-tune your servicing strategy. You’ll be running Windows 10 alongside Windows 11. By design, you can approach the Windows 11 upgrade using the same tools and processes you use to manage Windows 10 feature updates today. That said, it’s a good time to review those tools and processes and actively optimize or simplify. By seeing the deployment of updates as an ongoing process—instead of a singular project—you can more quickly roll out new features and quality, security, and productivity enhancements. This will also set you up for long-term success by ensuring your Windows 10 and Windows 11 devices stay current and supported. For specific details around Windows 11 servicing and lifecycle, see our Windows lifecycle and servicing update overview.
- Prep your helpdesk. Update scripts and manuals with screenshots to reflect the new user interface, the upgrade experience, the initial experience for new devices.
- Set user expectations with regard to Windows 11 adoption across your organization. Let them know when your rollout phases will occur and offer training and readiness materials well in advance to prepare and excite them for the changes to come.
Embrace cloud-based management
Utilizing cloud-based solutions—and Microsoft Endpoint Manager in particular—will simplify the rollout of Windows 11 and make it easier to keep devices up to date moving forward.
- Windows Autopilot will enable you to deploy new Windows 11 devices in a “business-ready” state that includes your desired applications, settings, and policies, or to change the edition of Windows (for example, from Pro to Enterprise).
- Microsoft Intune offers full control over apps, settings, features, and security for both Windows 11 and Windows 10. You can also use app protection policies to require multi-factor authentication (MFA) for specific apps.
- Cloud configuration offers a standard, easy-to-manage, device configuration that is cloud-optimized for users with curated apps, cloud-based user storage, Windows Autopilot, and Fresh Start to make worry-free management at scale a reality. Consider Cloud Configuration for appropriate devices with limited legacy needs.
- Endpoint analytics can help identify policies or hardware issues that may be slowing down your Windows 10 devices today and help you proactively make improvements before end users generate a help desk ticket, and before your roll out Windows 11.
To manage how and when your devices will receive the Windows 11 upgrade and future feature updates, take advantage of Windows Update for Business. These policies can be utilized for pre-release versions of Windows as well, such as Windows 11 Insider Preview Builds. See Plan for Windows 11 for more details.
Finally, to reduce bandwidth consumption when downloading and distributing Windows 11, and Windows feature updates in general, try Delivery Optimization. Delivery Optimization is a cloud-managed, self-organizing distributed cache that allows clients to download those packages from alternate sources (such as other peers on the network) in addition to the traditional Internet-based servers.
If a cloud-only approach isn’t right for your organization just yet, you can still modernize and streamline essential pieces of your endpoint management strategy as follows:
- Create a cloud management gateway (CMG) to manage Configuration Manager clients over the internet.
- Attach your existing Configuration Management estate to the cloud with tenant attach so you can manage all devices from within the Microsoft Endpoint Manager admin center.
- Use co-management to concurrently manage devices using both Configuration Manager and Microsoft Intune. This allows you to take advantage of cloud-powered capabilities like Conditional Access.
For more information on the benefits of these approaches, see Cloud Attach Your Future: The Big 3.
Explore Windows 11
As I mentioned at the start of this post, Windows 11 includes new capabilities designed to support hybrid work and the needs of today’s commercial organizations. The new snap experience makes it easy for users to arrange their desktops and group windows together – a long-requested set of information worker features. Smart un-docking and re-docking mean that users can plug in without having to reset their desktop. And the native integration with Teams will bring a prominent part of all our work and personal lives directly into Windows.
Here are some additional resources to help you learn more about the improvements Windows 11 will offer with regard to security, manageability, and the user experience:
We’re in this together
You’ve built your business on Windows. Now you can build your future with Windows 11. The keys to a successful transition remain the same as with any OS upgrade or feature update: make data-driven decisions, leverage tools and capabilities to simplify tasks or entire phases of the process, and ensure that end users are safe, secure, and productive.
Understanding and following the guidelines I’ve outlined above will put you in a strong, strategic position to adopt and deploy Windows 11 regardless of your organization’s size, industry, or location. Need more guidance or resources? Leave a comment below and let us know what you need to plan and prepare more effectively.
by Contributed | Jun 28, 2021 | Technology
This article is contributed. See the original author and article here.
Today, I’m offering an overview of the product lifecycle and details on how we will service Windows 11.
Last week we announced Windows 11, the future of Windows for all users. Windows 11 is built on the familiar Windows 10 foundation and will begin to be available the second half of this year. When we originally released Windows 10, we made a commitment to keep devices protected and productive through best-in-class servicing. We are pleased with the progress we have made in keeping over 1.3 billion devices updated on a global scale. Along with the end user experience and security improvements in Windows 11, we are also introducing enhancements you have suggested and asked for to our servicing approach.
Windows 11 lifecycle
Windows 11 will have an annual feature update cadence, a change from the semi-annual cadence of Widows 10. Windows 11 feature updates will release in the second half of the calendar year and will come with 24 months of support for Home, Pro, Pro for Workstations, and Pro Education editions. Windows 11 will come with 36 months of support for Enterprise and Education editions, continuing to provide additional time and flexibility for the validation and at-scale deployments common on those editions. The change to an annual update cadence and slightly longer lifecycle versus Windows 10 is based on user feedback and our overall update approach.
Windows 11 for consumers
For consumers we will continue to provide choices for control and transparency related to device updates. This includes the ability to schedule a restart, pause an update, and have full control over which optional updates to install. The feature update process for Windows 10 to Windows 11 will be a user-initiated ‘seeker’ process to choose to update to Windows 11. For users who are not eligible for Windows 11 due to the hardware requirements, the seeking experience will not be available. You can find more information on device and hardware requirements here. We will continue to document all our releases and updates with release notes (in 36 languages) and share information on releases via the Windows release health hub.
Windows 11 for commercial organizations
Windows 11 will be available via all the existing Windows 10 servicing channels our commercial organizations are familiar with. You will also be able to use many of the same familiar management and deployment tools and processes including but not limited to Windows Update for Business, Microsoft Endpoint Manager, and Windows Autopilot. For Enterprise and Education customers the Windows Update for Business deployment service provides more IT control over Windows Update than ever before to approve, schedule or expedite updates via Microsoft Endpoint Manager, PowerShell or even custom tools created using the Microsoft Graph SDK. Prior to deploying, commercial organizations can determine if the devices within their organization meet the device and hardware requirements for Windows 11 using the Windows 11 PowerShell Script or when Windows 11 is launched via Endpoint Analytics or Update Compliance. More information for commercial organizations is available in Steve Dispensa’s blog on Planning for Windows 11 and our new Windows 11 Docs. IT admins also have easy, integrated access on both monthly and feature updates and related information on Windows release health on the Microsoft 365 admin center.
Keeping you protected and productive
We are continuing our ongoing commitment and investments in Windows 11 to improve the overall update process, focusing on ensuring you have a reliable, productive experience. Windows 11 retains the familiar Windows cumulative monthly security update process (also referred to as the “B” release or Patch Tuesday release); however, with Windows 11 these will be smaller in size (up to 40%). These monthly releases will continue to contain all previous updates to keep devices protected and productive. We will also continue to make the monthly “C” release preview updates available to users who seek these optional updates and for those in the Windows Insider Program or Windows Insider Program for Business.
Next steps
While Windows 11 marks an exciting milestone for the future of Windows, we will continue to support Windows 10 through October 14, 2025. We will be introducing Window 10, version 21H2 in the second half of this year along with a Windows 10 Long-Term Servicing Channel (LTSC) edition. We will be sharing more detailed information on both the next update to Windows 10 and Windows 11, including details on how we will make available and rollout each release. Stay tuned for more information on Windows, and remember that being on the latest version of Windows provides you with both the latest features and security protections to help keep your device safer.
by Contributed | Jun 28, 2021 | Technology
This article is contributed. See the original author and article here.
Leveraging data for Analytics, Reporting, and self-service Business Intelligence can provide great value to an organization. Most large organizations (especially those in Regulated Industries) also need to ensure that Sensitive Data such as PHI, PII, PIFI, Company IP, and Company Financials are properly managed and controlled. With Microsoft Power BI and some thoughtful planning, organizations can scale out an Analytics, Reporting and self-service Business Intelligence platform that ensures Security and Compliance for Sensitive Data.
Below is a recorded version of a presentation reviewing considerations and best practices for planning a secure and scalable Power BI Enterprise Architecture with Sensitive Data at the core. Topics include:
- Securing Power BI Tools such as Power BI Desktop and Gateways
- Planning Azure Active Directory (AAD) based authentication and Workspace Architectures
- Row Level Security (RLS) and Object Level Security (OLS)
- Microsoft Information Protection (MIP)
- Microsoft Cloud App Security (MCAS)
- vNets / Private Links
- Azure Data Lake integration

Recent Comments