by Scott Muniz | Oct 31, 2022 | Security, Technology
This article is contributed. See the original author and article here.
CISA has released two fact sheets to highlight threats against accounts and systems using certain forms of multifactor authentication (MFA). CISA strongly urges all organizations to implement phishing-resistant MFA to protect against phishing and other known cyber threats. If an organization using mobile push-notification-based MFA is unable to implement phishing-resistant MFA, CISA recommends using number matching to mitigate MFA fatigue. Although number matching is not as strong as phishing-resistant MFA, it is one of best interim mitigation for organizations who may not immediately be able to implement phishing-resistant MFA.
CISA recommends users and organizations see CISA fact sheets Implementing Phishing-Resistant MFA and Implementing Number Matching in MFA Applications. Visit CISA.gov/MFA for more information on MFA, including an infographic of the hierarchy of MFA options.
by Scott Muniz | Oct 31, 2022 | Security
This article was originally posted by the FTC. See the original article here.
Brought to you by Dr. Ware, Microsoft Office 365 Silver Partner, Charleston SC.
by Contributed | Oct 29, 2022 | Technology
This article is contributed. See the original author and article here.
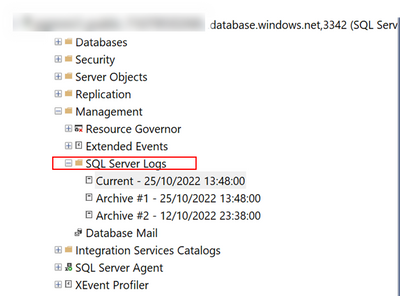
When you start a PITR restore in your Managed Instance, is very useful be able to track how it progresses. Azure Portal does not show too many details about it, but we can use Managed Instance logs to track it.
The way to do it, is quite simple. You just need to connect to your MI using your SSMS (SQL Server Management Studio) and open “SQL Server Logs” that you will find under “Management“
After open logs, is the time to filter then to be focus on the recovery process.

After applying the filter, you will be able to track restore progression.

Simple and effective
Enjoy. –
Paloma.-
by Contributed | Oct 29, 2022 | Technology
This article is contributed. See the original author and article here.
Hi,
AKS takes more and more space in the Azure landscape, and there are a few best practices that you can follow to harden the environment and make it as secure as possible. As a preamble, remember that containers all share the kernel through system calls, so the level of isolation in the container world is not as strong as with virtual machines, and even more as with physical hosts. Mistakes can quickly lead to security issues.
1. Hardening the application itself
This might sound obvious but one of the best ways to defend against malicious attacks, is to use bullet proof code. There is no way you’ll be 100% bullet proof, but a few steps can be taken to maximize the robustness:
- Try to use up-to-date libraries in your code (NuGet, npm, etc.), because as you know, most of your code is actually not yours.
- Make sure that any input is validated, any memory allocation is well under control, should you not use frameworks with managed memory. Many vulnerabilities are memory-related (Buffer overflow, Use-after-free, etc.).
- Rely on well-known security standards and do not invent your own stuff.
- Use SAST tools to perform static code analysis using specialized software such as Snyk, Fortify, etc.
- Try to integrate security-related tests in your integration tests
2. Hardening container images
I’ve seen countless environments where the docker image itself is not hardened properly. I wrote a full blog post about this, so feel free to to read it https://techcommunity.microsoft.com/t5/azure-developer-community-blog/hardening-an-asp-net-container-running-on-kubernetes/ba-p/2542224. I took an ASP.NET code base as an example, but this is applicable to other languages. I’ll summarize it here, in a nutshell:
- Do not expose ports below 1024, because this requires extra capabilities
- Specify another user than root
- Change ownership of the container’s file system
3. Scanning container images
Most of the times, we are using base images to build our own images, and most of the times, these base images have vulnerabilities. Use specialized software such as Snyk, Falco, Cloud Defender for Containers, etc. to identify them. Once identified, you should:
- Try to stick to the most up-to-date images as they often include security patches
- Try to use a different base image. Usually light images such as Alpine-based ones are a good start because they embed less tools and libraries, so are less likely to have vulnerabilities.
- Make a risk assessment against the remaining vulnerabilities and see if that’s really applicable to your use case. A vulnerability does not automatically mean that you are at risk. You might have some other mitigations in place that would prevent an exploit.
To push the shift left principle to the maximum, you can use Snyk’s docker scan operation, right from the developer’s machine to already identify vulnerabilities. Although Snyk is a paid product, you can scan a few images for free.
4. Hardening K8s deployments
In the same post as before (https://techcommunity.microsoft.com/t5/azure-developer-community-blog/hardening-an-asp-net-container-running-on-kubernetes/ba-p/2542224), I also explain how to harden the K8s deployment itself. In a nutshell,
- Make sure to drop all capabilities and only add the needed ones if any
- Do not use privileged containers nor allow privilege escalation (make values explicit)
- Try to stick to a read only file system whenever possible
- Specify user/group other than root
5. Request – Limits declaration
Although this might not be seen as a potential security issue, not specifying memory requests and limits can lead to an arbitrary eviction of other pods. Malicious users can take advantage of this to spread chaos within your cluster. So, you must always declare memory request and limits. You can optionally declare CPU requests/limits but this is not as important as memory.
6. Namespace-level logical isolation
K8s is a world where logical isolation takes precedence over physical isolation. So, whatever you do, you should make sure to adhere to the least privilege principle through proper RBAC configuration and proper network policies to control network traffic within the cluster, and potentially going outside (egress). Remember that by default, K8s is totally open, so every pod can talk to any other pod, whatever namespace it is located in. If you can’t live with internal logical isolation only, you can also segregate workloads into different node pools and leverage Azure networking features such as NSGs to control network traffic at another level. I wrote an entire blog post on this: AKS, the elephant in the hub & spoke room, deep dive
6.1 RBAC
Role-based access control can be configured for both humans and systems, thanks to Azure AD and K8s RBAC. There are multiple flavors available for AKS. Whichever one you use, you should make sure to:
- Define groups and grant them permissions using K8s roles
- Define service accounts and let your applications leverage them
- Prefer namespace-scoped permissions rather than cluster-scope ones
6.2 Namespace-scoped & global network policies
Traffic can be controlled using plain K8s network policies or tools such as Calico. Network policies can be used to control pod-level ingress/egress traffic.
7. Layer 7 protection
Because defense-in-depth relies on multiple ways to validate whether an ongoing operation is legal or not, you should also use a layer-7 protection, such as a Service Mesh or Dapr, which has some overlapping features with service meshes. The main difference between Dapr and a true Service Mesh is that applications using Dapr must be Dapr-aware while they don’t need to know anything about a service mesh. The purpose of a layer-7 protection is to enable mTLS and fine-grained authorizations, in order to specify who can talk to who (on top of network policies). Most solutions today allow for fine-grained authorizations targeting operation-level scopes, when dealing with APIs. Dapr and Service Meshes come with many more juicy features that make you understand what a true Cloud native environment is.
8. Azure Policy
Azure Policy is the corner stone of a tangible governance in Azure in general, and AKS makes no exception. With Azure Policy, you’ll have a continuous assessment of your cluster’s configuration as well as a way to control what can be deployed to the cluster. Azure Policy leverages Gatekeeper to deny non-compliant deployments. You can start smoothly in non-production by setting everything to Audit mode and switch to Deny in production. Azure Policy also allows you to whitelist known registries to make sure images cannot be pulled from everywhere.
9. Cloud Defender for Containers
Microsoft recently merged Defender for Registries and Defender for Kubernetes into Defender for Containers. There is a little bit of overlap with Azure Policy, but Defender also deploys DaemonSets that check for real-time threats. All incidents are categorized using the popular MITRE ATT&CK framework. One of the selling point is that Defender can handle any cluster, whether hosted on Azure or not. So, it is a multi-cloud solution. On top of assessing configuration and threats, Defender also ships with a built-in image scanning process leveraging Qualys behind the scenes. Images are scanned upon push operations as well as continuously to detect newer vulnerabilities that came after the push. Of course, there are other third party tools available such as Prisma Cloud, which you might be tempted to use, especially if you already run the Palo Alto NVAs.
10. Private API server
This one is an easy one. Make sure to isolate the API server from internet. You can easily do that using Azure Private Link. If you can’t do it for some reasons, try to at least restrict access to authorized IP address ranges.
11. Cluster boundaries
Of course, an AKS cluster is by design inside an Azure Virtual Network. The cluster can expose some workloads outside through the use of an ingress controller, and anything can potentially go outside of the cluster, through an egress controller and/or an appliance controlling the network traffic.
11.1 Ingress
Ingress can either be internet-facing callers or internal callers. A best practice is to isolate the AKS ingress controller (NGINX, Traefik, AGIC, etc.) from internet. You link it to an internal load balancer. Traffic that must be exposed to internet should be exposed through an Application Gateway, Front Door (using Private Link Service) or any other well-known non-Azure solution such as Barracuda, F5 etc. You should also distinguish pure UI traffic from API traffic. API traffic should also be filtered using an API gateway such as Azure APIM, Kong, Ambassador, etc. For “basic” scenarios, you might also offload JWT token validation to service meshes, but they will not have comparable features. You should for sure consider real API gateways for internet-facing APIs.
11.2 Egress
Pod-level egress traffic can be controlled by network policies or Calico, but also by most Service Meshes. Istio has even a dedicated egress controller, which can act as a proxy. On top of handling egress from within the cluster itself, it is a best practice to have a next-gen firewall waiting outside, such as Azure Firewall or third-party Network Virtual Appliances (NVA).
12. Keep consistence across clusters and across data centers
You start with one cluster, then 2, then a hundred. To keep some sort of consistency across cluster configurations, you can leverage Azure Policy. If your clusters are using on-premises or in another cloud, you can also use Azure Arc. Microsoft recently launched Azure Kubernetes Fleet Manager, which I haven’t tried yet but is surely something to keep an eye on.
Conclusion
The above tips are by no means exhaustive but if you start with that, you should be in a better position when it comes to handling container security. There are a myriad of tools available on the market to better handle container security. Azure has some built-in capabilities and it is up to you to see if you prefer to use best of breed or best of suite. Note that more and more Azure native tools span beyond Azure itself, so your single pane of glasses could be Azure.
by Scott Muniz | Oct 28, 2022 | Security, Technology
This article is contributed. See the original author and article here.
CISA has added one new vulnerability to its Known Exploited Vulnerabilities Catalog, based on evidence of active exploitation. This type of vulnerability is a frequent attack vector for malicious cyber actors and pose significant risk to the federal enterprise. Note: To view the newly added vulnerabilities in the catalog, click on the arrow in the “Date Added to Catalog” column, which will sort by descending dates.
Binding Operational Directive (BOD) 22-01: Reducing the Significant Risk of Known Exploited Vulnerabilities established the Known Exploited Vulnerabilities Catalog as a living list of known CVEs that carry significant risk to the federal enterprise. BOD 22-01 requires FCEB agencies to remediate identified vulnerabilities by the due date to protect FCEB networks against active threats. See the BOD 22-01 Fact Sheet for more information.
Although BOD 22-01 only applies to FCEB agencies, CISA strongly urges all organizations to reduce their exposure to cyberattacks by prioritizing timely remediation of Catalog vulnerabilities as part of their vulnerability management practice. CISA will continue to add vulnerabilities to the Catalog that meet the specified criteria.

by Contributed | Oct 28, 2022 | Dynamics 365, Microsoft 365, Technology
This article is contributed. See the original author and article here.
Last April I shared that Microsoft is working on an initiative that encourages partners to invest in a cloud-first strategy. Today, we are excited to announce that the Business Central Universal Code initiative went into effect with the launch of Dynamics 365 Business Central 2022 release wave 2.
The Universal Code initiative is designed to encourage the use of a modern architecture in customer implementations of Business Central. It gives all on-premises customers the choice to select a cloud (SaaS) implementation when desired while also finding the right apps on the Microsoft AppSource marketplace. The initiative reduces the friction around potentially complex, lengthy, and expensive upgrades and frees up partner capacity over time. Partners can use the additional capacity for activities beyond (re)implementing customizations, providing more value to their customers.
Microsoft partners share the impact of Universal Code
On AppSource, you can easily discover the success of our modern Universal Code initiative. As of October 2022, more than 2,800 Business Central apps are available to respond to the unique requirements of customers. Our partner channel is sharing the positive impact a modern architecture has on their business:
“It was scary to change our industry solution from a customized code to Universal Code as we didn’t want to compromise its rich functionality, but our team succeeded faster than expected because of their great expertise and out-of-the-box thinking. The impact has been enormous! Today, we are able to serve 14 localizations through fully automated means and we are able to generate weekly releases. In the past this took us a month of manual work. Universal Code in combination with our tooling is providing us the agility to stay in front!”
Richard Postborg, CTO, TRIMIT Group A/S
“For us here at LS Retail, Universal Code is all about sustainability for the customer. With Universal Code and the move to the extensibility framework, customers can upgrade their environments with a fraction of the effort it required before. This is good for everyone involved. The customer can stay current with a minimal effort. The partners can add value in other areas, such as providing business insights. This is a win-win for everyone involved.”
Dadi Karason, CTO, LS Retail
The future of Business Central on-premises is Universal Code
The modern architectural choice of Universal Code is key to the success of our customers, partners, and Microsoft. We encourage customers to have the Universal Code conversation with their implementing partner.
As of October 2022, new Dynamics 365 Business Central customers deploying on-premises and customers transitioning to Dynamics 365 Business Central on-premises deployments will have to deploy a “cloud-optimized extensions” architecture (Universal Code) or license payable modules that unlock classic customization behavior.
Learn more
Find supporting materials with details about the Universal Code initiative at https://aka.ms/BCUniversalCode.
Partners can also learn more about next steps by watching the Universal Code session at the Dynamics 365 Business Central virtual launch event. Register to watch on-demand at https://aka.ms/BCLE.
The post The Dynamics 365 Business Central Universal Code initiative is live appeared first on Microsoft Dynamics 365 Blog.
Brought to you by Dr. Ware, Microsoft Office 365 Silver Partner, Charleston SC.
by Contributed | Oct 28, 2022 | Technology
This article is contributed. See the original author and article here.
Adoption and usage of data governance tools are critical and lack of user engagement can be a serious blocker for the whole organization in its data governance journey. When it comes to solution adoption, fortunately Microsoft Purview comes with the built-in ability to analyze it.
This functionality is very useful to answer the following questions:
- Are users actively using Microsoft Purview?
- How is usage changing over time?
- What is activity type e.g., data curation or search data?
- Which assets are the most viewed ones in an organization?
- What are we missing in the catalog?
How to track the adoption?
Adoption tracking is part of Data estate insights functionality in Microsoft Purview. To be able to use it, the user needs to have appropriate permissions assigned. There is a dedicated Insights Reader role that can be assigned to any Data Map user, by the Data Curator of the root collection. More information about required permissions can be found in Permissions for Data Estate Insights in Microsoft Purview – Microsoft Purview | Microsoft Docs.
Let’s start with some basics
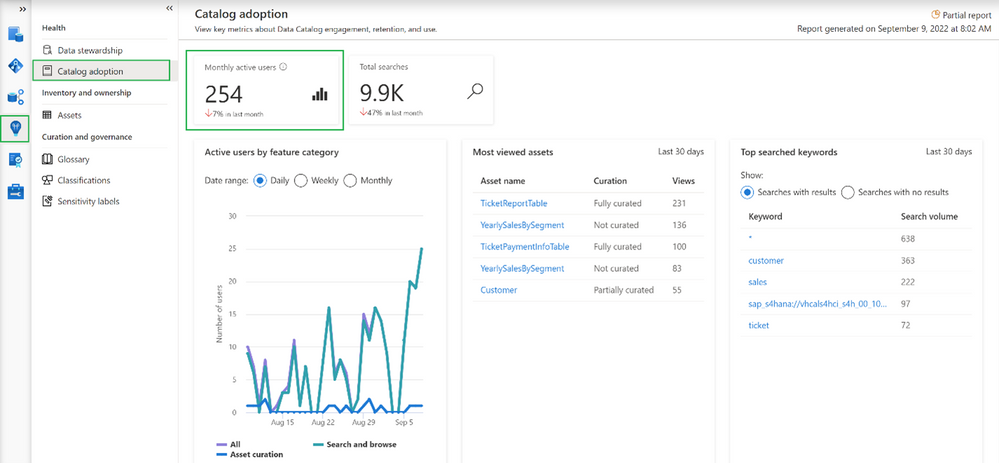
Going into the Insights area and choosing Catalog adoption, we can find information about monthly active users.
In our case, we can see that currently we have 254 distinct users and the number dropped 7% in the last month. Microsoft Purview counts active users as a user who took at least one intentional action across all feature categories in the Data Catalog within a 28-day period. It’s also possible to determine how active our users are in total as Microsoft Purview aggregates number of total searches performed by users

Note
Data estate insights functionality in Microsoft Purview shows information based on user permissions, which means data seen in Insights is limited to collections to which the user has permission to access. In this case, the user used to see insights has access to all collections, meaning the information visible in the catalog adoption is the overall number of users in the organization.
Even more information about catalog users
More adoption data means more insights into how the catalog is used.

This option shows the breakdown of active users by feature category. Feature category was divided into:
- All (which covers all kinds of users)
- Search and browse (which indicates users who are reading data from the catalog by searching them or directly browsing the catalog assets)
- Asset curation (activities related to data curation like assigning data owner, description, applying classification, etc.)
Information on the chart can be shown in Daily/Weekly/Monthly time range.
Increase catalog adoption by giving users more precise information…
Among the information that you get as part of adoption reports is information about which assets are the most viewed in the organization. If you are wondering why it is important to have a look at the following summary:

The most viewed asset (231 views) “TicketReportTable” is fully curated (more about curation in the 2nd part of the article) which means the asset has an assigned owner, description, and at least one classification. On the other hand, the 2nd most viewed asset (136 views in last 30 days) “YearlySalesBySegment” is not curated at all. This can lead to situations where users are accessing catalogs and get poor-quality information. As a result, users may step back from using data catalog and adoption will be dropping. Based on such insights you can intensively work on asset curation and only provide users with high-quality information about data in your organization.
Adoption insights available in Microsoft Purview also give the ability to identify the most searched keywords.

It is interesting that one of the most searched assets is only partially curated. Based on this information it is possible to help data stewards and owners set priorities and identify the most important areas in an organization. On the other hand, it’s also possible to get information about keywords that were searched by users but yielded no results.

In this example, it looks like users are looking for information related to “sales” and couldn’t find it. This is an important tip for a data governance team and shows the next possible areas to investigate.
Summary
Now you should have a better understanding of how to identify the progress of Microsoft Purview adoption, You should also have learned how to improve it by converting provided insights into actions, like a better data curation process or by adding new assets to your catalog, which are searched by users.
by Scott Muniz | Oct 28, 2022 | Security, Technology
This article is contributed. See the original author and article here.
CISA, the Federal Bureau of Investigation (FBI), and the Multi-State Information Sharing and Analysis Center (MS-ISAC) have released Understanding and Responding to Distributed Denial-of-Service Attacks to provide organizations proactive steps to reduce the likelihood and impact of distributed denial-of-service (DDoS) attacks. The guidance is for both network defenders and leaders to help them understand and respond to DDoS attacks, which can cost an organization time, money, and reputational damage.
Concurrently, CISA has released Capacity Enhancement Guide (CEG): Additional DDoS Guidance for Federal Agencies, which provides federal civilian executive branch (FCEB) agencies additional DDoS guidance, including recommended FCEB contract vehicles and services that provide DDoS protection and mitigations.
CISA encourages all network defenders and leaders to review:
by Scott Muniz | Oct 28, 2022 | Security, Technology
This article is contributed. See the original author and article here.
VMware has released security updates to address multiple vulnerabilities in VMware Cloud Foundation. A remote attacker could exploit one of these vulnerabilities to take control of an affected system.
CISA encourages users and administrators to review VMware Security Advisory VMSA-2022-002 and apply the necessary updates and workarounds.

by Contributed | Oct 27, 2022 | Dynamics 365, Microsoft 365, Technology
This article is contributed. See the original author and article here.
Today, many companies face global supply chain challenges. From unexpected demand to ever-increasing fulfillment expectations, the stakes have never been higher. In response, some are looking for new strategies and solutions to help them quickly predict and overcome disruptionsto keep goods moving and their businesses profitable.
Create resilient supply chains with innovative new offerings
Join Chris Capossela and Panos Panay, Chief Marketing Officer and Chief Product Officer at Microsoft, for the Supply Chain Reimagined digital event on November 16, 2022, to explore how to bring visibility, agility, connectivity, and sustainability to your supply chain.
You’ll learn about product innovations, essential insights, and the latest trends shaping supply chains, today and tomorrow. We’ll also take on topics like end-to-end visibility and data connectivity. You’ll leave with a better understanding of how technology is being used to improve both the customer experience and the bottom line.
And you’ll discover real-world best practices for supply chain resilience from thought leaders, industry experts, and Microsoft customers and partners. Plus, you’ll get valuable lessons learned from Microsoft supply chain leaders across our Xbox, devices, and global Azure datacenter teams as they share the inside story of our own supply chain transformation.
Don’t miss this opportunity to engage in energizing conversations with leading experts about how to overcome today’s supply chain challenges.
Register for the Supply Chain Reimagined digital event today.
Learn how to create a connected, agile supply chain from your existing systems
Many of today’s leading supply chain systems are siloed solutions that don’t talk to each other. Because of that, some can’t handle the complexity of supply chain ecosystems that span providers, manufacturers, distributors, third-party and fourth-party logistics, delivery carriers, and consumerswhich leads to inefficient, reactive supply chain operations.
This digital event is a great opportunity for you to explore an effective solution to traditional supply chain issues. You’ll learn about a composable approach to supply chain transformation, which brings together various best-of-breed solutions on a common platform. You’ll see how to use this modular approach to enhance your existing systemsto deliver faster solutions to urgent problems and help your business become more resilient.
At Microsoft, we believe that a modular approach is key to supply chain resilience. That’s why we’re committed to providing solutions that work with your existing application landscapeto add extensible, scalable, and intelligent technologies that immediately improve supply chain practices, workflow, and value. This boosts agility by giving your teams the ability to quickly rearrange and reorient as needed depending on internal or external factors, like a sudden change in materials or a shift in customer priorities.
Moving from a siloed data infrastructure to a unified data platform is another key to supply chain resilience that highlights the benefits of an open, composable solution. Data is at the heart of supply chain operations and having a system that connects data across disparate systems is a critical advantage. You’ll gain end-to-end visibility across inventory systems, supplier schedules, and inbound and outbound orders, and you’ll empower your workforce to move from reactive to proactive, data-driven decision making throughout all areas of your supply chain.
Getting these essential insights is the first step toward building a connected, agile supply chain for your business. And it’s just one aspect of this information-packed digital event. We hope you’ll join us.
Bring sustainability into focus for your organization
Sustainability is a growing imperative for business as customers, regulators, investors, and employees are all asking organizations to do more to reduce their environmental impact. The pressure for measurable change is on supply chain leaders, as their systems often have the largest environmental impacts due to emissions or resource consumption.
At this digital event, you’ll find out how to build sustainable value chains on a secure, connected platform. You’ll learn from leaders in supply chain transformation how to reframe your strategy around sustainability and gain insights into practices that will empower you to deliver sustainability by design.
You’ll also gain insight into how Microsoft leaders have prioritized sustainability in our own supply chain practices, including building circularity into our design and striving to improve the impact across environmental, social, and governance factors.
Strengthen business resiliencenow and in the future
Finally, at the Supply Chain Reimagined digital event on November 16, 2022, you’ll also get an exclusive look at the future of supply chain transformation and the new solutions that can take you there. In addition to learning how to create an agile, connected, and sustainable supply chain, you’ll:
- Get key insights you can act on from thought leaders on topics like customer satisfaction, business agility, and operational efficiency.
- See what’s shaping supply chain innovation today and tomorrow with real-world best practices and lessons learned from Microsoft and industry leaders.
- Learn how our customers, including Mitch Arends from the Kraft Heinz Company, are partnering with Microsoft to improve supply chain resilience.
- Hear exciting announcements and be among the first to see new product innovations unveiledall designed to help protect your business from supply chain challenges.
- Ask Microsoft supply chain experts all your most pressing questions in a live Q&A chat.
Join us on Wednesday, November 16, 2022, from 9:00 AM to 10:15 AM Pacific Time (UTC-8).
Supply Chain Reimagined
Start reimagining your supply chain for a more agile, resilient future.
The post Bring agility, connectivity, and sustainability to the forefront—at Supply Chain Reimagined appeared first on Microsoft Dynamics 365 Blog.
Brought to you by Dr. Ware, Microsoft Office 365 Silver Partner, Charleston SC.


Recent Comments