This article is contributed. See the original author and article here.
Join Microsoft at GTC, a global technology conference running March 20 – 23, 2023, to learn how organizations of any size can power AI innovation with purpose-built cloud infrastructure from Microsoft.
Microsoft’s Azure AI supercomputing infrastructure is uniquely designed for AI workloads and helps build and train some of the industry’s most advanced AI solutions. From data preparation to model and infrastructure performance management, Azure’s comprehensive portfolio of powerful and massively scalable GPU-accelerated virtual machines (VMs) and seamless integration with services like Azure Batch and open-source solutions helps streamline management and automation of large AI models and infrastructure.
Attend GTC to discover how Azure AI infrastructure optimized for AI performance can deliver speed and scale in the cloud and help you reduce the complexity of building, training, and bringing AI models into production. Register today! GTC Developer Conference is a free online event.
Microsoft sessions at NVIDIA GTC
Add the below Microsoft sessions at GTC to your conference schedule to learn about the latest Azure AI infrastructure and dive deep into a variety of use cases and technologies.
Nidhi Chappell, General Manager, Azure HPC, AI, SAP and Confidential Computing
Kathleen Mitford, Corporate Vice President, Azure Marketing, Microsoft
Manuvir Das, Head of Enterprise Computing, NVIDIA
Azure’s purpose-built AI infrastructure is enabling leading organizations in AI to build a new era of innovative applications and services. The convergence of cloud flexibility and economics, with advances in cloud performance, is paving the way to accelerate AI initiatives across simulations, science, and industry. Whether you need to scale to 80,000 cores for MPI workloads, or you’re looking for AI supercomputing capabilities, Azure can support your needs. Learn more about Azures AI platform, our latest updates, and hear about customer experiences.
Microsoft offers some of the most powerful and massively scalable Virtual Machines, optimized for AI workloads. Join us for an in-depth look at the latest updates for Azure’s ND series based on NVIDIA GPUs, engineered to deliver a combination of high-performance, interconnected GPUs, working in parallel, that can help you reduce complexity, minimize operational bottlenecks operations, and can deliver reliability at scale.
Next-Generation AI for Improving Building Security and Safety
Adina Trufinescu, Senior Program Manager, Azure Specialized Compute, Microsoft
Computer Vision – AI Video Analytics
Deep Learning Institute Workshops and Labs
We are proud to host NVIDIA’s Deep Learning Institute (DLI) training at NVIDIA GTC. Attend full-day, hands-on, instructor-led workshops or two-hour free training labs to get up to speed on the latest technology and breakthroughs. Hosted on Microsoft Azure, these sessions enable and empower you to leverage NVIDIA GPUs on the Azure platform to solve the world’s most interesting and relevant problems.
Whether your project is big or small, local or global, Microsoft Azure is empowering companies worldwide to push the boundaries of AI innovation. Learn how you can make AI your reality.
This article is contributed. See the original author and article here.
This month, we’re bringing new AI-powered capabilities to Microsoft Teams Premium, helping keep everyone aligned with Microsoft Viva Engage, and sharing new Loop components in Whiteboard to help your team collaborate in sync.
This article is contributed. See the original author and article here.
At end of October 2022 we saw an issue where a customer using PolyBase external query to Azure Storage started seeing queries fail with the following error:
Msg 7320, Level 16, State 110, Line 2
Cannot execute the query “Remote Query” against OLE DB provider “SQLNCLI11” for linked server “(null)”. EXTERNAL TABLE access failed due to internal error: ‘Java exception raised on call to HdfsBridge_IsDirExist: Error [com.microsoft.azure.storage.StorageException: The server encountered an unknown failure: ]occurred while accessing external file.’
Prior to this, everything was working fine; the customer made no changes to SQL Server or Azure Storage.
“The server encountered an unknown failure” – not the most descriptive of errors. We checked the PolyBase logs for more information:
EXTERNAL TABLE access failed due to internal error: ‘Java exception raised on call to HdfsBridge_IsDirExist: Error [com.microsoft.azure.storage.StorageException: The server encountered an unknown failure: ] occurred while accessing external file.’
Microsoft.SqlServer.DataWarehouse.Common.ErrorHandling.MppSqlException: EXTERNAL TABLE access failed due to internal error: ‘Java exception raised on call to HdfsBridge_IsDirExist: Error [com.microsoft.azure.storage.StorageException: The server encountered an unknown failure: ] occurred while accessing external file.’ —> Microsoft.SqlServer.DataWarehouse.DataMovement.Common.ExternalAccess.HdfsAccessException: Java exception raised on call to HdfsBridge_IsDirExist: Error [com.microsoft.azure.storage.StorageException: The server encountered an unknown failure: ] occurred while accessing external file.
at Microsoft.SqlServer.DataWarehouse.DataMovement.Common.ExternalAccess.HdfsBridgeFileAccess.GetFileMetadata(String filePath)
at Microsoft.SqlServer.DataWarehouse.Sql.Statements.HadoopFile.ValidateFile(ExternalFileState fileState, Boolean createIfNotFound)
— End of inner exception stack trace —
We got a little bit more information. PolyBase Engine is checking for file metadata, but still failing with “unknown failure”.
The engineer working on this case did a network trace and found out that the TLS version used for encrypting the packets sent to Azure Storage was TLS 1.0. The following screenshot demonstrates the analysis (note lower left corner where “Version: TLS 1.0” is clearly visible
He compared this to a successful PolyBase query to Azure Storage account and found it was using TLS 1.2.
Azure Storage accounts can be configured to only allow a minimum TLS version. Our intrepid engineer checked the storage account and it was so old that it predated the time when this option was configurable for the storage account. But, in an effort to resolve the customer’s issue, he researched further. The customer was using a Version 7 Java Runtime Environment. Our engineer reproduced the error by downgrading his JRE to Version 7 and then querying a PolyBase external table pointing to his Azure storage account. Network tracing confirmed that JRE v7 will use TLS 1.0. He tried changing the TLS version in the Java configuration but it did not resolve the issue. He then switched back to JRE v8 and the issue was resolved in his environment. He asked the customer to upgrade to Version 8 and found the issue was resolved.
Further research showed that there were Azure TLS Certificate Changes requirements for some Azure endpoints and this old storage account was affected by these changes. TLS 1.0 was no longer sufficient and TLS 1.2 was now required. Switching to Java Runtime Environment Version 8 made PolyBase utilize TLS 1.2 when sending packets to Azure Storage Account and the problem was resolved.
Today’s buyers value authentic engagements and expect the companies they buy from to know them and to provide one-of-a-kind experiences. This past year, we continued to invest in solutions that help our customers meet these demands by delivering personalization at scale.
Customers can automate buyer-centric experiences and processes using trigger-based journeys to respond to actions and signals in real time and easily optimize customer journeys with insights from across digital and physical channels. With configurable key performance indicators (KPIs), customers can use out-of-box machine learning templates or bring their own AI/machine learning modelsboth options supporting rapid innovation that expands the discovery of insights.
Microsoft Dynamics 365 equips organizations with holistic views of their customers so they can discover what buyers need with insights that power individualized experiences and the delivery of deeply personalized content in customer journeys. Going forward, we will continue to expand this functionality for our customers.
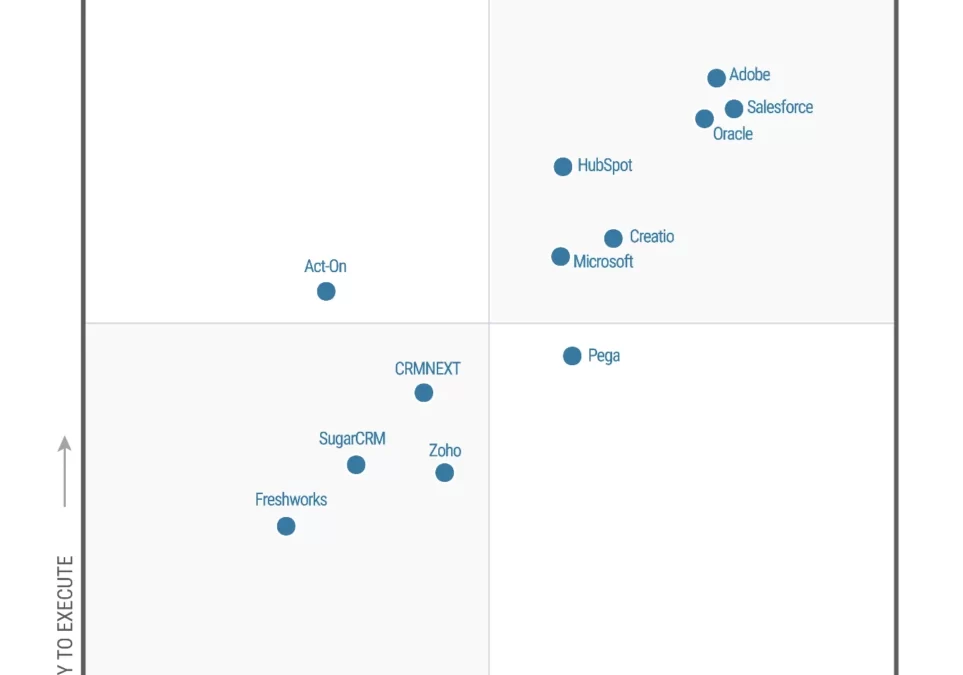
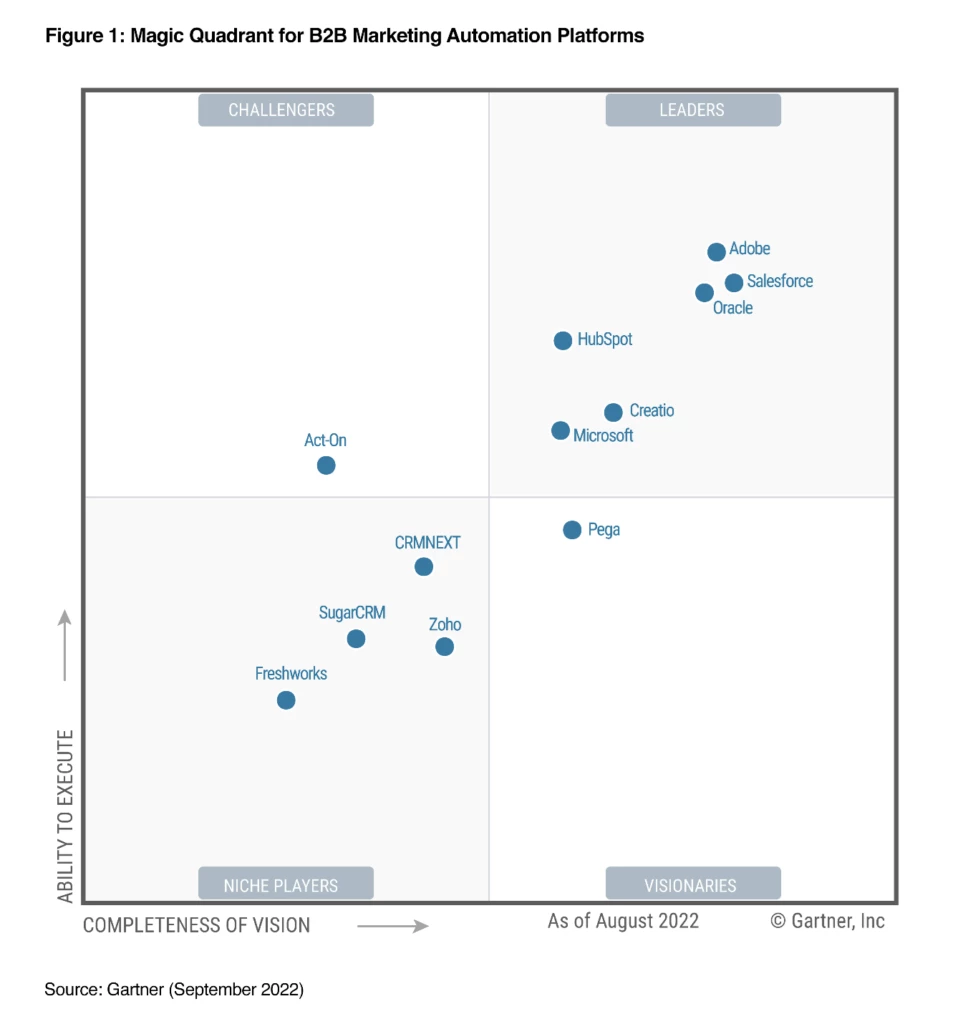
Figure 1: Magic Quadrant for B2B Marketing Automation**
Data at the center of everything
Gartner recognizes “B2B marketing automation platforms as technologies that serve as an essential tool for customer journey orchestration in support of B2B customer acquisition, retention and growth objectives.”
Dynamics 365 supports the practice of demand generation, helping our customers to capture, qualify, and nurture leads and accounts across multiple channels.
Data is at the center of all these functions, and it is the power behind the insights that drive what businesses need to do now and what they should do tomorrow. Microsoft helps businesses thrive and grow by capturing, analyzing, predicting, and reporting on their data.
One of the ways we are helping customers like Eika use one, coherent data platform to optimize their business-to-business (B2B) customer engagement with a high level of agility is the common data platform, Microsoft Dataverse. Dataverse lets you securely store and manage data used by business applications.
By using one single vendor that unifies and simplifies support processes for all solutions, customers benefit from products built to talk and complement each other. For instance, solutions like Dynamics 365 can work closely with other Microsoft technologies, such as Microsoft 365, Azure, Power BI, and LinkedIn to enhance and extend Dynamics 365 capabilities. This native integration also simplifies user adoptionusers are more comfortable when working with a familiar set of applications, and this ease of use can help lower total cost of ownership (TCO) and IT costs.
Additionally, customers that want to extend their investments in Microsoft technologies with applications to support their unique business needs have a huge range of options. Independent software vendors (ISVs) across the globe have created hundreds of software as a service (SaaS) applications that use Dynamics 365 and the underlying Microsoft Power Platform to deliver business value on top of Microsoft’s B2B automation platform.
Helping to ensure our customers’ success
Microsoft customers can participate in two customer success programs that deliver support for their implementations and can help them drive continuous adoption. FastTrack for Dynamics 365 is an engineering-led implementation guidance service that has been shown to speed deployments, drive higher usage, and reduce customer support needs. The second program, the Subscription Support for Microsoft Dynamics 365, is a support option delivered by a dedicated customer success unit within Microsoft.
Together, these programs have driven proven and lasting customer success. FastTrack for Dynamics 365 guides customers through successful implementations, bringing the best practices from thousands of deployments. The Subscription Support for Microsoft Dynamics 365 helps them drive continuous adoption, ensuring customers are realizing ongoing business value from the solutions they deploy.
Reimaging your B2B marketing automation
As today’s digital-first buyers become more informed, meeting their expectations is becoming a more difficult challenge. They’re more likely than ever to ignore anything that doesn’t feel authenticforcing businesses to connect customer insights and data across the organization to meet customers where they are and to capitalize on every opportunity.
B2B marketing automation platforms serve as an essential tool for customer journey orchestration in support of B2B customer acquisition, retention, and growth objectives. As Gartner mentioned in their report, “while B2B marketing automation platforms are designed to primarily support B2B use cases, they can also provide much needed functionality to B2C organizations selling high-consideration products and/or B2B2C models with more complex, indirect sales processes.”
We are excited to be positioned as a Leader in the Gartner Magic Quadrant and are committed to helping both our B2B and business-to-consumer (B2C) customers meet the changing expectations of their customers. We invite you to learn more about how Microsoft is helping marketers around the world reimagine customer experience.
2022 Gartner Magic Quadrant for B2B Marketing Automation Platforms
Microsoft is excited to be recognized as a Leader in the Gartner Magic Quadrant.
Source: Gartner, Magic Quadrant for B2B Marketing Automation Platforms, Rick LaFond, Julian Poulter, Jeffrey L. Cohen, Matt Wakeman, Jeff Goldberg , 19 September 2022
*Gartner is a registered trademark and service mark and Magic Quadrant is a registered trademark of Gartner, Inc. and/or its affiliates in the U.S. and internationally and are used herein with permission. All rights reserved. Gartner does not endorse any vendor, product or service depicted in its research publications, and does not advise technology users to select only those vendors with the highest ratings or other designation. Gartner research publications consist of the opinions of Gartner’s research organization and should not be construed as statements of fact. Gartner disclaims all warranties, expressed or implied, with respect to this research, including any warranties of merchantability or fitness for a particular purpose.
**This graphic was published by Gartner, Inc. as part of a larger research document and should be evaluated in the context of the entire document. The Gartner document is available upon request from Microsoft.
Because of the right outer join, the filter on Category is applied after the join is performed on the entire fact table.
The query results will be correct, but the performance will be bad.
What can be done to make the query perform better?
We need to convince PBI to create an inner join instead of the rightouter join.
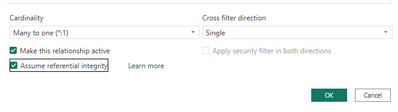
There are two way to force an inner join:
Define the relationship as M:M
Define the relationships as 1:M and checking the option Assume Referential integrity.
In the case of inner join , the filter(s) on the dimension that appear at the end of the query, will be pushed by the ADX engine to the early stages of execution and so the join will be only on the products that belong to Cat1 in this example.
The result will be a much faster query.
Summary
If you see in the queries generated by PBI any other join except inner, you have to change your PBI model so that the joins will be inner.
This article is contributed. See the original author and article here.
Introduction
AI, without a doubt, is revolutionizing low code development. The capabilities of Artificial Intelligence into Low code have the power to revolutionize the way you work and enhance the applications and solutions you build.
You may be wondering what’s in it for you with AI as a low code developer. Well, AI has immense potential from automating repetitive tasks, adding intelligence into your applications, building chatbots, automated workflows, predictive analysis and much more on AI.
As a low code developer, you understand the power of technology to streamline the development to deployment process. Well in addition, with the recent development of AI this is a chance to take your skills to the next level. This is a rapidly growing field with massive impact and as a low code developer, you certainly do not need ten years of experience to develop AI models or rather add intelligence into your solution. In this blog, we’ll explore the basics of AI for low code developers, what opportunities you have in this platform and responsible AI.
What is Artificial Intelligence?
AI refers to the development of algorithms that can perform tasks that typically require human intelligence such as recognition, decision-making, solving problems and cognitive services. This usually involves training a computer/model to recognize patterns, make decisions and solve problems based on data. With the current development of AI, the main goal is to be able to create systems that can learn, adapt, and improve over time.
The results of AI are immense and have the potential to revolutionize many industries and change the way we live and work. For a low code developer this means you can automate tasks, improve accuracy and speed, provide valuable insights that can enhance user experience.
Opportunity of AI for a low code developer.
As a low code developer, the opportunity to integrate AI into your development process is too good to ignore. Regardless of your level of experience as a low code developer, AI is a powerful tool that can help you add intelligence into your solution and get the most out of it. As AI continues to evolve, we can expect to see more innovative solutions and use cases of AI in our solutions. Some examples of the several ways you can use AI as a low code developer include:
Creating chatbots – Leveraging Power Virtual Agents helps you create conversational chatbots where customers can get quicker services from your business with tasks such as customer service, ticket processing and general inquiry. It is easier also to integrate chatbots solutions into your existing solutions easily. For instance, once you are done building your solution you can publish the chatbot onto your website, mobile apps, messaging platforms (teams, Facebook). Get started here Intelligent Virtual Agents and Bots | Microsoft Power Virtual Agents
Top tip: Remember to publish your chatbot for any updates you make to reflect changes.
Automated workflows – AI can be used to automate workflows in low code applications, reducing manual effort and improving efficiency. This also helps an organization follow a structured manner in the business processes with the organization.
Decision making – Using AI you can be able to gain some valuable insights from the data that you have. For instance, if you need to predict a future trend based on data from the past few years, you can achieve this as a low code developer using AI
Image and object detection – Leveraging object detection allows you to fully utilize AI as a low code developer from tasks such as document scanning and extraction of texts from images. This will help you improve the quality of your applications and extract substantial amounts of data in a short time.
Natural language processing – This can be used in low code applications to improve accuracy and speed of text- based tasks such as sentiment analysis. If you need to detect the tone in a customer service review, you can leverage on this to detect the sentiments whether it is positive, neutral, or negative.
Here are some of the key benefits of using AI in low code development.
Automation of repetitive tasks – With AI, you can automate repeated tasks such as data entry, form processing and this will let you focus on other high priority business activities
Improved accuracy and speed – Some processes that are tedious and manual can be prone to errors and time consuming. Pre-built AI Models can be integrated into your solutions to enhance your application’s accuracy and speed.
Gaining valuable insights – AI can help low code developers extract valuable insights from data such as trends, this helps you make data-driven decisions for greater business success.
Getting started with AI as a Low code developer.
You can quickly bring AI into your solutions using Microsoft Power Platform, connecting to your business data regardless of where they are stored in One Drive, SharePoint, Azure, Dataverse
With a few simple steps you can easily get started using AI Builder
.
Understand business requirements – Before you begin, it is important to understand the business process that needs to be integrated with AI.
Choose a use case – Once you have decided on the business process that needs AI choose the best use case you can start with. Some of the common use cases we have are similar across businesses, including form processing, invoice processing and sentiment analysis. If the business problem is unique to your business, you can create a model from scratch to better suit your business.
Using AI Builder – To use AI Builder, you need to have a Microsoft Power Apps or Power Automate license, with which you can access AI Builder from your Power App or flow. If you don’t have one, you can create a free developers account here
Choosing an AI Model – You can either use a pre-built template or create a custom model from scratch using your own data or pre-existing data. Using a prebuilt model means that you are utilizing already built AI scenario templates, like invoice processing.
Test and deploy your model – Once you have selected the model that you want to use based on the business process case, with AI builder, you can test the model’s performance before deployment. With this you can validate the model’s accuracy and adjust it as needed. Once you are satisfied you can deploy it to your Power Apps application or Power Automate flow.
Monitoring and Improvement – After deploying your model, you can monitor its performance and adjust as per your need.
Responsible AI
As you get started with AI as a low code developer, it is important to ensure that the AI you build is developed and used for the right purpose and in the right environment. Microsoft highlights six key principles for responsible AI namely:
Transparency
Fairness
Reliability and safety
Privacy and security
Inclusiveness
Accountability.
To achieve this as a low code developer who is exploring AI, Microsoft provides resources to help the developers, businesses, and individuals to understand and use responsible AI practices and ethics. This provides a set of principles to guide the development of AI in a responsible way.
This article is contributed. See the original author and article here.
Preparando-se para o exame DP-900 Microsoft Azure Data Fundamentals e não sabe por onde começar? Este artigo é um guia de estudo para certificação DP-900!
Fiz uma curadoria de artigos da Microsoft para cada objetivo do exame DP-900. Além disso, compartilho os conteúdos da #SprintDP900, uma série de mentorias do Microsoft Reactor.
No Microsoft Reactor, oferecemos diversos conteúdos gratuitos de capacitação em tecnologias da Microsoft e organizamos sprints de estudos para certificações. Na #SprintDP900, estamos realizando uma série de 3 aulas sobre certificação Azure Data Fundamentals, nos dias 28 de fevereiro, 01 e 02 de março. Todas as pessoas que participarem do Cloud Skills Challenge e assistirem as aulas, poderão participar do quiz de avaliação de conhecimentos e concorrer a um voucher gratuito para realização da prova.
Agenda #SprintDP900
28 de fevereiro, às 12:30h #SprintDP900: Introdução à Banco de dados no Azure e tipos de serviços
No primeiro encontro, você irá aprender sobre os conceitos básicos de banco de dados na nuvem, entendo cargas de trabalho, funções e serviços comuns.
As gravações das aulas estarão disponíveis em nosso canal, basta acessar o link de cada sessão.
O Microsoft Cloud Skills Challenge é uma plataforma integrada com o Microsoft Learn, que é uma plataforma global, disponível 24 horas por dia, 7 dias por semana. Você pode criar sua agenda de estudos, pois o desafio estará disponíveis no período de 28/02/2023 a 10/02/2023. As aulas semanais ocorrem no formato ao vivo e se você não puder participar, terá a possibilidade de assistir as gravações.
O que eu preciso fazer para ganhar um voucher de certificação?
Você deverá realizar sua inscrição para as aulas ao vivo e realizar a trilha de estudos proposta no Cloud Skills Challenge. Na aula que será realizada no dia 02 de março, vamos disponibilizar um quiz de validação de conhecimentos para selecionar as 100 pessoas que receberão, por e-mail, um voucher gratuito para realização da certificação DP-900: Azure Data Fundamentals. O critério de priorização dos vouchers é a conclusão do Cloud Skills Challenge, participação nas aulas e obtenção de 80% de acerto no quiz.
Recursos adicionais de aprendizado
Se você não tem muita familiaridade com computação em nuvem, recomendo estudar a trilhaAzure Fundamentals:


![[Data Virtualization] May need to update Java (JRE7 only uses TLS 1.0)](https://www.drware.com/wp-content/uploads/2023/02/medium-52)


Recent Comments