This article is contributed. See the original author and article here.
Azure Sentinel Incidents contain detection details which enable security analysts to investigate using a graph view and gain deep insights into related entities. The responsiveness of a security analyst towards the triggered incidents (also known as Mean Time To Acknowledge – MTTA) is crucial as being able to respond to a security incident quickly and efficiently will reduce the incident impact and mitigate the security threats.
The newly introduced Automation Rules allow you to automatically assign incidents to an owner with the built-in action. This is extremely useful when you need to assign specific incidents to a dedicated SME. It will reduce the time of acknowledgement and ensure accountability for each incident.
However, some organizations have a group of analysts working on different shift schedules and required the ability to assign an incident to an analyst automatically based on the working schedule to improve the MTTA.
In this blog, I will discuss how to extend the incident assignment capability in Azure Sentinel by using a Playbook to rotate user assignments based on shift schedules. Plus, I will also discuss how you could manage incident assignments for multiple support groups at the end of the blog.
Considerations and design decisions
Before we dive into the Playbook, let’s discuss some of the important points taken into consideration and the design decisions when implementing this incident assignment Playbook.
- Scheduling tool
- Shifts for Teams is used as the scheduling tool because it is available as part of the Microsoft Teams and it provides the ability to create and manage employee schedules.
- It is easier to automate incident assignment when there is a centralized schedule management tool to keep track of employees’ timesheet or availability.
- Assignment criteria
- The goal is to assign the incidents equally across all analysts. Hence, the analyst with the least number of incidents in current shift will be assigned first.
- We also need to consider the average time a security analyst takes to resolve a security incident (also known as Mean Time To Resolve – MTTR). In this Playbook, I have set a default value of 1 hour as the MTTR (a configurable variable) and I am using it as a condition where a security analyst must have at least 1 hour remaining in the shift to be eligible for incident assignment. For example, if a security analyst is about to go off shift in 30 minutes, the incident won’t be assigned to that analyst as the remaining time is less than the default value of 1 hour.
- Notification
- It is important to notify the assignee when an incident is being assigned.
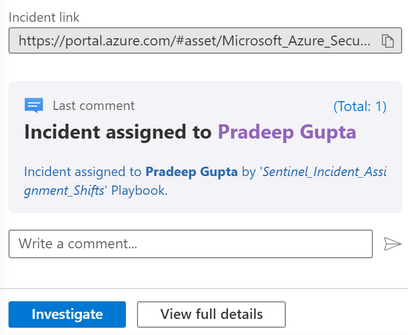
- In this Playbook, an email will be sent to the assignee and a comment will be added to the incident on the incident assignment.
What is Shifts for Teams?
Shifts is a schedule management application in Microsoft Teams that helps you create, update, and manage schedules for your team. Shifts is enabled by default for all Teams users in your organization. You can add Shifts app to your Teams menu by clicking on the ellipses (…) and select Shifts from the app list.
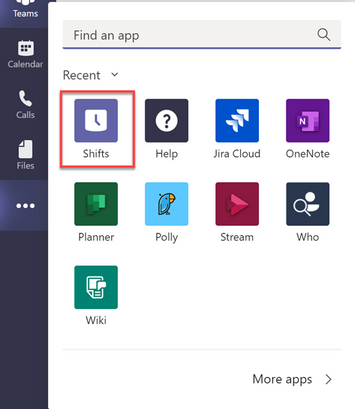
The first step to get started in Shifts is to populate schedules for your team. You can either create a schedule from scratch (create for yourself or on behalf of your team members) or import an existing one from Excel. In terms of permission, you need to be an Owner of the team to create the schedule. The schedules will not be visible to your team members until you publish it by clicking “Share with team” button.
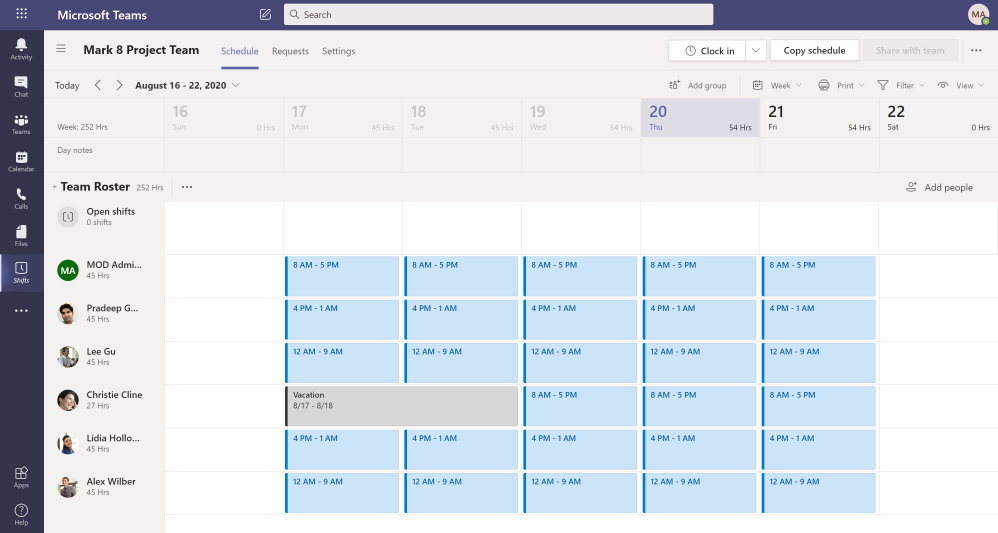
Here is an example of how a Shifts schedule looks like. If you’re an owner of multiple teams, you can toggle between different Shifts schedules to manage them.
The Logic App
Download link:
Here is the link to the Logic App template.
Prerequisites:
1. User account or Service Principal with Azure Sentinel Responder role
– Create or use an existing user account or Service Principal or Managed Identity with Azure Sentinel Responder role.
– The account will be used in Azure Sentinel connectors (Incident Trigger, Update incident and Add comment to incident) and a HTTP connector.
– This blog will walk you through using System Managed Identity for the above connectors.
2. Setup Shifts schedule
– You must have the Shifts schedule setup in Microsoft Teams.
– The Shifts schedule must be published (Shared with team).
3. User account with Owner role in Microsoft Teams
– Create or use an existing user account with Owner role in a Team.
– The user account will be used in Shifts connector (List all shifts).
4. User account or Service Principal with Log Analytics Reader role
– Create or use an existing user account with Log Analytics Reader role on the Azure Sentinel workspace.
– The user account will be used in Azure Monitor Logs connector (Run query and list results).
5. An O365 account to be used to send email notification.
– The user account will be used in O365 connector (Send an email).
Post Deployment Configuration:
1. Enable Managed Identity and configure role assignment.
a) Once the Playbook is deployed, navigate to the resource blade and click on Identity under Settings.
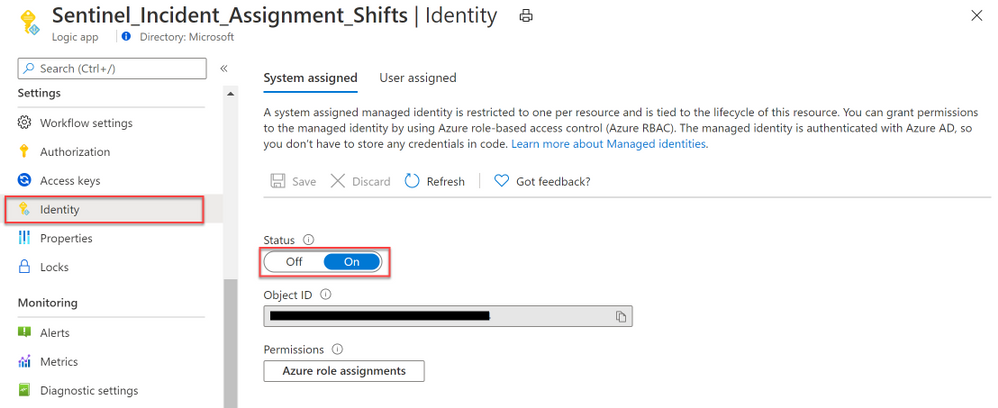
b) Select On under the System assigned tab. Click Save and select Yes when prompted.
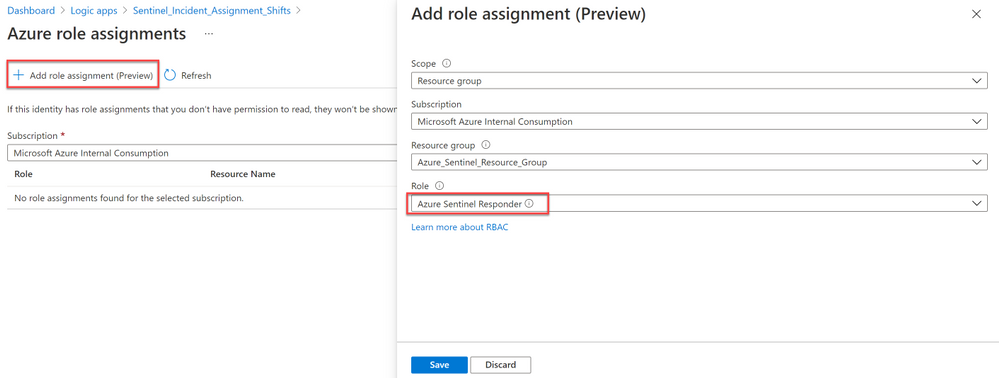
c) Click on Azure role assignments to assign role to the Managed Identity.
d) Click on + Add role assignment.
e) Select Resource group under Scope and select the Subscription and Resource group where the Azure Sentinel Workspace is located.
(Note: it’s the subscription and resource group of the Azure Sentinel workspace, not the Logic App).
f) Select Azure Sentinel Responder under Role and click Save.
2. Configure connections.
a) Edit the Logic App to find the below connectors marked with .
– When Azure Sentinel incident creation rule was triggered.
– List all shifts.
– Run query and list results – Get user with low assignment.
– Update incident.
– Add comment to incident.
– Send an email.
b) We will leverage the Managed Identity we configured in step 1 for the following Azure Sentinel Connectors
(hint: these are the ones with Azure Sentinel logo):
– When Azure Sentinel incident creation rule was triggered.
– Update incident.
– Add comment to incident.
i) On the first connector (trigger), select Add new
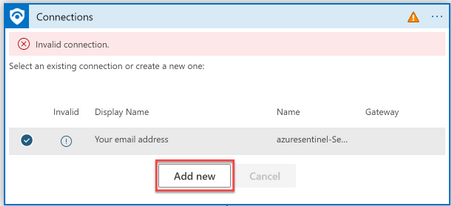
ii) Click “Connect with managed Identity”.
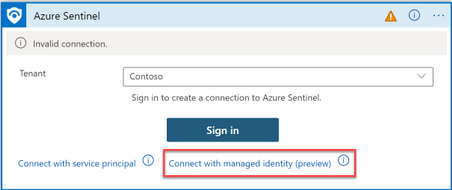
iii) Specify the connection name and click Create.
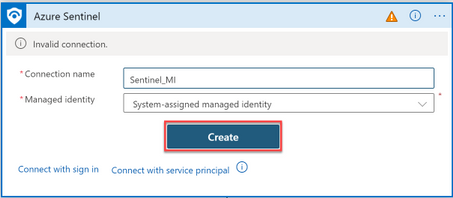
iv) On the remaining Azure Sentinel Connectors, select the connection you created earlier.
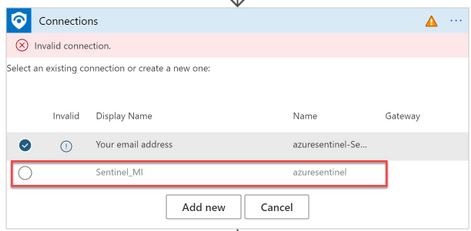
c) Next, fix the below remaining connectors by adding a new connection to each connector and sign in with the accounts described under prerequisites.
– List all shifts.
– Run query and list results – Get user with low assignment.
– Send an email.
3. Select the Shifts schedule
a) On the List all shifts connector, click on the X sign next to Team field for the drop-down list to appear.

b) Select the Teams channel with your Shifts schedule from the drop-down list.
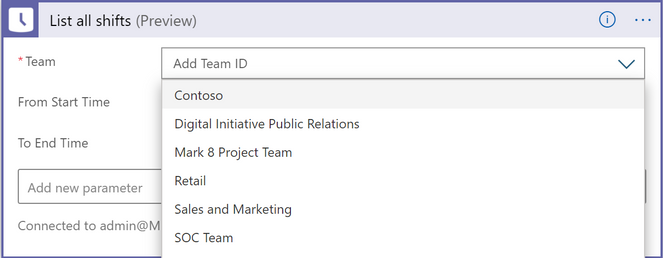
c) Save the Logic App once you have completed the above steps.
Assign the Playbook to Analytic Rules using Automation Rules
1) Before you begin, ensure you have the following permissions:
– Logic App Contributor on the Playbook.
– Owner permission on the Playbook’s resource group (to grant Azure Sentinel permission to the playbooks’ resource groups).
2) Next, create an Automation Rule to assign the Playbook to your analytic rules with you specified conditions.
3) In the below example, I am creating an Automation Rule to run the incident assignment Playbook for selected Analytic rules and the severity equals to “High” and “Medium”.
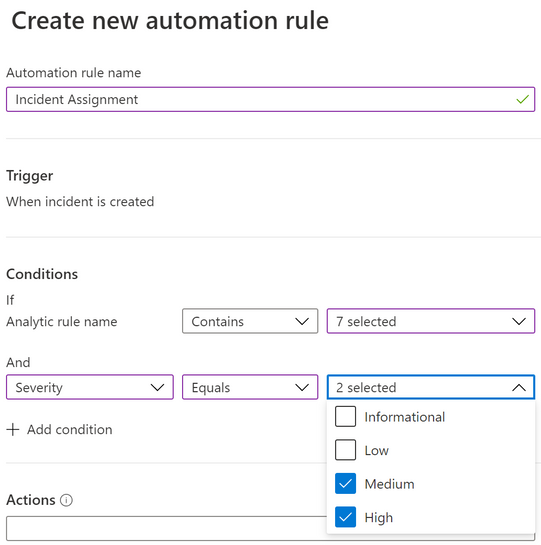
4) Uder Actions -> select Run Playbook and choose the Playbook.
Note: If the Playbook appeared as grey-out in the drop-down list, that means Azure Sentinel doesn’t have permission to run this Playbook.
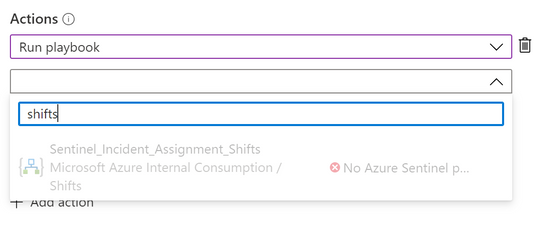
You can grant permission on the spot by selecting the Manage playbook permissions link and grant permission to the playbooks’ resource groups.
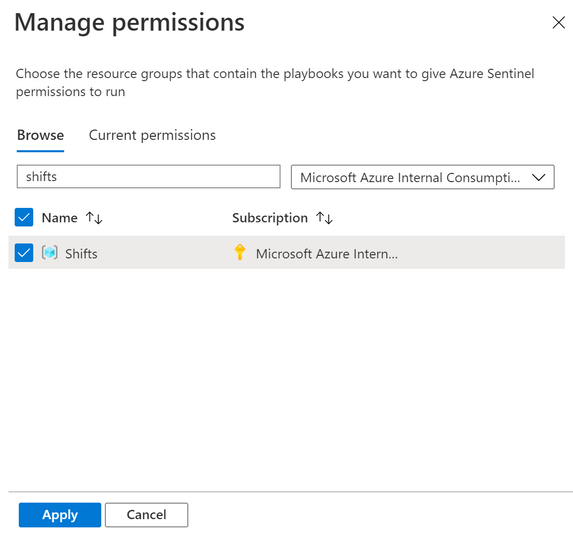
5) After that, you will be able to select the Playbook. Click Apply.
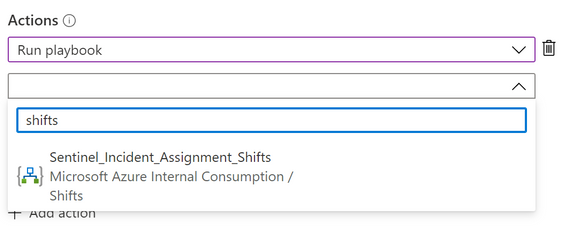
Note: If you received the error message “Caller is missing required Playbook triggering permissions” when saving the Automation Rule, that means you do not have the “Logic App Contributor” permission on the Playbook.
Incident Assignment Logic
1) When an incident is generated, it triggers the Logic app to get a list of analysts who are on-shift at that time (analysts with time-off will be excluded from the incident assignment).
2) Analyst with the least incidents assigned on the current shift will be assigned incident first. When there are multiple analysts with same incident count, the selection be will based on the order of the analyst’s AAD objectId.
3) Analysts must have at least 1 hour left (default value) in their shift to be eligible for assignment.
For example, if the shift of an analyst is ending at 6pm. The analyst will not be assigned between 5pm and 6pm.
You can change the variable value of “ExpectedWorkHoursPerIncident” to 0 if you want the analyst to be assigned during the final shift hour.

4) Here is a sample assignment flow for your reference:
In this example, the following shift schedules have been configured for 4 analysts.
User Object Id | Shift Schedule |
A1 | 8am to 6pm |
A2 | 8am to 6pm |
A3 | 4pm to 2am |
A4 | 4pm to 2am |
Here is how the incident assignment would work based on the incident assignment logic:
Incident Creation Time | Assign to | Total |
8:00am |
A1 | A1=1 A2=0 A3=0 A4=0 |
9:45am |
A2 | A1=1 A2=1 A3=0 A4=0 |
2:00pm |
A1 | A1=2 A2=1 A3=0 A4=0 |
4:00pm |
A3
| A1=2 A2=1 A3=1 A4=0 |
4:10pm |
A4 | A1=2 A2=1 A3=1 A4=1 |
5:00pm |
A3
*A3 is assigned instead of A2 because ExpectedWorkHoursPerIncident is set to 1. | A1=2 A2=1 A3=2 A4=1 |
5:50pm |
A4
*A4 is assigned instead of A2 because ExpectedWorkHoursPerIncident is set to 1. | A1=2 A2=1 A3=2 A4=2 |
11:20pm |
A3 | A1=2 A2=1 A3=3 A4=2 |
Notification
Email Notification:
- When an incident is assigned, the incident owner will be notified via email.
- The email body has a direct link to the incident page and a banner with color mapped to incident’s severity (High=red, Medium=orange, Low=yellow and Informational=grey).
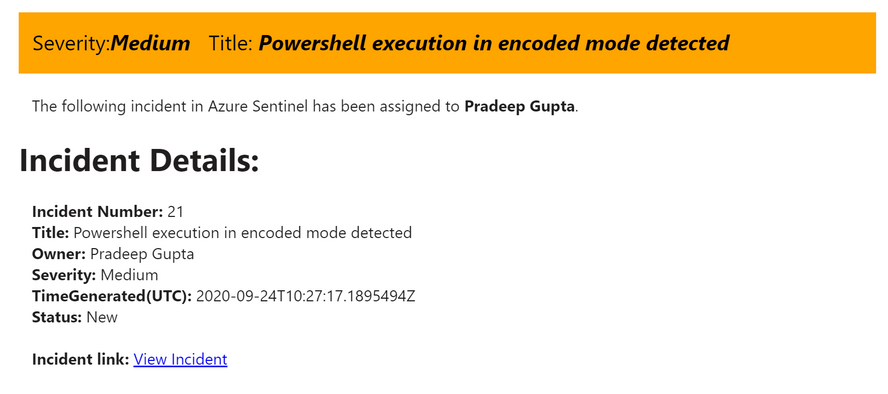
Incident Comment:
- Comment will be added to the incident for the assignment with the name of the Playbook.
Managing Incident assignment for multiple Support Groups
There are times when you need to assign incidents based on different incident types and support groups. For example, Team A is responsible for Azure AD incidents, Team B is responsible for Office 365 incidents while the rest of the incidents will go to Team C.
This can be achieved by creating Shifts schedule for each support group and deploy a separate Playbook for each group. Then, assign the Logic App to the analytic rules accordingly as illustrated in the diagram below:
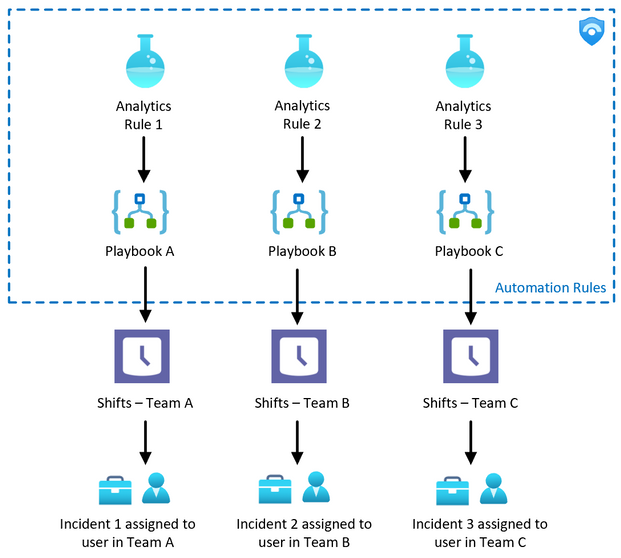
Below are the sample Automation Rules created for multiple Shifts channels (Support Groups).

Each Automation Rule is configured for different Team:
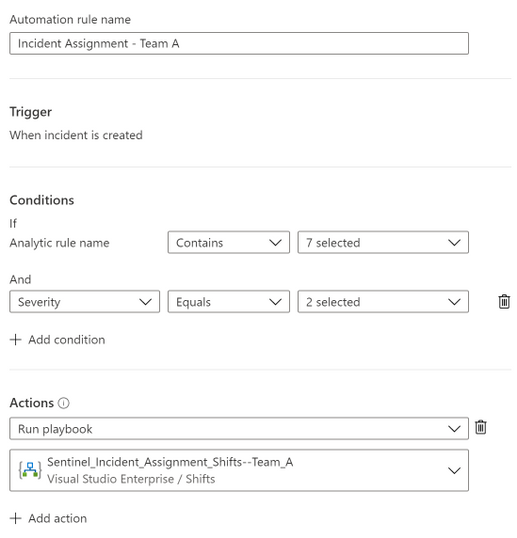
Automation Rule for Team A
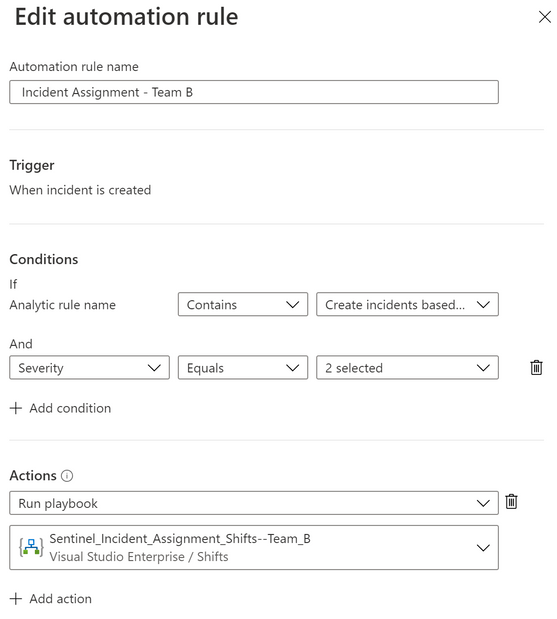
Automation Rule for Team B
Summary
I hope you find this useful. Give it a try and hopefully it would help in reducing the time of acknowledgement (especially for critical incidents) in your environment.
Special thanks to @liortamir , @Yaniv Shasha , @edilahav and @Ofer_Shezaf for the review.
Brought to you by Dr. Ware, Microsoft Office 365 Silver Partner, Charleston SC.


Recent Comments