by Scott Muniz | Jul 29, 2020 | Uncategorized
This article is contributed. See the original author and article here.
Scenario: Two schemas: A and B. User test has access to everything under schema A, he does not have permissions under Schema B. Schema A and B were created by the same owner.
A view was created under schema A pointing to a select under schema B. Customer can’t query table under schema B, but once he does a select on the view under Schema A he is able to access data under schema B. (??) weird, is not?
------------------------------
--Master Database
CREATE LOGIN testUser1
WITH PASSWORD = 'Lalala!0000'
----Change to SQLDW
CREATE USER testUser1 FROM LOGIN testUser1
------------------------------------------
CREATE SCHEMA Schema_B;
go
CREATE SCHEMA Schema_A;
go
--------------------------------------
GRANT CREATE SCHEMA ON DATABASE :: [SQL_DW_database_name] TO testUser1
GRANT SELECT, INSERT, DELETE, UPDATE, ALTER ON Schema::Schema_A TO testUser1
------------------------------------------
CREATE TABLE Schema_B.TestTbl
WITH(DISTRIBUTION=ROUND_ROBIN)
AS
SELECT 1 AS ID, 100 AS VAL UNION ALL
SELECT 2 AS ID, 200 AS VAL UNION ALL
SELECT 2 AS ID, 200 AS VAL
go
----------------------------------------
CREATE VIEW Schema_A.Bypass_VW
AS -- runs successfully
SELECT * FROM Schema_B.TestTbl
go
-------------------------------------------------------------------------
--Log into SQLDW with the testUser1 ; --->executing as this user.
GO
SELECT * FROM Schema_B.TestTbl---> user does not have access
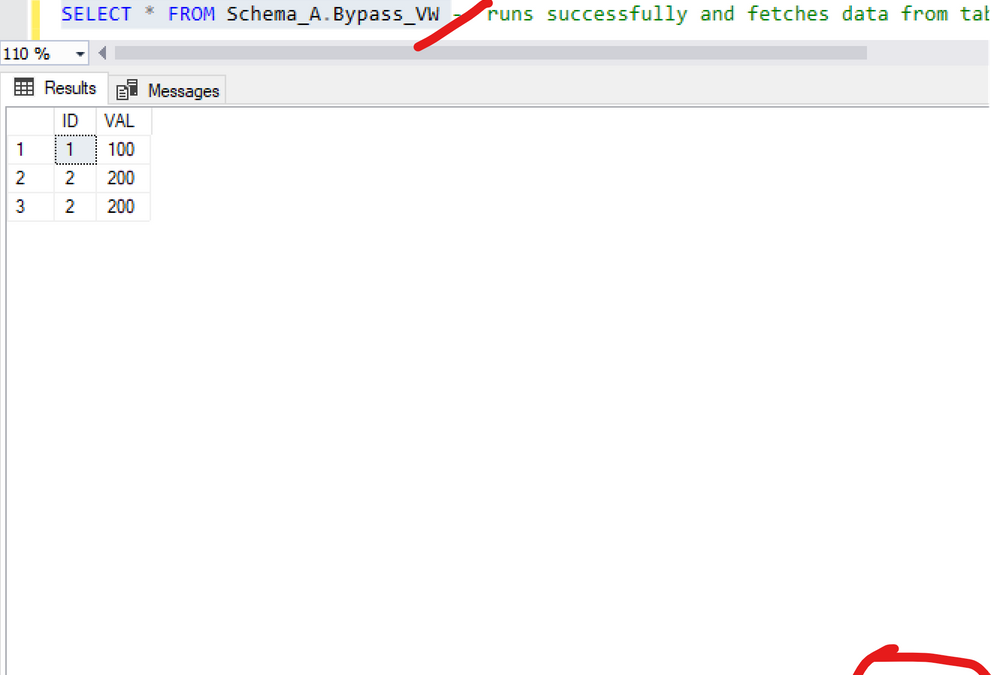
SELECT * FROM Schema_A.Bypass_VW -- runs successfully and fetches data from table not having select access to
Figure 1 and 2 exemplifies:

Figure 1: Query view

Figure 2: Query table
Here is the documentation about this:
A user with ALTER permission on a schema can use ownership chaining to access securables in other schemas, including securables to which that user is explicitly denied access. This is because ownership chaining bypasses permissions checks on referenced objects when they are owned by the principal that owns the objects that refer to them. A user with ALTER permission on a schema can create procedures, synonyms, and views that are owned by the schema’s owner. Those objects will have access (via ownership chaining) to information in other schemas owned by the schema’s owner. When possible, you should avoid granting ALTER permission on a schema if the schema’s owner also owns other schemas.
For example, this issue may occur in the following scenarios. These scenarios assume that a user, referred as U1, has the ALTER permission on the S1 schema. The U1 user is denied to access a table object, referred as T1, in the schema S2. The S1 schema and the S2 schema are owned by the same owner.
The U1 user has the CREATE PROCEDURE permission on the database and the EXECUTE permission on the S1 schema. Therefore, the U1 user can create a stored procedure, and then access the denied object T1 in the stored procedure.
The U1 user has the CREATE SYNONYM permission on the database and the SELECT permission on the S1 schema. Therefore, the U1 user can create a synonym in the S1 schema for the denied object T1, and then access the denied object T1 by using the synonym.
The U1 user has the CREATE VIEW permission on the database and the SELECT permission on the S1 schema. Therefore, the U1 user can create a view in the S1 schema to query data from the denied object T1, and then access the denied object T1 by using the view
(https://docs.microsoft.com/en-us/sql/t-sql/statements/grant-schema-permissions-transact-sql?view=sql-server-ver15)
Note this is the same across any version of SQL Server: SQLDB, SQLDW, SQL Server
Workaround:
I changed my demo based on the documentation. The point here is: there are 2 schemas with the same owner. So let’s change that: different schema owners.
List the ownership and keep this information:
----Create a new login
--Master Database
CREATE LOGIN testowner
	WITH PASSWORD = 'Lalala!0000'
--SQLDW
CREATE USER testowner FROM LOGIN testowner
-------------
--list objects ownership
SELECT 'OBJECT' AS entity_type

    ,USER_NAME(OBJECTPROPERTY(object_id, 'OwnerId')) AS owner_name

    ,name

FROM sys.objects


---Keep the result of the permission. Once we change the ownership of the schema the permission per schema will be reset. ( if there is such information)
Select USER_NAME(principal_id),* from sys.schemas

--- I will change Schema_B as my schema permissions are only on Schema_A
ALTER AUTHORIZATION ON SCHEMA::Schema_B TO testowner;

----------

--list objects ownership again. Check a new owner was added
SELECT 'OBJECT' AS entity_type

    ,USER_NAME(OBJECTPROPERTY(object_id, 'OwnerId')) AS owner_name

    ,name

FROM sys.objects
And as figure 3 shows, the ownership chaining was solved:

Another way to solve this would include for example: Deny to the user select on the View(Schema_A.Bypass_VW ) or deny the select, like:
Deny select on Schema_A.Bypass_VW  TO testUser1
Deny SELECT ON SCHEMA :: Schema_A TO testUser1
Thanks Joao Polisel and Moises Romero for the advice on this.
That is it!
Liliam
UK Engineer
by Scott Muniz | Jul 29, 2020 | Uncategorized
This article is contributed. See the original author and article here.
This is the second in a series of posts based on interviews with experienced Dynamics 365 Microsoft Certified Trainers (MCTs). The premier technical and instructional experts in Microsoft technologies, MCTs offer live virtual instructor-led training (VILT) that provides in-depth, hands-on experience tailored to learners’ needs. We talked with three MCTs about their approach to teaching Dynamics 365 skills and preparing partners and customers for Microsoft Certification: Julian Sharp on Microsoft Power Platform, Beth Burrell on customer engagement, and Brandon Ahmad on finance and operations. Whether you’re a business owner in search of training for your company or someone who wants to build your skills and get certified in Dynamics 365—or if your goal is to become an MCT yourself—you’ll find their take on Dynamics 365 training as inspiring as it is valuable.
________
Microsoft Dynamics 365, a set of integrated business applications, long ago surpassed previous Microsoft CRM and ERP solutions, explains Beth Burrell, MCT and CRM Senior Client Engagement Manager at Microsoft Learning Partner DXC Technology. In fact, the functionality of Dynamics 365 has expanded and deepened so much over the past few years—now covering sales, marketing, commerce, customer service, finance, operations, supply chain management, human resources, and AI—that it’s hard to keep up with all the new capabilities without expert training. There’s no longer one set of skills to know, but many, so you can’t be proficient after just one course. You need to traverse all the functionality of Dynamics 365 to see what it does, what it can do. And since the IT or tech world isn’t always the real world of business, you also need a different approach to training than familiarizing yourself with the documentation. Now training isn’t geared to just IT techs but also to low-code or no-code businesspeople who need to know how to create and use Dynamics 365 apps.
The good news, Burrell says, is that the opportunities for and ways to train in Dynamics 365 have also improved over the past years. Dynamics 365 training, which once had its own separate portal, is now part of Microsoft Learn. All Dynamics 365 documentation is linked to Microsoft Learn, too, which makes it much more accessible. The free, online Dynamics 365 learning paths and modules available on Microsoft Learn can help you build your skills and work toward certification—on your own schedule. And virtual instructor-led training (VILT) offered by Microsoft Learning Partners and taught by MCTs helps you dig deep into Dynamics 365 capabilities, keep up to date with new releases, and prepare for certification. As a Microsoft Most Valuable Professional (MVP) for Dynamics 365 who continues to advocate for the latest releases and works closely with the Dynamics 365 team, Burrell enjoys this ever-expanding and advancing functionality and the challenge of training people in it.
Although the hands-on labs and walk-throughs available on Microsoft Learn are invaluable, the kind of intensive, tailored training you get in a course led by an MCT takes learning to another level. MCTs are highly trained and experienced, and they have access to the best tools and labs as well as techniques. And, she’s quick to add, they form a genuine community. They share teaching tips, how to’s and fixes, and new ways to access tasks, so when you take an MCT-led course, you’re benefiting from the wisdom of not just one instructor but many.
Take Course 55260A: Microsoft Dynamics 365 for Customer Service, which prepares you for Exam MB-230: Microsoft Dynamics 365 Customer Service. This is the course Burrell often starts with for people and organizations, because it covers the functionality of Dynamics 365 from the start of a business process to its end. She also begins here because everyone, no matter what their background, has had experience with customer service or a help desk and is familiar with calls, cases, and tickets. That way she can build on what learners already know.
Burrell tailors this course to a business that learners are likely to be familiar with, like a bike shop or retail store, so the tools and tasks she focuses on resonate with them and correlate with real-life situations. Real-world learning, she explains, is a hallmark of MCT training. And, if an organization or team wants to focus the training in a specific area, like sales, Burrell focuses her teaching that way. She uses Microsoft Official Courseware (MOC) as the “backbone” of her teaching, to make sure everything is covered to prepare students for the certification exam. But she’s also always looking for ways to help them connect the technology, tasks, and terminology with their experience in the world so they learn how to use the business apps skillfully, regardless of whether they plan to take the exam and get certified.
She starts with a focused review of what participants have already learned on their own using the modules and learning paths on Microsoft Learn, tailoring the language she uses to class members or to the industry broadly. She uses this material as a baseline. Instead of reading from a screen, she uses a product or task to create views, flows, and more, so participants see the technology in action before she asks them to create a task and work it through end to end, from bot to chat to case number, and so on. Next she jumps into MOC, to “show them on the map where they’re going to drive,” and then moves into the labs to walk through the functionality. In the labs, she explains each task rather than using step-by-step instruction, because in her experience as a teacher she’s found that simply following instructions does not equal learning. Burrell’s commitment to helping students learn to use the technology in real-life situations is evident in the way she supplements the course materials. For example, she might ask students in pairs to role-play a customer interaction, to help them see where things can break down and how to respond. She even gives homework that challenges them to use their skills to solve a specific business problem they’ve experienced.
“Cookie-cutter training doesn’t work,” she notes. Not everyone learns the same way, so the combination of visuals, walk-throughs, reading, hands-on exercises, and interaction with the instructor is key. “And it’s fun to use a different approach,” she adds. Throughout, she focuses on proficiency not abstract terms. She tells learners the official name of a functionality but doesn’t insist that they use those terms. Instead, she encourages class members to focus on performing the task and calling it whatever works best for them. Communication is one of Burrell’s strong suits. When she started out as an IT person working with servers, she discovered she had a knack for talking in laypeople’s terms and gradually found her way from doing informal one-on-one training to more formal group training.
Burrell also tailors her teaching to the experience of each learner, making sure to keep a good pace for the class. She does this by building in 5 to 10 minutes at the end of each section to review, let the learners play with the technology on their own, or catch up, which gives her time to shadow participants and find out whether they have questions or need help. Classes range from 10 to 15 participants, so she’s able to give people this individual attention.
What she enjoys most is the moments when learners experience an Aha! moment. “That’s the fun of teaching for me,” she says, “when I can see students getting it.” Fun is a word Burrell uses often when talking about the training she leads. Getting students engaged is what makes it fun for her. “Some people may think they’re too old to learn, or they may be in the class because their employer requested they take it. I love seeing all students, even these, get engaged and enjoy the learning. They gain a sense of accomplishment and leave eager to show peers or an employer their new skills.” After a training, some students write her to let her know about something they achieved using Dynamics 365, and she finds their excitement as well as their proficiency rewarding.
It’s clear listening to Burrell that she’s an excellent instructor, creative and passionate about both Dynamics 365 and teaching. Train with Burrell or another MCT and enjoy building real-world customer engagement skills that can help make valuable contributions to your business and your career.
Explore MCT-led training for more Dynamics 365 certifications:
Browse MCT-led Dynamics 365 exam- and certification-prep courses offered by Learning Partners.
_______
by Scott Muniz | Jul 29, 2020 | Alerts, Microsoft, Technology, Uncategorized
This article is contributed. See the original author and article here.
Howdy folks!
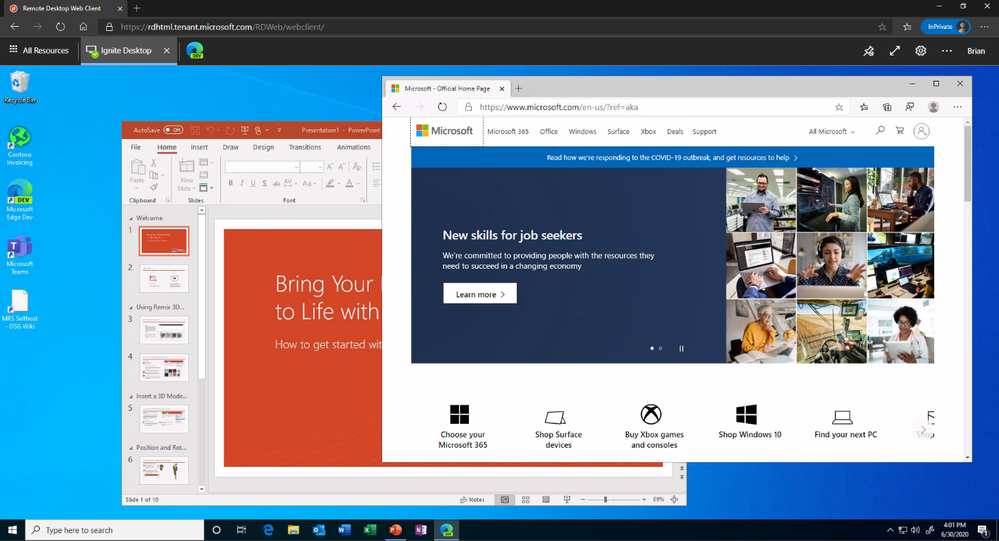
Today we’re announcing the public preview of Azure AD Application Proxy (App Proxy) support for the Remote Desktop Services (RDS) web client. Many of you are already using App Proxy for applications hosted on RDS and we’ve seen a lot of requests for extending support to the RDS web client as well.
With this preview, you can now use the RDS web client even when App Proxy provides secure remote access to RDS. The web client works on any HTML5-capable browser such as Microsoft Edge, Internet Explorer 11, Google Chrome, Safari, or Mozilla Firefox (v55.0 and later). You can push full desktops or remote apps to the Remote Desktop web client. The remote apps are hosted on the virtualized machine but appear as if they’re running on the user’s desktop like local applications. The apps also have their own taskbar entry and can be resized and moved across monitors.
 Launch rich client apps with a full desktop like experience
Why use App Proxy with RDS?
RDS allows you to extend virtual desktops and applications to any device while helping keep critical intellectual property secure. By using this virtualization platform, you can deploy all types of applications such as Windows apps and other rich client apps as-is with no re-writing required. By using App Proxy with RDS you can reduce the attack surface of your RDS deployment by enforcing pre-authentication and Conditional Access policies like requiring Multi-Factor Authentication (MFA) or using a compliant device before users can access RDS. App Proxy also doesn’t require you to open inbound connections through your firewall.
Getting started
To use the RDS web client with App Proxy, first make sure to update your App Proxy connectors to the latest version, 1.5.1975.0. If you haven’t already, you will need to configure RDS to work with App Proxy. In this configuration, App Proxy will handle the internet facing component of your RDS deployment and protect all traffic with pre-authentication and any Conditional Access policies in place. For steps on how to do this, see Publish Remote Desktop with Azure AD Application Proxy.
 How Azure AD App Proxy works in an RDS deployment
Configure the Remote Desktop web client
Next, complete setup by enabling the Remote Desktop web client for user access. See details on how to do this at Set up the Remote Desktop web client for your users. Now your users can use the external URL to access the client from their browser, or they can launch the app from the My Apps portal.
As always, we’d love to hear any feedback or suggestions you may have. Please let us know what you think in the comments below or on the Azure AD feedback forum.
Best regards,
Alex Simons (@alex_a_simons)
Corporate Vice President Program Management
Microsoft Identity Division
Learn more about Microsoft identity:
by Scott Muniz | Jul 29, 2020 | Uncategorized
This article is contributed. See the original author and article here.
Hi IoT developers! We’ve refreshed the IoT Plug and Play Preview with new features and enhancements. You can get started today preparing your devices and applications for the next generation of IoT solutions enabled by IoT Plug and Play. Specifically, this release enables device developers and OEM’s to begin building devices they can certify for IoT Plug and Play ahead of the general availability launch. Furthermore, solution developers can begin creating IoT Plug and Play aware solutions using the latest SDKs with the updated IoT Plug and Play specifications that will seamlessly integrate with Azure IoT services and solutions from our partners.
The new IoT Plug and Play features dramatically enhances the developer experience for both device developers and solution builders. Device developers can declare their device model to IoT Hub at connection time using the open source SDKs that are production ready. Solution builders can develop solutions that automatically understand the device and start interacting with the devices, all without writing any embedded code.
Existing devices already connecting to and using Azure IoT communication patterns (Device Twins, Direct Methods, Telemetry) can be easily upgraded with minimal code changes. Device developers just need to describe the device capabilities in a model and include this model’s identifier in the connection string. On the solution side, developers can retrieve the model from its identifier and use it to make their applications dynamically recognize devices capabilities and adapt to these, delivering the next generation of IoT solutions.
IoT Plug and Play and Azure Digital Twins are both based on the Digital Twins Definition Language (DTDL) that is open source and is based on open W3C standards such as JSON-LD and RDF, which enables easier adoption across services and tooling.
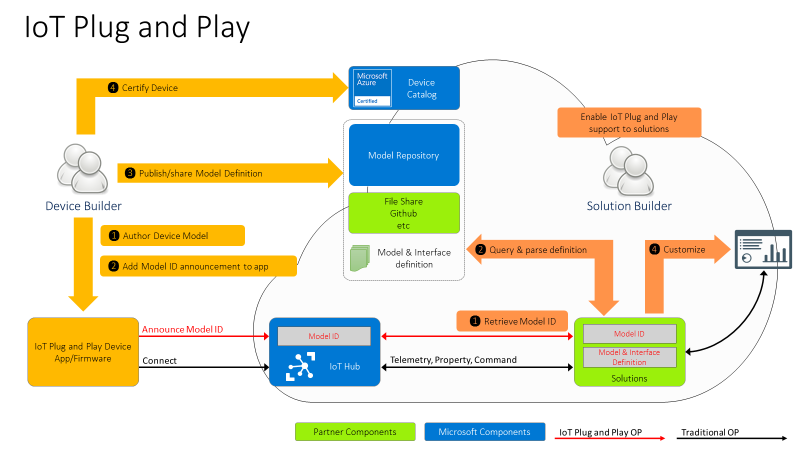
IoT Plug and Play simplifies IoT solution development
Device interactions with an IoT solution can be described in terms of telemetry, properties, and commands using the Digital Twins Definition Language (DTDL) version 2, the same language used by Azure Digital Twins (more on this later). These communication patterns are implemented in the MQTT protocol that’s broadly used in the industry to connect IoT devices. With IoT Plug and Play we go one step further by modeling device communication patterns with an open language. Our goal is to improve IoT solutions development productivity by enabling Model-driven workflows such as code generation, automatic validation, and dynamic UI.
Developers can use the Azure IoT device SDKs available in C, .NET, Java, Python and Node, or any MQTT library to interact with IoT Hub in a secure and reliable way. All of these have been updated to support IoT Plug and Play.
Let’s dive into what’s new and how to get started!
New Azure IoT Hub features
Azure IoT Hub is a Cloud service that enables secure and scalable device connections, communication, and integration with IoT solutions. Think of it as your device gateway. IoT Hub handles authentication of devices, establishes bidirectional communication, and offers several types of interactions with devices such as telemetry, device twin state synchronization, and direct methods, all built on top of the IoT Hub communication protocol.
However, these patterns on their own aren’t defining a shared convention between device and cloud application. Device developers and solution developers need to agree on a convention defining what’s in the telemetry payload, what’s the data format, what commands are supported by devices, and what properties they expose. This is exactly what IoT Plug and Play does. Here is how this all comes together.

For the Device developer:
- Using latest enhanced tools and SDKs (more details below on what’s new), the Device developer will author a device model using DTDL.
- To enable Model ID registration, IoT Hub accepts a new parameter in the MQTT Connection packet with the Model ID sent by the device and makes this Model ID available to cloud applications. Once the model is defined, the device developer just needs to add the Model ID announcement in the connection message and ensure the device implementation matches the model. With this Model ID, IoT Hub will be able to identify devices that support IoT Plug and Play and enable to seamlessly integrate them into IoT Plug and Play enabled solutions (see below).
- Device developers can share their devices’ models with solution developers directly or through a public or private repository, with the corresponding Model IDs.
- Device builders can certify their devices for solution builders to get the guarantee that devices are indeed supporting Plug and Play and can seamlessly be integrated into next generation IoT solutions.
For the solution developer:
- Solution builders can retrieve devices’ Model ID from IoT hub.
- With the Model ID, they will acquire and parse the matching IoT Plug and Play model for the device from the model repository or other sharing mechanism agree upon with the device builder.
- With the IoT Plug and Play model, solutions can dynamically adjust their user interface depending on the devices connecting.
IoT Plug and Play Preview is currently available in Japan East, Central US, and North Europe.
Device SDKs are production ready
As of today, all Azure IoT Hub device SDKs are already updated, and support IoT Plug and Play. Here are the steps required to enable IoT Plug and Play on any device:
- Create the model describing the device interactions
- Implement the device model including sharing the Model ID during the connection and using the Azure IoT communication patterns (Device Twins, Direct Methods, Telemetry)
- Validate the device’s implementation of the model using a tool to interact with the device (Azure IoT Explorer, IoT Plug and Play CLI, REST APIs, Service SDKs)
We’ve got some good news for device developers: even though IoT Plug and Play is still in Preview, device builders can use these SDKs to build certification ready devices starting today. This means we won’t make any further breaking changes to the SDKs and all devices created today will work without any modification when IoT Plug and Play becomes generally available (GA).
New features for solution builders
To fulfill the promise of the Digital Twins vision, IoT Plug and Play offers APIs compatible with Azure Digital Twins (ADT), allowing any IoT Plug and Play device to seamlessly integrate into Digital Twins applications.
This new preview REST API can be consumed by the Azure Digital Twins Service SDKs, available for Node and Python. Support for Java and .NET will be added soon. Furthermore, Azure IoT Hub can produce Digital Twins change notifications.
These features enable the alignment of IoT Hub with ADT to accelerate the creation of modern smart environmental solutions.
Developer Experience
To create device models, developers can use the Visual Studio extensions for DTDL, available for VSCode and Visual Studio 2019, with all expected features such as Intellisense and automatic validation. Read more about this extension in this blog post announcement.
Because IoT Plug and Play exposes REST APIs, you can easily extend your own tooling, scripts, and development environments. In fact, the Azure IoT Explorer tool, the Visual Studio and Code extensions, and the Azure CLI IoT extension are all taking full advantage of the IoT Plug and Play REST APIs.
We have samples and docs for all languages available in our new released documentation on docs.microsoft.com/azure/iot-pnp to help you learn IoT Plug and Play concepts.
Hello IoT Plug and Play World !!
How about we walk you through how this all looks?
Let’s create a simple device using the .NET SDK, (other languages are available in the Quickstarts) that reports the current memory available as a telemetry data point, the frequency of this signal will be configurable by a writable property that can be set from the solution side.
First, we create the DTDL interface, applying a model-first approach, and then we implement a device in .NET that produces messages that are compatible with the IoT Plug and Play convention.
We’ll use the DTDL VSCode extension to create the interface using the command palette: DTDL: CreateInterface, and replace the default contents with the telemetry and property elements.
{
  "@context": "dtmi:dtdl:context;2",
  "@id": "dtmi:com:example:mydevice;1",
  "@type": "Interface",
  "displayName": "mydevice",
  "contents": [
    {
      "@type": "Telemetry",
      "name": "workingSet",
      "schema": "double"
    },
    {
      "@type": "Property",
      "name": "refreshInterval",
      "schema": "integer"
      "writable" : true
    }
  ]
}
To create the device code we use .NET and the Microsoft.Azure.Devices.Client/1.27.0 NuGet package.
To initialize the DeviceClient we need the Device Connection String and the Model Id
string modelId = "dtmi:com:example:mydevice;1";
string connectionString = "<deviceConnectionString>";
int    refreshInterval = 5;
var client = DeviceClient.CreateFromConnectionString(connectionString,
                      TransportType.Mqtt,
                      new ClientOptions() { ModelId = modelId });
Console.WriteLine("client connected");
Let’s start by reading the refreshInterval from the desired properties
var twin = await client.GetTwinAsync();
if (twin.Properties.Desired.Contains(nameof(refreshInterval)))
{
  JValue refreshIntervalProperty = twin.Properties.Desired[nameof(refreshInterval)];
  refreshInterval = refreshIntervalProperty.Value<int>();
  Console.WriteLine("Found refreshInterval:" + refreshInterval);
}
And sending the telemetry in a loop.
while (true)
{
  var serializedTelemetry = JsonConvert.SerializeObject(
    new { workingSet = Environment.WorkingSet }
  );
  var message = new Message(Encoding.UTF8.GetBytes(serializedTelemetry));
  message.ContentType = "application/json";
  message.ContentEncoding = "utf-8";
  await client.SendEventAsync(message);
  Console.WriteLine(serializedTelemetry);
  await Task.Delay(refreshInterval * 1000);
}
Finally, we want to subscribe to any desired property update. Note that the device must report back if the desired property was applied. The extra properties are described in the IoT Plug and Play Convention.
await client.SetDesiredPropertyUpdateCallbackAsync(async (desired, ctx) =>
{
  if (desired.Contains(nameof(refreshInterval)))
  {
    JValue refreshIntervalProp = desired[nameof(refreshInterval)];
    refreshInterval = refreshIntervalProp.Value<int>();
    Console.WriteLine("Received refreshInterval:" + refreshInterval);
    TwinCollection reportedProperties = new TwinCollection();
    TwinCollection ackProps = new TwinCollection();
    ackProps["value"] = refreshInterval;
    ackProps["ac"] = 200;
    ackProps["av"] = desired.Version;
    ackProps["ad"] = "desired property received";
    reportedProperties[nameof(refreshInterval)] = ackProps;

    await client.UpdateReportedPropertiesAsync(reportedProperties);
  }
}, null);
Use the service SDK to add IoT Plug and Play support in your solutions
Our service SDKs allow you to easily take advantage of IoT Plug and Play in your IoT solutions. Let us show you how.
IoT Solutions use the Azure SDK to interact with the devices using IoT Hub’s patterns (Telemetry, Device Twins and Direct Methods). The new Azure IoT Hub Digital Twins service SDKs lets you retrieve the Model Id announced by the device.
This time we are going to use the Node.js service SDK from NPM.
const dt = require('azure-iot-digitaltwins-service') // preview
const cs = '<HubConnectionString>'
const dtclient = new dt.DigitalTwinServiceClient(new dt.IoTHubTokenCredentials(cs))
dtclient.getDigitalTwin('mxchip1')
  .then(dtresp => {
    if (dtresp) {
      const twin = dtresp._response.parsedBody
      const modelId = twin.$metadata.$model
      console.log(modelId)
    }
  })
With the Model Id available, your custom solution can make smart decisions about how to interact with the device. If the device implements the model Id we know of, we can safely update the refreshInterval property using the new Digital Twins patch api.
if (modelId === 'dtmi:com:example:mydevice;1') {

  const patch = [{
      op: 'add',
      path: '/refreshInterval',
      value: 3
  }]

  dtclient.updateDigitalTwin(deviceId, patch, dtresp.eTag)
    .then(patchResp => {
      console.log(patchResp)
    })
}
If the .NET device simulator is still running you should see how the device reacts.
Full code and sample model available in this gist
Use Azure IoT Explorer to validate the device implementation
The last step is to validate the device implementation against its Model. For this, we use Azure IoT Explorer which has been updated to support IoT Plug and Play from version 0.11.1.
To connect the Azure IoT Explorer tool to IoT Hub, you need the admin IoT Hub connection string. When you’re connected, go to the devices section and add a new device. When you have the device id registered, you can grab the connection string and replace in the first code snippet we created before for the device.

Azure IoT Explorer can load your models from a local folder. In the main screen – Home, select IoT Plug and Play settings and set the source to a local folder where your DTDL model files are located.
Now, when you run the device code (remember to update the connection string), Azure IoT Explorer will populate the IoT Plug and Play view with a default UI built from the model.
See what happened here in the Azure IoT Explorer? Its UI adapted to the device model without any need for code change or configuration. Isn’t that convenient?

You can now inspect telemetry, properties and interact with the device.
Let’s update the refreshInterval value from the Azure IoT Explorer UI and see the bi-directional communication with the device in action.

IoT Central will use IoT Plug and Play
Integration with IoT Central is a key component of the IoT Plug and Play value proposition. By the time IoT Plug and Play becomes generally available, IoT Central will be updated to fully support the new capabilities and conventions in full alignment with DTDL v2, additionally all certified IoT Plug and Play devices will automatically work with Central. Stay tuned for more updates on this soon.
Next Steps
Don’t miss the latest IoT Show with more live demos connecting Things to Azure using IoT Plug and Play, check it out in
Channel9 and
YouTube
Our team is eager to see how you will take advantage of IoT Plug and Play in your IoT devices and solutions. We are also looking forward to getting your feedback. You can find us in our open source GitHub Repos for the SDKs, or you can simply engage in a conversation right here in the IoT Tech Community commenting below.


Recent Comments