
by Contributed | Jul 8, 2021 | Technology
This article is contributed. See the original author and article here.
We need you to help us level the playing field in higher education

We are a MSc student consulting team from Imperial College Business School London working on a project for Microsoft’s Open Sourced auto-assessment Python Library, PyBryt.
We consist of 5 team members, Yaw Kusi Arthur, Rohit Kumar Lalwani, Karlan Cortese, Milan Patel, Stepan Cherkasov and we’re interested in learning about educators in higher education’s perspective on auto-assessment tools. With your help, we aim to gain insights that would better PyBryt and, in the process, level the playfield of education!
PyBryt is a free, Open-Source auto-assessment Python library for teaching and learning that offers meaningful feedback to learners, analysis of complexity within learner solutions, plagiarism detection and easy integration into existing organizational infrastructure.
Find out more about PyBryt here With you help we can empower you as an educator. Click on the survey above now!
Click below to access the survey:
Educator Survey (5min)
by Contributed | Jul 8, 2021 | Technology
This article is contributed. See the original author and article here.
Application deployment
Let’s deploy a demo app to verify that the app gateway and the AKS cluster have been successfully integrated.
kubectl apply -f deployment_aspnet.yaml
Let’s deploy the application.
kubectl get po -o wide
NAME                                    READY   STATUS    RESTARTS   AGE    IP            NODE                                NOMINATED NODE   READINESS GATES
aad-pod-identity-mic-787c5958fd-kmx9b   1/1     Running   0          177m   10.240.0.33   aks-nodepool1-94448771-vmss000000   <none>           <none>
aad-pod-identity-mic-787c5958fd-nkpv4   1/1     Running   0          177m   10.240.0.63   aks-nodepool1-94448771-vmss000001   <none>           <none>
aad-pod-identity-nmi-mhp86              1/1     Running   0          177m   10.240.0.4    aks-nodepool1-94448771-vmss000000   <none>           <none>
aad-pod-identity-nmi-sjpvw              1/1     Running   0          177m   10.240.0.35   aks-nodepool1-94448771-vmss000001   <none>           <none>
aad-pod-identity-nmi-xnfxh              1/1     Running   0          177m   10.240.0.66   aks-nodepool1-94448771-vmss000002   <none>           <none>
agic-ingress-azure-84967fc5b6-cqcn4     1/1     Running   0          111m   10.240.0.79   aks-nodepool1-94448771-vmss000002   <none>           <none>
aspnetapp-68784d6544-j99qg              1/1     Running   0          96    10.240.0.75   aks-nodepool1-94448771-vmss000002   <none>           <none>
aspnetapp-68784d6544-v9449              1/1     Running   0          96    10.240.0.13   aks-nodepool1-94448771-vmss000000   <none>           <none>
aspnetapp-68784d6544-ztbd9              1/1     Running   0          96    10.240.0.50   aks-nodepool1-94448771-vmss000001   <none>           <none>
We can see that the pods of the app are working correctly. Note that their IPs are 10.240.0.13, 10.240.0.50, and 10.240.0.75.
The app gateway backend can be seen as the IP above.
az network application-gateway show-backend-health
 -g $RESOURCE_GROUP
 -n $APP_GATEWAY
 --query backendAddressPools[].backendHttpSettingsCollection[].servers[][address,health]
[
  [
    "10.240.0.13",
    "Healthy"
  ],
  [
    "10.240.0.50",
    "Healthy"
  ],
  [
    "10.240.0.75",
    "Healthy"
  ]
]
Check the I P address on the front end.
az network public-ip show -g $RESOURCE_GROUP -n $APPGW_IP --query ipAddress -o tsv
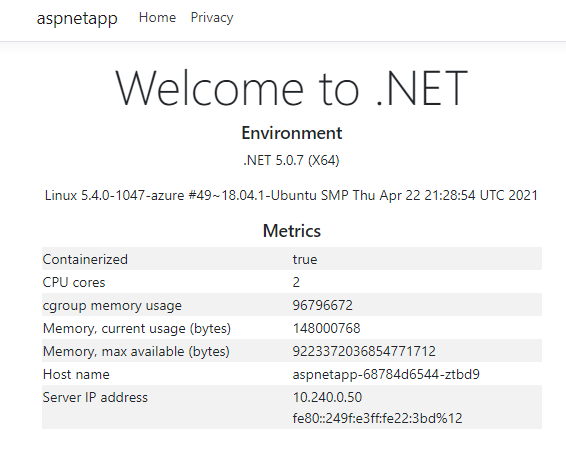
Then access this IP with a browser and you’ll see it.
Refresh a few more times, and Host name and Server IP address display 3 host names and IPs in turns, which are the 3 pod names and intranet IPs of the pods we deployed earlier. This shows that pods integration in the application gateway and AKS has been successfully implemented.
Deploy a new cluster of AKS
Create a new version of the AKS cluster
Let’s create a new AKS clusters in the subnet where the existing AKS is located. Our previous version of AKS uses the current default version of1.19.11. The new AKS cluster uses 1.20.7, and all the other parameters remain unchanged.
AKS_NEW=new
az aks create -n $AKS_NEW
-g $RESOURCE_GROUP
-l $AZ_REGION
--generate-ssh-keys
--network-plugin azure
--enable-managed-identity
--vnet-subnet-id $AKS_SUBNET_ID
--kubernetes-version 1.20.7
We also installs application-gateway-kubernetes-ingress in the new AKS cluster with Helm.
Install Pod Identify in the new version of the AKS cluster
Connect to the AKS cluster.
az aks get-credentials --resource-group $RESOURCE_GROUP --name $AKS_NEW
Install AAD Pod Identify
kubectl create serviceaccount --namespace kube-system tiller-sa
kubectl create clusterrolebinding tiller-cluster-rule --clusterrole=cluster-admin --serviceaccount=kube-system:tiller-sa
helm repo add aad-pod-identity https://raw.githubusercontent.com/Azure/aad-pod-identity/master/charts
helm install aad-pod-identity aad-pod-identity/aad-pod-identity
Install Application Gateway Ingress Controller with helm.
helm repo add application-gateway-kubernetes-ingress https://appgwingress.blob.core.windows.net/ingress-azure-helm-package/
helm repo update
Deploy apps on the new version of the AKS cluster
We install the same app in the new AKS cluster.
kubectl apply -f deployment_aspnet.yaml
Once the app is deployed, list Pod.
kubectl get po -o=custom-columns=NAME:.metadata.name,
podIP:.status.podIP,NODE:.spec.nodeName,
READY-true:.status.containerStatuses[*].ready

NAME                                    podIP          NODE                                READY-true
aad-pod-identity-mic-787c5958fd-flzgv   10.240.0.189   aks-nodepool1-20247409-vmss000002   true
aad-pod-identity-mic-787c5958fd-rv2ql   10.240.0.103   aks-nodepool1-20247409-vmss000000   true
aad-pod-identity-nmi-79sz7              10.240.0.159   aks-nodepool1-20247409-vmss000002   true
aad-pod-identity-nmi-8wjnj              10.240.0.97    aks-nodepool1-20247409-vmss000000   true
aad-pod-identity-nmi-qnrh9              10.240.0.128   aks-nodepool1-20247409-vmss000001   true
aspnetapp-68784d6544-8pd8c              10.240.0.130   aks-nodepool1-20247409-vmss000001   true
aspnetapp-68784d6544-8r2hr              10.240.0.172   aks-nodepool1-20247409-vmss000002   true
aspnetapp-68784d6544-9ftvm              10.240.0.107   aks-nodepool1-20247409-vmss000000   true
In the actual production operations process, after deploying a good app, we do not associate to the existing application gateway directly. Instead, we remotely log on and test through private network access.
kubectl run -it --rm aks-ssh --image=mcr.microsoft.com/aks/fundamental/base-ubuntu:v0.0.11
Once the container is started, it goes straight into the container, and we visit the three intranet IPs mentioned above –10.240.0.107, 10.240.0.130, 10.240.0.172. For example,
root@aks-ssh:/# curl http://10.240.0.107
root@aks-ssh:/# curl http://10.240.0.130
root@aks-ssh:/# curl http://10.240.0.172
We see that all can return content normally. This can used to simulate the new environment has been tested and passed, and finally the new AKS cluster is associated with the existing application gateway.
Switching the app gateway to integrate with the new version of AKS
Install the AGIC with the following command.
helm install agic application-gateway-kubernetes-ingress/ingress-azure -f helm_agic.yaml
Wait a few seconds
kubectl get po -o=custom-columns=NAME:. metadata.name,podIP:.status.podIP,NODE:.spec.nodeName,READY-true:.status.containerStatuses[*].ready
NAME                                    podIP          NODE                                READY-true
aad-pod-identity-mic-787c5958fd-flzgv   10.240.0.189   aks-nodepool1-20247409-vmss000002   true
aad-pod-identity-mic-787c5958fd-rv2ql   10.240.0.103   aks-nodepool1-20247409-vmss000000   true
aad-pod-identity-nmi-79sz7              10.240.0.159   aks-nodepool1-20247409-vmss000002   true
aad-pod-identity-nmi-8wjnj              10.240.0.97    aks-nodepool1-20247409-vmss000000   true
aad-pod-identity-nmi-qnrh9              10.240.0.128   aks-nodepool1-20247409-vmss000001   true
agic-ingress-azure-84967fc5b6-9rvzn     10.240.0.152   aks-nodepool1-20247409-vmss000001   true
aspnetapp-68784d6544-8pd8c              10.240.0.130   aks-nodepool1-20247409-vmss000001   true
aspnetapp-68784d6544-8r2hr              10.240.0.172   aks-nodepool1-20247409-vmss000002   true
aspnetapp-68784d6544-9ftvm              10.240.0.107   aks-nodepool1-20247409-vmss000000   true
We can see that the pod for agic-ingress-azure-*** is up and running.
First look at the back end of the app gateway from the command line and it’s updated to the new pods.
az network application-gateway show-backend-health
-g $RESOURCE_GROUP
-n $APP_GATEWAY
--query backendAddressPools[].backendHttpSettingsCollection[].servers[][address,health]
[
  [
    "10.240.0.107",
    "Healthy"
  ],
  [
    "10.240.0.130",
    "Healthy"
  ],
  [
    "10.240.0.172",
    "Healthy"
  ]
]
Let’s go back to the browser to refresh the public network IP of the app gateway and see that the Host name and IP display have switched to the new backend.

If the new AKS cluster fails, we can switch back to the old AKS cluster. Just connect to the old AKS cluster first.
az aks get-credentials --resource-group $RESOURCE_GROUP --name $AKS_OLD
Run the commands to install AGIC again.
helm uninstall agic
helm install agic application-gateway-kubernetes-ingress/ingress-azure -f helm_agic.yaml
We can see that the pod for AGIC is already running.
kubectl get po -o wide
NAME                                    READY   STATUS    RESTARTS   AGE    IP            NODE                                NOMINATED NODE   READINESS GATES
aad-pod-identity-mic-787c5958fd-kmx9b   1/1     Running   0          2d1h   10.240.0.33   aks-nodepool1-94448771-vmss000000   <none>           <none>
aad-pod-identity-mic-787c5958fd-nkpv4   1/1     Running   1          2d1h   10.240.0.63   aks-nodepool1-94448771-vmss000001   <none>           <none>
aad-pod-identity-nmi-mhp86              1/1     Running   0          2d1h   10.240.0.4    aks-nodepool1-94448771-vmss000000   <none>           <none>
aad-pod-identity-nmi-sjpvw              1/1     Running   0          2d1h   10.240.0.35   aks-nodepool1-94448771-vmss000001   <none>           <none>
aad-pod-identity-nmi-xnfxh              1/1     Running   0          2d1h   10.240.0.66   aks-nodepool1-94448771-vmss000002   <none>           <none>
agic-ingress-azure-84967fc5b6-nwbh4     1/1     Running   0          8s     10.240.0.70   aks-nodepool1-94448771-vmss000002   <none>           <none>
aspnetapp-68784d6544-j99qg              1/1     Running   0          2d     10.240.0.75   aks-nodepool1-94448771-vmss000002   <none>           <none>
aspnetapp-68784d6544-v9449              1/1     Running   0          2d     10.240.0.13   aks-nodepool1-94448771-vmss000000   <none>           <none>
aspnetapp-68784d6544-ztbd9              1/1     Running   0          2d     10.240.0.50   aks-nodepool1-94448771-vmss000001   <none>           <none>
Then look at the app gateway backend
az network application-gateway show-backend-health
 -g $RESOURCE_GROUP
 -n $APP_GATEWAY
 --query backendAddressPools[].backendHttpSettingsCollection[].servers[][address,health]
[
  [
    "10.240.0.13",
    "Healthy"
  ],
  [
    "10.240.0.50",
    "Healthy"
  ],
  [
    "10.240.0.75",
    "Healthy"
  ]
]
We can see that the same app gateway backend has been restored to the IPs of the old AKS cluster.
During the process to uninstall and reinstall the AGIC, neither the app gateway nor the app’s pods are being operated. Therefore, there is not any interruption to front-end access. With this, it is possible to finally implement the old and new AKS clusters that are retained at the same time and can be switched in real time.
summary
The above is an example of a common Web application that demonstrates a new AKS cluster can be securely upgraded with a blue-green deployment. In addition to Web apps, applications of all types and scenarios can be referenced to switch between AKS clusters and upstream integrations for real-time switching and rollback.
by Contributed | Jul 8, 2021 | Technology
This article is contributed. See the original author and article here.
Azure Kubernetes Services (AKS) is a managed Kubernetes service on Microsoft Cloud Azure that can be used to rapidly deploy Kubernetes clusters, integrate with other Azure services and features to achieve simple operations and elastic business applications. The Kubernetes community is booming, and version upgrades are frequent. AKS manages version upgrade so that AKS clusters can be upgraded at the click of a button, rolling through the working nodes within a cluster. This makes it easy to upgrade AKS for small or non-mission-critical clusters. However, the in-place upgrade method is not very suitable for large-scale clusters or mission-critical applications, because it has a long overall upgrade time and the possibility of upgrade failure. And the failure cannot be rolled back. The safest approach is to create a new AKS cluster, switch upgrades using blue-green deployments. This approach can switch in seconds, and roll back the backup cluster at any time, which is faster and safer. Correspondingly, the architecture and operation of this approach is more complex. This article leads you to gradually build such an architecture scheme. This time we’re using a scenario for a classic Web application, which can be expanded into other scenarios.
Architecture overview
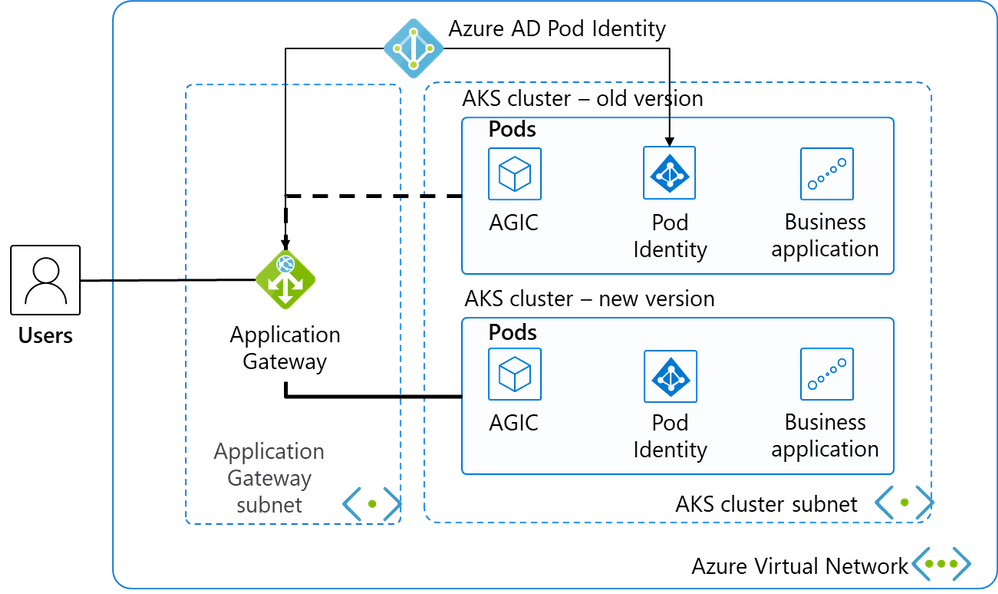
This is a classic Web application architecture diagram, and we’ve selected the most streamlined resources to keep the demonstration and instructions as concise as possible.
Place 2 subnets in a virtual network, and place the application gateway in the first subnet as a load balancer for external services.
The second subnet has only 1 AKS cluster daily and deploys the business system. The AKS cluster uses advanced network CNI to simplify network patterns and facilitate application gateway communication with them.
Deploy Pod Identity is deployed in the AKS cluster to authorize pods in AKS to manage the application gateway through Azure AD’s Pod Identity.
AGIC, known as Application Gateway Ingress Controller, not only distributes network traffic from the app gateway to the appropriate Pod, but also monitors changes in some Kubernetes resources, automatically updates the back-end pool of the app gateway as AKS scales, and updates the back-end pool of the app gateway synchronously as the AKS cluster switches. The core idea for our blue-green deployment is dynamically updating the back end of the app gateway with AGIC.
Resources Deployment
Basic resources such as the network
We quickly create the underlying resources of the current environment with CLI. Resource group:
AZ_REGION=ChinaNorth2
RESOURCE_GROUP=AKS_Upgrade
az group create -n $RESOURCE_GROUP -l $AZ_REGION
Create VNET and subnets.
VNET_NAME=AksVnet
APPGW_SUBNET=AppGwSubnet
AKS_SUBNET=AksSubnet

network  vnet  create on $VNET_NAME
-g $RESOURCE_GROUP
-l $AZ_REGION
--address-prefix 10.0.0.0/8
--subnet-name $APPGW_SUBNET --subnet-prefix 10.1.0.0/16

az network vnet subnet create
-g $RESOURCE_GROUP
-n $AKS_SUBNET
--address-prefixes 10.240.0.0/16
--vnet-name $VNET_NAME
The current AKS cluster
Create a public IP.
APPGW_IP=AppGatewayIp
az network public-ip create -n $APPGW_IP
-g $RESOURCE_GROUP
--allocation-method Static
--sku Standard
Create an app gateway.
APP_GATEWAY=AppGateway
az network application-gateway create -n $APP_GATEWAY
 -g $RESOURCE_GROUP
 -l $AZ_REGION
 --vnet-name $VNET_NAME
 --subnet $APPGW_SUBNET
 --sku Standard_v2
 --public-ip-address $APPGW_IP
Create an old AKS cluster with the current default mainstream AKS version. Get the subnet ID of the AKS cluster we created earlier.
AKS_SUBNET_ID=$(az network vnet subnet show -g $RESOURCE_GROUP --vnet-name $VNET_NAME --name $AKS_SUBNET --query id -o tsv)
Create the old AKS cluster.
AKS_OLD=old
az aks create -n $AKS_OLD
-g $RESOURCE_GROUP
-l $AZ_REGION
--generate-ssh-keys
--network-plugin azure
--enable-managed-identity
--vnet-subnet-id $AKS_SUBNET_ID
At the time of writing, the mainstream AKS version is 1.19.11.
The app gateway integrates with the current version of AKS
We use the Azure service principal to authorize the AKS cluster to manage the configuration of the application gateway.
Connect to the AKS cluster
az aks get-credentials --resource-group $RESOURCE_GROUP --name $AKS_OLD
We can then manage the AKS cluster with the familiar kubectl.
Install Helm and run the following command to add the application-gateway-kubernetes-ingress Helms package. Our AKS cluster has enabled Kubernetes RBAC, so use the following command.
kubectl create serviceaccount --namespace kube-system tiller-sa
kubectl create clusterrolebinding tiller-cluster-rule --clusterrole=cluster-admin --serviceaccount=kube-system:tiller-sa
helm repo add aad-pod-identity https://raw.githubusercontent.com/Azure/aad-pod-identity/master/charts
helm install aad-pod-identity aad-pod-identity/aad-pod-identity
The command will return:
NAME: aad-pod-identity
LAST DEPLOYED: Tue Jun 29 08:14:30 2021
NAMESPACE: default
STATUS: deployed
REVISION: 1
TEST SUITE: None
NOTES:
You have successfully installed AAD Pod Identity in your Kubernetes cluster!
…
Wait a minute or two and use
kubectl get po -o wide
NAME                                    READY   STATUS    RESTARTS   AGE   IP            NODE                                NOMINATED NODE   READINESS GATES
aad-pod-identity-mic-787c5958fd-kmx9b   1/1     Running   0          71s   10.240.0.33   aks-nodepool1-94448771-vmss000000   <none>           <none>
aad-pod-identity-mic-787c5958fd-nkpv4   1/1     Running   0          72s   10.240.0.63   aks-nodepool1-94448771-vmss000001   <none>           <none>
aad-pod-identity-nmi-mhp86              1/1     Running   0          72s   10.240.0.4    aks-nodepool1-94448771-vmss000000   <none>           <none>
aad-pod-identity-nmi-sjpvw              1/1     Running   0          72s   10.240.0.35   aks-nodepool1-94448771-vmss000001   <none>           <none>
aad-pod-identity-nmi-xnfxh              1/1     Running   0          72s   10.240.0.66   aks-nodepool1-94448771-vmss000002   <none>           <none>
See that several of the related pods are already running.
Install Application Gateway Ingress Controller with helm.
helm repo add application-gateway-kubernetes-ingress https://appgwingress.blob.core.windows.net/ingress-azure-helm-package/
helm repo update
Copy the following YAML file and save it as helm_agic.yaml to configure AGIC.
# This file contains the essential configs for the ingress controller helm chart
# Verbosity level of the App Gateway Ingress Controller
verbosityLevel: 3


# Specify which application gateway the ingress controller will manage
#
appgw:
    subscriptionId: <subscriptionId>
    resourceGroup: <resourceGroupName>
    name: <applicationGatewayName>
    environment: AzureChinaCloud

    # Setting appgw.shared to "true" will create an AzureIngressProhibitedTarget CRD.
    # This prohibits AGIC from applying config for any host/path.
    # Use "kubectl get AzureIngressProhibitedTargets" to view and change this.
    shared: false


# Specify which kubernetes namespace the ingress controller will watch
# Default value is "default"
# Leaving this variable out or setting it to blank or empty string would
# result in Ingress Controller observing all acessible namespaces.
#
# kubernetes:
#   watchNamespace: <namespace>


# Specify the authentication with Azure Resource Manager
#
# Two authentication methods are available:
# - Option 1: AAD-Pod-Identity (https://github.com/Azure/aad-pod-identity)
# armAuth:
#    type: aadPodIdentity
#    identityResourceID: <identityResourceId>
#    identityClientID:  <identityClientId>

## Alternatively you can use Service Principal credentials
armAuth:
    type: servicePrincipal
    secretJSON: <<Generate value with: "az ad sp create-for-rbac --sdk-auth | base64 -w0">>


# Specify if the cluster is RBAC enabled or not
rbac:
    enabled: true # true/false
Let’s fill in the parameter values in the above profiles one by one.
<subscriptionId>
Use command az account show –query id -o tsv to get.
<resourceGroupName>
Use the value of $RESOURCE_GROUP environment variable.
<applicationGatewayName>
Use the value of $APP_GATEWAY environment variable.
The value of secretJSON is obtained using the az ad sp create-for-rbac–sdk-auth | base64 -w0 command, which is a long string of more than 800 bytes encoded by base64.
Because our AKS cluster has RBAC enabled, the last configuration rbac is set to true.
Finally, run the following command.
helm install agic application-gateway-kubernetes-ingress/ingress-azure -f helm_agic.yaml
returns
W0629 08:16:47.733467   16087 warnings.go:70] apiextensions.k8s.io/v1beta1 CustomResourceDefinition is deprecated in v1.16+, unavailable in v1.22+; use apiextensions.k8s.io/v1 CustomResourceDefinition
NAME: agic
LAST DEPLOYED: Tue Jun 29 08:16:48 2021
NAMESPACE: default
STATUS: deployed
REVISION: 1
TEST SUITE: None
NOTES:
Thank you for installing ingress-azure:1.4.0.

Your release is named agic.
The controller is deployed in deployment agic-ingress-azure.

Configuration Details:
----------------------
 * AzureRM Authentication Method:
    - Use AAD-Pod-Identity
 * Application Gateway:
    - Subscription ID : 3d07553f-f6a8-455f-9de6-876fbcc00bb4
    - Resource Group  : AKS_Upgrade
    - Application Gateway Name : AppGateway
 * Kubernetes Ingress Controller:
    - Watching All Namespaces
    - Verbosity level: 3
And then
kubectl get po -o wide
NAME                                    READY   STATUS    RESTARTS   AGE     IP            NODE                                NOMINATED NODE   READINESS GATES
aad-pod-identity-mic-787c5958fd-kmx9b   1/1     Running   0          4m54s   10.240.0.33   aks-nodepool1-94448771-vmss000000   <none>           <none>
aad-pod-identity-mic-787c5958fd-nkpv4   1/1     Running   0          4m55s   10.240.0.63   aks-nodepool1-94448771-vmss000001   <none>           <none>
aad-pod-identity-nmi-mhp86              1/1     Running   0          4m55s   10.240.0.4    aks-nodepool1-94448771-vmss000000   <none>           <none>
aad-pod-identity-nmi-sjpvw              1/1     Running   0          4m55s   10.240.0.35   aks-nodepool1-94448771-vmss000001   <none>           <none>
aad-pod-identity-nmi-xnfxh              1/1     Running   0          4m55s   10.240.0.66   aks-nodepool1-94448771-vmss000002   <none>           <none>
agic-ingress-azure-8d9d85dd9-z8dwh      1/1     Running   0          2m37s   10.240.0.70   aks-nodepool1-94448771-vmss000002   <none>           <none>
We can see that the new agic-ingress-azure pod is also working.
by Contributed | Jul 8, 2021 | Technology
This article is contributed. See the original author and article here.
Final Update: Thursday, 08 July 2021 08:03 UTC
We’ve confirmed that all systems are back to normal with no customer impact as of 07/08, 06:30 UTC. Our logs show the incident started on 07/07, 22:45 UTC and that during the 07 hours and 45 minutes that it took to resolve the issue some of customers with workspace-enabled Application Insights resources in Central US may have experienced intermittent log data gaps and incorrect alert activation.
- Root Cause: The failure was due to an issue with our dependent service
- Incident Timeline: 07 Hours & 45 minutes – 07/07, 22:45 UTC through 07/08, 06:30 UTC
We understand that customers rely on Application Insights as a critical service and apologize for any impact this incident caused.
-Soumyajeet
by Contributed | Jul 8, 2021 | Technology
This article is contributed. See the original author and article here.
Have you ever got your PC to the state where it has all the settings and software installed and configured that you need to use and it’s just in the right state for your daily tasks and then bam something happens, and you need to rebuild or start from scratch with a new PC?
Yip, I’ve been there and it’s always super annoying trying to get your PC back to the state you had it in before. Thankfully, a lot of things are getting better, and you have technology that can sync your settings that can then be pulled down again easily speeding up the rebuild of your PC to the way you like it. But what about the software you like to have installed with that specific version installed that does just what you want?
Well, this is where Windows Package Manager can come into play!
What is it?
Windows Package Manager is an open-source project that Microsoft announced at Build 2020 and version 1.0 was released at Build 2021. It can help you manage and install software onto your machines in an easy and consistent way.
It’s straightforward to get it installed on your machine and start installing software.
Exporting your software list
So how can it help with the initial problem, well the Windows Package Manager has an import and export features that allows you to export a list of software installed on your PC and then use that file to install the same software on another machine. And I might be a bit biased, but I really like this feature, so let me show you how it works.
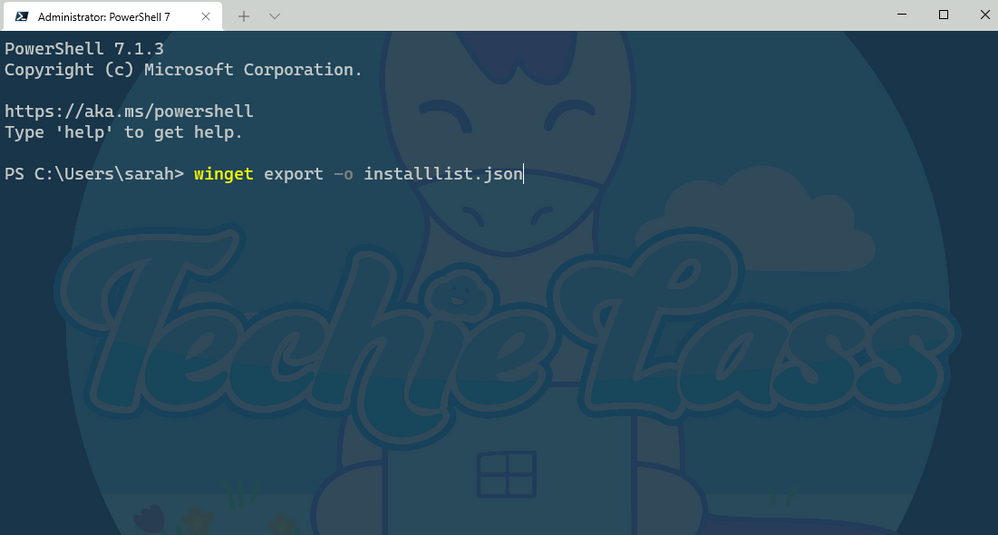
Within Windows Package Manager installed on your machine open your favourite command shell, I like Windows Terminal.
Enter the command:
winget export -o nameoflist.json
This will export a list of software that is installed on your machine to a file location of your choosing. The file will be a JSON file.
Windows Package Manager export command
 Windows Package Manager export list
As you can see from the output file picture above Windows Package Manager lists out each of the software that’s installed.
You do have another option when exporting the list. You can use this command:
winget export -o nameoffile.json –include-versions
 Windows Package Manager export with versions
 Windows Package Manager export list with versions
Now you can see from the output file the file contains the version of software you have as well, so if you have a need for a specific version to be installed and want to take a note of that you can.
Editing the output file
Now what happens if you want a specific version of a specific piece of software, but you don’t care about the versions of the other?
Well, you can edit the output file to suit your needs. As I said earlier it’s a JSON file so can be easily edited within something like Visual Studio Code.
 Windows Package Manager modify export list
Hopefully, you can see from that short clip, that Intellisense within Visual Studio Code is helping to identify where my syntax is wrong, in this case by leaving trailing commas and accidentally deleting quotation marks I need.
Import onto another machine
Now that we have a list of software that we like to have installed, we can start to use this on other machines.
So transfer the JSON file you’ve created to another machine and make sure that you have Windows Package Manager installed.
Now you have the JSON file and Windows Package Manager setup it’s time to use that file to install the software you want, with the versions you prefer.
With the winget import command there are some switches that you can use when importing. You have –ignore-unavailable and –ignore-versions.
The –ignore-unavailable command will continue if any packages are unavailable and the –ignore-versions will ignore any specified versions in the import file and install the latest version instead.
Your needs and wants will depend on how you use those switches. For me I’m going to take my JSON file with listed software and versions and install as per that file with this command:
winget import –import-file installlistversion.json –ignore-unavailable
 Windows Package Manager import command
After a few minutes, the software I want is now installed on that second machine!
Give it a try!
I’d love to hear how you are using this feature in your environment or if you have any feedback after using it!

Recent Comments