This article is contributed. See the original author and article here.
Not too long ago, it was the first day of school, then it was the first NFL game and we just passed the first day of fall. As seasons change, I am reminded of the things that I should do but often don’t. Either I forget or avoid. So it is for Business Continuity/Disaster Recovery (BCDR) efforts. About 10 years ago, I wrote a blog post with some points about DR (Disaster Recovery – Microsoft Tech Community) then, about seven years ago, I posted a DR ‘reminder’ (Disaster Recovery – A Reminder – Microsoft Tech Community). Those were both ‘pre-cloud’ – which seems so long ago. In any event, a post from me around BCDR for cloud components is well past due.
NOTE: Service availability is one aspect of BCDR, as is data availability. For the most part, those two elements are solid when it comes to SaaS – those are two of the value props of the SaaS model. However, in this post, I’m focusing on recovering from accidental or malicious deletions of configurations in some of your key Microsoft cloud services.
“What would you do if…?”
You get a call that ‘something is going on’ – people aren’t getting blocked when they should be. People aren’t getting prompted when they should be. Where you’d normally see your org’s logo on the sign in pages, you see the Microsoft logo. You recall that moments ago, you didn’t get prompted when you went to check email via OWA this morning. Your stomach turns.
You pop open the Azure portal and immediately notice you don’t get MFA’d. Your stomach turns again but more deeply. Your face gets hot. Your brain races as you ask yourself “Did I do something?” You open the AAD Conditional Access portal spot … there are only a few ‘default’ policies listed. There are normally a dozen or more policies with your custom naming standard. You rub your eyes to see if you’re just not seeing it but the emptiness remains. You refresh the portal page. You verify the tenant name … still blank. You quickly jump over to the MEM portal … many of the Intune policies and settings are gone, too. You check out the Defender for Cloud Apps (aka MCAS) policy page; your custom CASB policies are gone. It’s like you’re signing in to a brand new M365 trial.
Before you tackle the ‘who/what/when/where’ questions from management to explain what happened, you need to get back to a functional run-state. That won’t be too tough, thankfully, as you have nightly exports from the various M365 services. Or you have a weekly calendar reminder to run manual exports, every Friday when you first get into the office, right? Or you have Word docs with screen captures of the portal pages that you update the first Tuesday of every month, right? Or an XLS with the settings? Or you have a chicken-scratch Notepad file from when you first setup the policies?
Or, perhaps you don’t; perhaps you have nothing more than a vague visual memory of what you’d see when you’d look in the portals; a general idea of the various policies and what they did – but only sparse memories of a few of the myriad settings across the services. Oh, and the portal UIs have changed considerably since you setup those policies years ago (if it even was you who set them up). It’s gonna be a loooong day(s).
Ok, back to reality … whew.
An ounce of prevention (or planning) is worth a pound of cure. Just do something. It doesn’t need to be perfect. The only thing worse than a mass-deletion event is one without any sort of recoverability planning and desired settings references/materials. Staring at a blank portal page, trying to recall from memory what had been setup previously is no bueno. Plus, management will be asking ‘why weren’t we better prepared to recover from this?’ Have a solid answer vs a ‘deer in the headlights’ stare.
Sadly, as of today, there isn’t a ‘backup now’ or ‘recover now’ button in the portals but there is some good news; since these are SaaS capabilities, there are no servers to restore or infrastructure to recover/establish. It’s basically entering configuration information in web forms.
Here are a few ideas on possible BCDR for your M365 services (you may find/have others – if so, great! Share what’s worked/not worked for you in the comments)
Screen-scrapes from the portal pages into organized docs that are stored in an available manner (electronically, local USB and hard-copy – three ring binders are great for this type of info, stored in your DR tubs)
In the past, this was a more viable option but these days, in my view, there are just too many configuration screens/options for a given configuration and it takes a long time and a lot of clicks to drill-down to all of the various pages/sub-pages of a configuration/policy.
That said, if this is your jam, rock on. Put on some headphones, fire up Winamp and blast REO Speedwagon while you try to wear out the CTRL/C/V buttons on your keyboard.
M365 DSC is a well-developed PowerShell toolset to do all sorts of things with many cloud service configurations (export/import, monitor for drift, etc.)
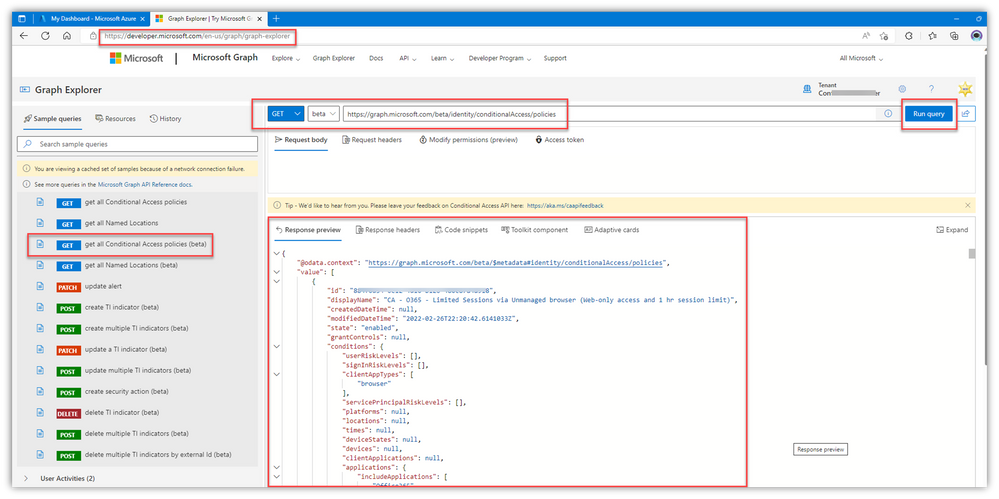
This is very helpful. There are some handy ‘built in’ GET queries in the various entity groups on the left (Users, Security, etc.) – GET is your friend for exports/documenting current state. Stay far, far away from anything EXCEPT GET or you may self-induce an accidental change
As a bonus, Graph is powerful – way beyond just config exports. Any skills you develop with this BCDR endeavor will carry over into other M365 management and admin tasks.
Below is an example of a query to list the AAD CA policies in my lab:
Explore the various options “discoverable” in the dynamic auto-fill query box – I guarantee you’ll be giddy at some of the things you’ll find:
Here are a few query URLs you can copy and paste in the query box, then copy/paste the GET results into Notepad or something – It’s literally THAT easy to grab many of your critical cloud configs
NOTE: You might not have the proper permissions to access certain elements from Graph, even if you’re using a GA account:
It’s an easy fix, right from within Graph Explorer, but be sure you understand what ‘Consent’ means – and also realize that your global AAD settings might restrict or block these consent actions:
NOTE: MDCA (Defender for Cloud Apps aka MCAS) doesn’t seem to have similar graph exposure. You can export the ‘whole’ portal config, policies and IP list into a single JSON file via Settings but I don’t know what that includes/leaves out, and there isn’t a way to re-import it for recovery.
Regardless, you can easily get screen captures of your custom policies from the portal.
In my case, I use a naming convention for my custom MCAS policies which makes it super easy to sort them in the portal, then get screen shots of each policy
Visuals are Important
A few notes about the visual branding elements of the various services/portals, and the Company Portal for Intune:
At this point, I don’t know of a way to export the images/pictures/graphics that are uploaded to the services. In the exports of the settings (if you can find them), there are references to CDN URL links but they’re ambiguous and don’t point directly to a ‘file.’
Those files have very specific size limits/pixel counts and other parameters, not to mention there were probably hoops to jump through to get ‘organizational approval’ to use those specific images, etc. Track down those specific files that were uploaded and store them in the event that an accidental (or planned) change gets made to those and you want to revert/roll-back/recover.
Those visual elements are part of your org’s ‘front door’ to most M365 services – most of your users will see those often.
If those visuals change, even expectedly, it can cause “confusion” for a lot of people (read: many helpdesk calls). Be prepared.
If you use custom colors in the Intune customizations and/or the Office ‘theme,’ they are likely hex values that you should make a note of.
With BCDR topics, you have to think well outside of typical ‘day to day’ operations. Make sure you have a plan, the plan is documented and vetted/tested and updated every month/quarter/year.
Here are a few more “table-top exercises” and thoughts related to BCDR:
If Teams/chat and Exchange/email are down, along with AD/AAD (i.e. the GAL), how will you communicate with one another? No Teams chats. No email. No phone numbers.
You can call someone’s cellphone but how will you find phone numbers?
How will you execute a ‘war room’ meeting/conference call if Teams is down?
Make a plan, make a list of names and phone numbers, store it somewhere and have a hard-copy. Update it (quarterly?).
Ensure the decision tree used to declare a BCDR ‘incident’ includes cloud services/issues
Print out the settings/config/recovery docs and put them into a 3-ring binder in your DR tub, along with a USB stick containing those files
Don’t fall prey to the idea that ‘high availability’ is all you need. Accidents happen – and they replicate.
Try to expect the unexpected. Think through the ‘what ifs’ and worst-case scenarios.
I recall being part of a DR event where the highly available SAN went down … care to guess where the well-developed DR plans/docs/tools/etc. were stored?
Cautionary reminders
Credential exposure: All of this BCDR documentation I mentioned above should be for your service settings, profiles and configurations – it should not include your (nor anyone’s) credentials. Safety first. Zero trust.
Of course, special accounts/credentials needed for BCDR might need to be stored – but securely and separately from configuration recovery docs.
Risk of unintended changes:
Using Graph is very helpful but stick with GET. If you wander down the paths of POST, DELETE, SET … anything other than GET … you could very well enter a world of pain.
Many of the cloud configuration screens/UIs don’t have the typical Win32 app ‘Are you sure?’ verification prompts. Admins sometimes accidentally make a change just by ‘casual administration,’ while they poke around in portal pages.
Sharing IT horror stories is a pretty fun past-time of ‘the job’ but in the heat of an incident or outage, there is VERY little fun. Do yourself a favor (and your org), take some time in the next week and review/setup exports of your key configurations. You’ll sleep a bit better once you do.
This article is contributed. See the original author and article here.
The new Customer Service admin center unifies and simplifies administration across the Microsoft Dynamics 365 Customer Service suite. We’re deprecating the old standalone administration experiences in the service management area of the Customer Service Hub, Omnichannel admin center, and app profile manager. Support for these experiences will end in April 2023. We want to make sure your admins and other IT professionals have the information they need to prepare for these changes.
Start using the unified admin center now
If you haven’t already tried the new Customer Service admin center, you’ll find it’s more efficient than the old standalone admin experiences it’s replacing. All in one place, you can set up and manage cases, channels, knowledge articles, queues, routings, automatic record creation rules, agent experience profiles, insights, schedules, and more.
Here are just a few of the improvements in the new unified admin center:
We’ve consolidated administration experiences across the Customer Service Hub, Omnichannel admin center, and app profile manager.
Get step-by-step guidance when you’re setting up a channel.
We’ve added a search feature to help you easily find administrator settings.
The reorganized site map is now task-oriented and adapts to the capabilities you’ve provisioned. Based on core Customer Service, if you have provisioned Omnichannel for Customer Service, then other features are automatically available.
Overview pages for each area list at-a-glance information with deep links to manage features.
Landing pages for each feature provide an overview of all the capabilities.
Deprecation of standalone admin experiences
With the release of the Customer Service admin center, we are announcing the deprecation and end of support of the following standalone admin experiences in April 2023:
Service management area in the Customer Service Hub
Omnichannel admin center
App profile manager
Starting in October 2022, the Omnichannel admin center and the service management area in the Customer Service Hub will be hidden by default in newly created organizations and environments. You have the option to bring them back, but we recommend that you start using the new Customer Service admin center as soon as possible.
The app profile manager standalone experience will be removed in April 2023.
Action needed: Move to unified admin center now
If your organization is using any of the standalone admin experiences listed above, we recommend you move to the new unified app as soon as possible. The app is automatically installed in all Customer Service organizations and is available on the Dynamics 365 app page.
All existing setups will appear in the Customer Service admin center. If you have customizations, you can migrate them to the new app. No other migration is needed.
This article is contributed. See the original author and article here.
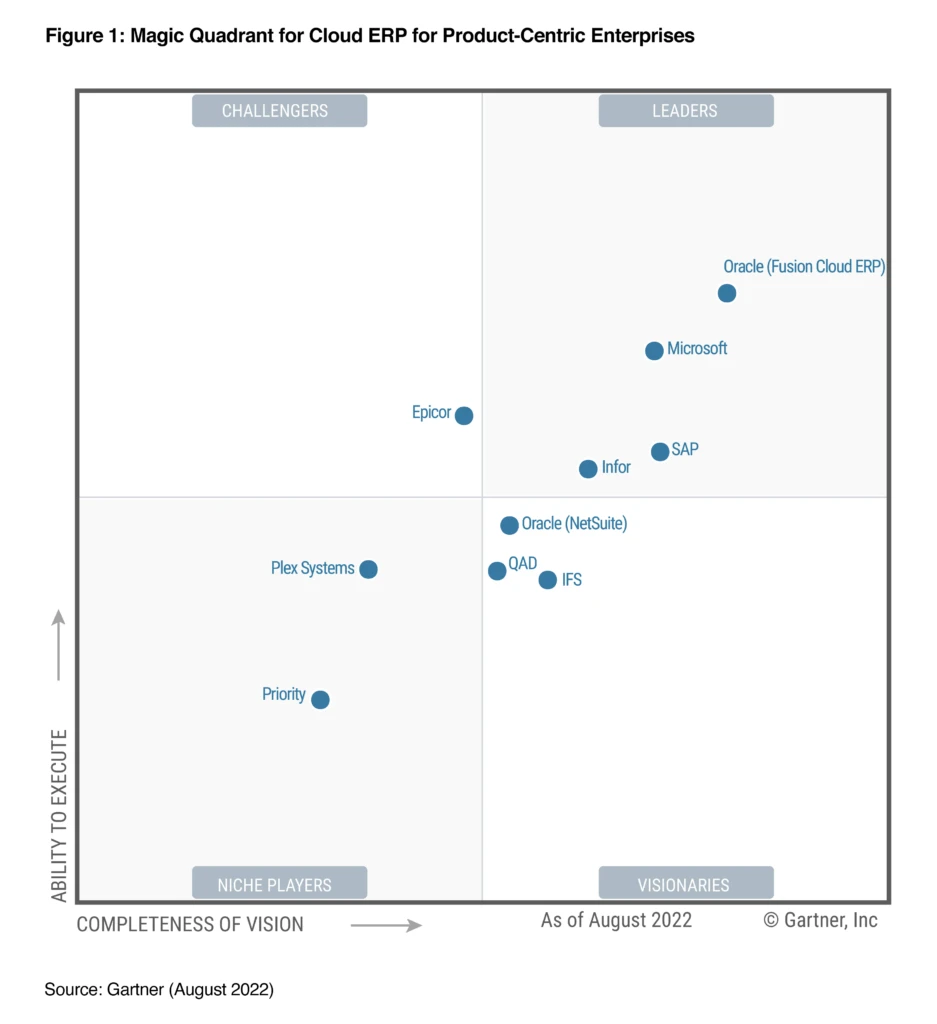
We are excited and honored thatGartner has recognized Microsoft as a Leader in their 2022 Magic Quadrant for Cloud ERP for Product-Centric Enterprises.* This evaluation of Microsoft was based on specific criteria that analyzed our overall Completeness of Vision and Ability to Execute.This is the second year in a row we’ve been recognized as a Leader. As Product-Centric enterprise customers transition their mission-critical enterprise resource planning (ERP) processes to the cloud, we believe they look to recognized vendors for the technology to transform and realize business value. We’re honored to be recognized in this space.
Figure 1: Magic Quadrant for Cloud ERP for Product-Centric Enterprises**
An integrated enterprise ERP solution
Both Dynamics 365 Supply Chain Management and Dynamics 365 Finance offer organizations the standard capabilities they expect in an ERP solution but delivered on a modern, open, and cloud-based architecture that empowers composability and scalability. These solutions can work as stand-alone products or together as an integrated, extensible solutiongiving businesses the flexibility to work the way they want.
Building a Leader
At the heart of our vision is the relentless desire to empower organizations to enable a resilient and sustainable supply chain, and it is through this vision and dedication that we have built a Leader. Let’s explore the qualities we believe put us in this category.
Cloud-native ERP integrated with the Microsoft technology stack
Dynamics 365 is a cloud-native application that runs, and was built on, Microsoft Azure. This seamlessness between cloud and application helps organizations to scale as their business grows and to protect their data with security tools from Microsoft. Companies can drive innovation with continuous updates, which are quality validated and controlled by the customer, allowing them to set the pace of change while also leveraging the latest and greatest feature updates. It also allows organizations to use Microsoft Power Platform. Power BI can bring insights to the surface, and Power Automate can streamline processes by automating repetitive tasks with no-code tools embedded in Dynamics 365. The underlying Microsoft Dataverse architecture also makes it easy to integrate with third-party applications for niche requirements or communicate with customers and suppliers when order or shipment information is updated.
Dynamics 365 integrates natively with Outlook and Teams, enabling companies to use the tools they already have and are familiar with to augment their finance and supply chain tasks. Stay in the flow of work with embedded Teams integration, which allows cross-team collaboration on things like supply and demand planning.
Embedded advanced analytics on a composable platform
Dynamics 365 incorporates embedded Power BI dashboards, which puts the data you need at your fingertips and in the context of modules like warehousing and procurement. For example, with Power BI, you can gain a single view of your warehouse performance to optimize location capacities and make efficient labor scheduling decisions.
Dynamics 365 Supply Chain Management and Dynamics 365 Finance are built on a composable platform, making it easy to extend your solution with Power Platform, providing low-code tools like Power Apps and Power Automate. Where ERP customizations were once a heavy, time-consuming task, these tools empower end users to customize their solutions and build apps so you can work the way you want. Furthermore, users can leverage prebuilt customizations and industry-specialized solutions from our ISV partner network to help speed development even further. Internally at Microsoft, we’re leveraging Dynamics 365 and custom Power Apps to enable a circular economy at our Microsoft Circular Centers.
Flexible manufacturing capabilities
Modern manufacturers require nimble solutions and flexible systems to adapt quickly to changing demands and production processes. Dynamics 365 Supply Chain Management features a logical and intuitive UI designed for modern production floor execution, whether you’re running discrete or continuous processes.
Additionally, while some manufacturers may use the native functionality in Dynamics 365 to control their manufacturing activities for machines, equipment, and personnel, many manufacturers are implementing manufacturing execution systems (MES) to meet advanced and bespoke manufacturing requirements. For manufacturers that have either built MES solutions in-house over a number of years or have implemented a third-party MES, integrating an MES with ERP can be challenging. Dynamics 365 Supply Chain Management takes the pain out of integrating with your MES by leveraging the power and simplicity of application programming interfaces (APIs). Data exchange is fully automated and occurs in near real time, keeping data current in both systems with no manual data entry required.
Investing in innovation with global coverage
We are thrilled to be recognized as a Leader again in this year’s Gartner Magic Quadrant for Cloud ERP for Product-Centric Enterprises.* But our ambitions don’t stop here. We are continuing to invest in making Dynamics 365 Supply Chain Management and Dynamics 365 Finance even better with innovations that will make our products smarter and more efficient for for enterprises of all scaleglobal, large, and mid-market.
Learn more
To learn more about Dynamics 365 Supply Chain Management or Dynamics 365 Finance, request a demo or take a tour today.
Magic Quadrant reports are a culmination of rigorous, fact-based research in specific markets, providing a wide-angle view of the relative positions of the providers in markets where growth is high and provider differentiation is distinct. Providers are positioned into four quadrants: Leaders, Challengers, Visionaries, and Niche Players. The research enables you to get the most from market analysis in alignment with your unique business and technology needs. View a complimentary copy of the Magic Quadrant report to learn more.
*GARTNER and Magic Quadrant are registered trademarks and service mark of Gartner, Inc. and/or its affiliates in the U.S. and internationally and are used herein with permission. All rights reserved. Gartner does not endorse any vendor, product or service depicted in its research publications, and does not advise technology users to select only those vendors with the highest ratings or other designation. Gartner research publications consist of the opinions of Gartner’s research organization and should not be construed as statements of fact. Gartner disclaims all warranties, expressed or implied, with respect to this research, including any warranties of merchantability or fitness for a particular purpose.
**This graphic was published by Gartner, Inc. as part of a larger research document and should be evaluated in the context of the entire document. The Gartner document is available upon request from Microsoft.
Source: Gartner, “Magic Quadrant for Cloud ERP for Product-Centric Enterprises,” Greg Leiter, Dixie John, Robert Anderson, Tim Faith, September 26, 2022.
This article is contributed. See the original author and article here.
A banner image for the Microsoft Ignite event happening October 12-14, 2022.
For this year’s Microsoft Ignite on October 12-14, we’re looking forward to sharing our latest innovations to help you meet the opportunities and address the challenges of managing IT environments in the current economic climate.
IT organizations large and small are on a mission to ensure they’re getting the most value out of their current investments. To do this, many organizations are adding adoption specialists and other new roles in the IT department to help drive adoption and usage of new services and ensure positive user experience. Recently, we’ve evolved the Microsoft 365 admin center to help IT admins with everything from managing deployments and updates to understanding the adoption and usage across their organization.
At Ignite, we’re excited to share new innovations designed to address the needs of these new roles and also improvements to help you administer Microsoft 365 more efficiently. All to help you maximize the value of your investments.
Ignite will be offering a variety of content and many ways to engage with us and with each other. You can expect keynotes and breakout sessions, live virtual roundtables, community engagement, and expert discussions. We pulled together the most relevant pieces for Microsoft 365 admins to help you get better oriented at the event and get the most value for your time.
Realize value through new intelligent capabilities designed for Microsoft 365 admins and adoption specialists
Over the last few years, organizations of all sizes found themselves moving part or all their IT environments to the cloud to support remote employees, whether they were ready or not. Now that the dust has settled a bit, IT admins are taking a closer look at how they can continue driving adoption and improving the end user experience to ensure they’re getting everything they can out of those investments.
In this session, James and Amisha will discuss two new Microsoft 365 admin capabilities that provide deeper visibility into people and technology, usage, health, training, product feedback, and Net Promoter Score (NPS) trends. They’ll also talk about how IT admins and change experts can use this information—which includes tenant-level data only to ensure user privacy is protected—to drive awareness and adoption campaigns to help users understand the art of what’s possible and get the most out of Microsoft 365 capabilities. This information also helps IT admins identify trends and proactively address adoption issues.
Empower partners and SMB customers to achieve more with Microsoft 365
Our mission at Microsoft is always to empower every person and every organization on the planet to achieve more. Today, more than ever, we want to ensure that achieving more doesn’t mean adding complexity, which can prevent you from getting the most out of your Microsoft 365 investment. This is especially important for our partners securing cloud transformations at small and medium-sized businesses (SMB) and for smaller organizations with small IT teams who are already stretched to their limits.
In this session, Meg and Nick will provide a closer look at new investments in the Microsoft 365 admin center, including the Microsoft 365 Lighthouse admin portal for Managed Service Providers (MSP) and the Microsoft 365 Admin mobile app and Admin app in Microsoft Teams, and the new Business Advisor program, designed to help our partners and SMB customers drive operational efficiency and ensure a secure environment for users.
How to optimize your environment and manage change using Microsoft 365 admin center
Based on your feedback over the last year, we’ve continued to improve admin experiences to help you keep your Microsoft 365 environment healthy, and effectively manage change. Sandhya, Maryam, and team will give you an overview of the latest Microsoft 365 admin center innovations for managing your day-to-day efficiency with features like Global Search and ServiceNow integration, reducing security risks through greater visibility into updates, managing change for users more effectively, and improvements we’ve made to make tracking system health and monitoring your Microsoft 365 environment.
Unlock new experiences across Microsoft 365 to lower costs and empower employees
Speaker: Colette Stallbaumer
Organizations today face the challenge of engaging and empowering an increasingly distributed workforce at home, in the office, and everywhere in between. Leaders must reduce cost and complexity while continuing to invest in employees to meet changing expectations. To gain competitive advantage in this rapidly evolving business environment, organizations need integrated, cloud-powered solutions that enable employees to be productive and secure–from anywhere. Join us to learn about the new capabilities we are lighting up across Microsoft 365 to power this new world of work.
Roundtable sessions: A closer look at new Microsoft 365 admin center capabilities
Join us for our roundtable sessions where our product experts will provide more technical deep dives and discussions on how you can use the Microsoft 365 admin center to ensure you’re getting the most out of your Microsoft 365 investment:
Karuana Gatimu and Amisha Bhatia will join you for a discussion about understanding Microsoft 365 usage across your organization. You’ll have a chance to provide feedback on our new user experience and usage features, such as new roles, analytics, and tools, and discuss how you envision using these features in your own organizations. They will also share best practices for making the most of these tools.
Emine Atayurt and Vibin Chingapurath will talk with you about best practices for keeping tabs on your Microsoft 365 environment and reacting quickly to problems. They’ll explain how you get notified about issues in your tenant that require action, show you how to tag users for early issue detection, and demonstrate advanced monitoring for service incidents. Most importantly, they’ll get your input on what the product roadmap should look like to make you successful in these areas.
Zina Ndugwa, Sonia Perunneparampil, and Samantha Kitetu will present the latest profile editor designs to understand how you might use the editor in your organization and any challenges you predict. They also want to learn what features resonate more with your organizations and how you think the profile experience can assist you in supporting hybrid work today.
We are excited to have you join us at this year’s Microsoft Ignite!
Join us for a post-Ignite Microsoft 365 admin center AMA on Tuesday, November 1st at 10:00 AM PT to ask questions about news from Ignite. Make sure to RSVP to the event in the link above!
Continue the conversation or start your own in the Microsoft 365 community as Microsoft Ignite approaches! Make sure toFollow or Subscribe to the Microsoft 365 Blog space so you don’t miss any announcements from Ignite.
This article is contributed. See the original author and article here.
From how we’re helping every employee thrive with Microsoft Viva, to new Microsoft Teams Rooms offerings for hybrid meetings, to new security and management capabilities in Windows 11—read on to learn what’s new in Microsoft 365 this month.


Recent Comments