This article is contributed. See the original author and article here.
Welcome to Azure Data Factory’s November monthly update! Here we’ll share the latest updates on What’s New in Azure Data Factory. You can find all our updates here.
We’ll also be hosting our monthly livestream next week on December 15th at 9:00am PST/ 12:00pm EST! Join us to see some live demos and to ask us your ADF questions!
Continuous integration and continuous delivery (CI/CD)
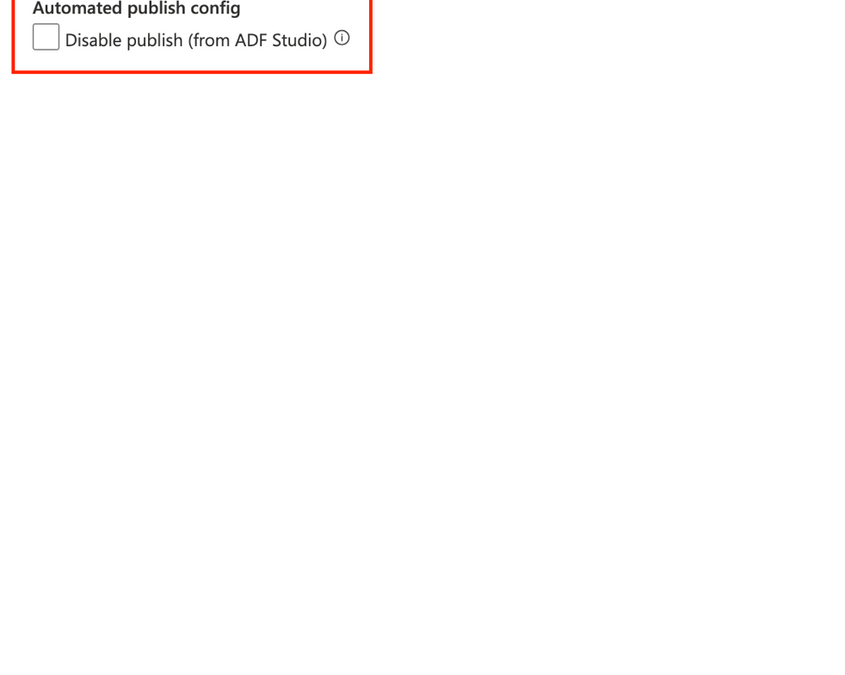
Disable publish button in ADF studio now available
We have added the ability to disable the publish button from the ADF studio when source control is enabled. Once this is enabled, the Publish button will be grayed out in the ADF Studio. This will help to avoid overwriting the last automated publish deployment.
We added some new updates to the SAP CDC connector in mapping data flows, adding new capabilities:
Incremental only is now available
You can get changes only from SAP system without initial full load. With this feature, you have the flexibility to focus on incremental data process without worrying about big data volume movement on an initial full data load.
Performance improvements have been made – source partitions in initial full data load
With a simple radio button, you can now connect your SAP system to multiple sessions in parallel to extract data, which will greatly reduce the time to perform an initial full data load from your SAP system.
Pipeline template added to Template Gallery
There is a new pipeline template in the Template Gallery to help speed up your journey on loading big amounts of SAP objects by a parameterized pipeline with SAP CDC enabled in ADF. You can get more information on the template here.
Pipeline designer enhancements added to ADF Studio preview experience
We have added three new UI updates to the ADF Studio preview experience:
Dynamic Content Flyout
A new dynamic content flyout has been added to make it easier to set dynamic content in your pipeline activities without having to use the expression builder.
Error Messaging
Error messages have been relocated to the Status column in Debug and Pipeline monitoring. This will make it easier to view errors whenever a pipeline run fails.
Container view for monitoring
A new monitoring view is available, adding the option to enable the container view. This view provides a more consolidated monitoring view of activities that were run. A big change that you will see is that nested activities are now grouped under the parent activity. To be able to view more activities on one page, you can choose to hide the list of nested activities under the parent activity.
We hope that you found this helpful! Let us know in the comments if there’s anything else you’d like to see in our blogs or livestreams. We love hearing your feedback!
This article is contributed. See the original author and article here.
Microsoft Dynamics 365 Supply Chain Management now streamlines warehouse configuration, reducing the time it takes to set up, validate, maintain, and troubleshoot your warehouse management processes. Let’s take a closer look at these and other improvements that help prevent wrong configurations and improve your users’ experience.
The new location directive scope feature eliminates the need to configure different location directives for multiple SKUs. You can now configure one location directive for a work unit that consists of single or multiple items, saving time, reducing maintenance and troubleshooting, and maximizing efficiency. Scope options give you more freedom when you design location directives and help reduce redundant configurations.
Location directive scope also allows you to edit the query that defines when a directive should be applied for a single order with multiple items.
We strongly recommend using this feature, especially if complexity and number of records make your location directive configuration difficult to manage.
Save time configuring Warehouse management with guided setup
Configuring Warehouse management is a time-consuming task if done manually. New step-by-step wizards in Dynamics 365 Supply Chain Management make configuring the Warehouse management module easier than ever before.
The Warehouse management initiation wizard provides detailed, step-by-step guidance for configuring basic settings from scratch, such as when you’re adding a legal entity.
The Warehouse initiation wizard provides detailed, step-by-step guidance for setting up an individual warehouse.
The Warehouse implementation tasks workspace helps you track your progress through a pre-configured list of tasks required to implement Warehouse management from scratch.
New troubleshooting tools find common mistakes in Warehouse management configuration
Errors in your Warehouse management configuration can lead to disaster. Additional validations and a new set of self-healing rules in the optimization advisor make it easier to identify and correct the most common configuration errors. We strongly recommend running the optimization advisor after you configure the Warehouse management module to detect any missing or incorrect configurations.
A new Preview query results feature helps you determine why a location directive isn’t working as intended, allows you to confirm the desired outcome of your queries, and helps you quickly identify issues with your query configurations.
Acceptance tests speed up validation of location directive configurations
In the past, Warehouse management customers would set up location directives, create test data, execute the process, and see whether the system worked. If it didn’t, they were back to square one, changing the setup, recreating test data, wasting time and money. Testing location directives was a laborious manual process that could take a lot of time.
The Warehouse management module now includes a powerful framework called acceptance tests. Its purpose is simple: to facilitate faster validation of location directive configuration. Here’s how the acceptance tests feature can be so powerful:
Test it before you embrace it: After you set up a location directive, you can test to validate the outcome of the directive without having to create test data. You can also use smart on-hand simulation to validate your configuration.
Visualize the location directive flow: The coverage view uses colored highlighting to indicate which location directives, lines, and actions were used in determining the result of a selected test.
Simplify maintenance: Turn on Run tests after change to automatically run all tests any time you change a location directive.
Adjust query criteria quickly with Edit query preview
The ability to reuse queries across warehousing configurations provides a great deal of flexibility. The new Edit query preview allows you to quickly review and adjust criteria when needed in the Related information panel, without having to open Edit query.
New Move up and Move down buttons in the Work templates page allow you to quickly change the sequence of work templates.
Copy configurations
Now you can roll out location directives to new warehouses without mistakes by copying location directive configurations across warehouses.
This article is contributed. See the original author and article here.
Purpose
The purpose of this post is to walk through the process of creating an event driven alerting mechanism for Azure Policy compliance.
Assumptions
General knowledge of Azure, PowerShell, and resource creation, both in the portal and with command-line interfaces.
Challenge
Many organizations use Azure Policy to track, measure, maintain, and enforce regulatory policy compliance. These regulatory compliance initiatives could be standard baseline initiatives that have been assigned or they could be customized regulatory compliance initiatives, created just for that particular organization. Regardless of the regulatory compliance initiative type, organizations have prioritized not just compliance to a regulatory compliance initiative but also when a policy state change occurs. A common question we hear is “How can I be alerted when my policy compliance state changes?”. If an organization would rather use automation instead of a manual method, this article will describe an alerting mechanism that will notify you about what policy changed, when that policy changed, and how you want to be notified about that change.
In Azure, there are multiple ways to accomplish the same objective. Azure Policy is no different. These different methods can be broken down into two categories: event driven and time driven. Time driven methods require you to query or retrieve some data from a source on a schedule. This scheduled query would then leverage technology to determine logic and trigger a response. While this time driven method does work, it is complex and inefficient. This particular method introduces delays between the time a policy event occurs and the time in which you get an alert. The other method related to Azure Policy is event driven. An event driven method is a way to trigger a response to a policy event when it happens. This event driven approach will be the focus of this post.
Querying the Azure Activity log has been one way that administrators have retrieved Azure Policy events. However, the Azure Activity log does not provide the level of detail that is required for Azure Policy especially in regard to regulatory compliance. Admins would like to know when a regulatory compliance policy is no longer in compliance. Unfortunately, because the Azure Activity log is focused on all Azure Activity, it does not provide specifics about Azure Policy event changes. This event driven solution will walk you through the steps of obtaining a method for rich Azure Policy activity details such as regulatory compliance changes.
Solution
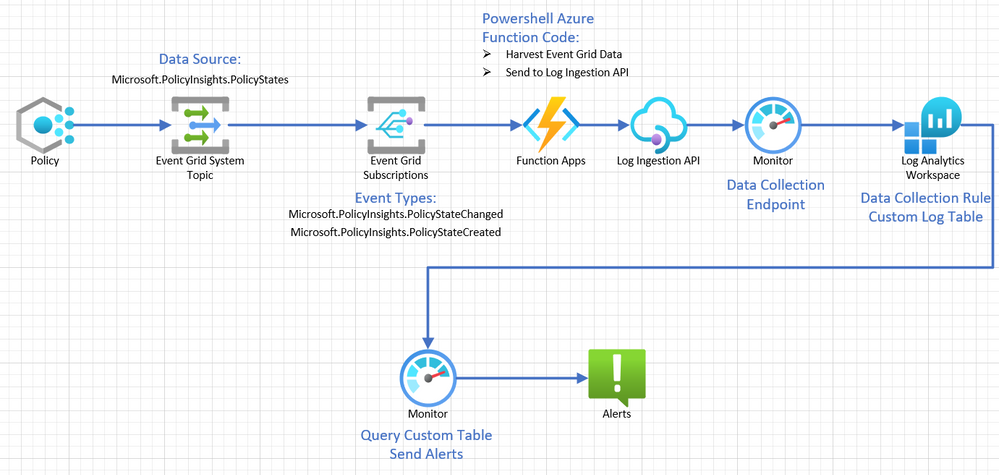
The first item needed in the solution is to determine where the type of data source is that we need to capture for Azure Policy regulatory compliance details. The preferred data source for capturing policy specific events is the PolicyInsights event data. PolicyInsights data comes in three event types in Azure: Policy Compliance Status Added, Policy Compliance Status Changed, Policy Compliance Status Deleted. The next question would be: How do I access or capture this PolicyInsights Event data and then create alerts so that I can be notified when certain policy events happen, like compliance change? The following architecture answers that question.
Azure Policy: The first step in this process is Azure Policy. Policies are assigned and those policies have compliance states.
Event Grid: When an Azure Policy compliance state changes, the Event Grid will pick it up because it is “listening” for PolicyInsights events.
Event Grid Subscription: An Event Grid Subscription will be configured to send those captured events to an Azure Function.
Azure Function: An Azure Function will be using PowerShell code to harvest the incoming policy event data and use the Log Ingestion API to send it to the Log Analytics Workspace through a Data Collection Endpoint and Data Collection Rule.
Log Ingestion API: The Log Ingestion API will be used to send this data through the Data Collection Endpoint and Data Collection Rule to the Log Analytics Workspace.
Log Analytics Workspace: A Log Analytics Workspace will be configured with a Custom Table created to receive the data coming from the Data Collection Endpoint.
Monitor: Azure Monitor will be used to run queries on the Custom Table to indicate when an alert should be triggered.
Alert: An alert will be configured to be triggered when the Custom Table query indicates something is out of compliance.
Key Vault
In this reference architecture, we will use a Key Vault to store a secret value that gets dynamically retrieved by the PowerShell code in the Azure Function. The purpose of this process is to maintain proper security posture and provide a secure way to store and retrieve this sensitive data. An existing Key Vault may be used, or you may elect to create a new one for this purpose. Rather than walk through the creation of a new Key Vault, we will just be covering the specific configuration items that are needed. Key Vault deployment docs can be found here ( https://learn.microsoft.com/en-us/azure/key-vault/general/quick-create-portal).
Secrets: The Key Vault will be used to store the App Registration Secret that you created in the AAD App registration. The value of the secret was one that you should have saved in your reminders notepad. Go to your Key Vault and click “Secrets”.
Now click “Generate/Import” on the top menu bar to create a new secret.
Upload option is Manual. Assign a “Name” and “Secret Value“. We used “PolicyAlert-Secret” as the name and put in the AAD App Registration secret as the value. Leave as enabled. Then click “Create“.
Access Configuration: The Key Vault will need to have the Access Configuration set to Azure role-based access control. Click to apply the Azure role-based access control Permission model. This model is required so that you can setup specific access for the Azure Function managed identity in a later step.
Access Control: You will need to assign the “Key Vault Secrets User” role to the Azure Function managed identity. If you have not yet created that managed identity, you can come back later to do it or do it in the Azure Function section of the portal.
Event Grid System Topic
The Event Grid System Topic will capture the PolicyInsights data so it can be sent to a Log Analytics Workspace.
Type Event Grid in the Global Azure search and select it.
Under Azure service events, select System topics.
Create New and use these Basic Settings:
Change the Topic Types to Microsoft PolicyInsights
Ensure that the scope is set to Azure Subscription
Ensure that the appropriate Subscription name has been selected.
Select the appropriate Resource Group
Give the SystemTopic an appropriate name such as egst-PolicyAlert
Tags as needed
Review and create.
Function App
The Function App be used to harvest the PolicyInsights data from the Event Grid and then write it to a Log Analytics Workspace.
Basics:
Go to Azure Global Search and type/select Function App
Click Create
Select Resource Group where Event Grid resides
Give name to function app according to naming convention and that makes sense for example, FN-PolicyAlert or FA-PolicyAlert
Publish: Code
Runtime Stack: PowerShell Core
Version: 7.2 (newest available)
Region: Select the region where you are working and have the EventGrid resource located
Operating System: Windows
Plan type: Consumption (Serverless)
Hosting: Select a storage account that you already have or accept the storage account that is created automatically.
Networking: Leave network injection to off
Monitoring: Enable Applications Insights; accept the newly created application insight.
Deployment: Accept the defaults.
Tags: As needed
Review and Create
Identity: Once the Function App is created, you need to configure the Managed Identity.
After updating the slider to enable system assigned managed identity, the following pop up will occur. Click Yes to enable.
As outlined earlier, assign the “Key Vault Secrets User” role to the Azure Function managed identity. Click on Azure role assignments, click on + Add role assignment (preview), select the scope to Key Vault, the Subscription in which you are working, the resource, being the actual Key Vault to which you want to apply the role to the managed identity, and finally what role to which you are assigning the managed identity which is the Key Vault Secrets User
Check permissions on the Key Vault. Go to Key Vault. Select Access Control (IAM). Click Check Access. Select for Find: Managed Identity. Ensure you have the correct subscription, select the managed identity, Function App and select the Function app you created for this solution.
You should see the role of Key Vault Secrets User
Function
The Function inside of the Function App will be running code to format the Event Hub data and write it to Log Analytics.
Create the Function (inside of the Function App).
Go the Function App that you just created.
From the left hand menu, in the Functions sub menu, click on Functions.
Click Create. A flyout menu will pop up on the right hand side of the screen.
Leave the development environment as Develop in portal.
The next section will be Select a Template. In this search bar, type and search for “Azure Event Grid Trigger” and select it. You can accept the default name but you can change the name to something that makes sense to the solution and/or naming convention, in this case we used “PolicyAlertTrigger1“.
Once the Function is created, select Integration to view the contents.
Click to open the “Trigger” (eventGridEvent in this example).
Please note the “Event Trigger Parameter Name“. This can be customized but it must match in the PowerShell code for the function. In this example, we will use the default value of “eventGridEvent“.
Next, click “Create Event Grid Subscription“.
On the “Create Event Subscription” part of the portal, use the following options/values.
Name: EvtSub-PolicyAlert (this is customizable but should following naming conventions)
Event Schema: Event Grid Schema
Topic Types: Search for “policy” and select Microsoft PolicyInsights.
Source Resource: Azure Subscription *(might be autofilled)
System Topic Name: egst-PolicyAlert (or the name you created) *(might be autofilled)
Event Types: Policy Compliance State Created, Policy Compliance State Changed
Endpoint Type: Azure Function * (might be autofilled)
Endpoint: PolicyAlertTrigger1 (Your Azure Function created in the previous step) * (might be autofilled)
AAD App Registration
An AAD App registration is needed for the Log Ingestion API, which is used to write the data to Log Analytics.
In the Azure global search, type Azure Active Directory.
Once in your AAD tenant, under the Manage sub menu, click “App Registrations“.
Click +New Registration and use the following settings:
Name: AR-PolicyAlert-Ingestion
Supported account types: Accounts in this organizational directory only
Click Register
Once you create the new registration, click to open the registration. Be sure to store your Tenant ID and App ID “reminders” in a text document (like notepad) so you can copy/paste it in a later step. The snapshot below just has the values blanked out but shows the IDs that are needed by being highlighted.
When inside of your new registration, click “Certificates and Secrets” and then go to “Client Secrets“.
Create a new client secret. Put the name you want to use in the “Description” and add this to your reminders notepad. Ensure that you have the correct expiration for the secret according to your organization. Click Add.
Once the new secret is created, immediately copy the secret value and add it to the reminders notepad. This value will only be visible for a short time and you cannot get access to it again.
These steps will show how to create a customer data table in the Log Analytics Workspace and create a Data Collection Rule.
Go to the Azure global search bar and type in Log Analytics Workspaces (LAW)
If you do not have a current Log Analytic workspace, please create one before moving on to the next step.
Open the LAW, from the lefthand side menu, under settings, select Tables.
Select +Create, and then select New custom log (DCR-based)
On the Create page, name the Table in this case, the table is called PolicyAlert
Next, click “Create Data Collection Rule” blue hyperlink. (This Table which we just named, will be where you will be sending your policy data.)
Give the new DCR a name, in this case, it is named DCR-PolicyAlert. Click Done.
When back at the “Create custom log” page, select the Data Collection Rule, DCR-PolicyAlert, you just created if it did not auto populate.
Select the Data Collection Endpoint (DCE) that you created earlier in Azure Monitor. In this case the DCE is DCE-PolicyAlerts
Click Next to continue
Setting up the data format/schema is the next step, which can be a little confusing. In this step, you will upload/paste in a sample json that represents the data that you will be using. If you would like to use the exact same data that we are using in this article, HERE is a sample file you can use for this upload. This sample data file will basically define the data structure in your LAW Table. This will need to be coordinated with your PowerShell code that is completed in a later step.
When you upload the sample file (or any other), you will likely get an error about the “TimeGenerated” data field. This is an expected error. This field is required in Custom Tables so you will next need to “transform” a data/time field in our sample data to suit the Custom Table. If you get this error, click the “Transformation Editor” in the previous image. The following image shows the query you can use. Type in the following KQL. Run the query and then click Apply.
You should now be able to click Next to continue.
Click the Create. *Please note you will see the table name appended with _CL. In this case, PolicyAlert_CL is the name of the custom table.
This process will setup access to the Data Collection Rule as part of writing the data to Log Analytics via the Log Ingestion API.
Go to Azure global search. Type Monitor and select it.
Within Azure Monitor, go to Settings, and click “Data Collection Rules” on the left menu.
Find the DCR created in the previous step and click on it.
Once on the DCR you created, click “Access Control (IAM)” from the left hand menu.
Find Grant access to this resource, click “Add Role Assignment“.
Add the role “Monitoring Metric Publisher” to your previously created AAD App Registration. In our example, we named ours “AR-PolicyAlert-Ingestion“. Submit the role assignment when completed.
For Role, search for Monitoring Metrics Publisher. Select it. Click Next.
For Members, select the name of the app registration from earlier in the solution. In this case, AR-PolicyAlert-Ingestion
Click Next
Click Review and Assign.
Setup Function App Managed Identity to have Access to Key Vault
Here you will setup the managed identity for Key Vault so it can read your secret store in Key Vault.
Setting up access to your Key Vault secrets to the Managed Identity for your Function App can be done from the Key Vault or from the Function App Identity page. In this article we will describe how to do it from the Function App Identity page. This access control will allow your Function App to query the Key Vault for the secret that you stored from the previous step.
Go to the Global Azure search bar and type Function App
Go to your Function App that you created for this solution.
From the Settings menu, click the Identity button on the left menu.
You should see your managed identity there from the previous step. Now click “Azure Role Assignment“.
Now click “Add Role Assignment“.
As shown in the following image, choose Scope=Key Vault, Resource=(Your Keyvault), Role=”Key Vault Secrets User”.
Assigntherole and submit the change.
Setup PowerShell Operating Environment in Function App
This process will prepare your Azure Function powershell environment.
Go to your Function App that you created in a previous step.
Under Functions, click on “App Files” on the left side.
There will be a drop-down menu near the top middle of your screen. Choose the “requirements.psd1” option.
Edit the text in the file so that you have an entry for “Az.Accounts” and “Az.KeyVault“, as indicated in the graphic, and then click “Save“. This will tell your function to automatically install the PowerShell modules specified when the app restarts next.
With the Az module line uncommented, you now need to restart the function app.
To do this, click on “Configuration” on the left bar, under Settings.
Navigate to the “GeneralSettings” tab on the top right.
Find the setting “PowerShell Core Version” on the right and change it to a different value and click save. Acknowledge the change and wait until it completes. Once the task is completed, reverse that setting back to its originalvalue and click save again. In my example, I went from “PowerShell 7.2” to “PowerShell 7.0” back to “PowerShell 7.2”. This process is just to force Azure to restart the Function App so the Az Modules will load.
Loading the PowerShell modules could take a few minutes so do not immediately expect it be there right after the restart completes.
When the PowerShell is executed in your function app, it should have the PowerShell Az modules loaded by default.
Setup PowerShell in Function
Here you will setup the powershell code within the Azure Function.
In this section we will setup the PowerShell code and operating environment with the Function created in the previous step. For our reference architecture in this article, you can download the PowerShell source code from HERE.
Go to the Function App, FN-PolicyAlert or what you called the Function App for this solution.
From the left-hand menu, under Functions, select Functions.
You should be able to see on the right-hand side, the function that was created earlier in this solution called, “PolictAlertTrigger1“, and click on it to open it.
On the left menu, under Developer, click “Code + Test“.
This will open the code editor. Grab all of the code from HERE and paste it into the editor. You need to make sure that you have verified that all of the PowerShell variables at the top of the code are filled in with your appropriate values. Many of these values will come from the “reminders” notepadtextfile mentioned in earlier steps.
Need the DCE logs ingestion URI – go to the DCE in monitor and copy
For the DCR immutable ID, go to the DCR, click on JSON view
Setup Alerting
Here you will setup the alerting mechanism within Azure Monitor.
Go to the Log Analytics Workspace (LAW) where you have sent the Custom Logs that you created earlier which in the previous steps in this example was called, LAW-. In this example, the custom log table is called PolicyAlert_CL.
In a blank query space, please type or paste in the following KQL query to query the custom log table for the policy compliance event changes
Run the Query by click the Run button to ensure that it is working properly.
Click on New alert rule to create the alerting for the policy compliance event changes.
The alert rule that is being created will be based on the current log query. The Scope will already be set to the current resource.
Next, on the Condition tab, the Log query will already be populated with the KQL query that we entered.
On the Condition tab, the Measurement section will define how the records from the log query will be measured. As this query has one or more summarized columns, the Table rows option will be shown. Leave Table rows as the selection. Aggregation granularity refers to the time interval over which the collected values are aggregated. By default, the value is set to 5 minutes.
For this example, leave this set to 5 minutes.
On the Condition tab, the Configure dimensions section allows you to separate alerts for different resources. In this example, we are only measuring one resource so there is no need to configure.
On the Condition tab, the Configure alert logic is where we can configure the Operator and Threshold values against the value returned from what we are measuring. In this case, select the operator as greater than and the threshold value as 0. We would like to be alerted when there is a policy compliance change. With these settings, we will be notified when the threshold value is greater than 0; so every time a change occurs.
Next, we will need to select a frequency of evaluation value; how often do we want the log query to run and be evaluated. Remember, the cost for the alert rule increases the lower the frequency is meaning if I have something run with a frequency of every minute, it will cost more than something that I run every 10 minutes. There will be a pro tip that shows an estimated cost. In this example, select 5 minutes.
The remaining steps are all about how you want to be notified by using Action Groups. The procedures to create Action Groups is well documented HERE. For our example, this image shows a basic Action Group that just sends an email. In the example, the name of the Action Group is ag-PolicyAlert-Action. Also, the Action Group will contain the email address of the group/individual that will be notified when a policy compliance change occurs. Please keep these items in mind when designing your Action Group.
Wrap-Up
Now that this setup has been complete, you should be able to receive an email notification whenever an alert is generated from an Azure Policy Compliance status change. There are several possible solutions to use and ways to expand functionality in this architecture so stay tuned for future posts that expand on this approach.
This article is contributed. See the original author and article here.
We’ve been working diligently to address user feedback about desktop files not opening in the Visio web editor. Today, we’re excited to announce that we’ve made a number of improvements towards a more seamless user experience between the Visio web and desktop apps.
What’s new
Visio users can now open and edit files containing shapes with the following properties in Visio for the web:
Rectangle gradients
More fill and line patterns
OLE objects
Data graphics
Shadow text
Vertical text
Double underlines
Shadow effects
Reflection effects
Glow effects
Soft edges
Bevel effects
3-D rotations
Perspectives and 3-D rotation perspectives
Compound line patterns
1-D and 2-D protection
*Note: Some interactions have been optimized to ensure they work in Visio for the web.
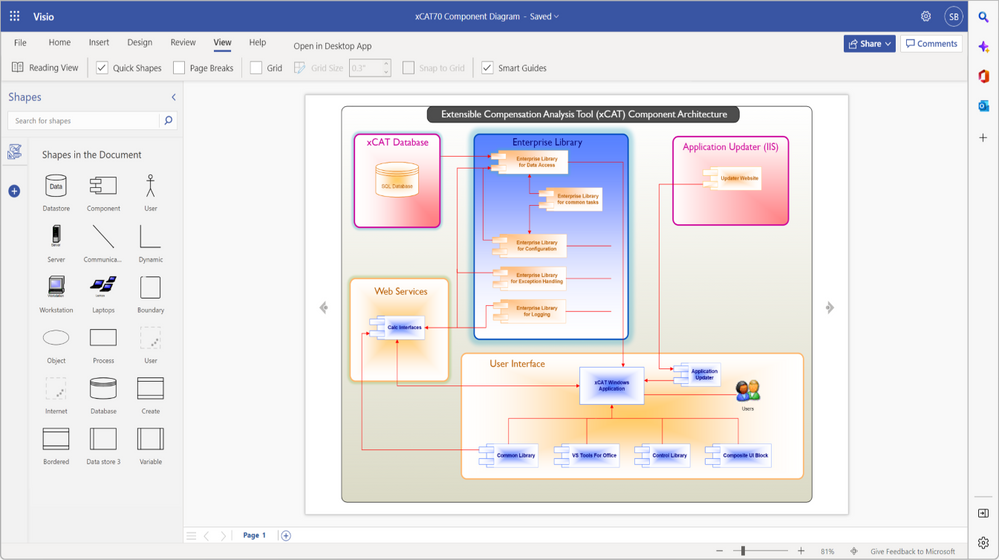
An image of a component architecture diagram demonstrating how shapes with gradients appear in Visio for the web.
Looking ahead
Our goal is to always make it easier for you to think and collaborate on ideas visually—whether improving processes, developing new reporting structures, or brainstorming concepts. With this new update, we hope you will find it easier to work with colleagues, from whichever app you prefer.
We are continuing to make improvements on this front and look forward to introducing support, for example, for diagrams containing shapes with layers or diagrams with more than 1,000 shapes. To learn more about the properties that can still lead to compatibility issues when editing files in Visio for the web, please see Why can’t I open a diagram for editing in Visio for the web?
Watch our on-demand webinar
Watch the event recording here: Editable for all: How to create diagrams that work virtually anywhere and across Visio versions. During this session, we show you how to create Visio files that can be accessed by all stakeholders regardless of which Visio version (or app) you use. We also discuss how to avoid or quickly address any web alerts that prevent in-browser edits, so you can jump right back into your workflow.
We are listening!
We look forward to hearing your feedback and learning more about how we can ensure a more seamless user experience between Visio apps. Please tell us what you think in the comment section below. You can also send feedback via the Visio Feedback Portal or directly in the Visio web app using “Give Feedback to Microsoft” in the bottom right corner.
This article is contributed. See the original author and article here.
Marketers are often asked to do more with lessand do it yesterday. Every day, they need to quickly create compelling, unique email content that grabs the customer’s attention in a sea of competing messages. Designing marketing email content can be incredibly challengingand often the toughest part is getting started. It’s hard to be creative under pressure. Wouldn’t it be ideal if you could just focus on the key points you want to convey and let artificial intelligence generate your email copy? With AI-powered Content ideas in Microsoft Dynamics 365 Marketing, you can.
Kickstart creativity with Content ideas
The new Content ideas feature in Dynamics 365 Marketing helps you kickstart the creation of marketing emails and discover new ways to express your thoughts. AI generates custom suggestions that you can review and edit, much like brainstorming with a teammate. With Content ideas, you can find inspiration in seconds to create engaging event registration emails or convincing reminders to return and complete a purchase.
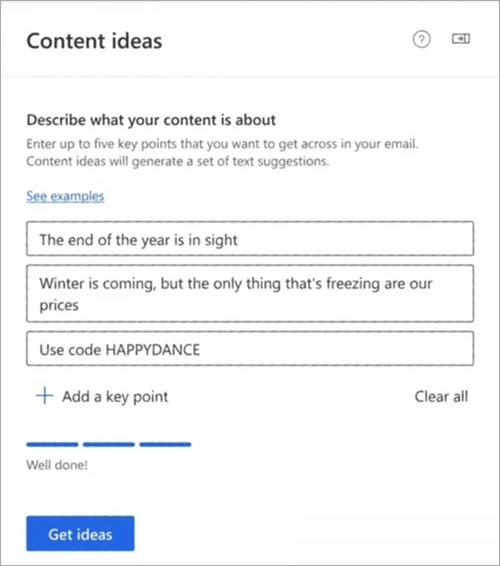
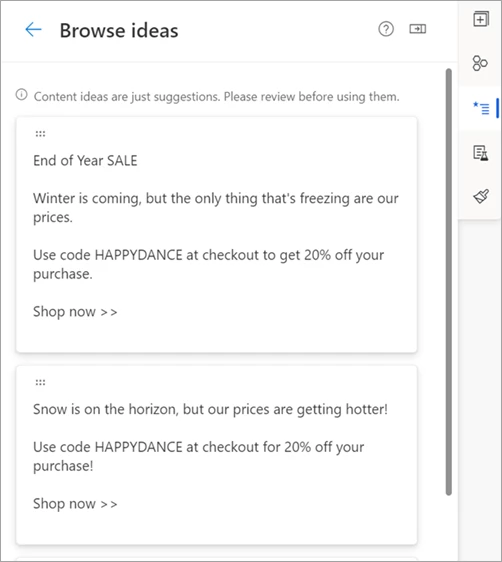
Imagine that you work as a marketer for a clothing retailer. The new winter collection hits the market in a few days, and you need to create a promotional email to sell out the fall collection. All you need to get started are a few thoughts about what you want your email to say. Content ideas will use them to generate text suggestions for you.
You type:
The end of the year is in sight
Winter is coming, but the only thing that’s freezing are our prices
Use code HAPPYDANCE
And, in just seconds, AI supplies the inspiration for engaging emails.
Content ideas will generate up to 20 text suggestions for your key points. Select the content you like best and use it as-is or customize it. No more writer’s block.
With Content ideas, you can easily produce new and original marketing email content on demand, without having to struggle or search the web for hours for an original idea.
Content ideas is a game changer for marketers
In our example, Content ideas helped you craft your fall promotion email campaign in minutes. You gained precious time and created engaging email content that was perfectly adapted to your brand’s essence. Your email campaign is a remarkable success. Customers snapped up the remaining clothes from last fall. The store is ready for winter, and so are you with fresh content ideas!
There’s no doubt that generative AI is on the rise. It’s a game changer for marketers, and with good reason. The possibilities are infinite. Microsoft is at the forefront of incorporating this exciting innovative technology in our products. Through Content ideas, Dynamics 365 Marketing capitalizes on AI to make marketers more productive and their jobs easier. By providing custom solutions that make each business unique, Content ideas helps marketers reimagine their email campaigns to deliver more with less.
Try it today, and level up your email campaigns with unique content in seconds!
Content ideas is available in preview in English-language environments in the North America region only. We will expand availability to more regions if there is high customer demand.
Content ideas uses the most advanced generative AI language model in the world, GPT-3. GPT-3 has been trained on a vast number of text samples from the Internet to generate text in English that looks and sounds like it was written by a human. Microsoft runs on trust. Trust must be earned in the short term as well as the long term. In Dynamics 365 Marketing, we see the responsible use of AI as an opportunity to demonstrate trustworthiness as well as a path for innovationa way to minimize harm and expand our capacity to provide useful and delightful experiences for our customers and their customers. Read how Dynamics 365 Marketing approaches responsible AI with intention.
Product visuals are for illustrative purposes only and might not reflect the general availability feature.


Recent Comments