Transform technician experience with the new Field Service Mobile UX

Transform technician experience with the new Field Service Mobile UX

This article is contributed. See the original author and article here.

We recently announced the preview of our new Dynamics 365 Field Service mobile experience. This blog details the new capabilities on how technicians can benefit from this new streamlined experience, which cuts down the number of taps required to complete a booking in nearly half! 
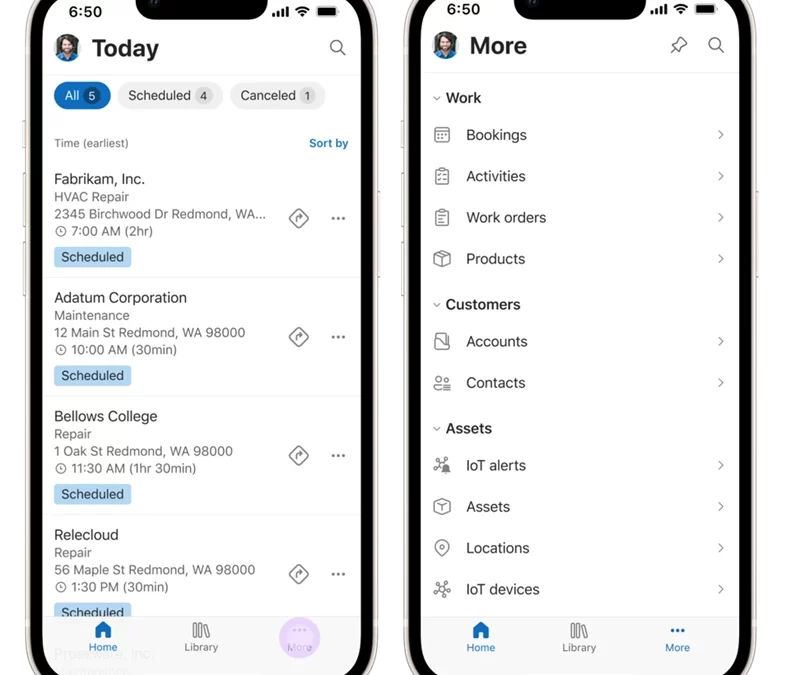
Home Page

Upon launching the app with the new experience enabled, you will notice several things. Firstly, the styling and theming follows the Microsoft’s Fluent design system – bringing an experience like other modern enterprise apps like Teams and Office to your field service technicians.

graphical user interface, application

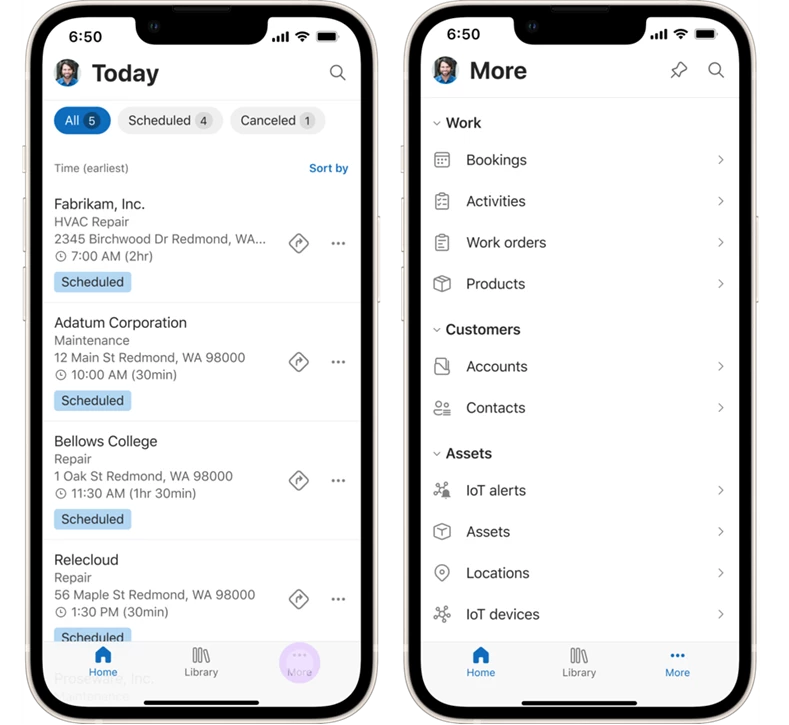
There is a new bottom navigation bar with 3 main buttons: 

  1. Home – the landing page for the app, currently today’s bookings 
  1. Library – for helpful reference materials such as Guides 
  1. More – for easy access to the other areas of the app via the sitemap.

Tapping on your user avatar in the top left opens a familiar navigation menu where you can get help, provide feedback and access useful app settings, such as the ability to change your time zone and your applicable Dynamics 365 org. 

Throughout the app, you will notice that touch targets are larger to eliminate mis-taps for conditions out in the field. Labels and icons, such as for booking status, are color coded for immediate visual recognition. The UX is responsive and adjusts to various screen sizes and portrait and landscape modes. 
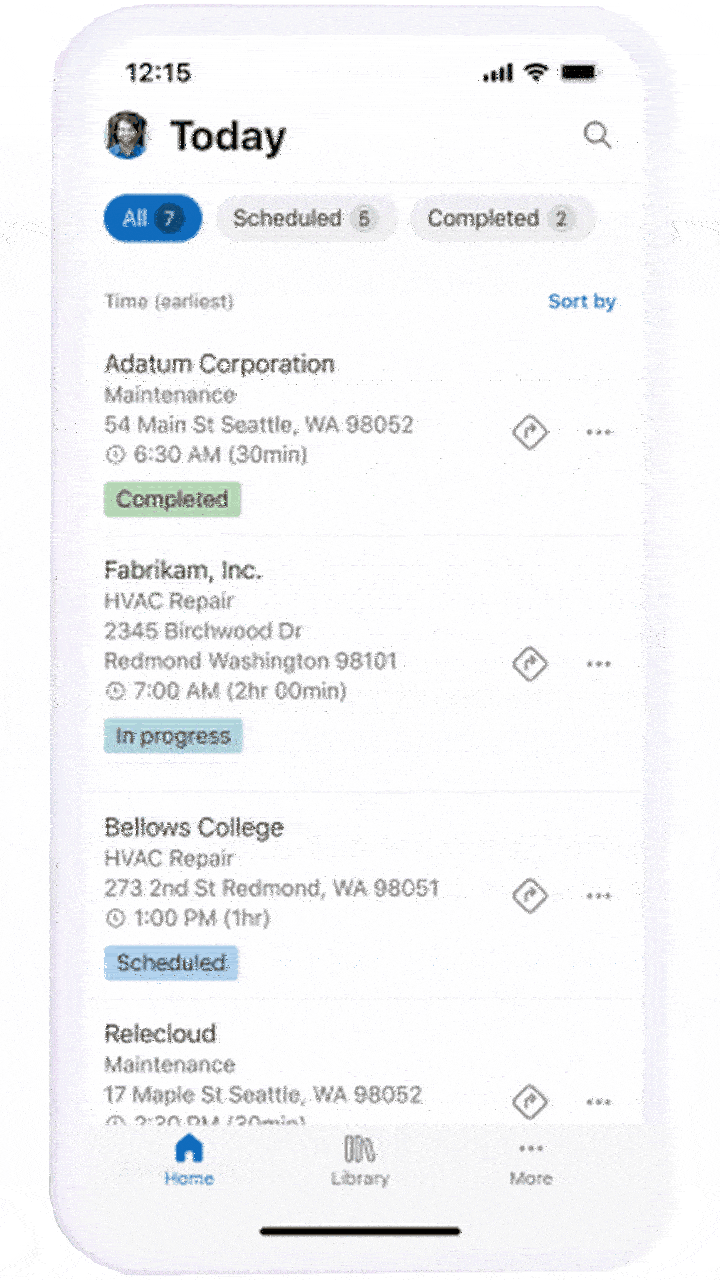
The Booking List 

Every row in the booking list highlights the most important fields at a glance – such as the customer’s name, the incident type, the service address, the booking start time and the current booking status. There are one-touch filters and sorting options at the top – enabling the technician to easily filter based on booking status or sort by columns other than time.

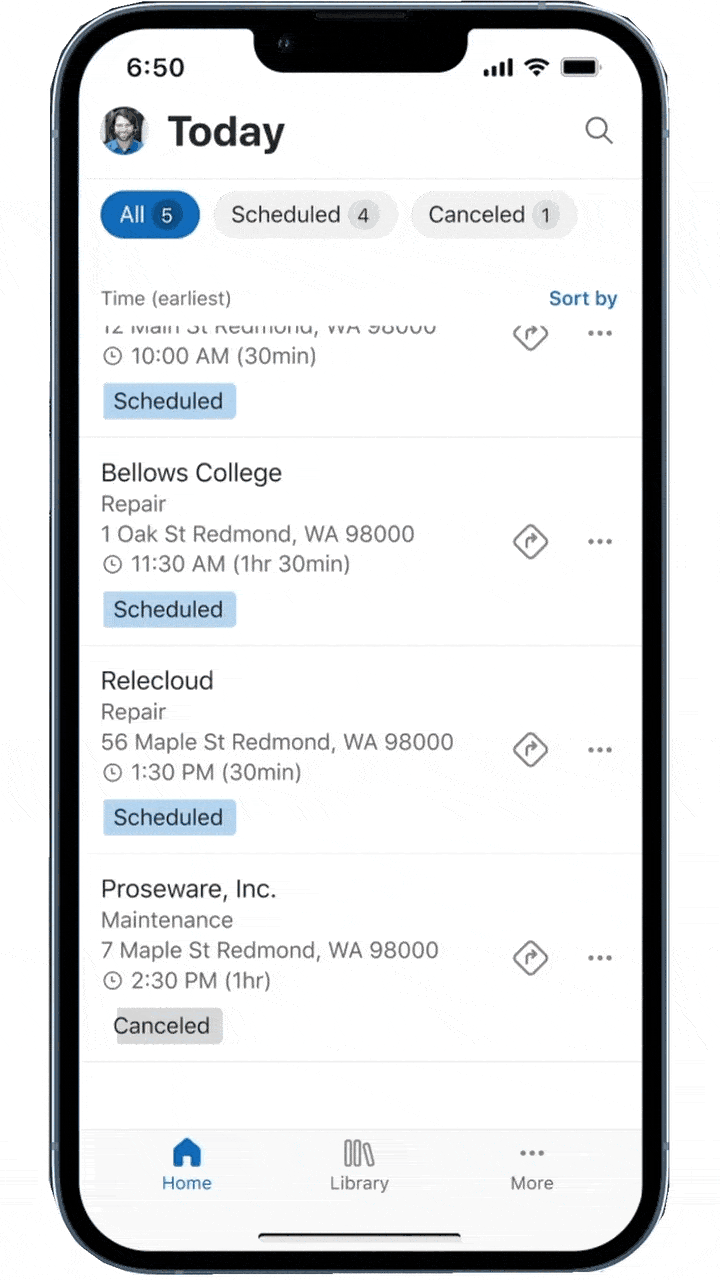
There are also nifty timesaving shortcuts – swipe gestures to change the booking status from within the booking list and one-touch “Get Directions” button to start navigation. All of these features are designed to reduce the time required to get basic information and perform tasks. To access the booking details, simply tap on the booking from the list. 

Booking details, tasks, services and products 

Within the booking form, there are tabs to keep the information organized in an intuitive manner. Technicians can smoothly swipe between the tabs, instead of having to tap on them. 

graphical user interface, text, application, chat or text message

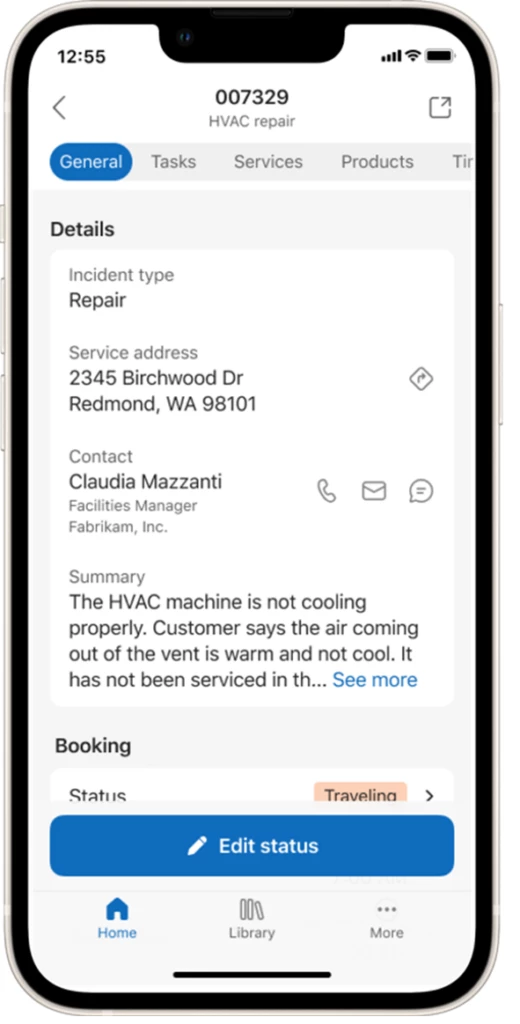
The General tab summarizes the key details of the booking and the associated work order. The “Edit Status” button at the bottom is both conspicuous and fixed at the bottom of the screen, making it easy to access and tap.

The one-touch “Get Directions” feature from the bookings list is available on this screen as well. Additionally, there are shortcuts to quickly start a phone call or send an email from to the onsite contact from this screen. The edit controls for the time and duration fields have also been completely redesigned using the Fluent mobile patterns. The summary field contains an expandable work description. 

graphical user interface, text, application, chat or text message

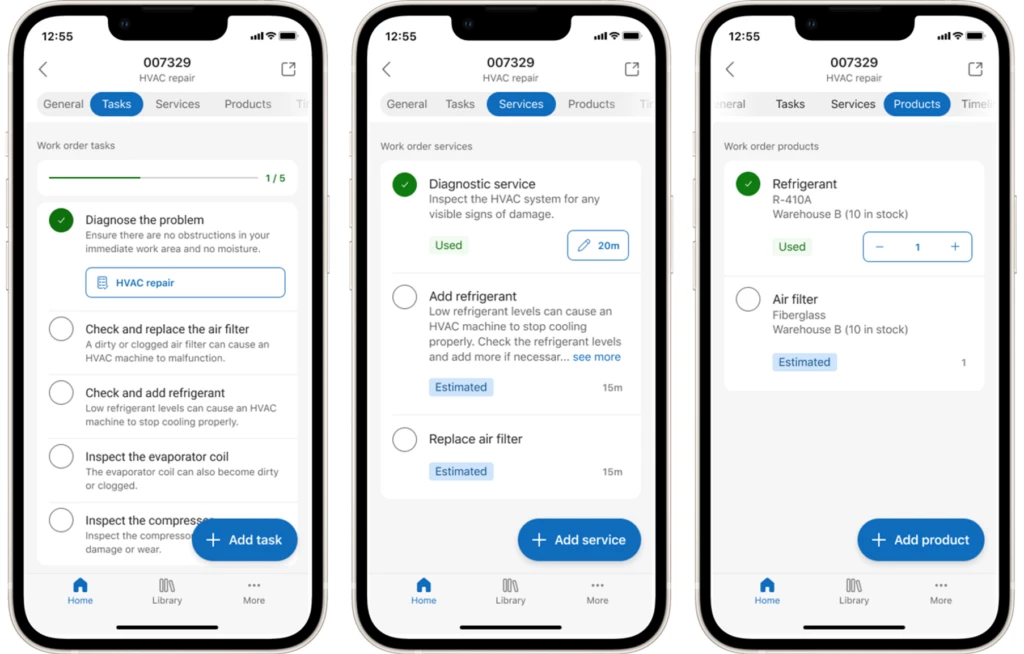
The tasks, products and services tabs include the list of Work Order Service Tasks, Work Order Products and Work Order Services for the current booking respectively. The tasks sub-grid has multiple UX niceties – a progress bar at the top, large tappable icons to easily check off completed tasks, a task description below each task title, links to attached Guides and Inspections (more on that in a bit) and a floating action button to quickly add tasks. The products and services lists inherit many of the same UX enhancements, with the additional features to mark an item as used and update the quantity inline.  

These lists are designed to reduce the need to tap into the individual items by surfacing the relevant details and editing capabilities in the list itself. 

graphical user interface, text, application

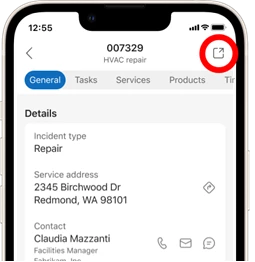
If a user needs the unified client interface (UCI) for additional booking details, they can tap on the icon on the top right of any screen. Tapping on a record that doesn’t have the new experience also takes the user to the UCI experience – for e.g., tapping into a task will currently open the UCI form. 

Step by step instructions

An exciting new feature for service technicians is the ability to access their Guides on their mobile devices with the Field Service app! If the Dynamics environment contains both Field Service and Guides solutions, users can access guides from within the library tab in the bottom navigation bar. Technicians can use guides containing instructional images and branching logic to help them when they need to follow predetermined procedures or troubleshooting maneuvers.

graphical user interface, text, application, chat or text message

Each guide also has an outline to enable the user to see all the steps briefly. Also, both inspections and guides can be initiated from the task list as long as they’re attached to a particular service task – surfacing the instructions in context of the work order! 

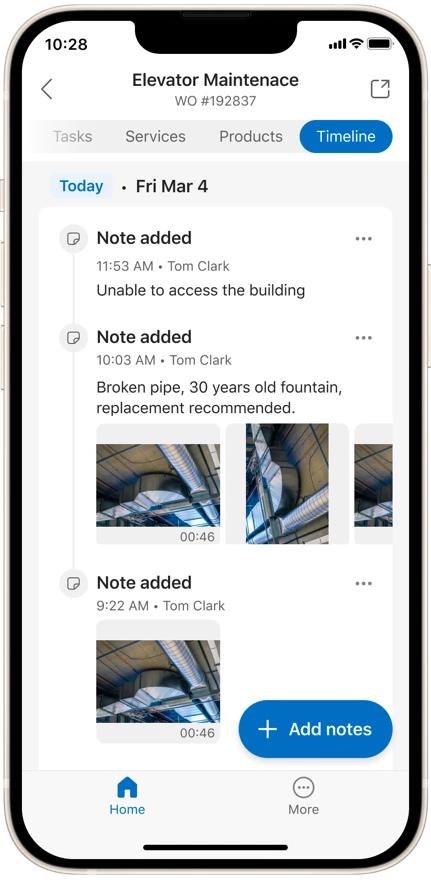
Taking notes and attaching images 

Technicians will love the new timeline experience in the booking. It provides a streamlined view of text and image notes from the annotations table. It is super easy to add multiple pictures in one go by selecting them from the phone’s image gallery – or just snap away in the control itself.  The image previews can also be seen inline. What’s more – rich formatted text is supported! 

graphical user interface, application

The new Field Service Mobile UX is packed with features simplifying the technician experience to enable them to be more productive in the field.

Try it out today by following our documentation. We are looking forward to your feedback as we bring additional enhancements, including support for our offline capabilities in the new experience as well. 

The post Transform technician experience with the new Field Service Mobile UX appeared first on Microsoft Dynamics 365 Blog.

Brought to you by Dr. Ware, Microsoft Office 365 Silver Partner, Charleston SC.

MVP’s Favorite Content: New Series to Elevate Your Skills

MVP’s Favorite Content: New Series to Elevate Your Skills

This article is contributed. See the original author and article here.

In this blog series dedicated to Microsoft’s technical articles, we’ll highlight our MVPs’ favorite article along with their personal insights.


Sander ten Brinke, Developer Technologies MVP in Netherlands


Sander ten Brinke.jpg


Performance Improvements in .NET 8 – .NET Blog


“For the last few years, I have looked forward to Stephen Toub’s blog posts about performance improvements in .NET. It shows that performance is very important to the .NET team, and it’s jaw dropping when you realize that this blog post will take HOURS to read. The blog post goes very in-depth, and you will learn many new things about .NET when reading it.”


Jev Suchoi, Developer Technologies MVP in Netherlands


Jev Suchoi.jpg


Microsoft Cloud Adoption Framework for Azure – Cloud Adoption Framework | Microsoft Learn


“It is the most comprehensive and tightly packed content library for Azure Cloud. Not only encapsulating technology and architecture topics but also addresses cultural and business best practices. It even covers well-known anti-patterns.


I use the Cloud Adoption Framework daily to explain “how to Cloud” to clients”.


*Relevant Blog:


Mastering Cloud Adoption Framework: Quick Start Backlog essentials :flexed_biceps: – (devjev.nl)


The perfect Azure naming convention – (devjev.nl)


Luke Murray, Microsoft Azure MVP in New Zealand


Luke Murray.jpg


What’s new in the Microsoft Cloud Adoption Framework – Cloud Adoption Framework | Microsoft Learn


“I use this almost every day as a reference point to learn and accelerate adoption! One of my favourite pages is the ‘What’s New’! As Cloud Adoption can change and new content gets added, the What’s New page helps me keep up to date with the latest Cloud Adoption frameworks.”


*Relevant Blog: Cloud Adoption Framework for Azure – Tools and Templates – luke.geek.nz The Cloud Adoption Framework also includes various templates and assessments to keep track of your Cloud Journey across the Strategy, Plan, Ready, Adopt and Govern cycles. The blog post, written below, is only a fraction of the content available.


Nobushiro Takahara, Data Platform MVP in Japan


Nobushiro Takahara.jpg


Migrate SQL Server workloads to Azure SQL – Training | Microsoft Learn


“This Microsoft Learn content is a exhaustive and easy-to-understand guide that provides useful information for Fit & Gap analysis, migration planning (assessment), and migration methods for migrating SQL Server on on-premise environment to Azure. It also describes how to assess the database using Microsoft Data Migration Assistant and specific procedures for data migration, so I believe that this is a good content you should refer to when planning a migration.”


(In Japanese: Azureへオンプレミス環境のSQL Serverを移行するための Fit & Gap 分析に役立つ情報、および、移行計画(アセスメント)、移行方式に関する情報が網羅的に分かりやすくまとまっています。また、Microsoft Data Migration Assistant を使用したデータベース評価の仕方、および、データ移行などの具体的な手順が記載されており、移行計画を立てる際に是非参照したほうが良いコンテンツだと思います。)


*Relevant Blog: 【保存版】SQL ServerのAzure移行に向けた移行フローチャート – NOBTAの気ままにITブログ (nobtak.com)

Release wave 2: Transforming customer experiences with generative AI and Microsoft Dynamics 365

Release wave 2: Transforming customer experiences with generative AI and Microsoft Dynamics 365

This article is contributed. See the original author and article here.

The innovation continues. Generative AI has opened the door to a new world of what’s possible.

In business applications, we’re using generative AI to break down silos and bridge gaps between data, insights, and people so sellers, marketers, and customer experience (CX) professionals can deliver exceptional experiences across the entire customer journey, seamlessly.

With our 2023 release wave 2, we’re taking these capabilities to new heights across our Microsoft Dynamics 365 Sales, Microsoft Sales Copilot, and Microsoft Dynamics 365 Customer Insights applications.

As unveiled at yesterday’s Business Applications Launch Event, I’m thrilled to share highlights of what’s to come, including new ways that these applications—fueled by generative AI and Copilot—can help you use data and insights that used to be hidden, unlock capabilities previously out of reach, and reach new levels of productivity and collaboration more easily than ever before. With a focus on delivering value to each line of business employee, our solutions are proven to maximize business outcomes across your organization.

Many of these capabilities are available today; all of them will be generally available or in preview before April 2024. Let’s check it out.

Use data and insights that used to be hidden

To deeply understand your customers, it all starts with data. But if your data is incomplete or you can’t get to it or take action on it, how valuable is that data and the insights that come out of it?

The new AI-driven capabilities releasing in this wave are set to revolutionize your customer experiences. With Copilot’s assistance, marketers, data analysts, and CX professionals can rapidly unlock data for enhanced decision-making, obtain valuable customer demographic and behavioral insights, and streamline both journey orchestration and content creation processes to fuel customer experiences.

Copilot in Dynamics 365 Customer Insights will help you to harmonize disparate data sources into one complete 360-degree view of each customer; it will automatically assess incoming data and offer suggestions to improve the quality, resulting in a more complete view and better insights into each customer.

Screenshot showing the results of the automatic incoming data assessment in Dynamics 365 Customer Insights – Data.

For sellers to maximize the number of qualified leads or deals closed, it’s important that they spend their time with leads and contacts with the highest likelihood of conversion. Obtaining this clarity involves looking across a growing number of customer touchpoint signals that sellers often don’t have access to (such as website visits or store visits), nor have time to analyze. That’s where the combined power of Dynamics 365 Customer Insights and Dynamics 365 Sales comes in. As sellers are working their leads, Copilot in Dynamics 365 Sales automatically summarizes the lead details, status, and recent activity details, including profile summaries from Customer Insights – Data. Combining sales data with important intent signals helps sellers get a full picture of their customer so they can tailor every engagement, right in their flow of work.

Dynamics 365 Sales screenshot showing a Copilot lead summary with information from Dynamics 365 Customer Insights – Data.

Unlock capabilities previously out of reach

Another one of the many beautiful things about Copilot is that it can unlock capabilities that were previously out of reach, and it applies to various roles across your organization.

For instance, thanks to dialog with data—a Copilot capability in Dynamics 365 Customer Insights—marketers and CX professionals can get insights and define the right target audience just by asking a simple question instead of relying on data experts to do the work for them.

Creating customer journeys has also been completely transformed with Copilot. Marketers can now use everyday language to describe the customer journey they want to create, and Copilot instantly designs that journey for them, offering suggestions on segments, trigger-based actions, communication timing, branching options, and much, much more. What’s even better is that the suggested journey is now editable. So if the marketer needs to make a last-minute change to the journey’s scope, they can do so by simply asking Copilot to make the update.

graphical user interface, text, application

When it comes to creating marketing content, bottlenecks can often arise: organizations may not have the right creative resources, enough time, or funding to produce effective content. So unfortunately, many promising campaigns never see the light of day. However, now, with the assistance of Copilot, marketers and CX professionals can easily produce highly appealing content with none of those roadblocks. Copilot capabilities like content ideas and content rewrite help these professionals write or refresh emails, forms, and more. And to make sure that collateral is on brand, they can use style assist which automatically applies colors, fonts, and styles based on a web URL and brand profiles to ensure a cohesive brand identity.

And to make it even easier to both understand your customers through data and act on insights from that data, we’ve combined Dynamics 365 Marketing and Dynamics 365 Customer Insights into a single offering, with the name “Dynamics 365 Customer Insights.” 

Reach new levels of productivity and collaboration

With customer expectations on the rise and customer loyalty at stake, sellers and marketers need to be more on top of their game than ever, so infusing Copilot into the tools they already use—whether it’s Dynamics 365, Microsoft Teams, or Outlook—our solutions empower them to transform their day-to-day operations and supercharge their productivity.

Sales Copilot capabilities in Outlook deliver insights and opportunity summaries so sellers no longer have to work across multiple applications to get a comprehensive view of an opportunity or to prepare for a meeting. These summaries are accessible in various places, including collaborative deal rooms, ensuring collective visibility.

To ensure that collaboration flows smoothly across sales teams, Sales Copilot in Teams provides AI-powered planner tasks, like simplifying task assignments, setting due dates, and keeping everyone in the loop. And once it’s time for the presentation, the team is equipped with real-time tips and suggestions within the Teams meeting so they can take charge of the discussions.

GIF showing AI-powered planner tasks in a Microsoft Teams deal room

And with Copilot in Dynamics 365 Sales, sellers no longer have to sift through tabs and sections, they have access to what they need at their fingertips, like AI-generated account summaries, and the ability to quickly follow up on emails using recommended actions.

Our goal is to equip sellers with the right information at the right time, in real time, so they can make every moment count when interfacing with a customer; and we’re making it all available within their flow of work.

Learn more about 2023 release wave 2 capabilities

The capabilities coming in this release wave are ushering in a new era of AI-powered efficiency and innovation, enabling you to use data and insights that used to be hidden, unlock capabilities previously out of reach, and reach new levels of productivity and collaboration.

To see how all of this comes to life, watch the CX overview segment of the Business Applications Launch Event.

The future of AI-driven success is here, and Copilot is leading the way. Stay tuned for more exciting updates, and be ready to implement these transformative capabilities in your organization.

A man who is smiling and looking at a laptop

Dynamics 365 2023 release wave 2

Generative AI has opened the door to a new world of what’s possible.

The post Release wave 2: Transforming customer experiences with generative AI and Microsoft Dynamics 365 appeared first on Microsoft Dynamics 365 Blog.

Brought to you by Dr. Ware, Microsoft Office 365 Silver Partner, Charleston SC.

Deploy Semantic Kernel with Bot Framework

Deploy Semantic Kernel with Bot Framework

This article is contributed. See the original author and article here.

If you’ve been working with Azure OpenAI for a while, chances are you’ve heard of Semantic Kernel. It is a library implemented in multiple programming languages that can handle prompt templates, manage conversation state, integrate with plugins and many other features essential to building an advanced LLM-infused application. But how exactly do you “deploy” Semantic Kernel?


Being a software library, Semantic Kernel can be deployed to any compute option capable of running Python, C# or Java. You’ve probably seen sample repositories with Jupyter notebooks you can use to explore the functionality. But in most cases you can’t give your end-users a notebook! In this article, we’ll give you an example and a solution accelerator that you can use to bring your AI application to production faster.


Solution Architecture


Below is the architecture diagram for the solution accelerator we put together. You can also pull the source code and deploy it yourself from our Github repo!


MarcoCardoso_3-1698325719740.png


As you can see in the diagram, Semantic Kernel is at the core of the solution, and will act as the orchestrator of the chat experience. It is deployed into an App Services instance, which will also be running the Bot Framework SDK. This enables our bot to be deployed across multiple channels, including web pages, Teams, and even third-party chat platforms like Slack.


The flow of chat messages is as follows:


  • End-users connect to a messaging channel your bot is published to, such as Web or Teams;

  • Messages get processed through Azure Bot Services, which communicates with a .NET application running on App Services.

  • The .NET application runs a Semantic Kernel Stepwise Planner at its core. The planner elaborates a series of steps to process the user’s request, and then executes it.

  • Each step of the plan is formulated through Azure OpenAI, and the executed against Cognitive Search (traditional RAG pattern), Azure SQL (structured data RAG) or any other externally connected plugins.

  • Now with the data gathered from plugins, the question is resubmitted to Azure OpenAI, where a final answer is formulated and presented to the end user. This concludes a conversation turn.


Built-in use cases


1. Traditional Retrieval-Augmented Generation (RAG)


To test out the traditional RAG pattern, we integrated a sample from the Azure Cognitive Search product called hotels-sample. It’s an index containing names, descriptions and other information about hotels, which you can search and filter through to explore the service.


First, we implemented the SearchPlugin class:


MarcoCardoso_4-1698326850579.png


Notice how Semantic Functions – the functionality that Semantic Kernel can call upon – are structured. Each Semantic Function and each of its arguments must be annotated with a human-readable description. This description will then be passed to the LLM so it can decide when to utilize that function, and pass in the right parameters. You can check out the source code in our repo, but this function is basically submitting a search to the Azure Cognitive Search index.


With debugging enabled, we can see each step of how the interaction happens:


MarcoCardoso_2-1698327326764.png


1. Thought: GPT-4 receives the question and determines it needs to use the SearchPlugin to respond.


2. Action: In the same step, GPT-4 formulates an action call with the appropriate parameters. The action is constructed in JSON format.


3. Observation: The plugin returns some hotel names and descriptions.


4. Final Answer: GPT-4 determines it now has all the information it needs, and provides an answer to the end user. Typically, this would be the only response the user sees!


This process of Thought-Action-Observation may repeat multiple times until the model obtains the required information. We’ll see an example of that in the next scenario.


2. Structured Data Retrieval-Augmented Generation


Much like Azure Cognitive Search, a SQL Database can be consumed by Semantic Kernel using the same technique. Again, we start by implementing a Plugin:


MarcoCardoso_3-1698327851998.png


This is slightly more complex – we added three Semantic Functions:


  • GetTables: Gets all tables in the database;

  • GetSchema: Gets the schema for a specific table;

  • RunQuery: Runs a query on the database;


We then expect the Semantic Kernel Planner to combine these as needed to reach a response. Let’s see an example, again with the debugging enabled to view intermediate steps:


MarcoCardoso_4-1698328246266.png


MarcoCardoso_6-1698328425620.png


This time, the conversation flow goes like this:


  1. Thought: GPT-4 receives the question and determines it needs to use the SQLPlugin to respond.

  2. Action: The first action required is to list tables to get the right table name for customers

  3. Observation: The plugin returns the table names in the database.

  4. Thought: Now knowing the correct table name, GPT-4 can formulate a query to get the number of customers

  5. Action: The action is to run a COUNT query on the SalesLT.Customer table

  6. Observation: The plugin returns the count of customers

  7. Final Answer: GPT-4 determines it now has all the information it needs, and provides the number of customers to the end user. Again, in a production scenario, this is the only answer the end-user would see.


3. Upload and analyze documents


The third and final common scenario we added to the accelerator is the upload of documents. Users can use the built-in upload function to send PDF files, and the bot will break them down and use Vector search to find relevant information.


Once again, starting with the plugin implementation:


MarcoCardoso_7-1698328735382.png


And moving on to the Web Chat:


MarcoCardoso_8-1698328826630.png


MarcoCardoso_9-1698328838238.png


Conclusion


Semantic Kernel is a very powerful and extensible tool, but deployment can be a challenge if you don’t know where to start. In this article, we provided a solution accelerator template you can use to quickly get to production, and create your own plugins and extensions.


Also please note that you’re responsible for what plugins you place in the hands of your end users! Imagine what would happen if a user asked “please drop the AdventureWorksLT database”. For that reason, you need to make sure your application has the precise role assignments to enable the actions it needs to perform, while limiting anything that should be out of its reach. Always keep security first!


In case you missed the GitHub repository link, here it is! Make sure to drop a star if it helped you!


https://github.com/Azure/semantic-kernel-bot-in-a-box


Delegate Azure role assignment management using conditions

Delegate Azure role assignment management using conditions

This article is contributed. See the original author and article here.

Were excited to share the public preview of delegating Azure role assignment management using conditions. This preview gives you the ability to enable others to assign Azure roles but add restrictions on the roles they can assign and who they can assign roles to.  


As the owner of an Azure subscription, you likely get requests from developers to grant them the ability to assign roles in your subscription. You could assign them the Owner or User Access Administrator role, but those roles grant permission to assign any Azure role (including Owner!), and that’s probably a lot more permission than necessary for that developer’s scenario. You could instead make role assignments for these developers on demand, but that makes you an unnecessary and impractical bottleneck in their workflow. 


Another common case we hear about is a deployment pipeline that needs to make role assignments as part of the deployment process, for example to grant a virtual machine managed identity access to Azure Storage and other resources. You don’t want to assign the deployment pipeline the Owner or User Access Administrator role because again, it’s a lot more permission than is needed for the scenario. 


We created this feature so you can grant permission to create role assignments, but only under specific conditions, such as for specific roles. You can do this in two ways: 


  • Make a role assignment that is constrained using conditions. 

  • Use a new built-in role that has built-in conditions. 


Let’s look at each scenario. 


How to delegate role assignment management using conditions


Meet Dara, a developer who needs to enable an Azure Kubernetes Service (AKS) managed identity to pull images from an Azure Container Registry (ACR). Now, you can assign Dara the Role Based Access Administrator role and add conditions so she can only assign the AcrPull and AcrPush roles and only to service principals. 


Figure 1: Delegate Azure role assignment management using conditions.Figure 1: Delegate Azure role assignment management using conditions.


Let’s look at how to do this step by step:


Step 1: When creating a new role assignment, on the Privileged administrator roles tab select the new Role Based Access Control Administrator role. You could also select any built-in or custom role that includes the Microsoft.Authorization/roleAssignments/write action.


Figure 2: Select roleFigure 2: Select role


Step 2: On the Members tab, select the user you want to delegate the role assignments task to.  


Figure 3: Select membersFigure 3: Select members


Step 3: On the Condition tab, click Add condition to add the condition to the role assignment.


Figure 4: Add condition to role assignmentFigure 4: Add condition to role assignment 


Step 4: On the Add role assignment condition page, specify how you want to constrain the role assignments this user can perform by selecting one of the templates. For example, if you only want to restrict the roles that a user can assign (ex. AcrPull and AcrPush) and the type of principals the user can assign roles to (ex. service principals), select the Constrain roles and principal types template.


Figure 5: Select role templateFigure 5: Select role template


Step 5: On the Constrain roles and principal types pane, add the roles you want the user to be able to assign and select to what principal types the user can assign roles to.


Figure 6: Select role and principal typeFigure 6: Select role and principal type 


Step 6: Save the condition and complete the role assignment.  JMQuade_7-1697746408908.png


Figure 7: Review role assignment with conditionsFigure 7: Review role assignment with conditions


How to delegate role assignment management using a new built-in role with built-in conditions


Now Dara wants to control who can sign into virtual machines using Microsoft Entra ID credentials. To do this, Dara needs to create role assignments for the Virtual Machine User Login or Virtual Machine Administrator Login roles. In the past, you had to grant Dara the Owner or User Access Administrator role so she could make these assignments. Now, you can grant Dara the new Virtual Machine Data Access Administrator role. Then, Dara will only be able to assign the roles needed to manage access to the virtual machine. 


Figure 8: Virtual Machine Data Access AdministratorFigure 8: Virtual Machine Data Access Administrator 


Similarly, you can assign Key Vault Data Access Administrator role to trusted users managing key vaults, enabling them to assign only Azure Key Vault-related roles.


To assign the new built-in roles with built-in conditions, start a new role assignment, select the Job function roles tab, and select a role with built-in conditions, such as Virtual Machine Data Access Administrator. Then complete the flow to add a new role assignment.


Figure 9 Select Key Vault or Virtual Machine Data Access AdministratorFigure 9 Select Key Vault or Virtual Machine Data Access Administrator


Roles with built-in conditions have Data Access Administrator as part of the role name. Also, you can check if a role definition contains a condition. In the Details column, click View, select the JSON tab, and then inspect the condition property. Over time we’ll add more roles with built-in conditions, for the most common scenarios, to make it easy to manage resources and manage access to those resources with simple role assignments. 


Figure 10: Key Vault Data Access Admin JSON view definitionFigure 10: Key Vault Data Access Admin JSON view definition


Next steps


We have several examples for you to get started and customize as needed. Delegating Azure role assignments with conditions is supported using the Azure portal, Azure Resource Manager REST API, PowerShell, and Azure CLI. Try it out and let us know your feedback in the comments or by using the Feedback button on the Access control (IAM) blade in the Azure portal!


Figure 11: Provide feedbackFigure 11: Provide feedback


Stuart Kwan 


Partner Manager, Product Management 


Microsoft Entra 


Learn more about Microsoft Entra: