
by Contributed | Jul 29, 2021 | Dynamics 365, Microsoft 365, Technology
This article is contributed. See the original author and article here.
Today’s consumers want the flexibility to buy and fulfill where, when, and how they choose. As retailers have expanded on purchasing options for customerslike buy online pick up in-storethey have quickly gone from value adds or differentiators, to baseline customer expectations. For many retailers, enabling omnichannel experiences is not only a means to grow; it is critical to surviving in a modern sales environment. Over the last year, retailers have moved quickly to meet customers on new and emerging channels to drive customer conversion and sales growth. Improving front-end experiences were often prioritized over establishing connected back-end systems that powered these new purchasing experiences and as a result, many retailers failed to deliver on a promise of seamlessly connected shopping for their customers due to siloed and disconnected data including cross-channel transactions and customer visibility.
Microsoft Dynamics 365 Commerce is built on a modern, intelligent, and headless platform that natively connects commerce systems, such as payment processing, fraud protection, along with easily extending to 3PL logistics. By looking across all facets of the customer journey, businesses can enable true omnichannel commerce across traditional and emerging channels, through a unified commerce platform. This ultimately allows retailers and consumer goods organizations to meet customers where they are, allow them to pay however they want, and make returns through whatever channel they choose to offer. It also provides managers and sellers with complete visibility of customers and business data. This connected data platform can help fuel your business for future innovation and growth across all relevant purchasing channels.
Let’s take a closer look at how data has transformed the way we perceive, power, and drive innovation across customer purchasing experiences.
Seamless journeys
Consumers expect seamless and frictionless experiences and have seemingly endless options of products and places to purchase. This means that even a single broken step in the customer journey can lead customers to move to another brand or retailer. In a recent PwC survey of 15,000 consumers, they found that one in three people will leave a brand they love after just one bad experience.1
Savvy retailers understand the value of a seamless journey and are making investments to make this a reality. They know that consumers will continually evaluate their brand experience against the best they’ve ever had, not against their idea of what their average experience has been. For example, consumers see no issue comparing smaller and medium-size companies against the most successful e-commerce and omnichannel retailers.
To help businesses compete effectively in this climate, Dynamics 365 Commerce can connect all the steps and touchpoints across the customer journey, from payments to returns, both online and in-store. It empowers retailers to drive a connected commerce experience, providing increased cross-channel visibility, improving customer retention rates and helping businesses gain the necessary insights to offer increasingly personalized experiences.

Personalized experiences
Considering consumers’ low tolerance for bad experiences, businesses of all sizes, even small to medium-sized, must create outstanding customer experiences across platforms, from social to in-person, to check out and returns. Customers spend up to 40 percent more,2 when they consider the experience highly personalized. Moreover, these types of integrated, seamless journeys lead to positive customer experiences that can also increase spending by as much as 140 percent.3
Truly connected systems
Achieving unified commerce requires integration across all systems and databases utilized in making omnichannel commerce a reality. Let’s consider payment systems to understand the benefits of integrating back-end systems.
Many businesses continue to use traditional payment gateways that route payments through a separate risk management system before passing them to another third party for payment authorization and completion. Typically, these legacy systems rely on numerous payment processors and processes for each different channel and region.
This type of disconnected system is inefficient and costly for businesses to operate. When systems are disconnected in this manner, it limits improvements to customer experiences because of a lack of insights and visibility. In addition, users will often have to run dozens of reports to stay on top of sales information from all channels and payment providers, and worse, these reports remain disconnected from ERP and CRM systems.

Integrated payments
Integrating payments is about more than consolidating all payments with one provider. It’s about ensuring all of your payment systems are integrated with other systems, including ERP systems, the point-of-sale platform, and the customer relationship management system. If businesses could integrate payment systems, they can enable the level of visibility necessary to provide more personalized customer experiences and move one step closer to true omnichannel retail.
Businesses can integrate payments in three ways: create a custom integration, use a plugin, or use a native integration. Custom integrations can be expensive due to integration and ongoing maintenance costs, pushing many retailers to opt for prebuilt plugins if a native integration was unavailable. Using plugins carries risk, however, as it means relying on yet another third party to build and maintain a vital link in your commercial processes. Native integration is a superior option as it reduces reliance on an additional third party and is also more affordable and reliable.
With Dynamics 365 Commerce, we offer the ability to work with a variety of payment providers, but we have invested in natively integrating payments to Adyen. Adyen (AMS: ADYEN) is the payments platform of choice for many of the world’s leading companies, providing a modern end-to-end infrastructure connecting directly to Visa, Mastercard, and consumers’ globally preferred payment methods. Adyen delivers frictionless payments across online, mobile, and in-store channels.
Because this integration is built and supported by Microsoft, you can depend on it to be an always up-to-date, seamless working solution while also delivering faster implementation for new businesses. For example, a retailer who recently chose Adyen on Dynamics 365 started accepting and testing payments within 38 minutes, compared to weeks with other providers.
Learn more about the Microsoft and Adyen partnership or check out our free Payments Webinar.
Build connected and seamless experiences today
Businesses across the globe have been challenged to adapt rapidly to changing customer needs and demands accelerated by the pandemic. Consumers and business-facing organizations are embracing digital transformation on a massive scale to compete and thrive in complex commerce environments. Dynamics 365 solutions enable retailers and consumer goods organizations to combine the best of digital and in-store to deliver personal, seamless, and differentiated customer experiences. With Dynamic 365 Commerce, businesses can streamline business processes, turn data into insights, and take advantage of dynamic, agile systems that adapt to customer needs on a proven and secure data platform.
Ready to take the next step with Dynamics 365 Commerce? You can take advantage of a free Dynamics 365 Commerce trial or check out our webinar, Get Full Control of Your Payments with Adyen and Dynamics 365.
1- “Experience is everything. Get it right.,” PwC
2- U.S., Business Impact of Personalization in Retail study, customer survey, Google, 2019
3- The true value of customer experiences, Deloitte
The post Exceed customer expectations with seamless and unified commerce experiences appeared first on Microsoft Dynamics 365 Blog.
Brought to you by Dr. Ware, Microsoft Office 365 Silver Partner, Charleston SC.
by Contributed | Jul 29, 2021 | Technology
This article is contributed. See the original author and article here.
In addition to being a Security Information and Event Management (SIEM) tool, Azure Sentinel is a Security Orchestration, Automation, and Response (SOAR) platform. Automation takes a few different forms in Azure Sentinel, from automation rules that centrally manage the automation of incident handling and response, to playbooks that run predetermined sequences of actions to provide powerful and flexible advanced automation to your threat response tasks.
In this blog we will be focusing on playbooks and understanding application programming interface (API) permissions, connections, and connectors in Azure Sentinel playbooks.
A playbook is a collection of response/remediation actions and logic that can be run from Azure Sentinel as a routine. It is based on workflows built in Azure Logic Apps which is a cloud service that helps you schedule, automate, and orchestrate tasks and workflows across systems throughout the enterprise. They are very powerful as they interact with Azure Sentinel features (they can update your incidents, update watchlists, etc.), and also with other Azure or Microsoft services and even third-party services. Whether you use out-of-the-box playbook connectors or the more generic HTTP connector, ultimately you will be interacting with various APIs.
When creating playbooks, solutions that we want to use to automate tasks need to have their own connector in Logic Apps (like Office 365 Outlook, Azure Sentinel, Microsoft Teams, Azure Monitor Logs…) or to have possibility to interact via API so that we can use the generic HTTP connector. As each connector needs to create an API connection to the solution and authorize it, if you are getting started with playbooks you may find it challenging to figure out what permissions are required. For example, our playbook templates on GitHub may come with multiple connections. When you first deploy a template, you may notice the playbook fails when you run it for the first time due to lack of permissions. In this blog post we will cover some of the main connectors you may encounter when you use Azure Sentinel playbooks, different methods to authenticate, as well as permissions you may require.
Before we move into specifics about identities and connectors, let’s quickly revisit the permissions needed to create and run a playbook in Logic Apps:
- Permissions required to create a Logic App:
- Logic App Contributor in the Resource Group (RG) where the Logic App has been created
- Permissions required to run a Logic App:
- Azure Sentinel Responder in the RG where your Azure Sentinel workspace resides
- Permissions required for an Azure Sentinel automation rule to run a playbook:
- Azure Sentinel Automation Contributor in the RG where the playbook to be triggered by the automation rule resides (these are explicit permissions for a special Azure Sentinel service account specifically authorized to trigger playbooks from automation rules. It is not meant for user accounts.)
Authorizing Connections
The first topic that we will cover are the type of identities you can use in a playbook to authorize a connection between Logic Apps and the solution of your choice. There are three types of identities:
- Managed identity
- Service principal
- User identity
Managed Identity
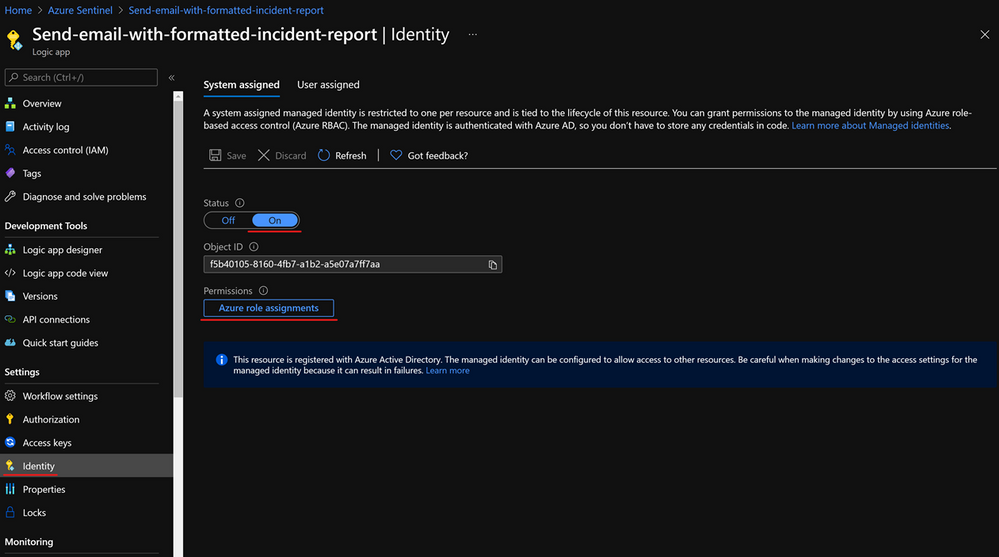
A common challenge for developers is the management of secrets and credentials used to secure communication between different components making up a solution. Managed identities eliminate the need for developers to manage credentials. To enable managed identity on your Logic App, you need to go under Identity, and choose from:
- A System assigned managed identity that turns your Logic App into an identity/service account to which you can provide permissions.
- A User-assigned managed identity which creates a separate Azure resource to which you can assign roles and permissions, and you can reuse on other Logic Apps.
After enabling a managed identity we have to assign appropriate permissions to it. If we use it with the Azure Sentinel connector, based on actions that connector will perform, we need to assign Azure Sentinel Reader, Azure Sentinel Responder, or Azure Sentinel Contributor role.

It is important to note that managed identity is in preview and is available only to the subset of connectors.
Note that there is hard limit of 2000 role assignments per subscription.
Managed identity is the recommended approach to authorize connections for playbooks. For more info about interaction between managed identity and playbooks, check this blog – What’s new: Managed Identity for Azure Sentinel Logic Apps connector – Microsoft Tech Community.
Service principal
A service principal is an identity assigned when you register an application in the Azure AD. Click here to see instructions on how to create an app registration as well as how to get an Application ID, Tenant ID, and to generate a secret that you will need to authorize a Logic App connection with a service principal.

A service principal needs to have appropriate permissions to be able to perform a task. In the case of Azure Monitor Logs for example, we need to have Log Analytics Reader role-based access control (RBAC) assigned to the service principal.

Once you create a service principal you can use it on multiple playbooks: in our example, we used a service principal for Azure Monitor Logs and we can reuse that connection for each playbook where we have an Azure Monitor Logs connector.
Note: You must manage your service principal’s secret and store it to a secure place (e.g.. Key Vault). This adds additional admin work since you will need to keep track of your service principal secrets as well as their expiration date. If the service principal’s secret expires, connections made with that service principal will stop working, which could have an adverse effect on your security operations.
User account
This is the most straightforward option in terms of identities, because you need to sign in with your user account or user account that has the required privileges. To use this, go to the Logic App and select API connections then select the API connection they want to authorize, select Edit API connection and select Authorize and Save.

Or you can sign in from the Logic App designer view, as seen in the below screenshot:

To successfully authorize a connection with a user identity, the user needs to have the appropriate license/permissions assigned to them. If we look at the Office 365 Outlook connector, the user needs to have an Exchange Online license assigned. If we want to use a user identity with Azure Monitor Logs connector then the user must have the Log Analytics Reader permission assigned to them.
Whilst this option is often the most convenient for users, there are downsides to using a user identity:
- It is harder to audit what actions were taken by a user and what actions were taken by the playbook.
- If a user leaves the organization you need to update all the connections that use that identity to another user account.
- If a user’s permissions or license changes (e.g. they don’t use Exchange Online anymore or don’t have the Log Analytics Reader permissions anymore) you will need to update these connections to a user identity with the correct licensing/permissions.
Connectors
Now, let’s have a look at some of the main playbook connectors you will use for Azure Sentinel.
Azure Sentinel
The Azure Sentinel connector can be used to trigger a playbook when an incident is created or with a manual trigger on the alert. The Azure Sentinel connector relies on the Azure Sentinel REST API and allows you to get incidents, update incidents, update watchlists, etc.
Connection options:
- Managed identity (Recommended)
- Service Principal
- User identity
Other prerequisites:
- Azure Sentinel Reader role (if you only want to get information from an incident e.g., Get Entities)
- Azure Sentinel Operator role (if you want to update an incident); or
- Azure Sentinel Contributor role (if you want to make changes on your workspace e.g., update a watchlist).

Once you have set up the connection you will notice that a new API connection has been created in the Logic App under API connections:

Microsoft Graph Security
Sometimes you might need to connect to the Graph Security API. For example, you can use the Microsoft Graph Security API to import Threat Intelligence (TI) indicators into Azure Sentinel. If you want to add TI indicators to your Threatintelligence table, there is a connector that calls the Graph Security API to do this:

To find out which permissions you need, you should refer to the Graph API documentation, and for this specific example refer to tiIndicator: submitTiIndicators – Microsoft Graph beta | Microsoft Docs. On the Permissions section, you will see it requires ThreatIndicators.ReadWrite.OwnedBy.
Again, here you can connect with your user or with a managed identity:

- Managed identity: this option is in preview and for now it is not possible to assign the required Graph API permission through the portal. If you want to choose this type of connection, you can assign the permission with PowerShell. If you want to explore this workaround, you can have a look at the personal blog “Rahul Nath” for instructions.
- Signing in with a user: this is the most straightforward option, but there are some downsides as explained earlier in the blog. Unless your user is allowed to establish a connection, you will need a Security Administrator or Global Administrator to authorize it. This can be done in Logic Apps under API Connections, and then Edit API connection

HTTP connector
This connector allows you to make a GET, PUT, POST, PATCH or DELETE API call to solutions that are supporting API connections. If you need to get specific information from the solution, and the connector is not available or the connector natively doesn’t support that action, while solutions support API calls, we can use an HTTP connector to get that data.

For example, since the Microsoft 365 Defender (M365D) connector does not synchronize comments, we can use an API GET call to ingest comments from M365D and update the Sentinel comment section with those values. In terms of permissions, what is required depends on the solution:
Key Vault
If you are using a service principal and want to save the secret in a secure place, the best practice is to store them in Key Vault. But what if we want to use this secret in our playbook for the HTTP connector explained above? In this scenario we have the Key Vault connector.
Options for connecting:
- Managed identity (Recommended)
- Service Principal
- User identity
Other prerequisites:
- Managed identity/service principal/user identity authorizing the connection must have assigned permissions to read the secret (Key Vault Secrets User to read; Key Vault Secrets Officer to manage). Instructions to assign these permissions can be found by clicking on this link.

You can use a Key Vault action to get a secret and use that secret inside of the playbook.
One more option with the Key Vault connector also is to turn on Secure Inputs and Secure Outputs features.


With this feature on, when the playbook runs a Key Vault action, the input and output content will be hidden by default.

Azure Monitor Logs
You will need to use the Azure Monitor Logs connector when you want to run a query against the data in your Azure Sentinel workspace from a Logic App. This can be used when we want to get more data about incident/alert entities before we decide what kind of action we will take. For example, we have a Watchlist with VIP users, and we want to cross-reference it with Accounts in the incident/alert. If the Account in the incident/alert is also in the Watchlist, then we will change the severity of the incident to High.
Options for connecting:
- Service principal (recommended)
- User identity
Other prerequisites:
- Service principal/user identity authorizing connection must have the Log Analytics Reader role assigned

Here is the query in the Azure Monitor Logs Logic App connector:

Office 365 Outlook
Whenever you want to send an email notification, send an email approval, flag an email, forward an email etc., you can use the Office 365 Outlook connector.
Options for connecting:
Other prerequisites:
- User authorizing connection must have an Exchange Online license assigned

There are different options to configure when using this connector e.g. add people to CC or BCC, add Attachment, configure the email address to use when replying, or change the importance of the email.
An important part of this connector to understand is the “From (Send As)” parameter. This is important because when you authorize a connection with the user identity, all emails will be sent from that account.

The “From (Send As)” parameter gives us the option to change from whom that email will be sent from to an Microsoft 365 Group, shared mailbox or some other user. Note that a valid Send As configuration must be applied to the mailbox so that it can send emails successfully.


Another option is to have one specific user account, like soc@xyz.com, which you will use to authorize Office 365 Outlook connection and all emails will appear as if they are sent from soc@xyz.com. Please note that the account used for this must be a user account (no Microsoft 365 Group or shared mailbox), and it must have a valid Exchange Online license/mailbox


Microsoft Teams
Microsoft Teams is another popular connector that can be used for sending notifications. As Microsoft Teams plays a big role in organizing teams and providing a place to centralize collections of information and has become even more critical since the pandemic, it’s a useful tool to integrate into your SOC operations and automation.
Options for connecting:
Other prerequisites:
- User authorizing connection must have a Microsoft Teams license assigned, and
- Specific permissions (to post a message to a channel, the user must be a member of that team; to add a member – must be owner; to create a new team group – must have permission to create a Microsoft 365 Group…)

Note that when a user authorizes a connection, all actions will appear as they are performed by that specific user. (Unlike with Office 365 Outlook where we have the “From (Send As)” parameter, that is not an option in Microsoft Teams.)

As mentioned with Office 365 Outlook connection, we can have one specific user account, like soc@xyz.com, which you will use to authorize Microsoft Teams connection and all actions will appear as if they have been initiated by soc@xyz.com.

Thanks to our reviewers @Jeremy Tan , @Innocent Wafula and @Javier Soriano .
We hope you found this article useful, please leave us your feedback and questions in the comments section.

by Contributed | Jul 29, 2021 | Dynamics 365, Microsoft 365, Technology
This article is contributed. See the original author and article here.
The lead routing capability (preview) in Dynamics 365 Sales automates the distribution of incoming leads to sellers and teams, ensuring that leads are consistently assigned based on repeatable rules and configurations defined by your organization. Automated lead routing creates process efficiencies, so the right prospect reaches the right salesperson at the right time, eliminating errors from manual routing, and creating a balanced workload for global sales teams.
Dynamics 365 Sales lead routing (preview) is based on an easily configurable, rule-based assignment engine that automatically distributes leads using various commonly used parameters, strung together in a simple rule framework.
Shorten sales cycles and improve conversion rates
Customers are looking for quick solutions. In this digital age, they are aware of their needs, and know how to fulfill them. If customers don’t get a quick and satisfactory response to their query, they can easily reach out to a competitor.
It is critical not only to assign the correct seller to a lead but also to ensure that leads are assigned immediately. Lead routing in Dynamics 365 Sales assigns it to the seller as soon as a lead is either created or updated. The system detects a change, and if it fulfills the rules conditions then the lead gets assigned to the seller. The assignment is also expedited with the use of target segments within the rules, which helps in improving the lead conversion rate.
The right people for the right job
Sellers have different skills and competencies, they speak different languages, they’re located in different geographies, and they have different levels of selling experience. Assignment of incoming leads should be based on these characteristics, to make sellers more effective in their engagements and improve the overall customer experience, resulting in overall higher conversion rates.
Lead routing in Dynamics 365 Sales can be configured using detailed seller attributes and business rule configurations. The lead routing rules provide the flexibility to support the simplest of matching to complex ones, based on business needs.
Lead routing rules support:
- Direct matching of attributes between seller and lead, for example the geographic location of the lead matches where the seller is located.
- Indirect matching of attributes between seller and lead, for example the lead’s parent account territory matches the seller’s territory.
Seller attributes used in a rule can come from two different sources:
- General seller attributes, which come from within the master data form in Dynamics 365.
- Specific seller attributes, which are used only for routing rules.
Here are a few common ways seller attributes can be used:
- Territory and geography (country, state, district, pin code)
- Specialization
- Availability and/or capacity of seller
- Product of interest
- Lead score
Automation keeps focus on strategic activities
Kitchen automation tools were invented to help cooks focus on critical cooking activities and bring relief from mundane tasks. The cooks’ focus was directed toward making a delectable dish and efficiencies were gained to be able to serve more dining guests within a limited amount of time.
Similarly, lead routing features can help those responsible for lead assignments focus on strategic and mission critical activities and bring relief from time-consuming lead assignment and distribution. The Dynamics 365 Sales lead routing is flexible and easy to construct.
The distribution can happen in the following ways:
- Round robin
- Load balancing
Lead distribution can take into consideration seller capacity and availability. Capacity can be set for each seller and availability is maintained by the seller in the availability calendar.
Lead routing is a critical factor of sales success. Accurate and timely distribution of leads can significantly impact the top line of the organization. Lead routing in Dynamics 365 Sales provides an automated, rule-based routing process.
Next steps
Learn more about lead routing in the Administrator guide, and try out the lead routing capability in Dynamics 365 Sales.
The post Automated lead routing (preview): Right salesperson, right time, more sales appeared first on Microsoft Dynamics 365 Blog.
Brought to you by Dr. Ware, Microsoft Office 365 Silver Partner, Charleston SC.

by Contributed | Jul 28, 2021 | Technology
This article is contributed. See the original author and article here.
Check out the most recent update to Microsoft Dynamics 365 Guides! With the July release of Guides, authors can now create guides to anchor faster and with more accuracy through markerless technology enabled by integration of Azure Object Anchors. Based on customer feedback, we have introduced an easier and more seamless way for you to anchor holograms to objects in the physical world using object anchoring.

Using Object Anchors, operators can easily move from one workstream to the next as HoloLens’ spatial insight detects anchors and seamlessly launches overlaid digital content. Learn more about how this new feature improves on-the-job guidance with Dynamics 365 Guides.
Why use Object Anchors instead of QR codes?
Object anchors enable users to automatically align digital content with physical objects, eliminating the need for QR-code markers while improving alignment accuracy.
- QR codes require physical artifacts of specific sizes to be printed out.
- Object Anchors are markerless.
- Sticking QR codes on objects might cause damage.
- Object Anchors are fully digital and have no risk of getting scratched or damaging physical products.
- Finding and scanning QR codes involves another step to the operator workflow.
- Once your object has been converted to the right format by the author, operators can easily walk up and look at the object to be detected. This reduces the time it takes to locate the physical marker and more seamlessly launch into a workflow.
- Using a single QR code can affect accuracy as it can be influenced by marker size, camera scanning angle, and distance from the marker. Manual processes that require QR code alignment can also impact alignment accuracy.
- Object Anchors minimize manual processes and increases the accuracy of detecting an object.
How does Azure Object Anchors work?
Object Anchors is an Azure service which enables the detection of specific objects in the real-world environment. It uses sensing and processing on a HoloLens to detect and align a digital model to a physical object. To detect the object, it requires a converted 3D model of the real-world object through AOA’s conversion service.
Once the 3D model has been converted, Azure Object Anchors primarily uses the depth sensor on the device to match the geometry of the real-world object and the converted model. When it finds the object, it overlays it with a mesh to indicate the object and visualizes the required and pre-authored Guides.
Considerations while using Object Anchors
When considering potential use cases, keep in mind the following:
- Object Anchors currently works best for stationary objects that don’t move.
- Objects should be 1-10 meters for each dimension for optimal alignment accuracy.
- An accurate 3D model of the object is required to convert to an Object Anchor. The currently supported file types are: .obj, .fbx, .glb, .gltf, .ply
- Highly reflective and dark material objects are difficult for the HoloLens to detect and may impact alignment and detection.
Recommended dimensions for objects
Workflow
Step 1 – Convert your 3D model to a detectable format:
- Use a 3D model of the object with which you want to align.
- Run this 3D model through the AOA conversion services cloud-based training and conversion pipeline (using Guides, authors will be able to perform that pre-conversion and assign detectable object to a guide as part of their workflow).
- Receive an object model output to use on your HoloLens 2 device .
Step 2 – Assign an anchor: Leverage the object model generated in the first workflow to assign it to a guide as its Object Anchor. Use the PowerPoint-style authoring experience to simply drag and assign the object as an anchor.

Step 3 – Author/ operate:
- Guides uses the Azure Object Anchors detection SDK to scan and detect the Object Anchor based on a real-world scan .
- Step by step holographic instructions are then overlaid accurately over the physical object, based on the Guides that you set up.
Try it out! Download the latest release of Guides here.
Instructions on how to upgrade your Guides solution are here.
Have a suggestion? Post it here in our categories or use this forum.
Don’t forget to tell us what you think and let us know about the different Mixed Reality solutions you build!

Recent Comments