
by Contributed | Jun 17, 2021 | Technology
This article is contributed. See the original author and article here.
Investments in Azure and Microsoft 365 can streamline your transition to the cloud and make it easier to manage endpoints across your organization. Now let’s explore ways to develop and implement effective strategy to make that transition and help you create the “how” and “why” to leverage these solutions in your own environment.
Update
Updating means staying ahead of adversaries and competition with technology innovations to drive security and business results through:
- Better managing the risk of change in a fast-moving technology world with deployment rings keeping Windows up to date with the latest quality updates, feature updates, and security features managed by solutions like expedited updates and Windows Update for Business.
- Optimizing and de-duplicating bandwidth without sacrificing control to quickly deploy critical changes to improve security and productivity using Delivery Optimization.
- Reshaping processes to avoid determinism, embrace statistics, and becoming quality driven via Update Compliance or Desktop Analytics.
- Redefining how your organization manages technology to invest in on-going servicing capabilities not products, and driving the use of processes and not projects.
Extend
Extending means driving real cloud value while still benefiting from your existing investments using Microsoft 365 to:
- Stop migrating user data and state, or losing user data trapped on an endpoint, and instead use the endpoints as a local cache for OneDrive, Known Folder Redirection with OneDrive, and State Roaming technologies. Even when using your personal managed devices to access data, OneDrive allows for changes to follow you to your primary Windows device.
- Increase management reach while reducing infrastructure architecture, deployment, and operations cost in with cloud-based and cloud-attached management tools such Microsoft Endpoint Manager, or Microsoft Endpoint Configuration Manager with Tenant Attach and the Cloud Management Gateway.
- Deploy trusted, signed apps and minimize complex infrastructure using Modern Software Distribution & Package Manager technologies such as MSIX and the Windows Package Manager (Winget.)
- Manage and monitor your application portfolio, software, and endpoint health in a perimeter-free world using modern insights such as Endpoint Analytics.
Standardize
Standardization involves increasing security and manageability while reducing operational costs by sticking with well-known and proven solutions:
Revitalize
To revitalize means building long-term user satisfaction by standardizing on reliable applications and a dependable, more focused operating system. This involves:
- Deploying a cloud config to users that only need one or two apps in addition to their productivity apps.
- Eliminating constant repackaging with vendor-provided packages and durable customization packages for a better application lifecycle management strategy.
- Separating applications from the operating system and from each other as a security or reliability boundary using App and Guard Containers such as Windows Defender Application Control (WDAC) and MSIX.
- Managing application catalogs like a portal, with tools such as Endpoint Manager’s Software Center & Company Portal to manage security and user experience while directly integrating with distribution platforms with application portfolio management.
- Quickly recovering from reliability or security issues by building capability to rapidly reset and recover with technologies such as device reset.
Secure
Securing endpoints from the cloud involves providing the right balance of security and convenience, reducing attack surfaces, and increasing monitorability by:
Simplify
Ironically, implementing a zero-trust approach simplifies user interactions in a world where identity is the new perimeter by using a single powerful Windows identity across apps and endpoints. We recommend:
Wrapping up
As you can see, the “north star” for endpoint management transformation involves a holistic end-to-end solution set that simplifies operations, optimizes user experiences, and increases security using the best of suite culminating in a modern, cloud-managed Windows endpoint. Microsoft 365 provides this holistic solution across the entire framework. We hope these principles help you develop the proper framework for your organization.
Have feedback or a best practice to share? Drop a comment below!
by Contributed | Jun 17, 2021 | Technology
This article is contributed. See the original author and article here.
Go further with Microsoft Lists. You know you want to. And now you can – on-demand.
We recently delivered five live workshops across multiple time zones – and we learned a lot. We’ve refined the content based on feedback and tightened up a few additional things – mindful of your time and ease of consumption.
The result: We’ve got a great two-part, on-demand workshop – two videos wrapped in a single page with additional resources. Dig in and learn how you and your team can best utilize Microsoft Lists. We teach you how to use and create views, configure conditional formatting, adjust forms, use rules, and more. Plus, we highlight no-code and low-code solutions leveraging integrated tools from the Power Platform. You’ll also find materials to deliver the Lists workshop to your organization (PowerPoint, speaker notes, demo materials).
Jump into the Microsoft Lists on-demand workshop now! [for ease of copy/pasting and sharing with others: https://aka.ms/MSLists/workshop]
What you’ll find on the Lists workshop page…
Watch the two-part Microsoft Lists workshop on-demand (https://aka.ms/MSLists/workshop).
Microsoft Lists workshop, part 1: “Creating and collaborating”
We’ll start with the basics – clarity on what Lists is and what it isn’t – including addressing numerous frequently asked questions (FAQs). We’ll then focus on a variety of ways to create lists from the new Lists home page and from within Microsoft Teams – inclusive of using new ready-made templates. Lots of demos – lots of insight.
Microsoft Lists workshop, part 2: “Make Lists work for you”
Continuing from part 1, we turn to making lists work for you using filters, views, rules, and formatting. We end with a look at how Lists integrates with the Power Platform to take lists even further with custom forms, flows and reporting. We wrap up with the roadmap to share what’s coming next for Microsoft Lists.
BONUS | Host a Microsoft Lists workshop within your organization
Interested in conducting a Microsoft Lists training within your organization – to kick off a pilot or help ramp up your future list pros? We’ve provided a few helpful, downloadable resources to assist your internal Lists evangelism (commonly delivered in 3-4 hours) – PowerPoint with speaker notes and demo suggestions + content for demo’ing creating a list from Excel.
Jump into the Microsoft Lists on-demand workshop now! (if you haven’t yet already)
We, too, have updated our Lists resource and adoption centers – our core public destinations to learn and consume all things Microsfot Lists (blogs, videos, demos, podcasts, deployment resources, and more). Let us know what you think.
Happy workshopping!
Thank you, Mark Kashman – senior product manager (Microsoft Lists)
P.S. did you jump into the Microsoft Lists on-demand workshop yet? Just checking ;)
by Contributed | Jun 17, 2021 | Technology
This article is contributed. See the original author and article here.
Today, we are announcing the public preview of the ability to use custom Docker containers in Azure Machine Learning online endpoints. In combination with our new 2.0 CLI, this feature enables you to deploy a custom Docker container while getting Azure Machine Learning online endpoints’ built-in monitoring, scaling, and alerting capabilities.
Below, we walk you through how to use this feature to deploy TensorFlow Serving with Azure Machine Learning. The full code is available in our samples repository.
Sample deployment with TensorFlow Serving
To deploy a TensorFlow model with TensorFlow Serving, first create a YAML file:
name: tfserving-endpoint
type: online
auth_mode: aml_token
traffic:
  tfserving: 100

deployments:
  - name: tfserving
    model:
      name: tfserving-mounted
      version: 1
      local_path: ./half_plus_two
    environment_variables:
      MODEL_BASE_PATH: /var/azureml-app/azureml-models/tfserving-mounted/1
      MODEL_NAME: half_plus_two
    environment:
      name: tfserving
      version: 1
      docker:
        image: docker.io/tensorflow/serving:latest
      inference_config:
        liveness_route:
          port: 8501
          path: /v1/models/half_plus_two
        readiness_route:
          port: 8501
          path: /v1/models/half_plus_two
        scoring_route:
          port: 8501
          path: /v1/models/half_plus_two:predict
    instance_type: Standard_F2s_v2
    scale_settings:
      scale_type: manual
      instance_count: 1
      min_instances: 1
      max_instances: 2
Then create your endpoint:
az ml endpoint create -f endpoint.yml
And that’s it! You now have a scalable TensorFlow Serving endpoint running on Azure ML-managed compute.
Next steps
by Contributed | Jun 17, 2021 | Technology
This article is contributed. See the original author and article here.
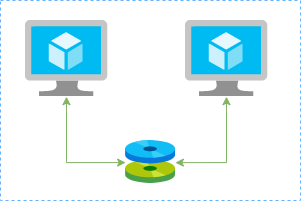
In this article I’ll show you how to create a redundtant storage pool using GlusterFS and Azure Shared Disks. GlusterFS is a network-attached storage filesystem that allows you to pool storage resources of multiple machines. Azure shared disks is a new feature for Azure managed disks that allows you to attach a managed disk to multiple virtual machines (VMs) simultaneously. Please note that enabling shared disks is only available to a subset of disk types. Currently only ultra disks and premium SSDs can enable shared disks. Check if the VM type you are planning to use support ultra or premium disks.
Our setup will consist in:
- An Azure Resource Group containing the resources
- An Azure VNET and a Subnet
- An Availability Set into a Proximity Placement Group
- 2 Linux VMs (Ubuntu 18.04)
- 2 Public IPs (one for each VM)
- 2 Network Security Groups (1 per VM Network Interface Card)
- A Shared Data Disk attached to the both VMs
I’ll be using the Azure Cloud Shell once is fully integrated to Azure and with all modules I need already installed.
Create SSH key pair
ssh-keygen -t rsa -b 4096
Create a resource group
New-AzResourceGroup -Name “myResourceGroup” -Location “EastUS”
Create virtual network resources
Create a subnet configuration
$subnetConfig = New-AzVirtualNetworkSubnetConfig `

  -Name “mySubnet” `

  -AddressPrefix 192.168.1.0/24
Create a virtual network
$vnet = New-AzVirtualNetwork `

  -ResourceGroupName “myResourceGroup” `

  -Location “EastUS” `

  -Name “myVNET” `

  -AddressPrefix 192.168.0.0/16 `

  -Subnet $subnetConfig
Create a public IP address for the VM01
$pip01 = New-AzPublicIpAddress `

  -ResourceGroupName “myResourceGroup” `

  -Location “EastUS” `

  -AllocationMethod Static `

  -IdleTimeoutInMinutes 4 `

  -Name “mypublicip01”
Create a public IP address for the VM02
$pip02 = New-AzPublicIpAddress `

  -ResourceGroupName “myResourceGroup” `

  -Location “EastUS” `

  -AllocationMethod Static `

  -IdleTimeoutInMinutes 4 `

  -Name “mypublicip02”
Create an inbound network security group rule for port 22
$nsgRuleSSH = New-AzNetworkSecurityRuleConfig `

  -Name “myNetworkSecurityGroupRuleSSH”  `

  -Protocol “Tcp” `

  -Direction “Inbound” `

  -Priority 1000 `

  -SourceAddressPrefix * `

  -SourcePortRange * `

  -DestinationAddressPrefix * `

  -DestinationPortRange 22 `

  -Access “Allow”
Create a network security group for the VM01
$nsg = New-AzNetworkSecurityGroup `

  -ResourceGroupName “myResourceGroup” `

  -Location “EastUS” `

  -Name “myNetworkSecurityGroup01” `

  -SecurityRules $nsgRuleSSH
Create a network security group for the VM02
$nsg = New-AzNetworkSecurityGroup `

  -ResourceGroupName “myResourceGroup” `

  -Location “EastUS” `

  -Name “myNetworkSecurityGroup02” `

  -SecurityRules $nsgRuleSSH
Create a virtual network card for VM01 and associate with public IP address and NSG
$nic01 = New-AzNetworkInterface `

  -Name “myNic01” `

  -ResourceGroupName “myResourceGroup” `

  -Location “EastUS” `

  -SubnetId $vnet.Subnets[0].Id `

  -PublicIpAddressId $pip01.Id `

  -NetworkSecurityGroupId $nsg.Id
Create a virtual network card for VM02 and associate with public IP address and NSG
$nic02 = New-AzNetworkInterface `

  -Name “myNic02” `

  -ResourceGroupName “myResourceGroup” `

  -Location “EastUS” `

  -SubnetId $vnet.Subnets[0].Id `

  -PublicIpAddressId $pip02.Id `

  -NetworkSecurityGroupId $nsg.Id
Create availability set for the virtual machines.
$set = @{

    Name = ‘myAvSet’

    ResourceGroupName = ‘myResourceGroup’

    Location = ‘eastus’

    Sku = ‘Aligned’

    PlatformFaultDomainCount = ‘2’

    PlatformUpdateDomainCount =  ‘2’

}

$avs = New-AzAvailabilitySet @set
Create the first virtual machine (myVM01)
Define a credential object
$securePassword = ConvertTo-SecureString ‘ ‘ -AsPlainText -Force

$cred = New-Object System.Management.Automation.PSCredential (“azureuser”, $securePassword)
Create a virtual machine configuration
$vmConfig = New-AzVMConfig `

  -AvailabilitySetId $avs.Id `

  -VMName “myVM01” `

  -VMSize “Standard_D4s_v3” | `

Set-AzVMOperatingSystem `

  -Linux `

  -ComputerName “myVM01” `

  -Credential $cred `

  -DisablePasswordAuthentication | `

Set-AzVMSourceImage `

  -PublisherName “Canonical” `

  -Offer “UbuntuServer” `

  -Skus “18.04-LTS” `

  -Version “latest” | `

Add-AzVMNetworkInterface `

  -Id $nic01.Id
Configure the SSH key
$sshPublicKey = cat ~/.ssh/id_rsa.pub

Add-AzVMSshPublicKey `

  -VM $vmconfig `

  -KeyData $sshPublicKey `

  -Path “/home/azureuser/.ssh/authorized_keys”
Create the VM
New-AzVM `

  -ResourceGroupName “myResourceGroup” `

  -Location eastus -VM $vmConfig
Create the second virtual machine (myVM02)
Define a credential object
$securePassword = ConvertTo-SecureString ‘ ‘ -AsPlainText -Force

$cred = New-Object System.Management.Automation.PSCredential (“azureuser”, $securePassword)
Create a virtual machine configuration
$vmConfig = New-AzVMConfig `

  -AvailabilitySetId $avs.Id `

  -VMName “myVM02” `

  -VMSize “Standard_D4s_v3” | `

Set-AzVMOperatingSystem `

  -Linux `

  -ComputerName “myVM02” `

  -Credential $cred `

  -DisablePasswordAuthentication | `

Set-AzVMSourceImage `

  -PublisherName “Canonical” `

  -Offer “UbuntuServer” `

  -Skus “18.04-LTS” `

  -Version “latest” | `

Add-AzVMNetworkInterface `

  -Id $nic02.Id
Configure the SSH key
$sshPublicKey = cat ~/.ssh/id_rsa.pub

Add-AzVMSshPublicKey `

  -VM $vmconfig `

  -KeyData $sshPublicKey `

  -Path “/home/azureuser/.ssh/authorized_keys”
Create the VM
New-AzVM `

  -ResourceGroupName “myResourceGroup” `

  -Location eastus -VM $vmConfig
Create a Shared Data Disk
$dataDiskConfig = New-AzDiskConfig -Location ‘EastUS’ -DiskSizeGB 1024 -AccountType Premium_LRS -CreateOption Empty -MaxSharesCount 2

New-AzDisk -ResourceGroupName ‘myResourceGroup’ -DiskName ‘mySharedDisk’ -Disk $dataDiskConfig
Attach the Data Disk to VM01
$dataDisk = Get-AzDisk -ResourceGroupName “myResourceGroup” -DiskName “mySharedDisk”

$VirtualMachine = Get-AzVM -ResourceGroupName “myResourceGroup” -Name “myVM01”

Add-AzVMDataDisk -VM $VirtualMachine -Name “mySharedDisk” -CreateOption Attach -ManagedDiskId $dataDisk.Id -Lun 0

update-AzVm -VM $VirtualMachine -ResourceGroupName “myResourceGroup”
Attach the Data Disk to VM02
$dataDisk = Get-AzDisk -ResourceGroupName “myResourceGroup” -DiskName “mySharedDisk”

$VirtualMachine = Get-AzVM -ResourceGroupName “myResourceGroup” -Name “myVM02”

Add-AzVMDataDisk -VM $VirtualMachine -Name “mySharedDisk” -CreateOption Attach -ManagedDiskId $dataDisk.Id -Lun 0

update-AzVm -VM $VirtualMachine -ResourceGroupName “myResourceGroup”
Create a proximity placement group
$ppg = New-AzProximityPlacementGroup -Location “EastUS” -Name “myPPG” -ResourceGroupName “myResourceGroup” -ProximityPlacementGroupType Standard
Move the existing availability set into a proximity placement group
$resourceGroup = “myResourceGroup”

$avSetName = “myAvSet”

$avSet = Get-AzAvailabilitySet -ResourceGroupName $resourceGroup -Name $avSetName

$vmIds = $avSet.VirtualMachinesReferences

foreach ($vmId in $vmIDs){

    $string = $vmID.Id.Split(“/”)

    $vmName = $string[8]

    Stop-AzVM -ResourceGroupName $resourceGroup -Name $vmName -Force

    }
$ppg = Get-AzProximityPlacementGroup -ResourceGroupName myResourceGroup -Name myPPG

Update-AzAvailabilitySet -AvailabilitySet $avSet -ProximityPlacementGroupId $ppg.Id

foreach ($vmId in $vmIDs){

    $string = $vmID.Id.Split(“/”)

    $vmName = $string[8]

    Start-AzVM -ResourceGroupName $resourceGroup -Name $vmName

    }
Configure the Disk on Linux VM01
ssh azureuser@13.82.29.9
Find the disk
lsblk -o NAME,HCTL,SIZE,MOUNTPOINT | grep -i “sd”
Partition a new disk
sudo parted /dev/sdb –script mklabel gpt mkpart xfspart xfs 0% 100%

sudo mkfs.xfs /dev/sdb1

sudo partprobe /dev/sdb1
Mount the disk
sudo mkdir /datadrive

sudo mount /dev/sdb1 /datadrive
Ensure mounting during the boot
sudo blkid
The ouput should be something similar to:
/dev/sdc1: LABEL=”cloudimg-rootfs” UUID=”5a9997c3-aafd-46e9-954c-781f2b11fb68″ TYPE=”ext4″ PARTUUID=”cbc2fcb7-e40a-4fec-a370-51888c246f12″

/dev/sdc15: LABEL=”UEFI” UUID=”2FBA-C33A” TYPE=”vfat” PARTUUID=”53fbf8ed-db79-4c52-8e42-78dbf30ff35c”

/dev/sda1: UUID=”c62479eb-7c96-49a1-adef-4371d27509e6″ TYPE=”ext4″ PARTUUID=”a5bb6861-01″

/dev/sdb1: UUID=”f0b4e401-e9dc-472e-b9ca-3fa06a5b2e22″ TYPE=”xfs” PARTLABEL=”xfspart” PARTUUID=”af3ca4e5-cb38-4856-8791-bd6b650ba1b3″

/dev/sdc14: PARTUUID=”de01bd39-4bfe-4bc8-aff7-986e694f7972″
sudo nano /etc/fstab
use the UUID value for the /dev/sdb1 device. Change by the UUID from your case and add the following at the end of the file:
UUID=f0b4e401-e9dc-472e-b9ca-3fa06a5b2e22 /datadrive xfs defaults,nofail 1 2
Configure the Disk on Linux VM02
ssh azureuser@40.114.24.217
Find the disk
lsblk -o NAME,HCTL,SIZE,MOUNTPOINT | grep -i “sd”
Partition a new disk
As the disk already was partitioned on the VM01, we can skip this step now.
Mount the disk
sudo mkdir /datadrive

sudo mount /dev/sda1 /datadrive
Ensure mounting during the boot
sudo blkid
The ouput should be something similar to:
/dev/sdb1: LABEL=”cloudimg-rootfs” UUID=”5a9997c3-aafd-46e9-954c-781f2b11fb68″ TYPE=”ext4″ PARTUUID=”cbc2fcb7-e40a-4fec-a370-51888c246f12″

/dev/sdb15: LABEL=”UEFI” UUID=”2FBA-C33A” TYPE=”vfat” PARTUUID=”53fbf8ed-db79-4c52-8e42-78dbf30ff35c”

/dev/sdc1: UUID=”d1b59101-225e-48f4-8373-4f1a92a81607″ TYPE=”ext4″ PARTUUID=”b0218b4e-01″

/dev/sda1: UUID=”f0b4e401-e9dc-472e-b9ca-3fa06a5b2e22″ TYPE=”xfs” PARTLABEL=”xfspart” PARTUUID=”dda03810-f1f9-45a5-9613-08e9b5e89a32″

/dev/sdb14: PARTUUID=”de01bd39-4bfe-4bc8-aff7-986e694f7972″
sudo nano /etc/fstab
use the UUID value for the /dev/sda1 device. Change by the UUID from your case and add the following at the end of the file:
UUID=f0b4e401-e9dc-472e-b9ca-3fa06a5b2e22 /datadrive xfs defaults,nofail 1 2
Install GlusterFS on Linux VM01
Please note that in my case the IPs 192.168.1.4 and 192.168.1.5 are the private ip’s from VM01 and VM02. Add those configuration on the /etc/hosts.
sudo nano /etc/hosts
192.168.1.4 gluster1.local gluster1

192.168.1.5 gluster2.local gluster2
sudo apt update

sudo apt install software-properties-common

sudo add-apt-repository ppa:gluster/glusterfs-7

sudo apt update

sudo apt install glusterfs-server

sudo systemctl status glusterd.service
Install GlusterFS on Linux VM02
Please note that the IPs 192.168.1.4 and 192.168.1.5 are the private ip’s from VM01 and VM02. Add those configuration on the /etc/hosts.
sudo nano /etc/hosts
192.168.1.4 gluster1.local gluster1

192.168.1.5 gluster2.local gluster2
sudo apt update

sudo apt install software-properties-common

sudo add-apt-repository ppa:gluster/glusterfs-7

sudo apt update

sudo apt install glusterfs-server

sudo systemctl status glusterd.service
Configure GlusterFS on Linx VM01
sudo gluster peer probe gluster2

sudo gluster peer status

sudo gluster volume create sharedvolume replica 2 gluster1.local:/datadrive gluster2.local:/datadrive force

sudo gluster volume start sharedvolume

sudo gluster volume status

sudo apt install glusterfs-client

sudo mkdir /gluster-storage
sudo nano /etc/fstab
Add the following at the end of the file:
gluster1.local:sharedvolume /gluster-storage glusterfs defaults,_netdev 0 0
sudo mount -a
Configure GlusterFS on Linx VM02
sudo gluster peer probe gluster1

sudo gluster peer status

sudo gluster volume status

sudo apt install glusterfs-client

sudo mkdir /gluster-storage
sudo nano /etc/fstab
Add the following at the end of the file:
gluster2.local:sharedvolume /gluster-storage glusterfs defaults,_netdev 0 0
sudo mount -a
Test
In one of the nodes, go to /gluster-storage and create some files:
ssh azureuser@myVM01

azureuser@myVM01:~# sudo touch /gluster-storage/file{1..10}
Then go to the another node and check those files:
ssh azureuser@myVM02

azureuser@myVM02:~# ls -l /gluster-storage

total 0

-rw-r–r– 1 root root 0 Apr  1 19:48 file1

-rw-r–r– 1 root root 0 Apr  1 19:48 file10

-rw-r–r– 1 root root 0 Apr  1 19:48 file2

-rw-r–r– 1 root root 0 Apr  1 19:48 file3

-rw-r–r– 1 root root 0 Apr  1 19:48 file4

-rw-r–r– 1 root root 0 Apr  1 19:48 file5

-rw-r–r– 1 root root 0 Apr  1 19:48 file6

-rw-r–r– 1 root root 0 Apr  1 19:48 file7

-rw-r–r– 1 root root 0 Apr  1 19:48 file8

-rw-r–r– 1 root root 0 Apr  1 19:48 file9
Now execute a shutdown on myVM02:
azureuser@myVM02:~# sudo init 0

Connection to 40.114.24.217 closed by remote host.

Connection to 40.114.24.217 closed.
Access myVM01 and you notice that you still with access to the files:
azureuser@myVM01:~$ ls -l /gluster-storage/

total 0

-rw-r–r– 1 root root 0 Apr  1 19:48 file1

-rw-r–r– 1 root root 0 Apr  1 19:48 file10

-rw-r–r– 1 root root 0 Apr  1 19:48 file2

-rw-r–r– 1 root root 0 Apr  1 19:48 file3

-rw-r–r– 1 root root 0 Apr  1 19:48 file4

-rw-r–r– 1 root root 0 Apr  1 19:48 file5

-rw-r–r– 1 root root 0 Apr  1 19:48 file6

-rw-r–r– 1 root root 0 Apr  1 19:48 file7

-rw-r–r– 1 root root 0 Apr  1 19:48 file8

-rw-r–r– 1 root root 0 Apr  1 19:48 file9
Now let’s create some new files:
azureuser@myVM01:~$ sudo touch /gluster-storage/new-file{1..10}

azureuser@myVM01:~$ sudo ls -l /gluster-storage/

total 0

-rw-r–r– 1 root root 0 Apr  1 19:48 file1

-rw-r–r– 1 root root 0 Apr  1 19:48 file10

-rw-r–r– 1 root root 0 Apr  1 19:48 file2

-rw-r–r– 1 root root 0 Apr  1 19:48 file3

-rw-r–r– 1 root root 0 Apr  1 19:48 file4

-rw-r–r– 1 root root 0 Apr  1 19:48 file5

-rw-r–r– 1 root root 0 Apr  1 19:48 file6

-rw-r–r– 1 root root 0 Apr  1 19:48 file7

-rw-r–r– 1 root root 0 Apr  1 19:48 file8

-rw-r–r– 1 root root 0 Apr  1 19:48 file9

-rw-r–r– 1 root root 0 Apr  1 20:00 new-file1

-rw-r–r– 1 root root 0 Apr  1 20:00 new-file10

-rw-r–r– 1 root root 0 Apr  1 20:00 new-file2

-rw-r–r– 1 root root 0 Apr  1 20:00 new-file3

-rw-r–r– 1 root root 0 Apr  1 20:00 new-file4

-rw-r–r– 1 root root 0 Apr  1 20:00 new-file5

-rw-r–r– 1 root root 0 Apr  1 20:00 new-file6

-rw-r–r– 1 root root 0 Apr  1 20:00 new-file7

-rw-r–r– 1 root root 0 Apr  1 20:00 new-file8

-rw-r–r– 1 root root 0 Apr  1 20:00 new-file9
Then just turn on the myVM02 and you will be able the see all files syncronized on myVM02:
azureuser@myVM02:~$ ls -l /gluster-storage/

total 0

-rw-r–r– 1 root root 0 Apr  1 19:48 file1

-rw-r–r– 1 root root 0 Apr  1 19:48 file10

-rw-r–r– 1 root root 0 Apr  1 19:48 file2

-rw-r–r– 1 root root 0 Apr  1 19:48 file3

-rw-r–r– 1 root root 0 Apr  1 19:48 file4

-rw-r–r– 1 root root 0 Apr  1 19:48 file5

-rw-r–r– 1 root root 0 Apr  1 19:48 file6

-rw-r–r– 1 root root 0 Apr  1 19:48 file7

-rw-r–r– 1 root root 0 Apr  1 19:48 file8

-rw-r–r– 1 root root 0 Apr  1 19:48 file9

-rw-r–r– 1 root root 0 Apr  1 20:00 new-file1

-rw-r–r– 1 root root 0 Apr  1 20:00 new-file10

-rw-r–r– 1 root root 0 Apr  1 20:00 new-file2

-rw-r–r– 1 root root 0 Apr  1 20:00 new-file3

-rw-r–r– 1 root root 0 Apr  1 20:00 new-file4

-rw-r–r– 1 root root 0 Apr  1 20:00 new-file5

-rw-r–r– 1 root root 0 Apr  1 20:00 new-file6

-rw-r–r– 1 root root 0 Apr  1 20:00 new-file7

-rw-r–r– 1 root root 0 Apr  1 20:00 new-file8

-rw-r–r– 1 root root 0 Apr  1 20:00 new-file9
As you can see the files was in sync and without any kind of data loss even in the case of one of the nodes was offline.

by Contributed | Jun 17, 2021 | Technology
This article is contributed. See the original author and article here.
Introduction
Some time ago I had to help a customer in a PoC over the implementation of ELK Stack (ElasticSearch, Logstash and Kibana) on Azure VMs using Azure CLI. Then here are all steps you should follow to implement something similar.
Please note you have different options to deploy and use ElasticSearch on Azure
Data Flow
The illustration below refers to the logical architecture implemented to prove the concept. This architecture includes an application server, the Azure Redis service, a server with Logstash, a server with ElasticSearch and a server with Kibana and Nginx installed.

DescrDescription of components
Application Server: To simulate an application server generating logs, a script was used that generates logs randomly. The source code for this script is available at https://github.com/bitsofinfo/log-generator. It was configured to generate the logs in /tmp/log-sample.log.
Filebeat: Agent installed on the application server and configured to send the generated logs to Azure Redis. Filebeat has the function of shipping the logs using the lumberjack protocol.
Azure Redis Service: Managed service for in-memory data storage. It was used because search engines can be an operational nightmare. Indexing can bring down a traditional cluster and data can end up being reindexed for a variety of reasons. Thus, the choice of Redis between the event source and parsing and processing is only to index/parse as fast as the nodes and databases involved can manipulate this data allowing it to be possible to extract directly from the flow of events instead to have events being inserted into the pipeline.
Logstash: Processes and indexes the logs by reading from Redis and submitting to ElasticSearch.
ElasticSearch: Stores logs
Kibana/Nginx: Web interface for searching and viewing the logs that are proxied by Nginx
Deployment
The deployment of the environment is done using Azure CLI commands in a shell script. In addition to serving as documentation about the services deployed, they are a good practice on IaC. In this demo I’ll be using Azure Cloud Shell once is fully integrated to Azure. Make sure to switch to Bash:

The script will perform the following steps:
- Create the resource group
- Create the Redis service
- Create a VNET called myVnet with the prefix 10.0.0.0/16 and a subnet called mySubnet with the prefix 10.0.1.0/24
- Create the Application server VM
- Log Generator Installation/Configuration
- Installation / Configuration of Filebeat
- Filebeat Start
- Create the ElasticSearch server VM
- Configure NSG and allow access on port 9200 for subnet 10.0.1.0/24
- Install Java
- Install/Configure ElasticSearch
- Start ElasticSearch
- Create the Logstash server VM
- Install/Configure Logstash
- Start Logstash
- Create the Kibana server VM
- Configure NSG and allow access on port 80 to 0.0.0.0/0
- Install/Configure Kibana and Nginx
Note that Linux User is set to elk. Public and private keys will be generated in ~/.ssh. To access the VMs run ssh -i ~/.ssh /id_rsa elk@ip
Script to setup ELK Stack
The script is available here. Just download then execute the following:
wget https://raw.githubusercontent.com/ricmmartins/elk-stack-azure/main/elk-stack-azure.sh
chmod a+x elk-stack-azure.sh
./elk-stack-azure.sh <resource group name> <location> <redis name>

After a few minutes the execution of the script will be completed, then you have just to finish the setup through Kibana interface.
Finishing the setup
To finish the setup, the next step is to connect to the public IP address of the Kibana/Nginx VM. Once connected, the home screen should look like this:

Then click to create Explore my own. In the next screen click on Discover

Now click on Create index pattern

On the next screen type logstash on the step 1 of 2, then click to Next step

On the step 2 of 2, point to @timestamp

Then click to Create index pattern


After a few seconds you will have this:

Click on Discover on the menu

Now you have access to all indexed logs and the messages generated by Log Generator:

Final notes
As mentioned earlier, this was done for a PoC purposes. If you want add some extra layer for security, you can restrict the access adding HTTP Basic Authentication for NGINX or restricting the access trough private IPs and a VPN.

Recent Comments