by Contributed | May 5, 2021 | Technology
This article is contributed. See the original author and article here.
In this blog post, we are going to have a look at how you can automatically upload files to an Azure Blob storage account using Power Automate Desktop. Power Automate Desktop is a great tool to build automation on your desktop. You can create flows, interact with everyday tools such as email and excel and work with modern and legacy applications.
For example, you can automate tasks like:
- Quickly organize your documents using dedicated files and folders actions
- Accurately extract data from websites and store them in excel files using Web and Excel automation
- Apply desktop automation capabilities to put your work on autopilot.
Now want tasks I want to build some automation is to upload files to an Azure Blob Storage account for long-term storage. These can be small and large files, in my cases I wanted to backup all my large video files to an Azure blob Storage account.
To learn more about Power Automate check out Microsoft Docs.
Preparation
Install Power Automate Desktop (it is free)
You can download Power Automate Desktop from here.
Sign in to the Power Automate Desktop Windows application using one of the following accounts and automate your tedious tasks.
A full comparison of the features included in each account can be found here.
Create an Azure Storage account
Secondly you create a Storage account in Azure. An Azure storage account provides you to host all of your Azure Storage data objects: blobs, files, queues, and tables. For more information about Azure storage accounts, see Storage account overview.
To create an Azure storage account just follow these steps on Microsoft Docs: Create a storage account.
Download AzCopy
Since I am dealing with large files, I decided to use the AzCopy utility. AzCopy is a command-line utility that you can use to copy blobs or files to or from a storage account. Get started with AzCopy.
Create Power Automate Desktop Flow
After we prepared everything, we can now start to create the flow in Power Automate Desktop.
Power Automate Desktop Flow – Upload to Azure Blob Storage using AzCopy
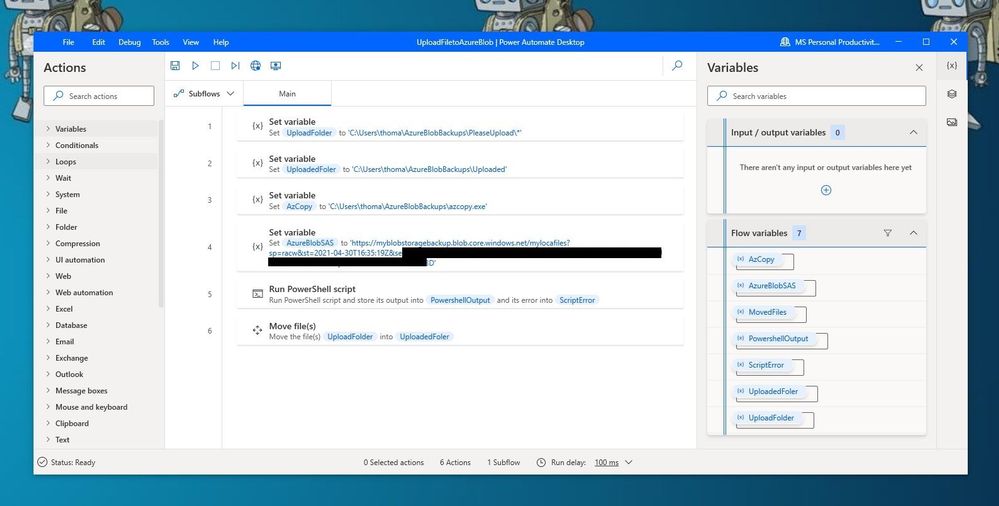
First, I create the following variables within the flow.
- UploadFolder – This is the folder where I place my files, which I want to be uploaded
- UploadedFolder – This is the folder where the file gets moved after it has been uploaded
- AzCopy – This is the path where I saved the azcopy.exe
- AzureBlobSAS – This is the URI for the Azure Blob Storage account including the Shared access signature (SAS) token
To generate the URI with the SAS (Shared access signature) token, go to the Azure Portal to your Azure storage account. Go to containers and create a new container. Open the container and on the and navigate to Shared access signature. Select add, create, and write permission, change the time if needed, and press Generate SAS token and URL. Copy the Blob SAS URL and save it as the variable in the flow.
 Azure Storage Account SAS Token
IMPORTANT: When you add the SAS URL to the variable you will need to make all the % to %% because of how Power Automate Desktops names variables.
Since we want to use the AzCopy utility to copy the files to the Azure Blob storage, you can now add the “Run PowerSheel script” action with the following PowerShell code:
%AzCopy% copy "%UploadFolder%" "%AzureBlobSAS%" --recursive=true
 Run PowerShell script
With the last step, we are going to move the uploaded files to another folder.
 Move Files
Conclusion
I hope this blog post provides you with a quick overview of how you can upload files to an Azure Blob storage account using Power Automate. There are of course other ways on how to do this but the great thing here is that you can easily upload large files and add more actions to your Power Automate Desktop Flow. If you have any questions, feel free to leave a comment below.
by Contributed | May 5, 2021 | Technology
This article is contributed. See the original author and article here.
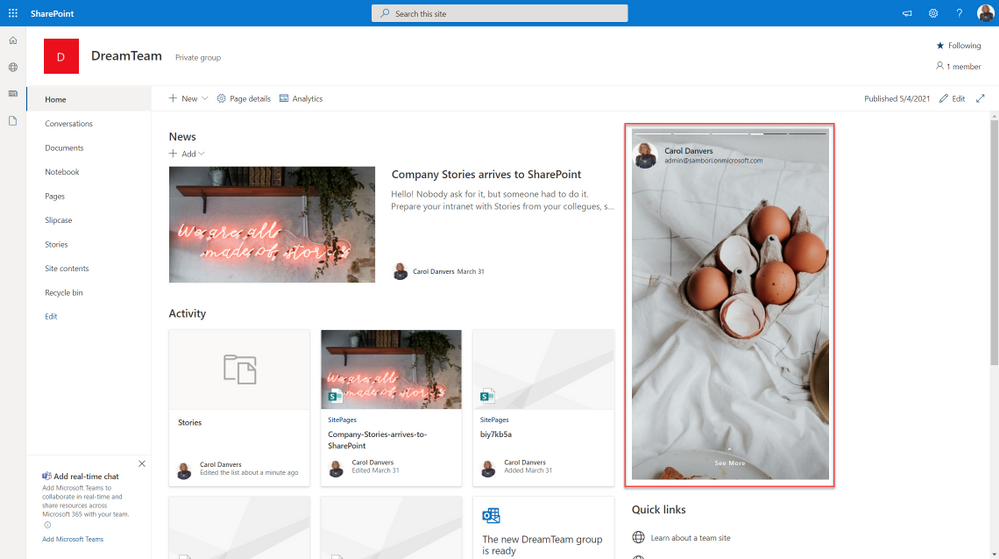
Would not be cool to engage your Modern Workplace users with content appearing like in your favourite social network? In my latest community sample, I built an SPFx webpart to do so. Here is how I did it, but first, this is how it looks:
SharePoint stories webpart
What we need first, is a SharePoint list that will contain all the “story images”, with the author of that story, and some Text, if we want to show the “show more” option. This list will be something like this:
 SP List
Now it is time to code our SPFx webpart.
Before starting, for all the UI thing, I am using an existing open-source React component called “react-insta-stories”, that you can find in its GitHub repository. This component does most of the hard work with the image slide and so on. In its most simple way, the component just needs an array of images:
 react package
But you can also specify an array of Story objects, where a Story can have the following properties:
 Story object properties
Now that we know how to use the Stories component, the webpart functionality is quite easy. We just need to get the Stories information from the SharePoint list, and compose the proper Stories array.
As usual when developing SPFx webparts, the webpart itself, just loads a React component, passing the information that we need, in this case, for simplicity, I am passing the entire WebPartContext object, but try to avoid this practice, and only pass what you need.
This is the main code in the Render webpart method:
 SPFx Webpart render
Once in the main React component, we are calling the SharePoint REST API to get the sotries from the list. To do so, I am using the endpoint:
/_api/web/lists/GetByTitle('Stories')/RenderListDataAsStream
As this endpoint is given me the Image URL in the format that I need (but pretty sure you can do the same with other endpoints, or using the PnP JS library). The code to do so is:
 componentDidMount
The method “_getStoryFromListItem” will create a Story object for the “react-insta-stories” component, and here we have an interesting challenge. The Story object, has a Header property, aimed to render the Story author information, so you just provide the profile image, and a couple of texts for heading and subheading. Although we could get the Author profile image, username and email using Graph API, it is going to be much easier to make use of the MS Graph Toolkit library, and use the MGT Person component. In order to render the GMT Person component, we cannot use the Story Header property, however, the Story object allow us to specify a custom render function for the entire Story, and in that function, we can use the Person component. This is the relevant code to achieve it:
 Story custom render function
The storyRenderer function is the one responsible for rendering the Story, and there, we use the GMT Person component. As you can see in the code above, we also use a React High Order Component called WithSeeMore, this component is from the react-insta-stories library and is the way to load a specific text when the “See more” link is clicked in the Story. So, if the list item has the Content field filled, we set the “seeMore” property of the Story object. This property is again a function, so you can customize how the content is rendered.
And that´s all!… you can get the full code sample in the PnP GitHub repository
Cheers!
by Contributed | May 5, 2021 | Technology
This article is contributed. See the original author and article here.
Node may go down for several reasons, please find the probable causes for Nodes going down in Service Fabric Cluster.
Scenario#1:
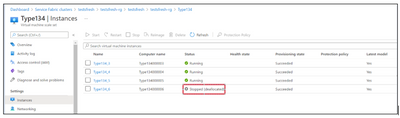
Check the Virtual Machine associated with the Node exists or Deleted or Deallocated.
Azure Portal-> VMSS Resource -> Instances
If Virtual machine doesn’t exist, then one must perform either of below to Remove node state from Service Fabric cluster.
From SFX:
- Go to the service fabric explorer of the cluster.
- Check the Advanced mode setting check box on the cluster:

- Then click on Ellipsis (…) of the down nodes to have the “Remove node state” options and click on it. This should remove node state from the cluster.
From PS Command:
PS cmd: Remove-ServiceFabricNodeState -NodeName _node_5 -Force
Reference: https://docs.microsoft.com/en-us/powershell/module/servicefabric/remove-servicefabricnodestate?view=azureservicefabricps
Scenario#2:
Check if Virtual machine associate with the node is healthy in VMSS.
Go to Azure Portal-> VMSS Resource -> Instances -> Click on the Instance -> Properties

If Virtual Machine Guest Agent is “Not Ready” then reach out to Azure VM Team for the RCA.
Possible Mitigation:
- Restart the Virtual machine from VMSS blade.
- Re-image the Virtual Machine.
Scenario#3:
Check the performance of the Virtual Machine-like CPU and Memory.

If the CPU or Memory is High, then Fabric related process will not be able to establish any instances/start the instances causing the node to go down.
Mitigation:
- Check which process is consuming high CPU/Memory from the Task Manager to investigate the root cause and fix the issue permanently.
Collect the dumps using below tool to determine the root cause:
DebugDiag:
Download Debug Diagnostic Tool v2 Update 3 from Official Microsoft Download Center
(or) Procdump:
ProcDump – Windows Sysinternals | Microsoft Docs
- Restart the Virtual machine from VMSS blade.
Scenario#4:
Check the Disk usage of the Virtual Machine, no space is the disk could lead to Node down issues.
For disk space related issues, we recommend to use ‘windirstat’ tool mentioned in the article: https://github.com/Azure/Service-Fabric-Troubleshooting-Guides/blob/master/Cluster/Out%20of%20Diskspace.md to understand which folders are consuming more space.
Mitigation:
Free up the space to bring the Node Up.
by Contributed | May 5, 2021 | Technology
This article is contributed. See the original author and article here.
We are pleased to announce the launch of the new Visio start page on Office.com, providing Visio users with a familiar start experience that is similar to other Office 365 apps and powerful Office features, like improved file discovery, improved collaboration features, and better template categorization.
From the new landing page, you will experience the benefits of the Office.com ecosystem combined with unique features of the existing Visio landing page. Below are additional details on the latest enhancements:
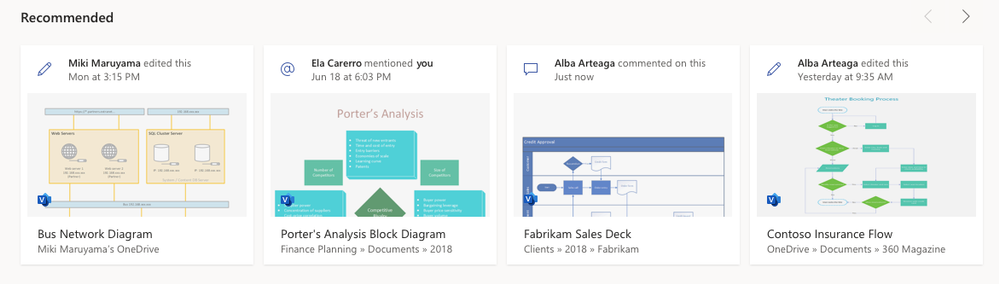
- Improved collaboration: The new design will allow you to see recommended files with actions from your teammates like, “Anne edited this Thursday at 9:10 pm.” You can easily open files that have been recently edited, accessed, and reviewed by your colleagues and quickly pick up where your colleagues left off.
- Better discovery of existing files: With the addition of My recent and Shared files, you can access your frequently used Visio files easily. There is also an option to add your files to the Favorites section for quick access by clicking on the star icon adjacent to the file.

- Better categorization of templates and sample diagrams: The new experience provides a set of templates at the top of the start page to quickly create new Visio diagrams.

To access the full set of templates and sample diagrams, click on More templates, which will direct you to the “More templates” page. Here, you will see the vast repertoire of Visio’s templates and sample diagrams. Navigate to the desired template and click on the Create button to design your new Visio diagram quickly. design your new Visio diagram quickly.

- New search experience: The new search experience will enable you to search quickly through Visio’s rich library of templates and sample diagrams using relevant search terms to help facilitate quicker file creation.

- Overall performance improvements: With the new landing page, you will also experience vastly improved app performance when opening existing or creating new Visio files, reduced time to create new files and so on.
How to access the new landing page
If you have a Visio Plan 1 or Visio Plan 2 subscription, you can access the new landing page via any of the below entry points:
- Click on the waffle menu in the top left. Then, click on All apps and search for “Visio.”

- Search for “Visio” in the universal search box at the top of the page and click on the Visio icon under the Apps header of the search results dropdown.

- Click on the All apps icon in the left navigation bar. Then, click on the Visio app tile under the Office 365 tab.

This experience will be rolling out gradually to our users , so stay tuned to experience the new start page soon!
New announcements are coming your way shortly, so keep checking the Visio Tech Community blog and please continue to send us your product feedback and ideas through UserVoice.

by Contributed | May 4, 2021 | Technology
This article is contributed. See the original author and article here.
What’s Up with Markdown?

Perhaps you’ve noticed a technology called Markdown that’s been showing up in a lot of web sites and apps lately. This article will explain Markdown and help you get started reading and writing it.
Markdown is a simple way to format text using ordinary punctuation marks, and it’s very useful in Microsoft 365. For example, Microsoft Teams supports markdown formatting in chat messages and SharePoint has a Markdown web part. Adaptive Cards support Markdown as well, as do Power Automate approvals. For the bot builders among us, Bot Composer language generation and QnA Maker both support markdown as well. And what’s at the top level of nearly every Github repo? You guessed it, a markdown file called README.md.
Designed to be intuitive
Imagine you’re texting someone and all you have to work with is letters, numbers, and a few punctuation marks. If you want to get their attention, you might use **asterisks**, right? If you’ve ever done that, then you were already using Markdown! Double asterisks make the text bold.
Now imagine you’re replying to an email and want to quote what someone said earlier in the thread. Many people use a little greater-than sign like this:
Parker said,

> Sharing is caring
Guess what, that’s Markdown too! When it’s displayed, it looks like this:
Parker said,
Sharing is caring
Did you ever make a little table with just text characters, like this?
Alpha | Beta | Gamma

——|——|——

  1   |   2  |  3
If so, you already know how to make a table in Markdown!
Markdown was designed to be intuitive. Where possible, it uses the formatting clues people type naturally. So you can type something _in italics_ on the screen and it actually appears in italics.
In all cases you’re starting with plain text – the stuff that comes out of your keyboard and is edited with Notepad or Visual Studio Code – into something richer. (Spoiler alert: it’s HTML.)
What about emojis?  Markdown neither helps nor blocks emojis, they’re just characters. If your application can handle emojis, you can certainly include them in your markdown.
Commonly used Markdown
Markdown isn’t a formal standard, and a lot of variations have emerged. It all started at Daring Fireball; most implementations are faithful to the original but many have added their own features. For example, the SharePoint Markdown Web Part uses the “Marked” syntax; if you’re creating a README.md file for use in Github, you’ll want to use Github Flavored Markdown (GFM).
This article will stick to the most commonly used features that are likely to be widely supported. Each section will show an example of some markdown and then the finished rendering (which, again, may vary depending on what application you’re using).
Each of the following sections shows an example of some simple Markdown, followed by the formatted result.
1. Emphasizing Text
Markdown:
You can surround text with *single asterisks* or _single underscores_ to emphasize it a little bit;

this usually formatted using italics.
You can surround text with **double asterisks** or __double underscores__ to emphasize it more strongly;

this is usually formatted using bold text.
Result:
You can surround text with single asterisks or single underscores to emphasize it a little bit; this usually formatted using italics.
You can surround text with double asterisks or double underscores to emphasize it more strongly; this is usually formatted using bold text.
2. Headings
You can make headings using by putting several = (for a level 1 heading) or – signs (for a level 2 heading) in the line below your heading text.
Markdown:
Result:
My Heading
You can also make headings with one or more hash marks in column 1. The number of hash marks controls the level of the heading.
Markdown:
# First level heading

## Second level heading

### Third level heading

 etc.
Result:
First level heading
Second level heading
Third level heading
etc.
3. Hyperlinks
Markdown:
To make a hyperlink, surround the text in square brackets

immediately followed by the URL in parenthesis (with no space in

between!) For example:

[Microsoft](https://www.microsoft.com).
Result:
To make a hyperlink, surround the text in square brackets immediately followed by the URL in parenthesis (with no space in between!) For example: Microsoft.
4. Images
Images use almost the same syntax as hyperlinks except they begin with an exclamation point. In this case the “alt” text is in square brackets and the image URL is in parenthesis, with no spaces in between.
Markdown:

Result:
In case you were wondering, you can combine this with the hyperlink like this:
Markdown:
[](http://pnp.github.io)
Result:
5. Paragraphs and line breaks
Markdown:
Markdown will

automatically

remove

single line breaks.
Two line breaks start a new paragraph.
Result:
Markdown will automatically remove single line breaks.
Two line breaks start a new paragraph.
6. Block quotes
Markdown:
Use a greater than sign in column 1 to make block quotes like this:
> Line 1

> Line 2
Result:
Use a greater than sign in column 1 to make block quotes like this:
Line 1 Line 2
7. Bullet lists
Markdown:
Just put a asterisk or dash in front of a line that should be bulleted.
* Here is an item starting with an asterisk

* Here is another item starting with an asterisk

    * Indent to make sub-bullets

        * Like this

– Here is an item with a dash

    – Changing characters makes a new list.
Result:
Just put a asterisk or dash in front of a line that should be bulleted.
- Here is an item starting with an asterisk
- Here is another item starting with an asterisk
- Indent to make sub-bullets
- Here is an item with a dash
- Changing characters makes a new list.
8. Numbered lists
Markdown:
1. Beginning a line with a number makes it a list item.

1. You don’t need to put a specific number; Markdown will renumber for you

8. This is handy if you move items around

    1. Don’t forget you can indent to get sub-items

        1. Or sub-sub-items

1. Another item
Result:
- Beginning a line with a number makes it a list item.
- You don’t need to put a specific number; Markdown will renumber for you
- This is handy if you move items around
- Don’t forget you can indent to get sub-items
- Or sub-sub-items
- Another item
9. Code samples
Many markdown implementations know how to format code by language. (This article was written in Markdown and made extensive use of this feature using “markdown” as the language!) For example to show some HTML:
Markdown:
    ~~~html

    <button type=“button“>Do not push this button</button>

    ~~~
Result:
<button type=“button”>Do not push this button</button>
10. Tables
Tables are not universally supported but they’re so useful they had to be part of this article. Here is a simple table. Separate columns with pipe characters, and don’t worry about making things line up; Markdown will handle that part for you.
Markdown:
Column 1 | Column 2 | Column 3

—|—|—

Value 1a | Value 2a | Value 3a

Value 1b | Value 2b | Value 3b
Result:
Column 1 |
Column 2 |
Column 3 |
|---|
Value 1a |
Value 2a |
Value 3a |
Value 1b |
Value 2b |
Value 3b |
HTML and Markdown
Markdown doesn’t create any old formatted text – it specifically creates HTML. In fact, it was designed as a shorthand for HTML that is easier for humans to read and write.
Many Markdown implementations allow you to insert HTML directly into the middle of your Markdown; this may be limited to certain HTML tags depending on the application. So if you know HTML and you’re not sure how to format something in Markdown, try including the HTML directly!
Editing Markdown
If you’d like to play with Markdown right now, you might like to try the Markdown Previewer where you can type and preview Markdown using any web browser.
For more serious editing, Visual Studio Code does a great job, and has a built-in preview facility. Check the VS Code Markdown documentation for details.
There’s a whole ecosystem of tools around Markdown including converters for Microsoft Word and stand-alone editing apps; these are really too numerous to list but are easy to find by searching the web.
Legacy
From vinyl records to 8-bit games and static web sites, there’s a trend these days to rediscover simpler technologies from the past. Markdown definitely falls into this category.
Back before “WYSIWYG” (What You See Is What You Get) word processors were cheap and pervasive, there were “runoff” utilities that were very much like Markdown. They turned text files into nicely formatted printed documents (usually Postscript). Markdown harkens back to these legacy tools, but adds HTML compatibility and an intuitive syntax.
Conclusion
While it may seem unfamiliar at first, Markdown is intended to make it easy for people to read and write HTML. Whether you’re a power user, IT admin, or developer, you’re bound to run into Markdown sooner or later. Here’s hoping this article makes it a little easier to get started!

Recent Comments