by Contributed | May 12, 2021 | Technology
This article is contributed. See the original author and article here.
We are announcing a general availability for Azure AD user creation support for Azure SQL Database on behalf of Azure AD Applications (service principals). See Azure Active Directory service principal with Azure SQL.
What support for Azure AD user creation on behalf of Azure AD Applications means?
Azure SQL Database and SQL Managed Instance support the following Azure AD objects:
- Azure AD users (managed, federated and guest)
- Azure AD groups (managed and federated)
- Azure AD applications
For more information on Azure AD applications, see Application and service principal objects in Azure Active Directory and Create an Azure service principal with Azure PowerShell.
Formerly, only SQL Managed Instance supported the creation of those Azure AD object types on behalf of an Azure AD Application (using service principal). Support for this functionality in Azure SQL Database is now generally available.
This functionality is useful for automated processes where Azure AD objects are created and maintained in Azure SQL Database without human interaction by Azure AD applications. Since service principals could be an Azure AD admin for SQL DB as part of a group or an individual user, automated Azure AD object creation in SQL DB can be executed. This allows for a full automation of a database user creation. This functionality is also supported for Azure AD system-assigned managed identity and user-assigned managed identity that can be created as users in SQL Database on behalf of service principals (see the article, What are managed identities for Azure resources?).
Prerequisites
To enable this feature, the following steps are required:
1) Assign a server identity (a system managed identity) during SQL logical server creation or after the server is created.
See the PowerShell example below:
- To create a server identity during the Azure SQL logical server creation, execute the following command:
New-AzSqlServer -ResourceGroupName <resource group>
-Location <Location name> -ServerName <Server name>
-ServerVersion “12.0” -SqlAdministratorCredentials (Get-Credential)
-AssignIdentity
(See the New-AzSqlServer command for more details)
- For existing Azure SQL logical servers, execute the following command:
Set-AzSqlServer -ResourceGroupName <resource group>
-ServerName <Server name> -AssignIdentity
(See the Set-AzSqlServer command for more details)
To check if a server identity is assigned to the Azure SQL logical
server, execute the following command:
Get-AzSqlServer -ResourceGroupName <resource group>
– ServerName <Server name>
(See the Get-AzSqlServer command for more details)
2) Grant the Azure AD “Directory Readers” permission to the server identity
created above
(For more information, see Provision Azure AD admin (SQL Managed Instance)
How to use it
Once steps 1 and 2 are completed, an Azure AD application with the right permissions can create an Azure AD object (user/group or service principal) in Azure SQL DB. For more information, see the step-by-step tutorial doc
(see Tutorial: Create Azure AD users using Azure AD applications ).
Example
Using SMI (System-assigned Managed Identity) set up as an Azure AD admin for SQL DB,
create an Azure AD application as a SQL DB user.
Preparation
Enable steps 1 and 2 indicated above for the Azure SQL logical server
- In the example below, the server name is ‘testaadsql’
- The user database created under this serve is ‘testdb’
- Copy the display name of the application
- In the example below the app name is ‘myapp’
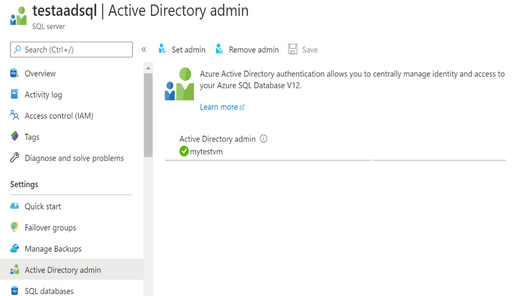
- Using the Azure portal, assign your SMI (display name mytestvm) as an Azure AD admin for the Azure SQL logical server (see the screenshot below).
- Create Azure AD application user in SQL DB on behalf of the SMI
- To check that the user ‘myapp’ was created in the database ‘testdb’ you can execute the T-SQL command select * from sys.database_principals.
PowerShell Script
# PS script creating a SQL user myapp from an Azure AD application on behalf of SMI “mytestvm”
# that is also set as Azure AD admin for SQ DB
# Execute this script from the Azure VM with SMI name ‘mytestvm’
# Azure AD application – display name ‘myapp’
# This is the user name that is created in SQL DB ‘testdb’ in the server ‘testaadsql’
# Metadata service endpoint for SMI, accessible only from within the VM:
$response = Invoke-WebRequest -Uri
‘http://169.254.169.254/metadata/identity/oauth2/token?api-version=2018-02-01&resource=https%3A%2F%2Fdatabase.windows.net%2F‘ -Method GET -Headers @{Metadata=”true”}
$content = $response.Content | ConvertFrom-Json
$AccessToken = $content.access_token
# Specify server name and database name
# For the server name, the server identity must be assigned and “Directory Readers”
# permission granted to the identity
$SQLServerName = “testaadsql”
$DatabaseName = ‘testdb’
$conn = New-Object System.Data.SqlClient.SQLConnection
$conn.ConnectionString = “Data Source=$SQLServerName.database.windows.net;Initial Catalog=$DatabaseName;Connect Timeout=30”
$conn.AccessToken = $AccessToken
$conn.Open()
# Create SQL DB user [myapp] in the ‘testdb’ database
$ddlstmt = ‘CREATE USER [myapp] FROM EXTERNAL PROVIDER;’
$command = New-Object -TypeName System.Data.SqlClient.SqlCommand($ddlstmt, $conn)
Write-host ” “
Write-host “SQL DDL command was executed”
$ddlstmt
Write-host “results”
$command.ExecuteNonQuery()
$conn.Close()
For more information see
For feedback/questions on this preview feature, please reach out to the SQL AAD team at SQLAADFeedback@Microsoft.com
by Contributed | May 12, 2021 | Technology
This article is contributed. See the original author and article here.
As we continue our journey to provide world class threat protection for our customers, we announce general availability of our cloud-native breadth threat protection capabilities, deliver better integration with Microsoft’s threat protection portfolio and expand our threat protection for multi-cloud scenarios.
At RSA this year we are happy to announce general availability for our cloud breadth threat protection solutions: Azure Defender for DNS and Azure Defender for Resource Manager. By detecting suspicious management operations and DNS queries, these cloud-native agentless solutions are helping organizations protect all their cloud resources connected to the Azure DNS & Azure management layer from attacks. Together these new solutions provide breadth protection for your entire Azure environment, which is complementary to our existing Azure Defender in-depth protection for popular Azure workloads.
We are also announcing general availability of built-in and custom reports in Security Center: you can leverage built-in reports created as Azure Workbooks for tasks like tracking your Secure Score over time, vulnerability management, and monitoring missing system updates. In addition, you can create your own custom reports on top of Security Center data using Azure Workbooks or pick up workbook templates created by our community, share those across your organization and leverage to relay security status and insights across the organization. Learn more in Create rich, interactive reports of Security Center data.
At RSA, we are also introducing new capabilities to create a seamless experience between Azure Defender and Azure Sentinel. The enhanced Azure Defender connector, makes it easier to connect to Azure Sentinel by allowing to turn on Azure Defender for some of the subscriptions or for the entire organization from within the connector. We are also combining alerts from Azure Defender with the new raw log connectors for Azure resources in Azure Sentinel. This allows security teams to investigate Azure Defender alerts using raw logs in Azure Sentinel. We also added new recommendations in Azure Security Center to help deploy these log connectors at scale for an entire organization.
Today’s hybrid work environment spans multi-platform, multi-cloud, and on-premises. According to Gartner 2/3 of customers are multi-cloud. We recently extended the multi-cloud support in Azure Defender to include not just servers and SQL but also Kubernetes – and all using Azure Arc. Azure Security Center remains the only security portal from a cloud vendor with multi-cloud support including AWS and GCP.
As always – don’t forget to enable Azure Defender for your cloud services and especially for virtual machines, storage, and SQL databases. Make sure you are actively working to improve your to improve your security posture and please continue to reach out with feedback.
by Contributed | May 12, 2021 | Technology
This article is contributed. See the original author and article here.
We are happy to announce that REST APIs for scanning data plane are now released. Software engineers or developers in your organization can now call these APIs to register data sources, set up scans and classifications programmatically to integrate with other systems or products in your company.
Purview Scaning Data Plane Endpoints
You need to have the purview account name to call scanning APIs. Below is how the endpoint will look:
https://{your-purview-account-name}.scan.purview.azure.com
Set up authentication using service principal.
To call the scanning APIs, the first thing you need to do is to register an application and create a client secret for that application in Azure Active Directory. When you register an application a service principal is automatically created in your tenant. For more information on how to create a service principal (application) and client secret, please refer here.
Once service principal is created, you need to assign ‘Data source Admin’ role of your purview account to the service principal created above. The below steps need to be followed to assign role to establish trust between the service principal and purview account.
- Navigate to your Purview account.
- On the Purview account page, select the tab Access control (IAM)
- Click + Add.
- Select Add role assignment.
- For the Role select Purview Data Source Administrator from the drop down.
- For Assign access to leave the default, User, group, or service principal.
- For Select enter the name of the previously created service principal you wish to assign and then click on their name in the results pane.
- Click on Save.
You’ve now configured the service principal as an application administrator, which enables it to send content to the scanning APIs. Learn about roles here.
Get Token
You can send a POST request to the following URL to get access token.
https://login.microsoftonline.com/{your-tenant-id}/oauth2/token
The following parameters needs to be passed to the above URL.
- client_id: client id of the application registered in Azure Active directory and is assigned ‘Data Source Admin’ role for the Purview account.
- client_secret: client secret created for the above application.
- grant_type: This should be ‘client_credentials’.
- resource: This should be ‘https://purview.azure.net’
Figure 1: Screenshot showing a sample response in Postman.
Scanning Data Plane REST APIs
Once you have followed all the above steps and have received access token you can now call various scanning APIs programmatically. The different types of entities you can interact with are listed below:
- Classification Rules
- Data Sources
- Key Vault Connections
- Scans and scan related functionality like triggers and scan rule sets.
The below examples explains the APIs you need to call to configure a data source , set up and run a scan for the data source but for complete information on all the REST APIs supported by scanning data plane refer here –
1. To create or update a data source using APIs the following REST API can be leveraged:
PUT {Endpoint}/datasources/{dataSourceName}?api-version=2018-12-01-preview
You can register an Azure storage data source with name ‘myStorage’ by sending a PUT request to the following URL
{Endpoint}/datasources/myStorage?api-version=2018-12-01-preview with the below request body:
{
“name”: “myStorage”,
“kind”: “AzureStorage”,
“properties”: {
“endpoint”: “https://azurestorage.core.windows.net/“
}
}
2. To create a scan for a data source already registered in Purview the following REST API can be leveraged:
PUT {Endpoint}/datasources/{dataSourceName}/scans/{scanName}?api-version=2018-12-01-preview
You can schedule a scan ‘myStorageScan’ using a credential ‘CredentialAKV’ and system scan rule set ‘AzureStorage’ for the already registered data source ‘myStorage’ by sending a PUT request to the following URL with the below request body:
{Endpoint}/datasources/myStorage/scans/myStorageScan?api-version=2018-12-01-preview
{
“kind”: “AzureStorageCredential”,
“properties”: {
“credential”: {
“referenceName”: “CredentialAKV”,
“credentialType”: “AccountKey”
},
“connectedVia”: null,
“scanRulesetName”: “AzureStorage”,
“scanRulesetType”: “System”
}
}
The above call with return the following response:
{
“name”: “myStorageScan”,
“id”: “datasources/myDataSource/scans/myScanName”,
“kind”: “AzureStorageCredential”,
“properties”: {
“credential”: {
“referenceName”: “CredentialAKV”,
“credentialType”: “AccountKey”
},
“connectedVia”: null,
“scanRulesetName”: “AzureStorage”,
“scanRulesetType”: “System”,
“workers”: null
},
“scanResults”: null
}
3. Once the scan is created you need to add filters to the scan which is basically scoping your scan or determining what objects should be included as part of scan. To create a filter, you can leverage the following REST API
PUT {Endpoint}/datasources/{dataSourceName}/scans/{scanName}/filters/custom?api-version=2018-12-01-preview
You can create a filter for the above scan ‘myStorageScan’ by sending a PUT request to the following URL with the below request body. This will create a scope to include folders /share1/user and /share1/aggregated and exclude folder /share1/user/temp/ as part of the scan.
{Endpoint}/datasources/myStorage/scans/myStorageScan/filters/custom?api-version=2018-12-01-preview
{
“properties”: {
“includeUriPrefixes”: [
“https://myStorage.file.core.windows.net/share1/user“,
“https://myStorage.file.core.windows.net/share1/aggregated“
],
“excludeUriPrefixes”: [
“https://myStorage.file.core.windows.net/share1/user/temp“
]
}
}
The above call will return the following response:
{
“name”: “custom”,
“id”: “datasources/myStorage/scans/myStorageScan/filters/custom”,
“properties”: {
“includeUriPrefixes”: [
“https://myStorage.file.core.windows.net/share1/user“,
“https://myStorage.file.core.windows.net/share1/aggregated“
],
“excludeUriPrefixes”: [
“https://myStorage.file.core.windows.net/share1/user/temp“
]
}
}
4.To run a scan, you need to use the following REST API
PUT {Endpoint}/datasources/{dataSourceName}/scans/{scanName}/runs/{runId}?api-version=2018-12-01-preview
You can now trigger the above scan ‘myStorageScan’ by sending a PUT request to the below URL. The runId is a guid.
{Endpoint}/datasources/myStorage/scans/myStorageScan/runs/138301e4-f4f9-4ab5-b734-bac446b236e7?api-version=2018-12-01-preview
The above call will return the following response:
{
“scanResultId”: “138301e4-f4f9-4ab5-b734-bac446b236e7”,
“startTime”: “2019-05-16T17:01:37.3089193Z”,
“endTime”: null,
“status”: “Accepted”,
“error”: null
}
To learn more about Azure Purview, check out our full documentation today.


Recent Comments