by Contributed | May 3, 2021 | Technology
This article is contributed. See the original author and article here.
Overview
In 2021, each month there will be a monthly blog covering the webinar of the month for the Low-code application development (LCAD) on Azure solution.
LCAD on Azure is a solution to demonstrate the robust development capabilities of integrating low-code Microsoft Power Apps and the Azure products you may be familiar with.
This month’s webinar is ‘Unlock the Future of Azure IoT through Power Platform’.
In this blog I will briefly recap Low-code application development on Azure, provide an overview of IoT on Azure and Azure Functions, how to pull an Azure Function into Power Automate, and how to integrate your Power Automate flow into Power Apps.
What is Low-code application development on Azure?
Low-code application development (LCAD) on Azure was created to help developers build business applications faster with less code.
Leveraging the Power Platform, and more specifically Power Apps, yet helping them scale and extend their Power Apps with Azure services.
For example, a pro developer who works for a manufacturing company would need to build a line-of-business (LOB) application to help warehouse employees’ track incoming inventory.
That application would take months to build, test, and deploy. Using Power Apps, it can take hours to build, saving time and resources.
However, say the warehouse employees want the application to place procurement orders for additional inventory automatically when current inventory hits a determined low.
In the past that would require another heavy lift by the development team to rework their previous application iteration.
Due to the integration of Power Apps and Azure a professional developer can build an API in Visual Studio (VS) Code, publish it to their Azure portal, and export the API to Power Apps integrating it into their application as a custom connector.
Afterwards, that same API is re-usable indefinitely in the Power Apps’ studio, for future use with other applications, saving the company and developers more time and resources.
IoT on Azure and Azure Functions
The goal of this webinar is to understand how to use IoT hub and Power Apps to control an IoT device.
To start, one would write the code in Azure IoT Hub, to send commands directly to your IoT device. In this webinar Samuel wrote in Node for IoT Hub, and wrote two basic commands, toggle fan on, and off.
The commands are sent via the code in Azure IoT Hub, which at first run locally. Once tested and confirmed to be running properly the next question is how can one rapidly call the API from anywhere across the globe?
The answer is to create a flow in Power Automate, and connect that flow to a Power App, which will be a complete dashboard that controls the IoT device from anywhere in the world.
To accomplish this task, you have to first create an Azure Function, which will then be pulled into Power Automate using a “Get” function creating the flow.
Once you’ve built the Azure Function, run and test it locally first, test the on and off states via the Function URL.
To build a trigger for the Azure Function, in this case a Power Automate flow, you need to create an Azure resources group to check the Azure Function and test its local capabilities.
If the test fails it could potentially be that you did not create or have an access token for the IoT device. To connect a device, IoT or otherwise to the cloud, you need to have an access token.
In the webinar Samuel added two application settings to his function for the on and off commands.
After adding these access tokens and adjusting the settings of the IoT device, Samuel was able to successfully run his Azure Function.
Azure Function automated with Power Automate
After building the Azure Function, you now can build your Power Automate flow to start building your globally accessible dashboard to operate your IoT device.
Samuel starts by building a basic Power Automate framework, then flow, and demonstrates how to test the flow once complete.
He starts with a HTTP request, and implements a “Get” command. From there it is a straightforward process, to test and get the IoT Device to run.
Power Automate flow into Power Apps
After building your Power Automate flow, you develop a simple UI to toggle the fan on and off. Do this by building a canvas Power App and importing the Power Automate flow into the app.
To start, create a blank canvas app, and name it. In the Power Apps ribbon, you select “button”, and pick the button’s source, selecting “Power Automate” and “add a flow”.
Select the flow that is connected to the Azure IoT device, its name should be reflected in the selection menu.
If everything is running properly your IoT device will turn on.
FYI in the webinar Samuel is running out of time, so he creates a new Power Automate flow, which he imports into the canvas app.
Summary
Make sure to watch the webinar to learn more about Azure IoT and how to import Azure Functions into your Power Apps.
Additionally, there will be a Low-code application development on Azure ‘Learn Live’ session during Build, covering the new .NET x Power Apps learning path, covering integrations with Azure Functions, Visual Studio, and API Management.
Lastly, tune in to the Power Apps x Azure featured session at Build on May 25th, to learn more about the next Visual Studio extensions, Power Apps source code, and the ALM accelerator package. Start registering for Microsoft Build at Microsoft Build 2021.

by Contributed | May 3, 2021 | Technology
This article is contributed. See the original author and article here.
Citus is an extension to Postgres that lets you distribute your application’s workload across multiple nodes. Whether you are using Citus open source or using Citus as part of a managed Postgres service in the cloud, one of the first things you do when you start using Citus is to distribute your tables. While distributing your Postgres tables you need to decide on some properties such as distribution column, shard count, colocation. And even before you decide on your distribution column (sometimes called a distribution key, or a sharding key), when you create a Postgres table, your table is created with an access method.
Previously you had to decide on these table properties up front, and then you went with your decision. Or if you really wanted to change your decision, you needed to start over. The good news is that in Citus 10, we introduced 2 new user-defined functions (UDFs) to make it easier for you to make changes to your distributed Postgres tables.
Before Citus 9.5, if you wanted to change any of the properties of the distributed table, you would have to create a new table with the desired properties and move everything to this new table. But in Citus 9.5 we introduced a new function, undistribute_table. With the undistribute_table function you can convert your distributed Citus tables back to local Postgres tables and then distribute them again with the properties you wish. But undistributing and then distributing again is … 2 steps. In addition to the inconvenience of having to write 2 commands, undistributing and then distributing again has some more problems:
- Moving the data of a big table can take a long time, undistribution and distribution both require to move all the data of the table. So, you must move the data twice, which is much longer.
- Undistributing moves all the data of a table to the Citus coordinator node. If your coordinator node isn’t big enough, and coordinator nodes typically don’t have to be, you might not be able to fit the table into your coordinator node.
So, in Citus 10, we introduced 2 new functions to reduce the steps you need to make changes to your tables:
alter_distributed_table
alter_table_set_access_method
In this post you’ll find some tips about how to use the alter_distributed_table function to change the shard count, distribution column, and the colocation of a distributed Citus table. And we’ll show how to use the alter_table_set_access_method function to change, well, the access method. An important note: you may not ever need to change your Citus table properties. We just want you to know, if you ever do, you have the flexibility. And with these Citus tips, you will know how to make the changes.
Altering the properties of distributed Postgres tables in Citus
When you distribute a Postgres table with the create_distributed_table function, you must pick a distribution column and set the distribution_column parameter. During the distribution, Citus uses a configuration variable called shard_count for deciding the shard count of the table. You can also provide colocate_with parameter to pick a table to colocate with (or colocation will be done automatically, if possible).
However, after the distribution if you decide you need to have a different configuration, starting from Citus 10, you can use the alter_distributed_table function.
alter_distributed_table has three parameters you can change:
- distribution column
- shard count
- colocation properties
How to change the distribution column (aka the sharding key)
Citus divides your table into shards based on the distribution column you select while distributing. Picking the right distribution column is crucial for having a good distributed database experience. A good distribution column will help you parallelize your data and workload better by dividing your data evenly and keeping related data points close to each other. However, choosing the distribution column might be a bit tricky when you’re first getting started. Or perhaps later as you make changes in your application, you might need to pick another distribution column.
With the distribution_column parameter of the new alter_distributed_table function, Citus 10 gives you an easy way to change the distribution column.
Let’s say you have customers and orders that your customers make. You will create some Postgres tables like these:
CREATE TABLE customers (customer_id BIGINT, name TEXT, address TEXT);
CREATE TABLE orders (order_id BIGINT, customer_id BIGINT, products BIGINT[]);
When first distributing your Postgres tables with Citus, let’s say that you decided to distribute the customers table on customer_id and the orders table on order_id.
SELECT create_distributed_table ('customers', 'customer_id');
SELECT create_distributed_table ('orders', 'order_id');
Later you might realize distributing the orders table by the order_id column might not be the best idea. Even though order_id could be a good column to evenly distribute your data, it is not a good choice if you frequently need to join the orderstable with the customers table on the customer_id. When both tables are distributed by customer_id you can use colocated joins, which are very efficient compared to joins on other columns.
So, if you decide to change the distribution column of orders table into customer_id here is how you do it:
SELECT alter_distributed_table ('orders', distribution_column := 'customer_id');
Now the orders table is distributed by customer_id. So, the customers and the orders of the customers are in the same node and close to each other, and you can have fast joins and foreign keys that include the customer_id.
You can see the new distribution column on the citus_tables view:
SELECT distribution_column FROM citus_tables WHERE table_name::text = 'orders';
How to increase (or decrease) the shard count in Citus
Shard count of a distributed Citus table is the number of pieces the distributed table is divided into. Choosing the shard count is a balance between the flexibility of having more shards, and the overhead for query planning and execution across the shards. Like distribution column, the shard count is also set while distributing the table. If you want to pick a different shard count than the default for a table, during the distribution process you can use the citus.shard_count configuration variable, like this:
CREATE TABLE products (id BIGINT, name TEXT);
SET citus.shard_count TO 20;
SELECT create_distributed_table ('products', 'id');
After distributing your table, you might decide the shard count you set was not the best option. Or your first decision on the shard count might be good for a while but your application might grow in time, you might add new nodes to your Citus cluster, and you might need more shards. The alter_distributed_table function has you covered in the cases that you want to change the shard count too.
To change the shard count you just use the shard_count parameter:
SELECT alter_distributed_table ('products', shard_count := 30);
After the query above, your table will have 30 shards. You can see your table’s shard count on the citus_tables view:
SELECT shard_count FROM citus_tables WHERE table_name::text = 'products';
How to colocate with a different Citus distributed table
When two Postgres tables are colocated in Citus, the rows of the tables that have the same value in the distribution column will be on the same Citus node. Colocating the right tables will help you with better relational operations. Like the shard count and the distribution column, the colocation is also set while distributing your tables. You can use the colocate_with parameter to change the colocation.
SELECT alter_distributed_table ('products', colocate_with := 'customers');
Again, like the distribution column and shard count, you can find information about your tables’ colocation groups on the citus_tables view:
SELECT colocation_id FROM citus_tables WHERE table_name IN ('products', 'customers');
You can also use default and none keywords with colocate_with parameter to change the colocation group of the table to default, or to break any colocation your table has.
To colocate distributed Citus tables, the distributed tables need to have the same shard counts. But if the tables you want to colocate don’t have the same shard count, worry not, because alter_distributed_table will automatically understand this. Then your table’s shard count will also be updated to match the new colocation group’s shard count.
How to change more than one Citus table property at a time
Here is a tip! If you want to change multiple properties of your distributed Citus tables at the same time, you can simply use multiple parameters of the alter_distributed_table function.
For example, if you want to change both the shard count and the distribution column of a table here’s how you do it:
SELECT alter_distributed_table ('products', distribution_column := 'name', shard_count := 35);
How to alter the Citus colocation group
If your table is colocated with some other tables and you want to change the shard count of all of the tables to keep the colocation, you might be wondering if you have to alter them one by one… which is multiple steps.
Yes (you can see a pattern here) the Citus tip is that you can use the alter_distributed_table function to change the properties of all of the colocation group.
If you decide the change you make with the alter_distributed_table function needs to be done to all the tables that are colocated with the table you are changing, you can use the cascade_to_colocated parameter:
SET citus.shard_count TO 10;
SELECT create_distributed_table ('customers', 'customer_id');
SELECT create_distributed_table ('orders', 'customer_id', colocate_with := 'customers');
-- when you decide to change the shard count
-- of all of the colocation group
SELECT alter_distributed_table ('customers', shard_count := 20, cascade_to_colocated := true);
You can see the updated shard count of both tables on the citus_tables view:
SELECT shard_count FROM citus_tables WHERE table_name IN ('customers', 'orders');
How to change your Postgres table’s access method in Citus
Another amazing feature introduced in Citus 10 is columnar storage. This Citus 10 columnar blog post walks you through how it works and how to use columnar tables (or partitions) with Citus—complete with a Quickstart. Oh, and Jeff made a short video demo about the new Citus 10 columnar functionality too—it’s worth the 13 minutes to watch IMHO.
With Citus columnar, you can optionally choose to store your tables grouped by columns—which gives you the benefits of compression, too. Of course, you don’t have to use the new columnar access method—the default access method is “heap” and if you don’t specify an access method, then your tables will be row-based tables (with the heap access method.)
It would not be fair to introduce this cool new Citus columnar access method without also giving you a way to convert your tables to columnar. So Citus 10 also introduced a way to change the access method of tables.
SELECT alter_table_set_access_method('orders', 'columnar');
You can use alter_table_set_access_method to convert your table to any other access method too, such as heap, Postgres’s default access method. Also, your table doesn’t even need to be a distributed Citus table. You can also use alter_table_set_access_method with Citus reference tables as well as regular Postgres tables. You can even change the access method of a Postgres partition with alter_table_set_access_method.
Under the hood: How do these new Citus functions work?
If you’ve read the blog post about undistribute_table, the function Citus 9.5 introduced for turning distributed Citus tables back to local Postgres tables, you mostly know how the alter_distributed_table and alter_table_set_access_method functions work. Because we use the same underlying methodology as the undistribute_table function. Well, we improved upon it.
The alter_distributed_table and alter_table_set_access_method functions:
- Create a new table in the way you want (with the new shard count or access method etc.)
- Move everything from your old table to the new table
- Drop the old table and rename the new one
Dropping a table for the purpose of re-creating the same table with different properties is not a simple task. Dropping the table will also drop many things that depend on the table.
Just like the undistribute_table function, the alter_distributed_table and alter_table_set_access_method functions do a lot to preserve the properties of the table you didn’t want to change. The functions will handle indexes, sequences, views, constraints, table owner, partitions and more—just like undistribute_table.
alter_distributed_table and alter_table_set_access_method will also recreate the foreign keys on your tables whenever possible. For example, if you change the shard count of a table with the alter_distributed_table function and use cascade_to_colocated := true to change the shard count of all the colocated tables, then foreign keys within the colocation group and foreign keys from the distributed tables of the colocation group to Citus reference tables will be recreated.
Making it easier to experiment with Citus—and to adapt as your needs change
If you want to learn more about our previous work which we build on for alter_distributed_table and alter_table_set_access_method functions go check out our blog post on undistribute_table.
In Citus 10 we worked to give you more tools and more capabilities for making changes to your distributed database. When you’re just starting to use Citus, the new alter_distributed_table and alter_table_set_access_method functions—along with the undistribute_table function—are all here to help you experiment and find the database configuration that works the best for your application. And in the future, if and when your application evolves, these three Citus functions will be ready to help you evolve your Citus database, too.
by Contributed | May 3, 2021 | Technology
This article is contributed. See the original author and article here.
Deprecated accounts are the accounts that were once deployed to a subscription for some trial/pilot initiative or some other purpose and are not required anymore. The user accounts that have been blocked from signing in should be removed from subscriptions. These accounts can be targets for attackers finding ways to access your data without being noticed.
The Azure Security Center recommends identifying those accounts and removing any role assignments on them from the subscription, however, it could be tedious in the case of multiple subscriptions.
Pre-Requisite:
– Az Modules must be installed
– Service principal created as part of Step 1 must be having owner access to all subscriptions
Steps to follow:
Step 1: Create a service principal
Post creation of service principal, please retrieve below values.
- Tenant Id
- Client Secret
- Client Id
Step 2: Create a PowerShell function which will be used in generating authorization token
function Get-apiHeader{
[CmdletBinding()]
Param
(
 [Parameter(Mandatory=$true)]
 [System.String]
 [ValidateNotNullOrEmpty()]
 $TENANTID,
 [Parameter(Mandatory=$true)]
 [System.String]
 [ValidateNotNullOrEmpty()]
 $ClientId,
 [Parameter(Mandatory=$true)]
 [System.String]
 [ValidateNotNullOrEmpty()]
 $PasswordClient,
 [Parameter(Mandatory=$true)]
 [System.String]
 [ValidateNotNullOrEmpty()]
 $resource
)
$tokenresult=Invoke-RestMethod -Uri https://login.microsoftonline.com/$TENANTID/oauth2/token?api-version=1.0 -Method Post -Body @{"grant_type" = "client_credentials"; "resource" = "https://$resource/"; "client_id" = "$ClientId"; "client_secret" = "$PasswordClient" }
$token=$tokenresult.access_token
$Header=@{
  'Authorization'="Bearer $token"
  'Host'="$resource"
  'Content-Type'='application/json'
  }
return $Header
}
Step 3: Invoke API to retrieve authorization token using function created in above step
Note: Replace $TenantId, $ClientId and $ClientSecret with value captured in step 1
$AzureApiheaders = Get-apiHeader -TENANTID $TenantId -ClientId $ClientId -PasswordClient $ClientSecret -resource "management.azure.com"
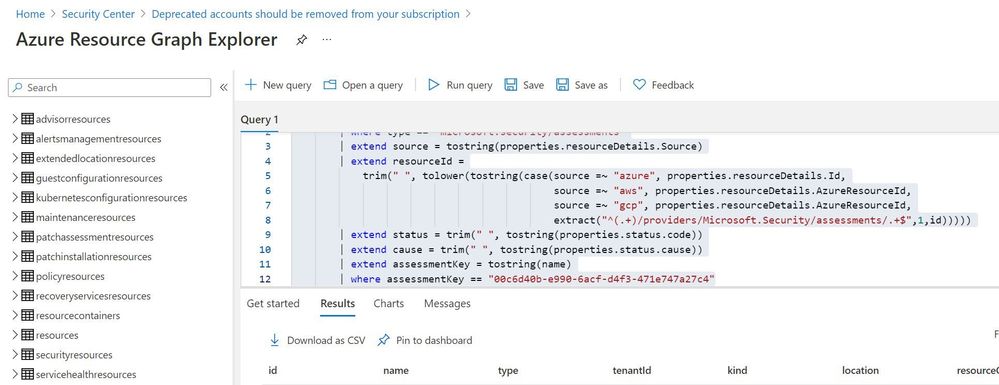
Step 4: Extracting csv file containing list of all deprecated accounts from Azure Resource Graph
Please refer: https://github.com/MicrosoftDocs/azure-docs/blob/master/articles/governance/resource-graph/first-query-portal.md
Azure Resource graph explorer: https://docs.microsoft.com/en-us/azure/governance/resource-graph/overview
Query:
securityresources
        | where type == "microsoft.security/assessments"
        | extend source = tostring(properties.resourceDetails.Source)
        | extend resourceId =
            trim(" ", tolower(tostring(case(source =~ "azure", properties.resourceDetails.Id,
            extract("^(.+)/providers/Microsoft.Security/assessments/.+$",1,id)))))
        | extend status = trim(" ", tostring(properties.status.code))
        | extend cause = trim(" ", tostring(properties.status.cause))
        | extend assessmentKey = tostring(name)
        | where assessmentKey == "00c6d40b-e990-6acf-d4f3-471e747a27c4"
Click on “Download as CSV” and store at location where removal of deprecated account script is present. Rename the file as “deprecatedaccountextract“
Set-Location $PSScriptRoot
$RootFolder = Split-Path $MyInvocation.MyCommand.Path
$ParameterCSVPath =$RootFolder + "deprecatedaccountextract.csv"
if(Test-Path -Path $ParameterCSVPath)
{
$TableData = Import-Csv $ParameterCSVPath
}

foreach($Data in $TableData)
{
  #Get resourceID for specific resource
  $resourceid=$Data.resourceId
  #Get control results column for specific resource
  $controlresult=$Data.properties
  $newresult=$controlresult | ConvertFrom-Json
  $ObjectIdList=$newresult.AdditionalData.deprecatedAccountsObjectIdList
  $regex="[^a-zA-Z0-9-]"
  $splitres=$ObjectIdList -split(',')
  $deprecatedObjectIds=$splitres -replace $regex
  foreach($objectId in $deprecatedObjectIds)
  {
    #API to get role assignment details from Azure
    $resourceURL="https://management.azure.com$($resourceid)/providers/microsoft.authorization/roleassignments?api-version=2015-07-01"
    $resourcedetails=(Invoke-RestMethod  -Uri $resourceURL -Headers $AzureApiheaders -Method GET)
    if( $null -ne $resourcedetails )
    {
     foreach($value in $resourcedetails.value)
     {
      if($value.properties.principalId -eq $objectId)
      {
       $roleassignmentid=$value.name
       $remidiateURL="https://management.azure.com$($resourceid)/providers/microsoft.authorization/roleassignments/$($roleassignmentid)?api-version=2015-07-01"
       Invoke-RestMethod  -Uri $remidiateURL -Headers $AzureApiheaders -Method DELETE
      }
     }
    }
    else
    {
     Write-Output "There are no Role Assignments in the subscription"
    }
   }
}
References:
https://github.com/Azure/Azure-Security-Center/blob/master/Remediation%20scripts/Remove%20deprecated%20accounts%20from%20subscriptions/PowerShell/Remove-deprecated-accounts-from-subscriptions.ps1
https://docs.microsoft.com/en-us/azure/security-center/policy-reference#:~:text=Deprecated%20accounts%20are%20accounts%20that%20have%20been%20blocked%20from%20signing%20in.&text=Virtual%20machines%20without%20an%20enabled,Azure%20Security%20Center%20as%20recommendations.

Recent Comments