by Contributed | Mar 15, 2021 | Technology
This article is contributed. See the original author and article here.
Introduction
This is John Barbare and I am a Sr. Customer Engineer at Microsoft focusing on all things in the Cybersecurity space. In this blog I will go over the new unified Microsoft 365 Defender Security Portal and go into detail of investigating an incident, the correlation of alerts, and a detailed look into at what Automated Investigation does and how it can help your organization. With that said, lets jump into Microsoft 365 Defender and look at a real incident and see how Microsoft 365 Defender can work for your organization.
Investigate Incidents in Microsoft 365 Defender
An incident is a collection of correlated alerts that make up the story of an attack. Malicious and suspicious events that are found in different device, user, and mailbox entities in the network are automatically aggregated by Microsoft 365 Defender. Grouping related alerts into an incident gives security defenders a comprehensive view of an attack.
For instance, security defenders can see where the attack started, what tactics were used, and how far the attack has gone into the network. They can also see the scope of the attack, like how many devices, users, and mailboxes were impacted, how severe the impact was, and other details about affected entities.
Having Automated Investigation or AIR (Automated Investigation and Response) set to full, Microsoft 365 Defender can automatically investigate and resolve the individual alerts through automation, various inspection algorithms, and artificial intelligence. AIR capabilities are designed to examine alerts and take immediate action to resolve breaches. AIR capabilities significantly reduce alert volume, allowing security operations to focus on more sophisticated threats and other high-value initiatives. All remediation actions, whether pending or completed, are tracked in the Action center. In the Action center, pending actions are approved (or rejected), and completed actions can be undone if needed.
Security defenders can also perform additional remediation steps to resolve the attack straight from the incidents view. Incidents from the last 30 days are shown in the incident queue. From here, security defenders can see which incidents should be prioritized based on risk level and other factors. Security defenders can also rename incidents, assign them to individual analysts, classify, and add tags to incidents for a better and more customized incident management experience. Microsoft 365 Defender aggregates all related alerts, assets, investigations, and evidence from across your devices, users, and mailboxes to give you a comprehensive look into the entire breadth of an attack. Investigate the alerts that affect your network, understand what they mean, and collate evidence associated with the incidents so that you can devise an effective remediation plan.
Investigate an Incident
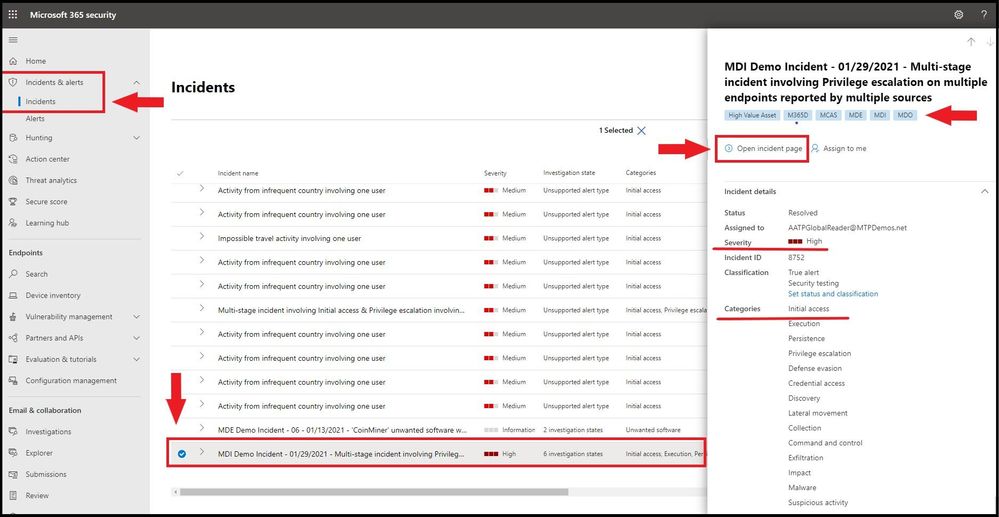
Select an incident from the incident queue. A side panel opens and gives a preview of valuable information such as status, severity, categories, and the impacted entities. Any machines tags that have been assigned to the device(s) will also be displayed. Select Open incident page.
Open incident page
Incident Page Overview
This opens the incident page where you will find more information about incident details, comments, and actions, tabs (overview, alerts, devices, users, investigations, evidence). Review the alerts, devices, users, other entities involved in the incident. The overview page gives you a snapshot glance into the top things to notice about the incident.
 Incident Page Overview
The attack categories give you a visual and numeric view of how advanced the attack has progressed against the kill chain. As with other Microsoft security products, Microsoft 365 Defender is aligned to the MITRE ATT&CK™ framework. The scope section gives you a list of top impacted assets that are part of this incident. If there is specific information regarding this asset, such as risk level, investigation priority as well as any tagging on the assets this will also surface in this section.
The alerts timeline provides a sneak peek into the chronological order in which the alerts occurred, as well as the reasons that these alerts linked to this incident. And last – the evidence section provides a summary of how many different artifacts were included in the incident and their remediation status, so you can immediately identify if any action is needed on your end. This overview can assist in the initial triage of the incident by providing insight to the top characteristics of the incident that you should be aware of.
Assigning the Incident
Once you have the Incident open, you will need to assign the incident. Select the Manage incident tab on the far right.
 Assigning the Incident
Once selected, a flyout card will appear on the far right. Here you will be able to add any new Incident tags to the alert, assign to yourself, and add any comments for the alert. Currently without investigating the incident, you cannot resolve the incident or set the classification at this time.
The incident name is automatically generated and changes dynamically when added details or insights emerge. Modifying the incident name will prevent the system from updating the name based on future insights. You can modify the incident name to better align with your preferred naming convention if possible. After entering the correct information, go ahead and select save.
 Assigning the Incident with comments
Alerts
You can view all the alerts related to the incident and other information about them such as severity, entities that were involved in the alert, the source of the alerts (Microsoft Defender for Identity, Microsoft Defender for Endpoint, Microsoft Defender for Office 365) and the reason they were linked together. Go ahead and select the Alerts tab at the top.
 Alerts tab
By default, the alerts are ordered chronologically, to allow you to first view how the attack played out over time. Clicking on each alert will lead you to the relevant alert page where you can conduct an in-depth investigation of that alert. In the Detection source tab under the alert section is which source pulled all the alert from. In this incident, one can see alerts from Microsoft Defender for Endpoint (Endpoint and 365 Defender) and Defender for Office 365 (Office 365).
 Detection source view
For any alert(s), you will want to investigate each alert listed under the Title column. For this Incident, we will select the first alert (Suspicious process injection observed) to investigate as part of the investigation. A flyout card will open and we can see details about this alert. We can see from here it was an Automated Investigation (#1859) that triggered this alert and is Partially Investigated. Also, all the alert details to include Incident name, service source, detection technology, detection status, category, Techniques, first/last activity seen, and when the alert was generated on.
 Alert Details
If we scroll further down the card on the right, we receive an alert description which informs us about the alert. We can also see the list of alert recommended actions to take. Next, is the Automated investigation details and incident details with any comments that have been added to this open incident. From the card, select the Open alert page.
 Alert Details
Opening the Alert Page
Once the Open alert page has been selected, it will pivot to the alert inside Microsoft Defender for Endpoint. This will give us more fine grained information to include the alert story and all other permanent information about the alert. If we see something we want to further investigate, select the drop down arrows at the end of each horizontal bar.
 Full Alert Page and Details
In this alert, we selected the “powershell.exe launched a script inspected by AMSI”. Once selected, we can see the actual script that was run and why it was flagged as a suspicious process injection. This goes with any script-based attack as you can view the actual script that was run. You can copy the script and/or download the script as seen on the far right.
 Analyzing the script
From here, we can continue to investigate the alert story to gather more evidence on the alert, go to the machine timeline to see what happened before and after the alert, and drill down to more details until a classification is warranted for a True/False positive for the classification.
Devices
The devices tab lists all the devices where alerts related to the incident are seen.
Clicking the name of the machine (under device name ) where the attack was conducted navigates you to its Machine page where you can see alerts that were triggered on it and related events provided to ease investigation.
 Devices Tab
Selecting the Timeline tab enables you to scroll through the machine timeline and view all events and behaviors observed on the machine in chronological order, interspersed with the alerts raised (on the timeline with down arrow).
 Timeline tab
Users
See users that have been identified to be part of, or related to a given incident.
Clicking the username navigates you to the user’s Cloud App Security page where further investigation can be conducted. Here we will go ahead and select the user.
 Users
Users
After selecting the user, we pivot to see the user’s profile, investigation priority score, alerts, and risky activities, and other information.
 User’s Profile to Include Risky Actions
Mailboxes
Investigate mailboxes that have been identified as part of or related to an incident. To do further investigative work, selecting the mail-related alert will open Defender for Office 365 where you can take remediation actions.
 Mailboxes
After selecting the user’s mailbox, we pivot to Defender for Office 365 to investigate the user’s mailbox. Using Explorer in Threat Management is a near real-time tool to help Security Operations teams investigate and respond to threats in the Security & Compliance Center. Learn more about Explorer.
This view shows information about all email messages sent by external users into your organization, or internal email sent between your users. This view can help you find missed threats. You can filter the view for threat hunting, and you can export up to 200,000 records for offline analysis.
Top 5 categories are shown by default; however, the chart can contain more than five categories of threats. Note that all filters used are manual, are applied upon clicking Refresh, and that the Advanced view contains a NOT condition for certain filters, and for creating complex queries. Use Threat Explorer rather than Export to see all records.
 Explorer in Threat Management
Investigations
Select Investigations to see all the automated investigations triggered by alerts in this incident. The investigations will perform remediation actions or wait for analyst approval of actions, depending on how you configured your automated investigations to run in Microsoft Defender for Endpoint and Defender for Office 365.
 Investigations tab
Select an investigation to navigate to the Investigation details page to get full information on the investigation and remediation status. If there are any actions pending for approval as part of the investigation, they will appear in the Pending actions tab. Take action as part of incident remediation.
We selected the first investigation “Suspicious process injection observed” and will pivot to the investigation details to see all investigation details.
One can select any of the tabs to see further details on the investigation, evidence, entities, and logs.
 Investigations Graph
Evidence
Microsoft 365 Defender automatically investigates all the incidents’ supported events and suspicious entities in the alerts, providing you with auto response and information about the important files, processes, services, emails, and more. This helps quickly detect and block potential threats in the incident.
 Evidence tab
Each of the analyzed entities will be marked with a verdict (Malicious, Suspicious, Clean) as well as a remediation status. This assists you in understanding the remediation status of the entire incident and what are the next steps that can be taken to further remediate.
 Remediation Status of Evidence
Conclusion
Thanks for taking the time to read this blog and I hope you have a better understanding of how an investigation works using Auto IR in Microsoft 365 Defender. I have implemented Microsoft 365 Defender in several large organizations and it has drastically reduced alert fatigue and has SOC (Security Operations Centers) personnel focus more on high level alerts while Microsoft 365 performs all the other investigations in the background.
Hope to see you in the next blog and always protect your endpoints!
Thanks for reading and have a great Cybersecurity day!
Follow my Microsoft Security Blogs: http://aka.ms/JohnBarbare
References
Microsoft 365 Defender – Microsoft 365 security
Use automated investigations to investigate and remediate threats – Windows security | Microsoft Docs

by Contributed | Mar 14, 2021 | Technology
This article is contributed. See the original author and article here.
Getting started with SharePoint’s custom column formatting
Have you ever wished that you could turn your boring old SharePoint list, full of useful data as it may be, into something with a little more pizzazz? And not just the simple (but highly effective) conditional formatting that SharePoint can give you for free, but something truly outside of the box.
Continue reading to learn how to turn this….

…into something like this…

What do you need to get started?
Thankfully, custom formatting isn’t terribly complicated, although it does take some getting used to. The only thing you’ll absolutely need is a modern SharePoint list with some columns, a basic understanding of JSON (this post has you covered), and some patience.
You’ll also need to know that you can’t customize most, but not all, column types in SharePoint online. As of this writing, you cannot customize the following field types: Managed Metadata, Filename (in Document Libraries), Retention Label, Sealed columns, Multi-line text column with enhanced rich text.
If you have it, some experience with HTML and CSS will come in handy, as would a little familiarity with Excel style functions, but none of it is required to just get started.
If you haven’t already, you may also want to at least scan through the official documentation for column formatting to get yourself acquainted with the schema used.
Schema Basics
The key to creating your custom column formatting will be in understanding the basics of the JSON schema used to define your presentation. Basically, what you’re attempting to do is describe some basic HTML elements and CSS styles using JSON.
Every definition will follow the same basic pattern: An object representing an HTML element, with optional attributes, CSS styling, and child elements.
{
    "$schema": "https://developer.microsoft.com/json-schemas/sp/v2/column-formatting.schema.json",
    "elmType": "div",
    "attributes": {
        "iconName": "Game"
    },
    "style": {
        "font-size": "48px",
        "color": "red"
    }
}
In the above sample, we’re defining our object as an HTML div element. A div is just a container for other HTML elements, such as text, images, links or even other divs. There are other valid values for “elmType” as well, such as ‘span’; ‘button’; and ‘img’; just to name a few.
In the case here, we’re also declaring that our div has an attribute named “iconName” with a value of “Game”. We’re also defining the CSS styling we want to use, setting the font size and color to ‘big and red’.
This definition would turn any column in our list into the below.
Our definition only has one element being defined. If all we wanted to do was display the icon, then we’re all set. But what if we also want to show the text content that was originally being displayed as well?
{
  "$schema": "https://developer.microsoft.com/json-schemas/sp/v2/column-formatting.schema.json",
  "elmType": "div",
  "style": {
    "width": "48px",
    "display": "block",
    "text-align": "center"
  },
  "children": [
    {
      "elmType": "div",
      "attributes": {
        "iconName": "Game"
      },
      "style": {
        "font-size": "48px",
        "color": "red"
      }
    },
    {
      "elmType": "div",
      "txtContent": "@currentField"
    }
  ]
}
With this, we’ve changed our root element to act as a container for two children. The first child is the same as the original example. The second child is another div that simply displays the string value of the column, resulting in the following:

Working with text
In the last example, we used the txtContent property and the @currentField built-in variable. For basic SharePoint field types, such as text, you can simply do like what was done in that example. However, some field types – such as people or date fields – may require a little extra work.
“There and back again” to the original example with Frodo, you may have noticed the ‘Age’ column (yes, Frodo was 50 years old when he leaves on his adventure). Here is the definition used for the transformation shown at the beginning.
{
    "$schema": "https://developer.microsoft.com/json-schemas/sp/v2/column-formatting.schema.json",
    "elmType": "span",
    "txtContent": "@currentField.displayValue",
    "style": {
        "font-family": "Luminari, Papyrus, Brush Script MT",
        "font-size": "28px",
        "text-align": "center"
    }
}
Raw value vs Display value
Notice how it’s using that displayValue property of @currentField? We could have simply done like in the original example and simply referenced the @currentField and have gotten away with it except that it would only display the raw numeric value, such as 1234 (sans comma).
By adding the additional property, we’re telling SharePoint to “give us the text as you would have displayed it”. For Frodo, there’s no noticeable change, but once we get to some of the longer lived folk in Middle Earth we’ll see the difference.
Here’s a before-and-after of what we get if we omit the property and when we include it…

It’s a subtle but impactful difference.
Font styling
You’ll also see that we’re not using the standard font to display our age. We can use the CSS ‘font-family’ property to use a non-standard font. In this sample, we’ve suggested three different styles of font to use. The browser will attempt to use them in the order specified, falling back to the next on the list if it doesn’t know about the first. Not all fonts or font-families may be supported and it’s a bit of trial-and-error to find the right one. In general, stick “Web Safe Fonts” and you’ll be alright.
Working with People fields
Like with number fields, people fields also have a set of extra properties we can use to display different things related to our people. Below is a complete example of a user object.
{
   "id": "122",
   "title": "Kalya Tucker",
   "email": "kaylat@contoso.com",
   "sip": "kaylat@contoso.com",
   "picture": "https://contoso.sharepoint.com/kaylat_contoso_com_MThumb.jpg?t=63576928822",
   "department":"Human Resources",
   "jobTitle":"HR Manager"
}
From this, we can see that that user’s display name – Kayla Tucker – is stored in the title property and the URL for their profile picture is stored in the “picture” property.
We can use that knowledge (and some CSS) to turn the standard people picker into something with a little more flair.

Here’s the JSON definition.
{
  "$schema": "https://developer.microsoft.com/json-schemas/sp/v2/column-formatting.schema.json",
  "elmType": "div",
  "style": {
    "display": "flex",
    "flex-direction": "column"
  },
  "children": [
    {
      "elmType": "img",
      "attributes": {
        "src": "@currentField.picture",
        "class": "ms-borderColor-themePrimary"
      },
      "style": {
        "border-width": "5px",
        "border-style": "solid",
        "border-radius": "15px"
      }
    },
    {
      "elmType": "div",
      "txtContent": "@currentField.title",
      "style": {
        "margin": "auto",
        "font-family": "Luminari, Papyrus, Brush Script MT",
        "font-size": "1.25em"
      }
    }
  ]
}
Our schema defines a parent div with two child elements: an img element and another div for our text.
Our image element has an attributes property, which is an object that has two properties defined: src & img.
The src property, which is required for all img elements, tells SharePoint where to find the image, which we’re specifying as the location for the picture property of the user field.
The other property, class, is available for all elements and allows us to specify a particular CSS class to the element. In this case, we’re telling it to use one of the built-in CSS classes available in SharePoint. Using these, we can support using theme colors without worrying about what happens when someone changes the current theme.
Working with expressions
There will be plenty of cases where we need to use some programmatic logic to accomplish your goals. Let’s look at our “Race” column example.
Among members of the Fellowship of the Ring are representatives of five of the different races that populate Middle Earth: Ainur, Elf, Dwarf, Human and Hobbit.
We have a choice column to represent the valid options for our members but, rather than simply display the name of the race, let’s see how we make the following transformation.

Here’s the definition:
{
    "$schema": "https://developer.microsoft.com/json-schemas/sp/v2/column-formatting.schema.json",
    "elmType": "img",
    "style": {
        "width": "48px"
    },
    "attributes": {
        "src": "=@currentWeb + '/SiteAssets/RaceIcons/' + @currentField + '.svg'",
        "alt": "@currentField"
    }
}
We’ve taken some images, which were found – and purchased – a website (there’s a link included in the resources section at the end of this post), and uploaded them into a folder named “RaceIcons” inside of the standard Site Assets library on my SharePoint site. They’re also named exactly the same as the available choices in the Race field on our list.
By structuring my pictures in this way, I can use an Excel-style expression to display the right image for the selected race with little effort.
Working with multi-valued fields
Many fields in SharePoint allow the selection of multiple values, such as lookups, people and choice columns. In these cases, we need to use a special attribute named forEach.
Let’s look at our Weapons multi-choice field transformation to see how this works. Perhaps my favorite character to see battling it out on screen was Gandalf. Watching him swinging a sword and staff around was really exciting, so we’ll use him as our example.

Here’s our definition.
{
    "$schema": "https://developer.microsoft.com/json-schemas/sp/v2/column-formatting.schema.json",
    "elmType": "div",
    "children": [{
        "forEach": "weapon in @currentField",
        "elmType": "img",
        "attributes": {
            "src": "=@currentWeb + '/SiteAssets/WeaponIcons/' + [$weapon] + '.svg'",
            "alt": "[$weapon]"
        },
        "style": {
            "display": "flex",
            "height": "32px",
            "margin": "auto"
        }
    }]
}
Like the previous example, we’ve loaded up some images in well-known location, and we’ve made sure that we’ve named our image files the same as the corresponding choices available in the choice field.
What’s special here is the use of the forEach attribute. The value “weapon in @currentField” tells SharePoint “Hey, for each selected option, create a copy of this element”; in this case, our image element.
You’ll also notice that in our src attribute, instead of using the @currentField built-in, we’re using the [$weapon] variable. Whatever text you put in front of “in @currentField” will be your variable name, so if we had said “thing in @currentField”, our variable would be [$thing].
Dealing with conditions
Plenty of times, you’ll want to render things differently based on certain conditions. SharePoint offers a lot built-in support for conditional formatting if all you need to do is change the text or background color. A common example would be to set the background or font color of a “Due Date” field to red if the date has passed.
If you need something more, though, we can use the if function in an expression in our custom formatting.
In our example, the Role field is a simple text field used to describe what role the member had within the group, but rather than display that text we want to display a different Fabric icon depending on the role.

And here’s the definition.
{
    "$schema": "https://developer.microsoft.com/json-schemas/sp/v2/column-formatting.schema.json",
    "elmType": "div",
    "style": {
        "width": "48px",
        "height": "48px",
        "font-size": "32px",
        "background-color": "green",
        "color": "white"
    },
    "children": [{
        "elmType": "div",
        "style": {
            "margin": "auto"
        },
        "attributes": {
            "iconName": "=if(@currentField == 'Ring-bearer', 'StatusCircleRing', if(@currentField == 'Guardian', 'Shield', if(@currentField == 'Melee', 'DecisionSolid', 'Bullseye')))"
        }
    }]
}
For the iconName property value, we’re using an if expression to walk through the possible conditions until we find the right one.
The if expression is straightforward: if( <condition to evaluate>, <value if true>, <value if false>). Where it gets a little difficult is when you have multiple conditions, like we do in our example.
In our example, all but the last condition have another if statement for the “value if false” part. To read our statement in English would go something like this:
“If ‘role’ is equal to ‘Ring-bearer’, then use the ‘StatusCircleRing’ icon. Otherwise, if ‘role’ is equal to ‘Guardian’, then use the the ‘Shield’ icon. Otherwise, if ‘role’ is equal to ‘Melee’, then use the ‘DecisionSolid’ icon. Otherwise, just use the ‘Bullseye’ icon”.
A final example
For our final example, we’ll look at the last column in our list: From.
The From column is a lookup column that references list items in a Middle Earth Locales list.

And the definition…
{
    "$schema": "https://developer.microsoft.com/json-schemas/sp/v2/column-formatting.schema.json",
    "elmType": "div",
    "style": {
        "display": "flex",
        "flex-direction": "column",
        "text-align": "center",
        "font-family": "Luminari, Papyrus, Brush Script MT",
        "font-size": "18px"
    },
    "children": [{
            "elmType": "img",
            "attributes": {
                "src": "=@currentWeb + '/SiteAssets/MiddleEarthLocales/' + @currentField.lookupValue + '.jpg'"
            },
            "style": {
                "height": "48px",
                "width": "48px",
                "border-width": "3px",
                "border-style": "solid",
                "border-color": "=if(@currentField.lookupValue == 'The Shire', 'brown', if(@currentField.lookupValue == 'Rivendell', 'purple', if(@currentField.lookupValue == 'Osgiliath', 'grey', if(@currentField.lookupValue == 'Mirkwood Forest', 'green', if(@currentField.lookupValue == 'Blue Mountains', 'blue', 'gold')))))",
                "border-radius": "100px"
            }
        },
        {
            "elmType": "div",
            "txtContent": "@currentField.lookupValue"
        }
    ]
}
There’s not much new in this example, aside from the use of a lookup field and its lookupValue property to display the value (there’s also a lookupId property available, if you need it) but it does illustrate how we can take all of the previous tactics to create something unique.
One DOES simply create awesome list visuals
We’ve been through all of our columns and we’ve covered all of the basic building blocks for creating amazing visuals and really spicing up the life of our list data, creating a great little breakdown of information related to members of the Fellowship with interesting visuals and colors.

Now that you’ve seen it all come together, time to get out there and start your own journey!
Additional Resources
While this post was pretty long, it still couldn’t quite cover everything out there. Below are some additional resources you may find useful.
Examples Repository (github.com) – My repository containing all of the JSON definitions shown in this blog, as well as a PnP provisioning template you can use to provision everything.
Use column formatting to customize SharePoint | Microsoft Docs – The official documentation for custom column formatting.
Flicon – Fluent UI Icon Search – A super handy tool for finding the right Fabric UI icon.
SharePoint List Formatting Samples (pnp.github.io) – A PnP community driven repository of custom column & view formatting samples. A great place to go to get inspired, or look for other samples if Hobbits aren’t your thing.
Iconfinder.com – This is the site I used to purchase the icons shown for weapons and races.


Recent Comments