by Contributed | Mar 22, 2021 | Technology
This article is contributed. See the original author and article here.
By Tejas Shinde
JMeter is quite a versatile tool when it comes to Load Testing. Developers can use it to simulate various usage patterns; it also has various plugins that enable it to manipulate these usage patterns.
When we want to simulate the application load by using APIs, we think about targeted throughput. In such scenarios, typically, we want to load the system with specific throughput (requests per second) for a specified duration.
In this post, we will take a look at some JMeter plugins that we can use for controlling throughput and ways to use these plugins more efficiently.
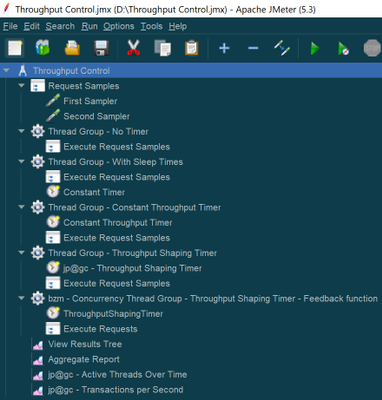
We will use the following JMeter plugins for this example:
- Dummy sampler – To simulate request samplers
- 3 Basic Graphs – To monitor the active threads and transaction rate (throughput)
- Custom Thread Groups – For Concurrency Thread Group
In the following example, we will try to simulate the load of ~20 req/sec. There are various ways you can control the rate at which you can generate the requests; the most commonly used ways are either introducing think time in between the requests or using any of the throughput controllers. The JMX solution can be found at the bottom of this article
Every thread group uses the same two samplers that are under the Test Fragment “Request Samples” using the module controllers.
For “First Sampler”, response time is set to “${__Random(3000,5000)}” and for “Second Sampler” it is set to “${__Random(5000,10000)}”
Throughout this test plan, all the thread groups are set to use 500 threads. And will be executed for ~5 minutes. Typically, the total number of threads needed to achieve a throughput can be calculated by using the following formula Throughput * Avg. Response Time / 1000. To be on the safer side, instead of Avg. Response Time, we use Maximum Response Time in the formula. However, for demo purpose, we are going to use 500 as thread count in the below examples
We will discuss the following cases:
- Without any throughput controlling measures
- With sleep time (Using Constant Timer)
- With Constant Throughput Timer
- With Throughput Shaping Timer
- With Concurrency Thread Group with Throughput Shaping Timer
Case 1: Without any throughput controlling measures
In this case, no throughput controlling is introduced. This gives us a rough idea about how much throughput we can achieve with 500 threads without having any throughput control.

Results:
When we run this thread group, the following are the results of the Aggregate Report:

In my case, JMeter was able to generate 81.2 requests/sec. (It may differ in your case based on the various factors)
Throughout the execution, 500 threads were active and sending the requests.
|
Throughput graph looks consistently distributed
|

|

|
As we can see, without using any throughput controlling measures, 81.2 req/sec were generated using 500 threads.
Case 2: With sleep time (Using Constant Timer)
In this case, throughput will be controlled by introducing sleep time in between threads. In this example, a Constant Timer with 15000 milliseconds is used for sleep time. You may need to try it out in a few runs to find the optimum value of sleep time to get the desired throughput.

Results:

Throughout the execution, 500 threads were active and sending the requests.
|
As we used sleep times, request generation happens in bursts where throughput will be balanced as a result of sleep times
|

|

|
Case 3: With Constant Throughput Timer
In this scenario, we will use Constant Throughput Timer. This timer will also work similarly to that of Constant Timer. It will pause the threads based on periodically based on the current value of throughput to match up the target throughput value. In this case, an advantage will be sleep time will be calculated automatically based on the target value.

*Note that the throughput value is in terms of req/min
Results:

Throughout the execution, 500 threads were active and sending the requests.
|
Throughput graph looks very much similar to the graph from the previous case, where we manually paused the threads
|

|

|
Case 4: With Throughput Shaping Timer
In this case, we are using a JMeter plugin – Throughput Shaping timer. This plugin also works similarly to Constant Throughput Timer, which pauses the threads based on the target Throughput. However, a couple of advantages are the request bursts are more consistent in nature, and the samples lie very close to the median value, as can be seen in the throughput graph. Also, this plugin will allow us to simulate various levels of throughput values over a period of time which is not possible in the case of Constant Throughput Timer as it can target only a specific value.

Results:

Throughout the execution, 500 threads were active and sending the requests.
|
With Throughput Shaping Timer, the graph looks more consistent, and the sample’s distribution is close to the median value of the throughput, which has been set as a target
|

|

|
Case 5: With Concurrency Thread Group with Throughput Shaping Timer
So far, in all of the previous cases, we have used 500 threads to generate the throughput of 20 req/sec. Depending upon the total number of requests and response time of those requests, it will be quite a calculation to identify the optimum number of thread count that is needed to generate the target output. In cases where the response time is quite low, we will need much less than 500 threads to generate that throughput. And similarly, in situations where response time is high, we may need more than 500 threads to generate the desired throughput.
To calculate the number of threads that are needed to generate the target throughput, we will use another plugin from JMeter in conjunction with Throughput Shaping Timer. Also, to generate the minimum amount of threads, we will use the Schedule Feedback function from JMeter, which will define the number of threads that should be running concurrently to generate the target throughput.
Following is the Concurrency Thread Group, which is from the “Custom Thread Groups” plugin. Target concurrency is defined using the feedback function that will work based on the feedback from Throughput Shaping Timer to provide the latest count of threads that are needed to achieve the target of the Throughput Shaping Timer.

Feedback function parameters can be explained as follows:
- ThroughputShapingTimer – Name of the element. In this case, the name of the Throughput Shaping Timer
- 5 – Number of threads at the start
- 500 – Maximum allowed threads
- 10 – Number of spare threads in the pool

Results:

So as you can see, by using less than 180 threads, we were able to generate a throughput of 19.1 (It’s less than 20 as a result of throughput ramp up and ramp down steps defined in Throughput Shaping Controller).
Maximum threads used during this run were less than 180.
|
Maximum threads used during this run were less than 180.
|

|

|
Caution:
- While using the concurrency thread group with Throughput Shaping Timer, makes sure that you specify the sufficient number of threads as if the number is not high, the plugin will show a warning message in the logs stating that there are not enough threads available in the pool to generate the target throughput
- Similarly, make sure that the specified thread count is not too high as it may result in a spike in throughput at the end of the test (as seen in the above throughput graph) while JMeter is shutting all the threads
Conclusion
Hopefully, this post has helped you learn how to control the throughput in your Load Test project by using the mentioned plugins. Please find references to the plugins and manual from JMeter below. You can also find an attachment containing the scenario that was used to write this article (JMX file).
Please leave us any questions or comments too. Thanks for reading!
References:
Attachment:
by Contributed | Mar 22, 2021 | Technology
This article is contributed. See the original author and article here.
Every year, for a number of years, Excel fans around the world test and develop their financial modeling skills through rounds of innovative challenges starting in the second half of the calendar year. The final round, usually towards the end of the year, tests the participants’ speed, ng theory, data and risk competence, and more—all on Excel. Read more here and here.
This year, Excel fans can get started earlier in the Financial Modeling World Cup (FMWC). FMWC started in January 2021, with monthly stages throughout the year. Each stage takes 2 hours to complete, over the span of 2 days. Read more about rules and schedules on the FMWC website.
“Financial Modeling World Cup brings together Excel users from all over the world, providing everyone an exceptional opportunity to promote their personal brand,” Andrew Grigolyunovich, CFA, FMWC Chairman
Stage 3 of FMWC is coming up on March 26-29. Register today to get started.
by Contributed | Mar 22, 2021 | Technology
This article is contributed. See the original author and article here.
You are reading the March issue of the Infrastructure + Security: Noteworthy News series! As a reminder, the Noteworthy News series covers various areas, to include interesting news, announcements, links, tips and tricks from Windows, Azure, and Security worlds on a monthly basis.
New region added to Azure HDInsight
Azure HDinsight is now generally available in UAE Central
Announcing Az Predictor
The Azure PowerShell modules expose over 4,000 cmdlets and, on average, ten parameters per cmdlet. Experienced PowerShell users will find the right cmdlet and parameter to achieve their goal but this can be more complicated for casual users.
Announcing Azure PowerShell 5.0
A major version is an opportunity to introduce several improvements that may not be compatible with the scripts that you have developed with a previous version. As always, we recommend that you read the migration guide to measure the impact of this new version on your environment. Az 5.0 introduces the following fundamental changes:
- Updated authentication
- A security update for Az.KeyVault
- Improved support for ACR (Azure Container Registry) and AKS (Azure Kubernetes Service)
- New default behaviors for Az.KeyVault and Az.Functions
Leveling Up Your Azure SQL Database Deployments | Data Exposed: MVP Edition
The Basic, Standard, and Premium service tiers fulfill a lot of customers’ needs. For some customers, though, the General Purpose, Business Critical, and Hyperscale service tiers offer additional performance and ability that is required for certain workloads. Even if you don’t require those abilities, the technology and infrastructure behind these are worth learning about! In this episode with Matt Gordon, we’ll discuss those service tiers as well as discussing the differences between Provisioned and Serverless deployments on the General Purpose tier. Come learn how to ramp up your Azure SQL Database experience!
AD Explorer v1.50, Disk Usage v1.62, VMMap v3.31 and Sysmon v12.02
- AD Explorer v1.50 – This release of AdExplorer, an Active Directory (AD) viewer and editor, adds support for exporting data from the “Compare” dialog and is now available for x64 and ARM64.
- Disk Usage v1.62 – This release of Disk Usage (DU), a tool for viewing disk usage information, now also accounts for the MFT (Master File Table), removes the MAX_PATH limitation and is now available for ARM64.
- VMMap v3.31 -This update to VMMap, a utility that reports the virtual memory layout of a process, fixes a Thread Environment Block bug on Windows 10 systems.
- Sysmon v12.02 – This update to Sysmon fixes several configuration parsing bugs.
- ARM64 ports – New ARM64 releases for AdExplorer v1.50 and DU v1.62. Download all ARM64 tools in a single download with the Sysinternals Suite for ARM64.
Announcing Windows Admin Center in the Azure Portal
This new capability allows you to manage the Windows Server OS running on Azure IaaS VMs seamlessly and at a more granular level. This in-built functionality provides the opportunity for greater oversight of your workloads right from the Azure Portal.
PowerShell support for Server Migration with Azure Migrate is now generally available
Automate migration of VMware virtual machines to Azure using Azure Migrate and Azure PowerShell.
Microsoft Endpoint Manager announces two new partner-led workshops
Microsoft is excited to announce the launch of two new partner-led workshops: Endpoint Management Workshop and Secure Work from Anywhere Workshop. Both workshops introduce customers to the core components of Microsoft 365 as the critical first step on the path to digital transformation.
Year two: Extended Security Updates for Windows 7 and Windows Server 2008
The Extended Security Update (ESU) program is a last resort for customers who need to run certain legacy Microsoft products past the end of support. Support for the following versions of Windows and Windows Server ended on January 14, 2020:
- Windows 7 SP1
- Windows 7 Professional for Embedded Systems
- Windows Server 2008 R2 SP1 and Windows Server 2008 SP2
- Windows Server 2008 R2 SP1 for Embedded Systems and Windows Server 2008 SP2 for Embedded Systems.
What’s new for IT pros in Windows 10, version 20H2
Windows 10, version 20H2 is now available through Windows Server Update Services (WSUS) and Windows Update for Business, and can be downloaded today from Visual Studio Subscriptions, the Software Download Center (via Update Assistant or the Media Creation Tool), and the Volume Licensing Service Center[1]. Today also marks the start of the 30-month servicing timeline for this Semi-Annual Channel release.
Simplifying on-premises deployment of servicing stack updates
To keep devices up to date, IT administrators who manage devices using on-premises methods must select and deploy the correct servicing stack update (SSU) with the latest cumulative update (LCU). In some cases, a specific version of the SSU must already be installed in order to install the latest LCU. If the device in question does not have the required SSU already installed, the LCU will fail to install.
What’s new in Azure Security Center- Oct 2020
Security Center is in active development and receives improvements on an ongoing basis. To stay up to date with the most recent developments, this page provides you with information about new features, bug fixes, and deprecated functionality.
Container Image Scanning Notification Playbook
Azure Container Registry (ACR) is a managed, private Docker registry service that stores and manages your container images for Azure deployments in a central registry. Azure Defender for container registries brings deeper visibility into the vulnerabilities effecting the container image. It scans every image for vulnerabilities and provides security recommendations using an integrated scanner powered by Qualys, the industry-leading vulnerability scanning.
Updates and Support Lifecycle |
Release information for updates to Microsoft 365 Apps
New Release notes for Microsoft 365 Apps for Enterprise (Previously Office 365 Pro Plus).
Azure Time Series Insights Gen2 Preview APIs Deprecated
The Azure Time Series Insights Gen2 public preview APIs have been deprecated. Read about the process for migrating onto the new generally available API version for Azure Time Series Insights Gen2.
Power BI dynamic M query parameter support
Power BI dynamic M query parameter allows users to explicitly inject filters at the designated place in the query and improve query performance by a few factors, especially when the report is built on top of a very big dataset, or using complex query logic.
Check out Microsoft Services public blog for new Proactive Services as well as new features and capabilities of the Services Hub, On-demand Assessments, and On-demand Learning platforms.
Thanks for reading!
Henry Phiri
Justin Barbalace
by Contributed | Mar 22, 2021 | Technology
This article is contributed. See the original author and article here.
If you are trying to setup Always On availability group between SQL instances deployed as SQL containers on Kubernetes platform, then I hope that this blog provides you the required reference to successfully setup the environment.
Target:
By end of this blog, we should have three SQL Server instances deployed on the Kubernetes aka k8s cluster. With Always On availability group configured amongst the three SQL Server instances in Read scale mode. We will also have the READ_WRITE_ROUTING_URL setup to provide read/write connection redirection.
References:
Refer Use read-scale with availability groups – SQL Server Always On | Microsoft Docs to read more about read scale mode.
To prepare your machine to run helm charts please refer this blog where I talk how you can setup your environment including AKS and preparing your windows client machine with helm and other tools to deploy SQL Server instances on AKS (Azure Kubernetes Service).
Environment layout:
1) To set this environment up, in my case I am using Azure Kubernetes Service as my Kubernetes platform.
2) I will deploy three SQL Server container instances using helm chart in a Statefulset mode you can also deploy this even using deployment mode.
3) I will use T-SQL scripts to setup and configure the always on availability group.
Let’s get the engine started:
Step 1: Using helm deploy three instances of SQL Server on AKS with Always on enabled and create external services of type load balancer to access the deployed SQL Servers.
Download the helm chart and all its files to your windows client, switch to the directory where you have downloaded and after you have done modification to the downloaded helm chart to ensure it is as per your requirement and customization, deploy SQL Servers using the command as shown below, you can change the deployment name (“mssql”) to anything that you’d like.
helm install mssql. --set ACCEPT_EULA.value=Y --set MSSQL_PID.value=Developer
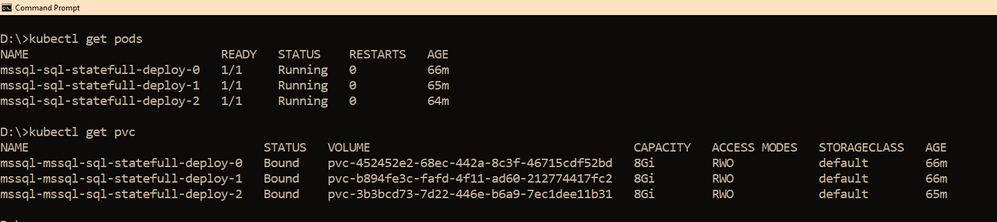
Within few minutes, you should see the pods coming up, the number of pods that would be started depends on the “replicas” value you set in the values.yaml file, if you use it as is, then you should have three pods starting up, as the replicas value is set to three. So you have three SQL Server instances using its own pvc’s up and running as shown below
We also need a way to access these SQL Servers outside the kubernetes cluster, and since I am using AKS as my kubernetes cluster, to access the SQL Server instances, we have created three services one each for the SQL Server pod. The yaml file for the services is also shared with the helm chart under the folder “external services” and the yaml file name is : “ex_service.yaml”. If you are using the sample helm chart, you can create the services using the command shown below:
kubectl apply -f "D:helm-chartssql-statefull-deployexternal servicesex_service.yaml"
Apart from the three external services, we will also need the pods to be able to talk to each other on port 5022 (default port used by AG for endpoints on all the replicas) so we create one clusterip service for each pod, the yaml file for this is also available in the sample helm chart under the folder “external services” and the file name is “ag_endpoint.yaml”. If you have not made any changes then you can create the service using the command:
kubectl apply -f "D:helm-chartssql-statefull-deployexternal servicesag_endpoint.yaml"
If all the above steps are followed you should have the following resources in the kubernetes cluster: 
Note: On our cluster, we already have a secret created to store sa password using the command below, the same sa password is being used by all the three SQL Server instances. It is always recommended to change the sa password after the SQL container deployment so the same sa password is not used for all three instances.
kubectl create secret generic mssql --from-literal=SA_PASSWORD="MyC0m9l&xP@ssw0rd"
Step 2: Create Certificates on primary and secondary replicas followed by creation of endpoints on all replicas.
Now it’s time for us to create the certificate and endpoints on all the replicas. Please use the External IP address to connect to SQL Server primary instance and run the below T-SQL command to create the certificate and endpoint.
--In the context of master database, please create a master key
use master
go
CREATE MASTER KEY ENCRYPTION BY PASSWORD = '<'mycomplexpassword'>';

--under the master context, create a certificate that will be used by endpoint for
--authentication. We then backup the created certificate
-- to copy the certificate to all the other replicas

CREATE CERTIFICATE dbm_certificate WITH SUBJECT = 'dbm';

BACKUP CERTIFICATE dbm_certificate TO FILE = '/var/opt/mssql/data/dbm_certificate.cer'
WITH PRIVATE KEY ( FILE = '/var/opt/mssql/data/dbm_certificate.pvk',ENCRYPTION BY PASSWORD = '<'mycomplexpassword'>');

--Now create the endpoint and authenticate using the certificate we created above.
CREATE ENDPOINT [Hadr_endpoint]
AS TCP (LISTENER_PORT = 5022)
FOR DATABASE_MIRRORING
(
 ROLE = ALL,
 AUTHENTICATION = CERTIFICATE dbm_certificate,
 ENCRYPTION = REQUIRED ALGORITHM AES
);
ALTER ENDPOINT [Hadr_endpoint] STATE = STARTED;
On the primary SQL Server instance pod, we should have the dbm_certificate.pvk and dbm_certificate.cer files at the location : /var/opt/mssql/data. As shown below
We need to copy these files to the other pods, you can use the kubectl cp commands to copy from the primary pod to your local client and then from the local client to the secondary pods. Sample commands are shown below
--Please ensure on the local machine you create the certificates folder and then run the --below command to copy the files from primary pod to the local machine
kubectl cp mssql-sql-statefull-deploy-0:/var/opt/mssql/data/dbm_certificate.pvk "certificatepvk"
kubectl cp mssql-sql-statefull-deploy-0:/var/opt/mssql/data/dbm_certificate.cer "certificatecer"
--Now copy the files from the local machine to the secondary pods
kubectl cp "certificatecerts" mssql-sql-statefull-deploy-1:/var/opt/mssql/data/dbm_certificate.cer
kubectl cp "certificatepvk" mssql-sql-statefull-deploy-1:/var/opt/mssql/data/dbm_certificate.pvk
kubectl cp "certificatecerts" mssql-sql-statefull-deploy-2:/var/opt/mssql/data/dbm_certificate.cer
kubectl cp "certificatepvk" mssql-sql-statefull-deploy-2:/var/opt/mssql/data/dbm_certificate.pvk
Post this the files should be available on every pod as shown below
Please create the certificates and endpoints on the secondary replica pods by connecting to the secondary replicas and running the below T-SQL commands:
--Run the below command on secondary 1&2 : mssql-sql-statefull-deploy-1 & mssql-sqlstatefull-deploy-2
--once the cert and pvk files are copied create the cert here on secondary and alsocreate the endpoint

CREATE MASTER KEY ENCRYPTION BY PASSWORD ='<'mycomplexpassoword'>';

CREATE CERTIFICATE dbm_certificate FROM FILE =
'/var/opt/mssql/data/dbm_certificate.cer'
WITH PRIVATE KEY ( FILE = '/var/opt/mssql/data/dbm_certificate.pvk',
DECRYPTION BY PASSWORD = '<'mysamecomplexpassword'>' );

CREATE ENDPOINT [Hadr_endpoint]
AS TCP (LISTENER_PORT = 5022)
FOR DATABASE_MIRRORING (
	    ROLE = ALL,
	    AUTHENTICATION = CERTIFICATE dbm_certificate,
		ENCRYPTION = REQUIRED ALGORITHM AES
		);
ALTER ENDPOINT [Hadr_endpoint] STATE = STARTED;
Step 3: Create the AG on the primary replica and then join the secondary replicas using T-SQL
On the primary replica run the below command to create the AG which has Read_only_routing_list configured and also has Read_write_routing_url configured to redirect connection to primary irrespective of the instance that you connect provided you pass the database name to which you want to connect.
--run the below t-sql on the primary SQL server pod
CREATE AVAILABILITY GROUP MyAg
     WITH ( CLUSTER_TYPE =  NONE )
   FOR
     DATABASE  test
   REPLICA ON
      N'mssql-sql-statefull-deploy-0' WITH
         (
         ENDPOINT_URL = 'TCP://mssql-mirror-0:5022',
         AVAILABILITY_MODE = ASYNCHRONOUS_COMMIT,
         FAILOVER_MODE = MANUAL,
         SEEDING_MODE = AUTOMATIC,
         SECONDARY_ROLE (ALLOW_CONNECTIONS = ALL, READ_ONLY_ROUTING_URL = 'TCP://104.211.231.206:1433' ),
         PRIMARY_ROLE (ALLOW_CONNECTIONS = READ_WRITE, READ_ONLY_ROUTING_LIST = ('mssql-sql-statefull-deploy-1','mssql-sql-statefull-deploy-2'), READ_WRITE_ROUTING_URL = 'TCP://104.211.231.206:1433' ),
         SESSION_TIMEOUT = 10
         ),
         N'mssql-sql-statefull-deploy-1' WITH
         (
         ENDPOINT_URL = 'TCP://mssql-mirror-1:5022',
         AVAILABILITY_MODE = ASYNCHRONOUS_COMMIT,
         FAILOVER_MODE = MANUAL,
		 SEEDING_MODE = AUTOMATIC,
         SECONDARY_ROLE (ALLOW_CONNECTIONS = ALL, READ_ONLY_ROUTING_URL = 'TCP://104.211.203.78:1433' ),
         PRIMARY_ROLE (ALLOW_CONNECTIONS = READ_WRITE, READ_ONLY_ROUTING_LIST = ('mssql-sql-statefull-deploy-0','mssql-sql-statefull-deploy-2'), READ_WRITE_ROUTING_URL = 'TCP://104.211.203.78:1433' ) ,
         SESSION_TIMEOUT = 10
         ),
         N'mssql-sql-statefull-deploy-2' WITH
         (
         ENDPOINT_URL = 'TCP://mssql-mirror-2:5022',
         AVAILABILITY_MODE = ASYNCHRONOUS_COMMIT,
         FAILOVER_MODE = MANUAL,
		 SEEDING_MODE = AUTOMATIC,
         SECONDARY_ROLE (ALLOW_CONNECTIONS = ALL, READ_ONLY_ROUTING_URL = 'TCP://104.211.203.159:1433' ),
         PRIMARY_ROLE (ALLOW_CONNECTIONS = READ_WRITE, READ_ONLY_ROUTING_LIST = ('mssql-sql-statefull-deploy-0','mssql-sql-statefull-deploy-1'), READ_WRITE_ROUTING_URL = 'TCP://104.211.203.159:1433'),
         SESSION_TIMEOUT = 10
         );
GO

ALTER AVAILABILITY GROUP [MyAg] GRANT CREATE ANY DATABASE;
Note: In the above command, please ensure that you pass the service names that you created in step 1 for the enpoint_url and you pass the external IP address of the SQL Server pods when configuring the read_write_routing_url option. Any error here can result in the secondary’s not able to join the AG.
Now on the secondary replicas please run the T-SQL command to join the AG, sample shown below
--On both the secondaries run the below T-SQL commands
ALTER AVAILABILITY GROUP [MyAg] JOIN WITH (CLUSTER_TYPE = NONE);
ALTER AVAILABILITY GROUP [MyAg] GRANT CREATE ANY DATABASE;
The AG should not be configured and the dashboard should look as shown below

Step 4: Read_write_routing_url in action
You can now try connecting to any of the secondary replicas and provide the AG database as the database context, you will automatically get routed to the current primary even without the presence of listener.


As you can see we are connecting to 104.211.203.78 which is the external IP address for pod: mssql-sql-statefull-deploy-1 which is secondary server, but the connection got re-routed to the current primary which is : mssql-sql-statefull-deploy-0 @ 104.211.231.206

To try manual failover, please follow the steps documented here.
Hope this helps!

by Contributed | Mar 22, 2021 | Technology
This article is contributed. See the original author and article here.
Over the past 19 years of the Imagine Cup, we’ve seen student projects encompassing issues in healthcare, accessibility, education, gaming, sustainability, travel, recreation, and beyond. Student ideas are unique in the passion, creativity, and perspective they bring – not just in new ways to solve global problems, but also how to improve our society as a whole and create a brighter and more inclusive future for all. The Imagine Cup aims to give these ideas the foundation, resources, and mentorship to showcase them on a global stage.
Where do our teams go after competing? We caught up with some Imagine Cup alumni from the past few years to find out what they’ve been up to.
Hollo, Hong Kong
2020 Imagine Cup World Champion
Since winning the trophy in 2020, Hollo has been hard at work expanding their business and growing their team. We chatted to Co-founder and CEO, Cameron van Breda, to see how Hollo’s grown across the past year. As a smart AI-powered preventative platform, Hollo’s app aims to improve individual mental health by integrating Machine Learning with suggestive diagnosis, therapy, and continual monitoring.
“{We’ve} been working on researching our AI technology further as well as growing our team and product. We’ve continued to work with local mental health NGOs and professionals to get the app and supporting web-app to be more polished over time.” Cameron shared the team’s 3 biggest achievements from 2020, which include: growing their team to a group of 10 (including data scientists, developers, psychologists, and interns), developing his personal management skills, and securing more business alliances for future projects.
The team also launched a new business under Hollo this year, Blossom, targeted towards enhancing women’s wellbeing. “Blossom was {our} way of testing how we can take the data we’ll have on our users and give them more value and bring them closer together as a community. Our team thought this would be a great experience to bring impact to a space that is really important. Blossom specifically targets helping {women} feel better…whilst building infrastructure as a social enterprise to bring impact to young women with workshops and community events around wellbeing in general.”
As part of their prize for winning the World Championship, the team also had the opportunity to meet with Microsoft CEO, Satya Nadella, earlier this year to receive mentorship and advice. The top takeaway for Hollo? “We took the chance to ask Satya for some feedback on a proposed research collaboration with the Microsoft Research departments that focus on AI. Our vision is to connect researchers from Microsoft, Hollo, and the University of Hong Kong, to create a breeding ground of innovation and application of AI for good. We felt like the values of Microsoft in using AI for increasing accessibility in Healthcare aligned with our goals, and so we opened the door for shared value creation.”

Tremor Vision, United States
2020 Imagine Cup World Finalist
Tremor Vision is a web-based tool that uses Microsoft Azure Custom Vision to enable physicians to detect early onset Parkinson’s disease and quantitatively track patients’ progress throughout a prescribed treatment plan. After competing in the 2020 World Championship, Tremor Vision’s Janae Chan landed a Software Engineering role at Microsoft, and her Imagine Cup experience helped her stand out from the crowd. “It was a good conversation starter and a unique experience for me personally. I was very excited to talk about it. In reviews and recruiting fairs, I would talk about it with passion and kick off conversations that opened opportunities. It makes you memorable. We’re proud of this project and want to share.”
Janae shared that while the team are now all working in separate remote locations and it’s been challenging to grow Tremor Vision the way they wanted over the past year, they still get together virtually to collaborate. “It’s a chatty group, so we’re collaborative online, with lots of ideas flying back and forth. We’re hanging out but also working. We’re night owls and might end up on a long call working and chatting.” Despite the challenges of our current world, Janae has been most excited about the response that Tremor Vision received after competing. “It’s kind of wild. People are reaching out post–Imagine Cup to ask to try Tremor Vision or to help with development. We’ve heard from people with Parkinson’s. We’ve had people from Microsoft reach out internally to team members. We’ve heard from lots of people with family and friends who have Parkinson’s. We had a platform to share and wanted to reach out.”
The team have continued to dig deeper to uncover more ways to make their project beneficial for users: “In further development, we’ve been doing user research and asking people with Parkinson’s what challenges they face, and learning what challenges other people face in taking care of someone with Parkinson’s. It’s a community collaboration effort to reach people. It’s impactful and worthwhile.” Ultimately, the team would like to reach clinical trials with their project to support more Parkinson’s patients.
Other highlights from past competitors
For their 2019 Imagine Cup project, Finderr created an Artificial Intelligence app solution to help visually impaired individuals find lost objects through their phones. Since competing, Finderr has continued working on their project, added new members to their team, and recently launched their iOS app in the App Store.
2018 World Finalists iCry2Talk have also continued to work on their app to translate a baby’s cry, making it available to download and giving numerous presentations since competing, including a TEDXAUTH talk. 2018 World Champions, team smartARM, had the opportunity to share their Machine Learning powered robotic prosthetic hand with Canadian Prime Minister Justin Trudeau.
2016 competitor Petros Psyllos is recognized by American and Polish Forbes in the top 30 brightest young inventors under 30 in Poland. He’s received over 17 main awards at national and international level in the field of invention, and also won a Microsoft Research Special Award.
These are just a few examples out of hundreds of other competitors who continue to innovate, inspire, and impact every day. We’re so glad the Imagine Cup was a part of their journey to make a difference with tech.
Advice for the next Imagine Cup World Champion
Our 2021 World Finalists are currently refining their project pitches for the chance to move forward in the competition. Looking for some preparation advice? Take a World Champion’s top 3 tips from Hollo:
- Keep it simple – the judges may not have tech related backgrounds, so really sell how the innovation simplifies or adds value to whoever it’s benefitting.
- Keep it succinct – you don’t have much time to convey every part of your product and business, so focus on what matters.
- Show how you bring value to users – there are many great ideas and features, but they might not be sustainable as a business. Keep this in mind as you build and pitch! The Imagine Cup is a great experience to compete and gain a funding opportunity to start your business.
Follow the journey of this year’s World Finalists to see who’ll move forward to compete for USD75,000 and mentorship with Microsoft CEO, Satya Nadella. Who will take home the trophy? Stay tuned on Instagram and Twitter.

Recent Comments