by Contributed | Mar 8, 2021 | Technology
This article is contributed. See the original author and article here.
If your organization is using Microsoft 365, you already have Azure Active Directory. It’s the identity platform that provides the authentication of your users’ credentials when they sign and and the authorization to your Microsoft 365 SaaS applications. If you want to then expand your use of Azure, you can take advantage of this existing directory instance, keeping all of your Microsoft services controlled by the same set of credentials. However, that doesn’t mean you should start using Azure Active Directory for your Microsoft 365 user management directly. Let’s explore the differences.
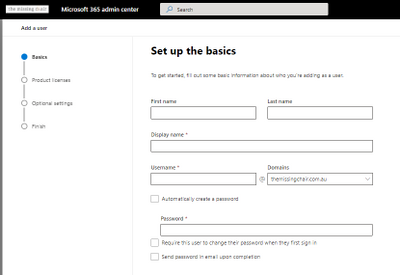
Adding a user
The Microsoft 365 admin center also allows you to set up user templates to help standardize the creation of new user accounts. The template includes their default domain, password settings on creation, location, licenses and apps to be assigned, administrative roles (such as Teams Administrator) and pre-populated profile information like office address. You can set up multiple templates for different scenarios and share them with the other admins.
In Azure Active Directory, you can bulk create user accounts with their information in a correctly formatted .csv file, but you cannot assign them a Microsoft 365 license during the creation process and some of the detailed profile information allowed in Microsoft 365 (such as office address) is also missing during the new user setup process. Microsoft 365 licenses do show up in the Azure Active Directory Licenses pane under All products, and they can be assigned to users there or new licenses bought, but generally you’d do your license management in the M365 admin center.
In both interfaces, you can assign administrative roles (like Billing Administrator or SharePoint Administrator) and add people to groups.
Create a new user with the Microsoft 365 Admin Center
 Creating a new user with Azure Active Directory
But only the Microsoft 365 admin center (and the Exchange admin center via Mailboxes) allow you to manage email aliases – that information appears in the user’s profile in Azure Active Directory in the list of proxy addresses, but it’s a read-only list.
Managing multi-factor authentication for a user from the Microsoft 365 admin center takes us straight to Azure Active Directory’s multi-factor authentication pane, with settings for users and service-wide settings (like trusted IP subnets and available methods).
Adding a guest user in the Microsoft 365 admin center shows you the Azure Active Directory integration – it takes you into the Azure portal and the new user page. If instead you add a guest user via the options inside Teams or SharePoint, the guest user will show up in both the M365 admin center and in the Azure Active Directory Users blade in the Azure portal. This is a great example of one identity system with multiple entry points.
 Adding a new guest user to Microsoft 365 takes you to the Azure Active Directory interface
Deleting a user
An important question for any organisation is “If I delete a user from Microsoft 365, what happens to their data?”, especially if you don’t want that data deleted! This is where the Microsoft 365 admin center is really helpful. Deleting a user takes you through a series of questions and options for their associated data. It’s now more automated than the old manual process of converting the mailbox to be a shared one, then deleting the original user account. The wizard asks if you want to give access to the deleted person’s email to another user (converting it to a shared mailbox), allows you to change the display name, set automatic replies, remove aliases and unassigns licenses. You are also asked if you want to give another user access to OneDrive files for 30days after the user is deleted.
To learn more, visit Remove or delete a former employee.
Delete a user in Azure Active Directory, and you’ll see a Yes/No prompt to confirm. That’s it.
 Azure Active Directory user delete confirmation prompt
Group management
If Azure Active Directory is my Microsoft 365 identity platform, where do I manage my groups? Well, it depends on what kind of group management you are doing. All groups will appear in Azure Active Directory but you can’t use the Azure portal to manage groups synced from an on-premises Active Directory (which must be managed in the on=prem directory) and some group types like distribution lists and mail-enabled security groups (which must be managed in the Microsoft 365 admin center or the Exchange admin center).
As you extend your use of Azure, you might create security groups directly in Azure Active Directory for access to Azure resources and applications, or you might use an existing mail-enabled security group that was created in M365 if it already reflect your organization’s structure – just be mindful where you have to go to make group changes and what resources (in M365 and Azure) that group has access to.
For more information, see:
Manage app and resource access using Azure Active Directory Groups
Manage Microsoft 365 groups
Manage a group in the Microsoft 365 admin center
Other admin centers
The Microsoft 365 admin center also contains links through to product or feature specific admin centers, such as security, compliance, Endpoint Manager, Teams, Yammer, SharePoint, OneDrive and more.
 Microsoft 365 admin center links
PowerShell
Comparing portal experiences is one thing, but what about PowerShell? The answer to this is “yes”!
To start with, there’s the Azure Active Directory PowerShell module (also known as Azure Active Directory PowerShell for Graph or just the AzureAD module) – with cmdlets like Get-AzureADGroup and New-AzureADUser. Learn more at Azure Active Directory PowerShell for Graph.
Then there is also the Microsoft Azure Active Directory Module for Windows PowerShell (whose cmdlets include Msol in their name). At the time of writing, there is some functionality that only exists in this module, and it’s safe (and recommended) to use both. One example of this is Set-MSolUserPrincipalName. Just note that the Microsoft Azure Active Directory Module for Windows PowerShell and those msol cmdlets won’t run on PowerShell version 7 or later or PowerShell Core. For more information, visit Connect to Microsoft 365 with PowerShell.
In addition, Microsoft 365 services may have their own specific PowerShell modules. For example, Exchange Online has a small set of cmdlets optimized for retrieving thousands and thousands of objects as one, with the Exchange Online PowerShell V2 module (also known as EXO V2). That has cmdlets like Get-EXOMailboxStatistics. To learn more, visit About the Exchange Online PowerShell V2 module.
Expanding your use of Microsoft Azure
Your use of Azure Active Directory is often first determined by your existing environment (before you adopted any Cloud services) and the order in which you started using the Cloud.
If you had on-premises Active Directory servers first and then started using Microsoft 365, you may have connected your on-prem AD to Azure Active Directory via Azure AD Connect. In this case, you may primarily be doing your user and group administration in your on-prem AD and syncing those changes to Azure AD. When you want to use resources and services in Azure, use this same directory instance and add your Azure subscriptions. It’s the one place that has your organization’s custom domain name and makes both user management and the end user experience better, as you dont have to manage separate identities for the same person. It also opens up the enhanced security features of Azure Active Directory Premium (like multi-factor authentication) for both your Azure and Microsoft 365 resources, and provides that seamless single sign on experience for your on-premises resources.
If you created Azure resources first as a cloud-native organization, it makes sense to use that same directory instance if you adopt Microsoft 365.
With your Azure subscriptions and resources, it’s a good idea to limit access by using Role-Based Access Control (RBAC) . It’s currently possible (as a preview feature) to use an M365 created mail-enabled security group to assign an Azure AD role to, but there are some limitations and licensing requirements. Also, on-premises groups cannot currently be assigned to Azure AD roles. For more information, visit Use cloud groups to manage role based assignments in Azure Active Directory (preview).
Summary
Azure Active Directory is the underlying platform for Microsoft 365, but there are some administrative functions you need to perform in the Microsoft 365 admin center or with the PowerShell commands for specific Microsoft 365 services. As you look to adopt more Azure-based resources, take a look at how your users and groups are already structured and identify where it makes sense to use these for access to Azure, without creating a separate identity directory. There’s power and simplicity in using your directory for both.
by Contributed | Mar 8, 2021 | Technology
This article is contributed. See the original author and article here.
Today, we had a very interesting service request that our customer requested to improve the process for inserting 10 millions of rows.
In this type of situation, we need to think about the the time spent in networking roundtrips.
In order to explain this I developed three different Powershell Scripts that you could find out in this GitHub repository
- InsertThis, basically is a Powershell command to insert the data and measure the time inserting every single row, using an INSERT command.
- InsertStore, basically is a Powershell command to insert the data and measure the time inserting every row, calling a parametrized query to reduce the amount of bytes sending to database.
- InsertBulk, basically is a Powershell command to insert the data using batches and BulkCopy technology.
In all the tests done, InsertBulk was the process that much faster inserted the data.
Enjoy!
by Contributed | Mar 7, 2021 | Technology
This article is contributed. See the original author and article here.
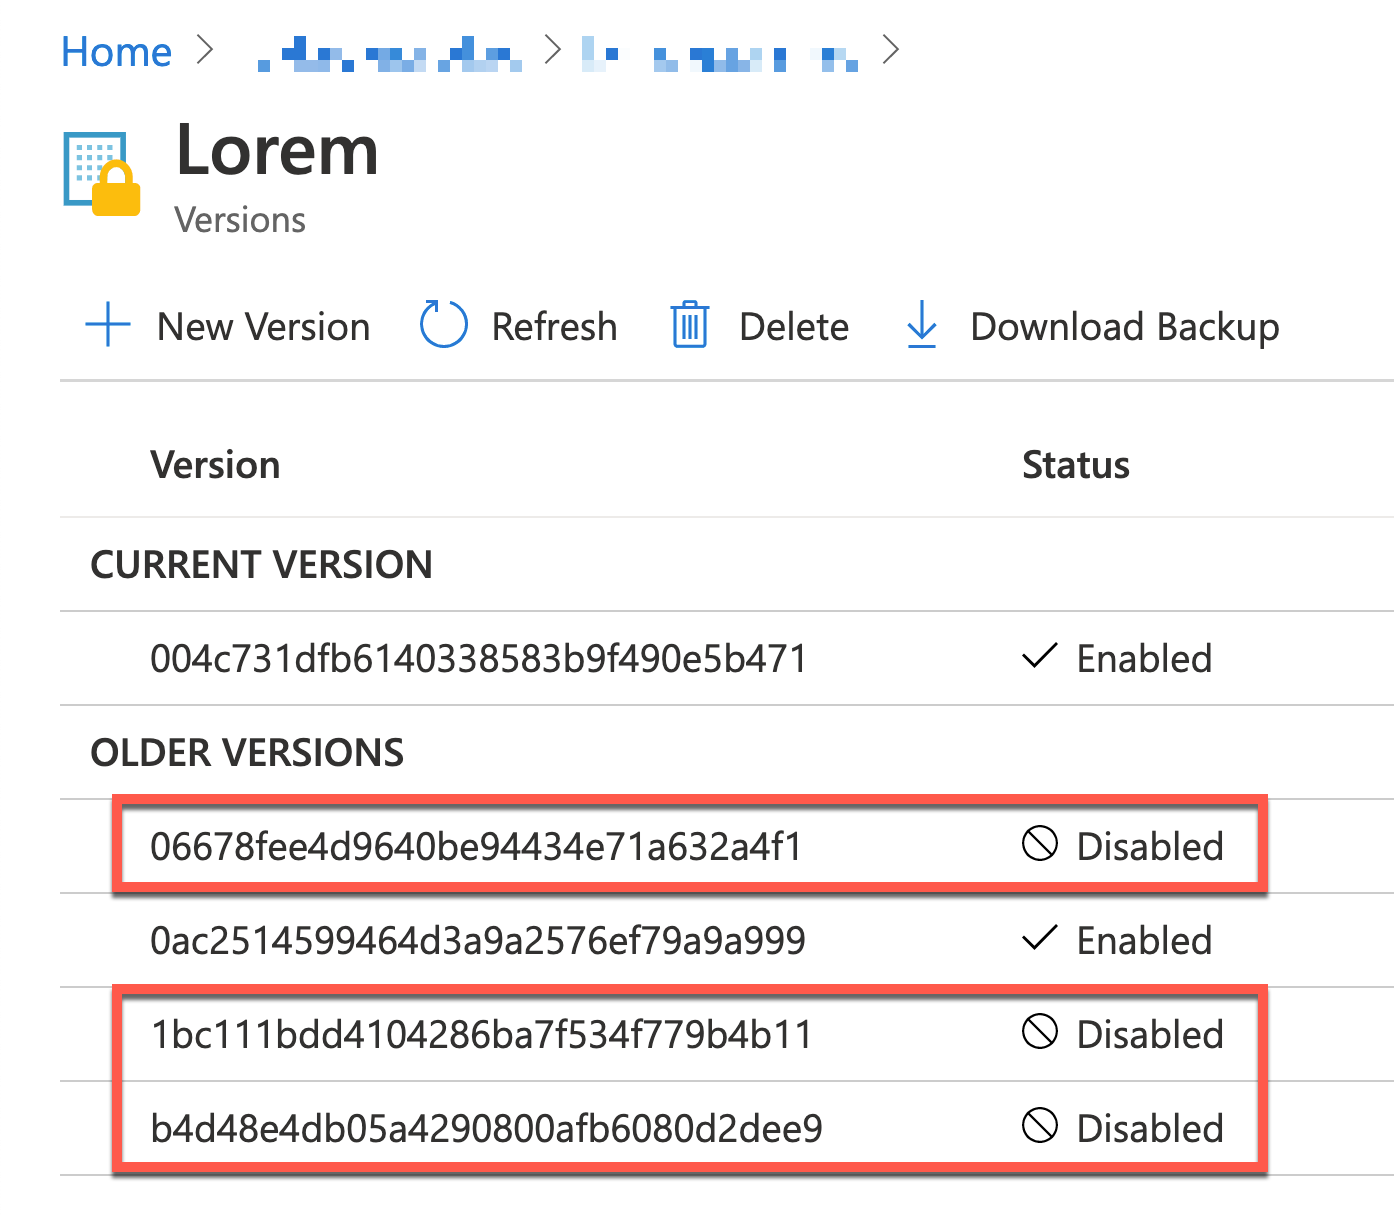
In my previous post, I discussed how all secrets in Azure Key Vault could automatically manage their versions to get disabled. While that approach was surely useful, it sometimes seems overkilling to iterate against all secrets at once. What if you can manage only a certain secret when the secret gets a new version updated? That could be more cost-effective. As an Azure Key Vault instance publishes events through Azure EventGrid, by capturing this event, you can manage version rotation.
Throughout this post, I’m going to discuss how to handle events published through Azure EventGrid and manage secret rotations using Azure Logic Apps and Azure Functions when a new secret version is created.
You can download the sample code from this GitHub repository.
Events from Azure Key Vault
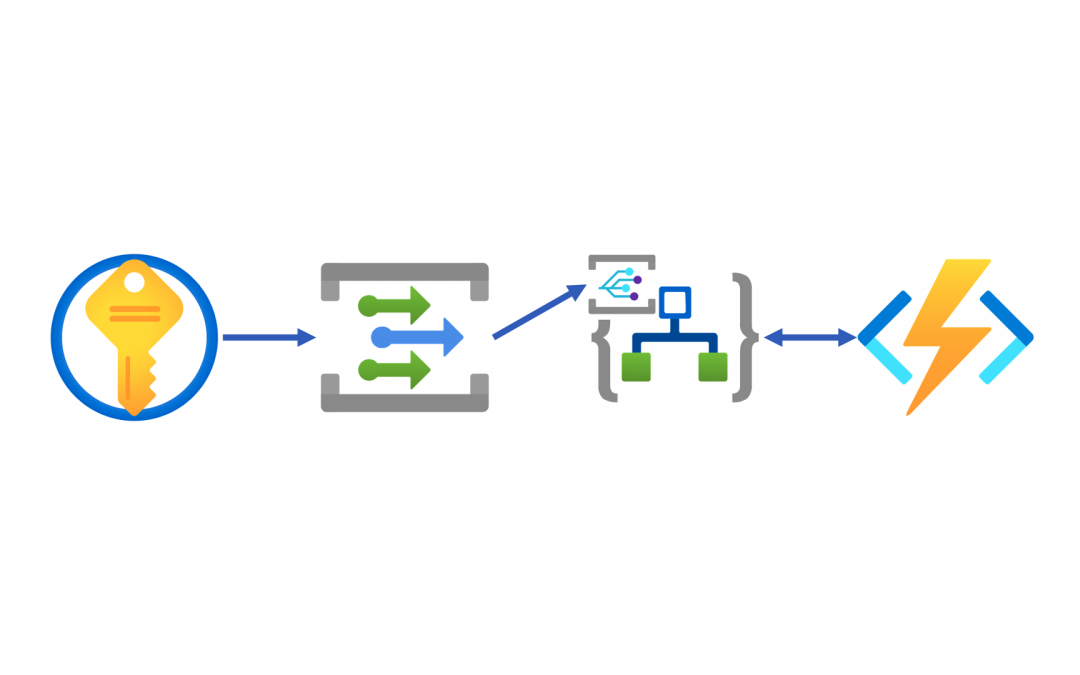
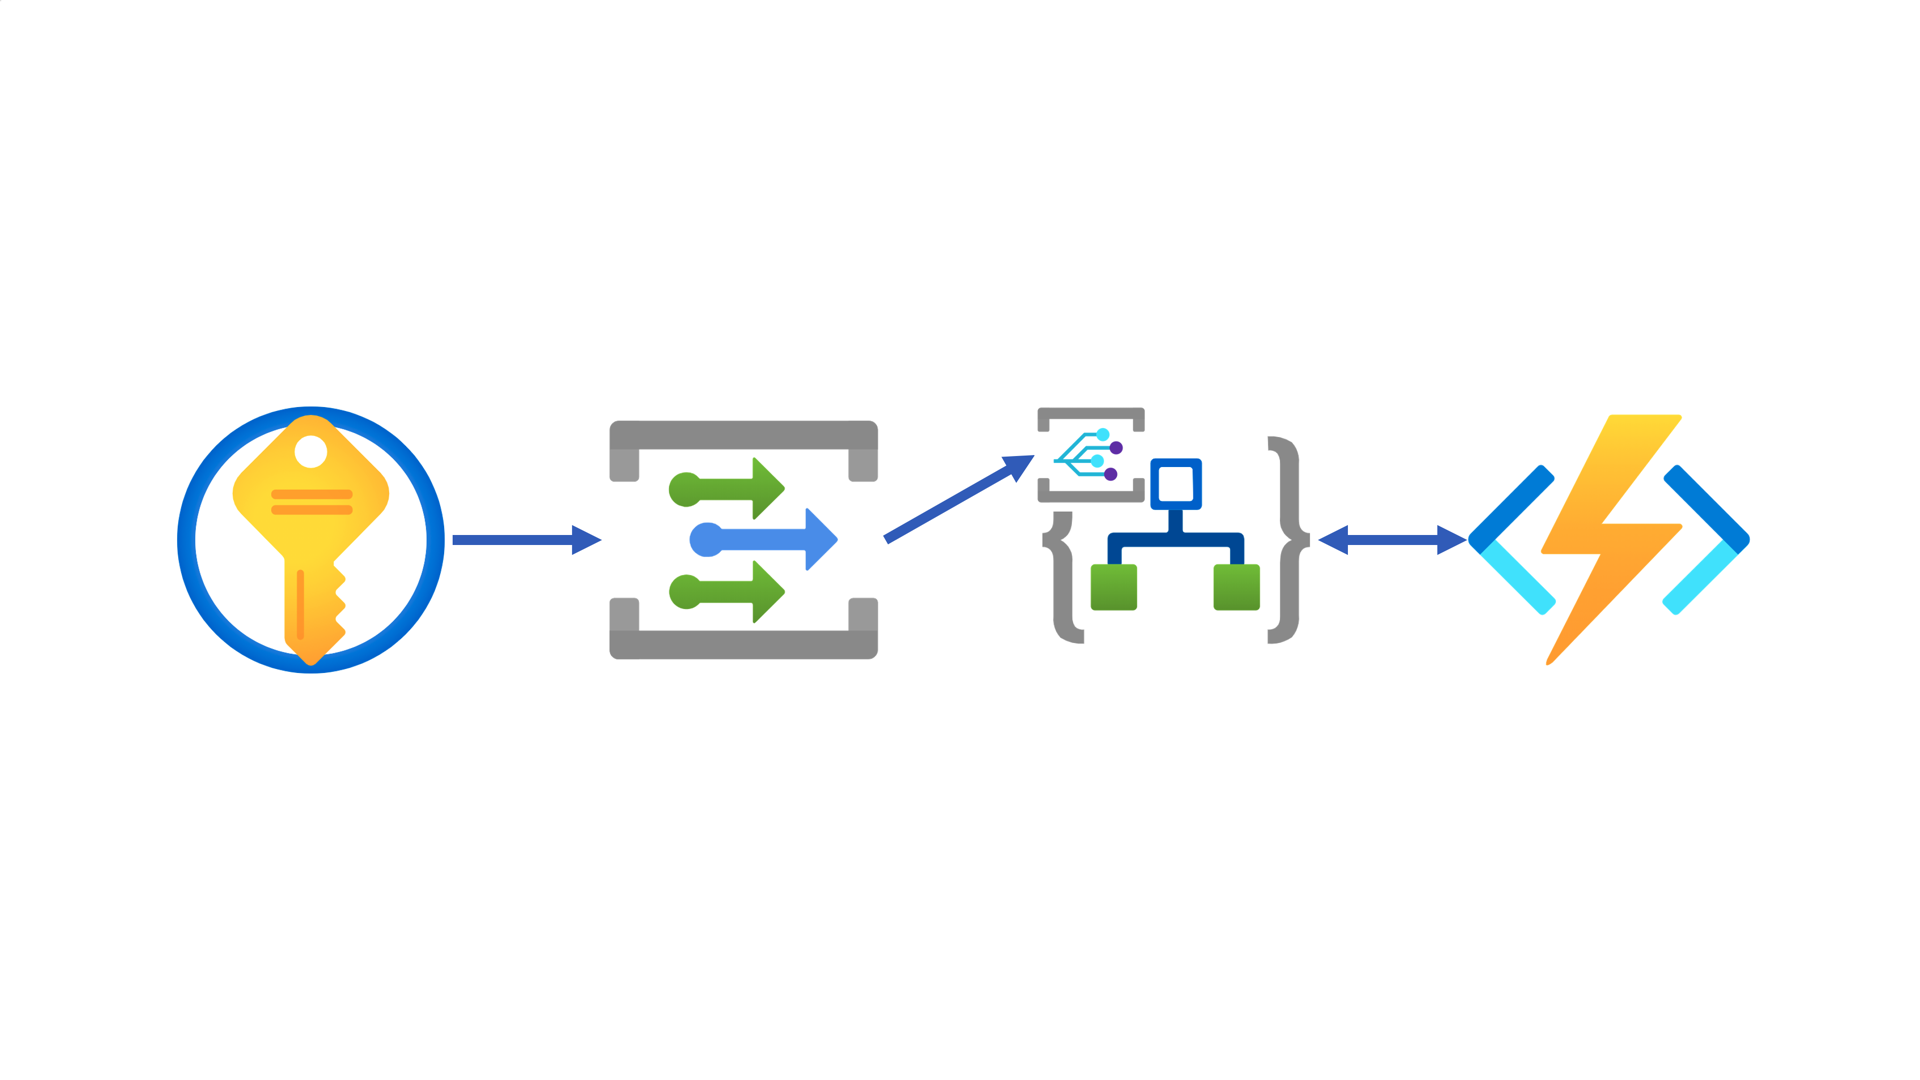
Azure Key Vault publishes events to Azure EventGrid. Whenever a new secret version is added, it always raises an event. Therefore, processing this event doesn’t have to iterate all secrets but focuses on the specific secret, making our lives easier. Here’s the high-level end-to-end workflow architecture using Azure Key Vault, Azure EventGrid, Azure Logic Apps and Azure Functions.
Like I mentioned in my previous post, using Azure Logic Apps as an event handler doesn’t require the event delivery authentication. But if you prefer explicit authentication, please refer to my another blog post.
There are two ways to integrate Azure Key Vault with Azure Logic App as an event handler. One uses the EventGrid trigger through the connector, and the other uses the HTTP trigger like a regular HTTP API call. While the former generates a dependency on the connector, the latter works both instances independently, which is my preferred approach.
First of all, create an Azure Logic App instance and add the HTTP trigger.
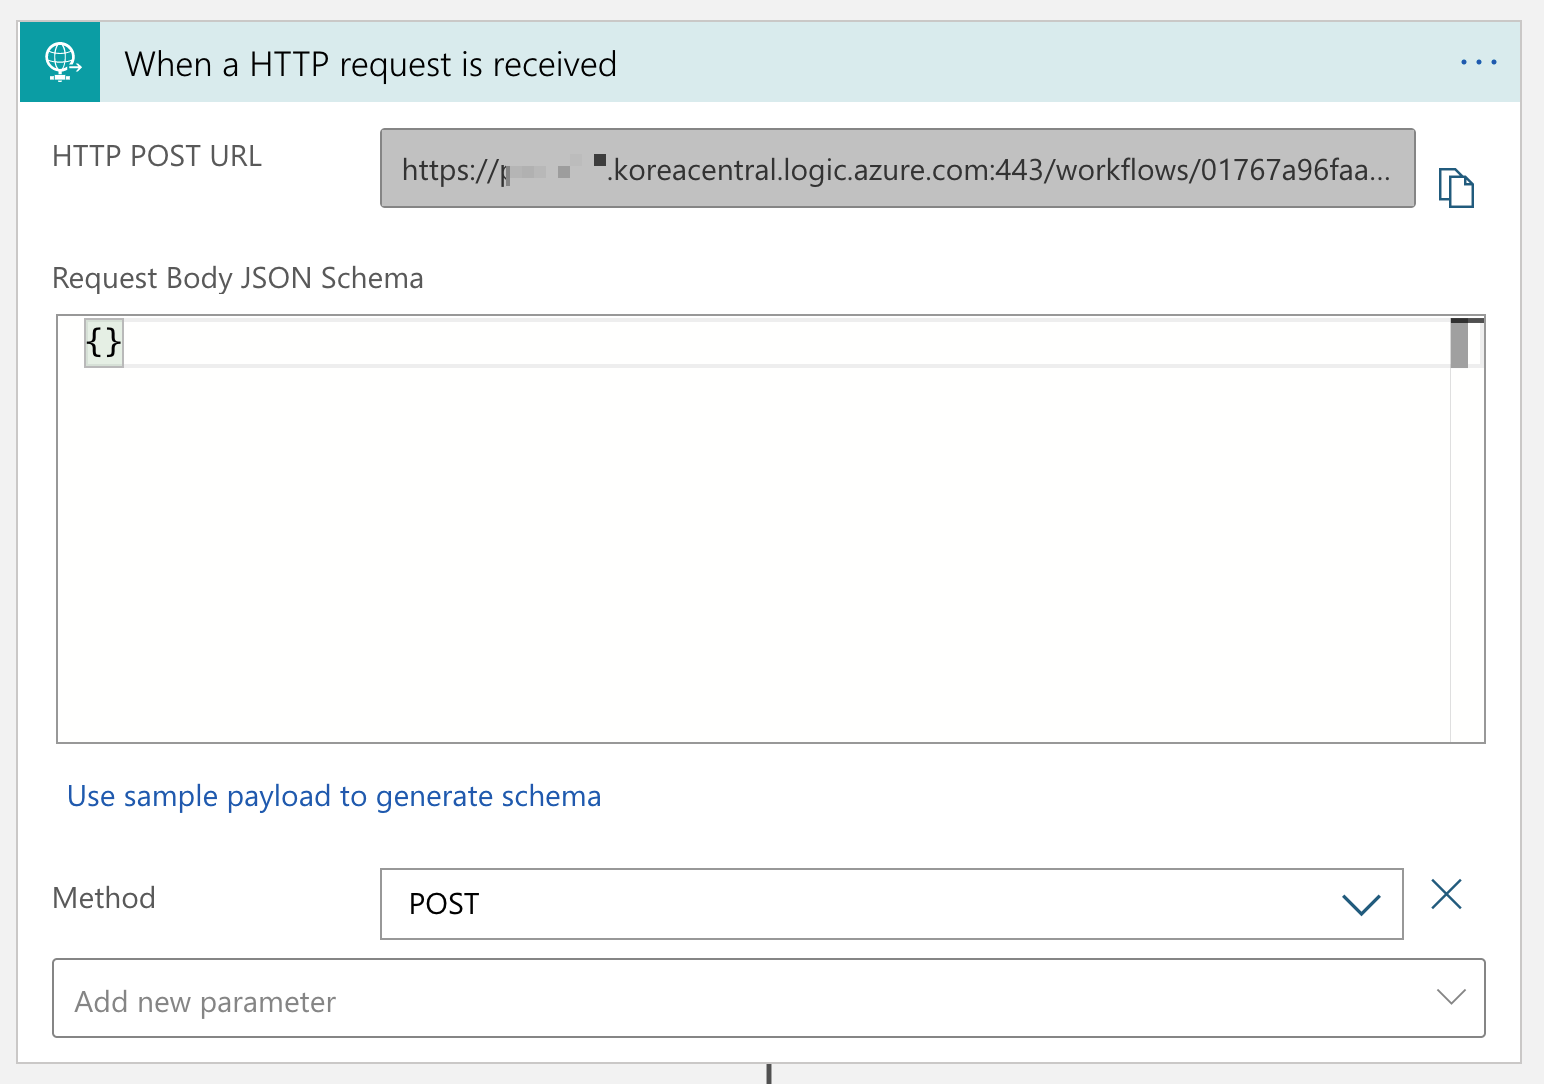
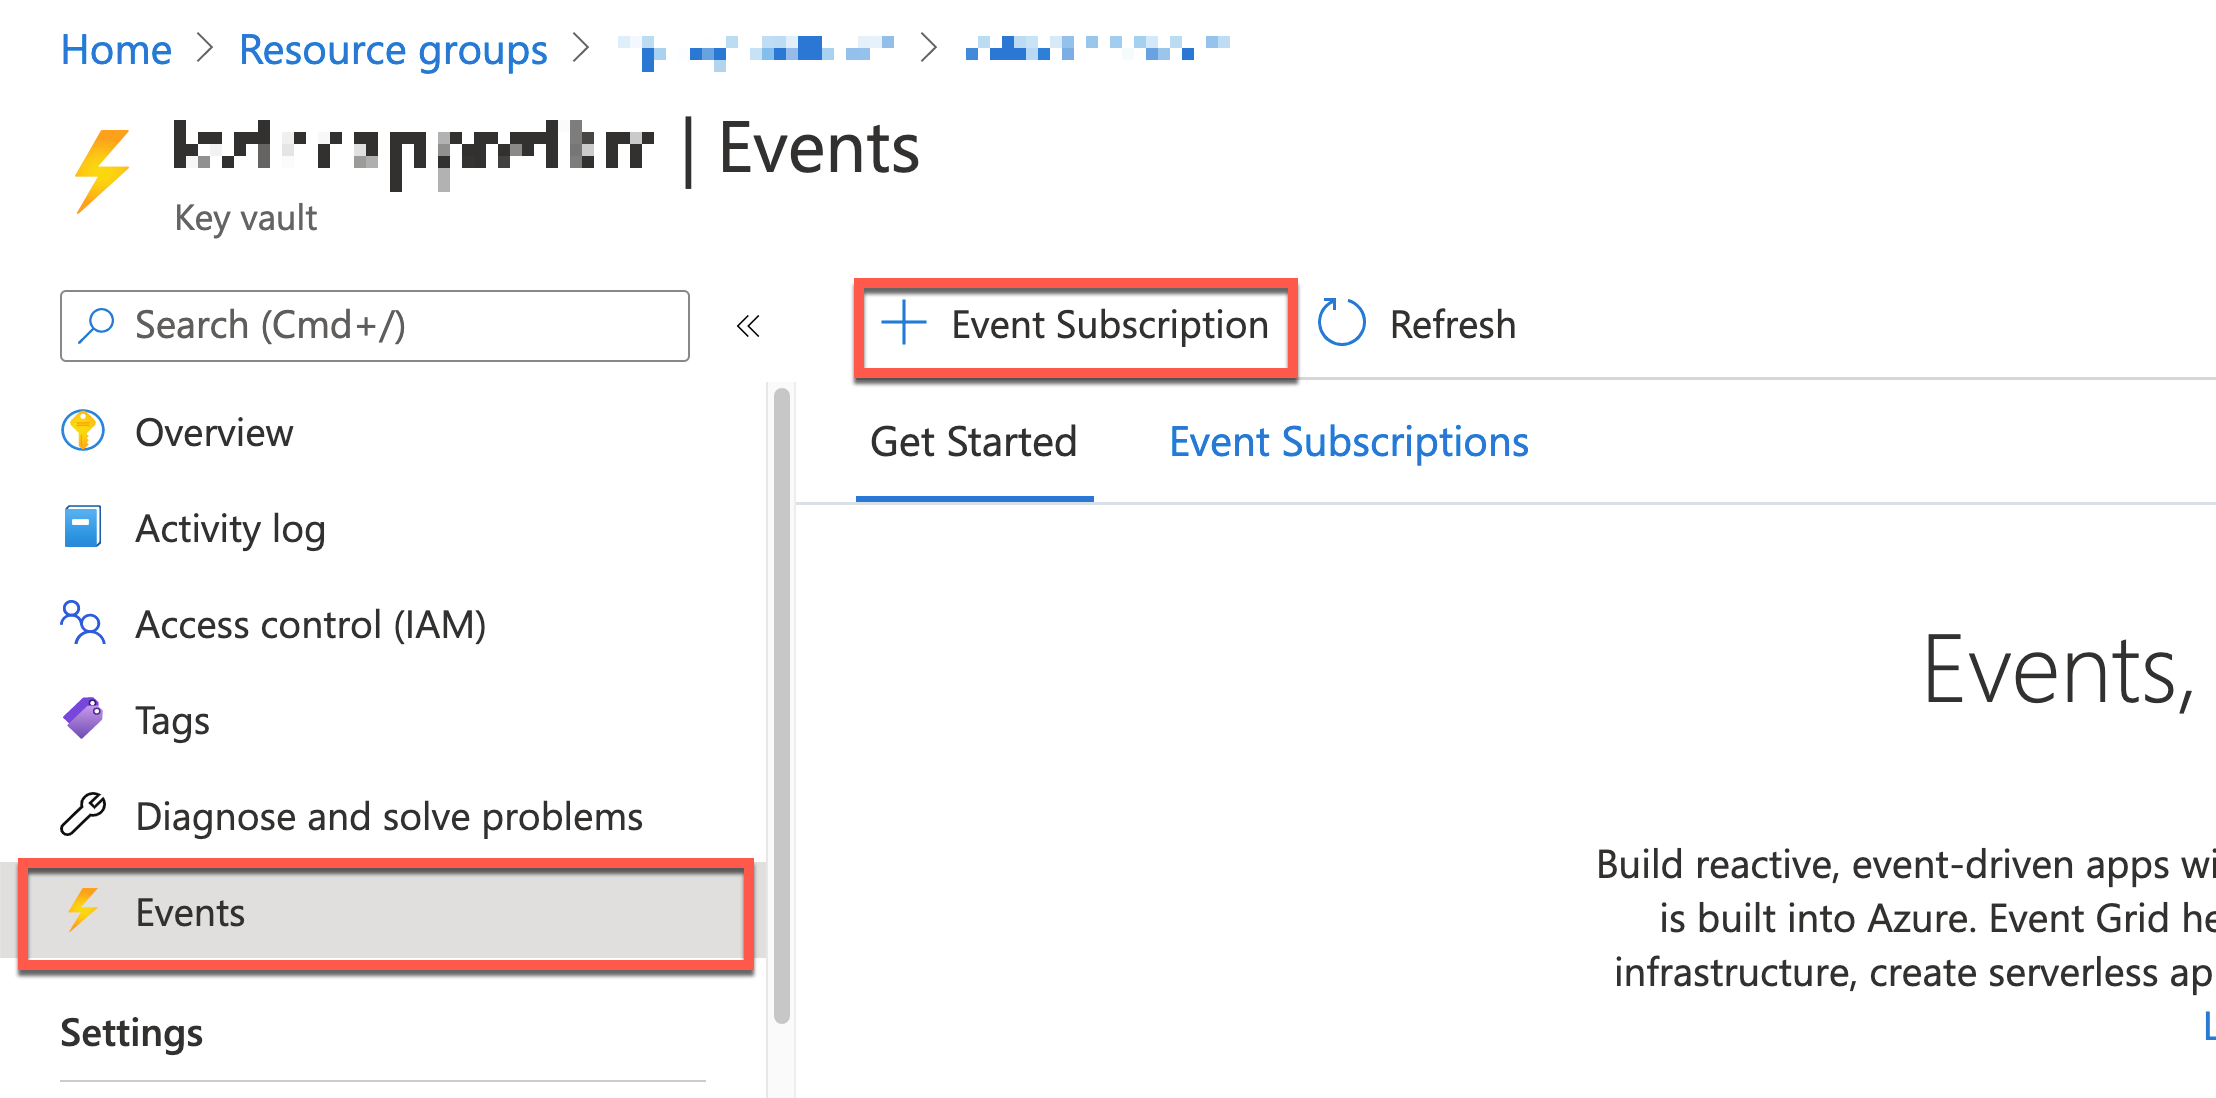
Once save the Logic App workflow, you will get the endpoint URL, which will be used as the event handler webhook. Go to the Azure Key Vault instance’s Events blade and click the + Event Subscription button.
You will be asked to create an EventGrid subscription instance. Enter Event Subscription Details Name, Event Schema, System Topic Name, Event Type, Endpoint Type and Endpoint URL.
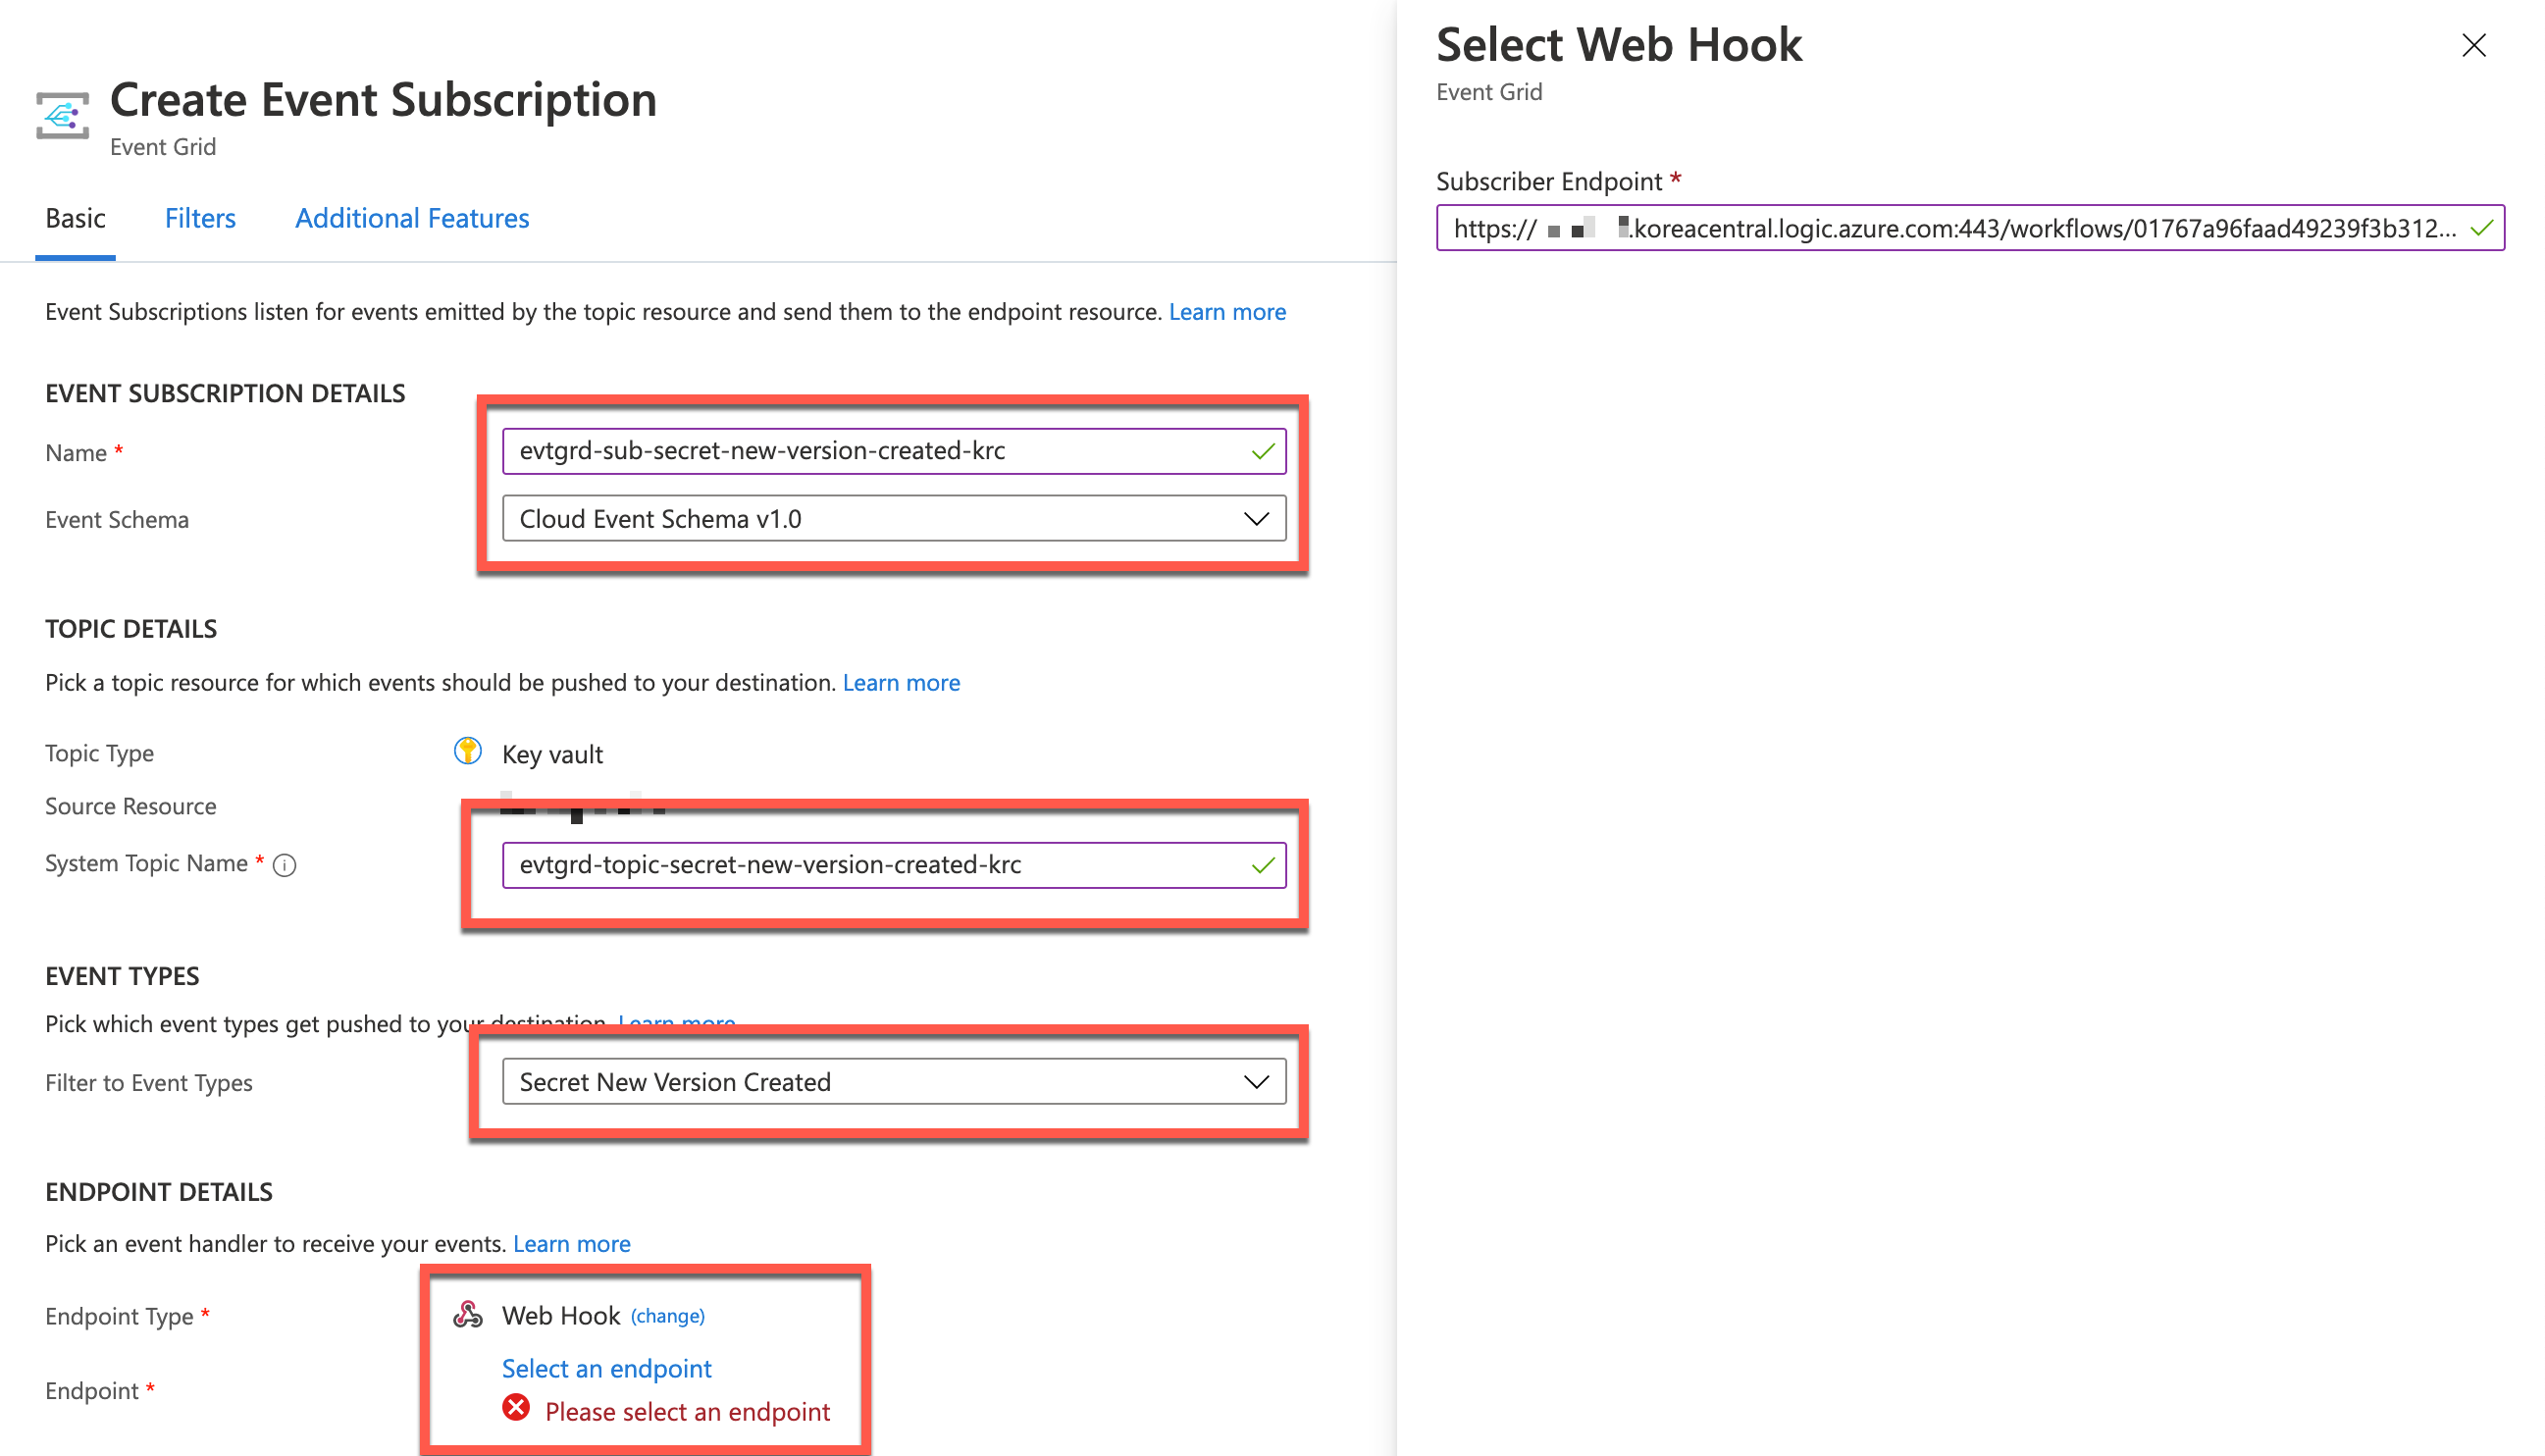
- In the Event Subscription Details session, choose Cloud Event Schema v1.0 because it’s the standard spec of CNCF and it’s convenient for heterogeneous systems integration.
- Enter the Event Grid Topic name to the
System Topic Name field.
- Choose only the
Secret New Version Created event in the Filter to Event Types dropdown.
- Choose Webhook and enter the endpoint URL copied from the Logic App HTTP trigger.
You’ve completed the very basic pipeline between Azure Key Vault, Azure EventGrid and Azure Logic Apps to handle events. If you create a new version of a particular secret, it generates an event captured by the Logic App instance. Confirm that the Microsoft.KeyVault.SecretNewVersionCreated event type has been captured.
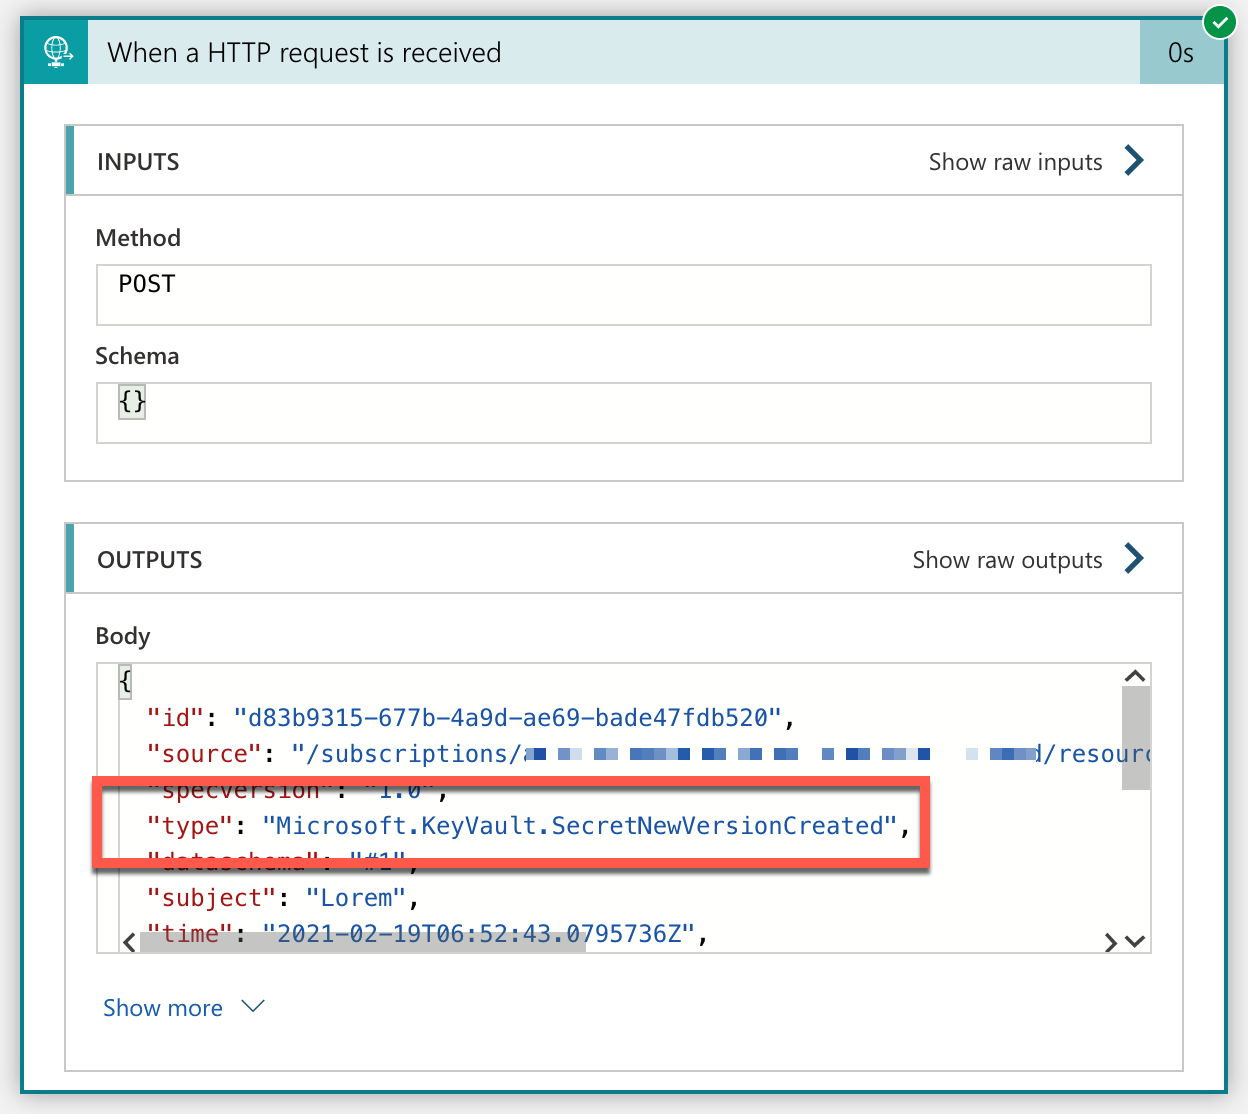
The actual event data as a JSON payload looks like this:
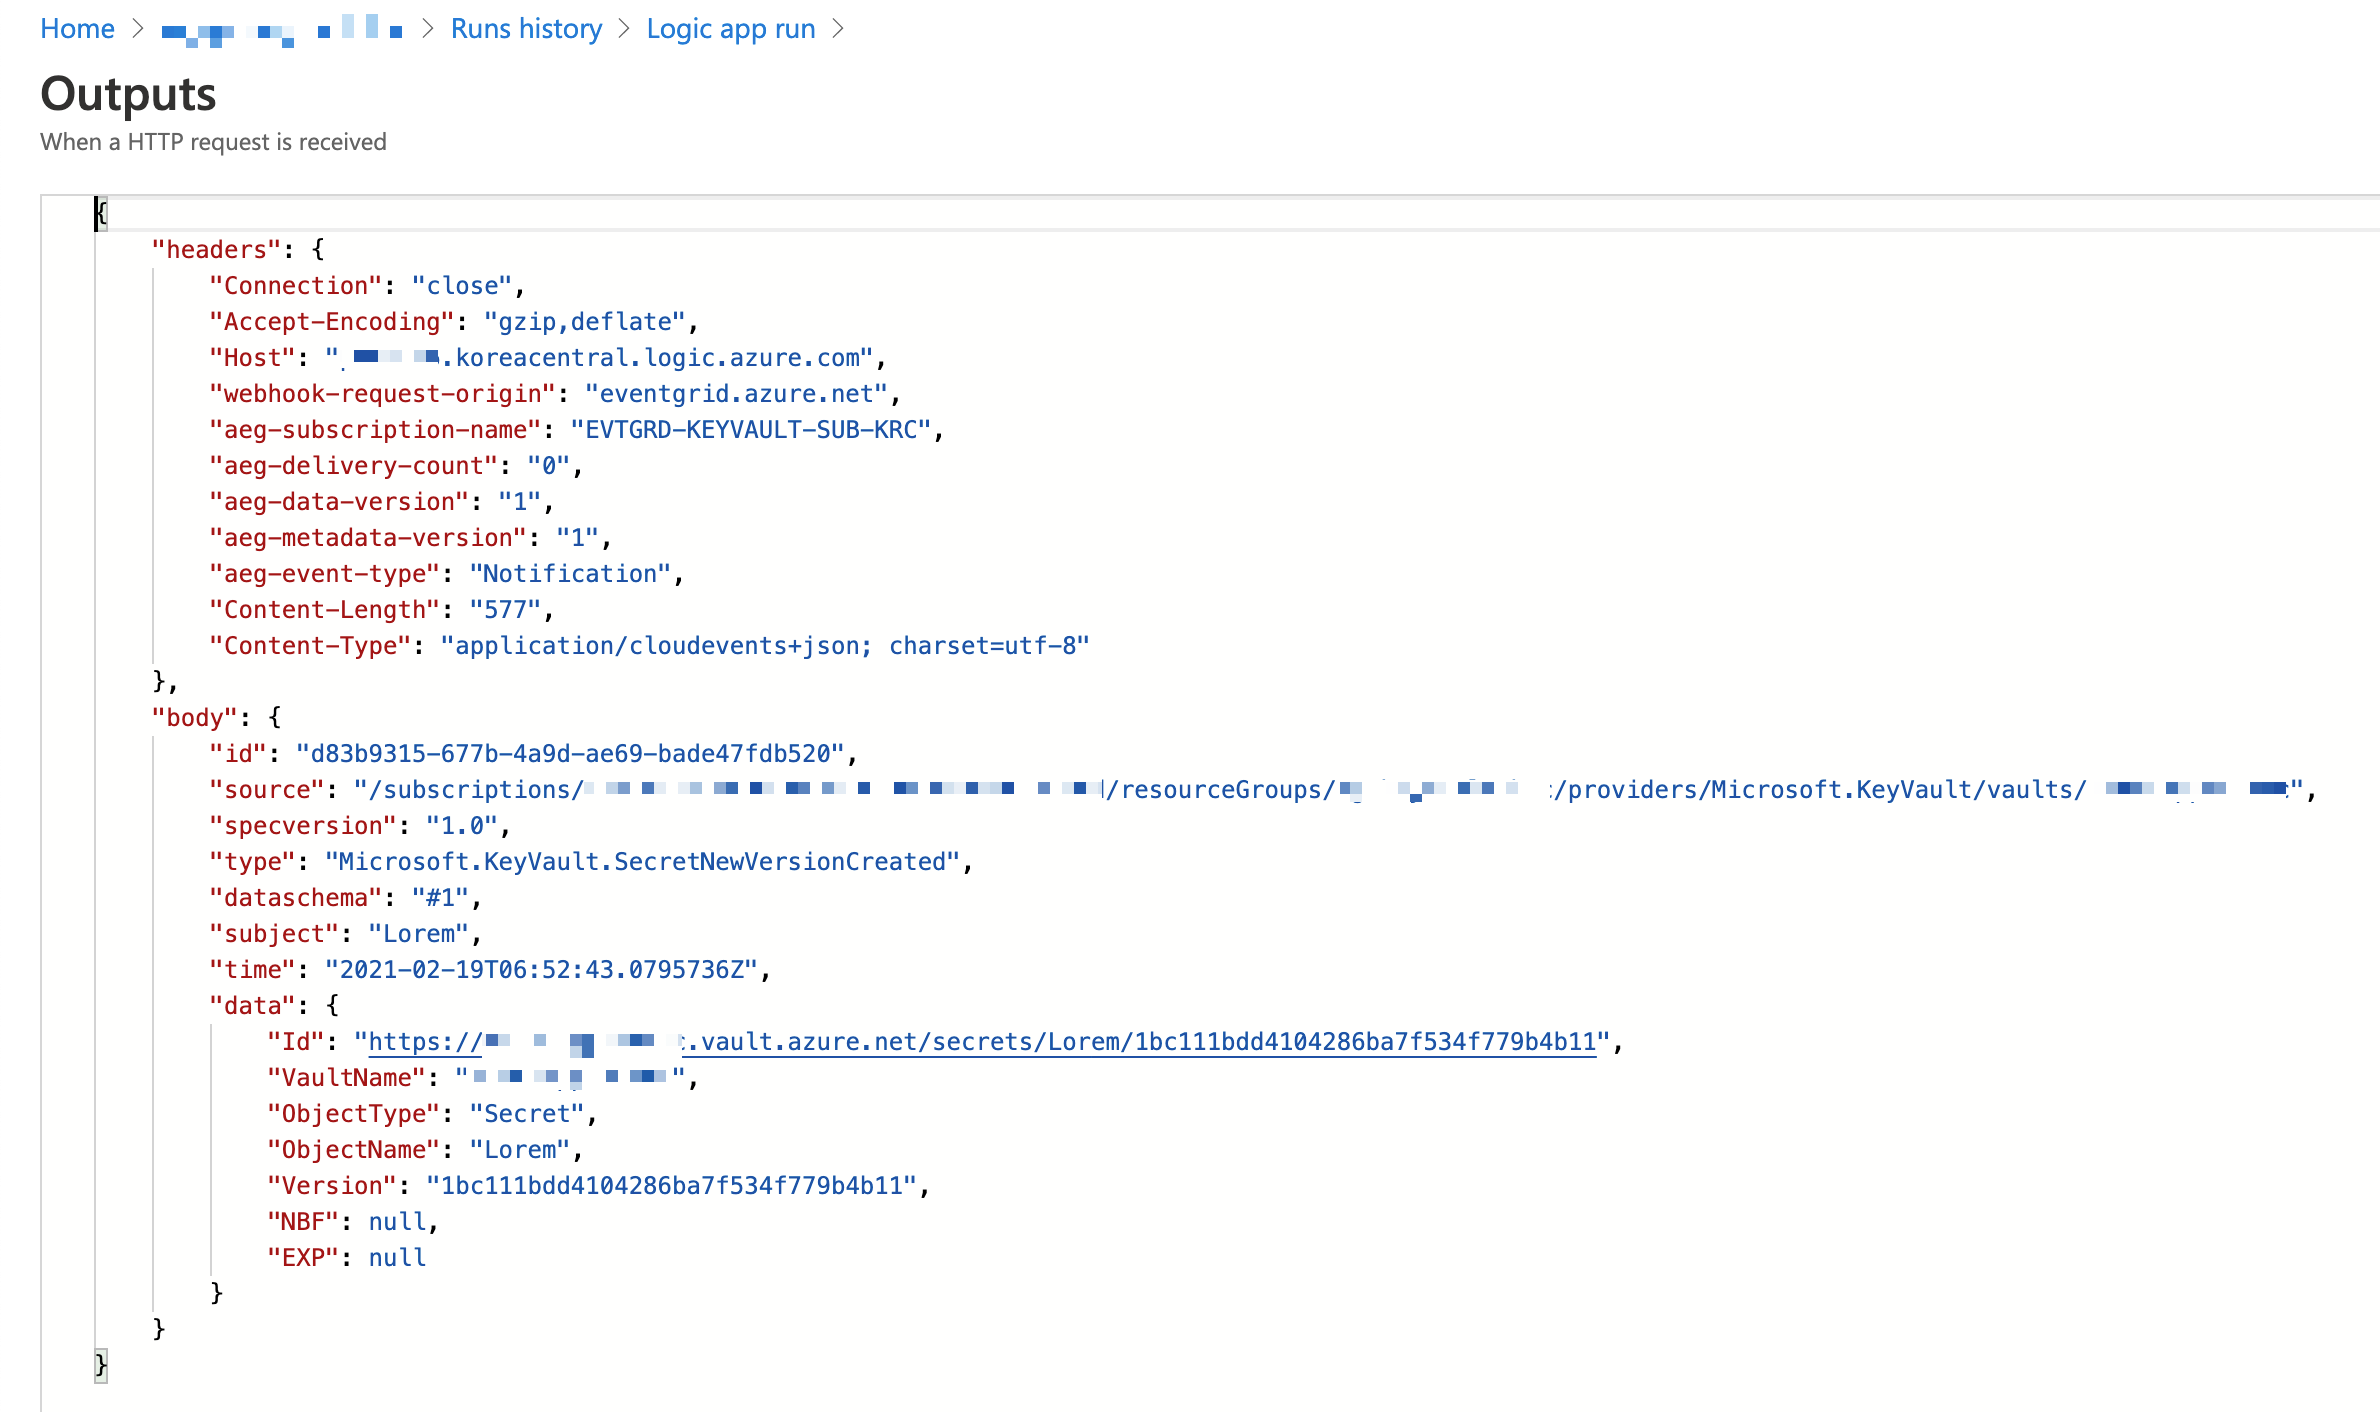
There is the attribute called ObjectName in the data attribute, which is the secret name. You need to send this value to Azure Functions to process the secret version rotation management. Let’s implement the function logic.
Version Rotation Management against Specific Secret via Azure Functions
There are not many differences from my previous post. However, this implementation time will become simpler because it doesn’t have to iterate all the secrets at once but look after a specific one. First of all create a new HTTP Trigger.
func new –name DisableSecretHttpTrigger –template HttpTrigger –language C#
A new HTTP trigger has been generated with the default template. Now, update the HttpTrigger binding settings. Remove the GET method and put the routing URL to secrets/{name}/disable/{count:int?} (line #5). Notice that the routing URL contains placeholders like {name} and {count:int?}, which are substituted with parameters of string name and int? count respectively (line #6).
    public static class DisableSecretHttpTrigger

    {

        [FunctionName(“DisableSecretHttpTrigger”)]

        public static async Task Run(

            [HttpTrigger(AuthorizationLevel.Function, “POST”, Route = “secrets/{name}/disable/{count:int?}”)] HttpRequest req,

            string name, int? count,

            ILogger log)

        {
Get the two values from the environment variables. One is the endpoint URL to the Azure Key Vault instance, and the other is the tenant ID where the Key Vault instance is hosted.
            // Get the KeyVault URI

            var uri = Environment.GetEnvironmentVariable(“KeyVault__Uri”);
            // Get the tenant ID where the KeyVault lives

            var tenantId = Environment.GetEnvironmentVariable(“KeyVault__TenantId”);
Next, instantiate the SecretClient object that can access the Key Vault instance. While instantiating, give the authentication options with the DefaultAzureCredentialOptions object. If your log-in account is bound with multiple tenants, you should explicitly specify the tenant ID; otherwise, you will get the authentication error (line #4-6).
            // Set the tenant ID, in case your account has multiple tenants logged in

            var options = new DefaultAzureCredentialOptions()

            {

                SharedTokenCacheTenantId = tenantId,

                VisualStudioTenantId = tenantId,

                VisualStudioCodeTenantId = tenantId,

            };

            var client = new SecretClient(new Uri(uri), new DefaultAzureCredential(options));
As you already know the secret name, populate all the versions of the given secrets. Of course, you don’t need inactive versions. Therefore, use the WhereAwait clause to filter them out (line #5). Additionally, use the OrderByDescendingAwait clause to sort all the active versions in the reverse-chronological order (line #6).
            // Get the all versions of the given secret

            // Filter only enabled versions

            // Sort by the created date in a reverse order

            var versions = await client.GetPropertiesOfSecretVersionsAsync(name)

                                    .WhereAwait(p => new ValueTask(p.Enabled.GetValueOrDefault() == true))

                                    .OrderByDescendingAwait(p => new ValueTask(p.CreatedOn.GetValueOrDefault()))

                                    .ToListAsync()

                                    .ConfigureAwait(false);
If there is no version enabled, end the function by returning the AcceptedResult instance.
            // Do nothing if there is no version enabled

            if (!versions.Any())

            {

                return new AcceptedResult();

            }
As you need at least two versions enabled for rotation if there is no count value given, set the value to 2 as the default.
            if (!count.HasValue)

            {

                count = 2;

            }
If the number of secret versions enabled is less than the count value, complete the processing and return the AcceptedResult instance.
            // Do nothing if there is only given number of versions enabled

            if (versions.Count < count.Value + 1)

            {

                return new AcceptedResult();

            }
Let’s disable the remaining versions. Skip as many as the count value of the versions (line #2). Set the Enabled value to false (line #7), the update them (line #9).
            // Disable all versions except the first (latest) given number of versions

            var candidates = versions.Skip(count.Value).ToList();

            var results = new List();

            results.AddRange(versions.Take(count.Value));

            foreach (var candidate in candidates)

            {

                candidate.Enabled = false;
                var response = await client.UpdateSecretPropertiesAsync(candidate).ConfigureAwait(false);
                results.Add(response.Value);

            }
Finally, return the processed result as a response.
            var res = new ContentResult()

            {

                Content = JsonConvert.SerializeObject(results, Formatting.Indented),

                ContentType = “application/json”,

                StatusCode = (int)HttpStatusCode.OK,

            };
            return res;

        }

    }
The implementation of the Azure Functions side is over. Let’s integrate it with Azure Logic Apps.
Integration of Azure Logic Apps with Azure Functions
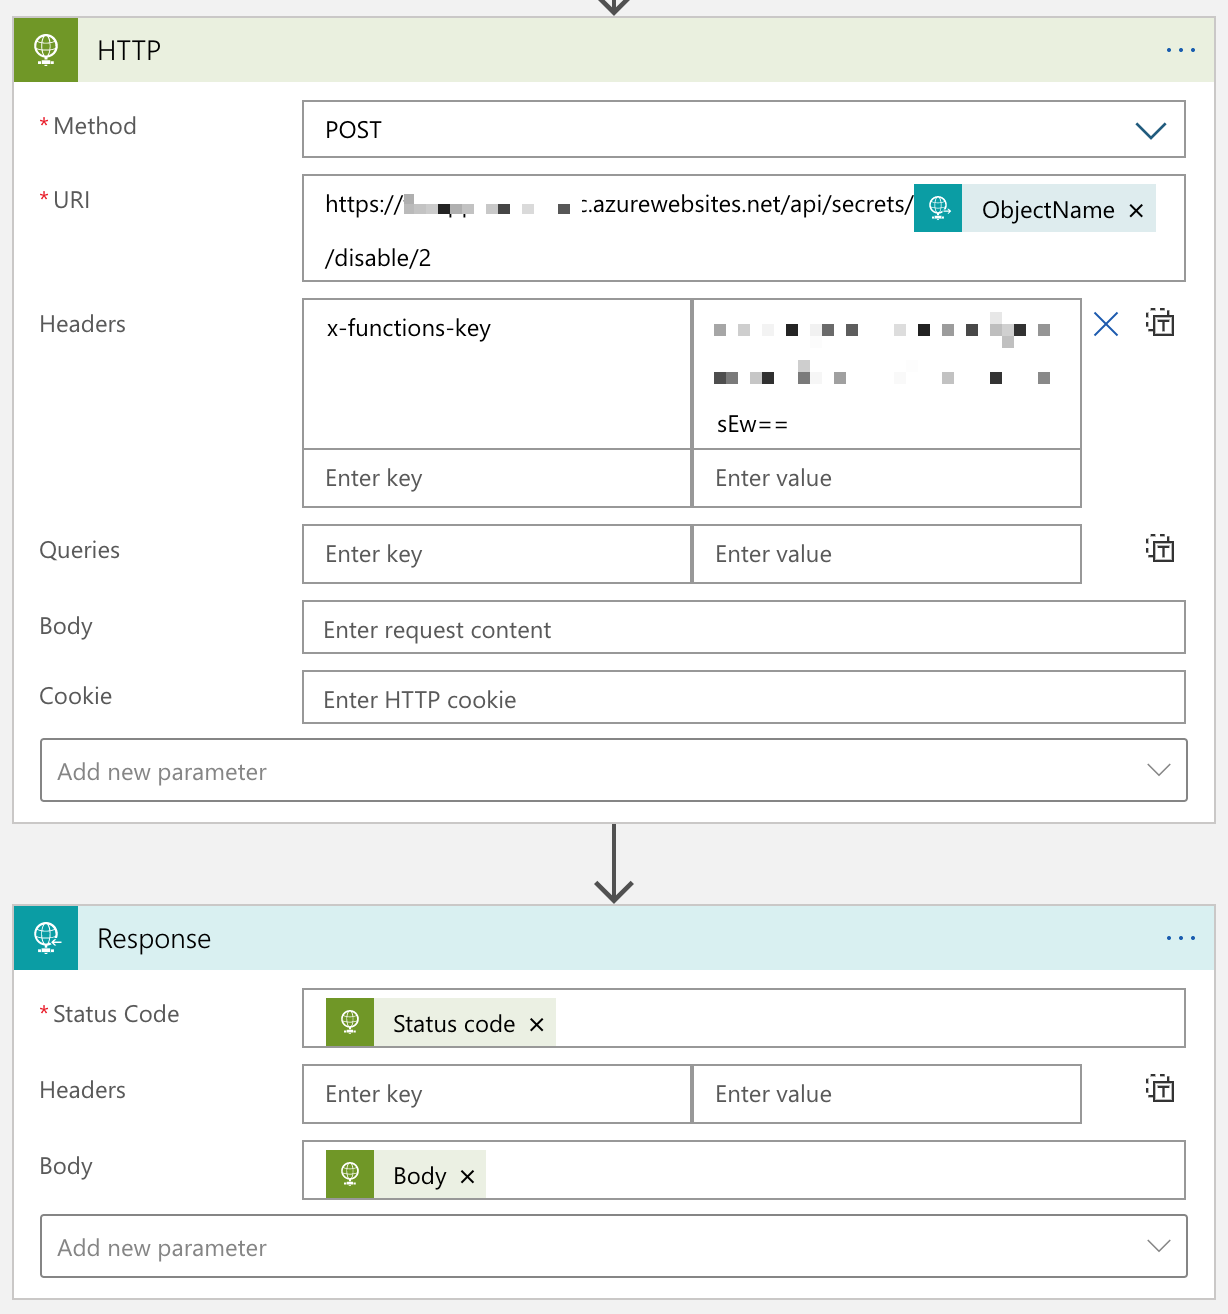
Add both HTTP action and Response action to the Logic App instance previously generated. Make sure that you call the Azure Functions app through the HTTP action, with the ObjectName value and 2 as the routing parameters.
Now, you’ve got the integration workflow completed from Azure Key Vault to Azure Functions via Azure EventGrid and Logic Apps. Let’s run the workflow.
End-to-End Test – Adding New Secret Version to Azure Key Vault
In order to run the integrated workflow, you need to create a new version of the Azure Key Vault Secrets.
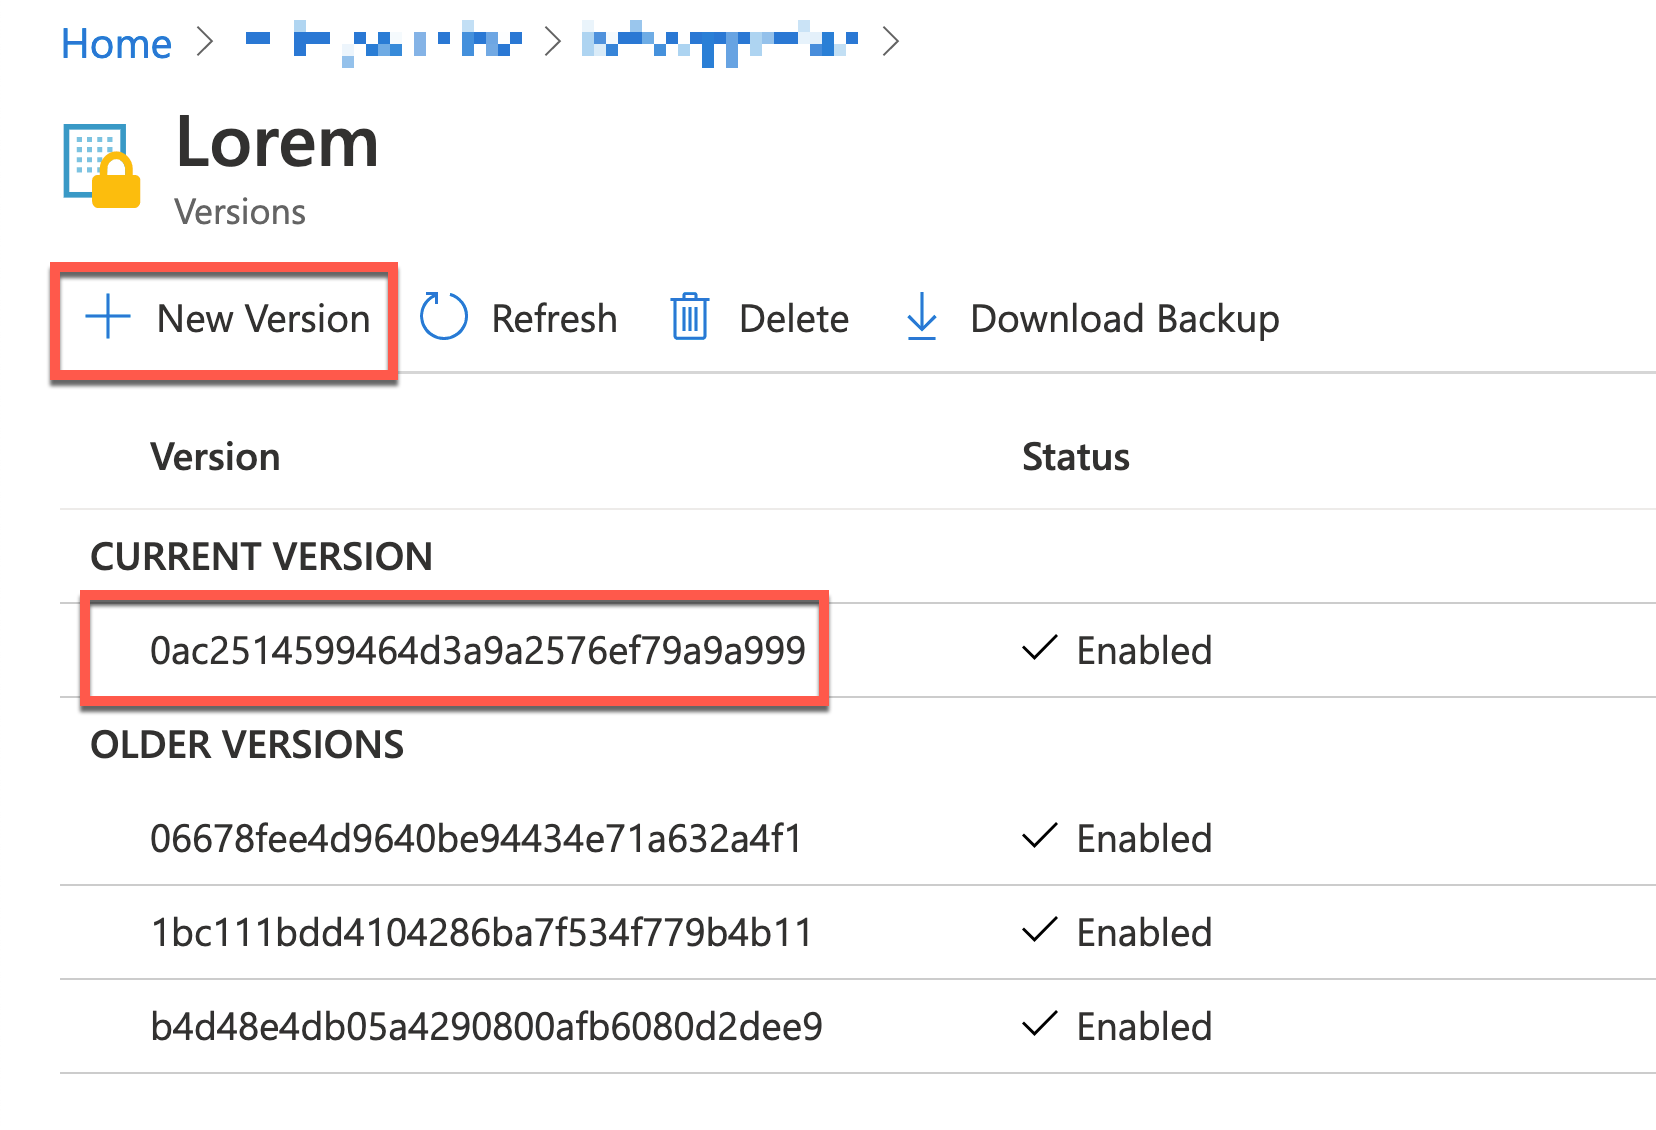
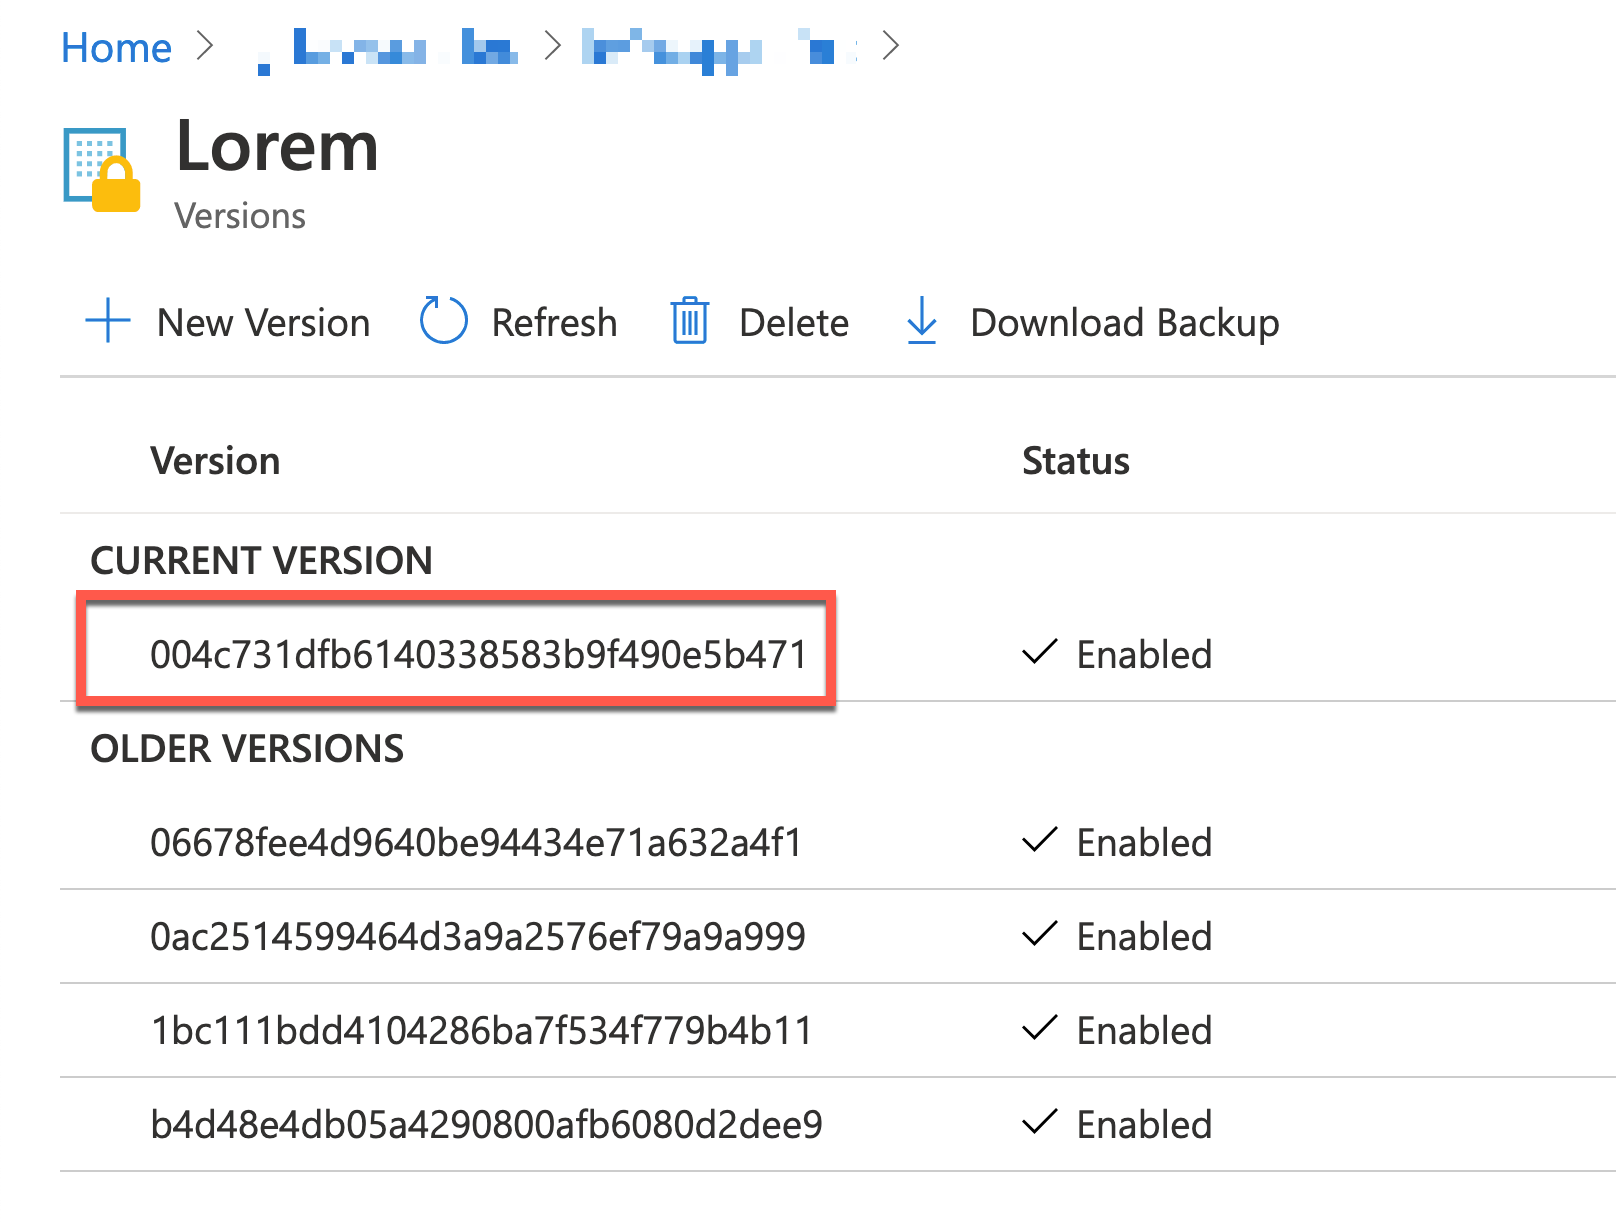
Add a new version of the secret.

You will see the new version added.
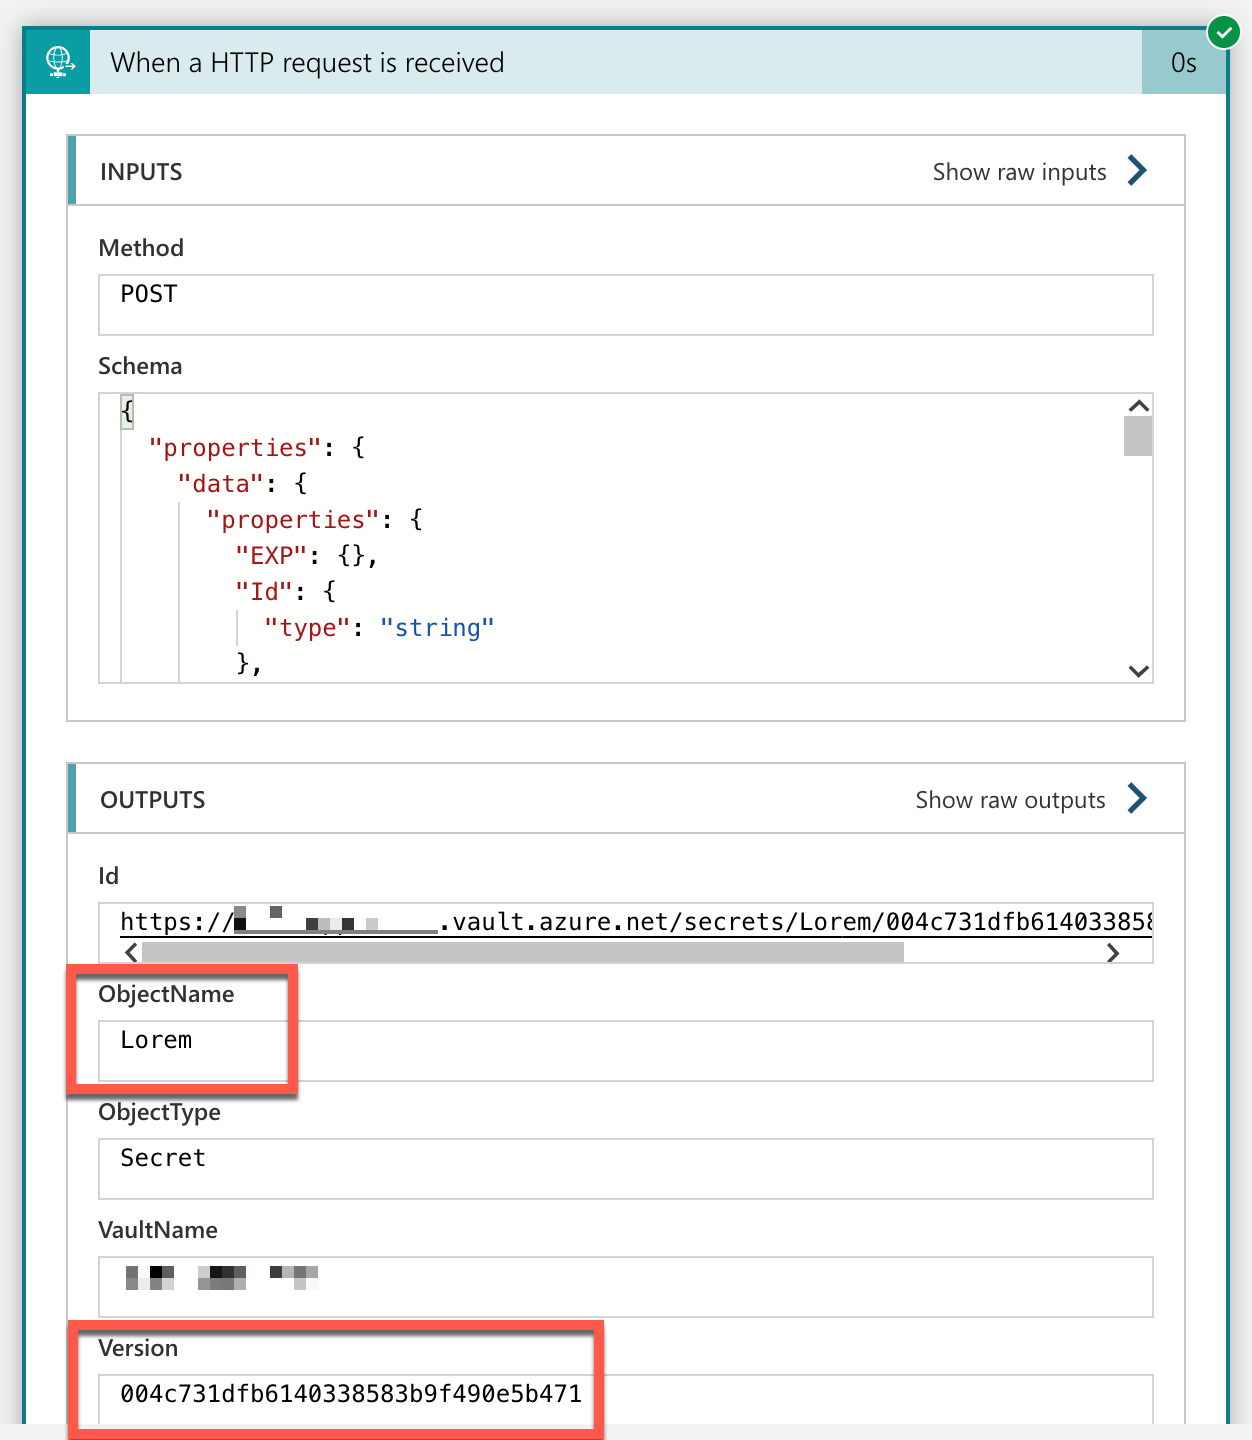
When a new secret version is added, it publishes an event to EventGrid, and the Logic App captures the event. Can you confirm the ObjectName value and the secret version are the same as the one on the Azure Key Vault instance?
Once you complete the end-to-end integration workflow, you will be able to see that all versions except the latest two have been disabled.
So far, we’ve implemented a new logic that captures an event published when a new secret version is added to Azure Key Vault instance, and process the rotation management against the specific secret, using Azure EventGrid, Azure Logic Apps and Azure Functions. It would be handy if you have a similar use case and implement this sort of event-driven workflow process.
This article was originally published on Dev Kimchi.
by Contributed | Mar 7, 2021 | Technology
This article is contributed. See the original author and article here.
How to start a new SPFx web part project with Microsoft Graph Toolkit and React
Context
Microsoft Graph Toolkit is a set of reusable components working with Microsoft Graph to accelerate your web developments with SharePoint Online, Microsoft Teams and more. With this kit, developers don’t have to write any code for authentification and authorization so I’m sure you’ll save a lot of time using it in your various projects. Now let’s see how we setup a SPFx web part project with Microsoft Graph Toolkit and React!
Create a new SPFx web part project
First, we need to create a new SPFx web part project with React framework using Yeoman generator tool:
yo @microsoft/sharepoint
Note: don’t forget to choose React framework during the setup of your project and use default project settings.
Install Microsoft Graph Toolkit for React
To install Microsoft Graph Toolkit for React, we need to install two packages with npm as below:
- mgt
- mgt-react
But why two packages? Because we need to use Providers and SharePointProvider classes included in mgt to pass the web part context to mgt-react components inside onInit method of the web part.
Install the two required packages with the following npm commands:
npm i @microsoft/mgt
npm i @microsoft/mgt-react
Use MGT components in the project
We are ready to use MGT components in our project, in this example I’ll use the Person component to display basic informations about the current user. To do this, we need to import classes from mgt-react then using them in our render method as below:
import { Person, PersonViewType } from '@microsoft/mgt-react';

// ...

public render(): React.ReactElement<IMgtReactDemoProps> {
    return (
      <div className={ styles.mgtReactDemo }>
        <Person personQuery="me" view={PersonViewType.twolines} line2Property={"jobTitle"}></Person>
      </div>
    );
}
We can now build and run our project for SharePoint Online service (no local workbench) using the following command:
gulp serve --nobrowser
To debug your web part in SharePoint Online service, use the workbench located here:
https://your-sharepoint-online-site/_layouts/workbench.aspx
We can now see the result of our web part using MGT in the SPO workbench:
That’s it, you have configured a SPFx web part project with Microsoft Graph Toolkit and React. You can now integrate other components in your web part project without writing any line of code. And don’t forget to look at the Get component which provides a great way to query any Microsoft Graph endpoint and display the results with a custom template you made for your line of business application ;)
You can read this article in my blog.
Resources
https://docs.microsoft.com/en-us/graph/toolkit/get-started/overview
https://docs.microsoft.com/en-us/graph/toolkit/get-started/mgt-react
https://www.npmjs.com/package/@microsoft/mgt
https://www.npmjs.com/package/@microsoft/mgt-react
Install MGT dependencies
To use Microsoft Graph Toolkit components with React, we need to use TypeScript 3.7 at least. Install this dependency with the following npm command:
npm i @microsoft/rush-stack-compiler-3.7 --save-dev
Note: -dev command add this package inside the devDependencies section in package.json file.
Then we need to update the tsconfig.json with the following content at line 2:
"extends": "./node_modules/@microsoft/rush-stack-compiler-3.7/includes/tsconfig-web.json"
Finally remove the following line from tslint.json to compile the project without any warning:
"no-use-before-declare": true,
Configure MGT in the project
Now we have installed all the required dependencies, we can configure MGT in our project. First you need to add the API permissions in your package-solution.json file as below:
    "webApiPermissionRequests": [
      {
          "resource": "Microsoft Graph",
          "scope": "User.Read.All"
      }
Note: you need to add all API permissions depending on which MGT components you are using in your project. In this example, I just need to read user profiles to display some properties in the web part with a Person component.
After this, we need to pass the context of the web part to MGT components, add the following code in your web part file (in my project MgtReactDemoWebPart) as below:
import { Providers, SharePointProvider } from '@microsoft/mgt';

// ...

protected onInit() {
  Providers.globalProvider = new SharePointProvider(this.context);
  return super.onInit();
}
Use MGT components in the project
We are ready to use MGT components in our project, in this example I’ll use the Person component to display basic informations about the current user. To do this, we need to import classes from mgt-react then using them in our render method as below:
import { Person, PersonViewType } from '@microsoft/mgt-react';

// ...

public render(): React.ReactElement<IMgtReactDemoProps> {
    return (
      <div className={ styles.mgtReactDemo }>
        <Person personQuery="me" view={PersonViewType.twolines} line2Property={"jobTitle"}></Person>
      </div>
    );
}
We can now build and run our project for SharePoint Online service (no local workbench) using the following command:
gulp serve --nobrowser
To debug your web part in SharePoint Online service, use the workbench located here:
https://your-sharepoint-online-site/_layouts/workbench.aspx
We can now see the result of our web part using MGT in the SPO workbench:
That’s it, you have configured a SPFx web part project with Microsoft Graph Toolkit and React. You can now integrate other components in your web part project without writing any line of code. And don’t forget to look at the Get component which provides a great way to query any Microsoft Graph endpoint and display the results with a custom template you made for your line of business application ;)
You can read this article in my blog.
Resources
https://docs.microsoft.com/en-us/graph/toolkit/get-started/overview
https://docs.microsoft.com/en-us/graph/toolkit/get-started/mgt-react
https://www.npmjs.com/package/@microsoft/mgt
https://www.npmjs.com/package/@microsoft/mgt-react
by Contributed | Mar 7, 2021 | Technology
This article is contributed. See the original author and article here.
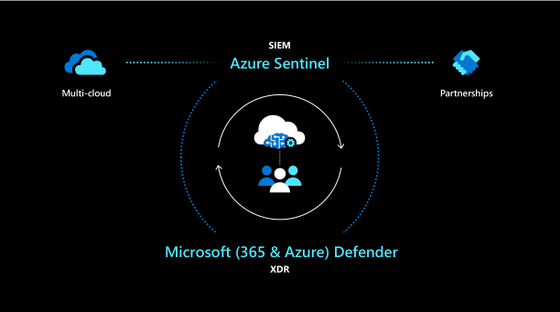
Harness the breadth and depth of integrated SIEM and XDR with new Microsoft 365 integration
Building on our promise for a modernized approach to threat protection with integrated SIEM and XDR, we are happy to share a deeper integration between Azure Sentinel and Microsoft 365 Defender, making it easier than ever to harness the breadth of SIEM alongside the depth of XDR.
Now in public preview, Microsoft 365 Defender incidents are fully integrated with Azure Sentinel, providing a seamless experience for responding to security threats. Incidents from M365D (formerly known as Microsoft Threat Protection or MTP) including all associated alerts, entities, and relevant information, can be streamed to Azure Sentinel, providing you with enough context to perform triage in Azure Sentinel. Once in Sentinel, Incidents will remain bi-directionally synced with M365D, allowing you to take advantage of the benefits of both portals in your incident investigation and response process.
This integration allows you to manage M365D incidents from Azure Sentinel, as the primary incident queue across the entire organization, so you can see – and correlate – M365 incidents together with those from all of your other cloud and on-premises systems. At the same time, it allows you to seamlessly leverage the unique strengths and capabilities of M365D for in-depth investigations. M365 Defender enriches and groups alerts from multiple M365 products, both reducing the size of the SOC’s incident queue and shortening the time to resolve. The component services that are part of the M365 Defender stack are:
- Microsoft Defender for Endpoint (MDE, formerly MDATP)
- Microsoft Defender for Identity (MDI, formerly AATP)
- Microsoft Defender for O365 (MDO, formerly O365ATP)
- Microsoft Cloud App Security (MCAS)
In addition to collecting alerts from these components, M365 Defender generates alerts of its own.
Common use cases and scenarios
- One-click ingestion of M365 Defender incidents, including all alerts and entities from M365 security products, into Azure Sentinel leveraging a shared schema.
- Leverage M365 Defender alert grouping and enrichment capabilities in Azure Sentinel, thus reducing time to resolve.
- Immediate Bi-directional sync between Azure Sentinel and M365D incidents on status, owner and closing reason.
- In-context deep link between a Sentinel and M365 Defender incident, using the same credentials, to facilitate investigations across both portals.
Further reading
- Our Ignite session, featuring a demo of this integration in action
- Documentation with detailed information on the integration, common use cases and limitations.
- Documentation on how to connect M365D incidents and raw data to Azure Sentinel.
- Documentation on Microsoft 365 Defender.

Recent Comments