
by Contributed | Dec 25, 2020 | Technology
This article is contributed. See the original author and article here.
2021 is right around the corner, and with it comes the optimism a new year brings. A clean slate, a new story to write.
So this week, we invite you to share what you hope to achieve in 2021—and the activities that will get you there.
Do you plan to spend more time listening in and sharing on live stream channels? Are there areas you want to brush up on? Do you have projects and goals you can’t wait to work on? Use our fill-in-the-blank to share your can-do items for 2021.

We shared these resources recently that support developer efforts, whether you’re just starting out or are ready to kick it up a notch:
Microsoft Learn Student Ambassadors
In 2020, we launched the Microsoft Learn Student Ambassadors program, where students can join a global community of peers, connect with mentors, learn the skills they need to land a dream job, and make a difference. Applications are open year-round, and we will accept hundreds more Student Ambassadors in 2021
Learn more about the program
Speed up development
What does it take to go from idea to development without detours? Best-in-class tools and product management are two of the things that boost velocity, a new McKinsey report found. Find out how to get stuff done faster in 2021 with this and other real-world strategies.
Read the McKinsey report on how to boost developer velocity
Learning to code
Intimidated by the idea of learning a new programming language? We’ve got a few ways to make it easier so 2021 is the year you make it happen. Download Visual Studio Code, then dive into tutorials and other resources that you can go through at your own pace.
Learn to program with Visual Studio Code
Predicting meteor showers using Python and VS Code
Shooting for the moon in 2021? This session may provide inspiration. Dr G explains what meteor showers are and how data science is used to predict these events. No coding experience required.
Watch the recorded live stream (50 min)
We’ve got one more thing to mention before we close out week 4 of #DevDecember:
- #DevWithABev is still going strong. It’s simple. Snap a pic of you with your fav bev and post on Twitter with the hashtag #DevWithABev.
There are only a few more days left in 2020 but we’ve got a final surprise in store—keep following #DevDecember to find out what it is.
Missed a day or a week? Head over to our #DevDecember homepage.
by Contributed | Dec 24, 2020 | Technology
This article is contributed. See the original author and article here.
Hi IT Pros,
Today we discuss about preparing our MD for Endpoint on Organization’s MacOS Systems and make them ready for “Big Sur”, the greatest and latest version of Mac operating system which is released by Apple on the 12th of November, 2020. Big Sur enhance MDM (Mobile Device Management) protocol as key for automated device enrollment, content caching and managing apps. Big Sur’s code running process has been moved from kernel extensions (KEXTs) to system extensions for security reason.
Microsoft Endpoint Manager now supports the following new device configurations on MacOS Big Sur :
- Non-OS software updates deferral
- “Enable direct download” setting for associated domains · 4096-bit SCEP certificate keys
- Prevent users from disabling automatic VPN
- Excluded Domains for per-app VPN connections
For Microsoft Defender for Endpoint (WD ATP), Microsoft released an update to Microsoft Defender for Endpoint MacOS that will leverage new system extensions instead of kernel extensions with the following details:
- An update to the Microsoft Defender ATP for Mac agent is required on all eligible macOS devices prior to moving these devices to macOS 11.
- The update is applicable to devices running macOS version 10.15.4 or later.
- To ensure that the Microsoft Defender ATP for Mac update is delivered and applied seamlessly from an end-user experience perspective, a new remote configuration must be deployed to all eligible macOS devices before Microsoft publishes the new agent version.
- If the configuration is not deployed prior to the Microsoft Defender ATP for Mac agent update, end-users will be presented with a series of system dialogs asking to grant the agent all necessary permissions associated with the new system extensions.
Even though Microsoft Defender ATP for Mac new implementation based on system extensions is only applicable to devices running macOS version 10.15.4 or later, deploying configuration proactively across the entire macOS fleet will have two benefits:
- ensure that even down-level devices are ready for macOS 11 Big Sur upgrade
- ensure that Microsoft Defender ATP for Mac continues protecting all macOS devices regardless OS version they were running prior to the Big Sur upgrade.
New configuration profiles for macOS Catalina and newer versions of macOS
You could deploy the Configuration Profile Policies by JAMF or Microsoft Endpoint Manager as your deployment tool. There are Configuration Profiles and Preference Control Policy that need to be deployed:
- System Extension configuration profile
- Privacy Preferences Policy Control, granting Full Disk Access to the Microsoft Defender ATP Endpoint Security Extension
- Network Extension configuration profile
- Option 1: JAMF Deployment
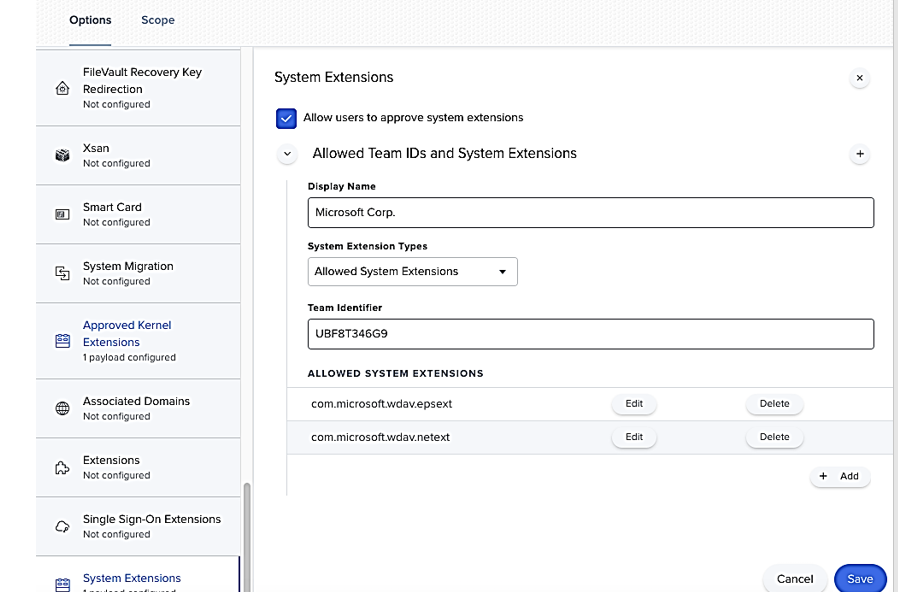
- System Extension configuration profile
- In Computers > Configuration Profiles select Options > System Extensions.
Select Allowed System Extensions from the System Extension Types drop-down list.
Use UBF8T346G9 for Team Id.
Add the following bundle identifiers to the Allowed System Extensions list:
com.microsoft.wdav.epsext
com.microsoft.wdav.netext
- Privacy Preferences Policy Control
Add the following JAMF payload to grant Full Disk Access to the Microsoft Defender ATP Endpoint Security Extension. This policy is a pre-requisite for running the extension on your device.
- Select Options > Privacy Preferences Policy Control.
Use com.microsoft.wdav.epsext as the Identifier and Bundle ID as Bundle type.
Set Code Requirement to identifier “com.microsoft.wdav.epsext” and anchor apple generic and certificate 1[field.1.2.840.113635.100.6.2.6] /* exists */ and certificate leaf[field.1.2.840.113635.100.6.1.13] /* exists */ and certificate leaf[subject.OU] = UBF8T346G9
Set App or service to SystemPolicyAllFiles and access to Allow.

As part of the Endpoint Detection and Response capabilities, Microsoft Defender ATP for Mac inspects socket traffic and reports this information to the Microsoft Defender Security Center portal. The following policy allows the network extension to perform this functionality.
Note
JAMF doesn’t have built-in support for content filtering policies, which are a pre-requisite for enabling the network extensions that Microsoft Defender ATP for Mac installs on the device. Furthermore, JAMF sometimes changes the content of the policies being deployed. As such, the following steps provide a workaround that involve signing the configuration profile.
Save the following content to your device as com.microsoft.network-extension.mobileconfig using a text editor:XML
<?xml version=”1.0″ encoding=”UTF-8″?><!DOCTYPE plist PUBLIC “-//Apple//DTD PLIST 1.0//EN” “http://www.apple.com/DTDs/PropertyList-1.0.dtd“>
<plist version=”1″>
<dict>
<key>PayloadUUID</key>
<string>DA2CC794-488B-4AFF-89F7-6686A7E7B8AB</string>
<key>PayloadType</key>
<string>Configuration</string>
<key>PayloadOrganization</key>
<string>Microsoft Corporation</string>
<key>PayloadIdentifier</key>
<string>DA2CC794-488B-4AFF-89F7-6686A7E7B8AB</string>
<key>PayloadDisplayName</key>
<string>Microsoft Defender ATP Network Extension</string>
<key>PayloadDescription</key>
<string/>
<key>PayloadVersion</key>
<integer>1</integer>
<key>PayloadEnabled</key>
<true/>
<key>PayloadRemovalDisallowed</key>
<true/>
<key>PayloadScope</key>
<string>System</string>
<key>PayloadContent</key>
<array>
<dict>
<key>PayloadUUID</key>
<string>2BA070D9-2233-4827-AFC1-1F44C8C8E527</string>
<key>PayloadType</key>
<string>com.apple.webcontent-filter</string>
<key>PayloadOrganization</key>
<string>Microsoft Corporation</string>
<key>PayloadIdentifier</key>
<string>CEBF7A71-D9A1-48BD-8CCF-BD9D18EC155A</string>
<key>PayloadDisplayName</key>
<string>Approved Network Extension</string>
<key>PayloadDescription</key>
<string/>
<key>PayloadVersion</key>
<integer>1</integer>
<key>PayloadEnabled</key>
<true/>
<key>FilterType</key>
<string>Plugin</string>
<key>UserDefinedName</key>
<string>Microsoft Defender ATP Network Extension</string>
<key>PluginBundleID</key>
<string>com.microsoft.wdav</string>
<key>FilterSockets</key>
<true/>
<key>FilterDataProviderBundleIdentifier</key>
<string>com.microsoft.wdav.netext</string>
<key>FilterDataProviderDesignatedRequirement</key>
<string>identifier “com.microsoft.wdav.netext” and anchor apple generic and certificate 1[field.1.2.840.113635.100.6.2.6] /* exists */ and certificate leaf[field.1.2.840.113635.100.6.1.13] /* exists */ and certificate leaf[subject.OU] = UBF8T346G9</string>
</dict>
</array>
</dict>
</plist>
Verify that the above file was copied correctly by running the plutil utility in the Terminal:

From the JAMF portal, navigate to Configuration Profiles and click the Upload button. Select com.microsoft.network-extension.signed.mobileconfig when prompted for the file.
Option 2: Endpoint Manager Deployment
To approve the system extensions:
- In Intune, open Manage > Device configuration. Select Manage > Profiles > Create Profile.
Choose a name for the profile. Change Platform=macOS to Profile type=Extensions. Select Create.

In the Basics tab, give a name to this new profile.
- In the Configuration settings tab, add the following entries in the Allowed system extensions section:
Bundle identifier
|
Team identifier
|
com.microsoft.wdav.epsext
|
UBF8T346G9
|
com.microsoft.wdav.netext
|
UBF8T346G9
|

- In the Assignments tab, assign this profile to All Users & All devices.
Review and create this configuration profile.
- Create and deploy the Endpoint Manager Custom Configuration Profile for MacOS Network Extension, Full Disk Access Policies
The following configuration profile enables the network extension and grants Full Disk Access to the Endpoint Security system extension.
Save the following content to a file named sysext.xml:
<?xml version=”1.0″ encoding=”UTF-8″?><!DOCTYPE plist PUBLIC “-//Apple//DTD PLIST 1.0//EN” “http://www.apple.com/DTDs/PropertyList-1.0.dtd“>
<plist version=”1″>
<dict>
<key>PayloadUUID</key>
<string>7E53AC50-B88D-4132-99B6-29F7974EAA3C</string>
<key>PayloadType</key>
<string>Configuration</string>
<key>PayloadOrganization</key>
<string>Microsoft Corporation</string>
<key>PayloadIdentifier</key>
<string>7E53AC50-B88D-4132-99B6-29F7974EAA3C</string>
<key>PayloadDisplayName</key>
<string>Microsoft Defender ATP System Extensions</string>
<key>PayloadDescription</key>
<string/>
<key>PayloadVersion</key>
<integer>1</integer>
<key>PayloadEnabled</key>
<true/>
<key>PayloadRemovalDisallowed</key>
<true/>
<key>PayloadScope</key>
<string>System</string>
<key>PayloadContent</key>
<array>
<dict>
<key>PayloadUUID</key>
<string>2BA070D9-2233-4827-AFC1-1F44C8C8E527</string>
<key>PayloadType</key>
<string>com.apple.webcontent-filter</string>
<key>PayloadOrganization</key>
<string>Microsoft Corporation</string>
<key>PayloadIdentifier</key>
<string>CEBF7A71-D9A1-48BD-8CCF-BD9D18EC155A</string>
<key>PayloadDisplayName</key>
<string>Approved Network Extension</string>
<key>PayloadDescription</key>
<string/>
<key>PayloadVersion</key>
<integer>1</integer>
<key>PayloadEnabled</key>
<true/>
<key>FilterType</key>
<string>Plugin</string>
<key>UserDefinedName</key>
<string>Microsoft Defender ATP Network Extension</string>
<key>PluginBundleID</key>
<string>com.microsoft.wdav</string>
<key>FilterSockets</key>
<true/>
<key>FilterDataProviderBundleIdentifier</key>
<string>com.microsoft.wdav.netext</string>
<key>FilterDataProviderDesignatedRequirement</key>
<string>identifier "com.microsoft.wdav.netext" and anchor apple generic and certificate 1[field.1.2.840.113635.100.6.2.6] /* exists */ and certificate leaf[field.1.2.840.113635.100.6.1.13] /* exists */ and certificate leaf[subject.OU] = UBF8T346G9</string>
</dict>
<dict>
<key>PayloadUUID</key>
<string>56105E89-C7C8-4A95-AEE6-E11B8BEA0366</string>
<key>PayloadType</key>
<string>com.apple.TCC.configuration-profile-policy</string>
<key>PayloadOrganization</key>
<string>Microsoft Corporation</string>
<key>PayloadIdentifier</key>
<string>56105E89-C7C8-4A95-AEE6-E11B8BEA0366</string>
<key>PayloadDisplayName</key>
<string>Privacy Preferences Policy Control</string>
<key>PayloadDescription</key>
<string/>
<key>PayloadVersion</key>
<integer>1</integer>
<key>PayloadEnabled</key>
<true/>
<key>Services</key>
<dict>
<key>SystemPolicyAllFiles</key>
<array>
<dict>
<key>Identifier</key>
<string>com.microsoft.wdav.epsext</string>
<key>CodeRequirement</key>
<string>identifier “com.microsoft.wdav.epsext” and anchor apple generic and certificate 1[field.1.2.840.113635.100.6.2.6] /* exists */ and certificate leaf[field.1.2.840.113635.100.6.1.13] /* exists */ and certificate leaf[subject.OU] = UBF8T346G9</string>
<key>IdentifierType</key>
<string>bundleID</string>
<key>StaticCode</key>
<integer>0</integer>
<key>Allowed</key>
<integer>1</integer>
</dict>
</array>
</dict>
</dict>
</array>
</dict>
</plist>
Verify that the above file was copied correctly. From the Terminal, run the following command and verify that it outputs OK:
Bash
$ plutil -lint sysext.xml
sysext.xml: OK
- To deploy this custom configuration profile: > In Intune, open Manage > Device configuration. Select Manage > Profiles > Create profile.
Choose a name for the profile. Change Platform=macOS and Profile type=Custom. > Select Configure. Open the configuration profile and upload sysext.xml. This file was created in the preceding step.
Select OK.

- In the Assignments tab, assign this profile to All Users & All devices.
- Review and create this configuration profile.
After this point, your environment is ready for MacOS devices to be upgraded to Big Sur, the MacOS newest version. MD for Endpoint on MacOS Devices will continue functioning normally after a successful OS upgrade.

Reference

by Contributed | Dec 24, 2020 | Technology
This article is contributed. See the original author and article here.
Assume you have a Existing Cluster
Resource Group: oldsf-rg
Cluster name: oldsfcluster
Step 1:
Go to Resource Group(oldsf-rg)- > Public IP address resource ->Configuration
Ensure you have static assignment, if not yet (If its Dynamic, when you associate old Public IP address to new Sf cluster, the IP address will get changed)
Step 2:
Please delete all the resources from the resource group (oldsf-rg) except your Public-Ip address resource.
Note: Do not delete the resource group directly, rather I would suggest you to delete the each resources separately in below order one by one( Since some resource will have dependency)
Order:
- Virtual machine scale set
- Service Fabric cluster
- Storage account (both)
- Virtual network
- Network security group
- Load Balancer
Now you will be having only Public IP address resource under your resource group (oldsf-rg)
Step 3:
Please create the new SF cluster with your desired configurations
Assume New SF name : newsfcluster
Please Note: Both Old and New Cluster has to be in Same region.
Once successful.
Step 4:
Go to New Resource group -> Load balancer resource-> Frontend IP configuration( left pane)
You will be able to see a dropdown as shown below, where your old Public IP address will be listed.

Associate the New LB to Old IP address and click on “Save”
Deployment Starts, please wait till the Deployment succeeded.
Step 5:
Once successful, Please verify below:
Old Public IP address is associated with New LB resource

Old Public IP address with New VMSS

Now you should be able to RDP into new node using old Public IP address (IPaddress:3389 )
Try Accessing the SFX with Public IP address:
https://XX.XXX.XXX.XXX:19080/Explorer/index.html#/
However when you click on SFX/Management Endpoint the one in Portal, you may get below Error:

Reason: Management Endpoint Domain is still pointing to Old DNS name which is no more resolving to Old public IP.
Step 6:
To map Management Endpoint Domain to New DNS name.
Go to new Public IP address resource -> Configuration
Copy the DNS value and Change the DNS name to some random value

And paste on Old Public IP address -> Configuration -> DNS name label

Now Azure-Portal-> SF cluster should point to new DNS name and SFX link should be accessible:


Recent Comments