by Scott Muniz | Dec 11, 2020 | Security
This article was originally posted by the FTC. See the original article here.
Scams can target specific communities, but they affect people in every community.
Brought to you by Dr. Ware, Microsoft Office 365 Silver Partner, Charleston SC.
by Contributed | Dec 11, 2020 | Technology
This article is contributed. See the original author and article here.
Today, when more and more organizations are using Microsoft Teams on a daily basis, we are happy to add more apps to our Marketplace that help our users, managers and employees enjoy using Teams more. This week we added Eloops, an employee engagement platform at Microsoft AppSource. With Eloops employees get to earn company virtual currency through engaging with content and activities like quizzes, challenges and a Peer-2-Peer recognition program and then redeem for rewards of their choosing in their virtual and customized company store. Eloops adds value by bringing a fun element to Teams.
Eloops helps HR professionals engage and align employees with company culture, values and goals at scale. The secret sauce behind the platform is endless pre-made content and virtual activities available in the Eloops marketplace that HRs can choose and customize based on short or long-term company needs. The content is designed to boost engagement, build company culture and improve overall employee experience.
Onboarding
Once you’ve added Eloops as an app to your Microsoft Teams account, you’re able to log into your Eloops account and you are immediately in the loop! (if If you don’t have an Eloops company account, you can easily create one and sign up using your Microsoft SSO!)
Engage & Earn Coins
Each company’s ‘Admins’ use the Eloops Dashboard to customize and send activities to their employees in Teams. Employees engage with the different content and earn themselves virtual coins.

Appreciate And Recognize Colleagues
Admins are able to customize the Peer-2-Peer Recognition feature by adding their company values. Employees are then able to reward their colleagues with virtual coins for ‘living’ these values as well as for other reasons.

Collect and Redeem Virtual Coins
Admins create their virtual currency by choosing its name, color, and how much employees will earn for participation and engaging with different activities.
The company store can also be customized with different gifts, experiences, and perks.

Measure and improve
Through the Eloops Dashboard, Admins can instantly find out which content works best, who are the most engaged employees or teams or departments, who are the most recognized employees, what are the most valued company values, and more!

Personalized Communications
Eloops allow managers to schedule, automate and send targeted and personalized messages to specific audiences and employees with special announcements, updates, birthdays and work anniversaries, or any kind of message from the Eloops dashboard.

How to get started?
If you haven’t already, you can install Eloops directly from Microsoft AppSource.
For more info and to see how Eloops works, go to https://eloops.com/microsoft-teams-app/.
Or if you prefer, watch this video to learn all about how to use Eloops in Microsoft Teams:

by Contributed | Dec 11, 2020 | Technology
This article is contributed. See the original author and article here.
Azure Durable Functions and External Events
Jaliya Udagedara is a Developer Technologies MVP based in Auckland, New Zealand. Originally from Sri Lanka, Jaliya is currently working as a Technical Lead for a US-based software development company. He has found his most significant interest in the world of Microsoft Software Development Technologies and Azure Stack. He likes to write blog posts and maintains his personal blog. Follow him on Twitter @JaliyaUdagedara

How to fix the borderless window “problem” in Windows Virtual Desktop
Robin Hobo is an Enterprise Mobility MVP and Senior Solutions Architect from the Netherlands who advises companies about the modern workplace. Robin is broadly oriented and has in-depth knowledge of various solutions like Windows Virtual Desktop (WVD) and Microsoft EM+S (including Microsoft Endpoint Manager – Microsoft Intune). For more, check out Robin’s blog and Twitter @robinhobo

Stay Up To Date With Power BI
Mohamed El-Qassas is a Microsoft MVP, SharePoint StackExchange (StackOverflow) Moderator, C# Corner MVP, Microsoft TechNet Wiki Judge, Blogger, and Senior Technical Consultant with +10 years of experience in SharePoint, Project Server, and BI. In SharePoint StackExchange, he has been elected as the 1st Moderator in the GCC, Middle East, and Africa, and ranked as the 2nd top contributor of all the time. Check out his blog here.

Windows Admin Center with Azure Security Center integration
James van den Berg has been working in ICT with Microsoft Technology since 1987. He works for the largest educational institution in the Netherlands as an ICT Specialist, managing datacenters for students. He’s proud to have been a Cloud and Datacenter Management since 2011, and a Microsoft Azure Advisor for the community since February this year. In July 2013, James started his own ICT consultancy firm called HybridCloud4You, which is all about transforming datacenters with Microsoft Hybrid Cloud, Azure, AzureStack, Containers, and Analytics like Microsoft OMS Hybrid IT Management. Follow him on Twitter @JamesvandenBerg and on his blog here.

WPF: HOW TO CONVERT BASE64 IMAGE TO BITMAPIMAGE
Asma Khalid is an Entrepreneur, ISV, Product Manager, Full Stack .Net Expert, Community Speaker, Contributor, and Aspiring YouTuber. Asma counts more than 7 years of hands-on experience in Leading, Developing & Managing IT related projects and products as an IT industry professional. Asma is the first woman from Pakistan to receive the MVP award three times, and the first to receive C-sharp corner online developer community MVP award four times. See her blog here.
by Contributed | Dec 11, 2020 | Technology
This article is contributed. See the original author and article here.
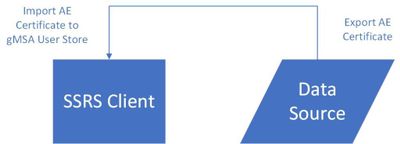
Let’s take a look at how to display Always Encrypted Data in SSRS with a gMSA (Group Managed Service Account). We are mixing some technologies and the one that throws a wrench into things is the gMSA. Here is the flow for moving the certificates.
Always Encrypted protects our data both at rest and in transit. To accomplish that, SQL only stores the encrypted data and cannot decrypt it; all the work is done by the client. In our case the client is SSRS and it is the account running the SSRS service that will need the certificate to decrypt data. Note that it is not the account running the report.
Certificate Stores
When configuring Always Encrypted, we have a choice between two key stores. In our example we will use the Windows Certificate Store. You can also use Azure Key Vault, but direct access with that method is not supported with SSRS. You could use the Windows Certificate Store, export the certificate, and import it into Azure Key Vault. However, SSRS cannot directly access Azure Key Vault.
The certificate is important because we must export it so we can later import it to our clients. Best practice is to run the Encrypt Column Wizard in SSMS from a server that is not the server hosting your data. This prevents us from accidentally leaving the cert on the server where if it gets compromised the attacker could get both the data and the certificate.
Always Encrypted Wizard
If you run the wizard from the client or application server, you have two choices. The first is to run SSMS as an administrator so you can store the certificate in the local machine store. This allows any application on the server to use the certificate if you give it permissions to do so. If you do not run SSMS as an administrator, you will only see the option to store the certificate in the local user store for the current user.

For our example we will use the Current User store to comply with the principal of “Least User Privilege“. Once we complete the Always Encrypted wizard, you can open Certificate Manager and export the cert making sure to include the private key.


Always Encrypted Certificate Import
We have our column encrypted and have exported the certificate. Next, we need to import it on the SSRS server. This is where the fun begins. You might be tempted to just import the certificate into the local machine store instead of the user store so all applications can use it. This does not work, and you will have to import into the user store for the account running the SSRS service. Normally you could right click the certificate manager and select “Run As” to be in the context of the account running SSRS. This does not work with a gMSA because you don’t know the password.
Get Creative
It’s time to get creative and break out some SysInternals tools. We are going to use PSExec to open Certificate Manager under the credentials of our SSRS gMSA account. We start by opening an administrative command prompt and executing the following from the location where we downloaded the SysInternals tools.

The first parameter -i is needed since we will be launching another command prompt interactively on the desktop. The second parameter -u provides our username and, in our case, the gMSA running the SSRS service. Remember that gMSA accounts need a $ sign at the end. The third parameter -p is the password for the gMSA account, but we do not know what it is. The ~ is allowed in place of the password. The last thing we provide is the executable we want to run. For us it will be another command prompt. Ideally, we would like to just run certmgr.exe from here, but that does not work.
Once you hit enter another command prompt will open where we can enter certmgr.exe to open the Certificate Manager under the context of our gMSA account. Now we can finally import the certificate.


View Your Reports
That’s it! Now you can go open your report in SSRS and see your Always Encrypted data displayed. These are some great security technologies, but it takes some outside of the box ideas to get them working together correctly.
by Contributed | Dec 11, 2020 | Technology
This article is contributed. See the original author and article here.
Purpose:
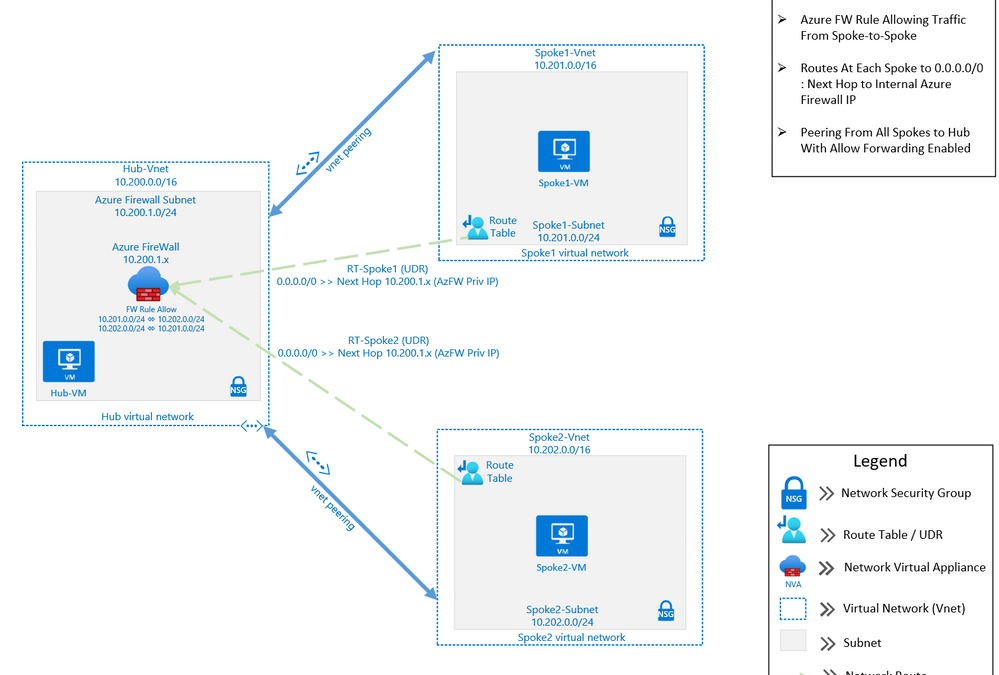
The purpose of this post is to demonstrate using Azure Firewall to control network traffic routing between Hub and Spoke networks in a Hub and Spoke Network Architecture. The Hub & Spoke Azure Architecture has become a common network topology for Azure deployments. The Cloud Adoption Framework describes this architecture in great depth. As with anything in cloud computing, there are several functional options to accomplish just about any goal but in this writing we will be focusing on how you can use the Azure Firewall as your routing device, also known as a Network Virtual Appliance, or NVA. We will walk through the process of building a Hub and Spoke Network Architecture that includes Spoke-to-Spoke routing. The key components that we will use to build this architecture are Azure Firewall, Route Tables (or UDR’s), and Virtual Network Peering (Vnet Peering).
This architecture can be used in many situations. A common scenario would be an enterprise network that may have resources that run between two or more Virtual Networks. In this scenario, there may be a web front-end, an application and a data tier that may need to communicate between with one another across those virtual networks. If these tiers are in different Virtual Networks, then routing will need to occur in order for network traffic to be able to cross those Virtual Network boundaries (e.g., data tier communicating with app or web tier). This writing will describe how to setup a solution to accomplish these goals.

Assumptions: Knowledge of creating Azure virtual machines and Azure virtual networks, as well as user-defined routes and peering is assumed. The firewall rules described in this writing will allow all outbound traffic from resources in Spoke1 and Spoke2. This configuration is for demonstration purposes only. Depending on the security posture needed for a production environment, this configuration would likely be more tightly controlled from the firewall. For our demonstration purposes, this configuration is being used for functionality and convenience.
Here are the required items to deploy this solution:
Resource Group:
Virtual Networks:
- Hub
- Address Space: 10.200.0.0/16
- Subnet named AzureFirewallSubnet : 10.200.1.0/24
- Subnet named hub-subnet: 10.200.0.0/24
- Spoke1
- Address Space: 10.201.0.0/16
- Subnet named spoke1-subnet: 10.201.0.0/24
- Spoke2
- Address Space: 10.202.0.0/16
- Subnet named spoke2-subnet: 10.202.0.0/24
Virtual Network Peering:
- Hub peers with Spoke1 (bi-directional)
- Forwarding must be enabled
- Hub peers with Spoke2 (bi-directional)
- Forwarding must be enabled
Route Tables:
- RT-Spoke1
- Attached to default subnet in Spoke1-Vnet.
- Routes:
- 0.0.0.0/0: Next Hop: <<Azure Firewall Private IP>>
- RT-Spoke2
- Attached to default subnet in Spoke2-Vnet.
- Routes:
- 0.0.0.0/0: Next Hop: <<Azure Firewall Private IP>>
Azure Firewall:
- NAT Rule Collection:
- Rule 1, priority 1000 allow:
- Spoke1-RDP, allow traffic from any source to destination firewall public IP address on port 3389 which is translated to Spoke1 VM private IP address on port 3389
- Network Rule Collections:
- Rule 1, priority 2000, allow:
- Spoke1-Outbound, allow all traffic from source 10.201.0.0/24 to any destination, all ports
- Spoke2-Outbound, allow all traffic from source 10.202.0.0/24 to any destination, all ports
Virtual Machines:
- (3) Windows VM’s
- (1) VM in Hub VNet, hub-subnet
- (1) VM in Spoke1 VNet, spoke1-subnet
- (1) VM in Spoke2 Vnet, spoke2-subnet
Step-by-step:
- Create the three virtual networks as outlined above: one hub and two spokes. Also create two Azure Virtual Machines of any size and without public IP addresses and place one on each spoke virtual network.
- Peer Spoke1 with the hub and peer Spoke2 with the hub. Do NOT peer Spoke1 and Spoke2. Enable the following settings on each peering:

Note: If you have a VPN gateway on the hub network and wish to use it to connect to an on-premise network, select “Use this virtual network’s gateway” on the hub peering.
When complete, the peering should indicate Connected:

- Create an Azure Firewall resource and place it in the hub virtual network. Assign an existing public IP address or add a new one. Since we are using the Azure Firewall as the virtual appliance, there is no need to enable Forced Tunneling to be able to send traffic to a secondary virtual appliance.
Azure Portal -> search for and click Firewalls -> click Add:

When the firewall resource is created, access it (Azure Portal -> search for and click Firewalls -> click the newly created firewall) and click Overview. Make note of the firewall’s public and private IP addresses as starred below:

- Create a user-defined route (UDR) route for Spoke1. The route will point all traffic (0.0.0.0/0) to the Azure Firewall private IP address gathered in step 3. To complete this step, you will need to create a Route Table with the following settings:
- Routes
- Address Prefix: 0.0.0.0/0
- Next Hop Type: Virtual Appliance
- Next Hop Address: <<Private IP of Azure Firewall>>
- Subnets
- Associate to the subnet for Spoke1, in our example 10.201.0.0/24
The completed routes should look like this:

- Create a similar route for Spoke2 and associate it to that subnet. It should look like this:
- Routes
- Address Prefix: 0.0.0.0/0
- Next Hop Type: Virtual Appliance
- Next Hop Address: <<Private IP of Azure Firewall>>
- Subnets
- Associate to the subnet for Spoke2, in our example 10.202.0.0/24.

- Within Azure Firewall, create a NAT rule collection for the Spoke1 VM with priority 1000. This will allow inbound RDP to the chosen VM. Note the Destination Address in the rule is the firewall’s public IP address gathered in step 3 and the Translated address is the Spoke1 VM private IP address. Use port 3389 for both the Destination and Translated ports. This rule effectively says, “For inbound traffic to my firewall’s public IP address on port 3389, translate it to my Spoke1 VM private IP address also on port 3389.”
Note: Allowing RDP to a VM is fine in our test setting but in a production environment another more secure arrangement (such as using a jump box) would be a better practice.
Azure Portal -> search for and click Firewalls -> click the newly-created firewall -> under Settings click Rules -> click NAT rule collection -> click Add NAT rule collection -> configure the rule using the settings below -> click Add to save the rule.

- Still in Azure Firewall, create a Network rule collection for the spokes with priority 2000 that will allow RDP traffic between the spokes and any destination.
Note it is possible to create just one rule to accomplish this but creating two rules, one per spoke, allows for changes to just one spoke, i.e., if you wanted to allow traffic from just one spoke to the other but not the internet.
In the firewall under Settings click Rules -> click Network rule collection -> click Add network rule collection -> configure the rule using the settings below -> click Add to save the rule.

- Now that everything is in place, let’s test it by using RDP to connect to the Spoke1 VM. Note to do this, you connect to the Spoke1 VM using the firewall public IP address in your RDP client. The sole NAT rule collection we created will send the traffic to the Spoke1 VM. Once logged in, perform the following tests:
- Ping the Spoke2 VM.
- Tracert to the Spoke2 VM -> verify the firewall private IP is the first hop, noting that sometimes the IP listed will not be the actual firewall IP but an IP in the same firewall subnet.
- Tracert to bing.com -> very the firewall private IP is the first hop (again, could be IP on same subnet)
- Open a web browser and visit https://whatismyipaddress.com/. Verify the public IP address this site returns matches the firewall’s public IP address listed on the firewall’s Overview page.
These tests show that intra-spoke and internet traffic goes through the Azure Firewall.
Conclusion:
If all tests are successful you have used Azure Firewall to route virtual network traffic between hub and spokes as well as the internet. Not only have you made your network more secure, but you have avoided a complex NVA solution and configuration.
Note the Azure Firewall has many deployment options, including using the Firewall Manager with Secure Virtual Networks and Hub Virtual Networks, each of which offers different security and deployment options. For further information, see the documentation for Azure Firewall and Azure Firewall Manager (links for both services found below).
Happy routing!
Further Reading:
Authors: @DJBartles / @PatrickHorn

Recent Comments