
by Contributed | Dec 30, 2020 | Technology
This article is contributed. See the original author and article here.
Before. 2020. Blink. Breathe. 2021 (soon). Breathe. Begin.
To close out the year, December 2020 brought many a new offering: SharePoint site header updates, send pages to Yammer, “SharePoint Success” site template, add Microsoft Teams to SharePoint team sites update (aka, Teamify), Microsoft Lists adoption center, Microsoft Graph Toolkit v2.0, and more. Details and screenshots below, including our audible companion: The Intrazone Roadmap Pitstop: December 2020 podcast episode – all to help answer, “What’s rolling out now for SharePoint and related technologies into Microsoft 365?” Blink. Breathe.
https://html5-player.libsyn.com/embed/episode/id/17363762/height/90/theme/custom/thumbnail/yes/direction/backward/render-playlist/no/custom-color/247bc1/
In the podcast episode, listen to an exclusive chat with @Tejas Mehta (LinkedIn | Twitter), principal program manager on the SharePoint team who owns content services integration work with Microsoft Teams. I nabbed a 6ft-apart check-in with Tejas to talk about life for SharePoint before Teams, ongoing integration work including this month’s #teamify update, and what the future may bring in this space. Also, exclusive this month on The Intrazone, we share the Top 10 SharePoint features released in 2020.
Tejas Mehta, principal program manager at Microsoft (SharePoint + Teams integration) [Intrazone guest]; myself and Tejas social-distanced, 6ft-pic-nic table-apart podcasting at Sammamish Commons.
All features listed below began rolling out to Targeted Release customers in Microsoft 365 as of December 2020 (possibly early January 2021). Blink. Breathe.
Inform and engage with dynamic employee experiences
Build your intelligent intranet on SharePoint in Microsoft 365 and get the benefits of investing in business outcomes – reducing IT and development costs, increasing business speed and agility, and up-leveling the dynamic, personalized, and welcoming nature of your intranet.
SharePoint site header updates
We are making it easier to customize the header of your site. The default site header for new SharePoint sites will be the compact header instead of the standard header. Site owners will see updated options in the “Change the Look” panel, including: a minimal header which has a reduced height to provide quick, visual access to content, an extended header includes an optional background image, expanded site logo widths, and options for logo alignment – left, middle, right. And now it’s easy to toggle site title label to be on or off.
 From the upper-right gear icon, click into the “Change the look” panel, select “Header” and then customize it the way you prefer.
Now you can truly control your site’s first impression, starting at the very top with the site header – just the way you want it.
Send SharePoint pages to Yammer
Expand the reach and the conversation of your SharePoint pages news posts. You can now send articles from SharePoint directly into Yammer communities and include questions, polls, praise, and rich text. It’s also possible to upload images and files to the post linked to the share.
 The SharePoint Send-to-Yammer dialog provides a rich preview for media and the ability add text to the post.
Page to post in a few clicks.
“SharePoint Success” site template
Now available via the SharePoint Look Book, the “SharePoint Success” site template is a ready to deploy, customizable SharePoint communication site that helps your colleagues create high-impact sites to meet the goals of your organization. It comes pre-populated with site creation inspiration and training on how to create high quality and purposeful SharePoint sites. You’ll find Microsoft maintained SharePoint training content feed, success stories, and site creation guidelines.
 Make this site your own to establish a learning destination to help everyone make SharePoint a success for your organization.
Teams and OneDrive destinations when using Migration Manager in the SharePoint admin center
Admins now have greater visibility and choice selecting destination(s) for files and folders when moving content from on-premises file shares into Microsoft 365. New beyond SharePoint, admins can select OneDrive usernames or URLs and/or select various Teams team and channels as migration destinations – moving files exactly where you want them.
 When moving files and folders into Microsoft 365 from on-premises file shares, admins choose OneDrive, SharePoint, and Teams as destinations.
A note on credentials: You need to have access to the destination as a global admin or OneDrive/SharePoint admin to the Microsoft 365 tenant where you want to migrate your content to, and access to the source; aka, Windows credentials that have read access to any of the network file shares you plan to migrate.
Teamwork updates across SharePoint team sites, OneDrive, and Microsoft Teams
Microsoft 365 is designed to be a universal toolkit for teamwork – to give you the right tools for the right task, along with common services to help you seamlessly work across applications. SharePoint is the intelligent content service that powers teamwork – to better collaborate on proposals, projects, and campaigns throughout your organization – with integration across Microsoft Teams, OneDrive, Yammer, Stream, Planner and much more.
Add Microsoft Teams to your SharePoint team site
We’re pleased to announce that we are making it even easier to bring SharePoint content into Teams, in the same motion of adding Microsoft Teams to your team site, aka #teamify. As you connect SharePoint to Teams, you choose what lists, libraries, and pages you want to bring into Teams as tabs in the new, default General channel.
 Choose what SharePoint lists, libraries, and pages to bring into Microsoft Teams as tabs in the new, default General channel when adding Teams to your SharePoint team site.
By default, your team site home page will be selected, you can change it to suit your needs, and you can fully navigate the primary document library from the Files tab – just follow the new folder breadcrumbs from the channel folder up to the root of the library. This helps bring content and collaboration to more of the sites you use for teamwork excellence.
Microsoft Lists adoption center on adoption.microsoft.com (managed by @Andrea Lum)
Simplify and accelerate your time to value throughout your organization. We know your time is important, so we’ve created adoption materials to help onboard employees at scale while being confident that you are improving the employee experience.
For Microsoft Lists, you’ll find an adoption playbook, day-in-the-life guides, a quick start guide, a look book, internal communication templates, pointers to documentation and training, plus materials to help build an internal Lists champion program within your organization.
 Screenshot showing the Microsoft Lists adoption center at https://aka.ms/ListsAdoption.
Learn more:
Related technology
OneDrive 2020 summary of highlights
It was a big year for OneDrive. And much of the value you see promoted by and for OneDrive also improves productivity experiences within SharePoint and Teams. Things like differential sync, 100GB file uploads, Add to OneDrive, expiring access for external users, and more.
This month’s The Intrazone Roadmap Pitstop: December 2020 audio companion (above) contains a segment of audio where we hear from @Randy Wong, Principal PM Manager, recap 2020 and explain the 200 million monthly active user impact on the service and how the team work hard to keep pace with both scale and innovation.
 PowerPoint slide from Microsoft Ignite 2020 highlighting the OneDrive 2020 roadmap.
The above below is a roadmap summary PowerPoint slide from Microsoft Ignite 2020, taken from the “What’s new and coming to OneDrive” session presented by @Ankita Kirti and @Jason Moore.
The Microsoft Graph Toolkit 2.0
A better dev toolkit is better for everyone. The Microsoft Graph Toolkit is great for developers of all experience levels looking to develop a web application, Microsoft Teams tab, or SharePoint web part that connects to and accesses data from Microsoft Graph. Collectively, it’s a collection of components and providers designed to ease app integration with Microsoft Graph – as easy as writing two lines of code. In 2.0, you’ll find reusable, framework-agnostic components and authentication providers for accessing and working with Microsoft Graph:
- Now broken into several packages so you only get the code you need.
- A new React package, making it simpler to use the toolkit when developing React applications by wrapping all components and exporting them as React components.
- New components like the Person Card 2.0, a new To Do component, and all components have better caching, theming, localization, accessibility with general bug fixes all around.
1.0 was so yesterday. 2.0 is here and awaits your Graph-powered apps. Dev with it today!
SharePoint and Microsoft Lists sweater backgrounds for Microsoft Teams meetings
Be the foreground. Be it in memory of the holidays, a New Year’s Eve Teams call, or you just wanna get cozy and warm on any chat or concall in 2021. SharePoint, Lists and many others got your back(ground) in Teams meetings.
 Some examples of what the cozy Microsoft-365-app-inspored holiday backgrounds look like in Microsoft Teams; clockwise from top left: Wenvi Hidayat + SharePoint + Christmas, Ben Truelove + Lists + Christmas, Mark Kashman + SharePoint + Hanukkah + Teams, and YOU + SharePoint.
Big thanks to my colleagues @Wenvi and @Ben Truelove for creating and getting these out there – and to our community members, Jason Custer and Michael Gillet.
Follow this all-in-one tweet thread to see all the designs and link to grad the full-res version that most captures your mood. Plus learn how to change your background for a Microsoft Teams meeting.
January 2021 teasers
Psst, still here? Still scrolling the page looking for more roadmap goodness? If so, here is a few teasers of what’s to come to production next month…
- Teaser #1 | JSON list form customization: footer, header, body [Roadmap ID: 63519]
- Teaser #2 | Microsoft Lists: Integrate menu item [Roadmap ID: 64869]
… shhh, tell everyone.
Helpful, ongoing change management resources
- Follow me to catch news and interesting SharePoint things: @mkashman; warning, occasional bad puns may fly in a tweet or two here and there.
Thanks for tuning in and/or reading this episode/blog of the Intrazone Roadmap Pitstop – December 2020 (blog/podcast). We are open to your feedback in comments below to hear how both the Roadmap Pitstop podcast episodes and blogs can be improved over time.
Engage with us. Ask questions. Push us where you want and need to get the best information and insights. We are here to put both our and your best change management foot forward.
Stay safe out there on the road’map, and thanks for listening and reading.
Appreciate your time,
Mark “HNY” Kashman – senior product manager (SharePoint/Lists) | Microsoft)
 The Intrazone Roadmap Pitstop – December 2020 graphic showing some of the highlighted release features.
Subscribe to The Intrazone at aka.ms/TheIntrazone, or where you get your podcasts (direct links to The Intrazone on various podcast platforms:
And listen and subscribe to other Microsoft podcasts: aka.ms/microsoft/podcasts
 The Intrazone, a show about the Microsoft 365 intelligent intranet: https://aka.ms/TheIntrazone.
by Contributed | Dec 30, 2020 | Technology
This article is contributed. See the original author and article here.
Hello readers  ,
,
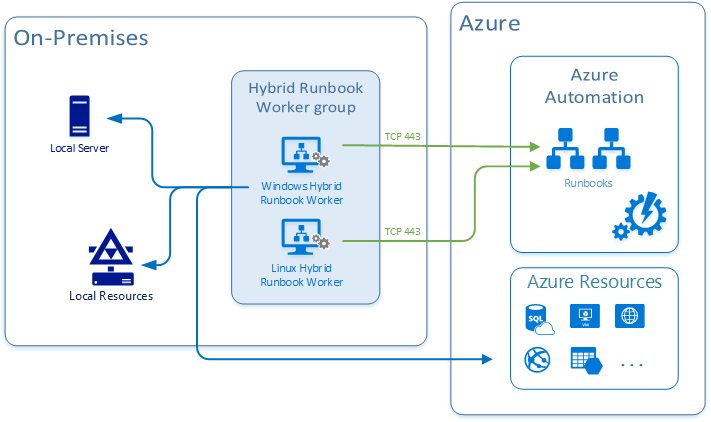
The Azure Automation question of today is: how can we manage (registration or de-registration) the Hybrid Runbook Workers (HRW) at scale?
In this automated world, it is fool to think that we need to go each computer one by one and run a given script to accomplish the task for the question above. My customers were struggling to find a solution to the question.
For those of you which are not aware of what an HRW is, let me give a brief description of it: Hybrid Runbook Worker feature of Azure Automation can be used to run runbooks directly on the machine (read: inside the guest OS) that’s hosting the role and against resources in the environment to manage those local resources. Hence, this feature can enable the interaction with any physical or virtual on-prem server, Azure VM as well as with any 3rd party cloud VMs.
You can read more on the official documentation page at https://docs.microsoft.com/en-us/azure/automation/automation-hybrid-runbook-worker
Coming back to the question, I found some methods to manage your HRWs at scale. The choice, which is always up to you, could be influenced by the products and the configurations already in use in your data center.
Below, I am going to describe 3 common ways:
Let’s start then …
Using Azure Automation State Configuration
As first method presented here, we can use Azure Automation State Configuration to manage our HRW at scale. Thanks to my colleague @Anthony Watherston, I was able to provide my customer with a DSC configuration file to fulfill the request.
In this case, the given computer(s), has to be already onboarded as DSC node (see Enable Azure Automation State Configuration | Microsoft Docs for more details).
So, assuming that DSC nodes are configured correctly, you can move on adding your configuration and then compiling it to make it usable by the nodes. Last step will be to assign a compiled configuration to a node (or nodes) to be applied to.
I will not dig into all necessary phases (adding, compiling, and assigning configuration). I’ll just focus on the method and will provide you with the sample configuration file (basically a .ps1 file) that you can compile and use to onboard the HRW.
NOTE: This script can onboard either a single HRW or a group, depending on the optional parameter hrwName. If you pass an empty value, then it will be assigned to the NetBIOS computer name, thus creating a single HRW.
Configuration OnboardHRW
{
    Param(
        [Parameter(Mandatory=$True)]
        [ValidateNotNullOrEmpty()]
        [string]$primaryKey,

        [Parameter(Mandatory=$True)]
        [ValidateNotNullOrEmpty()]
        [string]$endPointUrl,

        [Parameter(Mandatory=$false)]
        [string]$hrwName
        )

    Import-DscResource -ModuleName 'PSDesiredStateConfiguration'

    Node localhost
    {
        Script onboard
        {
            GetScript = { return @{Present = $true } }
            TestScript = {
                if (Test-Path HKLM:SOFTWAREMicrosoftHybridRunbookWorker)
                {
                    $epURL = $using:endPointUrl
                    $dir = Get-ChildItem HKLM:SOFTWAREMicrosoftHybridRunbookWorker | Where-Object PSChildName -eq $epURL.Split("/")[-1]
                    if ($dir)
                    {
                        if((Get-ChildItem HKLM:SOFTWAREMicrosoftHybridRunbookWorker$($epURL.Split("/")[-1])).Name.Count -gt 1 )
                        {
                            return $true
                        }
                        else
                        {
                            return $false
                        }
                    }
                    else
                    {
                        return $false
                    }
                }
                else
                {
                    return $false
                }
            }
            SetScript = {
                # Getting the AutomationAccount version directly from the folder inside the server. Saving 1 parameter.
                $AzureAutomationVersion = Get-ChildItem -LiteralPath "C:Program FilesMicrosoft Monitoring AgentAgentAzureAutomation" | Select -ExpandProperty Name

                # Validating group name paramter or setting the HRW name to be the NetBIOS computer name
                $myHrwName = $using:hrwName

                if(([string]::IsNullOrEmpty($myHrwName)) -or ([string]::IsNullOrWhitespace($myHrwName)))
                {
                    $myHrwName = $env:COMPUTERNAME
                }
                else
                {
                    $myHrwName = $myHrwName.Trim()
                }

                Import-Module -FullyQualifiedName "C:Program FilesMicrosoft Monitoring AgentAgentAzureAutomation$AzureAutomationVersionHybridRegistrationHybridRegistration.psd1"
                Add-HybridRunbookWorker -GroupName $myHrwName -Url $using:endPointUrl -Key $using:primaryKey
            }
        }
    }
}
You can modify the above configuration to be compiled using PowerShell instead of using the Azure State Configuration from the portal or to unregister the HRW. Give the Azure Automation State Configuration enough time (based on the node onboarding settings you have specified) and you will get your HRW registered on all assigned nodes.
The ‘PowerShell Remoting’ way
Another good method that I followed during some of my on-sites, is based on a PowerShell script that I created to make the HRW management at scale possible.
I came up with the idea of having a list of HRW, for instance in a csv file (in this case the content is supposed to be a 1:1 match of the HRW names with the computer names plus the necessary action) and passing each record as well as the necessary additional parameters to the script. This script could be executed from one computer to manage (just) one or more servers, according to what’s in the list. In case of multiple entries, we could leverage the PowerShell Remoting.
The structure of the csv is quite simple, it’s just a list of names followed by the corresponding action and separated by a comma (“,”) like the one in the screenshot below:

The script will read the list and for every record will perform the registration:
- Locally if the local computer name is equal to one of the records.
- Remotely using PowerShell Remoting, if none of the records is matching the local computer name.
NOTE: Actions have been defined according to those available in the HybridRegistration PowerShell module. Refresh is an additional one which just execute Remove and Add in sequence.
The remote installation will be done using a dedicated remote session established every time with the New-PSSession cmdlet.
You can leverage my sample script below or create a brand new one if you like. The code I used is:
param(
        [Parameter(Mandatory=$True,
                ValueFromPipelineByPropertyName=$false,
                HelpMessage='Insert the automation account endpoint from the Azure Portal --> Automation Account --> Keys --> URL',
                Position=0)]
                [string]$AutomationAccountURL,
        [Parameter(Mandatory=$True,
                ValueFromPipelineByPropertyName=$false,
                HelpMessage='Insert the automation account key from the Azure Portal --> Automation Account --> Keys --> Primary Access Key',
                Position=0)]
                [string]$AutomationAccountKey
)

#Region Functions

Function doAction ([string]$fAction, [string]$fAutomationAccountURL, [string]$fAutomationAccountKey, [string]$fAzureAutomationVersion, [string]$fRegKey)
{
    #Logging action and computer
    Write-Host "Performing action <$fAction> on server <$env:COMPUTERNAME>"

    Switch($fAction)
    {
        "Remove"
        {
            try
            {
                Remove-HybridRunbookWorker -url $fAutomationAccountURL -key $fAutomationAccountKey -ErrorAction Stop
                write-host "The hybrid worker <$env:COMPUTERNAME> has been succesfully de-registered." -ForegroundColor Green
            }
            catch
            {
                Write-Host "The hybrid worker <$env:COMPUTERNAME> was not registered."
            }

            if (Test-Path $fRegKey)
			{
				write-host "Deleting the corresponding registry key <$fRegKey> and all its subkeys."
				Remove-Item $fRegKey -Recurse
				write-host "Registry key <$fRegKey> and all its subkeys have been successfully deleted." -ForegroundColor Green
			}
			else
			{
				write-host "The corresponding registry key <$fRegKey> was not existing or has been succesfully removed by the de-registration process" -ForegroundColor Yellow
			}

    		# Restarting the service
            Restart-Service healthservice
        }

        "Add"
        {
            if(Test-Path "C:Program FilesMicrosoft Monitoring AgentAgentAzureAutomation$fAzureAutomationVersionHybridRegistration")
            {
                cd "C:Program FilesMicrosoft Monitoring AgentAgentAzureAutomation$fAzureAutomationVersionHybridRegistration"
                Import-Module .HybridRegistration.psd1
                try
                {
                    Add-HybridRunbookWorker -Name $env:COMPUTERNAME -EndPoint $fAutomationAccountURL -Token $fAutomationAccountKey -ErrorAction Stop
                    write-host "The hybrid worker <$env:COMPUTERNAME> has been succesfully registered." -ForegroundColor Green
                }
                catch
                {
                    Write-Host "Exception generated while registering hybrid worker <$env:COMPUTERNAME>. The error is: $($_.exception)" -ForegroundColor Red
                }
            }
            else
            {
                write-host "Path 'C:Program FilesMicrosoft Monitoring AgentAgentAzureAutomation$fAzureAutomationVersionHybridRegistration' does not exist on computer <$env:COMPUTERNAME>. Check if the MMA is installed and that the AzureAutomation version folder is correct." -ForegroundColor Red
            }
        }

        "Refresh"
        {
            # Performing a remove operation
            try
            {
                Remove-HybridRunbookWorker -url $fAutomationAccountURL -key $fAutomationAccountKey -ErrorAction Stop

				if (Test-Path $fRegKey)
				{
				    Remove-Item $fRegKey -Recurse
				}

    		    # Restarting the service
                Restart-Service healthservice

				# Performing an Add operation
				if(Test-Path "C:Program FilesMicrosoft Monitoring AgentAgentAzureAutomation$fAzureAutomationVersionHybridRegistration")
				{
					cd "C:Program FilesMicrosoft Monitoring AgentAgentAzureAutomation$fAzureAutomationVersionHybridRegistration"
					Import-Module .HybridRegistration.psd1
					try
					{
							Add-HybridRunbookWorker -Name $env:COMPUTERNAME -EndPoint $fAutomationAccountURL -Token $fAutomationAccountKey -ErrorAction Stop
							write-host "The hybrid worker <$env:COMPUTERNAME> has been succesfully re-registered (refresh)." -ForegroundColor Green
					}
					catch
					{
							Write-Host "Exception generated while registering hybrid worker <$env:COMPUTERNAM>. The error is: $($_.exception)" -ForegroundColor Red
					}
				}
				else
				{
						write-host "Path 'C:Program FilesMicrosoft Monitoring AgentAgentAzureAutomation$fAzureAutomationVersionHybridRegistration' does not exist. Check if the MMA is installed and that the AzureAutomation version folder is correct." -ForegroundColor Red
				}
			}
            catch
            {
                Write-Host "Exception generated while removing hybrid worker <$env:COMPUTERNAME>. The error is: $($_.exception)" -ForegroundColor Red
            }
        }
    }
}

#endregion

$currentLocation = Get-Location
$regKey = "HKLM:SOFTWAREMICROSOFTHybridRunbookWorker"
$AzureAutomationVersion = Get-ChildItem -LiteralPath "C:Program FilesMicrosoft Monitoring AgentAgentAzureAutomation" | Select -ExpandProperty Name

$srvList = Get-Content ".ServerList.csv"
ForEach ($srv in $srvList)
{
    If (!($srv -like "#*")-and !([string]::IsNullOrEmpty($srv)))
    {
        #parsing file
        [string]$srvName = $srv.Split(",")[0].trim(""",""");
        [string]$Action = $srv.Split(",")[1].trim(""",""").trim(" "," ");

        Set-Location $currentLocation
        Start-Transcript -Path ".Manage-HybridWorker-At-Scale-$srvName.Log"

        if($srvName -eq $env:COMPUTERNAME)
        {
            #Installing locally
            Write-Host "======================================================" -ForegroundColor Magenta
            Write-Host "======================================================" -ForegroundColor Magenta
            write-host "Executing locally on server <$srvName>." -ForegroundColor Cyan
            doAction $Action $AutomationAccountURL $AutomationAccountKey $AzureAutomationVersion $regKey
        }
        else
        {
            #Installing remotely
            Write-Host "======================================================" -ForegroundColor Magenta
            Write-Host "======================================================" -ForegroundColor Magenta
            write-host "Connecting to server <$srvName> using PowerShell Remote session." -ForegroundColor Cyan
            $psrSess = New-PSSession -ComputerName $srvName

            If($psrSess.State -eq "Opened")
            {
                Invoke-Command -Session $psrSess -ScriptBlock ${function:doAction} -Args $Action, $AutomationAccountURL, $AutomationAccountKey, $AzureAutomationVersion, $regKey
                #write-host "Installation on server <$srvName>, finished." -ForegroundColor Green
            }
            else
            {
                write-host "Error opening the remote session on server <$srvName>" -ForegroundColor Green
            }
            Remove-PSSession $psrSess
        }

        Stop-Transcript
    }
}

Set-Location $currentLocation

#Logging and of script
Write-Host "All the servers in the file have been processed."
Write-Host "<<End of script>>"
To run it, you can use the command below. Make sure you replace the highlighted values:
.Manage-HybridWorker-At-Scale.ps1 -AutomationAccountURL "<PUT_YOUR_AUTOMATIONACCOUNT_URL>" -AutomationAccountKey "<PUT_YOUR_AUTOMATIONACCOUNT_PRIMARYACCESSKEY>"
Leveraging SCOM
There’s also another way to achieve our goal. During a customer engagement, something shone a light in me. This customer was still using SCOM and he had the SCOM Management management pack (aka mp) from Kevin Holman imported. Should you want to know more about importing management packs, please refer the How to Import, Export, and Remove an Operations Manager Management Pack | Microsoft Docs page.
One of the greatest features in this MP is that you can execute any PowerShell script. Here comes the idea. Since all the agents were directly connected with Log Analytics and the necessary solution in place (see Deploy a Windows Hybrid Runbook Worker in Azure Automation | Microsoft Docs), why not using this agent task passing a one-line script to it? Doing this way, we could make multiple selection, meaning that we will configure at scale.
By now, you should have everything necessary in place to go ahead with this proposed approach. If so:
- Open the Operations Console (see How to Connect to the Operations and Web Console | Microsoft Docs).
- In the bottom-left corner, select Monitoring.

- In the folder list, navigate to the SCOM Management view folder, expand it and select SCOM Agents.

- In the center pane, select the agents you want to register as HRW.

- In the Task pane on the right, under the SCOM Management Base Class Tasks, click on the task called Execute any PowerShell.

- Click on Override.

- Configure the ScriptBody parameter with one of the commands below according to the purpose and click Override:
Add-HybridRunbookWorker -Name "$env:COMPUTERNAME" -EndPoint "<YourAutomationAccountUrl>" -Token "<YourAutomationAccountPrimaryAccessKey>”
Remove-HybridRunbookWorker -url "<YourAutomationAccountUrl>" -key "<YourAutomationAccountPrimaryAccessKey>"

NOTE: You should replace the values in the above command with those pertaining to your environment.
- Click Run.

These 3 methods are surely not the only ones existing, but they’re a good starting point to start thinking AT SCALE. Isn’t it  ?
?
Thanks for reading,
Bruno.
by Contributed | Dec 29, 2020 | Technology
This article is contributed. See the original author and article here.
Introduction
One of the ways that BizTalk can access SAP servers is by using Business Application Programming Interfaces (BAPIs), as documented in Operations on BAPIs in SAP. SAP introduced BAPIs as an object-oriented way to structure business data and processes. It is assumed that the reader has some familiarity with how to use this functionality in BizTalk.
In this article, we conclude our series on BAPI transactions by presenting, step by step, another implementation of the sales orders received in batches and created in SAP by using BAPI transactions. The following was covered in past articles:
The design here is a combination of the previous concepts into a solution that integrates the powerful BizTalk pipeline features such as batch processing, XML disassembly, XML validation, and Recoverable Interchange Processing (RIP). It is also the opportunity to provide more details on topics that were briefly touched upon, in the same step by step style – the intent being to serve as the “missing documentation” for SAP BAPI transactions in BizTalk. We present how to:
- Leverage XML disassembler and XML validator in the receive location in order to “front-load” the verifications previously done in the orchestration presented in Handling Errors in SAP BAPI Transactions.
- Write a custom pipeline component to promote properties (such as BTS.InterchangeID) needed for the same orchestration instance to process all messages in a batch as a single SAP Logical Unit of Work (LUW).
- Implement layered verifications to improve the granularity of error handling presented in Handling Errors in SAP BAPI Transactions and find errors before they get to the send adapter.
All code is provided in the archive attached to this blog post.
NOTE: Starting with BizTalk Server 2016 CU6 and BizTalk Server 2020 CU1, BAPI transactions need to be enabled explicitly, by creating the registry value HKLMSOFTWAREMicrosoftBizTalk Server3.0ConfigurationEnableBizTalkSapSessionProvider of type DWORD and setting it to ‘1’, as documented in the fix page.
|
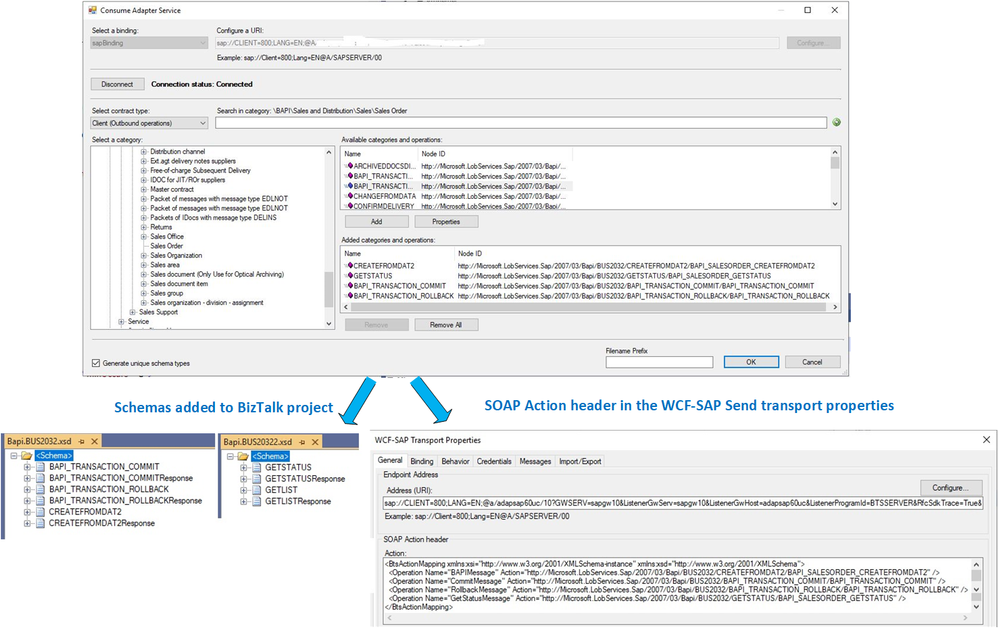
1. BAPI Operations and Schemas
In the demo scenario, sales orders are received under the form of XML documents and transformed to BAPI Sales Order (BUS2032). The first pre-requisite is to download schemas and metadata for BAPI transactions by using the “Consume Adapter Service” in Visual Studio, as explained in this section of the SAP Adapter documentation.
The figure below depicts the generated schemas for the BAPI methods BUS2032.CREATEFROMDAT2 (shortened to CREATEFROMDAT2 in the rest of this article) and BAPI_TRANSACTION_COMMIT.
BAPI Schema Generation
On the receiving side of BizTalk, we consider the general case where sales orders follow a simplified schema (Order) that may not necessarily correspond to the BAPI schema. A single XML document contains multiple orders, which are debatched in the receive location.
 Order Schema
The first step for using a debatching pipeline is to define an envelope schema to represent multiple orders. This is done according to the following process, initially documented in Calling a pipeline inside an orchestration:
- Add a new schema file to the project.
- Change the root node name to “Orders”.
- In the properties window for the <schema> treeview node: (a) change the Envelope property to Yes, and (b) import the Order schema.
- In the properties window for the “Orders” root node, set the Body XPath property to /*[local-name()=’Orders’ and namespace-uri()='<namespace of the schema here’
- Insert a child record under the root node.
- In the child record properties, set the data structure type field to Order. As a result, the Order definition will appear under Orders.
 Creating the Orders Envelope Schema
The message flow with the different schemas is shown in the following figure.
 Message Flow
Note: The send port is actually a Static Solicit-Response port. Responses from SAP are not shown here.
We assumed that received messages follow a simplified client-defined schema (Orders/Order) rather than CREATEFROMDAT2 directly, in order to make the demo scenario more general. Everything presented below is applicable with minor changes if batches of CREATEFROMDAT2 are received instead. A client schema makes sense in an integration context, where the source is decoupled from the destination; for instance, if the organization sending sales orders does not need to be aware that these sales orders are processed in BizTalk by creating CREATEFROMDAT2 BAPI transactions. Furthermore, BAPI schemas depend on the SAP system, and they can contain several hundreds of elements, many of them not necessarily applicable to every sales orders.
2. From Interchanges to LUWs
The key to understanding what designs can accommodate BAPI transactions is interchanges.
As explained in Run BAPI Transactions in SAP using BizTalk Server, the message context property Microsoft.Adapters.SAP.BiztalkPropertySchema.ConnectionState is used to associate a BAPI transaction to a Logical Unit of Work (LUW) on the SAP server. So, the first transaction has the property set to “OPEN”, subsequent transactions set it to “REUSE”, and the last transactions have either “CLOSE” or “ABORT”. This implies that messages are (1) grouped, and (2) ordered, to the extent that we can differentiate between first message, middle messages, and last message.
A series of transaction messages (i.e. OPEN-REUSE-REUSE-…-CLOSE) requires the same connection for outbound communication with the SAP server, and this connection is mapped to an LUW on the SAP server side by interchange id and send port id. The message properties look like:
 BAPI Messages Context Properties
To put it in layman’s terms, for BAPI transactions to be in the same LUW from OPEN to CLOSE/ABORT, they need to come from the same “place” (the interchange id) and to be sent out to the same “destination” (the send port) with the same route (the “session”). The use of {interchange id + send port id} is compatible with the “session” paradigm provided by the SAP Connector for Microsoft .NET (NCo) to expose the BAPI Transaction Model documented by SAP.
Common interchange id means that outbound messages are part of the same interchanges, which is achieved in the following setups:
- If messages are received by the same orchestration instance. It is the design presented in SAP BAPI Transactions Walkthrough, where incoming order messages provide a promoted id property used as correlation set in order to use the same orchestration instance for a series of related orders.
- If messages are debatched, as in Debatching SAP BAPI Transactions where debatching was done by an in-orchestration receive pipeline.
The current design is a combination of 1 and 2: Messages are debatched in the receive location and their BTS.InterchangeID property is used as correlation set by orchestration instances. Details are presented next.
3. Debatching Orders in the Receive Location
Let’s look at the receive location settings.
 Receive Location Settings
We use a custom pipeline, shown below, in order to promote the BTS.InterchangeID property, which is otherwise not accessible from within orchestrations.
 Custom Receive Pipeline
The custom pipeline uses the default XML disassembler and validator, which provides access to Recoverable Interchange Processing (RIP), feature which allows processing to go on if some messages within a batch are invalid. With standard interchange processing, the existence of any invalid message in a given interchange causes the entire interchange to be suspended even if it contains one or more valid messages. In the configuration of XML disassembler and validator, schemas and envelope schemas can be left blank; BizTalk automatically resolves the envelope and inner schemas from the messages.
The last validation stage is the custom pipeline component itself, which is based on a reusable pattern introduced in the WCF LOB Adapter SDK.
The relevant portions of the code (which may be found in the attached archive) are shown below. A class called NotifyingStream designed as a decorator of the Stream class, is used to invoke callbacks for specific events corresponding to when the stream is read. In our case, the custom pipeline component PromoteInterchangeId receives a notification when the entire stream has been read, thereby guaranteeing that all promoted properties from the message have been populated to the message context.
public IBaseMessage Execute(IPipelineContext pc, IBaseMessage inmsg)
{
    IBaseMessage outmsg = inmsg;
    Stream notifyingStream = new NotifyingStream(inmsg.BodyPart.Data, null, null, new NotifyingStream.LastReadOccurred(EndOfStream));
    outmsg.BodyPart.Data = notifyingStream;
    mBaseMessage = outmsg;return outmsg;
}

internal void EndOfStream()
{
    string interchangeId = (string)mBaseMessage.Context.Read(“InterchangeID”, “http://schemas.microsoft.com/BizTalk/2003/system-properties”);
    mBaseMessage.Context.Promote(“InterchangeID”, “http://schemas.microsoft.com/BizTalk/2003/system-properties”, interchangeId);

    // This is the place to add more promotions as needed, as explained in the blog post
}
public class NotifyingStream : Stream
{
    Stream mBaseStream;
    public delegate void LastReadOccurred();

    public NotifyingStream(Stream BaseStream, …, LastReadOccurred LastReadCallback)
    {
        mBaseStream = BaseStream;
        mLastReadCallback = LastReadCallback;
    }

    public override int Read(byte[] buffer, int offset, int count)
    {
        if (mBaseStream.Read(buffer, offset, count) == 0 && mLastReadCallback != null)
        {
            mLastReadCallback();
        }
    }
    // All other methods call the ones from Stream directly.

In addition to the promotion of BTS.InterchangeID, the custom pipeline component also sets the following properties, added for illustration purposes and for design alternatives considered later on:
– BatchId, which can be used as an alternative to using BTS.InterchangeID directly.
– BTS.SuspendMessageOnMappingFailure property, which can be used to add RIP behavior at the mapping phase in a receive port, as documented in Mapping Phase (Recoverable Interchange Processing).
– BTS.LastInterchangeMessage, which is used to indicate the last message in a batch. It is by default not set for other messages, thereby causing an exception if accessed from an expression in an orchestration. Adding the property to each message simplifies the orchestration later on.
The custom component was installed according to Deploying Custom Pipeline Components.
4. Orchestration Overview
The long-running orchestration relies on (1) the interchange id to pin messages within a batch to the same instance, and (2) Ordered Delivery of Messages to differentiate first-middle-last messages of the interchange. Processing can be decomposed into four stages, illustrated below:
- Validation
- LOB send/receive
- If last message, commit and exit
- Other messages: loop.
 Orchestration Stages
As previously mentioned, a single orchestration instance processes all messages in a batch, which are correlated based on their interchange id. More info regarding correlations may be found in Sequential Convoy & Singleton Orchestration. This is illustrated in the following figure:
 BTS.InterchangeID as Orchestration Correlation
An alternative to promoting and using the system property BTS.InterchangeID directly (for instance because we don’t want to change it by mistake) is to use a custom context property (BatchId) as depicted below.
 BatchId User-Created Context Property
BatchId can be set to the BTS.InterchangeID value inside the custom pipeline component:
mBaseMessage.Context.Write(“BatchId”, “https://SapBAPITxClientDebatching.PropertySchema1”, interchangeId);
Discussion: Logging and Error Handling
Before presenting each orchestration stage in detail, it is worth mentioning that logging is for demo purposes, to show the different places of interest that could be adapted to “real-world” applications, where further processing could be hooked up.
At each stage, whether it is in the regular flow or in exception handling, we keep track of the order status with the following schema and expression:
 Logging
A sequence of successful order creations looks like:
 Status Logs for Successful Transaction Sequence
5. Orchestration Validation Stage
The receive port takes care of validating Order messages. The goal of the validation stage in the orchestration is to further validate data during and after transformation of Order to CREATEFROMDAT2, rather than letting the SAP adapter take care of it, as we saw in Handling Errors in SAP BAPI Transactions. This is not to say that one way is better than another, just that processing is distributed differently. For instance in the current design, errors caused by invalid data are caught before the data is handled in the adapter, which results in a simpler design later on, while limiting exception processing at the LOB stage to more systemic errors like connectivity. As illustrated in the figure below, in the current design, validation is layered.
 Validation Phases in Orchestration
Each validation phase is explained in detail next.
5.1 Mapping Phase
First, the mapping of Order to CREATEFROMDAT2 is also a place where value verification can happen, for instance with script functoids.
 Using Script Functoids for Validations
As an example, purchase and requisition dates can be enforced to be in the past. The script functoid in the provided code looks like:
public static string CheckDateIsValid1(string param1)
{
  if (string.IsNullOrWhiteSpace(param1))
  {
    return DateTime.Now.ToString(“o”);
  }

  DateTime outValue;
  bool isValid = DateTime.TryParse(param1, out outValue);
  if (!isValid || outValue > DateTime.Now)
  {
    // For demo purposes: throw an exception explicitly.
    throw new Exception(“Invalid PURCH_DATE.”);
  }
  // Make sure the datetime follows the xsd datatype
  return outValue.ToString(“o”);
}
There is a similar functoid for other data fields.
Note: Even if script functoids are identical for different fields, the method names need to be different.
Discussion: Transform at port level?
The receive port can be configured to do the mapping instead of letting it done in the orchestration. The setting is:
 Transform in Receive Port
In this case, the custom pipeline component also needs to set the BTS.SuspendMessageOnMappingFailure to make sure that processing goes on if a failure happens on a single Order, as documented in Mapping Phase (Recoverable Interchange Processing) It would be done as follows:
// Set recoverability to true for the mapping phase in case the receiver wants to transform from client to BAPI in the RL.
mBaseMessage.Context.Write(“SuspendMessageOnMappingFailure”, “http://schemas.microsoft.com/BizTalk/2003/system-properties”, true);
The reason for doing the mapping in the orchestration in our demo scenario is that it allows all BAPI validations to happen in a single orchestration stage.
5.2 BAPI Validating Pipeline
We need the XML validator in order to catch additional restrictions in the BAPI schemas. For instance, dates have these restrictions:
 Constraint on Date Format from Generated Schema
More restrictions are documented in SAP Adapter Binding Properties.
Similarly to Debatching SAP BAPI Transaction Requests, a pipeline is called from the orchestration. This time however, a custom pipeline is needed in order to add XML validation to the default XML Receive Pipeline, which does not have XML validation by default (BizTalk Server: Default Pipelines).
 BAPI Validating Pipeline
Before using the pipeline, the following dependencies must be added to the BizTalk project:
- Microsoft.XLANGs.Pipeline.dll
- Microsoft.BizTalk.Pipeline.dll
The pipeline must be inside a scope of type Atomic because it is of non-serializable type. As a result, the orchestration has to be of type “Long-Running”. Inside the atomic scope, the first expression starts the pipeline execution:
ValidatingPipelineType = System.Type.GetType(“SapBAPITxClientDebatching.BAPIValidatingPipeline, SapBAPITxClientDebatching, Version=1.0.0.0, Culture=neutral, PublicKeyToken=9c30d143e3d921fe”);
PipelineOutputMessageVar = Microsoft.XLANGs.Pipeline.XLANGPipelineManager.ExecuteReceivePipeline(ValidatingPipelineType, BAPIRequest);
PipelineOutputMessageVar.MoveNext();
where PipelineOutputMessageVar is a variable of type Microsoft.XLANGs.Pipeline.ReceivePipelineOutputMessages.
The CREATEFROMDAT2 output of the pipeline is obtained with the expression:
BAPIRequestValidated = null;
PipelineOutputMessageVar.GetCurrent(BAPIRequestValidated);
Discussion: The alternative to validation at this stage is to let data format errors happen in the SAP adapter and handle them later on, as shown in Handling Errors in SAP BAPI Transactions. If we did not handle them, we would see the following on the first message:
A message sent to adapter “WCF-SAP” on send port “BAPI2032SalesOrdersSP” with URI “sap://CLIENT=800;LANG=EN;@a/…” is suspended.
 Error details: Microsoft.ServiceModel.Channels.Common.XmlReaderParsingException:
An error occurred when trying to convert the XML string thisistoolong of RFCTYPE RFCTYPE_CHAR
with length 4 and decimals 0 to a .NET type. Parameter/field name: SALES_ORG
Error message: The length of the value for the field exceeds the allowed value. Value: 13  Field:
SALES_ORG Allowed value: 4. —> Microsoft.ServiceModel.Channels.Common.XmlReaderParsingException:
The length of the value for the field exceeds the allowed value. Value: 13
Field: SALES_ORG Allowed value: 4
   at Microsoft.Adapters.SAP.SapMetadataUtilities.ConvertXmlStringToRfcStringNCo(
String data, RfcTypes type, Int32 singleByteLength, Int32 decimals, String fieldname,
Encoding encoding, Encoding realPartnerEncoding, Boolean padToExactLength, SAPConnection sapconnection)
and subsequent messages would fail due to the WCF channel left in an inconsistent state in the SAP adapter, typically with exceptions in the event log like:
A message sent to adapter “WCF-SAP” on send port “BAPI2032SalesOrdersSP” with URI “sap://CLIENT=800;LANG=EN;@a/…” is suspended.
Error details: System.InvalidOperationException: The Inner Channel to use was not found for the key
{0A73F66F-31FA-4E48-BAC5-14EAED9571D4}_{27D07099-1874-47C3-9E69-2AD1FA42DE8D};URI=sap://CLIENT=800;LANG=EN;@a/….
Specify a valid key.
5.3 Caching BAPI Messages
CREATEFROMDAT2 messages are saved in a list object to be used outside the pipeline scope:
TempXmlDocument = BAPIRequestValidated;
BAPIOrders.AddFromXMLString(TempXmlDocument);
where TempXmlDocument is a variable of type XmlDocument, and BAPIOrders is of custom type BAPIOrderList added in a helper library:
 BAPIOrdersList Class
The helper library also contains C# classes corresponding to the BAPI transactions schemas generated by running the Xsd.exe utility on the BAPI schemas generated in Visual Studio.
5.4 Validation Examples
The following logs were obtained from the various validation layers:
 Examples of Validation Failures
Note the use of CDATA to prevent parsing of characters that would otherwise invalidate the xml format.
6. Orchestration LOB Send/Receive Stage
The subsequent orchestration stage is similar to what has been presented in Handling Errors in SAP BAPI Transactions. Here is a visual overview before getting into the details:

Note that the connection state is set to REUSE only after a successful send.
We look at the messages being constructed and the data being logged. What gets saved:
1. CREATEFROMDAT2Response documents received from SAP;
2. Errors contained in CREATEFROMDAT2Response documents, formatted as strings;
3. Exception strings.
As explained in Using BAPIs in Distributed Systems (ALE), a value of “E” in any of the TYPE fields of BAPIRET2 in a CREATEFROMDAT2Response indicates transaction failure. For example:
<RETURN>
<BAPIRET2 xmlns=”http://Microsoft.LobServices.Sap/2007/03/Types/Rfc/”>
<TYPE>E</TYPE>
<ID>CZ</ID>
<NUMBER>95</NUMBER>
<MESSAGE>Sales organization abcd does not exist</MESSAGE>
…
</BAPIRET2>
<BAPIRET2 xmlns=”http://Microsoft.LobServices.Sap/2007/03/Types/Rfc/”>
<TYPE>E</TYPE>
<ID>V4</ID>
<NUMBER>219</NUMBER>
<MESSAGE>Sales document was not changed</MESSAGE>
…
</BAPIRET2>
</RETURN>
Errors are extracted by the orchestration with the following helper class (complete code in attached archive):
 BAPIReturnValues
which is used as in the expression:
BAPIResponseRetVal.Set(BAPIResponse);
where BAPIResponse is of type CREATEFROMDAT2Response.
The method BAPIReturnValues.GetErrorString() produces the error string logged to a file by using the RawString class documented in Sending string to file location in BizTalk and included in the BizTalk code attached to this blog post.
DataValueErrorMessage = new Microsoft.Samples.BizTalk.XlangCustomFormatters.RawString(
System.String.Format(“Message {0}”, BAPIResponseRetVal.GetErrorString()));
Handling Failures
Given that the data being sent to the server has been “sanitized” in previous stages, failures at this stage are expected to be more general, such as connectivity issues.
 Connection Error
Although not done here to keep the design as simple as it can be, it is possible to handle errors by re-enqueueing CREATEFROMDAT2 messages in the BAPIOrders cached list, as was done in Handling Errors in SAP BAPI Transactions and resetting the connection state to “OPEN” so a new WCF channel may be opened to restart a new LUW. This is can be done with minor changes to the existing orchestration.
7. Last Message in Batch and Commit Stage
The last message in a batch is identified by the BTS.LastInterchangeMessage property, which by default does not exist in other messages. This causes the following decision expression:
OrderReceived(BTS.LastInterchangeMessage) == true
to throw a PropertyNotFound exception. Catching the exception indicates that a message is not the last in the batch. As an alternative, is is possible to add the property to all messages by doing the following in the custom pipeline component:
// BTS.LastInterchangeMessage only exist on the last message. Populate it here for all other message so we don’t get the exception in the orch.
bool isLastInterchangeMessage = false;
try
{
    isLastInterchangeMessage = (bool)mBaseMessage.Context.Read(“LastInterchangeMessage”, “http://schemas.microsoft.com/BizTalk/2003/system-properties”);
}
catch(Exception)
{
    mBaseMessage.Context.Write(“LastInterchangeMessage”, “http://schemas.microsoft.com/BizTalk/2003/system-properties”, isLastInterchangeMessage);
}
BAPI transactions are committed once the last message in the batch has been processed, regardless of whether the last transaction was successful, if at least one transaction in the batch was successful. The processing at this stage is shown below.
 Processing the Last Message
Close-up of the Commit Scope:
 Commit Scope
8. Exiting the orchestration
In the general case, the orchestration instance either terminates after the commit has been sent, or gets suspended if something truly unexpected happens, i.e., something that is not handled by the catch blocks in place (we did not implement general exception handlers for this reason). The orchestration flow is such that successful BAPI transactions will be committed even if the last message in the batch is invalid and causes validation error(s).
If the last message fails validation in the receive port, the orchestration instance for the batch will never receive the last message, which is suspended. To address the issue, the receive shape for the next message in a batch is placed in one of the branches of a listen shape, and in the other branch of the same shape, a delay (currently one minute) determines the maximum amount of time to wait until a commit is issued for all transactions received thus far. This is depicted in the figure below, where the CommitScope is identical to the CommitScope in the previous section.
 Exit/Loop
9. Orchestration Summary
The orchestration is depicted below with all stages and connected ports.
 Orchestration at a Glance
The bindings file for the BizTalk artifacts is also provided in the attached archive.
 BizTalk Artifacts
10. Concluding Remarks
Here is a non-exhaustive list of “nice to have” features that did not make it to this article:
– Re-enqueueing of BAPI transactions in the orchestration to make it more “RIP” in the stages post validations.
– Instead of logging just one error, concatenate all errors for a given document. This can be done in the custom pipelines with the techniques presented in BizTalk custom XML validation to get error summary
– Instead of using a timer for the last message in a batch to be processed by, re-route messages suspended in the receive port to the orchestration (basically, take advantage of RIP).
– Simplify the design to debatch CREATEFROMDAT2 messages directly.
The underlying motivation for the current design was to investigate how to provide recoverable interchange processing for BAPI in the general BizTalk sense of Automatic recovery from failures of messages within a data interchange . It is a pertinent question given that (1) BAPIs in the same LUW are essentially an interchange, and (2) BAPIs can be applied to situations where best-effort is acceptable and some transactions should not block the processing of other messages. As an example of latter, BAPIs are used for high-performance mass data transfer by maximizing the number of requests before commits.
Having a “RecoverableInterchangeProcessing” property on the SAP send port configuration would be a very nice feature to have given the complexity of what was presented here.
References
Related blog articles
SAP BAPI Transactions Walkthrough
Debatching SAP BAPI Transactions
Scatter-Gather Pattern with SAP BAPI Transactions
Handling Errors in SAP BAPI Transactions
BAPI in BizTalk
Registry setting to enable BAPI transactions
Operations on BAPIs in SAP
Run BAPI Transactions in SAP using BizTalk Server
SAP Connector for Microsoft .NET
SAP Adapter Binding Properties
Get Metadata for SAP Operations in Visual Studio
Browse, search, and retrieve metadata from SAP for BAPI operations
Message Schemas for BAPI Operations
Orchestrations
Calling a pipeline inside an orchestration
Ordered Delivery of Messages
Sequential Convoy & Singleton Orchestration
Using Correlations in Orchestrations
Working with Convoy Scenarios
Walkthrough: Correlations in BizTalk Orchestration
Pipelines
Recoverable Interchange Processing
Mapping Phase (Recoverable Interchange Processing)
Deploying Custom Pipeline Components
BizTalk Server: Default Pipelines
SAP
BAPI Transaction Model documented by SAP
Using BAPIs in Distributed Systems (ALE)
Other
WCF LOB Adapter SDK
Automatic recovery from failures of messages within a data interchange
BizTalk custom XML validation to get error summary
Xsd.exe utility
Sending string to file location in BizTalk


Recent Comments